
| Download Example 1 Clean - Super Hard-On engaged, then the 3-band EQ engaged on top of it. Switched back and forth for the last few seconds. | |
| Download Example 2 Fuzz - Fuzz Factory on a very high gain setting. The 3-band EQ controls are all set at noon, then each control is cycled through multiple settings to show the range of the circuit. | |
| Download Example 3 Fuzz, Component Change - Fuzz Factory at a gated high gain setting. The first few seconds are the normal, unaltered circuit. The next section is the same riff, but with a .022 capacitor across the Q2B and JMP1 contact points, which cuts the low end and gives a raspier effect on the tone. | |
| Clips recorded with a '78 Les Paul Custom into a Dave Friedman Marsha head. Component Change clip recoded with Vintage ICON S-style guitar. | |
Inside the Box That Thinks Outside the Box
It’s hard to know where to start when describing the Inventobox, because there are so many features and possibilities and it can be a little easy to feel overwhelmed. In a nutshell, it features two channels and a bunch of controls that can be assigned to work with three internal effects modules—one that offers the tones from Z. Vex’s Super Hard-On booster, one that serves up the company’s famous Fuzz Factory sounds, and a Marshall-voiced tone stack with a three band EQ—in innumerable ways. But that’s just the beginning. You can also quickly and easily modify the circuits of included modules with individual electronics components to tweak tone possibilities almost beyond imagination.
The Inventobox is housed in two standard Z. Vex casings joined together, and it features 16 (count ’em—16!) knobs, 17 LEDs, two three-position DIP switches, and two footswitches. And that’s just on the front panel—there’s way more going on inside. To access the pedal’s guts, you remove four black thumbscrews from the upper section’s front panel and pull it up. Then use the two convenient metal rods to prop the plate open while you make component changes on the fly. Inside, you’re treated to a clean view of a modular design that uses a master “breadboard”—a solderless, plug-and-play circuit board commonly used by DIY enthusiasts to experiment with rough circuit designs.
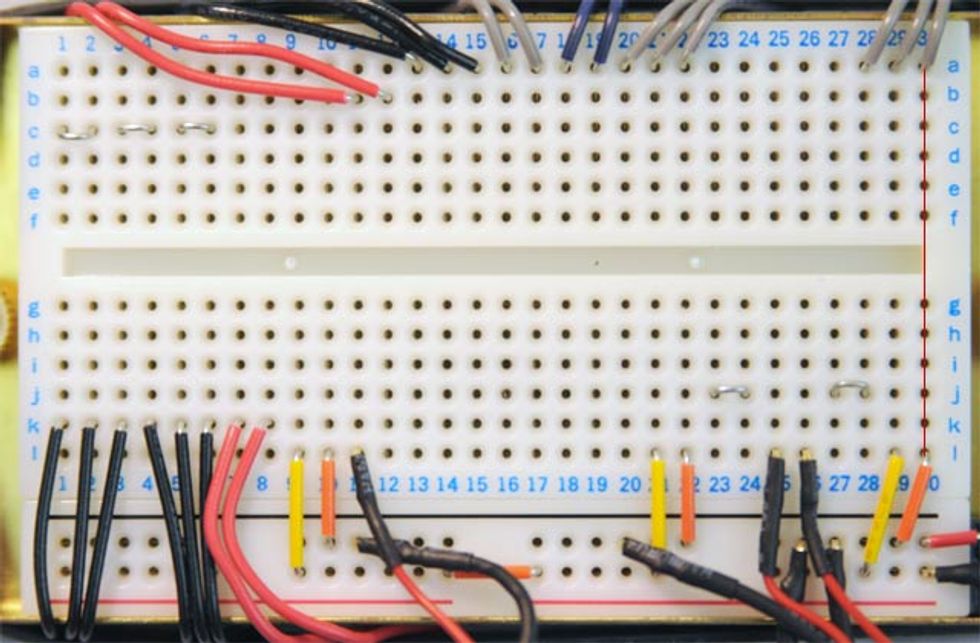
This image of the breadboard shows how the signal runs from top to bottom vertically in each column (A30 to L30, illustrated with the red line). As jumpers connect across the board horizontally or diagonally, the signal can pass from column to column.
The Inventobox comes with three tiny, proprietary circuit boards for the aforementioned tone modules already plugged into the breadboard.
As you’ve probably figured out by now, the key to the Inventobox’s coolness is that you can alter the circuit to your heart’s content, and no soldering is required. Just push the component in firmly, and that’s that. If it doesn’t work as intended or sounds bad, just replace it with a different one. The Inventobox was designed to be both resilient to little component misfires and roadworthy. Initial press releases about the pedal seemed to indicate that it shipped with a diverse variety of loose components that you could place at varying spots in the circuit, but to get the full gist of what the Inventobox could do I had to make a trip to Radio Shack to pick up a variety of capacitors to experiment with. Another speed bump we encountered was that, although many procedures are explained well in the included manual, some of the terms—like “wiper,” “CW,” and “CCW”—might confuse novices. Those of us who have worked with circuits before understand this language, but for everyday guitarists they’ll prove a bit perplexing. (The company informs us that a glossary is in the works.)
The various sockets and jumpers leading off of the board are held in place by a thick rubber band. Take the band off and underneath the breadboard you’ll find a brass plate held in by two thumbscrews, which are common household lamp parts. This makes it convenient to replace them in case they wear out or get lost. Removing the brass plate reveals yet another avenue of tonal exploration: replacing potentiometers. Changing the values can have a drastic effect on overall tone and response, depending on the pot that’s changed and the circuit it’s connected to.
I’ll admit, that’s a lot to take in. And there’s definitely a certain mindset you have to be in when learning how the Inventobox operates, but luckily it isn’t that difficult. The main thing you need to understand is how the breadboard works. It’s separated into two sections, one for the modular circuit boards themselves, and one for grounding the components (called a ground bus). Components are connected in columns, meaning that any connection directly above or below another will be part of the circuit. Think of each column of empty connection slots as small streams of water going down. To reroute water from one stream to another, you’d need to connect them with a pipe of some sort, and that’s basically what you do with the various capacitors, resistors, and jumpers that you’re encouraged to experiment with.
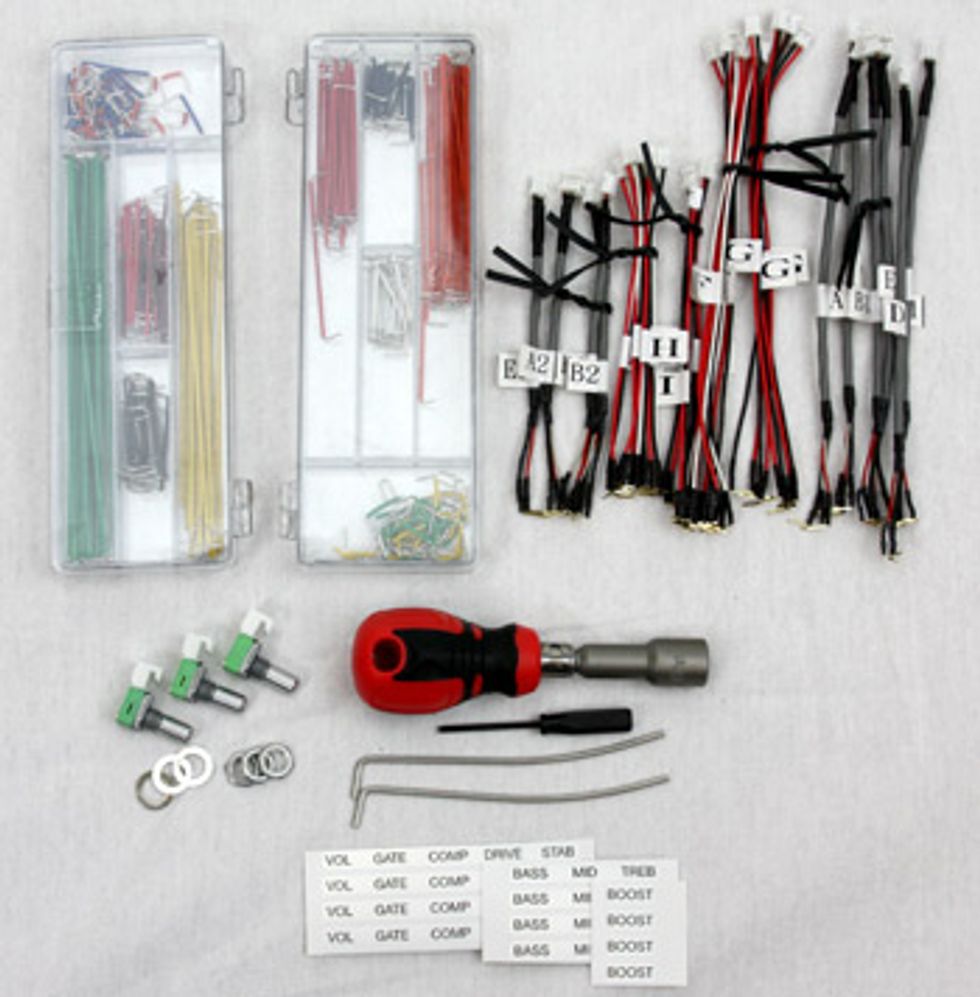 The goodies included with the Inventobox: jumper cables, potentiometers, labels, and tools. |
One of the Inventobox’s greatest strengths is that it lets you assign knobs to pedal functions. I’m used to the traditional Fuzz Factory layout, but the Inventobox lets you assign them in any order you want. There are two rows of six knobs in the top portion, but there are also four knobs just above the footswitches. I decided to assign the Fuzz Factory’s volume control to one of the bottom knobs, and assign the other four to the top row. This allowed me to create a bank of volume controls for each effect. That way I could set and forget the tone controls and easily get to the volume controls for each one without having to look amongst all the other knobs. Connecting the wires from each potentiometer is relatively simple, and it’s explained well in the instructions.
Sonic Excursions
After all this talk of routing, modular circuits, and wiring, you’re probably just wondering how this thing sounds. I played the Inventobox for a couple of days before I even started experimenting with different components, and that’s because the Tone Stack module is so great. That one little Marshall-flavored board provides a three-band EQ, and combining its tones with the Fuzz Factory module gives the wild and unwieldy fuzz even more flexibility. It’s one of the most versatile fuzz/overdrive units I’ve come across. The EQ is extremely sensitive and allows you to make drastic changes to the Fuzz Factory’s overall tone. The bass control, for example, can make even the buzziest, reediest fuzz tones from the Fuzz Factory sound massive, and the midrange control helps the raw tone cut through like a knife. In the past, some of the best tones that could be conjured from the Fuzz Factory just didn’t have the heft that many of us would like. In addition, a lot of my favorite Fuzz Factory tones have been hampered by the quick squelch of the noise gate closing, or the bass dropping out when a control is set too high or low. When you feed lower-gain Fuzz Factory settings into the Tone Stack with the Super Hard-On boost engaged, you get fantastic overdrive tones, as well. I had never imagined the Fuzz Factory could pull off a convincing Rolling Stones-style overdrive that wasn’t a fuzz tone.
Swapping Components
Circuit experimentation is what got so many people stoked about the Inventobox, and though that part of the game is simple, it does require a little knowledge of hardware components. You don’t necessarily have to understand how a capacitor or resistor works, but a basic knowledge of the values of those components is essential. For example, the Fuzz Factory circuit can be altered to accommodate bassists by allowing more low end into the signal. To accomplish this, you can change the input capacitor (the first component in the Fuzz Factory’s circuit) to one with a larger value, or you can add one before or after the existing germanium unit. I chose the latter option. Z. Vex recommends a capacitor larger than .1μF (the original germanium cap is 10μF). And the manual directs you to place capacitors across the circuit board areas marked Q2B (Q stands for “transistor”) and JMP1 (JMP means jumper).
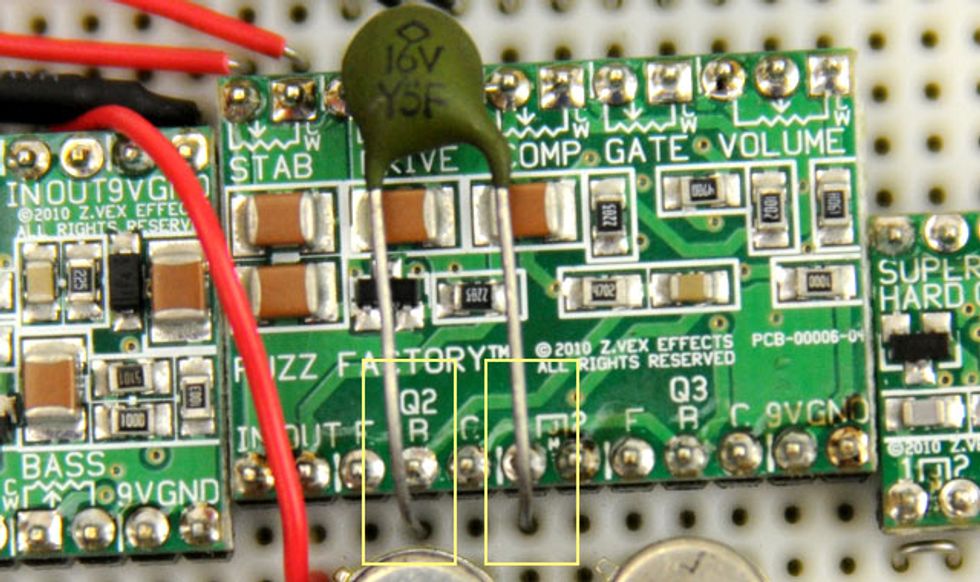
The highlighted sections show how the capacitor jumpers across Q2B and JMP1.
I added a 4.7μF capacitor, which provided a massive bass boost and great fuzzed out tones with a bass that had P- and J-style pickups. I also tried a 10μF electrolytic capacitor, which resulted in intense bass frequencies and eliminated most of the high end—but it was actually a really cool sound. With a 1978 Gibson Les Paul Custom with a Bare Knuckle Warpig in the bridge, the same circuit yielded a tone almost like a Moog synth. Some of the changes I made—such as replacing the germanium transistors with silicon ones—didn’t sound good at all. That’s the nature of this beast though, and the whole process was just really, really fun.
The Final Mojo
The Z. Vex Inventobox is clearly something of a niche product. Electronics novices will wish a variety of components that could be used with all three modules had been either included or recommended in the manual, but otherwise both newbies and experts alike will find the pedal’s potential staggering—especially knowing that more proprietary modules are on their way. Further, Zachary Vex says the pedal is open source—which means anyone could design and construct modules to use with it. But even if you’re not interested in taking it that far, you can create some really wild tones—and even some conservative ones, too. The Inventobox isn’t cheap, but if you’ve got the money, the time, and the inclination to dip your toes into the DIY world, the Inventobox offers an insanely fun way to carve out a piece of your own, personal tonal heaven.
Buy if...
You’re an effects pedal enthusiast with a taste for DIY projects.
Skip if...
you’re more of an open-the-box-and-play pedal fan.
Rating...
| Street $399 - Z.Vex - zvex.com |