Fat, bright, warm, thick, twangy, jangly, hot, creamy—guitarists use a lot of adjectives to describe their amps' tones, and the longer you play, the more you come to understand the gist of what these terms represent sonically. But what's responsible for these foundational characteristics? What is it within a circuit that makes one amp sweetly clean while another is raw and crunchy, when both are set to the same position on the volume knob?
There are several factors under the hood that affect the aural characteristics of the signal that passes through your amp, but many of the ingredients that make various classic tube amps so different from each other are found within their gain stages. On top of that, the amps' tonal traits are further determined by how these gain stages interact with each other within the circuit as a whole—for example, how the first gain stage impacts the second, and vice-versa, as the guitar signal makes its way down the line. Even beyond the ratios of clean-to-mean and hot-to-cool that are determined by an amp's gain stages, the various configurations are also responsible for a huge part of its voice—its core tone. In most amps, the EQ stages that we often think of as shaping the tone are there just to take away specific frequency bands from the sonic foundation that has already been formed elsewhere.
Most of the amps we consider high gain use several gain stages chained together—something called "cascading gain"—to achieve a hotter signal than one or two more vintage-style gain stages are capable of on their own.
Looking beyond that core voice, gain stages are what make some amps shimmer while others scream. The Mesa/Boogie Mark IIC+, Fender Twin Reverb, Marshall JCM800 2203, Bogner Ecstasy, and Soldano SLO are all tube amps that run at approximately 100 watts, but their very different types and numbers of gain stages are responsible for making one wail, another crunch and thump, and another chime and ring. Let's dig into the basic building blocks of different gain stages found in several classic amps' preamp sections, and then we'll see how coupling them to a range of different output stages further shapes their tone and response.
Setting the Stage
"Gain stage" is the term used to describe any place within a guitar amp where gain is added to the signal—that is, where its strength is increased. The external clue to a gain stage is often found by the presence of a knob that makes the amp louder in one way or another. It might be labeled volume, gain, drive, overdrive, lead, rhythm, or something else, but if the amp gets louder (and/or more distorted) when you turn it up, chances are the potentiometer behind that knob is interacting with a gain stage.
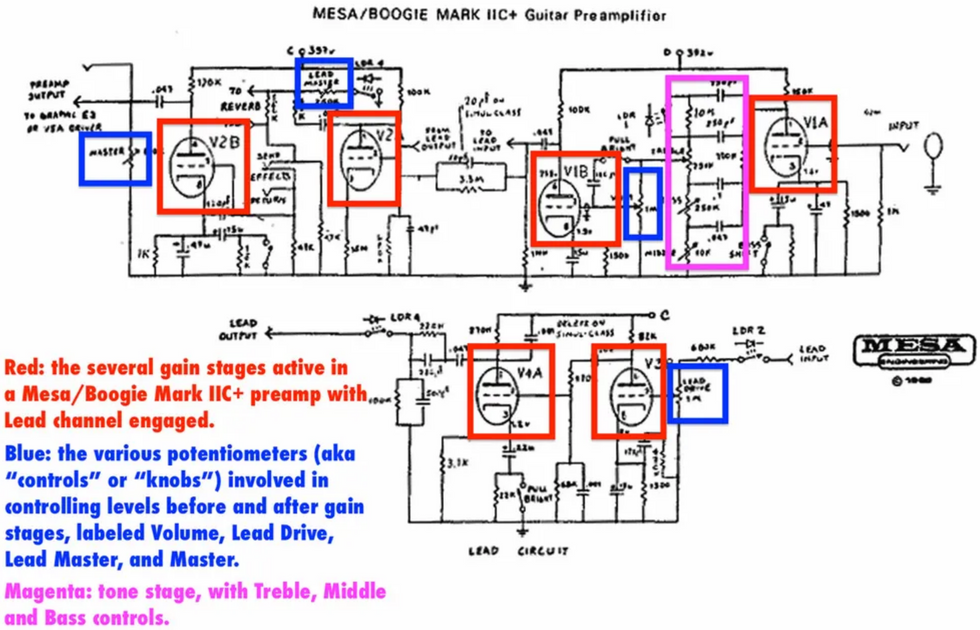
A look at the schematic for the early-'80s Mesa/Boogie Mark IIC reveals the several gain stages, related level controls, and the tone stage in the complex preamp envisioned by company founder Randall Smith.
In traditional all-tube guitar amps, gain is achieved with tubes, so each of these gain stages we're discussing revolves around a specific part of the circuit dedicated to helping each preamp tube do its thing. In fact, there are two triodes within each of the most common preamp tubes used in modern guitar amps—12AX7s and the like—so each of those little tubes can be wired up as if it is two preamp tubes within one bottle. In other words, the most common preamp tubes can provide two gain stages. (That said, some more esoteric amp designs use an EF86, a pentode preamp tube popularized by vintage Vox AC15s and modern Matchless DC30s alike, and which has only one gain stage per tube but is capable of more gain than a 12AX7.)
Of course, a12AX7—and related tubes like the 12AT7 and 12AY7—can also be used to perform other functions within the circuit, including as part of the tremolo, reverb, or effects-loop circuit, or as a phase inverter, for example. All this means that simply counting your amp's preamp tubes and multiplying by two doesn't necessarily reveal its total number of gain stages.
As complex as it is, the single-channel circuit of the Matchless John Jorgenson Signature Model requires only one gain stage, thanks to the capabilities of its EF86 pentode preamp tube (not shown), which is mounted on the other side of the chassis behind the associated circuitry highlighted here. The EF86 is also used in the Matchless DC30.
The thing about gain stages is that their effect on any amp's overall sound is both micro and macro. That is, the accompanying circuitry (resistors, capacitors, etc.) deployed by the amp's designer plays a key role in further shaping the tonal character of each gain stage. But that sound shaping is also cumulative.
So when several gain stages are involved—and there are at least two in the preamps of most guitar amps—each begins to act upon the other to determine the sound of the guitar signal that comes out the other end. As we'll see below, the amount by which multiple gain stages increase the guitar signal as one chains into the other in a more complex multi-stage preamp also determines how much distortion can be achieved when you turn up a high-gain amp.
Voicing
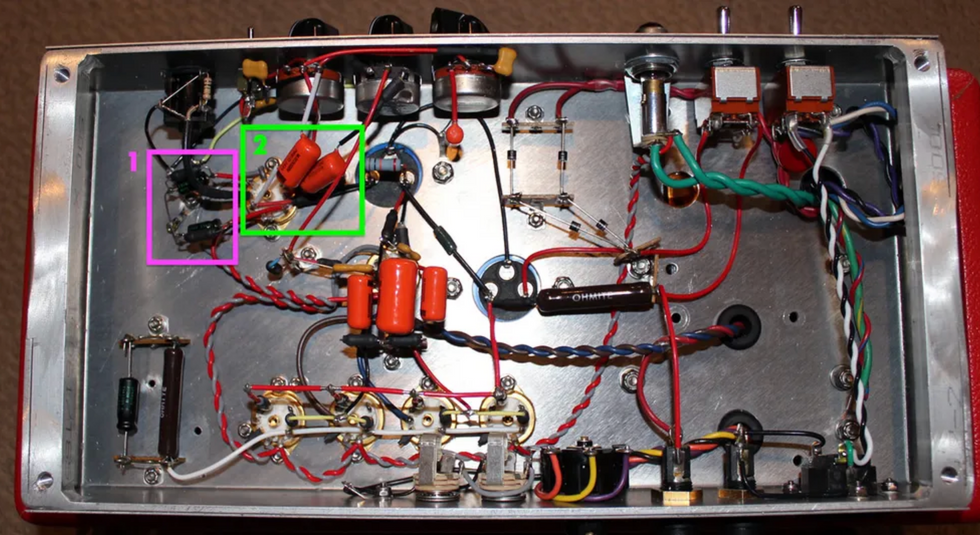
The simplicity of this Komet K29's point-to-point-wired preamp makes it easy to see the methods used to voice its two gain stages, which employ both halves of a single 12AX7 preamp tube (not shown, but mounted on the underside of the chassis, beneath the two highlighted orange capacitors). Two sets of cathode-bias resistors and bypass capacitors (Box 1) help establish the core voice of each stage, while two .022µF coupling capacitors (Box 2)—one between each gain stage and the level control that follows it—further refine the frequency response.
As mentioned previously, each gain stage requires a small network of capacitors and resistors to deliver the voltage that enables the gain stage to function, and to set its operating bias. The designer's choices of the types and values of components used plays a big part in shaping the frequency range of the signal at that point in the circuit. Signal capacitors are also used between stages (so-called "coupling caps") to block unwanted voltages from straying down the line when the audio signal itself is passed along, and the type and size of these capacitors further shapes the core tone of the amplifier. Clever designers very consciously and deliberately calculate the effect that components of different values and types will have on the audio signal at each stage.
In brief, and without getting overly technical, a designer might make a particular gain stage sound cleaner or hotter by adjusting its bias through careful resistor selection, and then make it fatter or brighter by using the appropriate bypass capacitor linked in parallel to that resistor. (Interestingly, the signal doesn't actually pass through these components: They merely help govern the tube's handling of the signal.) The designer may further sculpt the amp's voicing by placing a coupling capacitor of a relatively high value between that gain stage and the next to allow a full, bassy response, or one of a lower value to enhance a higher range of frequencies. Given the types and values of components available, there are countless possible permutations and nearly endless ways to dial in an amp's tone.
The OT plays a significant part in tone shaping, and its size, design, and build quality all factor into the way it does its job.
Beyond these means of voicing a gain stage and setting its propensity to distort, the ways in which stages are chained together plays a big part in determining how the amp as a whole behaves. We might split amps into two main categories—low and high gain—but in reality there can be a lot of overlap between the two.
Low-Gain or Vintage-Style Preamps
By today's standards, the preamps in most amps of the '50s and early to mid '60s are considered low-gain. These also tend to be simple and have fewer gain stages. They generally apply just enough preamplification to get your signal to a level that the output stage can handle, since the original objective of most guitar amps was to make the guitar louder while keeping it as clean as possible, rather than to intentionally generate distortion. It's no surprise, then, that these amps lean toward a cleaner, less distorted sound when the volume control is kept within reason—maybe up to 4 or 5 on the dial, give or take. Many low-gain or vintage-style amps are also known for their juicy overdrive, of course, which is achieved by turning that volume control up higher, at which point it does start to distort and push the output stage harder. In many cases this distortion would have been considered undesirable by the designers—an anomaly caused by pushing the amp beyond its intended operational parameters—but players quickly discovered that overdriven amps produce delectably dynamic tones.
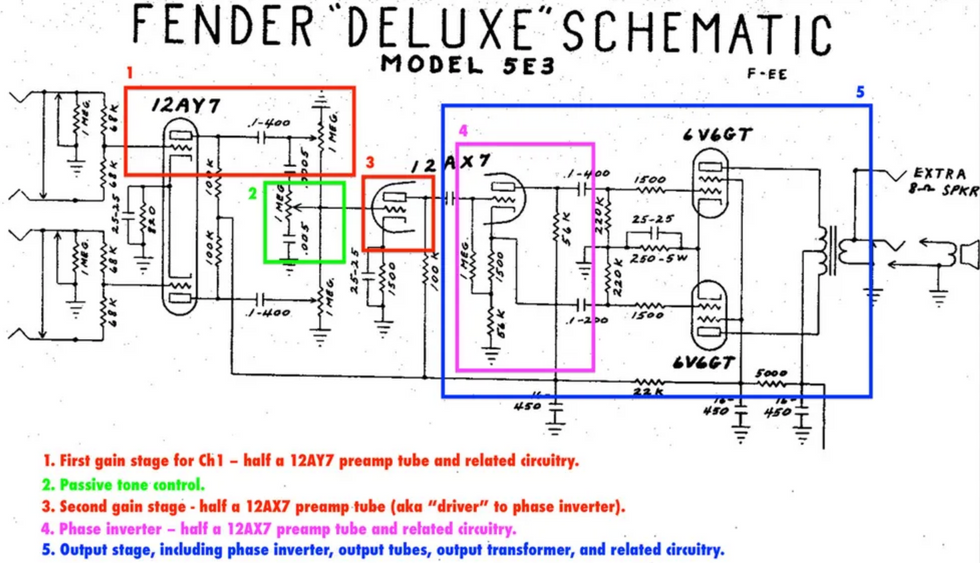
The Fender "tweed" Deluxe schematic shows the first and second gain stages, tone control, phase inverter, and output stage of one channel. Note the way the 12AX7 is used by the second gain stage and phase inverter.
Good examples of this sort of amp are the Fender "tweed" Deluxe and the normal channel of a Vox AC30—as well as the many amps they inspired. Each has just a single gain stage in the preamp, although the tweed Deluxe also has another gain stage—often called a "driver" stage—right in front of the phase inverter, which is the gateway to the output stage.
Others, such as Fender's "blackface" Deluxe Reverb, Twin Reverb, and similar models, have multiple tone controls (treble, bass, and sometimes middle) in a more complex EQ circuit sandwiched between two tube gain stages. This doesn't always make the amps a lot "hotter," though, because that second stage is necessary to recover some signal level that's lost in the more complex tone network (which, of course, also allows more fine-tuning of the amp's frequency response). The tweed Deluxe and its ilk, on the other hand, have only a simple tone control that acts as a "treble bleed," much as the tone control on a guitar, to pass some of the high frequencies to ground, rather than having the entire signal pass through it and lose gain in the process.
Others still, such as larger tweed amps, the Vox "top boost" channel, and the Marshall plexi-style preamp, have a first gain stage followed by another tube that drives the tone network that follows it—something called a "cathode follower." In the most basic sense, the results are somewhat similar in all of these, in that the ratio of clean to overdrive in these low-gain preamp types correlates fairly directly to their volume levels. Yet each of these amps shapes your guitar signal somewhat differently, leading to variations in tone, distortion, and playing feel. All are technically low-gain circuits, but some players will express distinct preferences for one over the other according to how they perform.
High-Gain Preamps
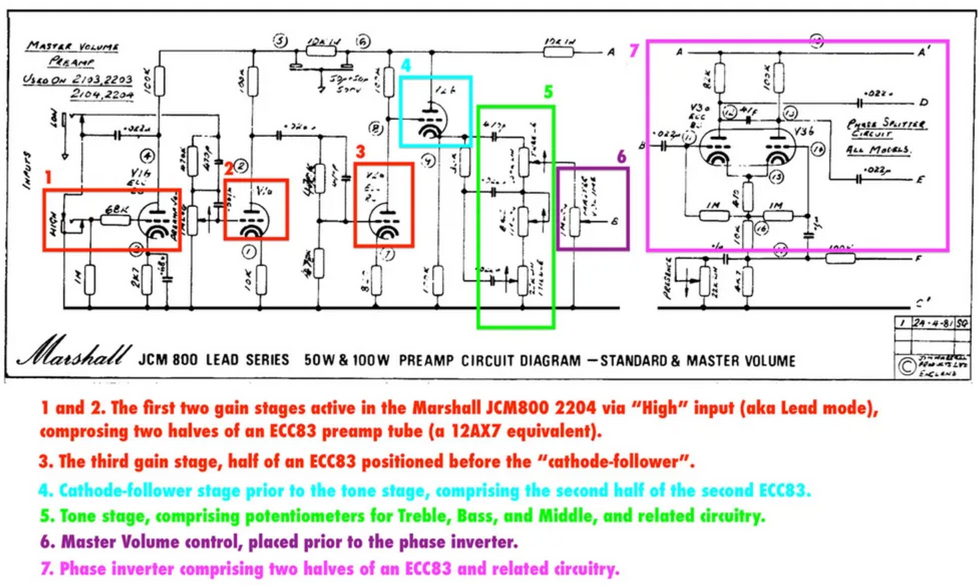
This diagram illustrates the cascading gain stages, cathode-follower stage, tone stage, and phase inverter of an early-'80s Marshall JCM800 2204 in lead mode.
Consider the sound of the lead channel in modern channel-switching amps or single-channel amps intended purely for rock overdrive, and what you're hearing is a high-gain preamp. Although we refer to these as modern, this topology really roared into existence in its popular form in the late '60s, when Randall Smith introduced his first Mesa/Boogie amps. Shortly thereafter, others also began modifying existing amps' low-gain preamps to become high gain.
As we've touched on already, a single gain stage can be designed to squeeze the maximum amount of gain from that preamp tube, but most of the amps we consider high gain use several gain stages chained together—something called "cascading gain"—to achieve a hotter signal than one or two more vintage-style gain stages are capable of on their own. In amps of this type, the saturated overdrive sound we hear is typically produced by pushing early gain stages to very high levels, often chaining one into the other to continually drive the gain higher and enable desired levels of distortion, and then reining in the signal at the end of the line to create the desired final output level.
There's a broad range of high-gain designs on the market, and different makers' amps often do things in quite different ways. It's also worth noting that they achieve a pretty wide range of gain levels within what we broadly call "high gain." For example, today's metal player might not consider a late-'70s Marshall 2204 high-gain at all, whereas it would have sounded extremely hot to the average rocker of its era.
Familiar names that typify the high-gain genre are Bogner, Soldano, Diezel, Fryette, EVH, ENGL, Fuchs, and, of course, good old Marshall and Mesa/Boogie—plus far, far more than we can list here. Most follow some evolution of circuitry that began with the original Mesa/Boogie designs, which chain together several gain stages. By increasing the gain incrementally from stage to stage (usually with controls labeled drive, gain, lead, or even just volume placed between them to govern how much signal from the previous stage is passed along to the next as you ramp up the signal all along the chain), designers can both conjure much higher levels of gain than a one- or two-stage preamp and still provide the player with the ability to dial in anything from the minimum to the maximum of that preamp's capabilities.
Even a relatively minor change of tubes or components or values or topologies within one little stage somewhere between input and output might change an amp's tone.
Earlier renditions of cascading-gain amps, such as the Marshall 2204 and its ilk, only chained two gain stages into each other, with a master volume control further down the signal path to govern the overall volume. Modern high-gain amps, on the other hand, might have four or more gain stages.
Channel Switchers
Most modern high-gain amps also offer two or more footswitchable channels. The clean or rhythm channels are often configured like traditional one- or two-stage vintage preamps. If there's a channel between the low-gain rhythm and high-gain lead channels, it's usually configured to produce anything from crunch to a more old-school lead, using a couple of gain stages.
In these amps, a stomp of the footswitch merely selects which of the multiple preamp channels is routed to the output stage, which itself is not reconfigured in any way. (A few more elaborate designs do offer some switchable changes in the back end, too. Fryette's Sig:X and Mesa/Boogie's Mark Five amps come to mind, but this is still a rare feature.) Most so-called channel switchers simply incorporate different types of preamp stages that exist in parallel to each other, with only one being active at any time.
On the other hand, some channel switchers with high-gain possibilities introduce their lead modes by enabling an extra gain stage or two after the initial stages that provide the clean/rhythm mode. The original Mesa/Boogie designs were like this, with the guitar signal running through both the clean and lead circuits when switched to lead mode. Similarly, Dumble's legendary Overdrive Special—and the many amps inspired by it—add a two-stage overdrive circuit to the foundation that you're already running through for your rhythm tone when you stomp on the lead footswitch.
Another big distinguisher between multi-channel amps is whether the individual channels have their own EQ stages or share a stage. The former allows the player to tailor tone settings to suit the individual channel, but is obviously more complicated to build and requires squeezing more into the circuit. The latter requires finding a compromise in tone settings that works for both the rhythm and lead channels (and possibly a crunch channel)—although in most well-designed amps this isn't all that difficult to achieve.
Master Volume vs. No Master Volume
This Divided by 13 CCC 9/15 amp uses a post-phase-inverter master volume (PPIMV, highlighted here), with shielded leads running to and from the circuit junction just beyond the phase inverter.
Almost all high-gain amplifiers have a master volume control, which is necessary to achieve the desired overdrive/distortion level at a manageable overall volume. In such cases, the first volume, gain, or drive control (the name can vary) sets the gain of the first preamp stage, while the master volume generally follows any and all other gain stages to govern how much signal is passed on to the output stage.
A master volume can be placed toward the back end of the preamp stage, or in an early part of the output stage, or just about anywhere in between, but will behave somewhat differently in different locations. Many modern high-gain amps with multiple gain stages have corresponding level controls within each preamp channel, in addition to a master control in the output stage to govern overall volume. If your amp has a lead channel with controls labeled gain, lead level, and master, for example, this is most likely what you are seeing: one knob to set initial preamp gain, another to rein it in following a further gain stage, and a final control to set the overall volume level of the amp (which might also determine the final volume level of any clean/rhythm channel that the amp includes).
A late-stage master volume control (also sometimes called a level control, or just volume, if the first-stage control is labeled something like gain or drive) is often configured as a "post-phase-inverter master volume," which you'll often see shortened to PPIMV, so-named because it comes after the phase-inverter but before the output tubes, placing it well into the output stage. Such masters are praised by many players for their "transparency"—the way they preserve the fundamental tone and gain settings of the rest of the amp and allow you to achieve your desired sound at lower volumes, rather than changing the core tone when the master is turned down.
In truth, almost any means of lowering overall amp volume will change its sound slightly. The mere act of reducing decibels makes things sound somewhat different to the human ear. But in many cases, reducing the signal level that hits the output tubes also alters tones in other ways, if only slightly. Even so, several designers have gotten pretty close to perfecting the transparent master volume, and this knob performs superbly in many amps.
That said, the master volumes used in highly acclaimed Marshall 2203 and 2204 amps of the late '70s used potentiometers placed further up the signal chain, right after the tone stack and beforethe phase inverter—yet few players complain about these amps' legendary overdrive tones.
No Master Volume Control
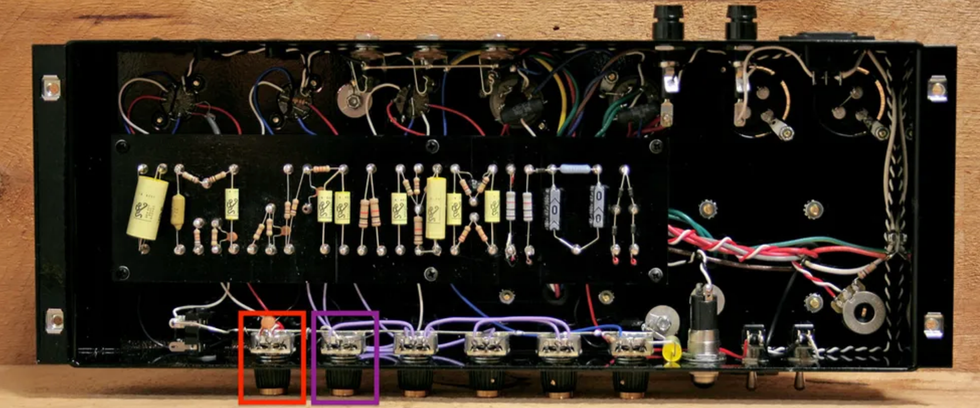
Following the circuit of Marshall's 2204 master-volume amps of the late '70s, this MGL20 has a preamp gain control for its first gain stage (highlighted at left), and a master control that immediately follows its tone stage (right) in the signal chain, meaning it comes beforethe phase inverter.
In the early days of the "boutique" amp craze, and somewhat as a backlash to the high-gain, channel-switching monsters of the '80s and early '90s, there was a lot of buzz about non-master-volume amps—amps built more to vintage-inspired standards and designs.
If your amp has no master volume and just a single volume control (or one volume control per channel), it's probably a low-gain preamp. That doesn't mean you can't push it into overdrive, but you will usually need to crank the volume up to get there—and many players may still want an overdrive or distortion pedal out front for more saturated lead tones. However, not all non-master-volume amps are low gain. The highly prized Trainwreck amps made by the late Ken Fischer (and now being made under license), as well as models by builders such as Komet and Dr. Z—some of which were also co-designed by Fischer—have relatively high-gain preamps. Either way, if your amp lacks a master volume and you can only get your favorite tones at impractical volumes, you can purchase an output-attenuator unit to insert in the signal path between your amp's output and speaker(s). This lets you turn up the amp to achieve the desired level of dirt, then rein in the volume via the attenuator's level control.
Low-Gain with Master
These days, many amps with low-gain preamps also have a master volume. This configuration doesn't usually yield true high-gain tones, but it can frequently allow decent crunch or even vintage-level lead tones by turning up the initial volume and turning down the master volume.
The Output Stage
An amp's output stage comprises everything from the input side of its phase inverter to the jack on the back of the amp that sends the signal to the speakers, including the output tubes and output transformer in between, plus a bunch of capacitors and resistors connecting it all.
The output stage takes the relatively low-level electrical signal that the preamp has already increased in voltage and increases the voltage further, ultimately converting it to a high-wattage, low-impedance signal that will drive a speaker. The output stage begins with the phase inverter, which includes yet another preamp tube that is configured with a network of resistors and capacitors to split the audio signal into two strands, while flipping one strand to the reverse of the other's phase in order to pass along two mirror-image signals to the two sides of the output stage for final amplification.
The split, inverted signal is then passed to two output tubes (or two parallel-wired pairs in larger amps), which act in a "push-pull" configuration—one tube "pushing" one side of the split signal while the other tube "pulls" its reverse-phase partner—to further increase the signal's strength and send it along to the output transformer. The output transformer then converts the signal to one that will power a speaker. (Note that small "single-ended" amps with just one output tube, such as the Fender Champ or Vox AC4, don't work in this push-pull manner, and therefore don't require a phase inverter.)
Power and Distortion Capabilities
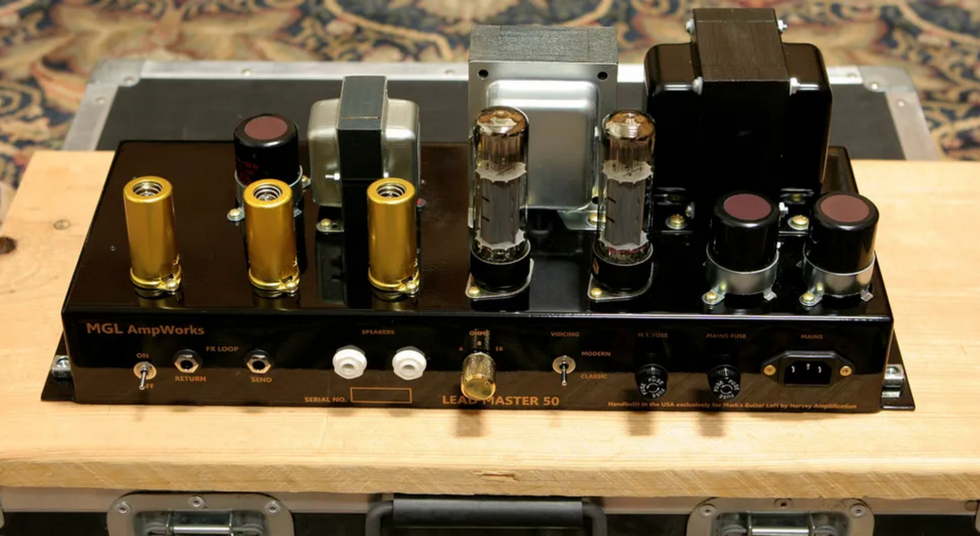
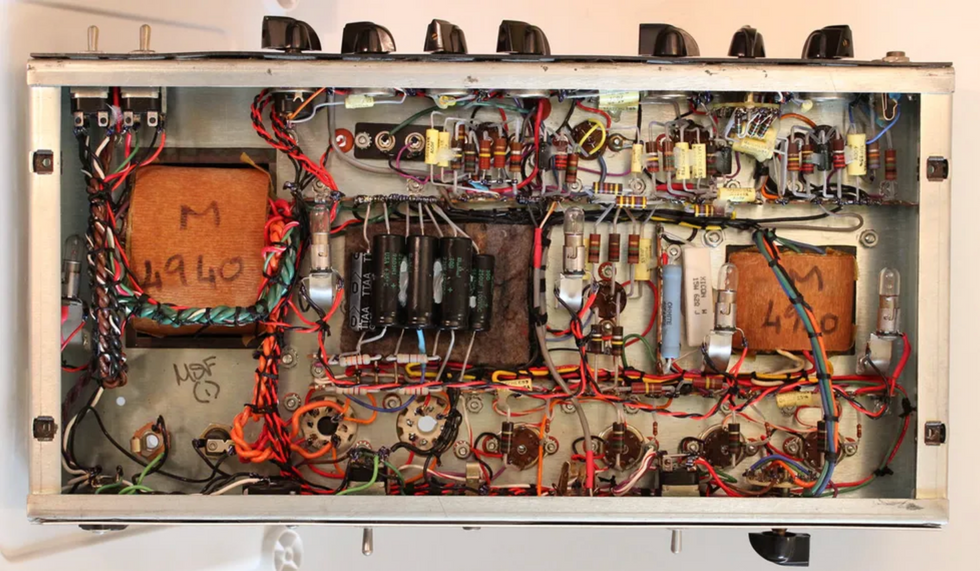
This MGL AmpWorks Lead Master 50's output transformer is the larger of the silver transformers, at the center of the row of three transformers behind the row of tubes. To its right is the power transformer, and to its left is the choke.
It's also important to know that the output stage is where an amp's overall power capability is determined: The combination of the type (and number) of output tubes and output transformer used are what make it a 15-watt amp or a 100-watt amp. A pair of 6V6s or EL84s and a relatively small output transformer deliver the former, for example, while four 6L6s or EL34s and a large transformer yield the latter. Any type of preamp stage we've discussed here, high gain or low, can essentially be partnered with any type of output stage.
In addition to determining output level, the output stage plays a big part in shaping the character and degree of the distortion induced when the amp is driven hard. Although in most amps the majority of distortion is generated in the preamp, this signal will drive smaller, lower-powered output stages harder than it will larger, higher-powered stages, thereby inducing more output-stage distortion in smaller amps, which can dramatically change the character of your overdrive sound in some cases.
Biasing Methods
Output-tube biasing might seem a rather esoteric and technical subject, but it's worth knowing a little about because the method by which any given amp is biased can affect its sound and performance. Further, knowing how an amp is biased should tell you a little something about the nature of its playing feel and harmonic content.
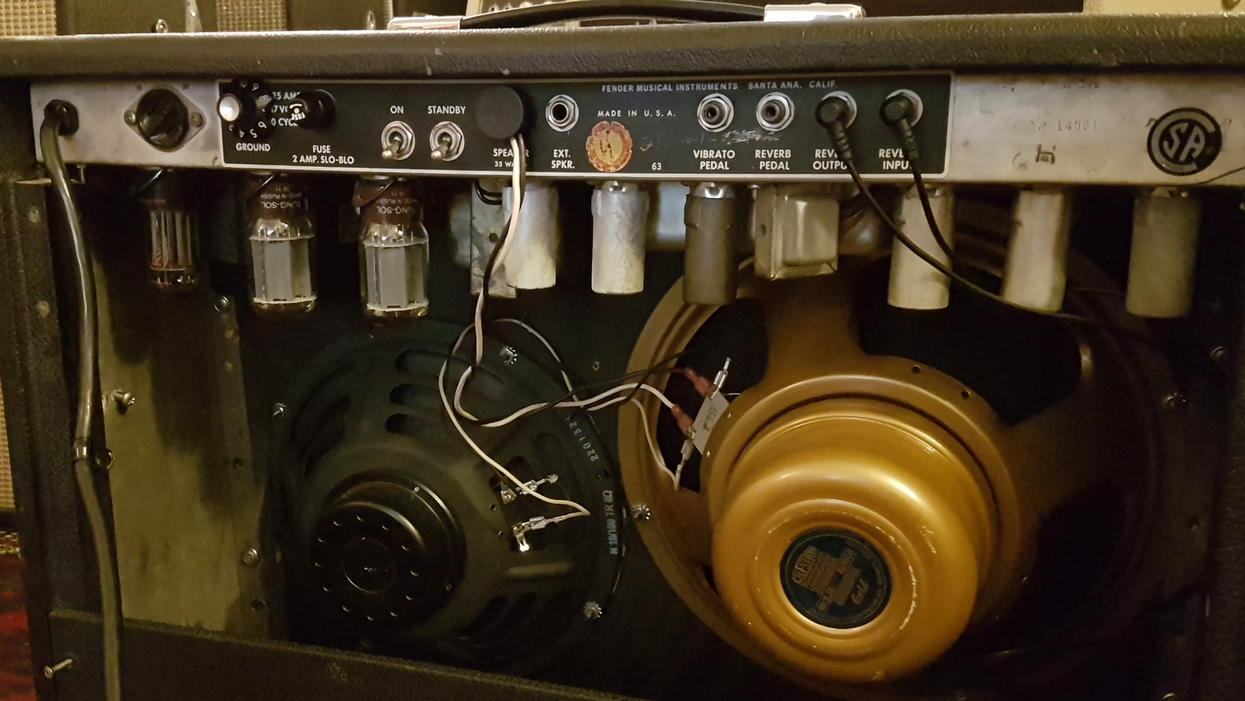
All tubes need to be biased—that is, have some control method applied to set their operating level at idle (much the way a car's carburetor is adjusted to set its idle)—but it is most significant with regard to output tubes. Bias is a very involved subject, but you mainly need to know that most amps' output tubes are biased in one of two main ways—by connecting their cathodes to ground via a large resistor of a value that determines this bias, or by applying a low negative voltage to their grids, as supplied by a small network of components connected to a tap on the power transformer. The former method is called "cathode bias," and the latter "fixed bias"—rather confusingly, perhaps, because the bias level on most fixed-biased amps made from the early '60s onward can actually be adjusted, whereas the bias level on cathode-biased amps is preset and cannot be adjusted (not without physically changing the bias resistor, at least).
Bias methods are significant because they help determine an amp's character and efficiency. Fixed-bias amps make somewhat more efficient use of their output tubes, in most cases, and provide a means of squeezing the maximum output wattage from any given design, while also generally sounding a little tighter and firmer, in the low-end in particular. Fender's Twin, Deluxe Reverb, and Bassman, and Marshall's JTM45 and plexi amps are classic examples of fixed-bias amps. Cathode-biased amps, on the other hand, tend to be less efficient, wattage-wise, while being characterized by a somewhat greater level of harmonic overtones when they begin to distort, along with what might be perceived as a softer bass response—and sometimes a slightly more tactile playing feel, too. Classic cathode-biased amps include the Fender tweed Deluxe, Vox AC15 and AC30, Matchless DC30, and Carr Mercury.
Output Transformers
In the vast majority of tube guitar amps, the output transformer (OT) is the largest component in the signal chain. It converts the high-impedance signal from the output tubes to a high-wattage, low-impedance signal. The OT is usually the second largest transformer hanging from the chassis' underside—the largest being the power transformer. Given that this component transforms the electrical signal from the output tubes to one that the speaker can pump through the air and into your ears, the OT plays a significant part in tone shaping, and its size, design, and build quality all factor into the way it does its job.
Roughly speaking, the bigger the OT relative to the output tubes, the bolder the sound and firmer the bass response. OT size also tends to equate to maximum wattage capabilities, although the OT can only translate what the output tubes provide. There are many other design parameters involved, of course, and these are just basic rules of thumb.
None of this means, however, that bigger is always better. An OT needs to be appropriately sized for the tubes that feed it, and appropriate to the designer's overall goals, too. For example, many smaller or mid-sized amps owe some of their juicy, succulent overdrive character to the fact that their output tubes are saturating a relatively small OT. Install a bigger, supposedly "higher quality" OT, and they might sound colder and less characterful.
The Tip of the Iceberg
If you want to learn more about the minutiae of how amplifier gain stages work, there are options out there for a tech deep-dive. But it should be easy enough already to see what a major mix-and-match puzzle any guitar amp is, and how much even a relatively minor change of tubes or components or values or topologies within one little stage somewhere between input and output might change its tone.
In the end, you really don't have to know how every little link in the signal chain functions to find the amp that will work best for you. But a good grounding in their basic operations—and more importantly, how different elements equate to different sound and feel—should help you narrow the search for the amp(s) that will best help you achieve your musical goals.
A Word About Tone Stages
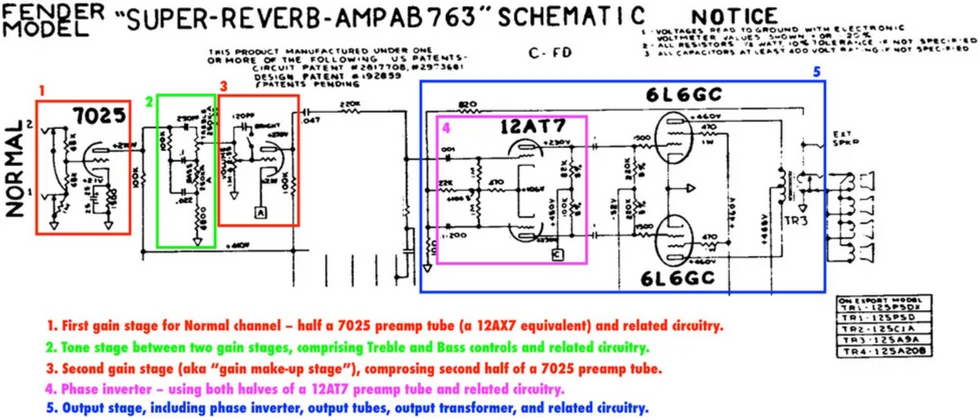
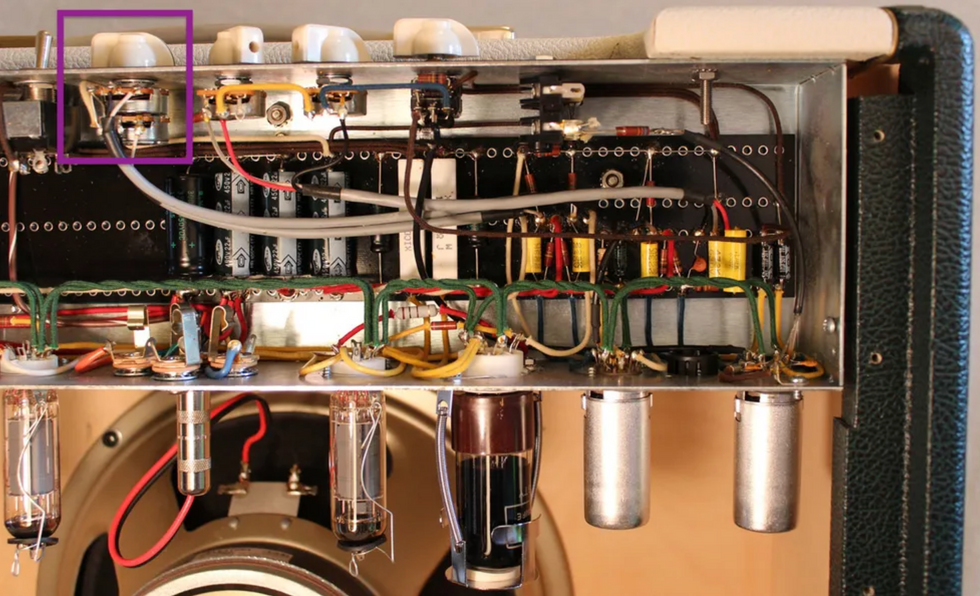
Like many of its "blackface" kin, the Fender Super Reverb has a second gain stage that's essentially a gain make-up stage. The highlighted areas in this photo of a Super circuit show (Box 1) the first channel's first gain stage, gain make-up stage, and related circuitry, and (Box 2) the inputs and volume, treble, and bass controls related to those two gain stages.
Tone stages (aka EQ stages) are also part of the preamp, but are generally considered apart from gain stages per se, although some types of tone stages do contain, employ, or rely upon gain stages provided by preamp tubes.
In smaller or more basic amps, like the archetypal Fender "tweed" Deluxe, a single tone control might not be a stage unto itself at all, but rather a simple treble-bleed network formed by a potentiometer and a capacitor or two that determine how much high-frequency content is tapped out of the signal before it exits the preamp. More complex EQ stages have separate bass and treble controls, and many add a midrange control, too, frequently using a preamp tube either to drive those controls (to avoid signal loss) or as a gain make-up stage following the tone controls to get the signal back up to where it needs to be prior to hitting the output stage.
Although most tone stages' controls feature similar names, they can execute their functions via very different electrical means—and they can have vastly different levels of interactivity and frequency controllability.
Other than the one-knob tone control found on tweed Deluxe-style amps, there are two common tone-stage topologies. In one camp are those found on the Fender tweed Bassman, Marshall JTM45 and plexi amps, the Vox AC30's "top boost" channel, and similar models. In the other are those found in "blackface" and "silverface" Fenders like the Deluxe Reverb and Twin Reverb. The former group uses an entire preamp tube positioned before the tone controls as a driver and cathode-follower (that is, the signal comes out of the tube's cathode, rather than its anode). The latter places the tone controls between the channel's first gain stage and a second traditional gain stage (called a gain make-up stage) that replaces the gain lost by the signal while travelling through the controls and related circuitry. In addition to having controls that interact with each other slightly differently, each tone-stage topology also imparts a slightly different playing feel to the amp, best defined as a crisp and snappy response in the blackface/silverface tone stack, and a tactile, somewhat creamier, touchy-feely response in the tweed/Marshall cathode-follower topology.
[Updated 8/23/21]