The beauty of a great guitar plugged straight into a great tube amp is undeniable. Still, some might say the full potential of an electric guitar is realized only when processing that signal. Of course, some of the most groundbreaking players of all time—from Jimi Hendrix to The Edge—have illustrated this point, and the current deluge of new pedals and thriving builders seems to bear this out.
If you are into processing, pedals might be plenty for you, especially in this era of stompboxes that do things even top studio gear couldn’t manage a decade ago. Still, there is a portal to another world of sound available for live use—a world explored by guitarists like Adrian Belew, John McLaughlin, Eivind Aarset, Fennesz, Dan Phelps, the late Andy Gill, and others. It’s a portal you may be looking at as you read this. I am talking about a laptop computer.
I was introduced to the concept of guitar and laptop performance through the series of Warper parties— gatherings dedicated to computer-based music—I attended in New York City. At the very first one, I encountered a guitarist with a computer built into his guitar and another playing jazz fusion through his laptop to backing tracks, also on computer. Yet a third player was performing arrangements of TV themes, playing guitar with one hand and keyboards with the other—all through a laptop.
Plug-ins offer sonic shaping and effect routing that is difficult or impossible to achieve with pedals. Even if you could, it would require a pedalboard the size of the entire stage and a router/switching system of NASA-level complexity.
For me, performing solo with a laptop let me privilege the kind of sonic fairy dust I had been offering as a side musician, shifting the lush pads and textures I had delivered to singer/songwriters for years out from the background and into the focus of attention. Plus, as someone who does not sing or play typical solo guitar, playing through a laptop let me take control of my performance opportunities: no pesky bandmate schedules to consider for rehearsal or booking.
Many guitarists already use a laptop to record everything from demos to final releases. These days, all it takes is a guitar, an audio interface, a DAW (Digital Audio Workstation), and a pair of speakers or even good headphones, and you are ready to make your next masterpiece. If you have worked this way, you have likely discovered plug-ins. Instantiated in a DAW, plug-ins offer sonic shaping and effect routing that is difficult or impossible to achieve with pedals. Even if you could, it would require a pedalboard the size of the entire stage and a router/switching system of NASA-level complexity. Multi-effects units might get you part of the way there but as yet cannot offer the range of potential sounds available with a computer.
With a wealth of creative software, a laptop lets you easily take lush reverbs and mangle them with filters or distortion. You can sequence effects to automatically appear and disappear over the course of a song or composition. If that sounds interesting, you might want to consider transporting your laptop, DAW, and plug-ins to the stage, either as your sole processing system or in conjunction with pedals. Here’s what you’ll need to get started.
Hardware
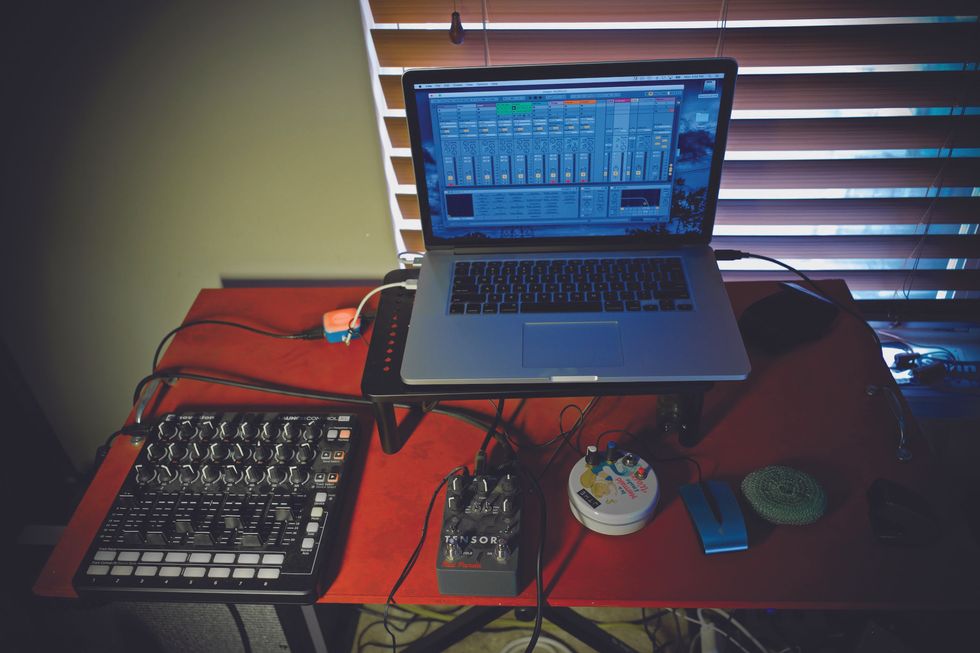
A MIDI controller, like the Novation Launch Control ($159 street) seen here, isn’t necessary to use Ableton Live, but using one increases interactive functionality.
Because live performance has different requirements than recording, ultra-high audio specs are not quite as important, but portability, reliability, build quality, and low latency are crucial. Latency is the time it takes for your signal to go into the audio interface, pass through the software on the laptop, go back into the interface, and travel out to the speakers, as measured in milliseconds. You will want the latency low enough that you don’t hear the sound reaching your ears noticeably after you hear/feel your pick hit the strings. Ideally, you will want the most powerful laptop you can afford in order to have access to the fastest processor possible. Plenty of RAM and a solid-state drive will contribute to the computer’s speed.
There are factors that affect latency. One is buffer size, delineated in samples. Without getting too technical, the lower you can set the buffer in your DAW, the less latency you will hear. How low you can set it, without getting dropouts and other unwanted glitches, is determined by the number of plug-ins you are running and the power of your computer. With virtually any of the current Apple M1 powered laptops you should be good to go. If you can’t afford a new computer, don’t worry. I was performing with a MacBook Pro over a decade ago with no problems. You can attempt this with a non-Apple computer, but virtually every major touring act uses Macs thanks to their reputation for reliability.
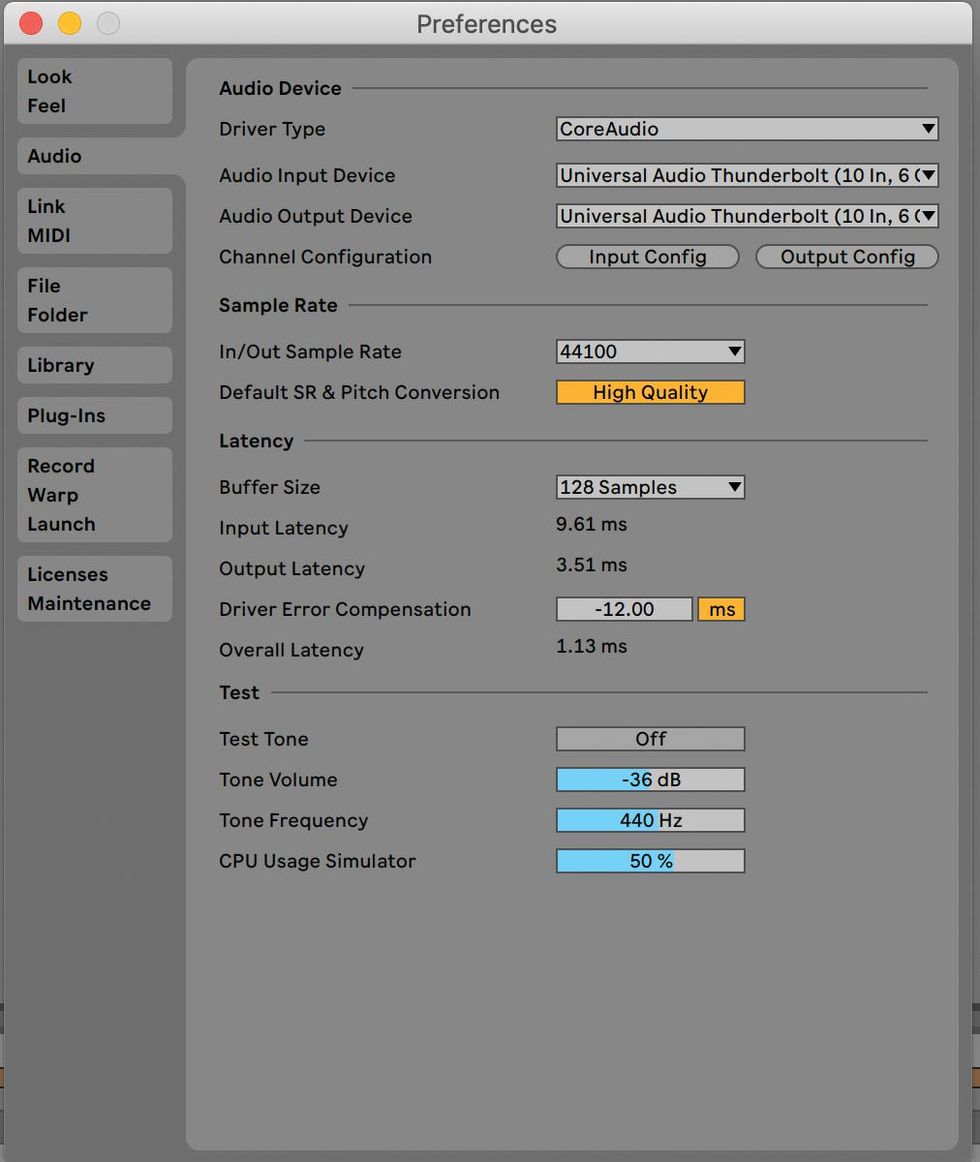
Here I have the buffer size set to 128, where I find I can record tracks without latency issues. With modern computer power and minimal plug-ins, you can probably set this even lower.
To plug your guitar into your computer, you will need an interface, which converts your signal from analog to digital. There are many available options, including the Universal Audio Arrow (available used for $350-$399) or Focusrite Scarlett ($179 street). You only need one input, unless you use both electric and acoustic guitars, which have different input requirements. The number of outputs will depend on your signal chain.
A MIDI controller of some sort—foot switcher, tabletop controller, or both—is a good idea because, as with pedals, you will want to turn effects on and off and have access to parameters. Akai, Korg, and others make a variety of tabletop controllers, ranging from $119 street and up, with knobs and switches that will let you turn on, blend, and manipulate the parameters of the plug-ins in your DAW.
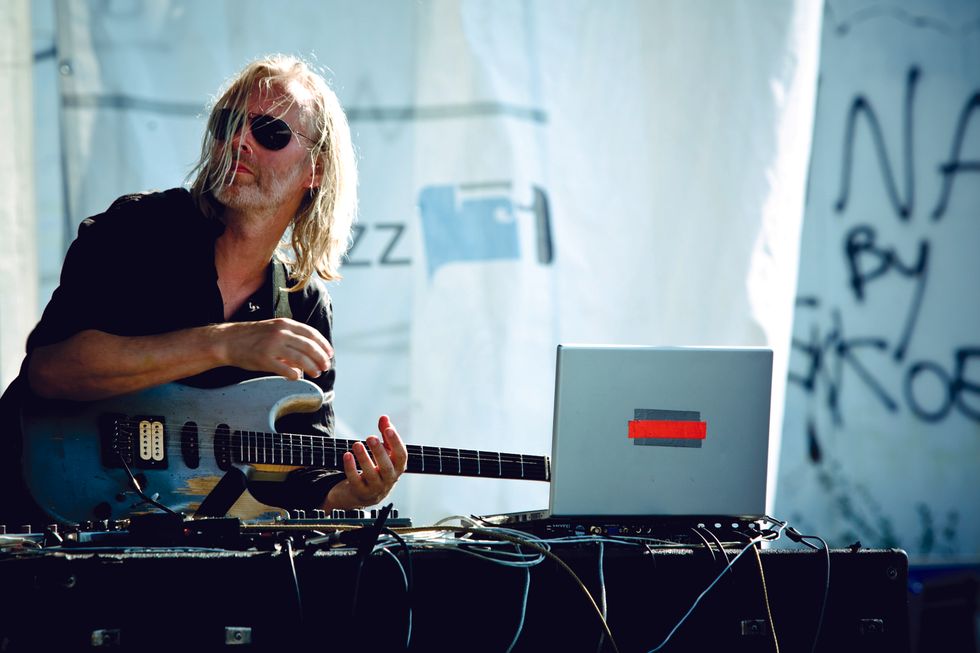
Eivind Aarset is among the group of creative guitarists who bring a laptop into the mix for all gigs.
Photo by soukizy.com
You might be thinking, “Aren’t my hands otherwise occupied playing my guitar?” That’s true, but one of the advantages of laptop guitar is advanced looping. Once a loop is created, a tabletop controller lets you easily route that loop through myriad effects—filters, resonators, delays, reverbs—in ways that are impossible with hardware loopers. A footswitch-style MIDI controller is helpful if you want to do sync’d rhythmic loops, though it’s not as necessary for ambient looping.
Software
To process your guitar in the computer, you can use any software that hosts plug-ins: Logic, Pro Tools, GarageBand, Logic MainStage, and others. As a performing tool, Ableton Live (starting at $99 street for an introductory version) is the most ideal and offers a number of unique features. With Ableton, you can tap in tempo, easily syncing all your effects and loops at once, and there are “nudge” buttons that let you move the tempo of loops slightly up or down to match a drummer’s shifting time without changing their pitch. The “link” feature lets you wirelessly sync your effects with your keyboard player’s laptop, your drummer’s loops, and even the computer running the show’s backing tracks and light show.
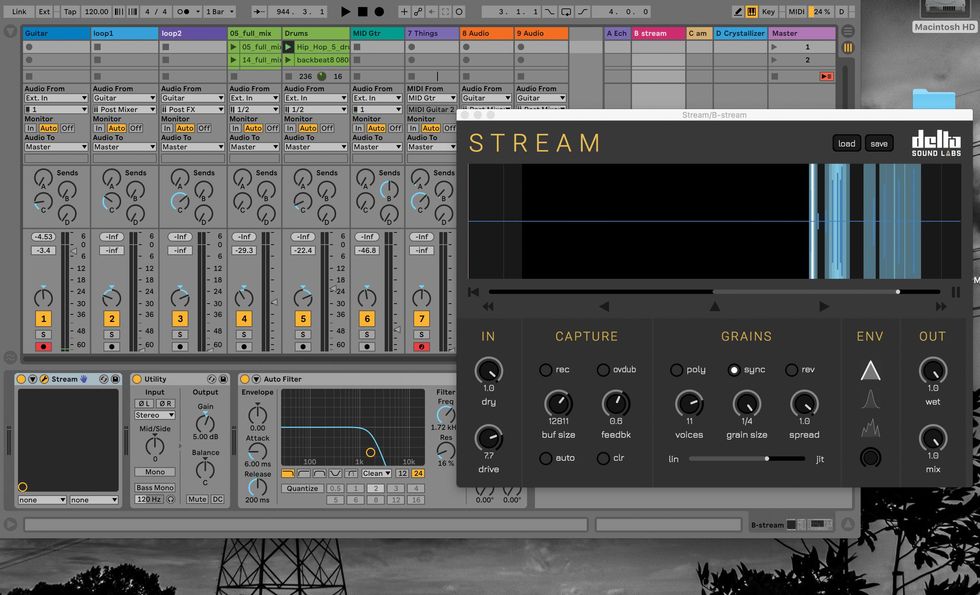
This is my performance setup in Ableton Live. It includes the Jam Origin MIDI Guitar plug-in ($149 street) that lets me control spoken-word recordings in a sampler without any kind of MIDI pickup on my guitar. Also shown is a great granular processing plugin, Stream, from Delta Sound Labs ($49 street).
Live’s native plug-ins will let you create a custom amp-modeling system; emulate digital, analog, and tape delays; and add stutter, granular, or bit-crushing effects. Plus, if you are performing solo using backing tracks and running through a PA, you can easily set a dedicated track to resampling and it will record your entire evening’s performance.
Live lets you loop in two different ways via the looper plug-in and “clip” system. The looper plug-in is great for overdubbing ambient soundscapes, but can also provide timed rhythmic parts, while the clip system is perfect for making multiple rhythmic-based loops that can then be triggered by a MIDI footswitch and/or tabletop controller. While you can’t overdub on a clip, you can set up multiple clip loop tracks where you are able to, for example, record all your verse parts in one row, your chorus parts in a second row just below, and create a third row for the bridge. You can then trigger these rows as scenes.
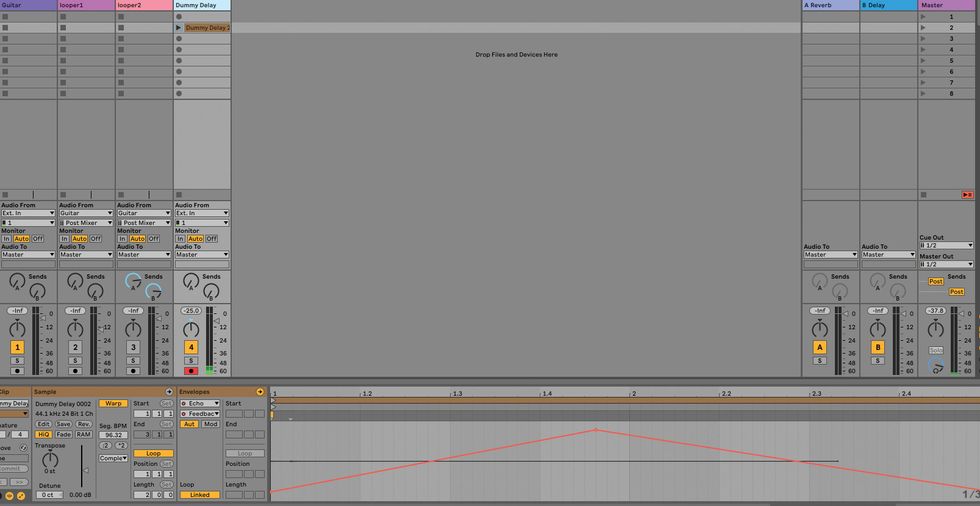
Here is a dummy clip set to raise and lower the feedback of the Ableton echo plug-in.
Live also lets you make “dummy” clips with no audio that can be set to modify effects parameters over time. For example, you could set a dummy clip to increase a delay plug-in’s feedback to just under runaway levels while simultaneously shortening the delay over a period of two bars, and then reverse the process over the next two bars. Try that with pedals!
Would you like to hear two great examples of guitarists using Ableton Live onstage? Check out any video with Eivind Aarset performing. Aarset uses it for a variety of sounds, including ambient reverbs and delays and looping. John Scofield collaborator Avi Bortnick also uses Live for myriad sounds and textures, one of which includes using his guitar to open a noise gate that lets rap vocals cut through only when he plays.
Signal Path
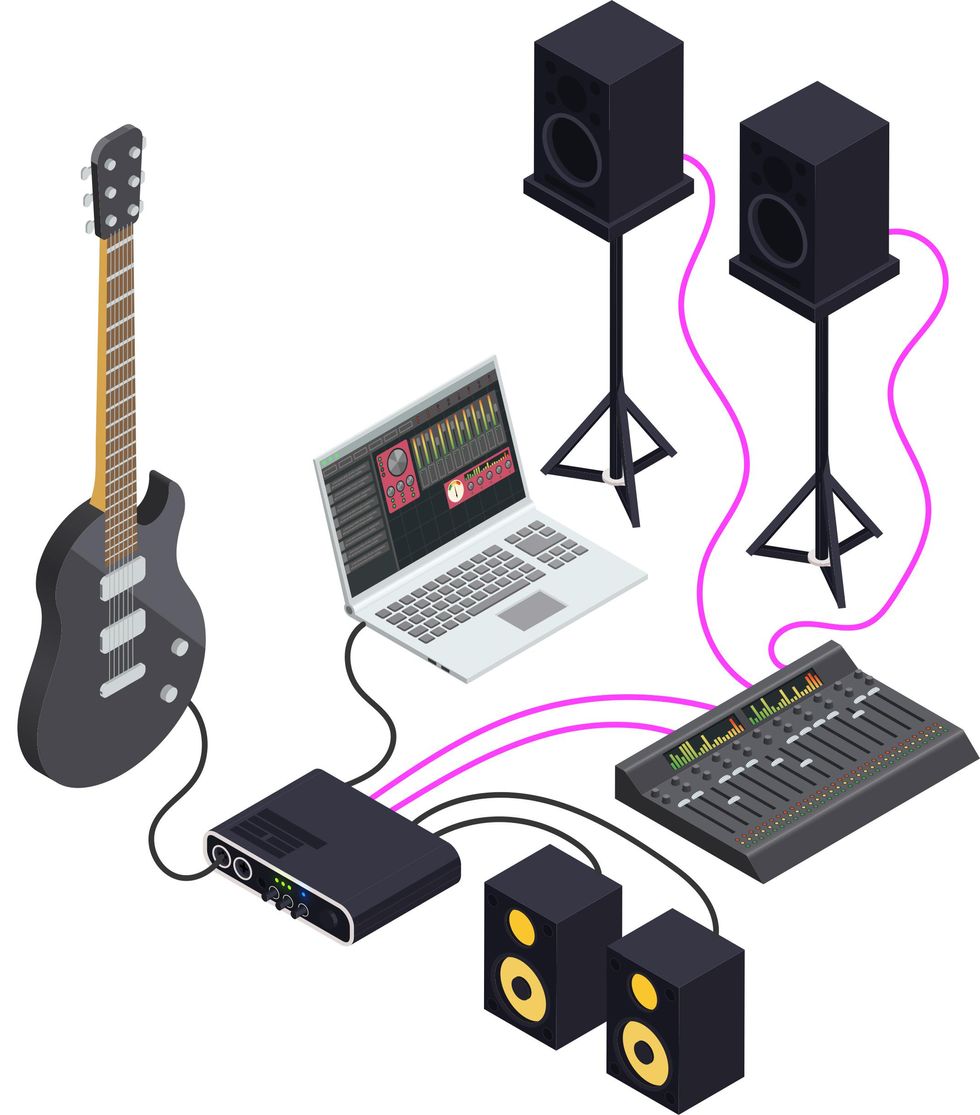
Fig. 1 (*Magenta cables indicate additional or alternative signal path.)
There are multiple ways to insert a laptop into your signal chain. You can run everything through your computer, employing amp modeling software—like Bias FX 2 ($49 street), Guitar Rig ($199 street), or AmpliTube ($99 street)—and running the signal from your audio interface to the house PA or a pair of powered monitors (Fig. 1).
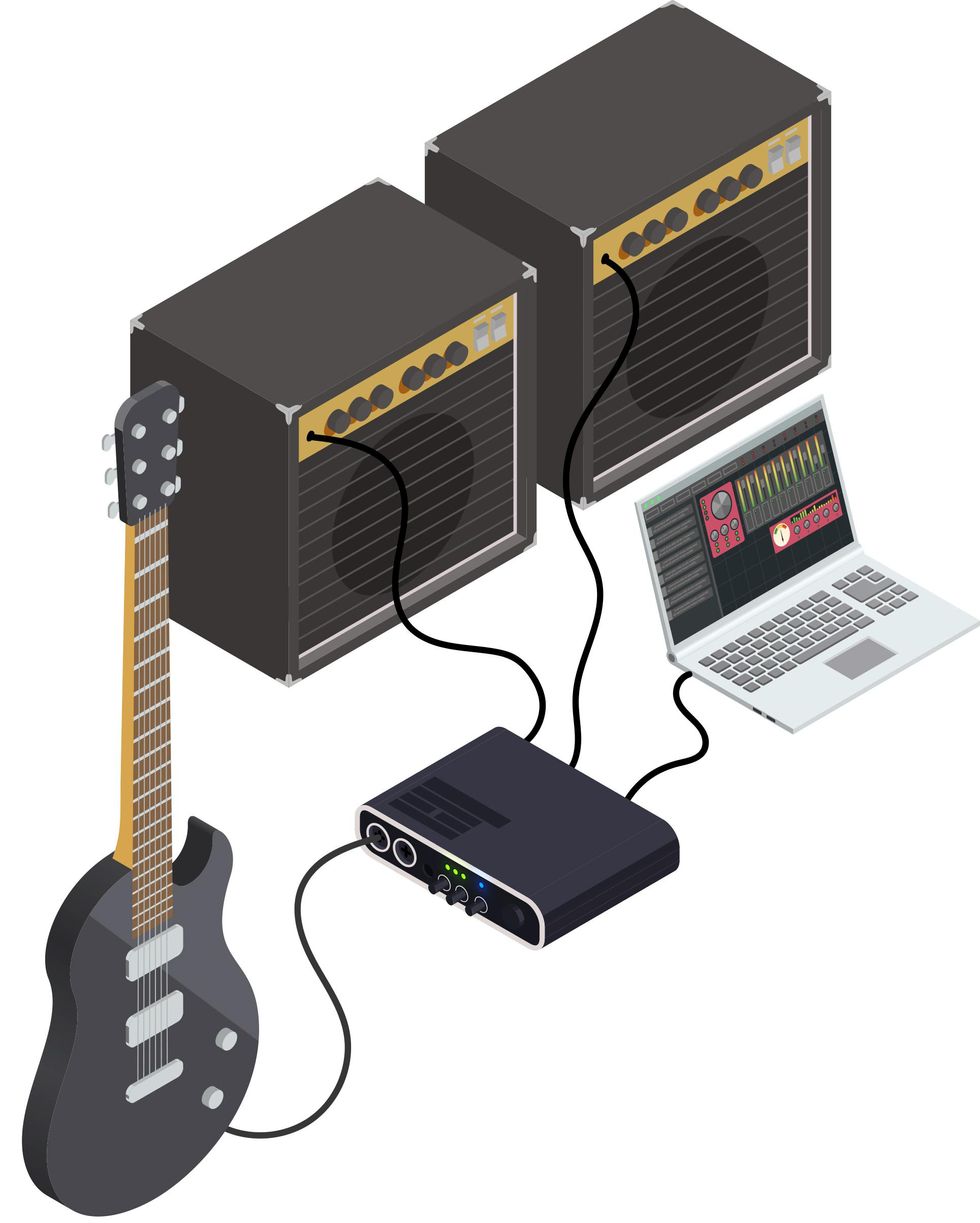
Fig. 2
You might instead eschew the amp modeling software and run the signal into a pair of guitar amplifiers (Fig. 2). This offers a way to keep your favorite tube amps as part of your rig. But be careful: Some effects plug-ins can put out low frequencies that don’t work well with guitar amps and speakers.
For both of those methods, all you need is an interface with one input and two outputs. You run your guitar signal into the interface, which converts your analog signal to digital, and then sends that digital info through USB, Lightning, or Thunderbolt cables into the laptop and the software. Next, a stereo digital signal is sent back to the interface, where it is converted to stereo analog and sent out to the amps, powered speakers, or PA using standard guitar cables or XLR-style microphone cables.
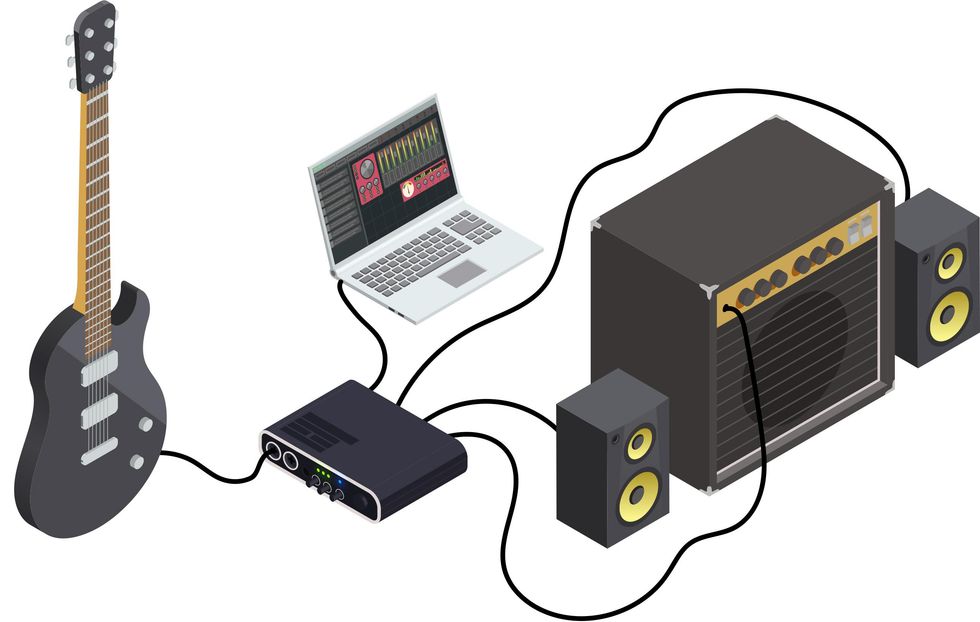
Fig. 3
A more complicated method is a version of the wet-dry-wet setup. Here you would split your guitar signal between a mono signal going directly into a guitar amplifier and the laptop’s stereo output to two full-range powered speakers or the PA. This setup can be achieved in a few ways. You can use an interface with one input and three or more outputs that can be routed inside the interface. This allows you to send your guitar signal from the interface simultaneously to the laptop and directly to a guitar amplifier (Fig. 3).
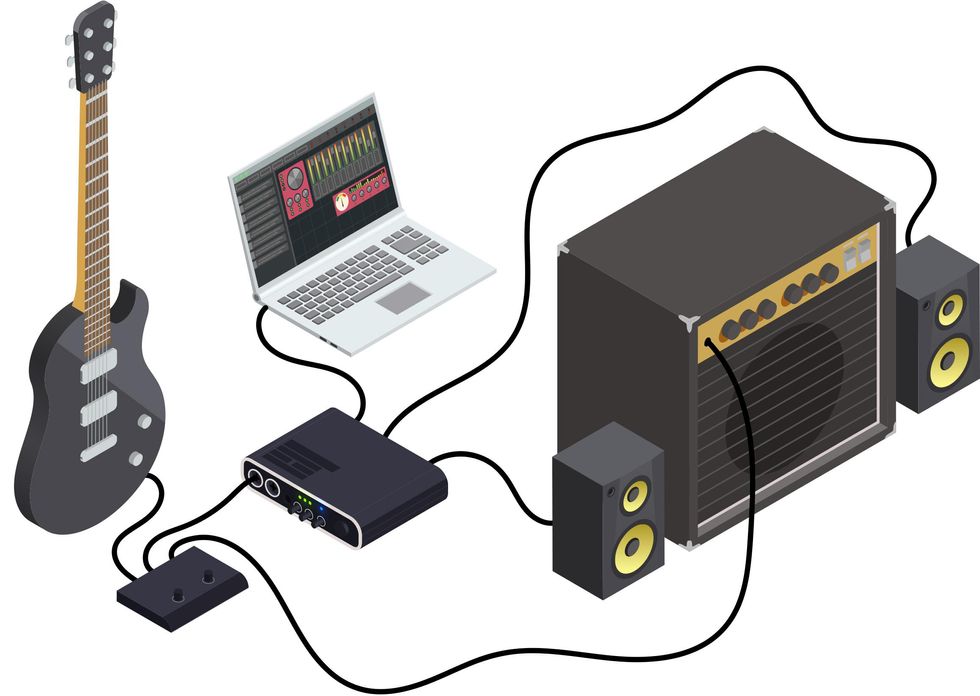
Fig. 4
Alternately, you could use a splitter box before the audio interface that sends one signal to your interface and computer, and one to the amp (Fig. 4).
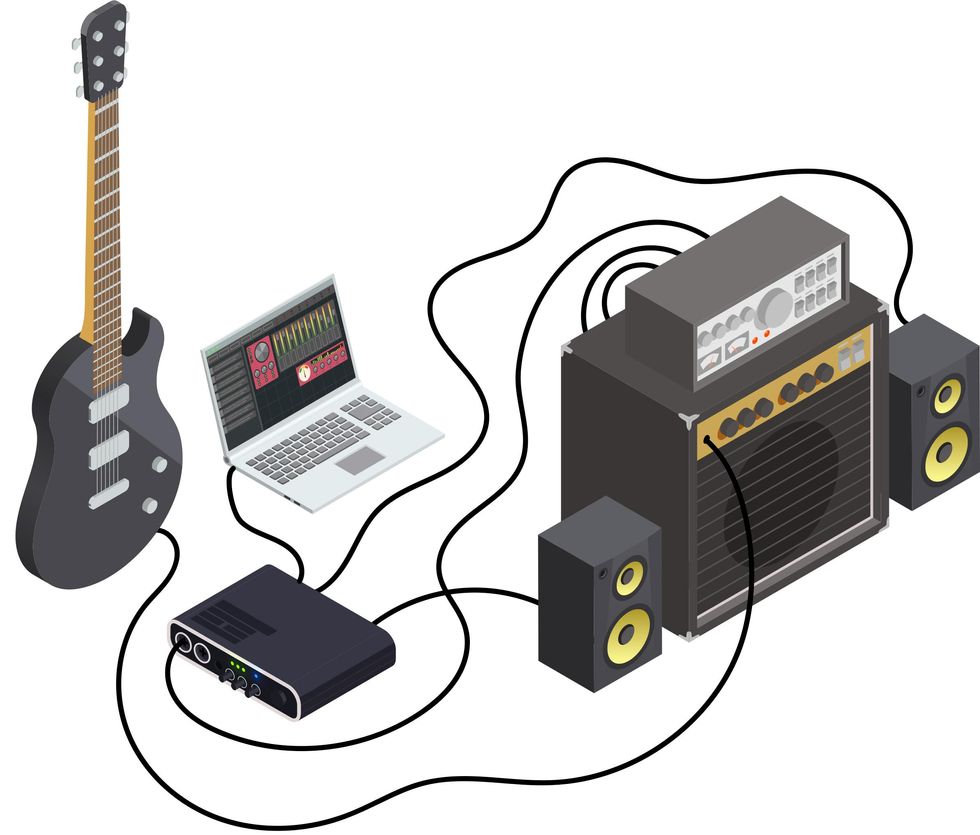
Fig. 5
If you don’t want to use modeling software in the computer for the wet signal, you can use a reactive load box, like the Universal Audio OX ($1,499 street) or Fryette’s Power Station ($899 street) or Power Load ($699 street), which gets placed between your amplifier and its speaker (Fig. 5). You run your guitar into the amp, and two outputs on the load box simultaneously send your amp signal to the speaker and, with speaker emulation, to the computer interface. Sending the sound of your amplifier to the DAW means there is no need for amp modeling within the computer. Once the sound is processed, it is sent to powered speakers or the PA, as in Fig. 2. In this method, your amplifier signal can remain dry and present, while processed sounds will emanate from the powered speakers or PA.
If you don’t want your amplifier signal completely dry or just want to place some of your effects pre-computer, you may want to use pedals in front of your amp. Which brings us to.…
Pedals and Laptop
As much as a computer can do, there are plenty of good reasons to combine pedals with laptop sounds. Digital modeling software sounds excellent these days, but adding a mild overdrive pedal before your interface can lend some analog warmth to the sound. In addition, a drive pedal set for just a little breakup can make the playing experience feel more organic. As you play harder and softer, the “give” of the pedal can often feel more expressive than even the best amp modeling software.
Plus, just as many plug-ins are not yet duplicated in pedal form, likewise there are pedals that perform functions not available as plug-ins. Glitchy, digital micro-looping pedals like the Red Panda Tensor, Hologram Electronics Dream Sequence, Chase Bliss’ Blooper and Mood, and the Hexe FX Revolver do not yet have any direct analogs in the plug-in world. If you want to learn a programming language like Max MSP, you might be able create something like these pedals inside your computer. Ableton includes Max for Live with the purchase of their suite and a plethora of pre-programmed plug-ins are available using Max as their basis, but these pedals still offer something special.
Taking the Stage
You now have all your hardware and software and are ready to perform. Depending on how you use the laptop in your signal chain, you might be able to place it out of the way and use a foot switcher, as if you were using a standard multi-effects unit. But if you want to maximize the advantages of using a computer live, you will likely want it at hand.
In almost two decades of performing with this setup, I have had fewer computer crashes than pedal malfunctions.
You can normally rely on the venue to provide a table of some sort, or you could try Eivind Aarset’s solution. He brings a keyboard stand and places his guitar’s hard case on it, creating a perfect platform for controller, computer, interface, and some of his hardware pedals. I haven’t used a hard case in years, so I just screwed some handles onto a painted piece of plywood and place that on a keyboard stand.
As with any performance, hearing yourself is crucial. If you are using guitar amps or powered speakers, they will act as monitors. Some powered speakers may have XLR outs to send to the house PA. If you are only running through the PA, you may want to use headphones plugged into your interface to be assured of hearing the same thing as the audience.
Some guitarists have trepidation about reliability when using a laptop. All I can say is that in almost two decades of performing with this setup I have had fewer computer crashes than pedal malfunctions. It is also easier to bring a backup laptop and interface than a second pedalboard and amp.
A laptop dedicated to only music is ideal, but if you don’t have that luxury, make sure to quit any programs other than the performing software in use. Turning off WiFi during your set will prevent notifications from interrupting and provide a little extra processing power. And speaking of power, while it is best to keep your laptop plugged in while performing, if there is ever an issue with clean power or a faulty socket, unlike with pedals, your laptop battery will take over and the show will go on.
Is It for You?
Playing through a laptop is not for everyone. You probably won’t be welcome at your local blues jam if you say, “Hang on a minute while I boot up my Mac.” But if your music involves a world of sounds that go well beyond those offered by hardware pedals and multi-effects, or you’re just seeking a more portable way of producing interesting tones, taking the stage with a computer might be an option. And, with tubes becoming harder to get, who knows? Someday it may be the best option.





![Rig Rundown: Russian Circles’ Mike Sullivan [2025]](https://www.premierguitar.com/media-library/youtube.jpg?id=62303631&width=1245&height=700&quality=70&coordinates=0%2C0%2C0%2C0)
