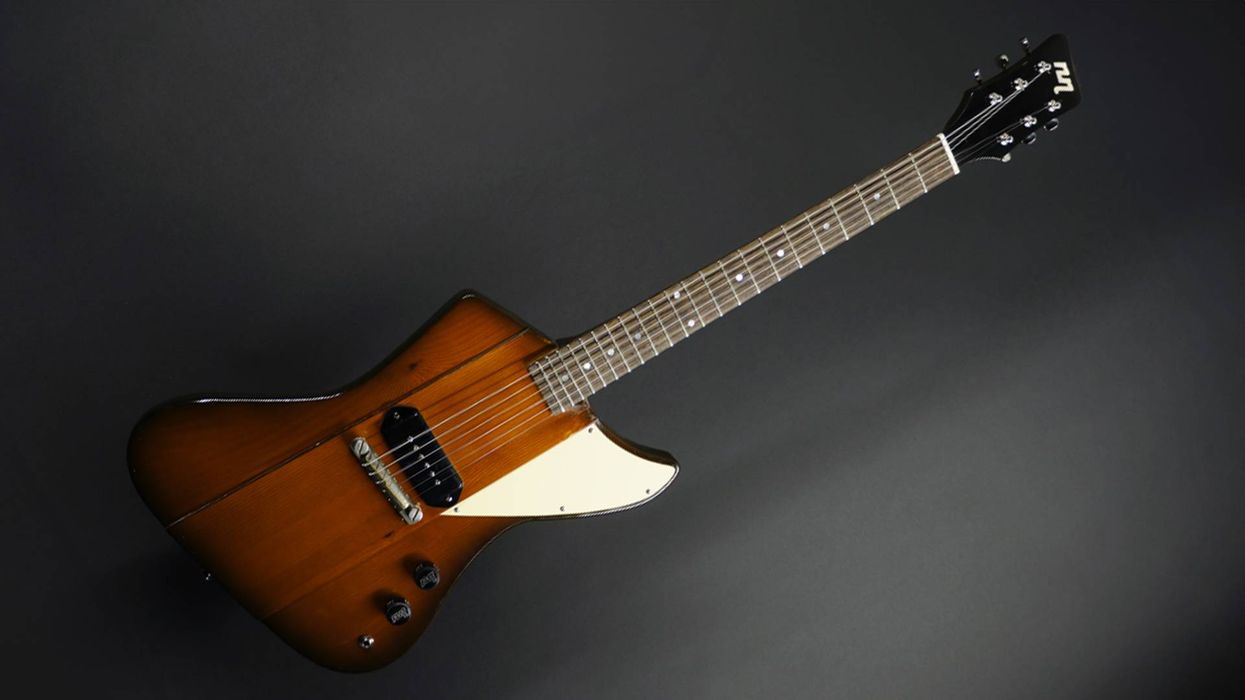
Some guitarists consider the notion of modifying an electric guitar from its stock configuration distasteful, while others consider it mandatory. As a custom builder with a decidedly vintage background, I fall somewhere in between. Generally, I’m most in favor of maximizing an instrument’s usability without jeopardizing the ability to return it to original condition.
However, when I’m building a guitar, there’s a myriad of small adjustments I can make to steer the instrument on a desired trajectory. These micro mods are interactive with each other and, depending upon the combination, offer a wide variety of sonic outcomes. But these little mods can also be applied to existing guitars—your guitars—in any number of permutations and to great affect. Let’s take a look at five mods that are easy enough for most players to try.
1. Foaming Pickup Cavities
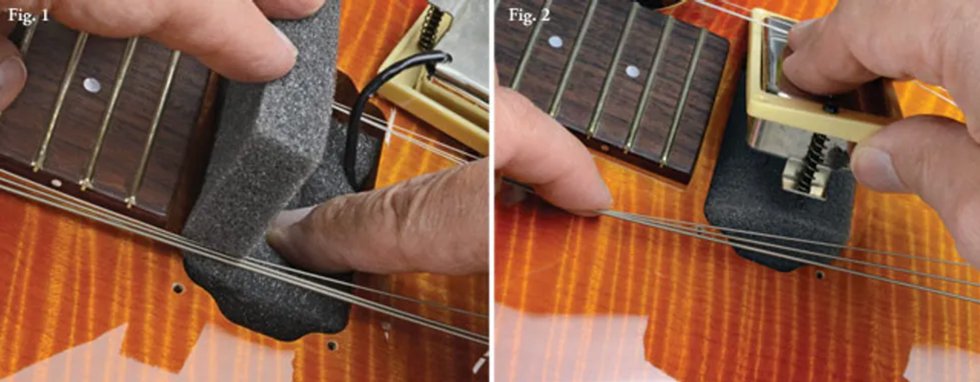
The first and easiest adjustment that most electric guitars can benefit from is stuffing soft foam into the cavity behind the pickups in order to stop microphonic squealing. The first time I used this was when I was repairing a Gibson Firebird for Johnny Winter—the foam stopped the pickup’s back plate from vibrating like a microphone diaphragm. I have since learned that reducing the space (the cubic volume) behind a pickup modifies its sound at higher sound levels. Discovering this resonating-chamber effect has altered my approach to routing a body for pickups on new guitars, too.
It’s easy to remove your pickup or pickguard and slide some foam rubber behind the unit. Start with soft foam first, and then increase the density to find the difference you like. Conveniently, the gray foam used in aftermarket pickup packaging makes great damping material: It’s soft enough that you can double it up (see Fig. 1 and Fig. 2) to create more pressure on the pickup’s back plate, too. This is a relatively no-frills mod that requires minimal materials and tools.
2. Pickup Magnet Tricks
As we all know, sometimes a pickup isn’t a perfect match for a guitar. I always approach pickup selection like a vocalist would choose a microphone—finding the one that best brings out the guitar’s character rather than attempting to change that innate character with a new pickup.
With this in mind, try swapping your existing pickups’ magnets instead of replacing the whole thing. Magnet type and strength are big contributors to a pickup’s tonality, so it stands to reason that tweaking them will affect your sound.
Swapping magnets is easiest to do with humbuckers. In fact, it can actually be done without completely disassembling the pickup—and sometimes without even unsoldering it.
The first step is to determine what’s in your pickup already. The most common magnets for humbuckers are (roughly in order of strength): alnico 2, alnico 4, alnico 5, and then various types of ceramic magnets. In simple terms, the stronger the magnet, the greater the potential output. But you can’t just look at magnetic strength alone, because stronger magnets also affect the string’s ability to sustain.
By moving up or down one level, in terms of magnetic strength, you can usually add or subtract a little edge from a pickup. If your guitar is too tangy, moving down one pickup level (e.g., from alnico 4 to alnico 2) may smooth it out. If you want to add bite, go with a slightly stronger magnet—like, alnico 5 to a ceramic magnet. The good part is that magnets are both easy to find and inexpensive in comparison to buying a whole new pickup.
Here’s how to swap magnets in a humbucker:
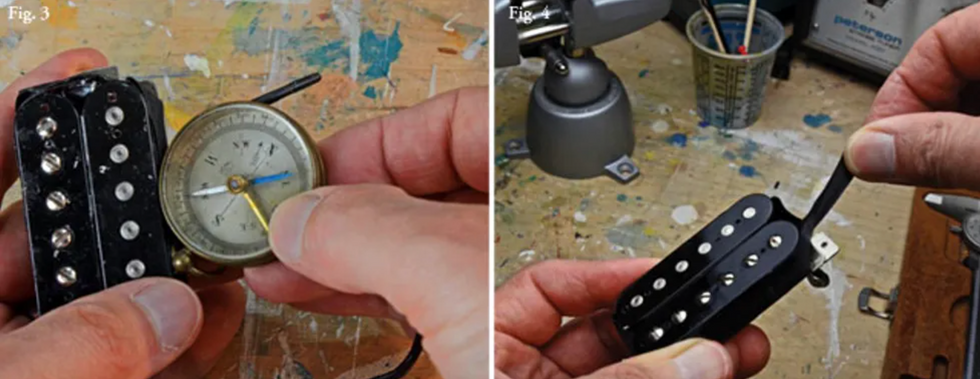
1. Before you begin, determine the magnet’s polarity orientation (north/south). You can use a simple magnetic compass to do this (Fig. 3).
2. Desolder the main leads and remove the pickup from your guitar.
3. Remove the protective outer tape (Fig. 4). This gives you a clear view of the internal parts. (Note: Be careful not to pull out the hookup wires underneath.) You should be able to see the magnet in the center, underneath the two coils.
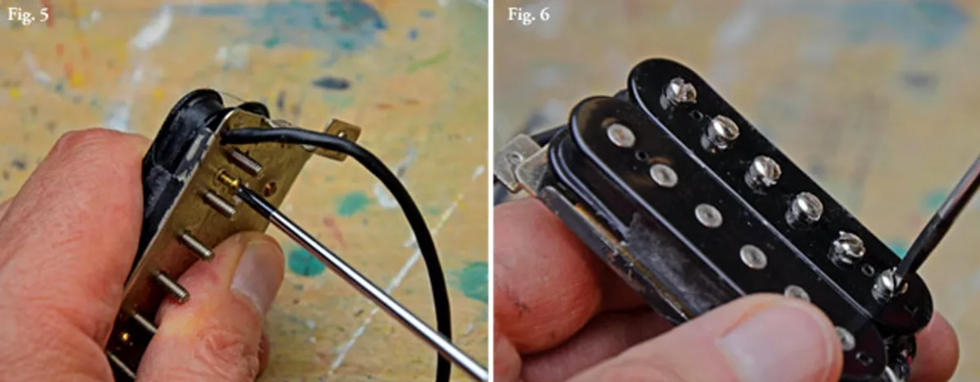
4. Loosen the four small coil-mount screws on the underside of the pickup (Fig. 5).
5. Raise each of the adjustable pole pieces about four turns to release the coil from the back plate (Fig. 6).

6. Gently pry the coils from the plate to provide a little gap (Fig. 7).
7. Place a screwdriver in the gap at one end of the pickup and slowly tap the magnet out (Fig. 8). Once enough of the magnet is exposed outside the housing, you’ll be able to pull the magnet out with your fingers. (Note: If your pickup is wax-potted, you may encounter some initial resistance as the wax breaks free.)
8. Slide in your new magnet, being careful to match the same magnetic orientation you observed in step 1 (Fig. 9).
9. Return the adjustable pole pieces to their prior position, replace the coil-mount screws and tape, and re-install the pickup in your guitar.
3. Modern vs. Vintage Wiring
Another relatively drastic but easy and cheap way to hot-rod your guitar’s sound with its current components is to alter how and where its volume and tone pots are connected to each other. The difference can be subtle—and it’s more a matter of preference than what’s “correct”—but it can make the difference between a guitar that is just OK and one that really is a joy to play.
With this mod, what you’re essentially doing is changing the way the tone and volume control interact, based upon how they “load” each other. I’ve mocked up a control setup here showing one volume and the corresponding tone control.
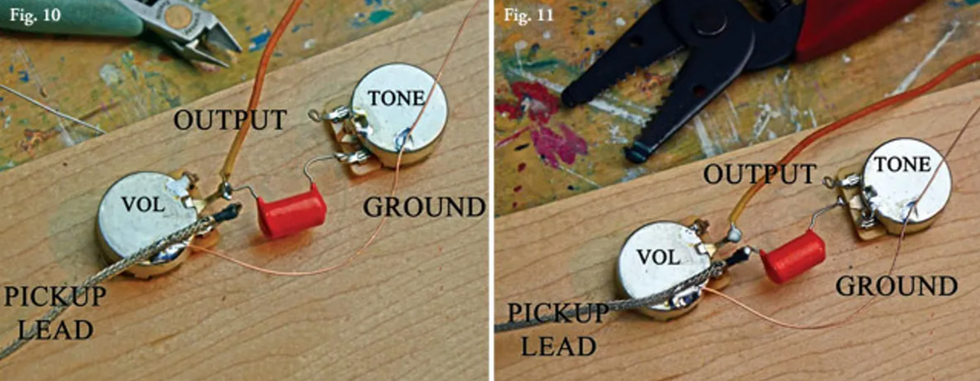
Fig. 10 Vintage wiring—which has pickups wired to the volume pot alone, and the tone control’s capacitor being attached to the output—yields minimal high-end roll-off when you turn the volume down. Fig. 11 Modern pickup circuits often have the tone control affecting the pickup’s tone before it gets to the volume knob, yielding a decrease in treble response as volume is reduced.
In the vintage setup, the pickup is wired to the pot lug alone, with the tone control capacitor being attached to the output side. This tends to allow the volume to be rolled off without losing too much high end. This is great for those who play clean rhythm by just lowering their guitar volume as opposed to switching amp channels or turning off a boost pedal. It’s old-school, and it works. The downside is that the tone control sometimes has to be rotated a bit more before its effects are heard.
In our so-called modern configuration, the tone cap is attached to the pickup before the volume pot. This presents the volume control with a totally different signal, resulting in a more colored sound as you reduce the volume. This can be useful if you like to turn up the guitar to cut through more. For me, the downside is the way it makes the tone control a bit of a hair-trigger affair. If you’re the type who avoids the tone control, this won’t be a factor for you.
If you have two sets of volume and tone controls (e.g., on a standard Les Paul), you may or may not decide to wire them differently, which can potentially open the door to even more tonal variations.
4. Add Steely Twang to Your Strat
There are times when a single-coil just doesn’t have enough twang. I’ve encountered Strat neck pickups that are just too wooly to provide me with that saucy, SRV/Hendrix-style rhythm juice. Or, sometimes an anemic bridge pickup just needs an extra dose of snap to push it into Tele-like territory. If so, this simple mod could be just what you’re looking for.
When Leo and the boys at the big “F” ranch developed the Tele, they put a big slab of steel under the bridge-pickup coil. This reflected the magnetic field up and toward the strings. In the words of Seymour Duncan’s Evan Skopp, this gives it more “crack”—which, if you’re addicted to twang, is a good thing. The better news is that you can attach a plate (sometimes called an elevator plate, because of how it elevates the magnetic field toward the strings) to any single coil whose pole-piece magnets are exposed at the back.
To do so, purchase a small piece of .047"(18-gauge) sheet steel from your local hardware store. Then:

1. Trim it to a manageable size and shape—about the same dimension as the pickup bobbin (Fig. 12). Then trim it so that it fits within the perimeter of the base plate without touching the lead wire contacts (Fig. 13). 2. Using a small piece of thin, double-sided tape, fit the plate over the bottom of the pickup, and then secure it with dabs of adhesive (Fig. 14). I prefer hot glue, because it’s easy to remove, but you can use epoxy or super glue, too.
This mod works great for Strat-type pickups or aftermarket Tele-style reproduction pickups that don’t already have a plate. Some pickup companies make P-90s that don’t have a metal base plate, and these can be twang-ified in this way, too. The best part is that, if you don’t like the sound, you can just peel the plate off and be right back where you started.
5. Fine-Tuning Your Tuners
This mod is a little different—and definitely not as affordable as the ones we’ve been talking about up to this point. When players think about modifications that involve tuning machines, the subject revolves around tuning stability. That’s all well and good, but I’ve rarely encountered a quality machine that slips—because the mechanical torque required to turn the tuner’s capstan is pretty stout. Problems of pitch are usually more related to capstan wobble or a bad nut-slotting job.
However, there’s another aspect of machine-head selection that I contemplate when building a custom guitar: weight. But this is more about sustain and tone than a question of neck-heaviness.
I’ve written in previous issues of Premier Guitar about how the size and shape of a guitar’s headstock affect its sustain and tone. Clearly, the mass of the tuning machines is a factor in this, as well. Having overseen the building of tens of thousands of custom guitars over the course of my career has given me cause to consider machine-head weight as a fine-tuning tool in and of itself. This kind of mod is more complex than the others I’ve presented here because it is harder to predict, and obviously more costly to dabble in because it involves replacing the existing tuners. Nevertheless, I put it out there for those of you who are willing to go to the limit of sanity in the search for a responsive instrument.
This mod revolves around the concept that adding mass to the headstock lowers its resonant frequency, while reducing mass will raise that frequency. The theory at work here is that vibration is absorbed or reflected back into the strings and body based upon this frequency. Depending upon the harmonic makeup of your particular instrument, changing this can enhance or degrade sustain and accentuate or attenuate certain harmonics. All of this is dependent not only on your guitar’s construction, but also on how large your headstock is to begin with. If all of this seems a bit hazy, that’s because it is. I don’t have a handy-dandy answer like “more mass equals more sustain” because it isn’t always true. Suffice it to say that you can make a difference in a guitar’s character by following this path. I usually go through this exercise with my builds because I have the luxury of time and the resources at hand. It’s like fine tuning a race car’s suspension settings to your liking.
Most of the better machine heads on the market these days use a standard .375" headstock hole, so swapping tuners isn’t that hard to do. The problem comes with the mounting at the rear of the peghead. Luckily, if you use the type that screw down from the front side with a nut and washer, you can swap and test before you drill additional mounting-screw holes.
To illustrate the potential variances in weight that one can expect with different tuners, I rounded up three of the most common choices and threw them on my shop scale. You can weigh your current machines to compare. Be sure to weigh all the hardware— screws, nuts, and washers—because it all comes into play. (All weights are in grams.)

The lightest of the bunch are minimalist Sperzel tuners, which look pretty sci-fi. They clocked in at 138 grams (Fig. 15). Well-made and beautifully finished, the Sperzels use a pin-mount on the back instead of wood screws—further reducing weight. This can be a game-changer if you have a substantial headstock.
Next up are the wonderful vintage Kluson reproductions by TonePros (Fig. 16). These are some of my favorites, and they weigh in at a moderate 186 grams with all hardware included. For many of my builds, the characteristics of these tuners are ideal. I enjoy the modern engineering these tuners hide within their vintage-styled exteriors, and the weight is almost perfect.
Unabashedly brute class, with typical German overbuilding, the Schallers shown here are the Incredible Hulk of the bunch (Fig. 17). At a hefty 272 grams, they have the might to get noticed when you fasten them to your axe. If you have a guitar with a tiny headstock, you’ll hear and feel a difference with the Schallers. Whether or not you like the change is subjective, and it depends on the makeup of the rest of your guitar.
Sweat the Small Stuff
As we’ve shown here, a lot of relatively small—and inexpensive (many are practically free)—tweaks can hot-rod your tone and maneuver it to an array of differing ports of call. In some ways, it’s like tossing a handful of dice instead of just two—because the way small tweaks interact can lead to exponential changes in sound. For that reason, my advice is to take it slow and only make a single change at a time to understand what it delivers. Besides, it’s more fun (and less stressful) that way, anyway!
[Updated 12/30/21]


