
How to bring the mojo of modulation, delay, distortion, and other effects to your recordings of … everything.
We guitarists have a long tradition of changing the electric guitar’s inherent tone by experimenting, inventing, and developing new tones and timbres through effects. More specifically, effect pedals. I believe our continued open-mindedness has kept our instrument relevant throughout the many decades and proven just how limitless a musical chameleon it truly is.
There is also a parallel tradition, almost as long, of using guitar pedals in unintended ways on other musical material. This time, in honor of our all-things-pedal issue, I’m going to show you how to set up and use your existing pedals on other audio sources besides your guitar. Before we get too far into the woods and try to connect our pedals to and from our audio interface, I want to briefly address two subjects—“levels” and “balanced/unbalanced signal cables”—that are important to understand, so you’ll get the best results.
Listed from weakest to strongest, there are four types of signal levels in the audio world: mic, instrument, line, and speaker level.
Mic level is the signal voltage generated by a microphone and is so weak, it requires using a preamplifier (preamp) to bring it up to line level.
Instrument level is the inherent signal output level (impedance varies) put out by an instrument, like the electric guitar or bass. It also requires a preamp to bring it up to line level.
Line level is the highest of the three levels but still needs a preamp and comes in two varieties: consumer (-10 dBV) and professional (+4 dBu). The latter is what your audio interface will boost everything up to before sending the signal to your monitor speakers.
Speaker level comes after all the signals (any of the previous three) are collectively boosted to line level and is then (post-amplification) output to your monitors. Because of the comparatively high voltage, this is why we use dedicated speaker cables and not instrument cables to connect the output of your interface to your monitors.
Now, let me quickly define the difference between balanced and unbalanced signal cables.
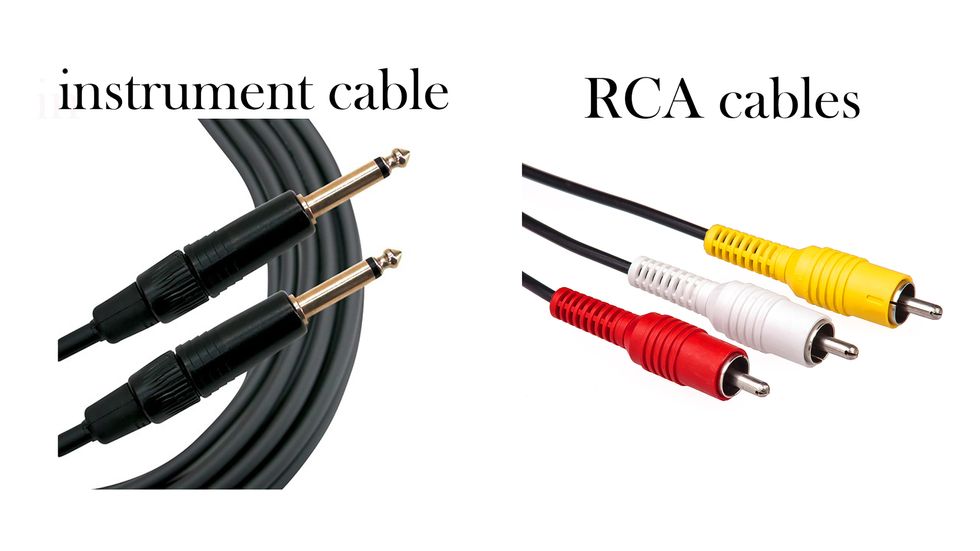
Fig. 1
• Unbalanced signal cables: The two most common are our standard, high impedance 1/4" TS (tip, sleeve) instrument cables and RCA cables [Fig.1].
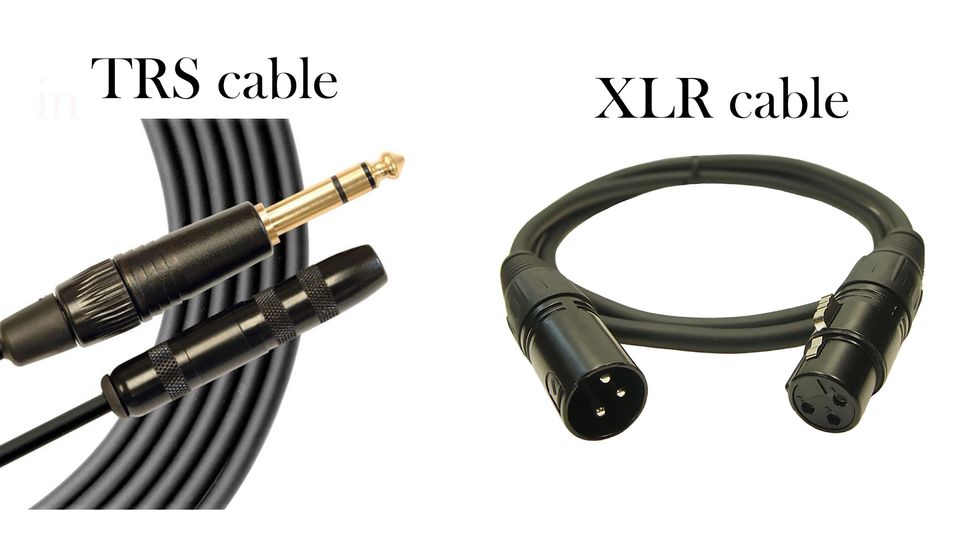
Fig. 2
• Balanced cables: The two most common are XLR cables and TRS 1/4" cables [Fig. 2].
Using this knowledge, we can get started making some musical mayhem and connecting our pedals.
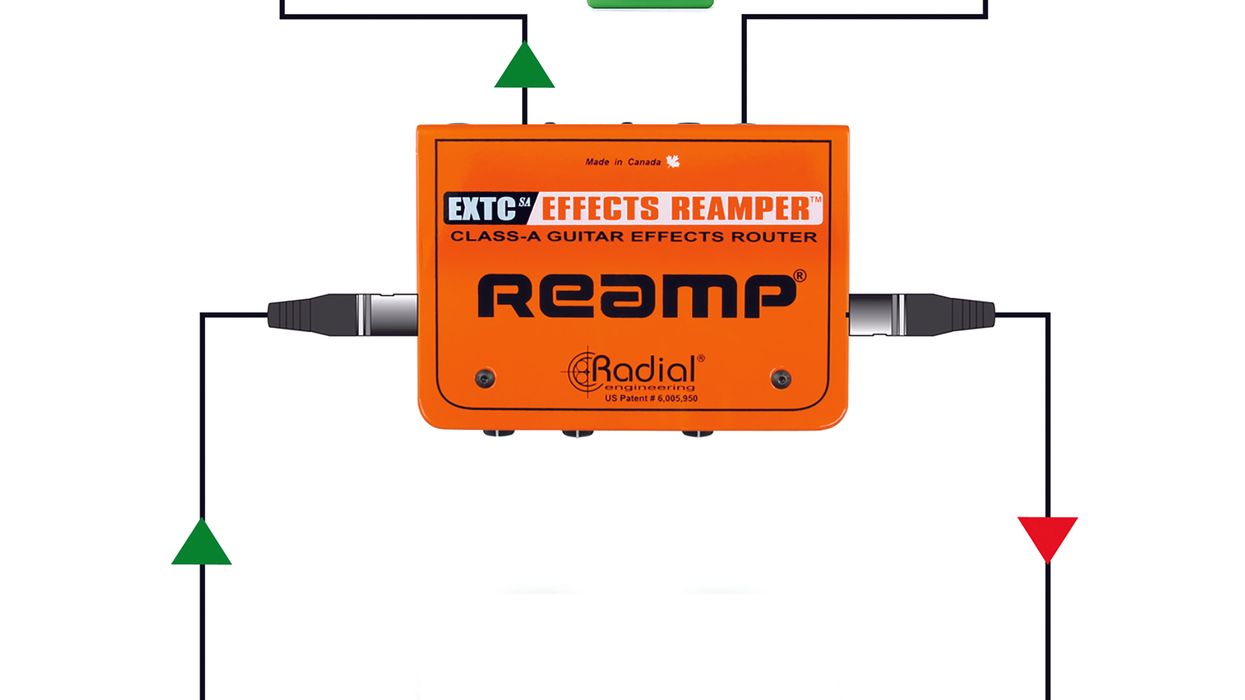
Step 1: Connect a balanced XLR or 1/4" TRS cable from a line output of your audio interface and to the input of your reamp box. I highly recommend the Radial EXTC Effects Reamper Class A Guitar Effects Router ($329 street), which further offers the possibility of combining two different effects loops. The reason why we need a reamp box (there are many on the market) is because it will convert the balanced, line level output of your audio interface to an unbalanced, instrument levelsignal that guitar pedals are designed to accept. A good reamp box can also match the impedance of your particular instrument for even better signal fidelity.
Step 2: Connect a standard 1/4" instrument cable from the output of the reamp box to your pedal(s).
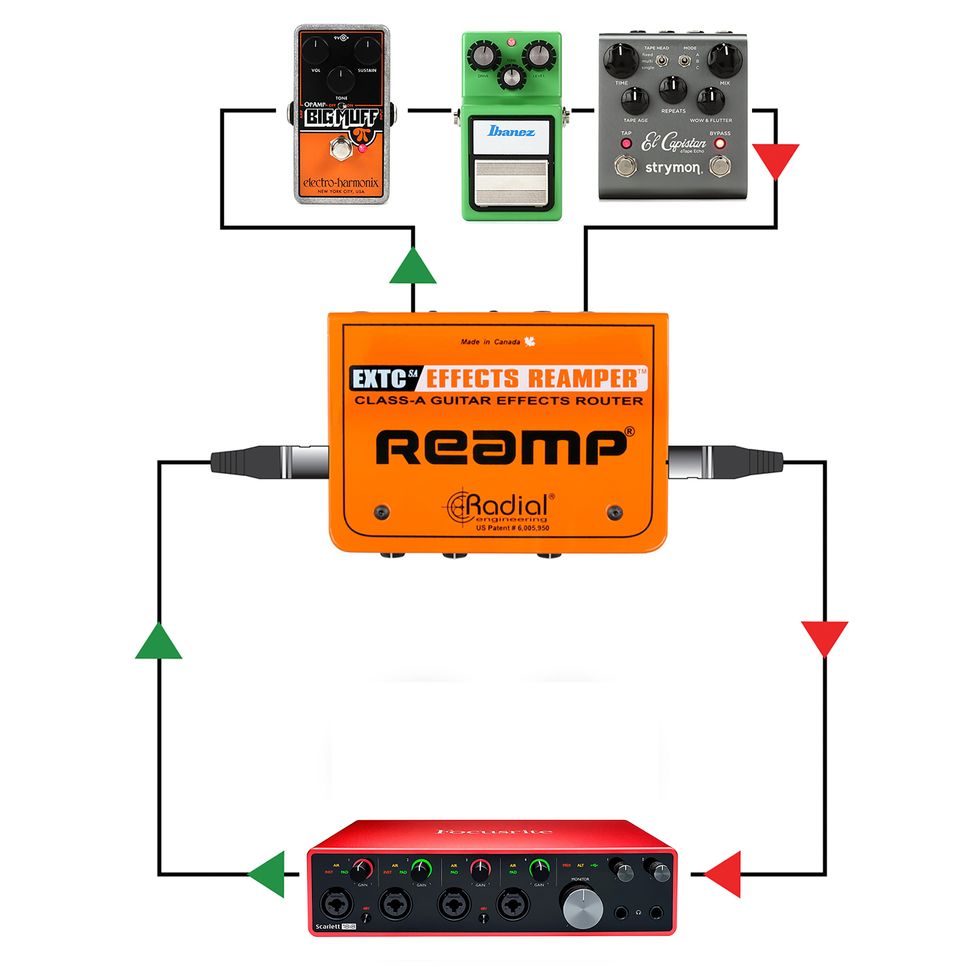
Fig. 3
Step 3: Connect another 1/4" instrument cable from the output of your last pedal to either your guitar amp and record your new tracks through your guitar amp, or plug into a regular DI box (which will convert the signal back to a balanced, line-level stage) and take that output to the input of your audio interface. If you have the Radial EXTC Effects reamper, you can do this all in one box [Fig. 3]!
Once this is set up, you can start sending any track you wish from your DAW/audio interface to all your pedals and go crazy! Soak your vocals in pitch-shifted, distorted reverb. Flange your synths and add delayed chorus. Or bit crush your drum tracks.
What I particularly love to do is play with various delay pedals’ feedback amounts and delay times as I record and get all of those quirky pitch-shifted pings and pongs from adjusting those values on the fly. You can also consider adding distortion and harmonies to a vocal on key words or phrases within your song. Your imagination is the only limit!
Finally, I encourage you to drop me a line at recordingdojo@premierguitar.com if you have questions and requests for future topics to cover. Until next time, namaste!
- Recording Dojo: Get Fuzzy! Tips for Doubling Down on Dirt ... ›
- Recording Dojo: What Is Compression & How Does It Work on Guitar? ›
- Recording Dojo: How to Capture the Best Delay Sound - Premier ... ›
- Electric Love Pedals Power Breast Cancer Research - Premier Guitar ›
- EarthQuaker Devices Life Pedal V3 Review - Premier Guitar ›
- TWA SH9 Scott Henderson Signature Distortion Review - Premier Guitar ›
- Ananashead Cream Amp Review - Premier Guitar ›
- Messiah Guitars Flare Review - Premier Guitar ›
- Catalinbread Soft Focus Effects Pedal Review - Premier Guitar ›
- EarthQuaker Ledges Reverb Review - Premier Guitar ›
- MXR Joshua Ambient Echo Review ›
- Discover Vintage Tone with Ananashead's Spirit Fuzz - Premier Guitar ›
- Ananashead Spirit Fuzz Review - Premier Guitar ›
Empress Effects is proud to announce the release of the Bass ParaEq, a bass-specific parametric EQ pedal.
Building on the success of their acclaimed ParaEq MKII series, which has already gained popularity with bassists, the Bass ParaEq offers the same studio-grade precision but with features tailored for bass instruments.
Basses of all types – including electric and upright basses with active and passive electronics – can benefit from the Bass ParaEq’s tone-sculpting capabilities.
The new pedal follows the success of the Empress Bass Compressor and ParaEq MKII Deluxe, which have become some of the company’s best-reviewed and top-selling products. The Bass Compressor’s popularity confirmed what Empress had long suspected: bassists are eager for tools built with their needs in mind, not just adaptations of guitar gear.
The Bass ParaEq retains the line’s powerful 3-band parametric EQ and studio-style features while introducing a bass-optimized frequency layout, a selectable 10MΩ Hi-Z input for piezo-equipped instruments, a dynamically-adjusted low shelf, and automatic balanced output detection—perfect for live and studio use alike.
The Bass ParaEq also offers an output boost, adjustable by a dedicated top-mounted knob and activated by its own footswitch, capable of delivering up to 30dB of boost. It’s perfect for helping your bass punch through during key moments in live performance.
Whether dialing in clarity for a dense mix or compensating for an unfamiliar venue, the Bass ParaEq offers precise tonal control in a compact, road-ready form. With 27V of internal headroom to prevent clipping from even the hottest active pickups, the Bass ParaEq is the ultimate studio-style EQ designed to travel.
Key features of the Bass ParaEq include:
- Adjustable frequency bands tailored for bass instruments
- Selectable 10MΩ Hi-Z input for upright basses and piezo pickups
- Auto-detecting balanced output for long cable runs and direct recording
- Three sweepable parametric bands with variable Q
- High-pass, low-pass, low shelf, and high shelf filters
- Transparent analog signal path with 27V of internal headroom
- Buffered bypass switching
- Powered by standard 9V external supply, 300mA (no battery compartment)
The Bass ParaEq is now shipping worldwide. It can be purchased from the Empress Effects website for $374 USD and through authorized Empress dealers globally.
Kiesel Guitars has introduced their newest solid body electric guitar: the Kyber.
With its modern performance specs and competitive pricing, the Kyber is Kiesel's most forward-thinking design yet, engineered for comfort, quick playing, and precision with every note.
Introducing the Kiesel Kyber Guitar
- Engineered with a lightweight body to reduce fatigue during long performances without sacrificing tone. Six-string Kybers, configured with the standard woods and a fixed bridge, weigh in at 6 pounds or under on average
- Unique shape made for ergonomic comfort in any playing position and enhanced classical position
- The Kyber features Kiesel's most extreme arm contour and a uniquely shaped body that enhances classical position support while still excelling in standard position.
- The new minimalist yet aggressive headstock pairs perfectly with the body's sleek lines, giving the Kyber a balanced, modern silhouette.
- Hidden strap buttons mounted on rear for excellent balance while giving a clean, ultra-modern look to the front
- Lower horn cutaway design for maximum access to the upper frets
- Sculpted neck heel for seamless playing
- Available in 6 or 7 strings, fixed or tremolo in both standard and multiscale configurations Choose between fixed bridges, tremolos, or multiscale configurations for your perfect setup.
Pricing for the Kyber starts at $1599 and will vary depending on options and features. Learn more about Kiesel’s new Kyber model at kieselguitars.com
The Sunset is a fully analog, zero latency bass amplifier simulator. It features a ¼” input, XLR and ¼” outputs, gain and volume controls and extensive equalization. It’s intended to replace your bass amp both live and in the studio.
If you need a full sounding amp simulator with a lot of EQ, the Sunset is for you. It features a five band equalizer with Treble, Bass, Parametric Midrange (with frequency and level controls), Resonance (for ultra lows), and Presence (for ultra highs). All are carefully tuned for bass guitar. But don’t let that hold you back if you’re a keyboard player. Pianos and synthesizers sound great with the Sunset!
The Sunset includes Gain and master Volume controls which allow you to add compression and classic tube amp growl. It has both ¼” phone and balanced XLR outputs - which lets you use it as a high quality active direct box. Finally, the Sunset features zero latency all analog circuitry – important for the instrument most responsible for the band’s groove.
Introducing the Sunset Bass Amp Simulator
- Zero Latency bass amp simulator.
- Go direct into the PA or DAW.
- Five Band EQ:
- Treble and Bass controls.
- Parametric midrange with level and frequency controls.
- Presence control for extreme highs.
- Resonance control for extreme lows.
- Gain control to add compression and harmonics.
- Master Volume.
- XLR and 1/4" outputs.
- Full bypass.
- 9VDC, 200mA.
Artwork by Aaron Cheney
MAP price: $210 USD ($299 CAD).
PG contributor Tom Butwin reveals his favorite songwriting secret weapon: the partial capo. Watch how the Shubb C7 and C8 can simulate alternate tunings without retuning your guitar—and spark fresh creative ideas instantly.
Shubb C8b Partial Capo for Drop-D Tuning - Brass
The C8 covers five of the six strings, leaving either the low E or high E string open, depending on how it's positioned.
- Standard setup: Placed on the 2nd fret while leaving the low E string open, it simulates Drop D-style sounds—except you're still in standard tuning (key of E). You get that big, droning bass feel without retuning.
- Reverse setup: Flipping the capo allows the high E string to ring, giving you shimmering drones and new melodic options across familiar chord shapes.
- A flexible tool that lets you simulate alternate tunings and create rich sonic textures—all while keeping your guitar in standard tuning.
Shubb C7b Partial Capo for DADGAD Tuning - Brass
The C7 covers three of the six strings—either D, G, and B or A, D, and G—depending on how it's flipped.
- Typical setup (D, G, B): Creates an open A chord shape at the 2nd fret without needing your fingers. This frees you up for new voicings and droning notes in the key of A.
- Reversed setup (A, D, G): Gets you close to a DADGAD-style tuning vibe, but still keeps you in standard tuning—great for modal, spacious textures often found in folk or cinematic guitar parts.
Use it alone or stack it with the C8 for wild, layered effects and truly out-of-the-box inspiration.