
A view of the mic closet at Nashville’s County Q studio.
Compare notes with Nashville producer-engineer Mike Purcell, who runs down the essentials of a pro-level home-studio mic collection.
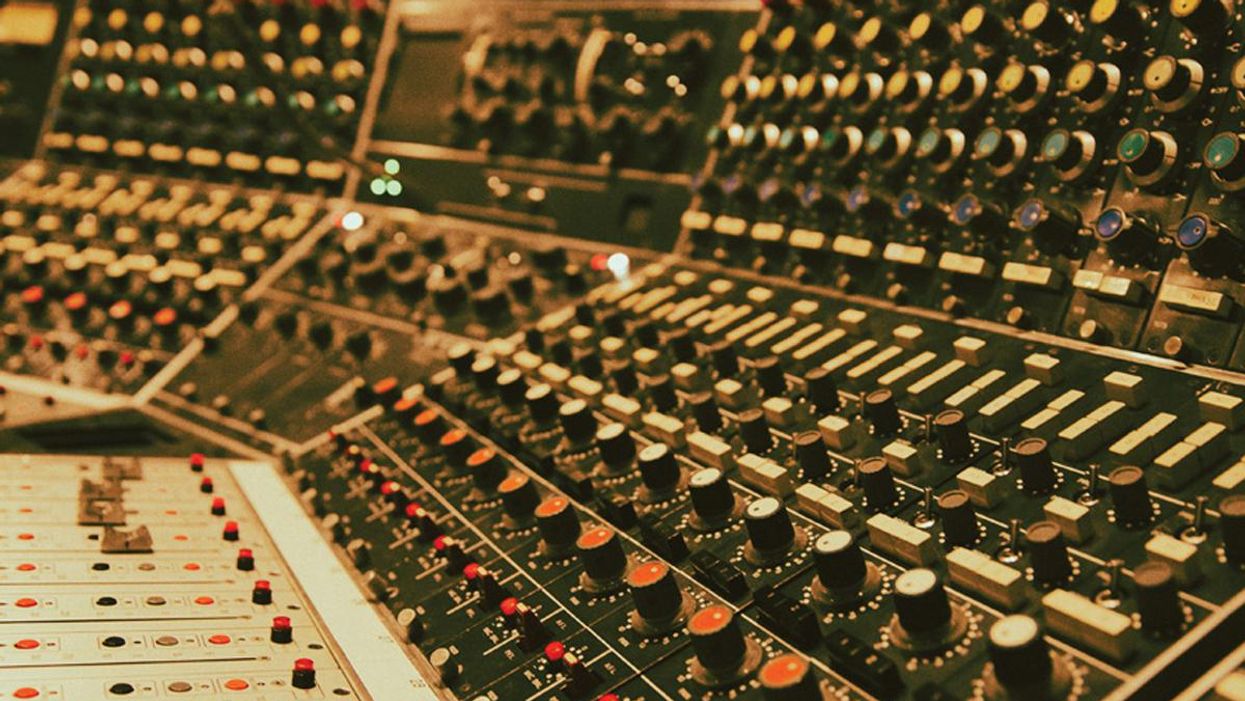
A well-rounded mic closet could take a lifetime to build. I’m constantly trying different things, but there’s always a core set of mics I come back to because they’re reliable and provide good results. Many of these mics work on a wide range of instruments. By knowing my mics, I can make a choice that’s going to enhance the sound of an instrument—especially guitar.
In this story, I’ve listed several options for each mic type covering a range of prices from low to high. A higher cost usually indicates that the quality of components and workmanship are better, leading to a more consistent product. Lower cost generally means quality control isn’t as strict and that mics may differ more from their published specs.
You’ve probably heard this before, but the three main types of mics are dynamic (or moving coil), condenser (or capacitor), and ribbon mics. Let’s work our way through each category.
Dynamic Mics
Dynamic mics are composed of a voice coil suspended in a magnet. Incoming sound moves the voice coil within the magnetic field and a current is created. This is passed through a transformer to step up the voltage, and then sent to a mic preamp.
Dynamic mics are the mainstay of live sound because of their durability and ability to be used on loud sound sources without overloading. These are desirable characteristics in the studio when we’ve got to place mics close to a flailing drummer or mike up a Marshall Super Lead 100 full stack.
Dynamic mics exhibit the following characteristics:
- They are less sensitive to transients and high frequencies (7k and up.) They capture these frequencies, but at a lower level than a condenser.
- They color the sound in the midrange between 3-5k, adding a slight bump in this area.
- On loud sound sources, they exhibit a type of mild compression or soft clipping, useful on amps, drums, and vocals.
- They are cardioid, or unidirectional, and are the most sensitive in the front with maximum rejection off the back. (There are divisions of cardioid: hyper, super, etc. In all cases, they are most sensitive at the front, with rejection off the back or sides.)
- They exhibit a proximity effect. As directional mics are placed closer to a sound source, they pick up more low end, 100 Hz and below. Dynamic mics are designed to use the proximity effect, so as they move farther from a sound source, they will sound thinner.
“Dynamic mics are the mainstay of live sound because of their durability and ability to be used on loud sound sources without overloading.”
Even though dynamics all exhibit these same general characteristics, each mic will color the sound differently. Some dynamic mics work better on drums. They have an increased low-frequency response, a dip in the lower mids, and a bump in the presence range—essentially an EQ curve that sounds good on bass drums and toms. Others may have a more pronounced bump in the upper mids, making them a great choice for guitar amplifiers. While dynamic mics are typically used for the close miking of drums and guitar amplifiers, they are also well-suited to some vocalists.
A well-rounded mic closet in a home studio that cuts four- or five-piece bands would have at least 8 to 10 dynamics. Modern production dynamic mics top out around $600, and most are under $250.
Dynamics mics to consider:
- Shure SM57 ($99 street): The most common mic in the world. It’s cheap, incredibly durable, and sonically consistent from mic to mic. It can take the highest sound pressure level (SPL) you can throw at it and work on any instrument in a pinch. It’s often used for snare drums or guitar amps. Many of Tom Petty’s vocals were recorded with an SM57.
- Shure SM58 ($99 street): The big brother to the SM57. It has a built-in pop filter/windscreen and a slightly different low-end response. There are hundreds of cheap knockoffs of the Shure SM57 and SM58. Stick with the originals and you’ll be much happier over the long run.
- Sennheiser e 609 ($99 street): An inexpensive supercardioid mic. The supercardioid pattern indicates it is much more directional than a cardioid. This can be useful when miking a snare drum, to reject sound off the sides of the mic. The e 609 also has a slightly less harsh frequency response, so can be useful on edgy or bright guitars.
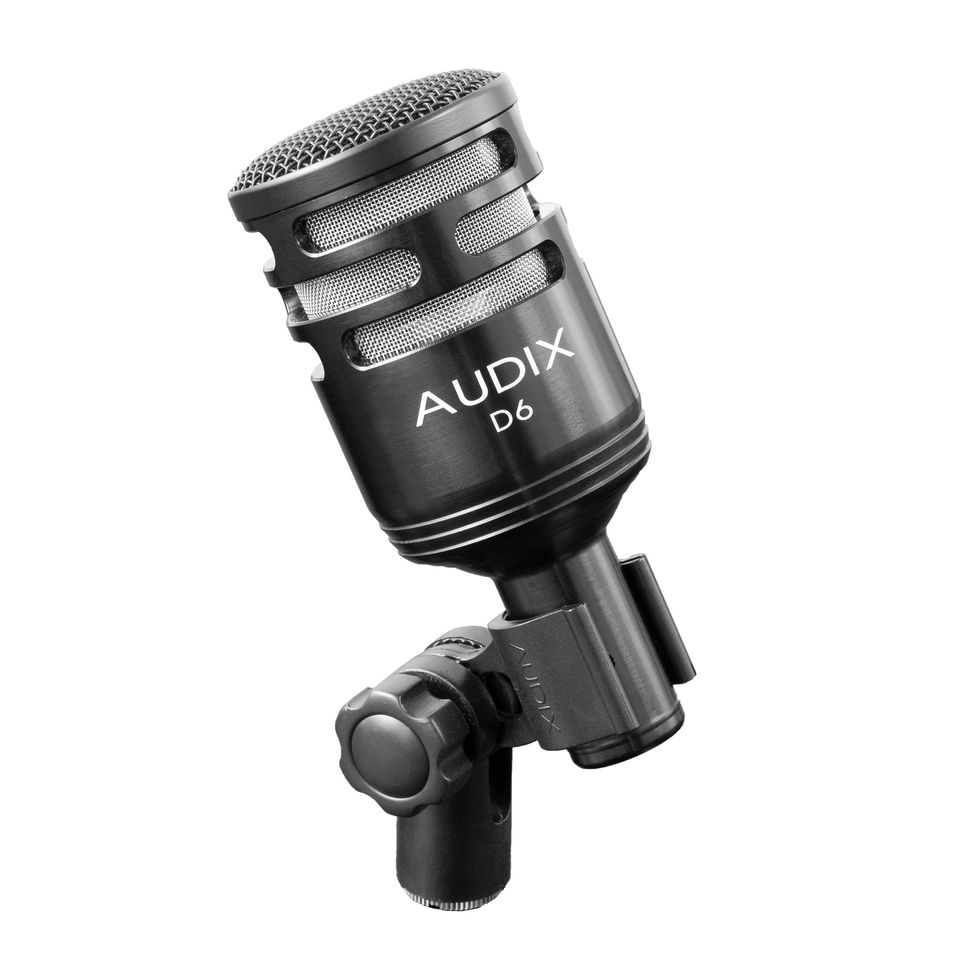
- Shure Beta 52A ($199 street), Audix D6 ($199 street), AKG D112 ($229 street): These are a newer generation of dynamic mics that are designed for bass drums. Plus, they work well on toms—although Audix also makes the D4 and D2, which are tailored towards smaller drum frequencies (rack tom, floor tom). And they work well on bass amplifiers.
- Sennheiser MD 421-II ($399 street): Excellent kick and tom microphone. The frequency response of the 421 works well on drums. It’s also commonly used on guitar amps and vocals.
- Shure SM7B ($399 street): Another variation using the SM57/58 diaphragm, this mic has electronics that allow you to tailor its frequency response. The SM7 is often used in broadcast and is a go-to choice for vocals by rap and metal artists.
Side note: Many manufacturers offer a drum-mic package—a great solution if you’re starting out. These usually include several dynamics for the close mics and a few condensers for the overheads and/or hi-hat. Plus, these mics can also be used for recording other instruments.
Here are a few examples of drum packages:
- Audix FP7 ($399 street): A seven-piece mic kit, with five dynamics and two condensers. Audix also offers larger drum packages.
- Avantone PRO CDMK-8 ($899 street): This eight-piece kit includes five dynamics and three condensers.
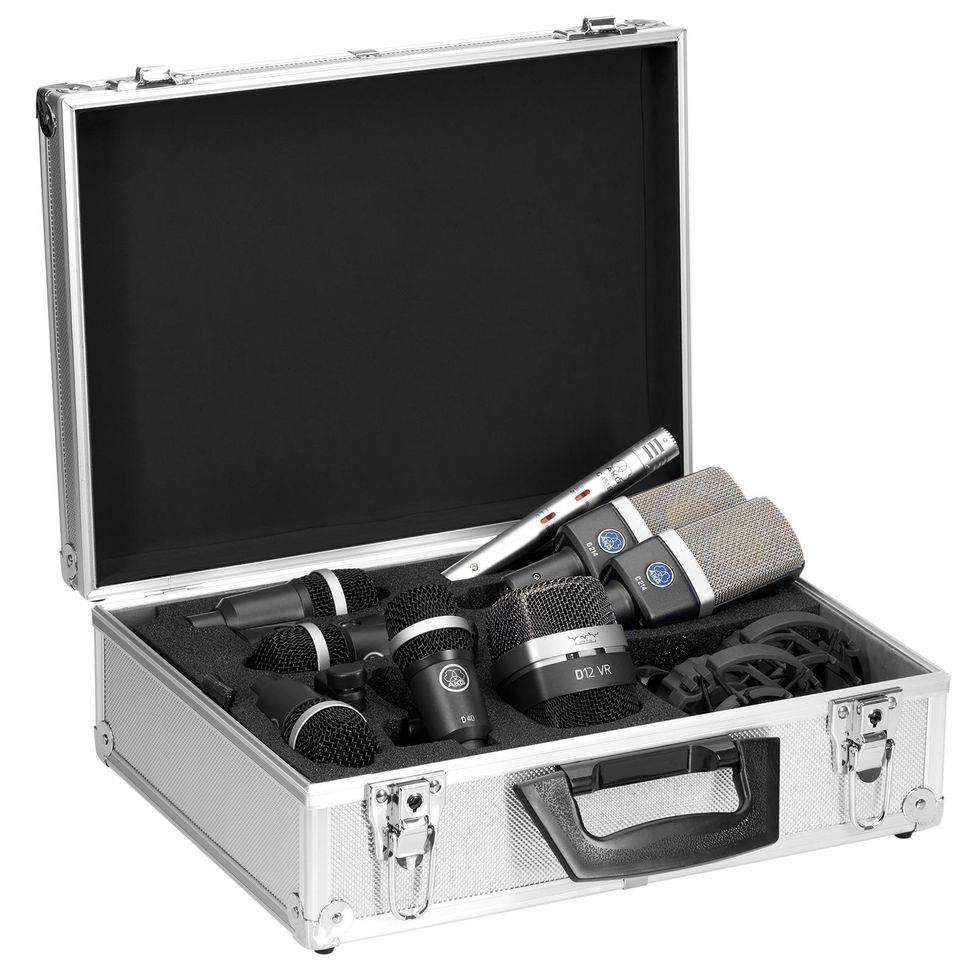
- AKG Drum Set Premium ($2,329 street): Another eight-piece set, with five dynamics and three condensers.
Condenser Mics
Condenser mics consist of a thin, charged diaphragm suspended over a metal plate. As sounds strikes the diaphragm, it moves and causes electrons to flow through the plate. This signal is amplified by internal electronics and passed through a transformer or field-effect transistor (FET) and is sent to a mic preamp.
Condenser mics exhibit these characteristics:
- They are active devices that require a power source, most commonly provided by +48V Phantom Power.
- Some are capable of multiple polar pickup patterns: cardioid, omnidirectional, figure eight, and everything in between.
- They may include a passive attenuation device (PAD), a switchable attenuator that prevents overload when the mic is used on loud sound sources.
- They may include a switchable high-pass filter (HPF), used to roll off unwanted low-end frequencies.
- They are the most sensitive mics, making them ideal for recording quiet instruments.
- They have the widest frequency response and are good at capturing frequencies across the audible spectrum.
- They color sound less than other mics and are good when you want to accurately capture the timbre of an instrument.
Condenser mics are divided into two categories: small diaphragm condensers (SDC) and large diaphragm condensers (LDC). SDCs have a diaphragm of less than 1" and tend to be more responsive to transients and high frequencies. Their off-axis response is also more even.
LDCs have a 1" or greater diaphragm. They sound fuller, but off-axis mic response can be uneven. LDCs, because of their overall size, can be harder to position in tight miking situations.
“Because of their sensitivity and wide frequency response, condenser mics are used for drum overheads and ambience, acoustic stringed instruments, piano, ensembles, amplifiers, and vocals.”
Matched microphone sets require that the frequency response and sensitivity of the two microphones are very similar. This allows them to record a balanced stereo image. So, a well-rounded mic closet will have a matched set of SDCs and LDCs, and a few assorted condensers for other purposes.
SDCs to consider:
- Rode NT5 ($219 single/$429 pair street): Rode is an Australian manufacturer that makes quality products at affordable prices. I’ve been impressed with all their equipment, and the NT5 is no exception.
- Shure SM81 ($399 street): A good, durable utility mic. Inexpensive. Not as open sounding as other SDCs. I use these for snare bottoms and hi-hats. They have a PAD and HPF.
- Warm Audio WA84 ($399 single/$749 pair street): Warm Audio is a relative newcomer to the pro audio world. They’ve been making reproductions of classic gear and offering them at lower prices. In general, I’ve been impressed with the quality of their products. These PAD-equipped mics are their version of the KM-184, at half the cost.
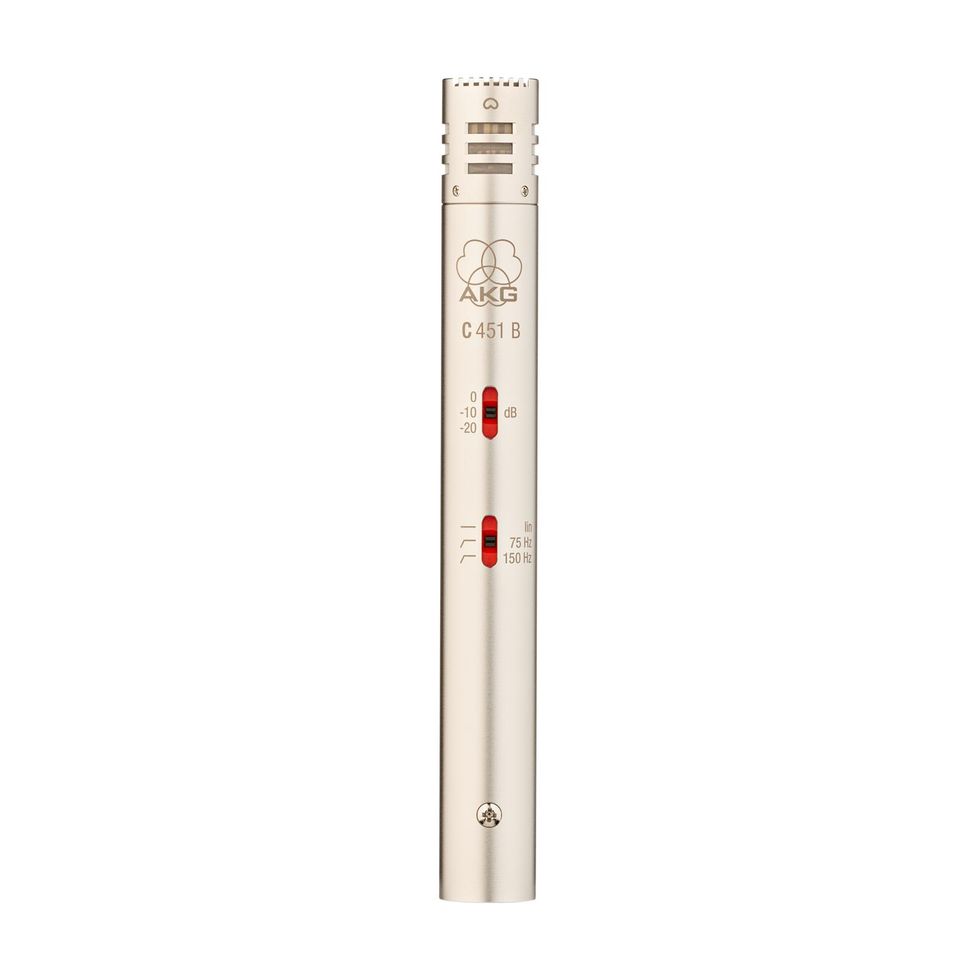
- AKG C451 B ($639 single/$1,395 pair street): Very responsive to transients and can take high SPL. These PAD and HPF mics yield an edgier sound. I love these on mandolin or banjo.
- Miktek C5 ($699 /$1,399 pair street): These mics include a switchable omni capsule, allowing for cardioid and omnidirectional use for spaced pair miking.
- Neumann KM184 ($849 single/$1,595 pair street): Smooth sounding all-around mic with an articulate and defined high-frequency response. One of my favorite go-to mics when I need a stereo recording of an instrument.
LDCs to consider:
With LDCs, manufacturers have families of mics that use the same basic components, but the higher-end mics will offer pattern selection or other features. Within the family, the sound will be similar. Examples are the AKG C214 and C414, and the Shure KSM32 and KSM44.
- Rode NT1000 ($329 street): I am a huge fan of Rode, and the NT1000 routinely beats out more expensive mics for vocals. This cardioid mic is solidly built and big sounding without harshness..
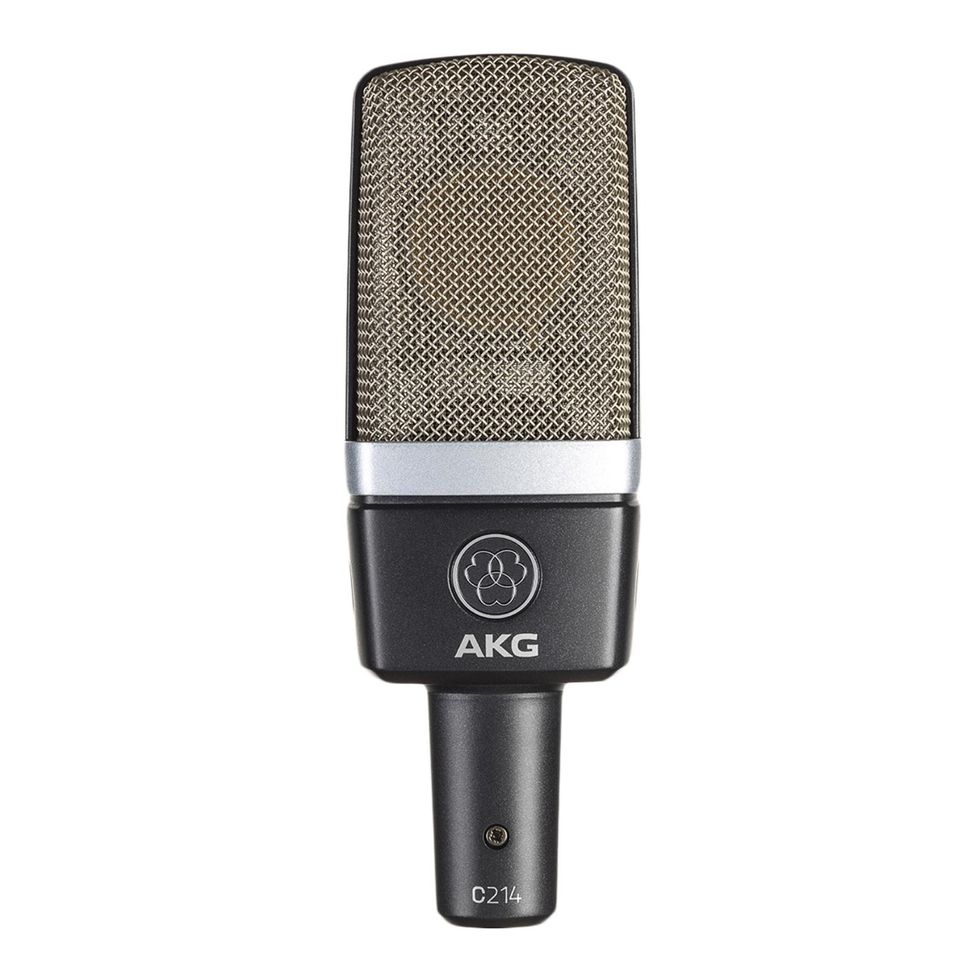
- AKG C214 ($465 street): The little brother to the AKG C414, this cardioid-only example with a PAD and HPF exhibits the same general frequency response, but it doesn’t have all the features of the 414.
- Audio Technica AT4033A ($399 street): One of my favorite inexpensive mics, the 4033 has a pleasant defined midrange and clarity that brings instruments through the mix. These may not be good when trying to capture extended low frequencies. Audio-Technica calls this cardioid mic a medium-diaphragm condenser.
- Miktek C1 and C7e ($599 and $899 street): Miktek is a Nashville-based manufacturer that has developed a line of mics that perform far outside their price class. The C1 has a PAD, HPF, and is cardioid only, while the C7e is multipattern.
- Neumann TLM 103 ($1,195 street): The TLM 103 is a smaller footprint package that utilizes Neumann’s classic U 87 capsule and transformer-less circuitry at a more affordable price. These sound great on vocals and acoustic stringed instruments, if you’re looking for a bigger sound.
- AKG C414 ($1,279 street): The 414 is another industry standard found in many studios. Based on the classic AKG CK12 capsule, the 414 has a wide frequency response. It is bright and present and can sound amazing on some singers and overly bright on others. It works well on pianos and acoustic guitars where you need a sheen on them.
- Neumann U 87 Ai ($3,695 street): The U 87 is a flagship standard that you can find in almost any studio. Multipattern select, HPF and PAD equipped, it’s got a fat low end, smooth high frequencies without harshness, and a thick, musical midrange. An incredibly flexible mic with excellent fidelity, it’s got a price tag to match its functionality. I’ve used these on toms for a huge sound, but you have to really trust the drummer if you’re putting this mic in range of their sticks
Ribbon Mics
Ribbon mics function by suspending a very thin conductive metal strip between two magnets. Sound waves strike the metal strip, causing it to vibrate. The vibration in the magnetic field creates a current in the magnets. This is sent through a transformer, and then the signal is sent to a mic preamp.
“Never run +48V phantom power to a ribbon mic. While most modern ribbons are phantom safe, it can destroy vintage ribbon mics.”
A good mic closet should have several ribbon mics, and possibly more depending on the style of production. Ribbon mics have seen a resurgence over the past 20 years and there is a wide variety available, ranging from $200 to $1,500 and more. Ribbons are used on guitar amps, as drum overhead or room mics, and on horns, acoustic guitars, percussion, and vocals.
Ribbon mics exhibit these characteristics:
- The thin ribbon allows them to be very sensitive to transients.
- They color the sound. They are warm sounding and add character.
- They are the least sensitive type of mic and ill-suited for quiet sound sources.
- They’re very fragile. A puff of wind (or the air coming out of a kick drum) can damage the mic.
- They are bi-directional/figure eight. They pick up sound from the front and back of the mic at the same level. Exceptions exist, like the Beyerdynamic M 160.
- Caution: Never run +48V phantom power to a ribbon mic. While most modern ribbons are phantom safe, it can destroy vintage ribbon mics. (Once again, there are exceptions. Active ribbon mics, like the AEA N22 Nuvo, exist. These do have internal amplification similar to a condenser and require phantom power.)
Ribbon mics to consider:
- Pinnacle Microphones Fat Top ($229/$519 pair street): The Fat Top is a current iteration of the original Cascade Fat Head. I’ve used Fat Heads for years. They’re wonderful on guitar amps and percussion.
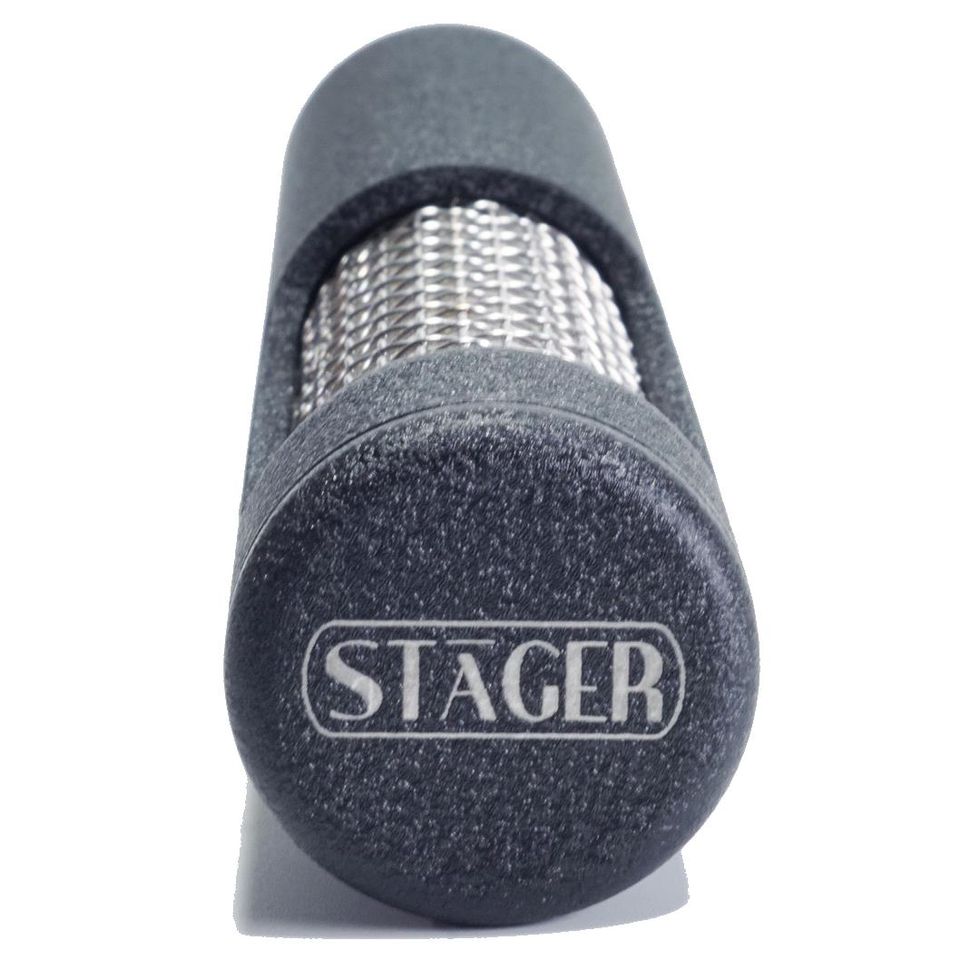
- Stager SR-66/SR-2N ($699/$649 street): Stager Microphones is a small boutique operation in Nashville. They use neodymium magnets in these models, for increased magnetism in a lighter package. The transformers are hand-wound and designed to get the best transfer of sound from ribbon to mic preamp. The SR-66 is a long-ribbon package, offering a flatter frequency response. The SR-2N is a midrange-forward short-ribbon design.
- Coles Electroacoustics 4038 ($1,485 street): The Coles 4038 is designed by the British Broadcasting Corporation in the 1950s and the tech specs have never changed. A lot of work went into engineering this mic. It has a flat frequency response up to 15k and is very responsive to transients.
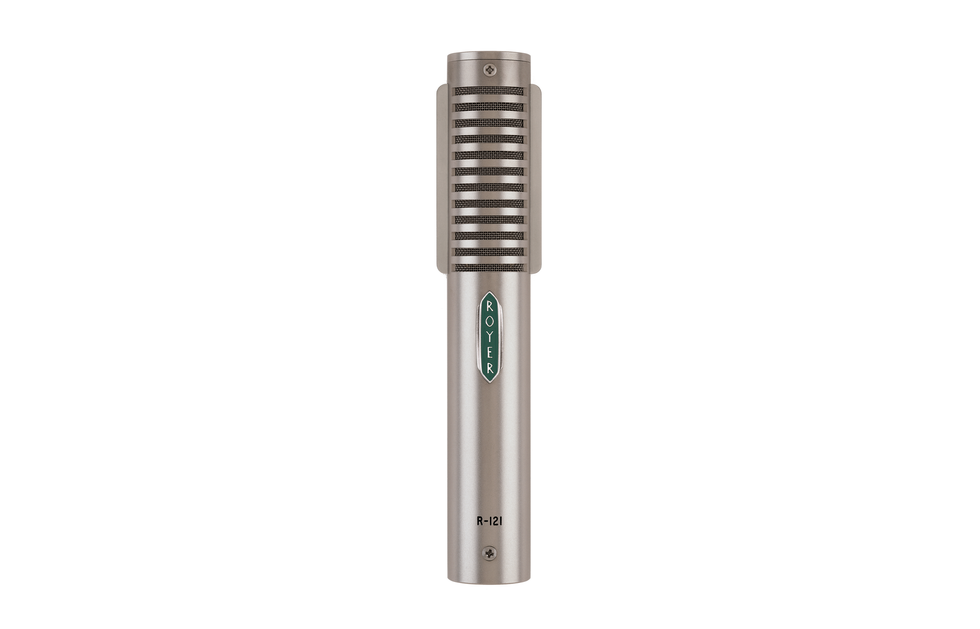
- Royer R-121 ($1,499 street): Royer Labs is one of the best-known manufacturers of ribbon mics. They’ve pioneered innovations in ribbon mic technology that allow them to be used on very loud sound sources without damage to the microphone. The R-121 is one of the most popular mics in existence and exhibits all the classic characteristics of a ribbon mic.
What about tube microphones?
Tube mics are a subset of condenser mics. Up until the 1960s, condensers used a tube for the amplification of the low-level diaphragm signal. Tubes sound nice, but have a lot of issues: heat, high power requirements, and they can suffer from microphonics. In the ’60s, a solid-state replacement for the tube was created: the FET, or field effect transistor. The FET emulates tube characteristics and has two benefits: smaller size and reduced power requirements. The first solid-state condenser mic designs used the same circuit except for the FET substitution, but they sounded different, crisper. They had lost the tube character.
Tube mics are revered for their warmth, wide frequency response, and pleasing sound. They are most commonly used for vocals, but I’ve used them for every instrument. There’s a robust market for inexpensive tube mic modification. Sometimes it’s as easy as swapping a tube, while others do capsule and component level changes. These mods can greatly enhance the sound of an inexpensive tube mic. A good mic closet should have at least one curated tube mic. They start at about $499 and can range upwards of $30,000.
Some manufacturers with tube mics in the below-$1,000 price range include Avantone, Warm Audio, Golden Age, and Lauten Audio. My recommendation is to audition several and find the one that will have the broadest application for your recording situation. They won’t sound exactly like their pricier counterparts, but they’ll give you a flavor in your mic closet that’s only possible with a tube microphone.
Tube mics to consider:
- Mojave MA-300SN ($1,399): Mojave was created by David Royer of Royer Labs. They use quality components for mics that meet exacting standards. The 300SN is a tube large-diaphragm condenser mic. It features a continuously variable pattern select, which ranges from omni to figure eight. The MA300SN has a warm low end with an open top.
- Miktek CV4 ($1,699 street): Miktek’s line of hand-built mics includes this large diaphragm condenser with nine polar patterns. I’ve used these on vocals and stringed instruments with great success.
- Peluso 22 47 SE ($2,149 street): Peluso Microphone Lab is a boutique company that hand builds each mic. The 22 47 is a reproduction of the venerable Neumann U 47. The 22 47 is a great choice for vocals and acoustic instruments, and I find myself using less EQ when recording with this mic. Their interpretations of other classic mics are also available.
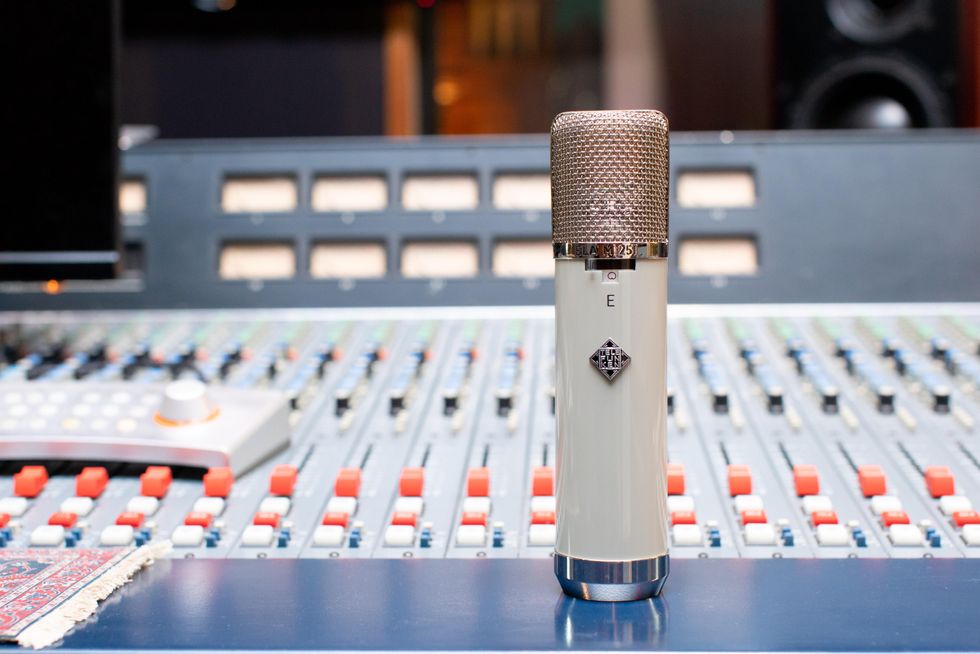
Photo by Nick Sonsini
- Telefunken ELA M 251 (repro: $10,996/vintage: $25,000-plus street): Around 3,700 units of the original 251 were manufactured from 1960 to ’65, but a modern reproduction is available. It has an open top end without harshness, a smooth, rich midrange, and low-end warmth with punchiness. It’s an excellent vocal mic and excels on harmonically rich instruments.
Now, Go Forth and Record
You’ve got to start somewhere when building your mic closet. If you’re not tracking full bands, I’d recommend starting with a couple dynamics (like the SM57) and a set of LDCs. With these mics, you’ll be able to cover basic overdub sessions. From there, borrow mics from friends, explore the world of ribbon and tube mic sounds, and discover what works best for your home studio.
What About DIs?
Direct boxes, or DIs, are an integral part of any studio. They are used to connect (Hi-Z) instruments with low-impedance (Lo-Z) microphone preamps. Hi-Z devices, such as guitars and basses, have 1/4" outputs. The DI provides a 1/4" input to connect to your guitar and an XLR output which connects to a preamp. DIs also have a 1/4" output jack. This is used to pass the signal through the DI and connect to an amplifier. Often, a bass or guitar is recorded to two tracks—one signal from the DI and the other from an amplifier.
There are two types of DIs: passive and active. Passive devices have of an internal transformer that changes the impedance of the signal. Active DIs require a power source for their internal electronics and will have less signal degradation than a passive device. A good home studio should have at least one active DI and two passive DIs.
Modern DAW interfaces usually have built-in Hi-Z inputs via 1/4" jacks that allow you to connect directly to your interface. These negate the need for a DI.
Here are several DI boxes to consider:
- Radial StageBug S-B2 ($89 street): Radial is well known for their technology in direct box design. This is a passive DI with a small footprint.
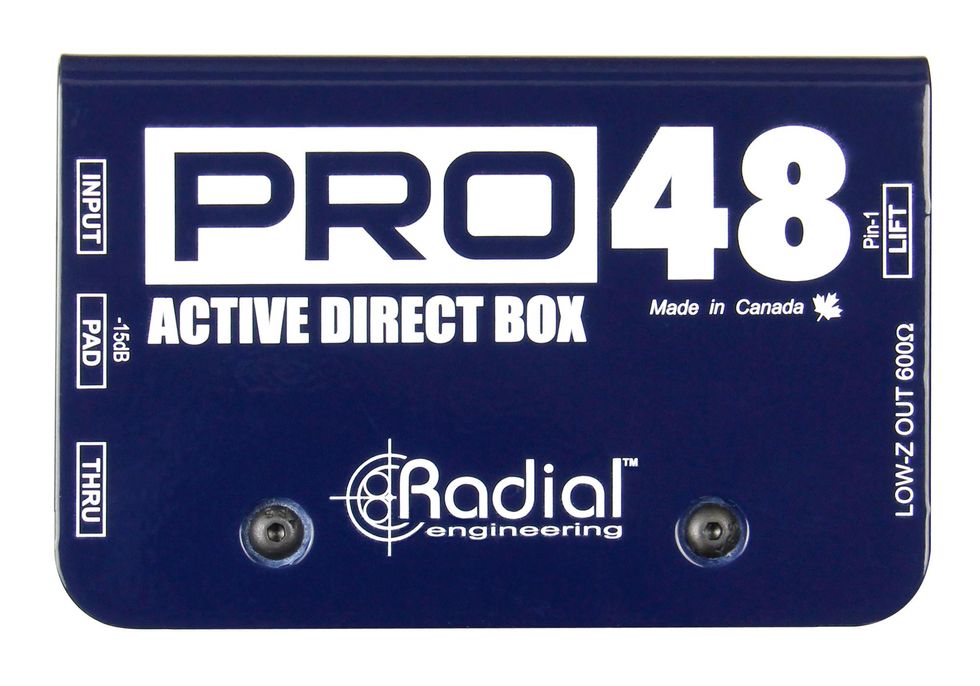
- Radial Pro48 ($129 street): These active devices are full-range DIs with a bandwidth of 20 Hz to 20k.
- Rupert Neve Designs RNDI-1($299 street): Like most Neve designs, this active device is engineered for the highest fidelity audio and sounds great.
Digital Modeling Mics
Digital microphone modeling systems are a relatively new development. They combine a specially designed microphone with modeling software that allows you to record audio that sounds as if you had used a different microphone. The software models a variety of classic or vintage mics. The two frontrunners in this new tech are the Slate Digital VMS Virtual Microphone System and Universal Audio’s Sphere L22 Microphone Modeling System (which was developed in conjunction with Townsend Labs).
They use a sonically transparent microphone designed to interface with their modeling software. The signal is passed from the mic through a neutral mic pre (one that doesn’t color the sound too much) to your DAW input. The plugin is applied to the audio and an output mic model is selected. The result sounds as if it had been recorded with the selected mic.
Slate and UA accomplish this by testing and measuring a microphone’s behavior and mapping that behavior out in software. The software knows the characteristics of the recording mic and processes the audio, applying the differences to the signal. The recorded signal now sounds as if it was recorded with a $20,000 Neumann U 67 (or whichever mic you’ve selected).
The benefit of these systems is that it is non-destructive. Just like amp modeling plugins, there is a dry sound recorded in your DAW, and the processing is applied with a plugin. You have the ability to modify it throughout the recording process, finding the sound that works with your final production.
These systems offer a huge range of sounds and offer mic selections that would not be available in your average home studio. And each system offers a selection of recognized mic models with an established track record.
The lowdown:
• Slate Digital VMS Virtual Microphone System (mic and software $499 street): This system’s ML-2 is a small diaphragm mic. Once recorded, sound is processed via the VMS plugin (compatible with AAX, VST2, VST3, and AU formats). The VMS software includes 13 mic models, ranging from the AKG C12 to the Shure SM7B. Two add-on mic bundles are available for purchase from Slate: Blackbird Mics ($199 street), featuring five mics from Nashville’s Blackbird Studio, and Classic Tubes ($299 street), featuring five modeled mics.
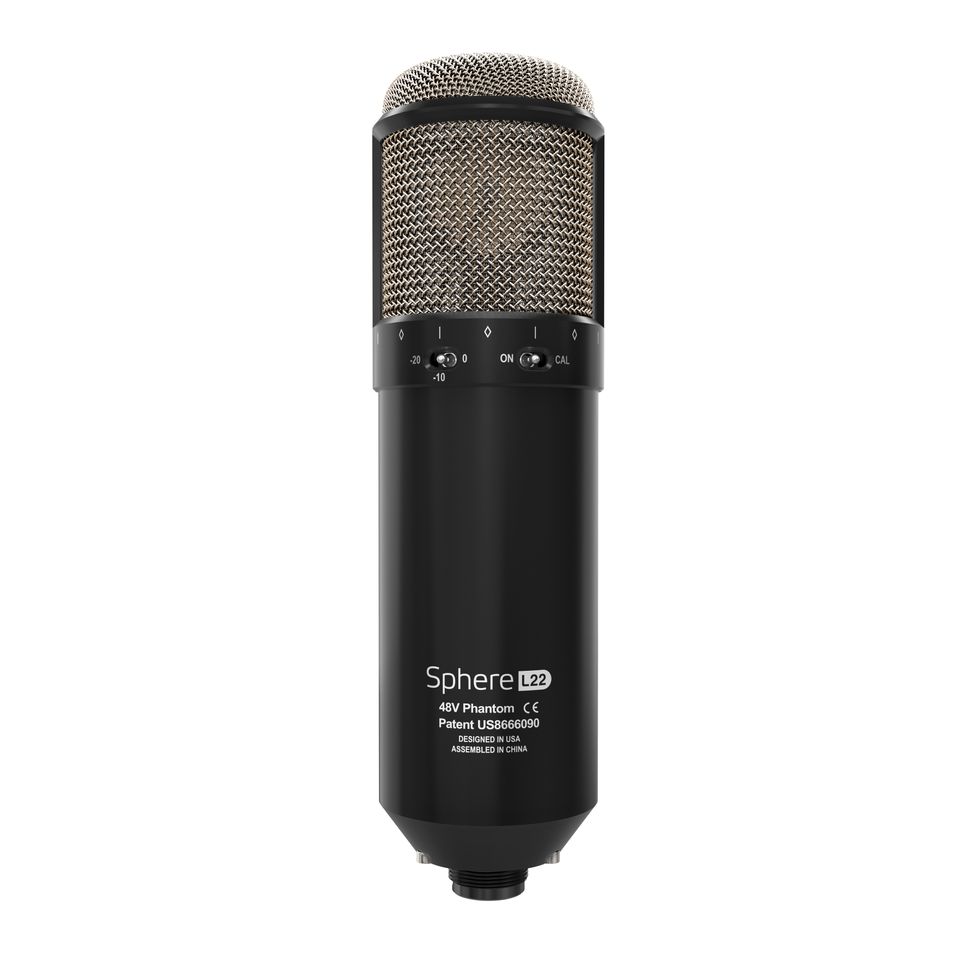
• Universal Audio Sphere L22 Microphone Modeling System ($1,199 to $1,499 street): UA’s Sphere L22 was developed in conjunction with Townsend Labs. The Sphere software works the same as VMS, tuned for the provided mic and offering 34 output mic models.
The Sphere system uses a dual-capsule mic. This allows the software to take the signal from both capsules and create a 3D sonic picture of the modeled microphone. In theory, this should offer off-axis behavior similar to the originals. The mic can use both capsules to create a stereo recording, too.
The software is available in UAD, AAX, VST2, VST3, and AU formats. It offers more tweakable parameters than the VMS. So, if you’re a knob twister and like to fine-tune your sounds, the Sphere is a good choice. The additional controls come with a higher price tag.
- Tone Tips: Modelers vs. Traditional Rigs, Part 2 ›
- Amp Mic’ing vs. Impulse Responses ›
- The Recording Guitarist: Mic Makes Right ›
- Color Coding Sessions Can Save Your Butt - Premier Guitar ›
- How to Get More Out of Your Mics with Modelers - Premier Guitar ›
An easy guide to re-anchoring a loose tuning machine, restoring a “lost” input jack, refinishing dinged frets, and staunching a dinged surface. Result: no repair fees!
Pardon my French, but I’m about to misethe hell out of some en scenein this article about do-it-yourself guitar repair. Buckle-vous up.
The Guitarist is in the middle of double-tracking a solo. It’s not quite right. Creative juices are flowing, but at any moment, the gate could slam shut. Their social media feed is stagnant, and the algorithm thirsts for content. The studio is 80 bucks an hour. That new boutique fuzz pedal would sound great on this track, surely? It would, of course, as these things are the cure for all problems, but it rests just out of reach.
Desperate for a solution, the Guitarist rests their perfect new guitar against the warm tube amp–only for a moment … but a horrible amplified bwaang from wood, string, and concrete’s violent meeting breaks the temporary silence as gravity muscles potential into the kinetic. The Guitarist breathes a defeated “aw, man,” like a loosened balloon farting hopelessly across an empty room. The gate closes, juices no longer loose, locked, impenetrable by any transistor-based effect. And it’s time to assess the damage.”
I bet you saw yourself in the opening scene of Twenty-Four-and-Three-Quarter-Inches of Woe, which may be the title of the screenplay I just started to write, most likely due to the fact that you’ve made a similarly boneheaded mistake with your instrument.
Unfortunately, my storytelling skills didn’t save a nice new Epiphone Casino from sliding off my amp, meeting the floor, and earning some damage on the way down. Yeah, that’s a true story, and I’m sure something similar has happened to you as well. It can happen to anyone who plays guitar for long enough, but there’s no need for despair yet.
If you’ve been victimized by gravity like I have, as long as the damage isn’t major, you can fix a lot of things yourself. I’ll use my felled Casino as an example. It suffered a loosened tuner, an input jack that fell inside the guitar, a damaged fret, and a few dents in the finish. While I work, I’ll provide some suggestions for supplies and tools to keep in your home repair kit, just in case you ever need them.
Tools for the Tasks
We ordered all of the tools we used in these repairs, excluding the painter’s tape and the toothpicks, which we picked up during lunch at Jack’s Bar-B-Que, from StewMac.
The essentials:
• ESP Multi Spanner
• Archtop Guitar Helping Hand
• Guitar Tech Screwdriver Set
• 3 Corner Fret Dressing Files
• Ultra Thin Master Glue
• GluBoost Fill n’ Finish
• Rectangular Sanding Kit
Can’t Tune It like That
First, let’s take care of the loose tuner, since it’s currently in no shape to reliably hold string tension. The tumble knocked it sideways, which loosened the screws holding in the key, which caused the wood around the screws to strip. It’s alarming to see, but this is a very simple fix.
Add to Repair Kit: Round toothpicks, water-thin CA glue, glue applicator tips, safety goggles
[Note: For the unfamiliar, CA is short for cyanoacrylate. It’s commonly referred to as “Super Glue,” but since that is a brand name, not the generic, I’ll refer to it here as “CA glue.”]
First, remove the tuner by backing the screws out, then pull the tuner from the headstock. My Casino’s tuning keys use a press-in bushing to hold the post straight in the headstock, so no further disassembly is required. However, if you experience this issue with a guitar with more modern-styled tuning keys, you’ll need to use an appropriately sized wrench or socket to remove the screw-in bushing before removing the key.
Next, break a toothpick in half, insert the thicker end into the hole where your mounting screw used to be. Break it off flush with the surface, and repeat the process with the other hole.
Safety goggles on: It’s CA glue time. Trust me, you do not want to squirt this stuff into your eye. Fit an applicator tip to the glue bottle and practice your squeeze on a scrap piece of paper or wood, far away from anything you don’t want glued to your guitar or yourself. This stuff is magic—it will bond things you never intended if you aren’t careful.
All you need is a very small drop, so practice until you can confidently flow out just a small controlled amount. Once you’ve mastered that, drop a small amount of water-thin CA glue into each filled hole. It will soak through the toothpick into the surrounding wood just enough for this quick fix. Let it cure for at least 15 minutes, but longer is even better.
Pop the tuner back in and drive the screws straight into the toothpick-filled holes. The screw will compress the toothpick into the existing wood and create new threads strong enough to hold your tuner in place.
Congratulations! You fixed it well enough to at least make it through a session. I’ve done this on several guitars that lasted years with no issues, so you should be confident in your work.
Hit the Road, Jack
Look, there’s no way to sugarcoat this. Fishing an output jack out of a hollowbody guitar is a pain. You can do this. All you need is patience and a few handy gadgets.
Add to Repair Kit: flashlight, multi-spanner, small drywall anchor, “helping hand,” small screwdriver
Your first task is to locate the jack inside the guitar. Odds are it didn’t fall far away from where it needs to be, since it’s probably wired to one of your control potentiometers. Use your flashlight to shine some light inside the f-hole to help find it.
I found mine wedged against the treble side of the rim, a little farther away than I can reach with my fingers. This is not zesty. I am unhappy but equipped and determined.
The tool I described as a “helping hand” becomes useful here. It’s essentially just a bent hook at the end of a handle made out of pliable heavy wire. Several guitar parts suppliers sell something similar. I got mine from StewMac for a reasonable price, but if you want to be thrifty about it, there’s no reason why you can’t cut and bend a wire coat hanger.
Take a few deep breaths, and working through the f-hole, use the hook end of your helping hand to gently pull the output jack back toward where it was mounted. Bend the helping hand however needed to reach the jack as easily as possible.
I managed to pull the jack back enough to put a small screwdriver through the jack’s mounting hole and then through the jack itself. That screwdriver will act as a guide while I lift the jack back into place with the helping hand.
You should expect this will take several attempts. Try not to get frustrated. With enough patience, you’ll be able to get the jack back where it belongs. Once you have the jack in place, carefully thread the washer and nut back onto the jack. It shouldn’t take much effort to thread it back on. Just be careful not to cross-thread the nut.
Now that the nut is threaded on enough so it won’t fall back in, the challenge is to tighten it without twisting the jack itself to avoid breaking any wires. I’ve seen and used a few different methods to accomplish this, but I came across one recently that I really like.
This is where you’ll use your drywall anchor. Get one small enough to fit inside the jack without using too much force, then tighten the screw in the anchor so that it spreads to fit tightly inside the jack. This will hold it steady enough to tighten the nut with a multi-spanner tool or an appropriately-sized wrench.
I like a multi-spanner for this job, because it’s always the right size and is slim enough to not be clumsy for operations like this. Like the helping hand, lots of suppliers sell something similar using different names. Mine is made by ESP and also arrived in my StewMac tool box. I use it all the time for all sorts of tasks.
Once the nut is tightened, unscrew the drywall anchor, remove it, and test the jack for sound by plugging your guitar into an amp. A positive result should be obvious at this point, but if you don’t hear any signal, or an excessive consistent buzz, get in touch with your local repair tech.
Got a Dent In My Fret, Man
Honestly, face-first is probably the best way a guitar like my Casino could have hit the ground. The damage could’ve been far worse. Check any forum for endless complaints about Gibson/Epiphone headstock breaks. But I do need to address some damage to a fret caused during the fall.
The issue here is that plain steel electric guitar strings—like your G, B, and E strings—are considerably harder than most frets (my stainless steel fret contingency, put your hands down and let me finish), so it’s possible for a string to leave a small sharp dent in a fret if you hit it with enough force. This specific issue might go unnoticed until it’s time to bend a note at that fret, then you’ll feel and hear the string catch it. No good.
Before we get started: Having allof your frets carefully levelled, recrowned, and polished is alwaysa better solution than partially levelling just a few frets. But considering the entire premise we’ve constructed, which is a situation where we just want the guitar back in action relatively quickly, a partial fret level on the upper frets is perfectly fine as long as it’s done carefully.
Add to Repair Kit: Crowning file (three-corner or rounded), assortment of sandpaper (400 grit to 800 should be fine), 0000 extra-fine steel wool (optional), fretboard conditioner, permanent marker.
First thing we need to do is identify which frets need the work. Let’s say you have a nick in your 17th fret on the treble side under the B string. The goal is to bring the height of that damaged fret and all the frets past it down until the nick disappears. After that, remove the strings before you begin working.
To accomplish this, mark the damaged frets and all frets past it with a permanent marker. A trusty black Sharpie works great for this, but any darker color works fine. For this repair, we only need to work on the treble side of the frets, so that’s all you need to focus on. Also, use some blue painter’s marking tape to protect the area of the guitar near where you will be working. Small slips of a file or sandpaper can cause some nasty injuries to the guitar’s surface.
Next, level the damaged fret and all frets past it (moving toward the bridge) with something stiff enough to not flex under pressure. I keep an old credit card—a nice sturdy one—with a bit of 400-grit sandpaper glued to one side along the shorter edge, 800 grit on the other side. Start with the 400 and work your way down, being careful not to use too much pressure. Let the sandpaper do the work.
You’ll notice the ink is removed as you sand. The way to make sure you’re keeping everything level is to stop frequently and observe the new clean areas on top of each fret. Each one should be about the same width.
This will take a while. A 400-grit sandpaper does not remove material quickly, 800 grit even less so. I’m suggesting this technique because working slowly makes it more difficult to get yourself in trouble. Several suppliers sell mini files for spot leveling, but I don’t recommend starting there because they remove fret material pretty aggressively.
Eventually you’ll notice the little divot in your 17th fret is almost gone. Now’s time to switch to 800 grit to finish the job. You guessed correctly: This will take even longer, but it’ll leave a nice finish without removing any more material than necessary.
Great! Now you have five flat-topped frets. That won’t sound very good, so now you need to re-crown them, giving them a rounded profile to match the other frets. I like to use a 3-corner file to slowly round over each side of the fret, working from the fretboard up, but if you feel like dropping some serious flow on a specialized crowning file, this job can be a lot easier. Be sure to get the marker back out, ink up each fret, and stop filing when just a tiny sliver of ink is left on top of each fret.
Use a piece of 800 grit paper to remove any file marks and smooth out each fret. If you have finer grits, you could work your way up to 1200 or so, but don’t go too hard or you could undo your work. You just want the frets clean and smooth. At this point, I like the way frets feel after a quick buff with 0000 steel wool, but the mess left behind does rightfully deter a lot of repair techs. If you opt in for this, be sure to tape off your pickups and consider finding a second location for this step.
Work in some fretboard conditioner if you like (skip it if you have a maple or synthetic board; no need for that here), put some new strings on, and check your work. Play every note on these frets, to make sure they ring out without any buzzes. It may not look perfect, but as long as the guitar sounds good, you’re okay until it’s time for a full level/crown/polish job.
Not Finished Until It’s, Uh, Finished
Now for the last souvenir from my Casino’s short journey to the floor. I noticed a few spots along the rim of the guitar where the finish was damaged. Specifically, it looks like the guitar hit something with an edge on the way down hard enough to put a couple of jagged dents in it, right along the binding.
Funny, that’s actually what binding is intended for–protecting edges and corners from damage. Anyway, we need to discuss a few things about guitar finishes.
For the purpose of this article, I’m only going to discuss repairs to the clear coat, since that’s where my damage is. Most guitars now are finished using polyurethane or lacquer for the top clear-coat layer.
Speaking verygenerally, lacquer finishes are softer and less durable, which makes hiding repairs a lot easier if you have the skills and patience. Polyurethane finishes are hard and tough in every way: hard to damage and tough to hide repairs regardless of skills or patience.
I happen to know that my formerly mint-condition Casino has a polyurethane finish, which means I’m going to lower my expectations with this repair. Instead of trying to make it look like it never happened, which will take a lot of work, I’ll just try to keep it from getting worse over time, which will take considerably less work.
It also means I won’t be discussing how to repair lacquer finishes, which is a bit more in-depth, requires a lot more patience and practice, and is therefore not really recommended for the average DIY’er—at least not in the scope of this piece. So if your guitar has a lacquer finish, I don’t think this part applies. Let someone else take care of it, or maybe skip this part and learn to love your guitar as is. The latter is still an admirable move.
Add to Repair Kit: Nothing! You already have what you need from the previous repairs. Feel good about that.
Since the damage is a pronounced dent with sharp edges in the clear coat, all I really need to do is seal it with an appropriate material. And the material appropriate for repairing polyurethane finishes is—you guessed it—CA glue, because it dries hard, clear, and quickly, much like polyurethane.
Step one: Use painter’s masking tape around the area of the damage, just in case the glue runs when applied. Step two: Put glue on the dented finish. CA glue will fill in all the small cracks within the damage and seal the existing finish. Be careful; use the smallest-drop-possible technique you perfected when fixing the tuning peg, and give it plenty of time to dry.
That’s it. That’s all I need to keep the finish from continuing to chip the more I play it. Yes, I saved the easiest one for last, as a little treat.
Obviously, this isn’t a particularly beautiful repair, so I could go above and beyond by using thicker CA glue—for example, GluBoost Fill n’ Finish—to fill it in completely, sand it level, and polish the area back to the original mirror gloss. Dan Erlewine has a few excellent YouTube videos outlining this exact method that are easy to find, and I encourage you to try if you’re so inclined. But for my purposes, this will do.
Accidents will happen if you’re actually playing your guitar, but they’re no cause for panic when they do. Even though the guitar isn’t perfect anymore, it’s perfectly playable, and I can get by with it for now. I broke it, so I fixed it, which is something I hope you feel empowered to do should you break yours.
Next time, I’ll use a good guitar stand.
The least exciting piece of your rig can impact your tone in a big way. Here’s what you need to know.
Hello, and welcome back to Mod Garage. This month, we will have a closer look at an often overlooked part of our guitar signal chain: the guitar cable. We’ll work out what really counts and how your cable’s tonal imprint differs from your guitar’s tone-control function.
Today, the choice of guitar cables is better than it’s ever been, and you can choose between countless options regarding color, stability, plug style, length, diameter, bending strength, shielding, etc. A lot of companies offer high-quality cables in any imaginable configuration, and there are also cables promising special advantages for specific instruments or music styles, from rock to blues to jazz.
Appearance, stability, longevity, bending stiffness, and plug configuration are matters of personal preference, and every guitarist has their own philosophy here, which I think is a great thing. While one player likes standard black soft cables with two straight plugs, their buddy prefers red cables that are stiff as hell with two angled plugs, and another friend swears by see-through coiled cables with golden plugs.
“We often want to come as close as possible to sounding like our personal heroes, but we fail because we’re using the wrong cable for a passive guitar.”
Regarding reliability, all these parameters are important. Who wants a guitar cable making problems every time you are on stage or in the studio? There are also technical parameters like resistance, capacitance, transfer resistance on the plugs, and more. Without making it too technical, we can summarize that, sound-wise, the only important technical parameter for a passive guitar circuit is the capacitance of the cable. Sadly, this information is often missing in the manufacturer’s description of a guitar cable, and there’s another thing we have to keep in mind: Most manufacturers try to offer cables with the smallest possible capacitance so the guitar can be heard “unaltered” and with a “pure” tone. While these are honourable intentions, they are self-defeating when it comes to making a guitar sound right.
Let’s take a trip back to the past and see what cables players used. Until the early 1980s, no one really cared about guitar cables—players simply used whatever was available. In the ’60s and ’70s, you could see a lot of ultra-long coiled cables on stage with players like Clapton, Hendrix, May, Townshend, Santana, and Knopfler, to name just a few. They used whatever was available, plugged in, and played without thinking about it. Ritchie Blackmore, for example, was famous for notoriously using incredibly long cables on stage so he could walk around. Joe Walsh and many other famous players did the same. Many of us have these players’ trademark sounds in our heads, and we often want to come as close as possible to sounding like our personal heroes, but we fail because we’re using the wrong cable for a passive guitar. So what are we talking about, technically?
It’s important not to look at the guitar cable, with its electrical parameters, as a stand-alone device. The guitar cable has to be seen as part of the passive signal chain together with the pickups, the resistance of the guitar’s pots (usually 250k or 500k), the capacitance of the wires inside the guitar, and, of course, the input impedance of the amp, which is usually 1M. The interaction of all these in a passive system results in the resonance frequency of your pickups. If you change one of the parameters, you are also changing the resonance frequency.
”Ritchie Blackmore, for example, was famous for notoriously using incredibly long cables on stage so he could walk around.“
You all know the basic formulation: The longer the cable, the warmer the tone, with “warmer” meaning less high-end frequencies. While this is true, in a few moments you will see that this is only half the truth. Modern guitar cables are sporting a capacitance of around 100 pF each meter, which is very low and allows for long cable runs without killing all the top end. Some ultra-low-capacitance cables even measure down to only 60 pF each meter or less.
Now let’s have a look at guitar cables of the past. Here, capacitances of up to 400 pF or more each meter were the standard, especially on the famous coiled cables. See the difference? No wonder it’s hard to nail an old-school sound from the past, or that sometimes guitars sound too trebly (especially Telecasters), with our modern guitar cables. This logic only applies to our standard passive guitar circuits, like those in our Strats, Teles, Les Pauls, SGs, and most other iconic guitar models. Active guitars are a completely different ballpark. With a guitar cable, you can fine-tune your tone, and tame a shrill-sounding guitar.
“No problem,” some will say. “I simply use my passive tone control to compensate, and that’s it. Come on, capacitance is capacitance!” While this logic seems solid, in reality this reaction produces a different tone. “Why is this?” you will ask. Thankfully, it’s simple to explain. You might be familiar with the typical diagrams showing a coordinate system with "Gain/dB" on the Y-axis and "Frequency/kHz" on the X-axis. Additional cable capacitance will shift the resonance frequency on the X-axis, with possible differences of more than one octave depending on the cable. A cable with a higher capacitance will shift the resonance frequency towards the left and vice versa.
Diagram courtesy Professor Manfred Zollner (https://www.gitarrenphysik.de)
Now let’s see what happens if you use your standard passive tone control. If you close the tone control, the resonance frequency will be shifted downwards mostly on the Y-axis, losing the resonance peak, which means the high frequencies are gone. This is a completely different effect compared to the additional cable capacitance.
Diagram courtesy Professor Manfred Zollner (https://www.gitarrenphysik.de)
To summarize, we can say that with different cable capacitances, you can mimic a lot of different pickups by simply shifting the resonance frequency on the X-axis. This is something our passive tone control can’t do, and that’s exactly the difference you will have to keep in mind.
So, let’s see what can be done and where you can add additional cable capacitance to your system to simulate longer guitar cables.
1. On the cable itself
2. Inside the guitar
3. Externally
In next month’s follow-up to this column, we will talk about different capacitances and how you can add them to your signal chain with some easy-to-moderate modding, so stay tuned!
Until then ... keep on modding!
Do you overuse vibrato? Could you survive without it?
Vibrato is a powerful tool, but it should be used intentionally. Different players have different styles—B.B. King’s shake, Clapton’s subtle touch—but the key is control. Tom Butwin suggests a few exercises to build awareness, tone, and touch.
The goal? Find a balance—don’t overdo it, but don’t avoid it completely. Try it out and see how it changes your playing!
An ode, and historical snapshot, to the tone-bar played, many-stringed thing in the room, and its place in the national musical firmament.
Blues, jazz, rock, country, bluegrass, rap.… When it comes to inventing musical genres, the U.S. totally nailed it. But how about inventing instruments?
Googling “American musical instruments” yields three.
• Banjo, which is erroneously listed since Africa is its continent of origin.
• Benjamin Franklin’s Glass Armonica, which was 37 glass bowls mounted horizontally on an iron spindle that was turned by means of a foot pedal. Sound was produced by touching the rims of the bowls with water-moistened fingers. The instrument’s popularity did not last due to the inability to amplify the volume combined with rumors that using the instrument caused both musicians and their listeners to go mad.
• Calliope, which was patented in 1855 by Joshua Stoddard. Often the size of a truck, it produces sound by sending steam through large locomotive-style whistles. Calliopes have no volume or tone control and can be heard for miles.
But Google left out the pedal steel. While there may not be a historical consensus, I was talking to fellow pedal-steel player Dave Maniscalco, and we share the theory that pedal steel is the most American instrument.
Think about it. The United States started as a DIY, let’s-try-anything country. Our culture encourages the endless pursuit of improvement on what’s come before. Curious, whimsical, impractical, explorative—that’s our DNA. And just as our music is always evolving, so are our instruments. Guitar was not invented in the U.S., but one could argue it’s being perfected here, as players from Les Paul to Van Halen kept tweaking the earlier designs, helping this one-time parlor instrument evolve into the awesome rock machine it is today.
Pedal steel evolved from lap steel, which began in Hawaii when a teenage Joseph Kekuku was walking down a road with his guitar in hand and bent over to pick up a railroad spike. When the spike inadvertently brushed the guitar’s neck and his instrument sang, Kekuku knew he had something. He worked out a tuning and technique, and then took his act to the mainland, where it exploded in popularity. Since the 1930s, artists as diverse as Jimmie Rodgers and Louis Armstrong and Pink Floyd have been using steel on their records.“The pedal steel guitar was born out of the curiosity and persistence of problem solvers, on the bandstand and on the workbench.”
Immigrants drove new innovations and opportunities for the steel guitar by amplifying the instrument to help it compete for listeners’ ears as part of louder ensembles. Swiss-American Adolph Rickenbacker, along with George Beauchamp, developed the first electric guitar—the Rickenbacker Electro A-22 lap steel, nicknamed the Frying Pan—and a pair of Slovak-American brothers, John and Rudy Dopyera, added aluminum cones in the body of a more traditional acoustic guitar design and created resophonic axes. The pedal steel guitar was born out of the curiosity and persistence of problem solvers, on the bandstand and on the workbench.
As the 20th century progressed and popular music reflected the more advanced harmonies of big-band jazz, the steel guitar’s tuning evolved from open A to a myriad of others, including E7, C6, and B11. Steel guitarists began playing double-, triple-, and even quadruple-necked guitars so they could incorporate different tunings.
In Indianapolis, the Harlan Brothers came up with an elegant solution to multiple tunings when they developed their Multi-Kord steel guitar, which used pedals to change the tuning of the instrument’s open strings to create chords that were previously not possible, earning a U.S. patent on August 21, 1947. In California, equipped with knowledge from building motorcycles, Paul Bigsby revolutionized the instrument with his Bigsby steel guitars. It was on one of these guitars that, in early 1954, Bud Isaacs sustained a chord and then pushed a pedal down to bend his strings up in pitch for the intro of Webb Pierce’s “Slowly.” This I–IV movement became synonymous with the pedal-steel guitar and provided a template for the role of the pedal steel in country music. Across town, church musicians in the congregation of the House of God Keith Dominion were already using the pedal steel guitar in Pentecostal services that transcended the homogeneity of Nashville’s country and Western clichés.
Pedal steels are most commonly tuned in an E9 (low to high: B–D–E–F#–G#–B–E–G#–D#–F#), which can be disorienting, with its own idiosyncratic logic containing both a b7 and major 7. It’s difficult to learn compared to other string instruments tuned to regular intervals, such as fourths and fifths, or an open chord.
Dave Maniscalco puts it like this: “The more time one sits behind it and assimilates its quirks and peculiarities, the more obvious it becomes that much like the country that birthed it, the pedal steel is better because of its contradictions. An amalgamation of wood and metal, doubling as both a musical instrument and mechanical device, the pedal steel is often complicated, confusing, and messy. Despite these contradictions, the pedal-steel guitar is a far more interesting and affecting because of its disparate influences and its complex journey to becoming America’s quintessential musical instrument.”