For players used to really big sounds, compact high-gain tube combo amps sometimes seem to demand too many tradeoffs to make the convenience and portability worth it. If you’re
For players used to really big sounds, compact high-gain tube combo amps sometimes seem to demand too many tradeoffs to make the convenience and portability worth it. If you’re used to pushing air with a 4X12, the relative lack of clarity and punch at high volumes and low headroom that you get from a 1X12 can feeling like you’re missing an arm—even if it’s still really dang loud.
With the Machete—Fender's newest addition to their Pro Tube series of amps—the aim is dish blisteringly aggressive tones from a 50 watt, dual-channel combo without sacrificing the range players get from big cabinets. And Fender achieves a lot of this versatility by making it one of the most tunable amps the company has ever built.
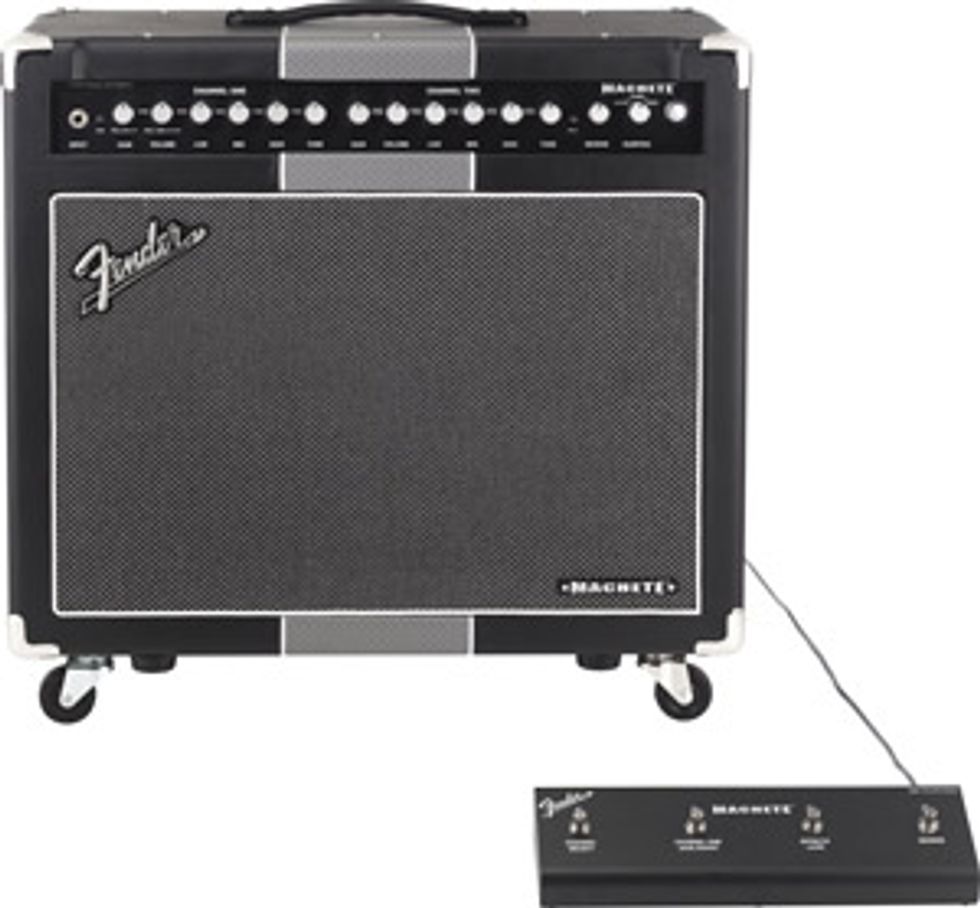
Bullitt-Head
The Machete is styled like a ’60s muscle car, with a sleek, black vinyl covering and a grey vinyl racing stripe that looks like it was fashioned from a steering wheel grip. 50 watts of dual-6L6GC power are pumped through a single 12” Celestion Vintage 30 speaker, which is mounted in the combo’s semi-open back cabinet. Instead of using a back panel that extends halfway down the back of the cabinet, Fender opted for a gap that’s only about four inches tall, which seems to serve primarily as ventilation for the amp’s dual power tubes. The preamp is driven via five 12AX7 tubes and a 12AT7 that works as a phase splitter to keep the preamp’s signal tight and focused.
The Machete’s two channels each have dedicated three-band EQ, preamp gain, master volume, and Notch controls. The Notch control is designed to sweep through a wide spectrum of midrange settings, enabling you to more precisely tune the amp to the guitar that you’re using. For example, if you’d like to add a little more raunch and midrange presence to your single-coil equipped guitar, moving the Notch knob up will get you there. Guitars with heavy natural mids like a humbucker-equipped Les Paul can be made sharper and crisper with a less aggressive notch setting.
The Clean channel’s preamp gain and volume controls double as Pull Bright and Pull Gain Boost features respectively. And players who use active pickups can breathe a sigh of relief with the amp’s 6db input attenuation switch, which helps keep the signal clearer for low impedance signals. The digital reverb is controlled by a single control for both channels. Finally, a control for setting the level of speaker damping sits near the end of the panel, and it’s one of the real keys to the Machete’s performance—making the amp feel and sound tighter and punchier, or more loose and harmonically driven depending on how you set it up.
The Machete's features don't end on the front panel. There's an effects loop with individual send and return level controls on the back panel, which can also be set as a switchable lead boost by connecting both the jacks together with a patch cable—adding up to 12db of gain when engaged. Pressing the PA Mute switch disables the tube power amp output completely, giving the player the option of using their favorite power amp if they choose to. There's also an XLR line out jack, which enables you to run the Machete directly into a mixing console, along with cabinet emulation via a small switch next to the jack. The amp can also be controlled via MIDI, and there’s a four-button footswitch for channel switching and engaging the boost on channel one, effects loop, and reverb.
Top Gear
To put it succinctly, the Machete isn't the type of Fender amp most Fender-philes will expect. It has a great clean channel, no surprise give its family heritage. But the overdrive capabilities are about as far from the sparkly, low gain, super-clear snap that put the Bassman and Twin Reverb on the map. The Machete really enjoys living on the edge of thick, molten gain and meaty, defined grit.
Clean things first, though. The clean channel’s tone is clear, even and not a bit over-compressed. At its essence the voice is akin to a Twin Reverb with more midrange presence and a softer attack. But you can get a lot of range out of the super-sensitive controls, and even the slightest movements of each of the EQ knobs had a rather substantial effect on the tone. A Gibson SG’s neck pickup initially sounded way too bassy, but one slight adjustment of the Bass control was all it took to tame it. Most amps in my experience would have taken a much more dramatic adjustment.
When I felt like the tone wasn’t as cutting as I liked, careful adjustment of the channel's Notch control let me set the midrange curve with ease. The amp's Damping control, also came in handy when I wanted to add or subtract presence in the high end. Moving it towards Loose gave the highs more bite and lent some sag in the mids, and further adjustments towards Tight dulled the high end and tightened up the lows.
Lest you have any doubts about the amp's onboard digital reverb ( or questions about why Fender would forgo one of their most famous trademarks—deep and rich spring reverberation—for a digital replication) the reverb is spectacular, with a very wide, expansive and all-encompassing if you need it that way. It will fill the room for atmospheric tunes like Radiohead's "Subterranean Homesick Alien” with the control set at just 10 o'clock and beyond that you can get into deep space realms that are great for Adrian Belew’s volume swells on King Crimson's "Matte Kudasai".
Ratings
Pros:
Super-smooth voicing. Sensitive controls. Great reverb.
Cons:
Expensive.
Tones:
Ease of Use:
Build:
Value:
Street:
$1,900
Company
fender.com
The Machete's second channel is what really sets it apart from the rest of Fender's amp line. The near-fire-breathing, muscular gain is a real surprise, and there's more than enough gain on this amp to satisfy the most demanding metalheads. I never really needed to move the Gain control past 11 o'clock for stuff as heavy as Alice in Chains riffs. Gain settings higher than three o'clock give the distortion an almost a square-wave, fuzzy quality that’s perfect for smooth and aggressive Santana-style lines. The tightest and most focused high-gain sounds come from keeping the control below the 12 o’clock setting. This is most definitely not an amp for a kid that expects bone-crushing metal rhythms from diming the gain.
Channel Two also is much more sensitive than Channel One to adjustments of the amp's Tuning control—an indispensable tool for getting different tones without having to touch any of the other controls. After setting all of the EQ controls and Notch control at noon, the Gain at 10:30 and dropping the Mid knob slightly, I had a killer hard rock rhythm tone to build upon. But moving the Tuning knob closer to Loose added much more bite and snarl to the high end while loosening up the lows and mids—effectively browning the sound. Turning the control the other direction tightened up the tone, though I needed to add a little high end via the EQ section in this instance. The sound and feel are not the same as the high-end bump you get from a looser speaker setting. But finding the right balance between speaker tuning and EQ will really help open up your guitar’s voice.
The Verdict
Fender's sleek 1x12 Machete combo has a lot to offer players who need to move between crystal cleans and bristling gain and favor a more modern voice in general. The Tuning and Notch controls make the amplifier a much more sensitive and versatile machine. And while the amp can go completely over the top with its overdrive, it’s smooth, harmonically rich, and big at moderate settings. And given that all this comes in a beautifully built and killer-looking combo that you can get in the trunk of your car, this is an amp that is arguably much, much more than the sum of its parts.
Watch our video review:
This Japan-made Guyatone brings back memories of hitchin’ rides around the U.S.
This oddball vintage Guyatone has a streak of Jack Kerouac’s adventurous, thumbing spirit.
The other day, I saw something I hadn’t noticed in quite some time. Driving home from work, I saw an interesting-looking fellow hitchhiking. When I was a kid, “hitchers” seemed much more common, but, then again, the world didn’t seem as dangerous as today. Heck, I can remember hitching to my uncle’s cabin in Bradford, Pennsylvania—home of Zippo lighters—and riding almost 200 miles while I sat in a spare tire in the open bed of a pickup truck! Yes, safety wasn’t a big concern for kids back in the day.
So, as I’m prone to do, I started digging around hitchhiking culture and stories. Surprisingly, there are organized groups that embrace the hitching life, but the practice remains on the fringe in the U.S. Back in the 1950s, writer Jack Kerouac wrote the novel On the Road, which celebrated hitchhiking and exposed readers to the thrill of maverick travel. Heck, even Mike Dugan (the guitarist in all my videos) hitched his way to California in the 1960s. But seeing that fellow on the side of the road also sparked another image in my brain: Yep, it always comes back to guitars.
Let me present to you a guitar that’s ready to go hitching: the Guyatone LG-180T, hailing from 1966. The “thumbs-up” headstock and the big “thumb” on the upper bout always made me think of thumbing a ride, and I bought and sold this guitar so long ago that I had forgotten about it, until I saw that hitchhiking dude. Guyatone was an interesting Japanese company because they were primarily an electronics company, and most of their guitars had their wooden parts produced by other factories. In the case of the LG-180T, the bodies were made by Yamaha in Hamamatsu, Japan. At that time, Yamaha was arguably making the finest Japanese guitars, and the wood on this Guyatone model is outstanding. We don’t often see Guyatone-branded guitars here in the U.S., but a lot of players recognize the early ’60s label Kent—a brand name used by an American importer for Guyatone guitars.
With a bit of imagination, the LG-180T’s “thumbs up” headstock seems to be looking for a roadside ride.
Kent guitars were extremely popular from the early ’60s until around 1966. The U.S. importer B&J fed the American need for electric guitars with several nice Kent models, but when the Guyatone contract ended, so did most of the Kent guitars. After that, Guyatone primarily sold guitars in Japan, so this example is a rare model in the U.S.
“Unless you are a master at guitar setups, this would be a difficult player.”
This headstock is either the ugliest or the coolest of the Guyatone designs. I can’t decide which. I will say, no other Japanese guitar company ever put out anything like this. You have to give the Guyatone designers a thumbs up for trying to stand out in the crowd! Guyatone decided to forgo an adjustable truss rod in this model, opting instead for a light alloy non-adjustable core to reinforce the neck. Speaking of the neck, this instrument features the most odd-feeling neck. It’s very thin but has a deep shoulder (if that makes any sense). Totally strange!
Another strange feature is the bridge, which offers very little adjustment because of the three large saddles, which sort of rock back and forth with the tremolo. It’s a shame because these pickups sound great! They’re very crisp and have plenty of zing, but unless you are a master at guitar set-ups, this would be a difficult player.
This could be why the LG-180T only appeared in the 1966 and 1967 catalogs. After that, it disappeared along with all the other Yamaha-made Guyatone electrics. By 1969, Guyatone had gone bankrupt for the first time, and thus ended guitar production for a few decades. At least we were blessed with some wacky guitar designs we can marvel at while remembering the days when you could play in the back end of an explosive 1973 AMC Gremlin while your mom raced around town. Two thumbs up for surviving our childhoods! PG
Fifteen watts that sits in a unique tone space and offers modern signal routing options.
A distinct alternative to the most popular 1x10 combos. Muscular and thick for a 1x10 at many settings. Pairs easily with single-coils and humbuckers. Cool looks.
Tone stack could be more rangeful.
$999
Supro Montauk
supro.com
When you imagine an ideal creative space, what do you see? A loft? A barn? A cabin far from distraction? Reveling in such visions is inspiration and a beautiful escape. Reality for most of us, though, is different. We’re lucky to have a corner in the kitchen or a converted closet to make music in. Still, there’s a romance and sense of possibility in these modest spaces, and the 15-watt, 1x10, all-tubeSupro Montauk is an amplifier well suited to this kind of place. It enlivens cramped corners with its classy, colorful appearance. It’s compact. It’s also potent enough to sound and respond like a bigger amp in a small room.
The Montauk works in tight quarters for reasons other than size, though—with three pre-power-section outputs that can route dry signal, all-wet signal from the amp’s spring reverb, or a mixture of both to a DAW or power amplifier.
Different Stripes and Spacious Places
Vintage Supro amps are modestly lovely things. The China-made Montauk doesn’t adhere toold Supro style motifs in the strictest sense. Its white skunk stripe is more commonly seen on black Supro combos from the late 1950s, while the blue “rhino hide” vinyl evokes Supros from the following decade. But the Montauk’s handsome looks make a cramped corner look a lot less dour. It looks pretty cool on a stage, too, but the Montauk attribute most likely to please performing guitarists is the small size (17.75" x 16.5" x 7.5") and light weight (29 pounds), which, if you tote your guitar in a gig bag and keep your other stuff to a minimum, facilitates magical one-trip load ins.
Keen-eyed Supro-spotters noting the Montauk’s weight and dimensions might spy the similarities to another 1x10 Supro combo,the Amulet. A casual comparison of the two amps might suggest that the Montauk is, more-or-less, an Amulet without tremolo and power scaling. They share the same tube complement, including a relatively uncommon 1x6L6 power section. But while the Montauk lacks the Amulet’s tremolo, the Montauk’s spring reverb features level and dwell controls rather than the Amulet’s single reverb-level knob.
“High reverb levels and low dwell settings evoke a small, reflective room with metallic overtones from the spring sprinkled on top—leaving ghostly ambience in the wake of strong, defined transient tones.”
If you use reverb a lot and in varying levels of intensity, you’ll appreciate the extra flexibility. High reverb levels and low dwell settings evoke a small, reflective room with metallic overtones from the spring sprinkled on top—leaving ghostly ambience in the wake of strong, defined transient tones. There are many shades of this subtle texture to explore, and it’s a great sound and solution for those who find the spring reverbs in Fender amps (which feature no dwell control) an all-or-nothing proposition. For those who like to get deep in the pipeline, though, the dwell offers room to roam. Mixing high level and dwell settings blunts the amp’s touch sensitivity a bit, and at 15 watts you trade headroom for natural compression, compounding the fogginess of these aggressive settings. A Twin Reverb it ain’t. But there is texture aplenty to play with.
A Long, Wide Strand
Admirably, the Montauk speaks in many voices when paired with a guitar alone. The EQ sits most naturally and alive with treble and bass in the noon-to-2-o’clock region, and a slight midrange lean adds welcome punch. Even the amp’s trebliest realms afford you a lot of expressive headroom if you have enough range and sensitivity in your guitar volume and tone pots. Interactions between the gain and master output controls yield scads of different tone color, too. Generally, I preferred high gain settings, which add a firecracker edge to maximum guitar volume settings and preserve touch and pick response at attenuated guitar volume and tone levels.
If working with the Montauk in this fashion feels natural, you’ll need very few pedals. But it’s a good fit for many effects. A Fuzz Face sounded nasty without collapsing into spitty junk, and the Klon-ish Electro-Harmonix Soul Food added muscle and character in its clean-boost guise and at grittier gain levels. There’s plenty of headroom for exploring nuance and complexity in delays and modulations. It also pairs happily with a wide range of guitars and pickups: Every time I thought a Telecaster was a perfect fit, I’d plug in an SG with PAFs and drift away in Mick Taylor/Stones bliss.
The Verdict
Because the gain, master, tone, and reverb controls are fairly interactive, it took me a minute to suss out the Montauk’s best and sweetest tones. But by the time I was through with this review, I found many sweet spots that fill the spaces between Vox and Fender templates. There’s also raunch in abundance when you turn it up. It’s tempting to view the Montauk as a competitor to the Fender Princeton and Vox AC15. At a thousand bucks, it’s $400 dollars less than the Mexico-made Princeton ’68 Custom and $170 more than the AC15, also made in China. In purely tone terms, though, it represents a real alternative to those stalwarts. I’d be more than happy to see one in a backline, provided I wasn’t trying to rise above a Geezer Butler/Bill Ward rhythm section. And with its capacity for routing to other amps and recording consoles in many intriguing configurations, it succeeds in being a genuinely interesting combination of vintage style and sound and home-studio utility—all without adding a single digital or solid-state component to the mix.
Watch the official video documenting the sold-out event at House of Blues in Anaheim. Join Paul Reed Smith and special guests as they toast to quality and excellence in guitar craftsmanship.
PRS Guitars today released the official video documenting the full night of performances at their 40th Anniversary celebration, held January 24th in conjunction with the 2025 NAMM (The National Association of Music Merchants) Show. The sold-out, private event took place at House of Blues in Anaheim, California and featured performances by PRS artists Randy Bowland, Curt Chambers, David Grissom, Jon Jourdan, Howard Leese, Mark Lettieri Group, Herman Li, John Mayer, Orianthi, Tim Pierce, Noah Robertson, Shantaia, Philip Sayce, and Dany Villarreal, along with Paul Reed Smith and his Eightlock band.
“What a night! Big thanks to everyone who came out to support us: retailers, distributors, vendors, content creators, industry friends, and especially the artists. I loved every second. We are so pleased to share the whole night now on this video,” said Paul Reed Smith, Founder & Managing General Partner of PRS Guitars. “I couldn’t be more proud to still be here 40 years later.”
With nearly 1,400 of the who’s who in the musical instrument industry in attendance, the night ended with a thoughtful toast from PRS Signature Artist John Mayer, who reflected on 40 years of PRS Guitars and the quality that sets the brand apart. “The guitars are great. You can’t last 40 years if the guitars aren’t great,” said Mayer. “Many of you started hearing about PRS the same way I did, which is you would talk about PRS and someone would say ‘They’re too nice.’ What’s too nice for a guitar? What, you want that special vibe that only tuning every song can give you on stage? You want that grit just like your heroes … bad intonation? The product is incredible.”
Be sure to locate your sample library where it can be quickly referenced on your DAW.
Improve your recordings using your own samples. Bryan Clark, house producer at Nashville’s Blackbird Studio, tells you how to take the final steps in building your own sample library.
Mastering the sample import process in your chosen DAW can significantly enhance your creativity and streamline your workflow. With a clear understanding of the tools and techniques available, you will be better equipped to bring your musical ideas to life and make your productions stand out.
This month, we finish up a three-part series on creating your own sample libraries. In this final installment, I’m going to give you the basic ways to import your samples into various popular DAWs. Each one has its unique workflow and user interface, but the fundamental process remains very similar. This Dojo guide will cover how to import samples into Ableton Live, LUNA, Logic Pro, Pro Tools, and Studio One.
Ableton Live
Steps to Import Samples
Drag and Drop: Simply locate the sample file in your computer’s file explorer, then drag and drop it directly into an audio track in the session or arrangement view.
Browser Window: Use Ableton’s built-in browser (on the left-hand side). Navigate to the sample’s location on your hard drive, then drag it into the workspace.
Create a Simpler or Sampler Instrument: Drag the sample into a MIDI track with Simpler or Sampler loaded. This allows you to trigger the sample using MIDI notes.
Tips: Use the warp feature for time-stretching and syncing samples to your project’s tempo.
Organize your samples into collections using the “Add Folder” option in the browser.
LUNA
Steps to Import Samples
Drag and Drop: Drag the sample from your file explorer directly into the timeline. Then hold the CTRL key down, click on the end of the loop, and drag it to the length it needs to be.
Browser/Workspace: Use the media browser to navigate to your sample’s location on your hard drive. Drag it into an audio track in your session.
Audio Track Import: Right-click on an empty area in the timeline or a track and select “Import Audio” to locate and add your sample.
Tips: Use LUNA’s built-in varispeed capabilities to match your sample to the session’s tempo.Logic Pro
Steps to Import Samples
Drag and Drop: Drag the sample from the Finder directly into an audio track in the workspace.
File Browser: Use the file browser (accessible via the media sidebar or “F” key) to locate and drag samples into the timeline.
Quick Sampler: Drag your sample onto a MIDI track with the Quick Sampler plugin loaded. This lets you play the sample chromatically.
Tips: Use Logic’s flex time feature to sync samples to your project’s tempo. Organize samples into Logic’s library for quick access.Pro Tools
Steps to Import Samples
Import Audio Dialog: Go to File > Import > Audio; then locate your sample and click “Convert” or “Add” to bring it into the session.
Drag and Drop: Drag the sample directly from your file explorer into an audio track.
Workspace Browser: Use the workspace (accessible via Window > New Workspace) to locate your sample. Drag it into your session.
Tips: Use the elastic audio feature for tempo matching and pitch adjustments.
Place your samples into playlists for efficient access during editing.
Studio One
Steps to Import Samples
Drag and Drop: Drag your sample directly from your file explorer into the timeline or browser.
Browser: Open Studio One’s browser (on the right-hand side), navigate to the folder containing your sample, and drag it into your project.
Sampler Track: Drag the sample onto a MIDI track, and use the Sample One sampler for additional manipulation.
Tips: Enable the “Stretch Audio Files to Song Tempo” option in the browser for automatic tempo synchronization. Create sample folders within Studio One’s browser for quick access.General Best Practices
Regardless of the DAW you use, it is important to maintain a smooth and efficient workflow. Organize your sample library with clear folder names and categories to make locating files easy (see last month’s installment for detailed strategies). Where possible, learn DAW-specific shortcuts for importing and editing samples to save time. Always check if your DAW offers a feature to sync the sample’s tempo to your project to ensure seamless integration. Finally, regularly back up your sample collection to avoid losing important audio files and preserve your creative assets! Seriously. Do it now.
Next month, we’re off to “console” land and I’ll be investigating console emulations (hype or not?), summing bus processors, and more to give you a more “studio” sound. Until then, blessings and namaste.