For the last two months, we’ve
been following the process of
removing and resetting the neck on
a sweet 1952 goldtop Les Paul. (If
you’ve missed either of these installments,
check out the December 2010 and January 2011 issues of Premier.) In this, the
third and final phase of our adventure,
we complete the very challenging
repair and restoration job.
Here’s a quick summary of the project thus far: When the guitar first came to us, we saw that, many years back, the trapeze tailpiece had been replaced with an ABR-1 bridge and tailpiece. In addition, the guitar’s neck angle made it virtually unplayable, so we knew that correcting the angle would restore its utility. Because of its previous alterations, we were not devaluing this goldtop’s collectability, but rather giving it the life it was originally designed for.
Removing the neck involved multiple steps. I pulled three of the upper frets, drilled six holes, spent five days injecting boiling water into the holes with a syringe, and finally applied steam into the sides and underside of the neck heel.
Once the neck was off, I needed to do some trimming and shimming. First, I carefully trimmed the inside lower heel of the neck using a chisel, flat file, and sanding block to achieve a very clean and flush heel-to-body joint. After carefully determining the needed reset angle, I cut a 1/8" x 1 15/32" x 4 1/4" Honduran mahogany shim, sanded it to a 2-degree pitch, and then glued it to the bottom surface of the neck’s extended tenon.
Next, I prepared two 1/16" x 3/8" x 3 1/8" maple support shims with a 2-degree taper to support the fretboard section that protrudes from either side of the mahogany neck tenon. Once these wing shims were glued in place, it was time to spray them gold to match the Les Paul’s body.

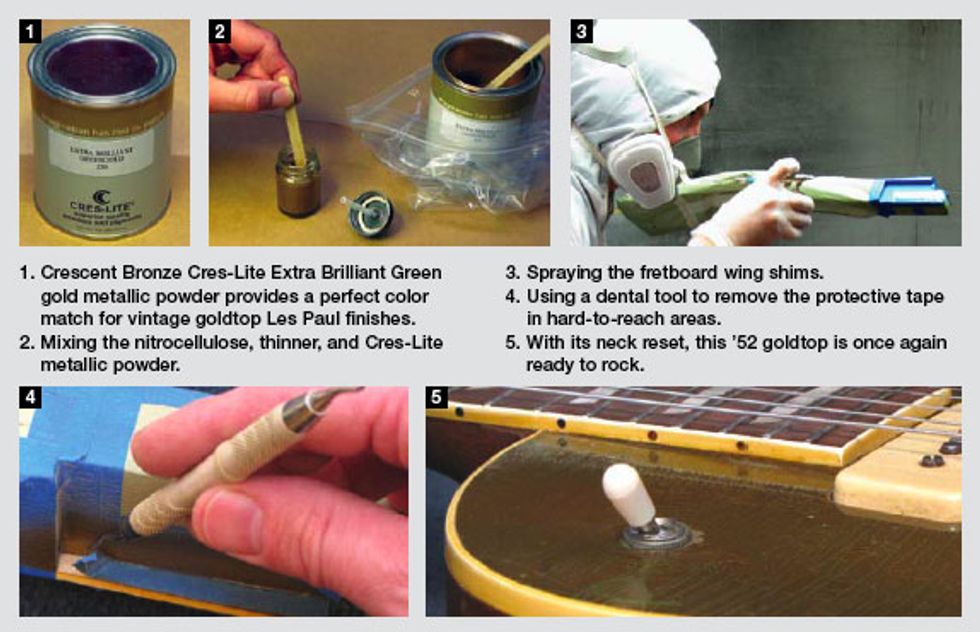
The book Guitar Finishing Step-By-Step by Dan Erlewine and Don MacRostie offers excellent insights on famous finishes and recipes for formulating them. One of the recipes the book covers is Gibson’s classic goldtop finish. In that section, the authors mention a company called Crescent Bronze that supplies metallic powders. I ordered one pound of Cres-Lite Extra Brilliant Greengold metallic powder from Crescent Bronze. To make the perfect color match, the gold needs to have some green in it. I used a 3/4-ounce jar for mixing the nitrocellulose, thinner, and greengold metallic powder. I slowly stirred the nitrocellulose mixture while gradually adding the powder. It only took a couple of pinches to give me the consistency I was looking for. Here’s a tip: As a safety precaution, store the can of powder in a Ziploc freezer bag. If you happen to drop the can, you do not want to have the lid pop off and let the powder contaminate your whole facility.
The 3/4-ounce mixing jar attaches to one of my Badger airbrushes that I use exclusively for metallic spraying. Before spraying the sides of the maple wing shims, I tested the color match on a piece of scrap wood. The gold sprayed smoothly and consistently, and the blend of tinted clear topcoat made the color match fall right into place. I protected the neck from unwanted overspray using Evermask masking paper and low-adhesion ScotchBlue Painter’s Tape. After the neck was sprayed and while the finish was still wet, I used a dental explorer instrument for removing the tape in hard-to-reach areas.
After finishing the maple shim supports and upper tenon lip, I was ready to glue in the neck. I used Behlen Ground Hide Glue—the traditional luthier’s glue that Gibson used in 1952. I mixed equal weights of dry ground hide glue and water into a Stew-Mac electric glue pot, while stirring to speed up the melting process. It didn’t take long to achieve a uniform consistency and adhesion. The glue pot maintains hide glue at 150-155 degrees F when 2/3 to 3/4 full. It is important to always check drying time with glue at room temperature. If you need more assembly time when working with hide glue, add water to the mix.
I applied glue to the body’s neck cavity and neck tenon using a 3/8" glue brush, and then clamped the neck to the body joint by applying even pressure with two bar clamps and a fretboard clamping caul. After the hide glue had completely cured, I reset the three original frets I’d previously pulled, using Stew-Mac’s medium-fretwire Fret Setter and Deadblow Fretting Hammer.
When the job was done, we all took turns enjoying the goldtop’s vintage tone and silky playability. Talk about wow factor!
 John Brown is the
inventor of the Fretted/Less
bass. He owns and operates
Brown’s Guitar Factory,
a guitar manufacturing,
repair, and restoration facility
staffed by a team of talented
luthiers. His guitar-tool and accessory designs
are used by builders all over the world. Visit
brownsguitarfactory.com or email John at
info@brownsguitarfactory.com.
John Brown is the
inventor of the Fretted/Less
bass. He owns and operates
Brown’s Guitar Factory,
a guitar manufacturing,
repair, and restoration facility
staffed by a team of talented
luthiers. His guitar-tool and accessory designs
are used by builders all over the world. Visit
brownsguitarfactory.com or email John at
info@brownsguitarfactory.com.
Here’s a quick summary of the project thus far: When the guitar first came to us, we saw that, many years back, the trapeze tailpiece had been replaced with an ABR-1 bridge and tailpiece. In addition, the guitar’s neck angle made it virtually unplayable, so we knew that correcting the angle would restore its utility. Because of its previous alterations, we were not devaluing this goldtop’s collectability, but rather giving it the life it was originally designed for.
Removing the neck involved multiple steps. I pulled three of the upper frets, drilled six holes, spent five days injecting boiling water into the holes with a syringe, and finally applied steam into the sides and underside of the neck heel.
Once the neck was off, I needed to do some trimming and shimming. First, I carefully trimmed the inside lower heel of the neck using a chisel, flat file, and sanding block to achieve a very clean and flush heel-to-body joint. After carefully determining the needed reset angle, I cut a 1/8" x 1 15/32" x 4 1/4" Honduran mahogany shim, sanded it to a 2-degree pitch, and then glued it to the bottom surface of the neck’s extended tenon.
Next, I prepared two 1/16" x 3/8" x 3 1/8" maple support shims with a 2-degree taper to support the fretboard section that protrudes from either side of the mahogany neck tenon. Once these wing shims were glued in place, it was time to spray them gold to match the Les Paul’s body.
The book Guitar Finishing Step-By-Step by Dan Erlewine and Don MacRostie offers excellent insights on famous finishes and recipes for formulating them. One of the recipes the book covers is Gibson’s classic goldtop finish. In that section, the authors mention a company called Crescent Bronze that supplies metallic powders. I ordered one pound of Cres-Lite Extra Brilliant Greengold metallic powder from Crescent Bronze. To make the perfect color match, the gold needs to have some green in it. I used a 3/4-ounce jar for mixing the nitrocellulose, thinner, and greengold metallic powder. I slowly stirred the nitrocellulose mixture while gradually adding the powder. It only took a couple of pinches to give me the consistency I was looking for. Here’s a tip: As a safety precaution, store the can of powder in a Ziploc freezer bag. If you happen to drop the can, you do not want to have the lid pop off and let the powder contaminate your whole facility.
The 3/4-ounce mixing jar attaches to one of my Badger airbrushes that I use exclusively for metallic spraying. Before spraying the sides of the maple wing shims, I tested the color match on a piece of scrap wood. The gold sprayed smoothly and consistently, and the blend of tinted clear topcoat made the color match fall right into place. I protected the neck from unwanted overspray using Evermask masking paper and low-adhesion ScotchBlue Painter’s Tape. After the neck was sprayed and while the finish was still wet, I used a dental explorer instrument for removing the tape in hard-to-reach areas.
After finishing the maple shim supports and upper tenon lip, I was ready to glue in the neck. I used Behlen Ground Hide Glue—the traditional luthier’s glue that Gibson used in 1952. I mixed equal weights of dry ground hide glue and water into a Stew-Mac electric glue pot, while stirring to speed up the melting process. It didn’t take long to achieve a uniform consistency and adhesion. The glue pot maintains hide glue at 150-155 degrees F when 2/3 to 3/4 full. It is important to always check drying time with glue at room temperature. If you need more assembly time when working with hide glue, add water to the mix.
I applied glue to the body’s neck cavity and neck tenon using a 3/8" glue brush, and then clamped the neck to the body joint by applying even pressure with two bar clamps and a fretboard clamping caul. After the hide glue had completely cured, I reset the three original frets I’d previously pulled, using Stew-Mac’s medium-fretwire Fret Setter and Deadblow Fretting Hammer.
When the job was done, we all took turns enjoying the goldtop’s vintage tone and silky playability. Talk about wow factor!
 John Brown is the
inventor of the Fretted/Less
bass. He owns and operates
Brown’s Guitar Factory,
a guitar manufacturing,
repair, and restoration facility
staffed by a team of talented
luthiers. His guitar-tool and accessory designs
are used by builders all over the world. Visit
brownsguitarfactory.com or email John at
info@brownsguitarfactory.com.
John Brown is the
inventor of the Fretted/Less
bass. He owns and operates
Brown’s Guitar Factory,
a guitar manufacturing,
repair, and restoration facility
staffed by a team of talented
luthiers. His guitar-tool and accessory designs
are used by builders all over the world. Visit
brownsguitarfactory.com or email John at
info@brownsguitarfactory.com.