 1. Before I replace the missing fretboard, I have to shape and glue in a piece of flat-sawn maple as a foundation
for the rosewood. 2. Shaping the edge of the new maple section. 3. Radiusing the maple surface before adding
a replacement piece of Brazilian rosewood. 4. Confirming the 7.25" radius after gluing and shaping the new
fretboard section. 5. Using a jig, Dremel tool, and 1/8" inlay router bit to cut a new nut slot in the fretboard.
6. An artist brush is ideal for applying the tinted nitrocellulose touchup finish.
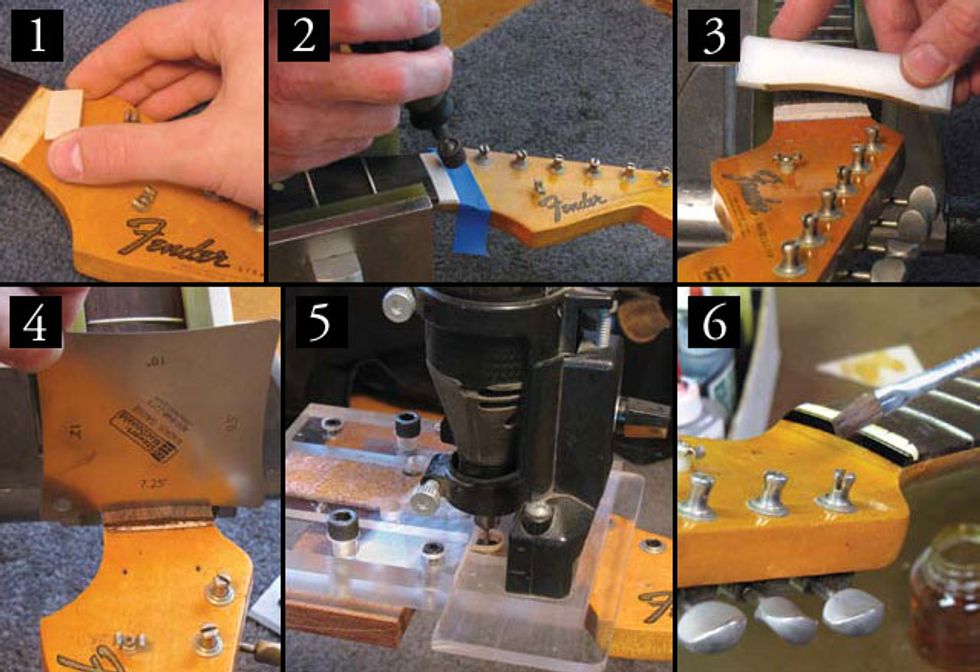
1. Before I replace the missing fretboard, I have to shape and glue in a piece of flat-sawn maple as a foundation
for the rosewood. 2. Shaping the edge of the new maple section. 3. Radiusing the maple surface before adding
a replacement piece of Brazilian rosewood. 4. Confirming the 7.25" radius after gluing and shaping the new
fretboard section. 5. Using a jig, Dremel tool, and 1/8" inlay router bit to cut a new nut slot in the fretboard.
6. An artist brush is ideal for applying the tinted nitrocellulose touchup finish.Last month we launched a series of columns on restoring a 1965 Fender Strat in Shoreline Gold [“Resurrectinga 1965 Shoreline Gold FenderStrat,” December 2011]. In the first part of this series, I explained the alterations previously done to this guitar and how we needed to develop a multi-step plan for restoring this fine Strat to its former glory. You may recall that a previous owner had decided to install a Floyd Rose locking nut and tremolo. My job will be to replace missing wood, patch various holes, and re-install the original Fender trem, which fortunately stayed with the guitar.
After July 1962, Fender replaced the “slab” board with a rosewood fretboard that had a convex bottom. At first, the rosewood cap remained fairly thick, but by 1963, this turned into a thinner veneer. Fender kept this design until mid-1983.
In the process of adding the Floyd locking nut, a repairman had previously removed a portion of the maple neck and Brazilian rosewood fretboard where the traditional nut is normally positioned. I divided this part of the restoration task into eight steps.
Step 1: Using my Stew-Mac Luthier’s Files (item #0842 from stewmac.com), I leveled and squared up the neck’s maple surface right to the fretboard’s front edge. The Fret Rocker (#3770) came in handy to check the squaring.
Step 2: I selected a flat-sawn piece of maple, and then shaped and dry-assembled the part until I got a desirable fit. I used medium-viscosity Super Glue (#7002) for securing the new maple piece. Curing time was around 25 seconds.
Step 3: Very carefully, I used a Dremel rotary tool (#0358) and sanding-drum bit with fine-grit sandpaper to knock down the front edge of the newly added maple section.Step 4: Before fitting and gluing the Brazilian rosewood fretboard section in place, I needed to put a 7.25" radius onto the top of the restored maple surface. For this, I made a sanding block with a 7.25" radius bottom out of ultra-highmolecular- weight polyethylene, and used double-stick tape to adhere sandpaper to its underside. I used my stainless steel Radius Gauge (#5432) for referencing. These two tools complimented each other well.
Step 5: Once the maple surface was ready, I selected a replacement section of Brazilian rosewood that would resemble the grain pattern and overall performance of the original fretboard. (My reclaimed and salvaged Brazilian rosewood is properly validated and CITES-certified.)
Step 6: After using a belt sander to trim and shape the Restoring the Neck on a 1965 Shoreline Gold Fender Strat BY john brown Brazilian rosewood piece and give it a 7.25" underside radius, I then glued it in place. For the playing surface, I returned to my set of Luthier’s Files, a radius-sanding block, and radius gauge to mimic the original fretboard shape.
Step 7: Fortunately, I had an old jig that was originally designed for routing out the shelf when installing a locking nut. Using this jig and a 1/8" carbide inlay router bit (#5154) attached to a Dremel, I cut a clean 1/8" slot in the fretboard. To finalize the slot and add a 7.25" inside-pocket radius (this is how it would have come from the Fender factory in 1965), I first used a 1/8" Nut Seating File (#5055) and then turned to an assortment of files and mini sanding blocks to feather-in and finish the restored section of wood before gluing in the newly fabricated nut.
Step 8: I used an artist paintbrush to apply the first coat of tinted nitrocellulose clear. Sometimes I rely on an airbrush for feathering-in touchup finish, but in this case, the paintbrush let me precisely control the placement and volume of the nitrocellulose finish. (These artist brushes are also really nice for drop-filling finish.)
All right—this phase is almost complete! Once I’ve applied a few more coats of nitrocellulose finish and let it cure for two weeks, I’ll sand the finish up to 1000 grit and buff it out. In this last step, it’s very important to pay attention to the sheen of the original finish and carefully blend in the new finish.
We’ll continue working on this guitar next month, so see you then!
 John Brown is the
inventor of the Fretted/Less
bass. He owns and operates
Brown’s Guitar Factory,
a guitar manufacturing,
repair, and restoration facility
staffed by a team of talented
luthiers. His guitar-tool and accessory designs
are used by builders all over the world. Visit
brownsguitarfactory.com or email John at
info@brownsguitarfactory.com.
John Brown is the
inventor of the Fretted/Less
bass. He owns and operates
Brown’s Guitar Factory,
a guitar manufacturing,
repair, and restoration facility
staffed by a team of talented
luthiers. His guitar-tool and accessory designs
are used by builders all over the world. Visit
brownsguitarfactory.com or email John at
info@brownsguitarfactory.com.