Looking for the coolest, simplest mods for your Strat, Tele, Les Paul, or “super strat”? Then look no further—Premier Guitar’s Mod Garage columnist Dirk Wacker walks us through the tastiest tone tweaks for the most popular guitars on the planet.
Hello and welcome to this expanded take on my usual Mod Garage madness. Here we're going to tackle my favorite mods for the four most common electric guitars—the Fender Stratocaster and Telecaster, the Gibson Les Paul, and hard-rock- and metal-friendly “super strats" of various makes.
Although I've got tons of ideas for great-sounding mods that can be fairly complex (just check out my past Mod Garage columns on premierguitar.com), I believe small, simple mods like the ones here can make a huge difference in the number and quality of tones at your disposal. The other benefit of easy mods is that they introduce those who might be anxious about messing with their beloved guitars to the exhilarating world of modding and give them the confidence to try even more adventurous, fun, and rewarding mods in the future.
So let's get started. We'll begin with Leo Fender's second classic design—the Strat.
The 7-Sound Stratocaster
One of the most popular wiring projects for Stratocasters is also one of the oldest, so nobody can tell exactly who came up with it first. Some say it was invented by famous Western swing guitarist Eldon Shamblin, other sources say it was another swing guitarist named Bill Carson—who just happened to be Leo´s favorite guitar test pilot.
Regardless of its origin, this mod aims to rectify the one bummer that greedy tweakers see in the Strat's otherwise super flexible 5-position switch: With three pickups onboard, that means there are actually seven possible pickup combinations on a Strat. But standard wiring doesn't let you pair the bridge and neck pickups (like on a Telecaster) or all three pickups at the same time.
Standard Fender Stratocaster 5-Way Wiring
Position | Pickup Combination |
1 | Bridge pickup only |
2 | Bridge and middle pickups in parallel |
3 | Middle pickup alone |
4 | Middle and neck pickups in parallel |
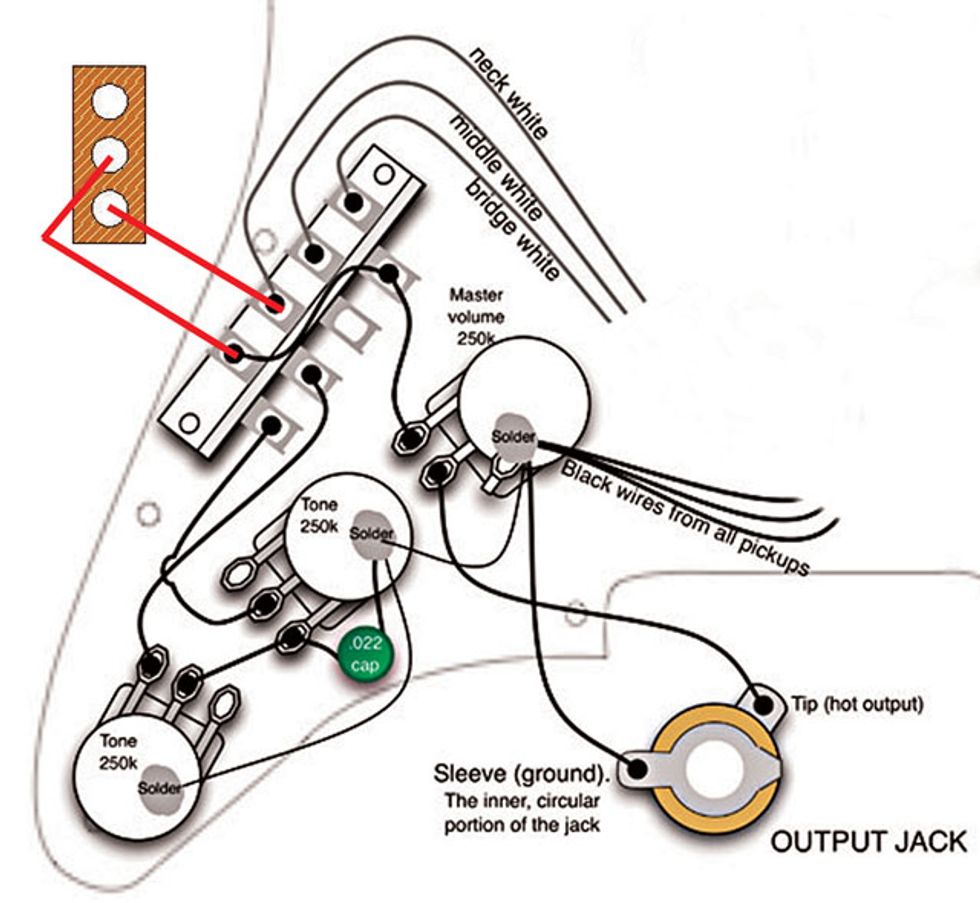
Thankfully, the 5-way selectors from companies like CRL or OakGrigsby (both of which are now owned by Electroswitch) make it easy to mod your Strat so that it still gets the factory-set combinations but also lets you add in the other two using an additional switch to engage the neck pickup. Several styles of switches can facilitate this, but they all have one thing in common—they're all a single-pole, single-throw (SPST) switch. In other words, they're all simple on/off switches.
You can install your new neck-pickup on/off switch by simply drilling a hole in your Strat's pickguard and installing a small SPST toggle, or you can replace one of the potentiometers with a push/pull or push/push pot with an integrated switch that lets you activate the neck pickup. Once you've done so, position 1 on your 5-way selector will still engage the bridge pickup alone, but when you flip your new toggle switch it will engage the neck pickup, too—so you'll have both in parallel. Same goes for position 2: It will still activate the bridge and middle pickups, but when you now engage the toggle you'll add the neck pickup, too.
7-Sound Stratocaster Mod Wiring
Position | Pickup Combination | With SPST Switch Engaged |
1 | Bridge pickup only | Bridge and neck in parallel |
2 | Bridge and middle pickups in parallel | All three pickups in parallel |
3 | Middle pickup alone | Middle pickup only |
4 | Middle and neck pickups in parallel | Middle and neck in parallel |
5 | Neck pickup only | Neck pickup only |
Another cool way to perform this mod is to use a new pickguard outfitted with three SPST on/off switches instead of a 5-way switch. (Fender used this method for the Elite Stratocaster that was available from 1983 to 1984 by using three small on/off pushbuttons rather than the more common toggles.) While some feel the three-SPST approach can make it easier to keep track of which pickups are active at a single glance, the disadvantage is that it often takes more up and/or down motions than a typical 5-way switch to select a new pickup combination.
As for the usefulness of these new combinations, all three pickups together can provide a nice rhythm sound in certain settings, while the neck-and-bridge combo reminds me of the middle setting on a Telecaster—but a lot fatter and more defined.
Wiring diagram for the 7-sound Strat mod. Diagram courtesy of Seymour Duncan Pickups.
The 4-Way Telecaster
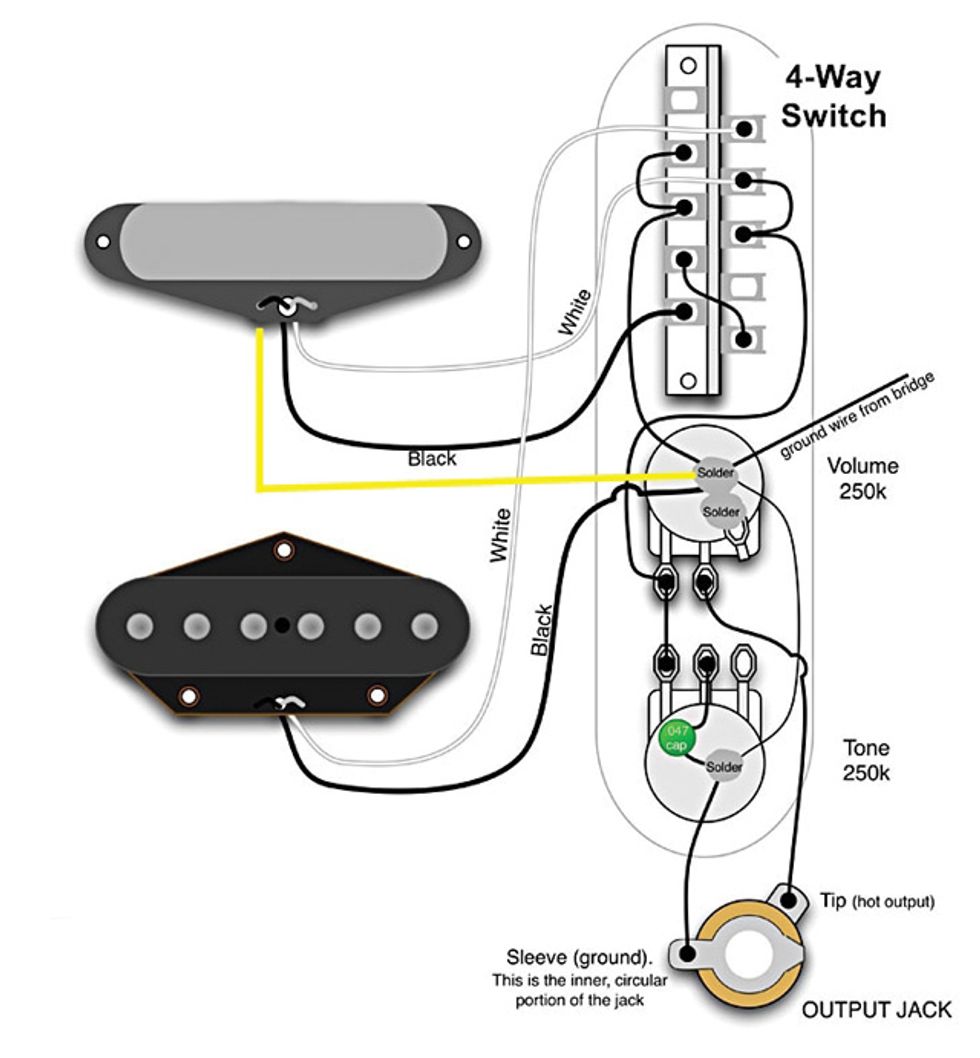
A marvelous mod for any standard-wired Telecaster is one in which you replace its stock 3-way switch with a special 4-way switch that, in addition to the standard middle-position parallel wiring of both pickups, lets you use the two pickups in series—a combination that yields a fat, loud tone that's great for leads.
This mod should not be confused with parallel/series humbucker switching. This is all about wiring two pickups, regardless of their type, together. On most guitars with more than one pickup, you can choose to play any one pickup by itself or through combinations of the pickups. The standard way to connect multiple pickups is to wire them in parallel—it's the industry standard because most people think it sounds more transparent and clear. It's the tone our ears know from countless records (e.g., positions 2 and 4 on a standard Strat). Only a few stock guitars use series-wired pickups, the most popular examples being the Brian May “Red Special" and most Danelectros.
So if series wiring is so uncommon, why should you try it? There are a lot of good reasons. First, if you want more volume and midrange out of your pickups, series switching may be perfect for you. Series-wiring two pickups together produces a longer path with increased resistance, which boosts volume and prevents the highest frequencies from getting through, while allowing more bass and midrange to pass through the circuit. It's great for driving a tube amp on the verge of overdrive into saturation without the help of an external booster. With series wiring, the output of one pickup goes into the input of another pickup, whereas with standard parallel wiring, each pickup takes its own path to the output. Because of this, series wiring has no effect on your tone when only one pickup is selected. In other words, single-pickup settings on two otherwise identical guitars—one with parallel wiring, one with series—will sound the same.
The reason you lose treble with series-wired pickups is because the long pickup wire works like a resistor. The longer the wire, the higher the resistance, which saps treble frequencies more than midrange and bass frequencies—just like with a long guitar cable. That means series-wired guitars are left with more prominent low end and midrange.
So now you know why series wiring produces a different tone, but why is it louder? Simply put, when you wire two pickups in parallel, each pickup loses a whopping three-quarters of its output. Essentially, you're adding two pickups operating at 25 percent output together, and you end up with a total output of about 50 percent. However, if you wire the same pickups in series, you'll add the outputs of two pickups operating at full volume. The result is a much louder sound. That said, this doesn't mean two pickups wired in parallel are half as loud as a single pickup, nor does it mean the two pickups wired in series are twice as loud as one pickup. Why? I don´t want to bore you to death with scientific explanations, but suffice it to say that it has to do with how the output level of your guitar translates to actual volume, the logarithmic nature of decibels (the unit of measure for volume), and the technicalities of how the human ear perceives them.
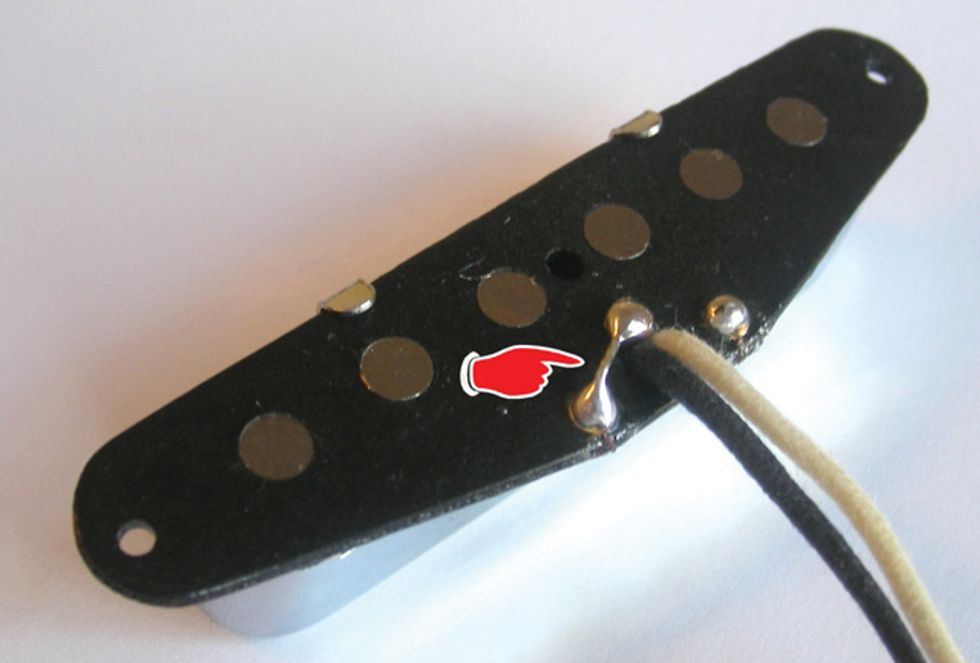
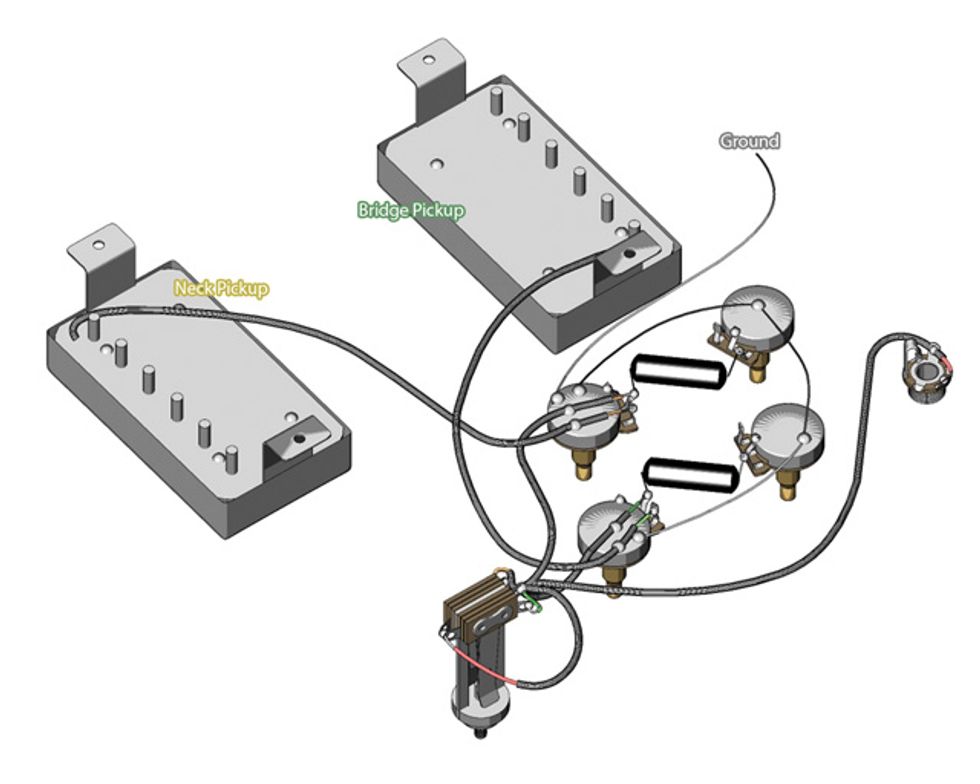
Let's move on to the details of setting up your Tele with the 4-way option. The first step is to unground and reground one of the pickups—preferably the neck unit. A typical Telecaster neck pickup has a metal cover, and one of its mounting tabs (which is folded under the coil) usually has a short jumper wire soldered to an eyelet on the pickup chassis (Photo 1).
A typical, metal-covered Telecaster neck pickup has a short grounding wire on the underside of its chassis.
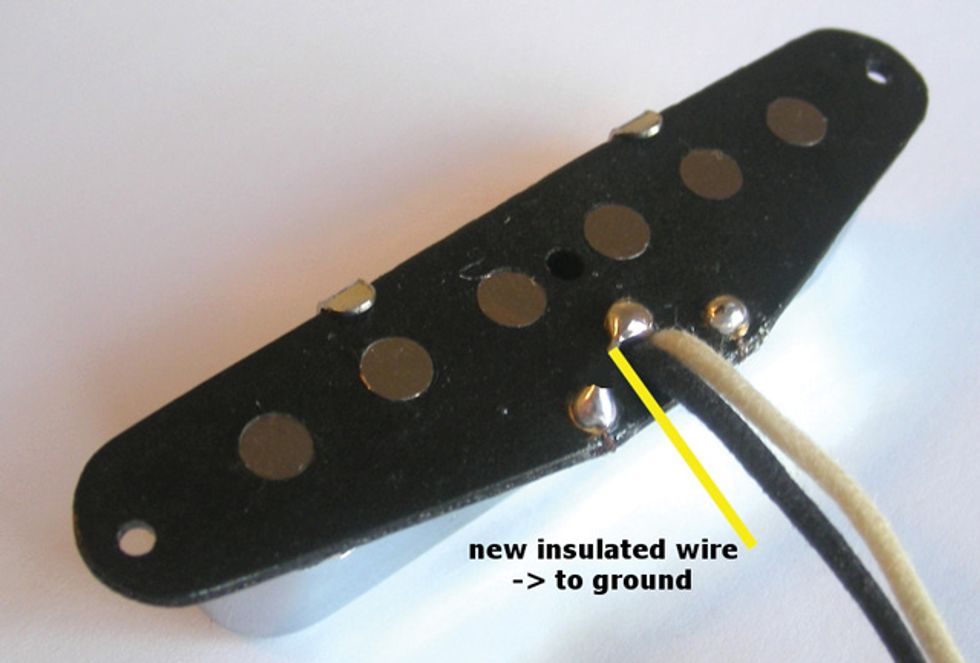
This wire connects the coil to the negative wire. To unground and reground the cover, carefully clip the little jumper (Photo 2) and add a new insulated wire connecting the cover's tab to a ground point in the control cavity (e.g., the back of a pot). Be sure to insulate your new solder joint with some tape or heat-shrink tubing to avoid having it make unwanted connections with other components.
After you've cut the neck pickup's stock ground wire, solder a new insulated ground wire connecting the pickup (at the point indicated by the yellow line) to a ground point in the guitar's control cavity.
After you've regrounded your neck pickup with the new jumper wire, you're ready to grab your new 4-way switch and start soldering.
Wiring diagram for the 4-way Tele mod. Diagram courtesy of Seymour Duncan Pickups.
The Vintage-Wired Les Paul
My favorite mod for a Gibson Les Paul, SG, or ES-335—or any other double-humbucker guitar with master volume and tone knobs for each pickup—is also sometimes called “'50s wiring," “vintage wiring," or “'50s vintage wiring." But it all means the same thing: This mod makes your dual-humbucker Gibson operate the way they did back in the nifty '50s. Many players with PAF or PAF-style humbuckers prefer it because it yields many of the tones heard on iconic albums by so many guitar legends. (That said, you can also apply this mod to Strats, Teles, or any other type of guitar.)
If you spend much time in online guitar forums, you may already know that this mod has been a bit of a hot topic in recent years. Because of that, there are a lot of myths and urban legends about it.
Electronically, there's nothing too special about this wiring: It simply connects the tone pot to the output (the middle lug) of the volume pot instead of to the input. Tonally, however, '50s wiring has three major influences on your tone: First, your overall tone gets stronger and more transparent—more in your face. Some players say it “blooms," because the notes just seem to open up after you've played them. It's difficult to get this type of response from a dual-humbucker guitar without using this wiring style.
The second big impact that the vintage-wiring mod has is that it drastically decreases the treble attenuation that occurs when you roll back a volume knob. With passive volume controls, when you turn down—even just a little—the treble loss is far greater than the volume loss. One way to remedy this by installing a “treble-bleed" network—a combination of a capacitor and a resistor in parallel or in series—on your volume pots. However, '50s wiring does the trick, too. This means it's much easier to clean up an overdriven amp by simply rolling back the volume on your guitar. (Incidentally, we'll cover the treble-bleed mod next—it's my favorite for “super strats.")
The third big effect of this mod is that it makes your guitar's tone and the volume controls interact more than before, similar to how some Fender tube amps' EQ and volume settings alter responsiveness (e.g., when you change the volume, the tone changes a little bit as well and vice versa). This may feel strange at first, but it doesn't take long to adjust to it. Further, you'll also notice that your guitar's tone controls react much more smoothly and evenly, without the typical hot spots.
One of the other cool things about this mod is that it's not only easy, but it's also “invisible"—you don't have to alter how you switch pickups or add any new switches that complicate the layout of your switches and knobs. It's also easy to switch back to standard wiring.
Wiring diagram for the vintage-wired Les Paul mod. Diagram courtesy of Gibson Guitar Corp.
The “Super Strat" Treble Bleed
The term “super strat" originated in the '80s when fans of shredding guitar started outfitting stock Fender Strats with a humbucker or two (often with toggles for tapping or splitting the coils) and a double-locking tremolo like those from Kahler and Floyd Rose. Ibanez is perhaps the most successful of the companies that caught on to the trend and made it the foundation of its unique line, but today the term “super strat" is used more broadly to refer to just about any brand of double-cutaway guitar that sports an abuse-proof vibrato system and electronics that offer a variety of single-coil and humbucker sounds.
Given this heritage, it goes without saying that these guitars are often already equipped with circuits far more elaborate than the classic axes we've been discussing up to this point. But there's still one area in which many of them can still be improved. That's where our fourth fab project—the treble-bleed mod—comes in.
“Super strats" are often used with heavy distortion, but unless they've got active electronics, as soon as you turn down their volume knob(s) to get a cleaner tone, the sound gets muddy and less defined. As previously described, this is because a good portion of the high-end content is bled to ground.
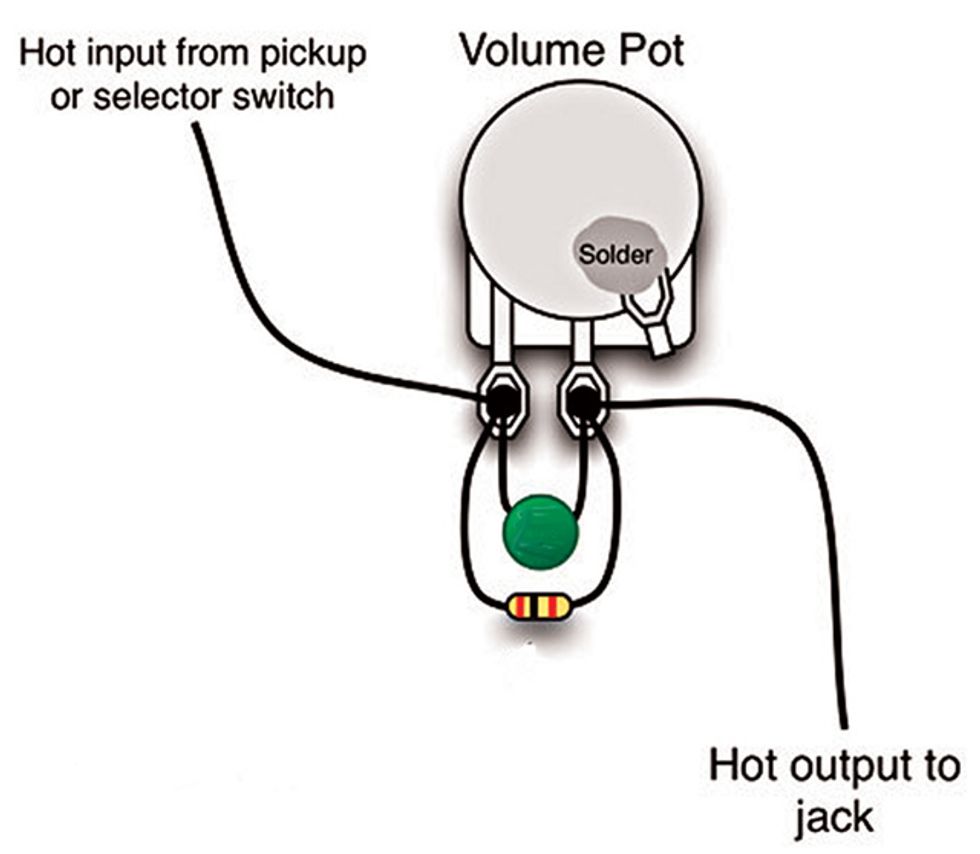
So what is a treble-bleed network and what does it do? In layman's terms, it´s a combination of a small capacitor and a resistor wired in parallel (there are also variations with a cap only or a resistor in series with a cap). Techies sometimes call it an “RC network" (the “RC" referring to the resistor and capacitor), a "high-pass filter," or a “treble-bypass filter." The theory behind this simple circuit is much more complicated than it looks, so I'll break it down the simplest way I can. As a rule of thumb, the circuit's brightness is determined by the resistor's value (i.e., a lower ohm rating translates to more treble), but the frequencies that are present are determined by the cap´s value (i.e., the lower the value, the higher the frequencies, and the higher the value the lower the frequencies).
When you roll down the volume in a treble-bled circuit, it begins filtering out bass frequencies, thus making the trebles more prominent. To be clear, it doesn't boost trebles—a passive circuit can only selectively attenuate. But with a little trial and error, you can fine-tune your circuit's component values in order to filter out the specific frequencies that are muddying your signal when you turn down. And the result can be just as effective—if not more so—than a boost, because it lifts the metaphorical wooly carpet from off your signal without boosting a handful of frequencies out of the context of an overall band mix.
Given the huge range of variables in the rest of your “super strat's" circuit—from pot values to pickup magnets and output ratings—it's almost impossible to specify which capacitors and resistors will work best for your project (never mind what the rest of your signal chain looks like). But a good starting point is to get some small caps—say, from 220 pF up to 1200 pF—and resistors—from 100k ? up to 330k ?—and start experimenting to find out what works best for your guitar, your rig, and your musical preferences.
The easiest way to experiment and find the optimum capacitor and resistor values is to solder two wires to the input and output of the volume pot, and then connect an alligator clip to each of the free ends. This way you can let the two wires hang out from the control compartment for fast access. Try a bunch of different cap and resistor values, and when you've found your favorite combination, solder it into the circuit permanently and remove the two test wires. Then your shred machine will be an even more versatile and great-sounding guitar, no matter how much distortion you've got it going through!
Wiring diagram for the “super strat" treble-bleed mod. Diagram courtesy of Seymour Duncan Pickups.
It's a Mod, Mod, Mod, Mod World
Whether you're new to modding or an old hand at it, remember that it's not always the complicated mods that sound the best. Simple mods—those here, and many others—can drastically enhance your guitar's tones. So give these a try, and then be brave and solder along to new ones, too. And if you're not already checking out my monthly Mod Garage column, be sure to join us there each month. Until then, keep on modding!
Focusrite announces the expansion of the Scarlett audio interface range with the 4th Gen 16i16, 18i16, and 18i20 models.
Scarlett’s fourth generation introduced several major advances that build on Focusrite’s legacy in professional audio: best-in-class audio specifications, enhanced creative capability, powerful workflow tools, and more. The three new interfaces add more analogue inputs and outputs, front-panel monitor switching and mute control, S/PDIF and ADAT connectivity, additional headphone outputs, and a built-in talkback mic on Scarlett 18i20.
Focusrite Scarlett 4th Gen 16i16, 18i16, and 18i20 now feature:
- Huge 122dB dynamic range, using the flagship RedNet range converters – found in the world’s best studios.
- All-new, remote-controlled preamps with 69dB of gain for studio sound from any mic.
- Pair Focusrite Control 2 for desktop with Focusrite’s new mobile app; enjoy full wireless control over inputs and monitoring mixes, allowing the adjustment of settings without being tethered by cables.
- Re-engineered Air mode with Presence, and all-new Harmonic Drive, adding rich harmonics to recordings by emulating the characteristics of vintage preamps.
- New Auto Gain and Clip Safe modes can handle up to eight microphones at a time, making session setup simple, and ensuring every take is a keeper.
- Brand-new Custom-designed headphone amps for the best playback ever heard from Scarlett.
- Redesigned Dynamic Gain Halos now with output as well as input metering.
- Professional studio features included: A/B speaker switching, built-in talkback mic on 18i20, and more.
- MIDI in /out plus S/PDIF, and ADAT in/out.
- Refreshed Easy Start tool, making it easier than ever to get set up and recording in minutes.
- Includes Ableton Live Lite, Pro Tools Artist 3 months, and FL Studio Producer Edition 6 months.
- Huge bundle of plug-in instruments and effects; including Antares Auto-Tune, Marshall Amp Modelling, synths, keys, drums, EQ, compression, reverb, and more.
Three new Scarlett interfaces
Scarlett 18i20 4th Gen, an update to the flagship 3rd Gen model, is a rack-mountable USB audio interface featuring 18 inputs, including eight advanced fourth-generation Scarlett preamps, and 20 outputs. 18i20 not only has an impressive amount of analogue and digital I/O, but also features additional workflow enhancements that make it a perfect fit for even the most complex project studios: a built-in talkback mic; A/B speaker switching for instant referencing on different monitors; and eight channels of LED bar metering, assignable to inputs or outputs as well as master output metering.
Scarlett 18i16 is a desktop-format USB audio interface with 18 inputs, including four 4th Gen Scarlett preamps and 16 outputs. Ideal for multitrack recording and designed for producers, 18i16 is the industry-leading interface for project studios. It makes an ideal hub to integrate hardware with a DAW, providing enough analogue and digital I/O to connect a huge number of external instruments, processors, and effects. Plus, manage complex routing with ease via the included Focusrite Control 2 software for desktop and mobile devices.
Scarlett 16i16 is a desktop-format USB audio interface which shares the same feature set as 18i16 but is slightly more compact, with 16
Scarlett 4th Gen
A giant leap for the world’s most popular audio interface range, Scarlett’s fourth generation debuted in 2023 with the Solo, 2i2, 4i4, Solo Studio, and 2i2 Studio.
All Scarlett 4th Gen interfaces feature re-engineered audio circuitry and professional-grade converters (taken directly from Focusrite's flagship RedNet interfaces), which deliver up to 122dB dynamic range. With up to 69dB of mic preamp gain on tap, they are designed to get the very best sound from any microphone. Custom-designed headphone amps with independent volume controls drive high-impedance headphones louder and with more clarity than any previous Scarlett.
Scarlett’s 4th Gen mic preamps feature a re-engineered Air mode, based on the sound of legendary Focusrite consoles. Each one now includes a selectable all-analogue Presence mode, and a new DSP-based Harmonic Drive mode for added richness.
The range also introduced two new features designed to ensure artists and producers never miss a perfect take: Auto Gain analyses ten seconds of incoming audio before setting set the perfect level, while Clip Safe automatically readjusts it to prevent clipping. These tools help artists record themselves easily and let experienced engineers quickly set multiple gains in high-pressure environments.
The included Focusrite Control 2 software takes care of setting up routing, levels, monitoring mixes, independent outputs, and routing options. In addition to the desktop application, the iOS and Android Focusrite Control 2 apps enables engineers and performers to adjust monitor mixes and mic preamp gains while away from the computer.
To help users get up and running with Scarlett in record time, Focusrite has developed an Easy Start tool that quickly guides from initial connection to their first recordings.
All Scarletts come with Ableton Live Lite, three months of Pro Tools Artist recording software, and six months of FL Studio Producer Edition. Also included is a curated selection of essential production software from Focusrite, Softube, Native Instruments, Antares, and many more. In addition, there are five free masters from Landr that can be used at any time, plus a two-month subscription to Landr Studio, offering unlimited music distribution on streaming platforms such as Spotify, Apple Music, YouTube Music and TikTok.
These interfaces will be available beginning mid-October 2024 with U.S. pricing as follows:
USD (excluding tax)
Scarlett 18i20: $649.99
Scarlett 18i16: $499.99
Scarlett 16i16: $369.99
For more information, please visit us.focusrite.com.
Focusrite Scarlett 18i16 Fourth Generation USB Audio Interface
Scarlett 18i16 4th GenA new version of the popular, extremely well-built boutique pedal that yields more organic sounds, via increased headroom. Ten-LED reduction meter is an easy-to-read improvement.
At $369 street, it ain’t cheap. Relatively steep learning curve.
$369
Origin Effects Cali76 FET
origineffects.com
The latest version of this popular boutique pedal adds improved metering and increased headroom for a more organic sound.
I used to not care about using a compressor—unless I was in the studio and wanted to add a little zazz to a solo. The additional sustain and tightly focused mids that a compressor helped me achieve were inspiring. Eventually, I began to wonder if a compressor would help give my guitar the tone and response I typically enjoyed at louder stage volumes in smaller, quieter rooms. As I began hunting for a compressor for those gigs, I ran across the original, now discontinued, Origin Effects Cali76 Compact Deluxe. I was intrigued by its, um, origin.
The Cali76’s circuitry was inspired by the famed Urei 1176 outboard compressor, which has lived in the racks of some of the world’s finest studios and appeared on recordings by well, just about everyone. Although I was skeptical that so much squeeze-ability could fit in a 5 1/2" x 3" x 2" enclosure, the FET-based device proved to be a star—not only on my low-volume-gig board, but among many players in the world at large. Today, the Cali76 is recognized for getting about as close to a vintage rackmount 1176 as a stompbox gets.
Reduxed and Revamped
Over the years, the U.K.-made Cali76 has seen other iterations, but this new version is notably smaller—not nano- or mini-sized, but roughly the same size as a Boss pedal. The enclosure’s bedrock quality is the same as earlier Cali76s—a gleaming brick of brushed steel with six sturdy control dials that feels like it could be dropped from space and survive the impact. The controls remain dry, out, in, ratio, attack, and release. The dry function is crucial for tone hunters. It allows you to blend your guitar’s compressed and unprocessed signal—a technique often called parallel compression started at Motown for recording vocals that had a renaissance in New York City mix studios in the ’90s. There’s also a 9V DC input (sorry batteries, but you haven’t got the muscle or the room), a 200 mA draw, a solid and smooth on/off switch, and the usual mono in and out.
But the new, all-analog Cali76 FET Compressor also features a few important upgrades. The single flashing jewel light of previous models has been replaced with a 10-LED gain reduction meter, arranged in linear fashion, to present a more precise illustration of compression level as well as the duration and intensity of the gain reduction. There’s also a lot more headroom: The 9 volts flowing into the new pedal are increased internally to 24 volts, so you can let it rip while keeping your tone natural, responsive, and focused.
Side by Side
I thought it would be fun to place the Cali76 FET Compressor and its older sibling together in my pedal chain, after some overdrives and fuzzes, and before some delays and a trail-heavy reverb. Although both pedals functioned essentially the same, the more precise 10-LED meter was an immediate improvement over the flashing red (no compression), orange (activated compression), and yellow (heading toward maximum compression) colors of the single jewel light on my old Cali76 Compact Deluxe, which I’ve found confusing for its rapid changes of hue, as well as less-effective performance on colorfully lighted stages.
With its ability to internally step 9 volts up to 24, the extra headroom makes the new Cali76 FET sound much more organic and more like my guitar’s pure tone, and I even hear and feelimproved response to picking dynamics at low volume, which you don't always expect from a compressor. Tone is enhanced across the EQ spectrum. I heard richer mids and trebles and more sparkling presence than in my Compact Deluxe. I also heard more-singing sustain than with my older compressor engaged. It’s quite nice, but whether you prefer the potentially darker tone of the elder unit to the transparency of the new one is a matter of taste.
The rest of the control set still does exactly what you’d expect, and very well at that. The “in” dial increases the incoming signal and amount of compression, while the attack dial changes the setting from slow to fast by moving clockwise. Slow equals percussive and bright, while a fast attack time setting lets the compressor grab transients early on, making for a smooth, less percussive, and aurally soothing attack, which I prefer. Likewise, slower settings on the release dial provide more sustain. And the ratio control adjusts the amount of gain reduction on the compressed signal, ranging from a minimum ratio of 4:1 and a maximum of 20:1.
The Verdict
If you’ve never played with a studio compressor, you might experience a sharper learning curve with the Cali76 FET than with, say, a more affordable MXR Dyna Comp or Keeley 2-knob device. But if it fits your budget, it’s worth exploring the rich, complex, and essentially organic sounds that the new Cali76 FET Compressor can achieve.
Featuring P-90 PRO pickups, CTS potentiometers, and a Custom ’59 Rounded C neck profile.
Epiphone’s Joe Bonamassa 1955 Les Paul Standard features the same Copper Iridescent color, a pair of Epiphone P-90 PRO pickups wired to CTS potentiometers and Mallory capacitors, a Custom ’59 Rounded C neck profile, a long neck tenon, and a “Nerdville” graphic hardshell case. This Epiphone 1955 Les Paul Standard is a passionate testament to Bonamassa’s unwavering commitment to the blues and its profound influence on his music.
The Epiphone Joe Bonamassa 1955 Les Paul Standard release is a nod to a pivotal period in the evolution of the Gibson Les Paul, in a finish guaranteed to turn heads. Whether you’re a Joe Bonamassa fan, a Les Paul enthusiast, or a musician seeking an instrument that stands out in both tone and appearance, the Joe Bonamassa 1955 Les Paul Standard is the perfect addition to your collection.
This partnership with Epiphone celebrates the timeless synergy between the brand and Joe’s musical trajectory. Joe’s latest release Live At The Hollywood Bowl immortalizes Joe's first-ever performance at the iconic Hollywood Bowl in August 2023. Accompanied by an impressive ensemble of 40 orchestra members, Bonamassa delivered an unforgettable performance. Live At The Hollywood Bowl With Orchestra showcases Bonamassa’s virtuosic blend of blues and rock, but also elevates fan-favorite tracks with grandiose orchestral arrangements by some of Hollywood's finest – David Campbell, Trevor Rabin, and Jeff Bova. “Very few gigs represent my journey in music more than the Hollywood Bowl. I moved to Los Angeles in 2003 in search of opportunity and cheaper rent than New York City. My first gig at The Mint was attended by 5 of my friends. We have played The Greek Theatre many times since, but the Bowl has always been a dream. The orchestra and the sheer scale of the event and venue are something I will never forget. I am so grateful that we filmed this special event in my life,” reminisces Bonamassa.
For more information, please visit epiphone.com.
Joe Bonamassa Introduces the Epiphone 1955 Les Paul Standard - YouTube
Enjoy the videos and music you love, upload original content, and share it all with friends, family, and the world on YouTube.Epiphone Joe Bonamassa 1955 Les Paul Standard Electric Guitar - Copper Iridescent
JB 1955 LP Std, Cop IridWonderful array of weird and thrilling sounds can be instantly conjured. All three core settings are colorful, and simply twisting the time, span, and filter dials yields pleasing, controllable chaos. Low learning curve.
Not for the faint-hearted or unimaginative. Mode II is not as characterful as DBA and EQD settings.
$199
EarthQuaker Devices/Death By Audio Time Shadows
earthquakerdevices.com
This joyful noisemaker can quickly make you the ringmaster of your own psychedelic circus, via creative delays, raucous filtering, and easy-to-use, highly responsive controls.
I love guitar chaos, from the expressionist sound-painting of Jimi Hendrix’s “Machine Gun” to the clean, clever skronk ’n’ melody of Derek Bailey to the slide guitar fantasias of Sonny Sharrock to the dark, molten eruptions of Sunn O))). When I was just getting a grip on guitar, my friends and I would spend eight-hour days exploring feedback and twisted riffage, to see what we might learn about pushing guitar tones past the conventional.
So, pedals that are Pandora’s boxes of weirdness appeal to me. My two current favorites are my Mantic Flex Pro, a series of filter controls linked to a low-frequency oscillator, and my Pigtronix Mothership 2, a stompbox analog synth. But the Time Shadows II Subharmonic Multi-Delay Resonator is threatening their favored status—or at least demanding a third chair. This collaboration between Death By Audio and EarthQuaker Devices is a wonderful, gnarly little box of noise and fun that—unlike the two pedals I just mentioned—is easy to dial in and adjust on the fly, creating appealing and odd sounds at every turn.
Behind the Wall of Sound
Unlike the Mantic Flex Pro, the Time Shadows is consistent. You can plug the Mantic into the same rig, and that rig into the same outlet, every day, and there are going to be slight—or big—differences in the sound. Those differences are even less predictable on different stages and in different rooms. The Time Shadows, besides its operating consistency, has six user-programmable presets. They write with a single touch of the button in the center of the device’s tough, aluminum 4 3/4" x 2 1/2" x 2 1/4" shell. Inside that shell live ghosts, wind, and unicorns that blow raspberries on cue and more or less on key. EQD and DBA explain these “presences” differently, relating that the Time Shadow’s circuitry combines three delay voices (EQD, II, and DBA) with filters, fuzz, phasing, shimmer, swell, and subharmonics. There’s also an input for an expression pedal, which is great for making the Time Shadows’ more radical sounds voice-like and lending dynamic control. But sustaining a tone sweeping the time, span, and filter dials manually is rewarding on its own, producing a Strickfaden lab’s worth of swirling, sweeping, and dipping sounds.
Guitar Tone from Roswell
Because of the wide variety of sounds, swirls, and shimmers the Time Shadows produces, I found it best to play through a pair of combos in stereo, so the full range of, say, high notes cascading downwards and dropping pitch as they repeat, could be appreciated in their full dimensionality. (That happens in DBA mode, with the time and span at 10 and 4 o’clock respectively, with the filter also at 4, and it’s magical.) The pedal also stands up well to fuzz and overdrives whether paired with humbucker, P-90, or single-coil guitars.
I loved all three modes, but the more radical EQD and DBA positions are especially excellent. The EQD side piles dirt on the incoming signal, adds sub-octave shimmer, and is delayed just before hitting the filters. Keeping the filter function low lends alligator growls to sustained barre chords, and single notes transform into orchestral strings or brass turf, with a soft attack. Pushing the span dial high creates kaleidoscopes of sound. The Death By Audio mode really hones in on the pedal’s delay characteristics, creating crisp repeats and clean sounds with a little less midrange in the filtering, but lending the ability to cut through a mix at volume. The II mode is comparatively clean, and the filter control becomes a mix dial for the delayed signal.
The Verdict
The closest delay I’ve found comparable to the Time Shadows is Red Panda’s function-rich Particle 2 granular delay and pitch-shifter, which also uses filtering, among other tricks. But that pedal has a very deep menu of functions, with a larger learning curve. If you like to expect the unexpected, and you want it now, the Time Shadows supports crafting a wide variety of cool, surprising sounds fast. And that’s fun. The challenge will be working the Time Shadows’ cascading aural whirlpools and dinosaur choirs into song arrangements, but I heard how the pedal could be used to create unique, wonderful pads or bellicose solos after just a few minutes of playing. If you’d like to easily sidestep the ordinary, you might find spelunking the Time Shadows’ cavernous possibilities worthwhile.