Beginner
Beginner
• Learn how to convert all open-position chords to moveable shapes.
• Identify the location of the root in each shape.
• Discover how to connect all five CAGED shapes to map out the entire neck in any key, starting on any one of the five shapes.
To get the most out of your guitar playing, you need to have a deep understanding of the fretboard. Wouldn't it be nice if the guitar was laid out in a logical fashion? Well, it is! Let me introduce you to the CAGED system and explain how it works as an organizing tool. Once you understand the CAGED system, I believe you'll be able to "crack the code" and see the fretboard's inherent logic.
Note: This system only works with standard tuning.
Instead of starting with a lengthy description of the CAGED system, I've found the best way to learn it is to immediately dive into the material. Think of this lesson as a hands-on tutorial. Step-by-step, I'll walk you through this time-tested approach while providing practical assignments—as if we were in a one-on-one lesson. We'll start with the basics and then work our way through more advanced applications. Grab your guitar and let's get to it!
The CAGED System
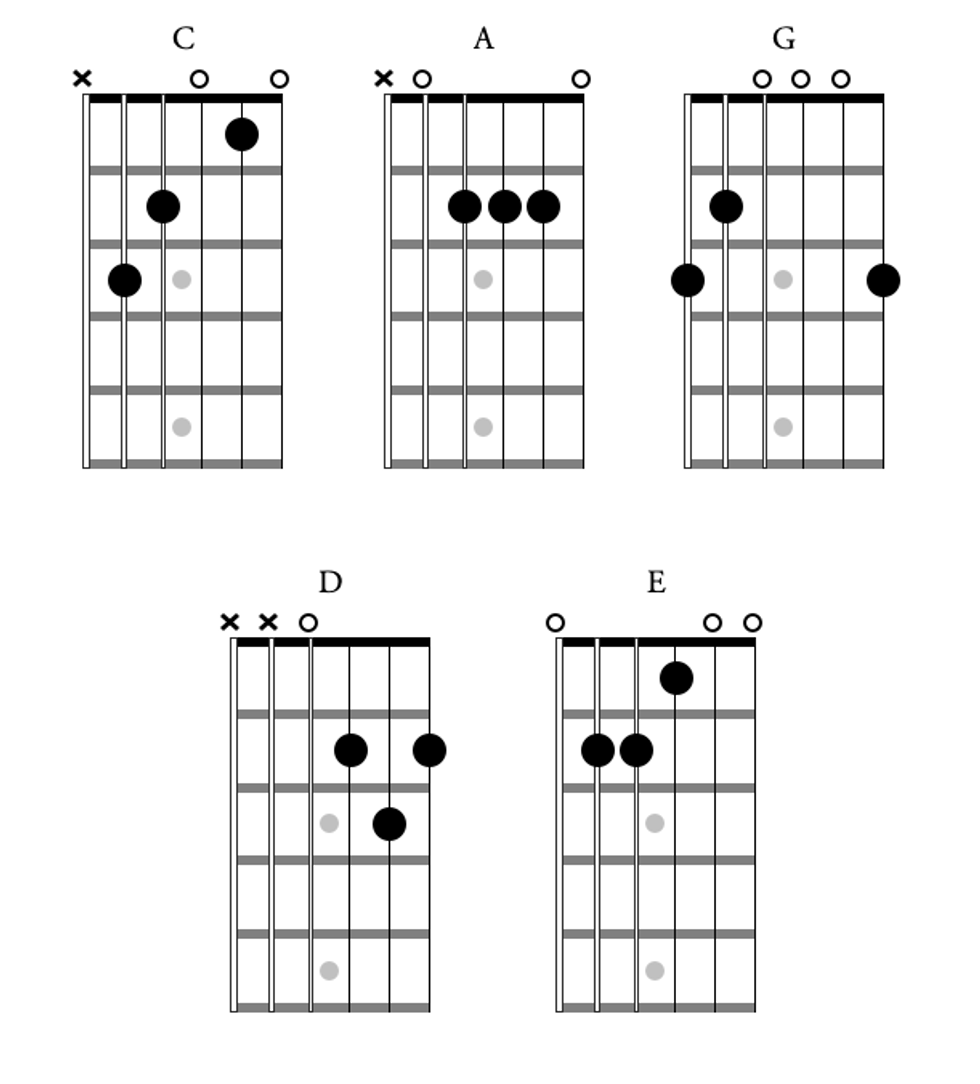
The CAGED system derives its name from five open-position chords: C, A, G, E, and D. To master the concepts in this lesson, you must know these five chords (Fig. 1).
CAGED Lesson Fig. 1
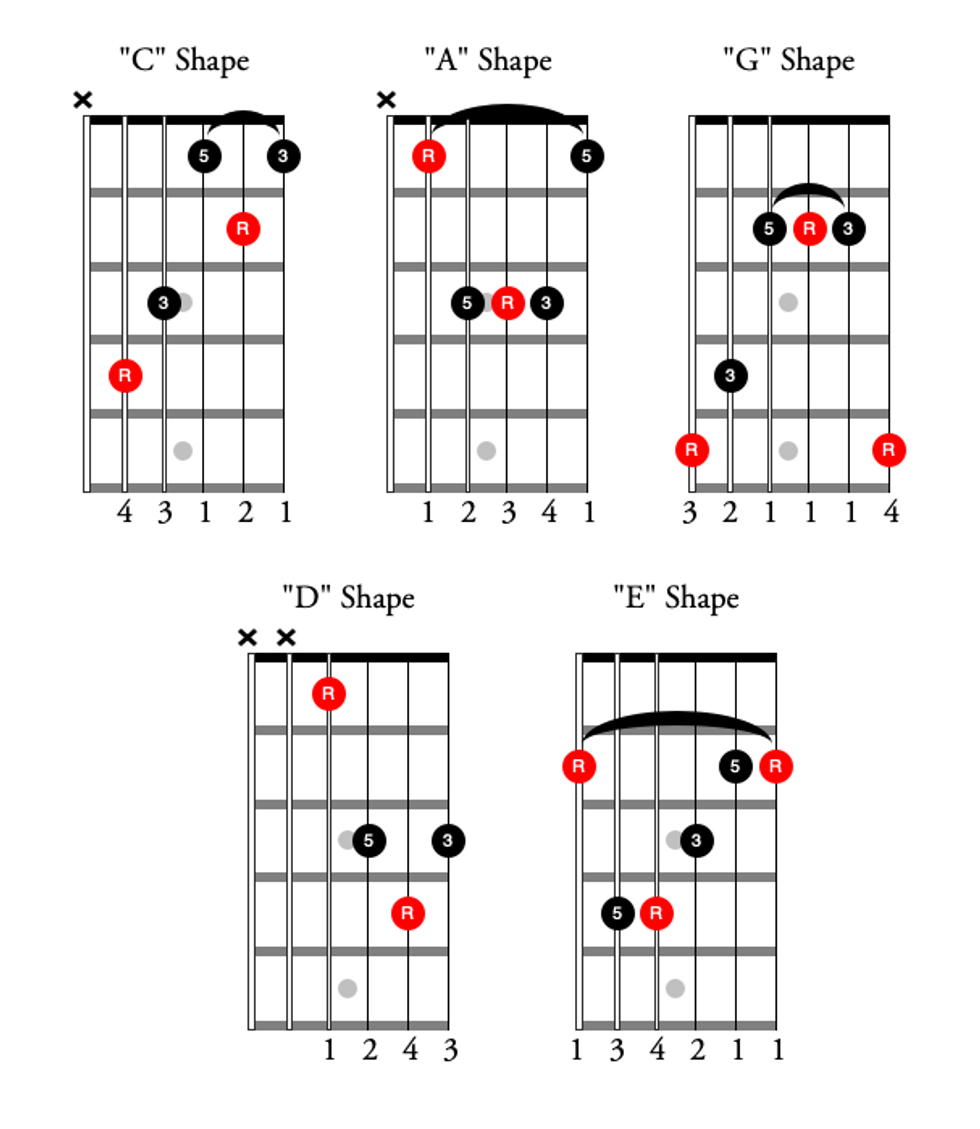
Next, you need to know where the root—a chord's musical foundation—is located in each of the five shapes. The root of a C chord, for example, is C. Major chords, which we'll focus on first, are built by stacking the root, third, and fifth notes of their respective major scales. The notes of the C major scale are C–D–E–F–G–A–B. Therefore, the root, 3, and 5 of a C chord are C–E–G.
In Fig. 2, you'll find the five CAGED chords with the location of the root, 3, and 5 labeled in each chord diagram. To help you get visually oriented within each shape, the roots are marked in red. You'll notice that each shape contains more than one root. C, A, and D each have a low and high root; G and E each have three roots—low, middle, and high.
CAGED Lesson Fig. 2

Assignment #1
Memorize the location of every root in each chord shape. For extra credit, memorize the locations of the 3 and 5.
Moving on Up
Now you know the shape of each chord in the basic CAGED system, as well as the location of their respective roots. The next step is to convert each open-position shape to a closed-position shape—meaning there won't be any open strings involved in playing the chord shape. To do this we must create barre chords out of each of the CAGED shapes.
Fig. 3 shows all the CAGED chords as barre chords. (Note: No barre is needed to play the "D" shape as a closed chord.) Some of these shapes may feel like old friends. The first barre chords most guitar players learn are the barre form of the "A" and "E" shapes.
CAGED Lesson Fig. 3
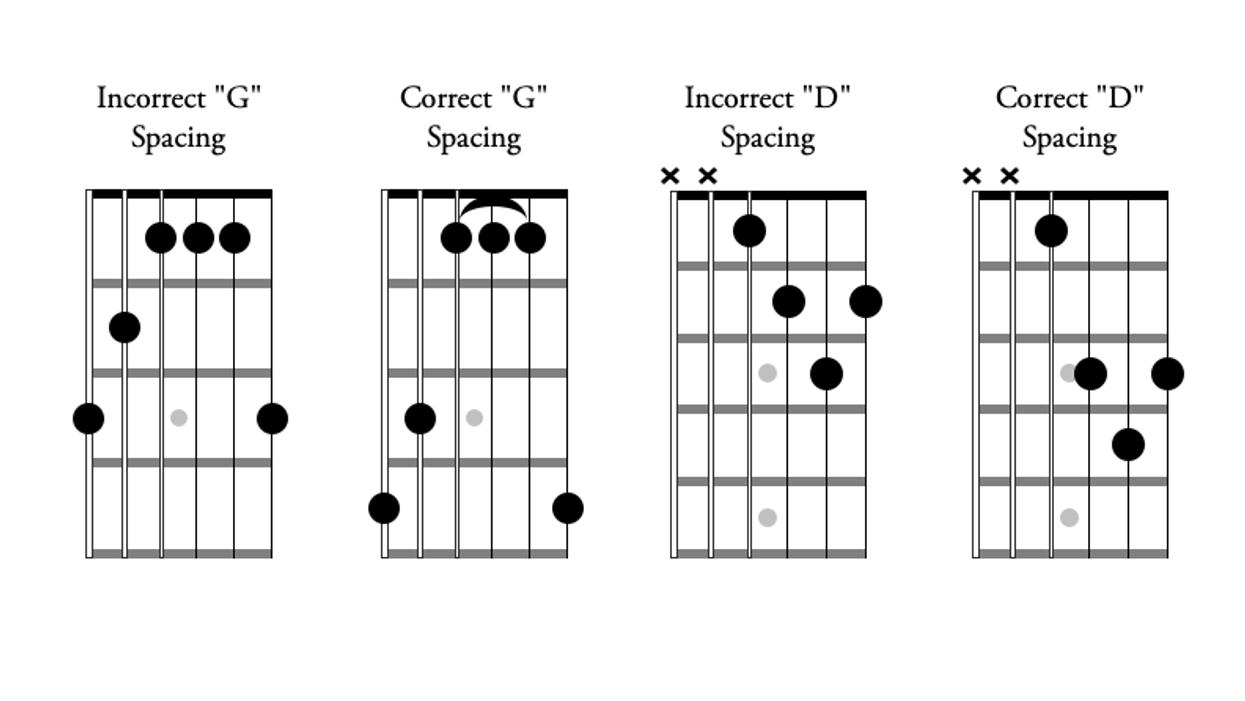
Two shapes that are less familiar and prone to spacing errors are the "G" and "D" shapes, and the common spacing error is to compress the fingering. Be sure to keep an empty fret between your first finger and the remaining fingers used to build the chord. Fig. 4 contrasts the incorrect, compressed fingerings with the correct ones for these two shapes.
CAGED Lesson Fig. 4
You may find a few of these shapes are difficult to grab due to the stretching involved. To minimize strain, don't wrap your thumb up and over the neck on the 6th-string side—keep it behind the neck instead. Also, I encourage you to only barre the necessary notes. For example, when playing the "G" shape, don't barre across all six strings; you only need to barre the three notes found on the 2nd, 3rd, and 4th strings. Why create any extra work?
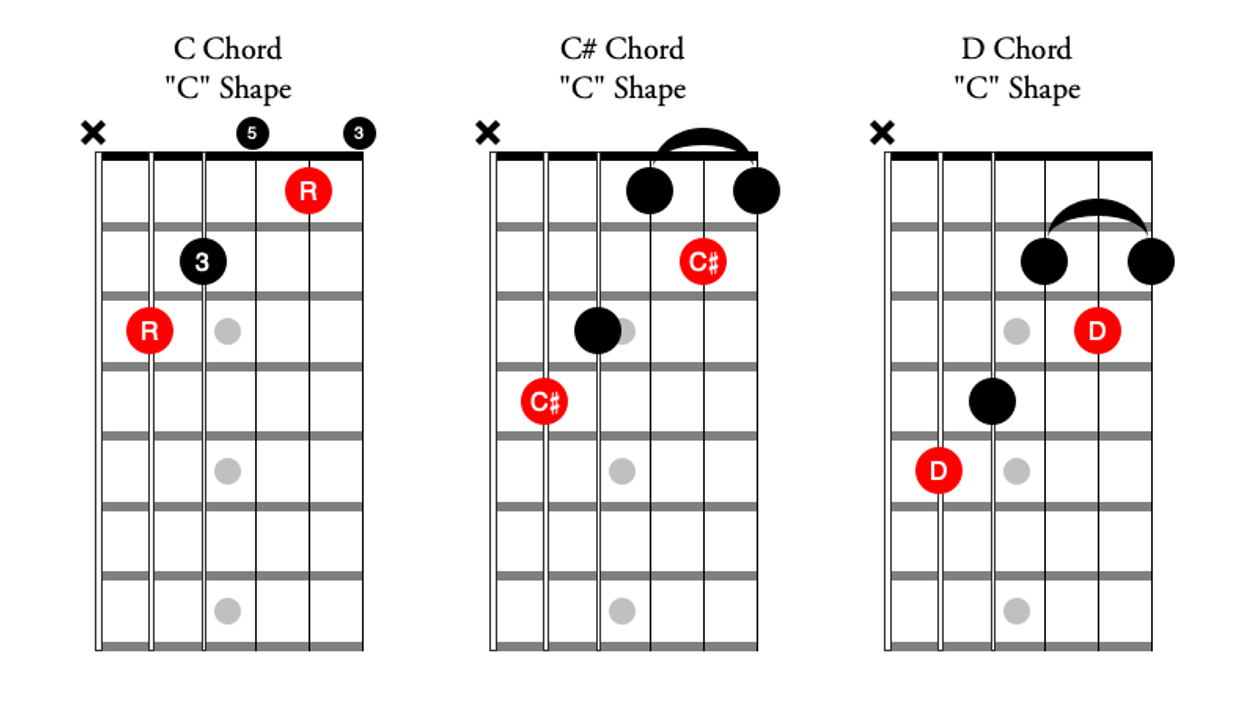
By converting each of the five CAGED shapes into barre or movable forms, you have exponentially increased your chord vocabulary. Each individual shape can become any major chord you need: Simply move the chord up or down the neck and place the shape's root on whatever note you want—it's that easy. When you look at Fig. 5, you'll see that moving the "C" shape up one fret creates a C# chord, and moving it up one more fret creates a D chord.
CAGED Lesson Fig. 5
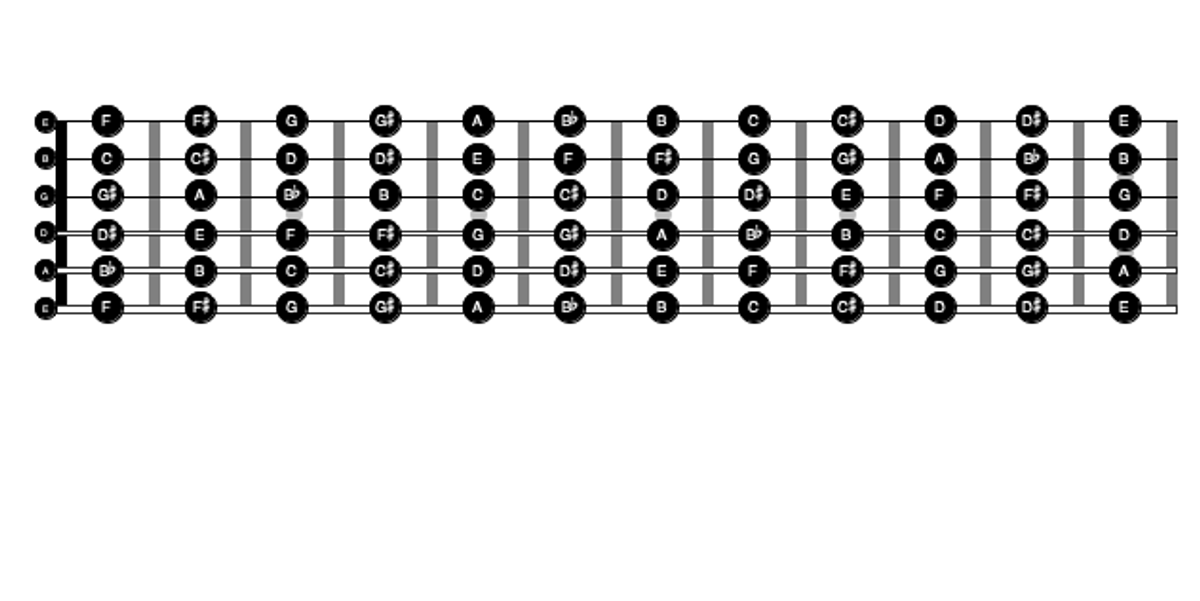
By knowing that the root is located on the 5th and 2nd strings in the "C" shape, and knowing the names of the notes on those two strings, I was able to correctly identify the actual chord I produced by shifting the "C" shape to these other locations. To do this with all five shapes, you need to know the location of the root within each shape and the names of the notes on the fretboard. Fig. 6 names all the notes on the fretboard.

CAGED Lesson Fig. 6
Assignment #2
Move each shape up and down in half-steps (in other words, one fret at a time), while focusing on keeping the shape together and not collapsing the "G" and "D" shapes. The goal is to correctly name the chord at any place along the neck.
What’s in a Name?
Up to this point, we've focused on acquiring the chord shapes and laying the foundation for realizing the full potential of the CAGED system. Think of each shape in the system as a puzzle piece: When all the pieces are connected, you will have mapped the entire fretboard. Again, the best way to see how this works is to experience it on your guitar. Play each of the chords listed in Fig. 7, paying attention to the fret markers and spacing of the shapes.
CAGED Lesson Fig. 7
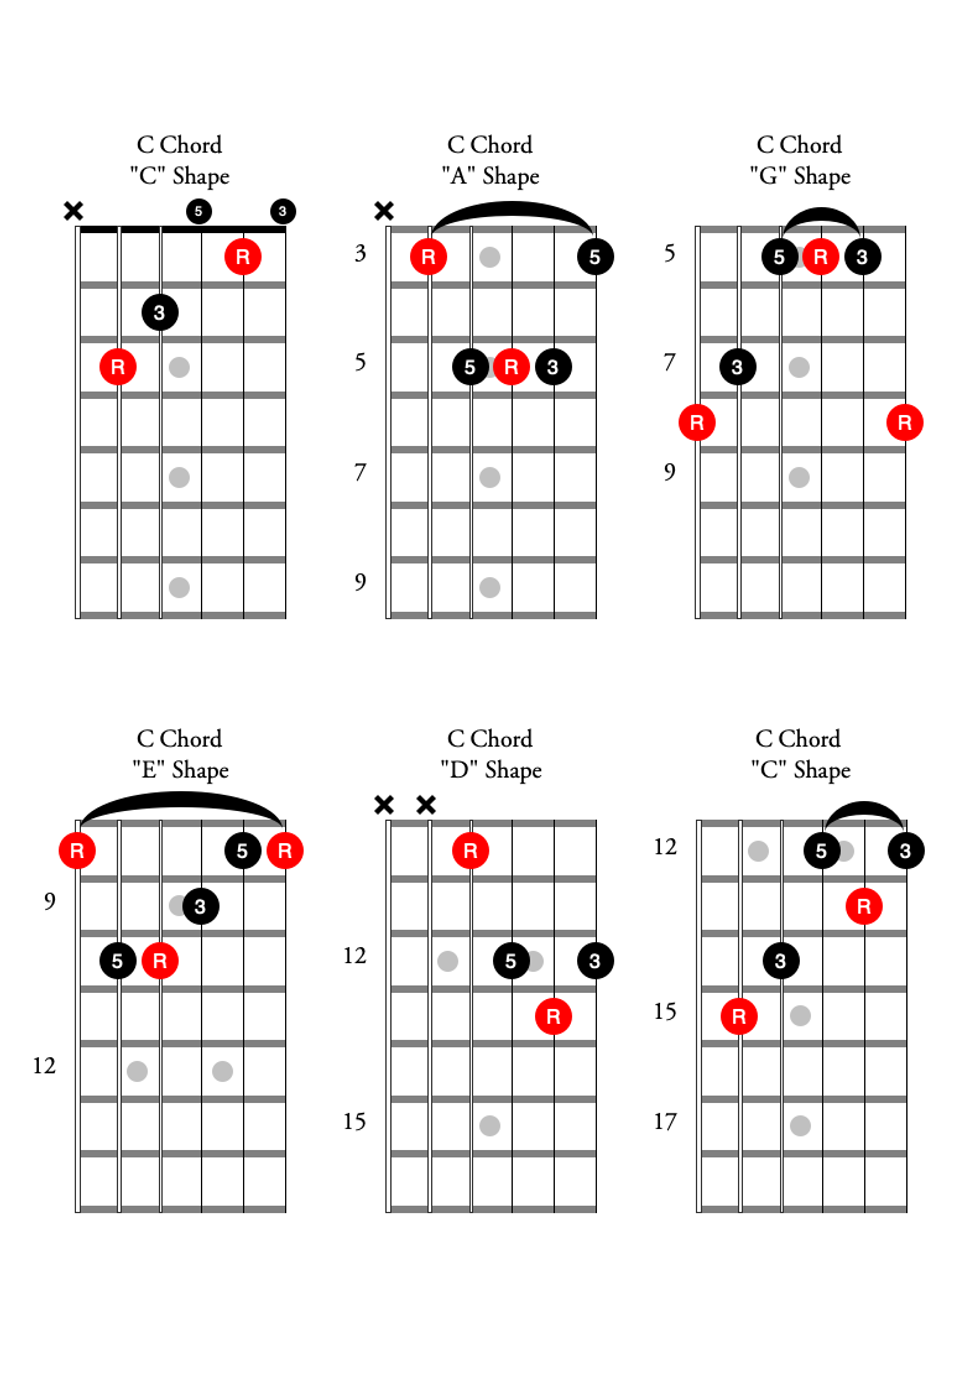
What did you notice? If you played this example correctly, you should have heard that they were all C chords. Hopefully you realized that you used all five shapes and you ended with the same shape you started with (assuming you have a cutaway on your guitar that allows you to access the higher frets).
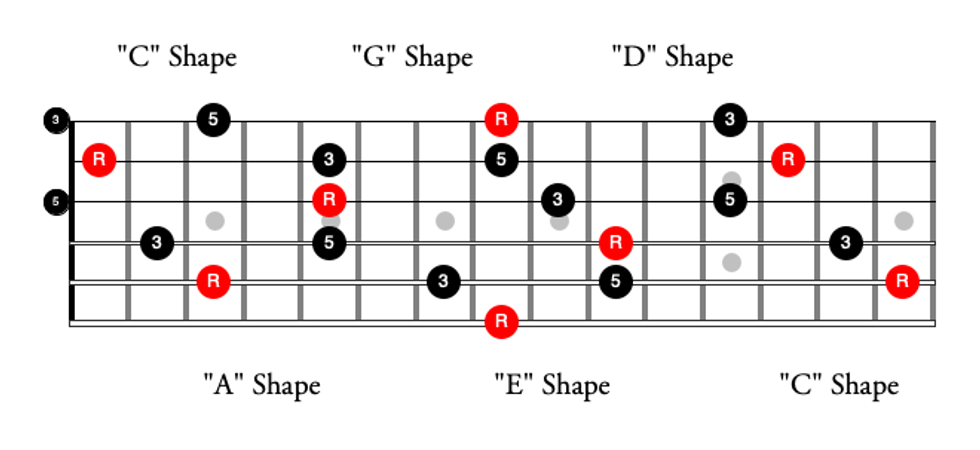
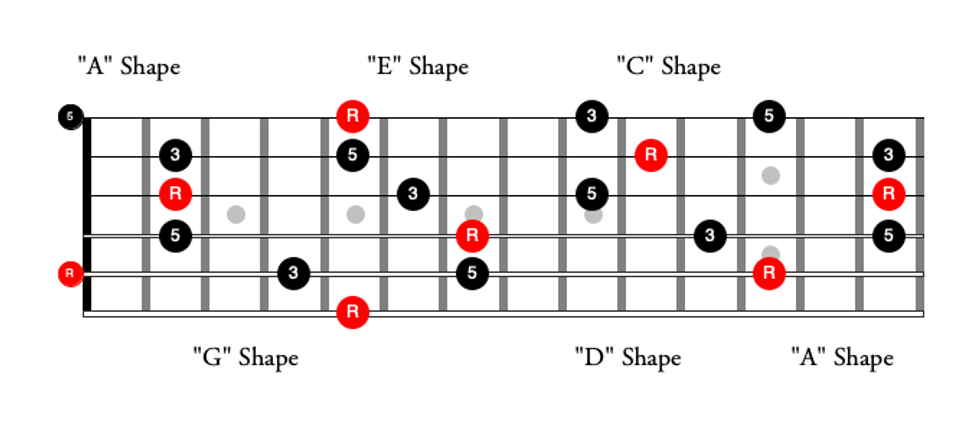
By the way, did you notice the order of the shapes used in this example? The name CAGED not only tells you what chord shapes make up the system, but also the order in which the shapes connect to one another to map out the fretboard. Fig. 8 places all five shapes as C chords in one fretboard diagram.
CAGED Lesson Fig. 8
What if you want to map out the chords in the key of A the same way you did for C? To do this, start with the open position A chord—an A chord with an "A" shape. Then think of the spelling of CAGED and find the letter following A, which is G. So, play an A chord with a "G" shape. Then it's an A chord with the "E" shape, and so on until we return to the "A" shape. So in this example, our shape sequence is AGEDC. This sequence is mapped out in Fig. 9.
CAGED Lesson Fig. 9
Making Connections
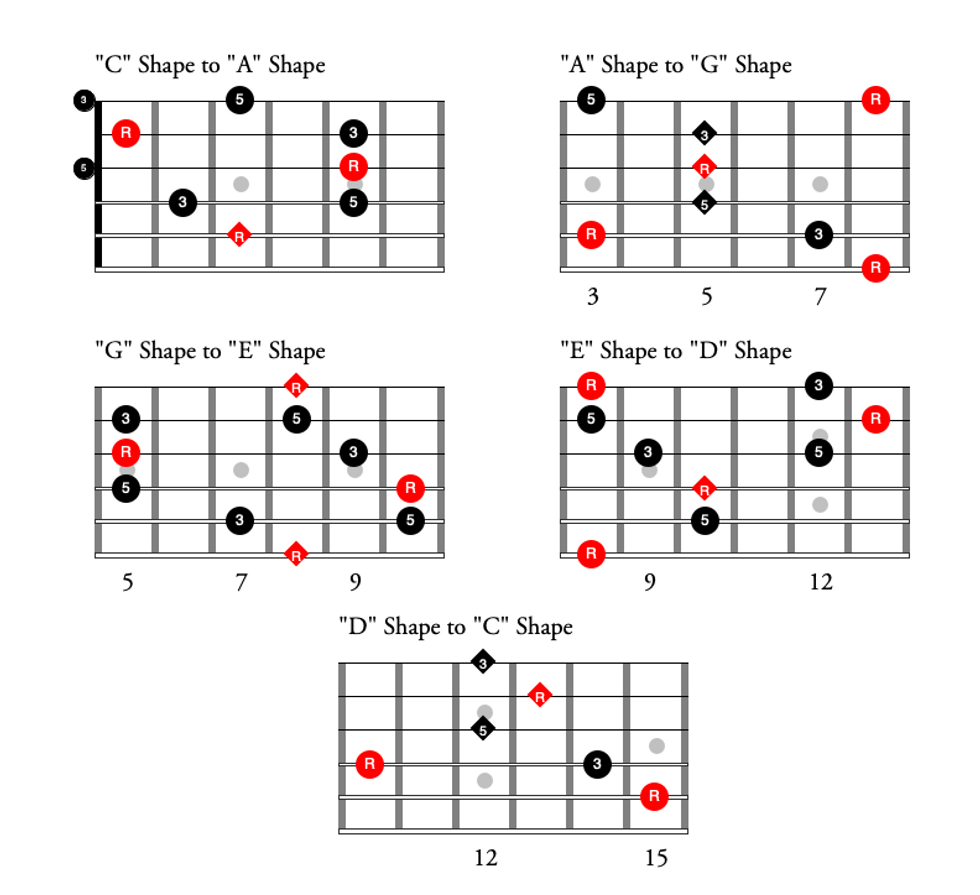
Earlier I suggested you think of the CAGED shapes as individual puzzle pieces that, when connected, map out the entire fretboard. By playing through the above examples, you've experienced this. When mapping out a chord, it is important to be visually aware of how two adjacent shapes connect to each other. A general rule to keep in mind: Between two adjacent shapes, there will always be at least one note that's common to both. In Fig. 10, I've diagrammed all pairs of adjacent shapes for the C chord. Notes that occur in both shapes are indicated with a diamond.
CAGED Lesson Fig. 10
Assignment #3
Play through the CAGED sequence starting on each of the CAGED chords in open position (like we did in Fig. 8 and Fig. 9, using the "C" and "A" shapes, only this time complete the series by working through the remaining three shapes—"G," "E," and "D"). Once you're comfortable with this, play the sequence in all keys. For example, start with a Bb chord using the "A" shape barred at the 1st fret, then play the CAGED sequence in the key of Bb. Pay attention to the common note(s) between two adjacent shapes—this will help minimize errors in shifting and connecting shapes.
Congratulations, you've mastered the fundamentals of the CAGED system and covered a lot of territory! The CAGED system provides a logical way of visualizing the neck using basic chord shapes you've most likely known for quite some time. But it doesn't stop there: The CAGED system is just as useful for scales and licks. In fact, I think of the CAGED system as five buckets where I can stash fretboard information. New chords, scales, licks, and melodies can all be related to one of the five shapes, and this allows you to integrate this information into your playing quickly and efficiently.