Pretty sounds live alongside freakish modulations in a phaser, flanger, and filter combo with super-impressive range.
Fantastic range of phase, flange, and filter tones that span conventional and radical sounds. Cool, practical, and functional trip switch. Beautiful design.
Some tones tend toward metallic, which might put off classicists.
$250
Death By Audio Disturbance
deathbyaudio.com
Somehow I sense that the Death By Audio team would appreciate that I wrote the review for their new Disturbance on the day I got a root canal. Dental drills whirring, bright lights, and flying spittle—this is the stuff of many DBA products. Yet the ominously named Disturbance—which manages to be a phaser, flanger, auto wah, and a sort of cocked-wah filter all in one—is actually capable of sounds that fall squarely in the category of beautiful. And like almost all DBA effects, it’s also capable of radical and jarring tones. Its ability to span these extremes is the Disturbance’s strength.
Silver Surfer Slides Away
The Disturbance is, even by DBA’s lofty standards, a cool convergence of industrial and graphic design. The gleaming silver enclosure guarantees you won’t mistake it for anything else on the floor. The control array is clear and functional, too, which is important for a pedal with such nuance and pretty-to-mangled sonic range. All told, it’s a rather simple layout. A small 3-way toggle switches between fazer, flanger, and filter settings. The three knobs along the top of the pedal are familiar and intuitive, but also take practice to understand entirely. Grasping their interrelationships is key to unlocking the whole of the Disturbance’s secrets.
The tensity control is a bidirectional intensity control. At noon, the modulation waveforms sound most fluid and even. As you turn it through its negative range, the output takes on an increasingly more metallic tone, and at maximum negative settings the waves peak with a trebly, whistling tonality. Yet, as you move back toward the middle, you’ll find some of the pedal’s clearest and most shimmering phase and flange voices, with hot, trebly peaks that elevate the modulation sound in a mix. You can even extract some great ’80s-vintage, chorus-like tones in this range at the right rate. To the clockwise side of center, the tensity control yields more vocal modulation voices and more low-mid emphasis that lends a bubble-gum chewiness to the modulation. There are even rich, Leslie-style tones lurking here at faster modulation speeds. At peak levels you can get wailing siren-like sounds from the flange mode, as well as peaky, hollowed-out phase tones.
The center point knob changes the polarity and center point of the LFO wave. Interestingly, it can be very subtle in many applications, and its effects are best understood by messing with it in filter mode. At the furthest counterclockwise setting, you’ll hear a distinct blunting of the transient note, tapering to a clearer tone. At the clockwise extreme you hear a clearer transient that swells into a more phasey tonality. At extreme tensity settings, the center point control has a more profound effect—emphasizing more trebly or bassier elements of the LFO cycle. The width control is, save for the self-explanatory speed control, the most straightforward function. It governs the LFO’s range. At minimum settings you get little sense of modulation at all. But as you turn clockwise the waveforms get thicker and more aqueous. At maximum levels it will negate the effects of the center point control entirely.
Trip It Up and Trip Out
One or the coolest features on the Disturbance is the trip footswitch. It freezes the phase, flange, or filter cycle, adding punctuation in an arrangement or helping bring a solo to a head. When using wild, more intense flange or phase settings, it can be a great way to duck out of a super-swirly section without losing any weird essence, as you might by switching to a completely dry tone. Freezing the precise point of an LFO cycle takes practice—not unlike using a looper. But the more I used it, the more I got hooked. And it’s a great way to extend the Disturbance’s practical capabilities.
The Verdict
Like any DBA pedal, the Disturbance is designed to leave its mark in a musical situation. So, though many settings here border on conventional, they may not satisfy classicists seeking canonical modulation tones. If you’re among this crowd, you may want to consider the tone score on a sliding scale. But I savored and bathed in the breadth of mellow to wild tones here. And I expect that to many players that relish the unexpected or crave sounds that make a statement, the Disturbance’s range of tones will be thrilling. That said, you don’t need to be a deviant or weirdo to find a wealth of inspiration in Disturbance. For musicians of just about any alignment, this is a pedal that will prompt invention. And while the $250 price is a touch high, it’s not much to pay for a pedal that can offer unique phaser, flanger, auto wah, and filter tones—particularly when you consider DBA’s build quality and generous break-it-and-we’ll-fix-it guarantee. Restless modulation fiends take note—the Disturbance is a treasure trove of satisfying swirl and many other wobblingly nasty surprises.
Separate, stackable custom-voiced circuits make a strong and crunchy case for two being better than one.
Recorded direct into Focusrite Scarlett 2i4 interface into GarageBand.
Clip 1: Channel 1: gain 2 o’clock, tone 12 o’clock, level 1 o’clock. Channel 2 (engaged at :20 to :30): gain 2 o’clock, tone 11 o’clock, level 3 o’clock, freq 2 o’clock, sub level 4 o’clock.
Clip 2: Channel 1: gain 12 o’clock, tone 2 o’clock, level 2 o’clock. Channel 2 (engaged at :20 to :40): gain 12 o’clock, tone 3 o’clock, level 3 o’clock, freq 12 o’clock, sub level 12 o’clock.
RatingsPros:Dual distortion circuits. LED position markers. Variety of distortion flavors. Gain dials have balanced/even sweep. Cons: A bit pricey if both distortions aren’t being utilized. Street: $169 Fender Trapper Bass Distortion fender.com | Tones: Ease of Use: Build/Design: Value: |
In case you didn’t notice, Fender has been making a spirited splash with new pedal offerings these past few years—24 since 2018, to be exact. In aesthetic concert with its compadre stomps in the line, Fender’s Trapper Bass Distortion boasts a lightweight, anodized-aluminum chassis and LED-illuminated controls. Its standout feature, however, is that it runs two separate, analog distortion circuits. Both channels house tone, output, and gain knobs, but the second channel also features a pair of dials to manage the low-pass frequency and clean-output volume from the low-pass filter.
With channel 2 as my starting point, I found the sweet spot for some subtle, raspy grit with the gain and tone both set around noon. It’s a smooth and tight distortion with good response that I’d simply set-and-forget for a round of straight-ahead hard rock. Gradually increasing the gain for heavier flavors, I was steadily rewarded with a modern-leaning, pretty fierce crunch. While leaner with the gain maxed, wide open was still a very usable tone and not a soupy, suffocated mess. With the pedal’s higher-gain settings, the sub-level and frequency controls are there for fine-tuning the central sound and helping to maintain clarity and depth. The two channels are stackable, so there’s more control over the pedal’s gain structure and tone. The second channel is also an apt tool for those occasions we’re granted a solo, or for more aggressive sections of a song when a boost with an extra helping of distortion is needed. If you’re dual-dirt curious or simply interested in a fresh flavor of distortion, the Trapper is worthy of a look-see.
Test Gear: Gallien-Krueger 800RB, Orange OBC212, Focusrite Scarlett 2i4, Fender Precision, Schecter Banshee
Here's how to clean up low-end mud and add definition to mixes.
Welcome back to the Dojo. This time we're going to look at the mighty high-pass filter (HPF) and how you can use it to clear out muddy, low-end frequency build-up in your mix, and get more separation between your guitars, bass, and kick drum.
A high-pass filter does exactly what the name implies: It attenuates the low frequencies while allowing the higher frequencies to “pass through" and be heard. You can find HPFs in many different places, but the best place to look is an EQ (either analog or digital). All DAWs come with EQs, so put one on your track and follow along.
Let's talk about the bottom end. In standard tuning, the lowest frequency on the guitar is about 83 Hz (our lowest E string), the standard 4-string bass can play down to 41 Hz, and (generally speaking) the kick drum fundamental lives in the 40 to 70 Hz range. This means that there is quite significant overlap from 40 to 100 Hz between these three instruments. Although defined lowest notes exist on instruments, that doesn't mean that when recording your guitars, bass, drums, etc., that other lower frequencies are not sneaking into your tracks!
Say you're creating your next guitar-laden behemoth, with dozens of guitar tracks. Every time you add another guitar track, you're also adding lower-end information that's accumulating and slowly covering up your bass and kick drum. You turn up your bass and kick, but then the guitars sound anemic and not as defined. It's getting bass heavy and you end up chasing your tail, getting frustrated, and asking “why can't I fix this?" Sound familiar?
Look at Fig. 1. This is an audio snapshot of me playing a grindy, super-distorted low rhythm part through my amp without a high-pass filter. You can tell by the peak, at 82 Hz, that I'm cranking low Es and Fs. Now look to the left of that 82 Hz peak. There's still a significant amount of low-end information present, especially from 70 Hz down, and this is only one track! Imagine doubling this part and adding more tracks. We're headed for some serious low-end buildup.
Now look at Fig. 2. This is the exact same section of audio with a high-pass filter at 155 Hz (the faint green line), with a 12 dB per octave slope. (More on this in a bit.) If you compare the difference you'll see that the 82 Hz peak has lessened, and most of the sub-frequencies have been radically reduced. Rest assured that the guitar sounds as bold and brazen as it did before, but now I've carved out room for my bass and kick drum to coexist.
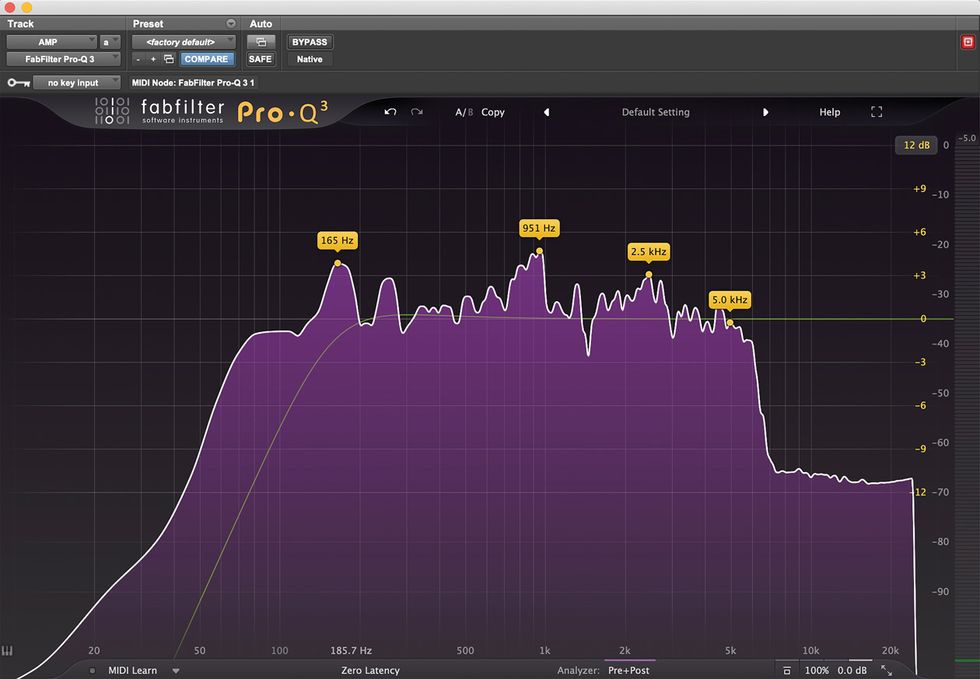
Fig. 2
I mentioned a 12 dB per octave slope. What does that mean? High-pass filters need to have a slope shape to be able to separate the frequencies you want to pass through from the ones you don't. The gentle slope of 12 dB per octave means that all the frequencies below wherever the filter is set (say A, or 440 Hz) will gradually be reduced, and by the time the next lowest A (220 Hz) comes around, it will be 12 dB lower. Most plug-in EQs, like the FabFilter Pro-Q 3 (which I love for many reasons), will offer many choices of slope shapes ranging, from 12 to 96 dB per octave. Remember this: The higher the slope shape value, the more you're absolutely shutting the door on those frequencies below your filter point. This can be very useful if you want to have total control over instrument ranges and how they overlap each other. Generally, I prefer 12 to 48 dB slopes, and only use 96 dB and above slopes for an effect and rare offending lower frequencies.
Try this: Take your rhythm guitar track with the lowest range and use a 48 dB per octave HPF. Slowly sweep it while listening to it in the mix. Stop when you notice it sounding slightly thin. Now pull the filter back just slightly to the left. Solo the track and toggle the HPF on and off. Notice how thin it sounds when soloed, but it has more gravitas in the mix! Why? Because you're allowing the bass and kick drum to occupy that region and making your mix sound better!
See you next month and keep experimenting.