
Don Peake wields one of his longtime companions, the Gibson ES-335 model.
The Wrecking Crew guitarist played with the Everly Brothers, the Jackson 5, Marvin Gaye, and many more. He shares memories of hanging with Elvis, the Beatles, and the Stones, long sessions with Phil Spector, recording with Sonny and Cher, and spitballing now-iconic guitar lines ingrained in music history.
The Wrecking Crew was a group of Los Angeles session players who shaped hundreds of hit records in the '60s and early '70s. The list of guitarists often named as crew members includes Tommy Tedesco, James Burton, Glen Campbell, Al Casey, Barney Kessel, and Howard Roberts. More rarely mentioned is Don Peake, who was right there in the studio trenches with them, creating timeless tracks for Phil Spector and others.
Peake later cut hits for Motown as well. If you listen to classic pop radio, you have doubtless heard the iconic opening wah-wah lick to Marvin Gaye's "Let's Get It On" and the guitar line doubling the bass on the Jackson 5's "I Want You Back," but probably never knew it was Peake playing those parts.
Though he appears briefly in The Wrecking Crew movie, it's safe to say Don Peake's place in the world of historic session guitarists is shamefully unsung. It's long past time for this purveyor of iconic guitar parts to be recognized. While many of his peers have departed, Peake luckily remains with us, ready to relay some amazing stories, which he does in this Premier Guitar interview.
"Elvis would come in three nights a week. We'd sit with him in the balcony on the break." —Don Peake
Don Peake was born in Los Angeles, California, on June 7, 1940. During high school, he played clarinet and sang with an a cappella choir. Picking up the ukulele at 16, he eventually moved to guitar. When word got out he could play Gene Vincent's "Be-Bop-A-Lula," it was recommended he try out for a gig with rockabilly singer Jackie Lee Cochran.
"I went to a night club called the Rag Doll," Peake recalls. "In the parking lot was a line of guitarists waiting to audition." Cochran fortuitously asked Peake if he knew "Be-Bop-A-Lula," and an affirmative answer helped him clinch the gig. Opening night, after playing that song, Cochran asked the young guitarist what else he knew. "Nothing," he replied.
Peake managed to keep the job, but to fill in the gaps he quickly signed up for lessons at Clara Joyce Sherman's School of Music in Hollywood. As luck would have it, his guitar teacher was Ray Pohlman, who would go on to be a regular guitarist and bassist in the Wrecking Crew. "Ray was a jazz guitarist who played with the Billy May Orchestra," he says. "He taught me to play and mentored me. I bought my blonde, 1946 Gibson ES-350 with the single pickup from him." A special guitar, indeed: The ES-350 Peake bought from Pohlman was a rare one-pickup jazz model made in 1946. Gibson started making the iconic two-pickup models in 1947.
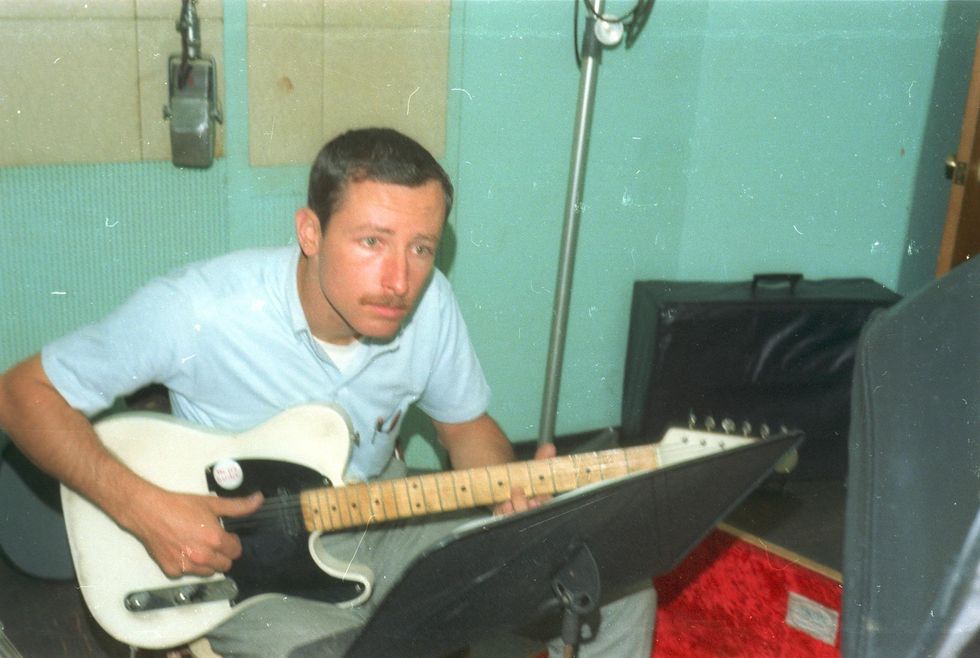
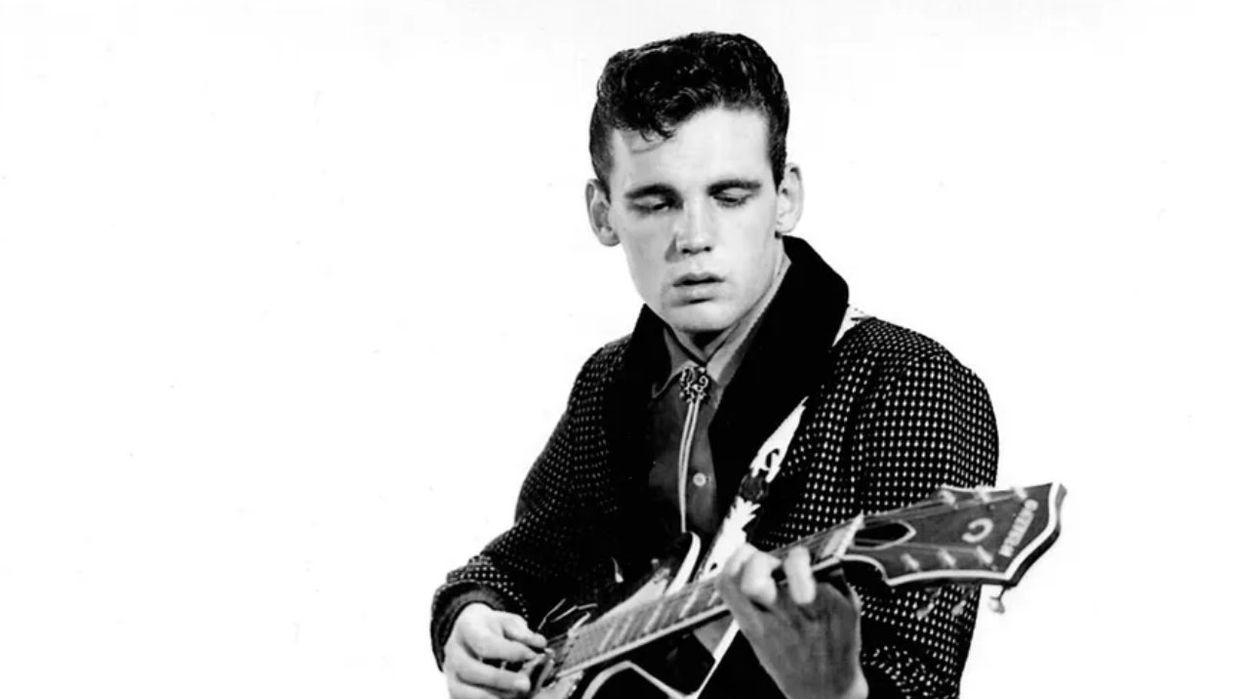
Here's Peake at work in studio, putting his skill at reading music to work. This is a still from the documentary film The Wrecking Crew.
Working with Cochran helped cement the young guitarist's reputation as a rock 'n' roll player, which led to a gig with Lance LeGault, Elvis Presley's movie stand-in. "LeGault loved Ray Charles' songs and had his sax player write out 'Hallelujah, I Love Her So,' 'Drown in My Own Tears,' etc.," says Peake. "I learned the exact guitar parts, which came in handy later. Elvis would come in three nights a week. We'd sit with him in the balcony on the break."
Learning to read music while playing rock 'n' roll gigs provided Peake a perfect primer for later working with the similarly schooled Wrecking Crew, who also helped create much of the era's teenage music. Another bit of serendipity was hanging out with a young Phil Spector.
"Phil was studying with Howard Roberts," Peake remembers. "I started studying with both Barney Kessel and Roberts. Howard would write out arpeggios for me, while Barney was 'Mr. Time.' He would say, 'You've got a rod connecting your forearm to your foot. You have to tap your foot and keep your arm moving. It doesn't matter if you miss the chord, keep going. Never stop your right hand.'" Spector gave Peake a T-Bone Walker LP, adding a blues influence to the guitarist's jazz and rock background. "T-Bone had those wonderful moving 9th chords," he says.
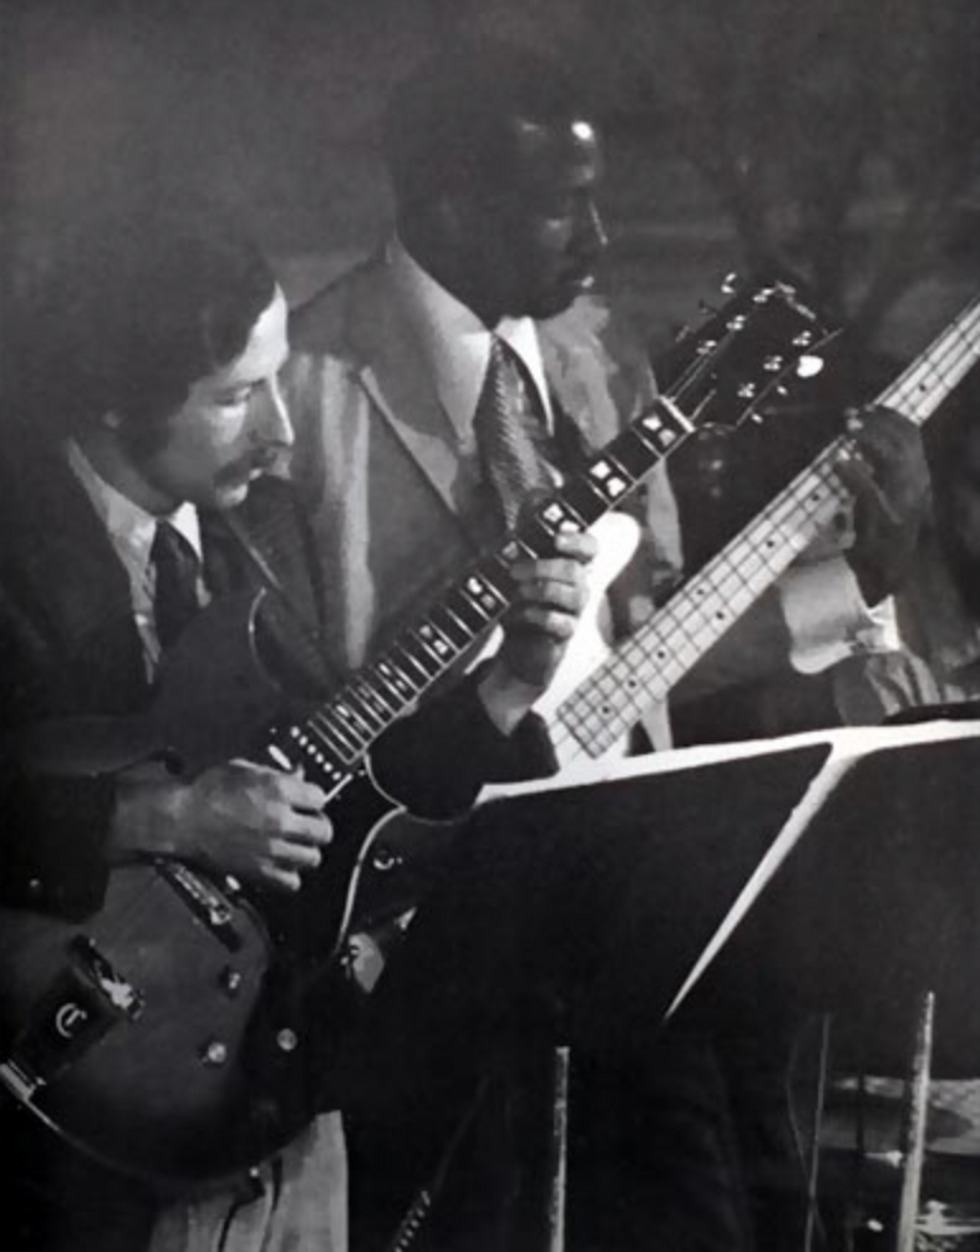
Shown here in 1972 at an RCA Hollywood Studio session, Peake holds a modified ES-335 that began life as a 12-string, owned by John Phillips of the Mamas & the Papas. Fellow sessioner Paul Herman got it from Phillips and cut down the headstock and painted it black before selling it to Peake, who then used the instrument as his primary studio axe.
Courtesy of Don Peake
Spector's friend Marshall Leib, from his group the Teddy Bears, told Peake that the Everly Brothers were looking for a guitar player. Playing with the Everlys would be his first big gig and place him at the center of the musical revolution taking place in early '60s England.
"We flew to London," he recalls. "After the gig, we went to a night club where a pretty good band was playing." Still wearing their matching gray suits, it was clear that Peake and company were a band as well, so the local performers joined them on their break. Among those locals were Albert Lee and Eric Clapton. In his autobiography, Clapton describes Peake as one of the American guitarists who impressed him as being technically better than he was.
On the next trip to England, the Everly Brothers headlined a tour featuring the Rolling Stones, Bo Diddley, and Little Richard. "As I was watching one of the other acts, I noticed a black man in a full-length peignoir across the stage, holding a bible," he says. "One of the stagehands said, 'That's Little Richard Penniman.'"
"Brother Ray came in and sat down at the piano. He said, 'Do you know 'Hallelujah, I Love Her So?'—cut back to Lance LeGault, making me learn those Ray Charles songs—I said, 'Absolutely.'" —Don Peake
Brothers and band soon started hanging with the Beatles and Stones in Hamburg. "The Star-Club had three stages," says Peake. "We traded sets: Everly Brothers, Rolling Stones, Beatles. Jim Gordon came over as the drummer. He went on to play with Clapton."
During his Everly Brothers tenure, Peake had to leave his 1951 Fender Broadcaster at home. "The Everly Brothers were sponsored by Gibson, so we weren't allowed to use a Fender guitar onstage," he explains. "They gave me a brand new, bright red SG. We were strumming hard, and it would constantly break the 3rd or 4th string. I didn't have a spare guitar, so I would finish the show playing an octave higher."
Once back in Los Angeles, producer Jimmie Haskell heard about Peake and arranged for him to play with Ricky Nelson. "I played on the Adventures of Ozzie and Harriet sessions for a little while," he says. "James Burton was there at the same time. He came in the studio one day and started bending strings. I said, 'How did you do that?' He said, 'I've got an E string, where my G string is supposed to be.' That was the first time we saw anybody play a light G string."
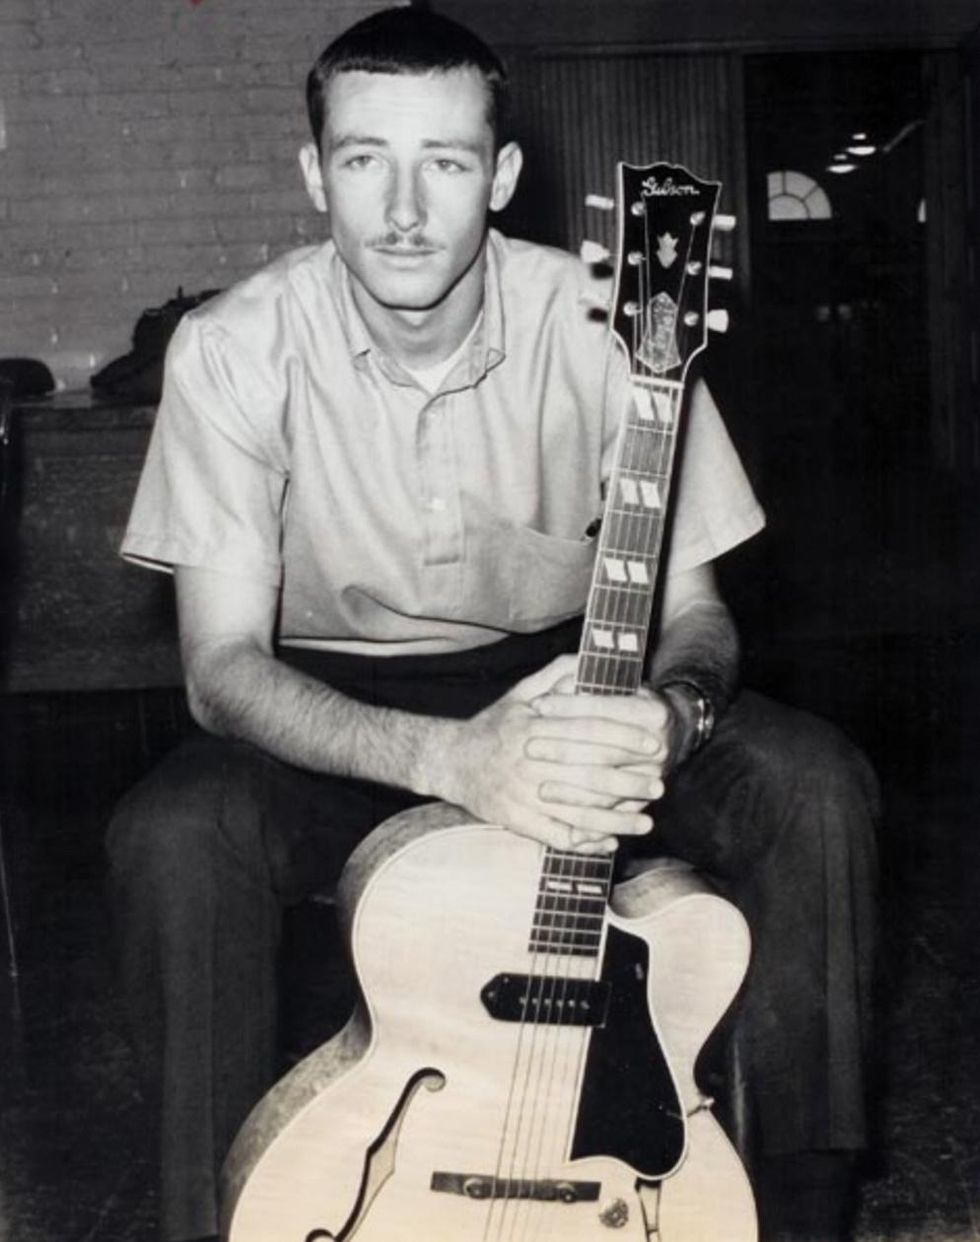
Don Peake bought this blonde 1946 Gibson ES-350 with a single pickup from Ray Pohlman, his guitar mentor and Wrecking Crew bandmate. This rare jazz model was a precursor to the two-pickup model introduced in 1947. Peake's chart-reading and big-band chops were honed while playing in the jazz band at L.A. City College, where this photo was taken in 1960.
Photo courtesy of Don Peake
Peake's sessions with the Wrecking Crew started around 1966 with the Righteous Brothers' "You've Lost That Lovin' Feelin'." That record would define Spector's "Wall of Sound" and become one of the most played radio tunes of all time. A sizable chunk of that "wall" was the guitar section, including Barney Kessel, Howard Roberts, Bill Pittman, Tommy Tedesco, and Peake, all playing together.
"Tommy or Barney would be the first chair," Peake recalls. "There were always three guys playing miked Gibson L-5s. I bought mine from Howard Roberts. The board at Gold Star only had seven channels, so they had all the guitar mics running together on one channel. Phil would have us move around to get the balance. He would rehearse us for three hours. Howard Roberts once said, 'Man, you come out here and play this. I'm getting tired.'"
Peake is featured on another major hit that sounds like a Spector production, but isn't. "One day, I'm up at Armin Steiner's studio and a shaggy-haired guy comes in with a beautiful girl in bangs," he relates. "The producer said, 'This is Caesar and Cleo.' The song was 'Baby Don't Go.' I did the tremolo strumming part."
"Don was the best reader of the three of us and would help us with any problems reading charts." —Louie Shelton
A week later, Ahmet Ertegun heard the duo, changed their name to Sonny and Cher, and ordered a full album, which included the massive hit "I Got You Babe."
"That tune is me on my Fender Telecaster with a lot of reverb," says Peake. "Sonny produced the records. He'd been a gofer for Phil Spector and, like Phil, he was into lots of reverb and long rehearsals. Barney Kessel was sitting next to me. He had played jazz with Charlie Parker and Lady Day [Billie Holiday]. After playing this one F7chord for three hours he said, 'Sonny, if a doctor told me I had only two weeks to live, I'd spend them with you because each moment is like an eternity'."
In 1964, Peake landed a gig with a man whose music had inspired him as a teenager. While recording at Gold Star Studios, he ran into his friend Arthur Wright on the phone with Ray Charles' manager Joe Adams. Wright put Peake on the call.
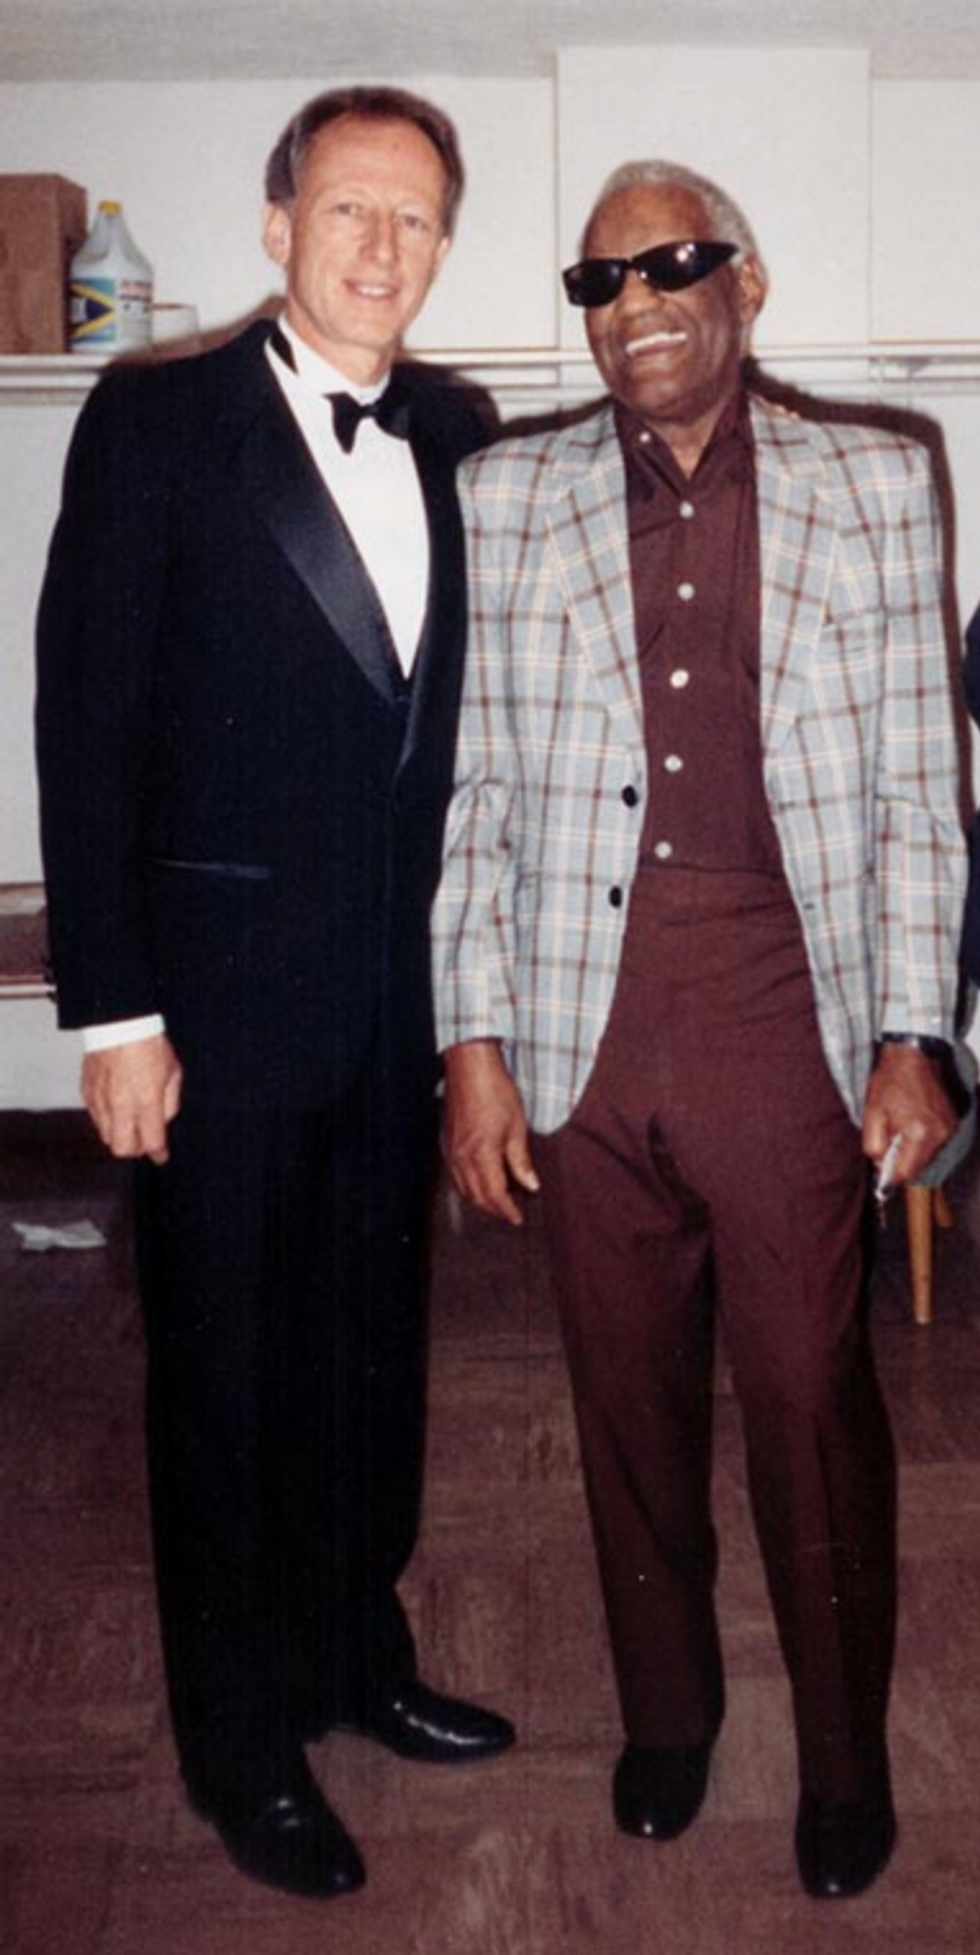
Don Peake with his boss, the great Ray Charles, in the dressing room before a show in Wichita, Kansas, circa 1993.
Courtesy of Don Peake
"Adams said, 'Ray Charles is looking for a guitar player," he recalls. "We've tried 35 guys and can't find anybody who can play the blues, read music, play jazz, and already knows Ray's old songs, because we've lost some of that music.' I said, 'I'm white.' He said, 'Can you play?' I said, 'Yes.' He said, 'Get down here.'"
Peake grabbed his Deluxe Reverb, Gibson L-5, and ES-350, and drove to the studio, where he hauled all three up a flight of stairs. With his hands full, he kicked open the rehearsal room door, slamming it into the wall.
"Staring at me were five saxophones, four trombones, four trumpets, bass, drums, an empty piano chair, and an empty guitar chair," he says. "I'd been playing with the jazz band at L.A. City College, so I knew how to read big band charts. The drummer called an up-tempo Count Basie blues and I started playing that L-5 as fast as I could. Leroy Cooper, the baritone player, leaned over to Lily Fort, the lead singer of the Raelettes, and said, 'That boy is serious.' Then they said, 'Get out your electric.' I picked up the 350 and we did 'Jumping with Symphony Sid.' Brother Ray came in and sat down at the piano. He said, 'Do you know 'Hallelujah, I Love Her So?'—cut back to Lance LeGault, making me learn those Ray Charles songs—I said, 'Absolutely.'"
Joe Adams informed Peake that Charles wanted to hire him at $200 a week. "I told him the Everly Brothers were paying $225," says Peake. Adams said he would have to talk to Mr. Charles. Fearing he had blown the gig of a lifetime, Peake drove to his mother's house, where he lived when he was off the road. "She said, 'Joe Adams called," he recalls. "They're going to pay you $225, but give you a separate envelope for the $25, so the rest of the band doesn't know about it.'" Thus, Don Peake became the first white guitarist to play with Ray Charles.
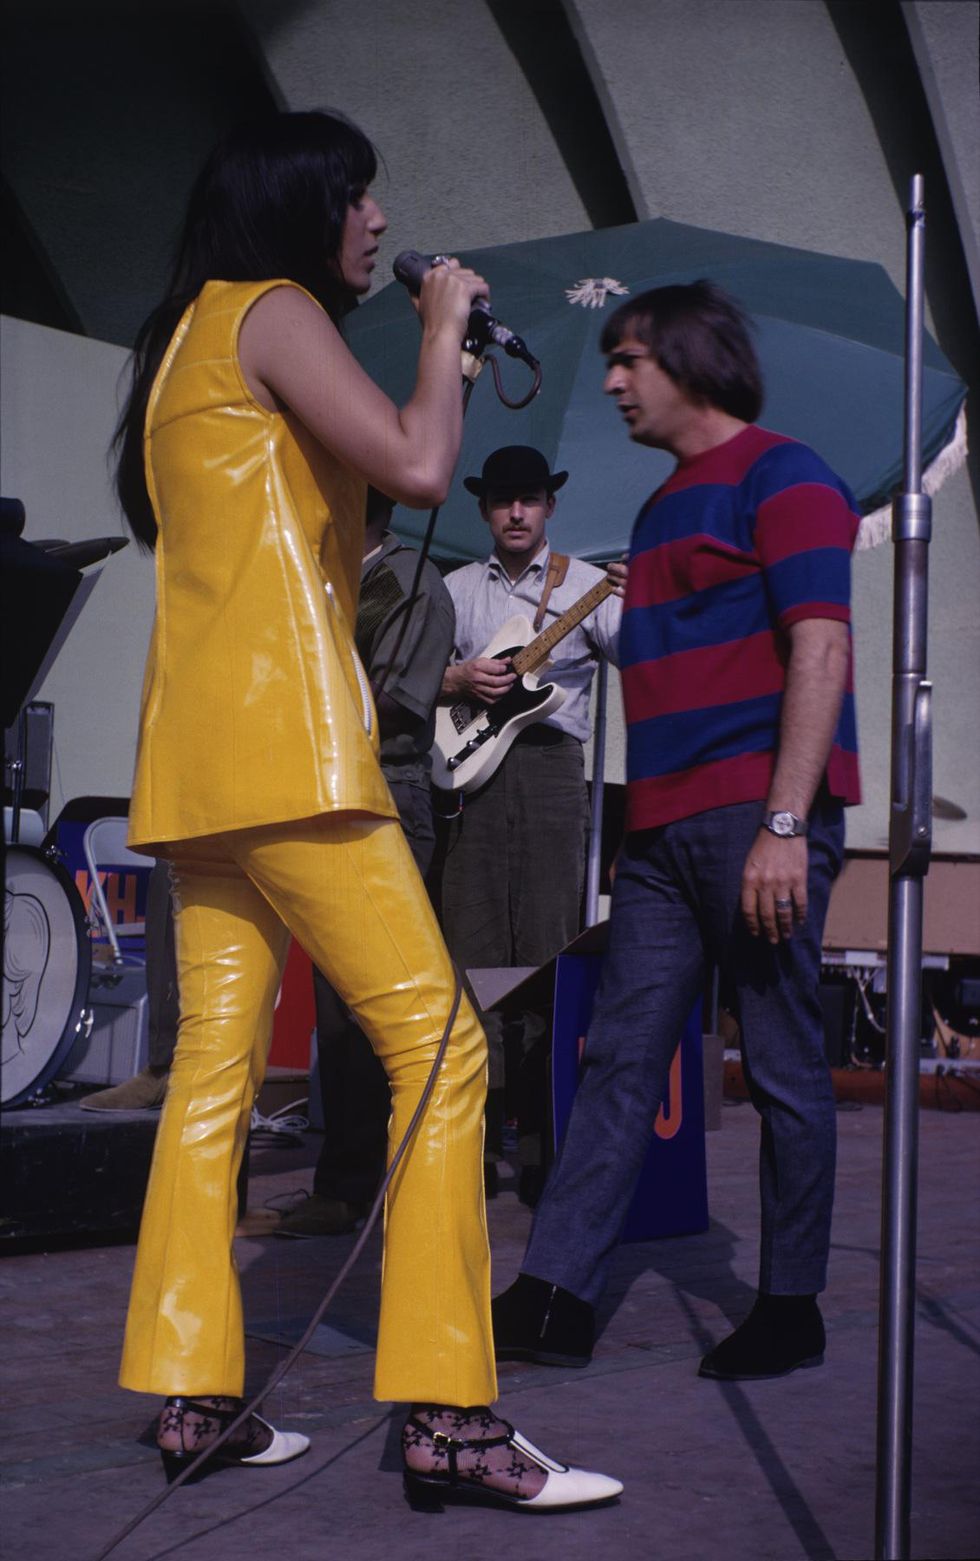
Don Peake peeks out of a Sonny and Cher sandwich while backing up the iconic duo at L.A.'s Hollywood Bowl in 1966.
Courtesy of Don Peake
Before they hit the road, Charles recorded a live album. During the show, he began playing the introduction to "Makin' Whoopee"—a song for which there was no chart. "I had never played it with him," says Peake. "When he goes up a half-step on the dominant you can hear me slide into it. I'm learning the song onstage while they're recording it."
Peake continued recording with Charles even after he stopped touring with him, cutting classics like "America the Beautiful" and "Crying Time." He can be heard loud and clear on a lesser-known Charles cover, "Blue Moon of Kentucky," playing the signature intro and the solo over the fade. Toward the end of the track, you hear Charles exhorting the guitarist, "Play it! Play it 'til it gets good." Rather than being critical, according to Peake, he is encouraging him. "He's saying, 'Keep going. It's good,'" Peake says.
While "Blue Moon of Kentucky" is a deep cut, the guitarist's soulful blues licks on the massive Charles hit "Let's Go Get Stoned" have been heard by countless millions through the decades. Though the tone sounds Fender-ish, the guitar was an old Gibson ES-175. "I restrung it with real light strings," Peake explains. "I ended up not liking it, but I did use it on that recording."
In 1966, Peake was asked to go on the road with Bobby Darin, but told Darin he wanted to stay in town and be an arranger. A week went by before he got the call from the singer's managers. "I went to their office, where they played me 'If I Were a Carpenter' by Tim Hardin," he says. "They wanted strings and I'd never written for strings before. I went home, opened up the Russell Garcia arranging book [The Professional Arranger Composer], and feverishly figured out how to write the string quartet. When we recorded at Gold Star, I stood near the studio door so I could get out quickly. When the strings came in, I thought, 'That sounds all right,' and started walking back into the studio." This Bobby Darin hit would mark the beginning of an arranging and scoring career that would ultimately replace Peake's session work, but the guitarist still had some classics to cut.
"There are certain guitar licks or solos that always give me goose bumps, and Don Peake's opening part on 'Let's Get It On' is one of those." —Denny Tedesco
By 1969, Motown had started recording in Los Angeles. Diana Ross was going to produce the first Jackson 5 record with Ben Barrett as contractor. For the Ross-produced record, Barrett put together a band that included Peake, David T. Walker, and Louie Shelton on guitar, Wilton Felder on bass, and Gene Pello on drums. "On 'I Want You Back,' I doubled the bass line with Wilton," he recalls. "I had to read it."
Peake was quite good at that, Louie Shelton recalls. "Don was the best reader of the three of us and would help us with any problems reading charts," Shelton says.
In addition to doubling one of the most famous bass parts of all time, Peake appears on much of the Jackson's subsequent output. That's his Coral electric sitar on "Maybe Tomorrow" from Third Album and his early fuzz pedal shaping the memorable distorted part on "ABC." "I also had a Cry Baby wah," says Peake. "It said Thomas Organ Company, Sepulveda, California, on the bottom." He doesn't remember if it was him or Wah Wah Watson, aka Melvin Ragin, playing the wah part on the Jacksons' "Never Can Say Goodbye," but he is very clear about who played the memorable intro to Marvin Gaye's "Let's Get It On." As with many Peake performances, there's a fascinating backstory.
"There was a fabulous guitarist named René Hall who was also a great arranger," he relates. "Hall started using me because of my blues playing. He actually had me come in and finish a B.B. King album. B.B. had walked away from the record company and wouldn't talk to them. They had already recorded the songs but needed guitar fills, so I did them."
Peake stands beside bassist Wilton Felder on an early Jackson 5 session. Peake played essential parts on some of the group's early, barnstorming hits.
Courtesy of Don Peake
In 1973, Hall was the arranger on "Let's Get It On," working at Motown's L.A. studio on Romaine Street. "René said, 'I want you to make up something at the beginning'," says Peake. "I turned on my wah-wah pedal and played." As was so often the case in those days, Peake's name was left off the album. Wah Wah Watson was on the road with Gaye at the time, so everyone assumed he played the part. "It's me," says Peake. "I made a terrible mistake about 15 seconds in," he says. "I got excited and hit the open G string." (Editor's note: Actually, it's 13 seconds in, and you can hear it clearly.)
"There are certain guitar licks or solos that always give me goose bumps and Don Peake's opening part on 'Let's Get It On' is one of those," says Denny Tedesco, director of The Wrecking Crew movie and son of Tommy Tedesco.
In addition to playing on some of the biggest hits of the day, Peake played on numerous movie scores. Though his excellent reading skills no doubt played a part, sometimes it was his rock 'n' roll heart that landed him the job.
"I played for Elmer Bernstein on the Steve McQueen movie Baby the Rain Must Fall," he says. "Bernstein called me because, though Tommy Tedesco could pretend to be musically ignorant, I just naturally came up with stuff that was unsophisticated. Bernstein said, 'Just do whatever you want.' On the soundtrack, you'll hear me playing all this crazy guitar."
As the 1970s progressed, with guitarists like Larry Carlton, Jay Graydon, and Steve Lukather coming up, sessions began drying up for Peake's generation of musicians. The guitarist looked toward composing and arranging for the next chapter of his musical life, but to be successful he found he had to fully commit. He began studying arranging and composing with Albert Harris, a famed Hollywood orchestrator, and called composer/conductor and frequent session contractor Ben Barrett to bow out of his studio guitarist role. "He didn't say the words, 'Are you out of your fucking mind?'—but I know he was thinking it," says Peake. Sane and serious, he sold the instruments in his cartage trunk and devoted himself to a career that would provide compositions and arrangements for more than 50 movies and television shows, including Knight Rider and My Two Dads.
For the last decade, Peake has been a professor at Los Angeles' Bridges Academy, a school for gifted children that have learning differences, such as autism and ADHD. "I teach guitar, jazz, and blues," he says. "Our music program allows these children to put both sides of their brain together. They get better at their studies."
As of this writing, Peake is still playing with some of the surviving members of the Wrecking Crew, including Chuck Berghofer, the bassist who played the slithery part on Nancy Sinatra's "These Boots Are Made for Walking."
"Don Randi is playing piano," he says. "The drummer is Ed Green. We do a Glen Campbell tribute, because we played on his records. We also do a Sonny and Cher song. We were just about to go on the road, when COVID hit."
This just scratches the surface of Peake's extraordinary life. Did we mention he was a champion race car driver? While there may be no official designation of who was in the Wrecking Crew, by any definition, Don Peake deserves mention as a member of that historic assembly. Maybe even more important is the mark his guitar playing left on memorable Motown tunes that have become embedded not just in music history, but in the culture at large.
Don Peake Essential Listening:
Description: Don Peake recorded tracks with Ray Charles even after he stopped touring with the pianist, cutting classics like "America the Beautiful" and "Crying Time." Peake can be heard loud and clear on a lesser-known Charles cover, "Blue Moon of Kentucky," playing the signature intro and the solo over the fade. Toward the end of the track, you hear Charles saying to Peake with enthusiasm, "Play it! Play it 'til it gets good."
Description: Peake played the guitar line doubling the bass on the Jackson 5's "I Want You Back." In addition to complementing one of the most famous bass parts of all time, Peake appears on much of the Jackson 5's subsequent output. He plays a Coral electric sitar on "Maybe Tomorrow" from 1970's Third Album, and that's also Peake's early fuzz pedal shaping the memorable distorted part on "ABC" from the same year.
Description: In 1966, Peake was asked to go on the road with Bobby Darin, but declined because he wanted to stay put and be an arranger. A week later, Peake got a call from the singer's managers to arrange strings for "If I Were a Carpenter." Peake had never written parts for strings before, but quickly figured out how to write for a string quartet. This Bobby Darin hit would mark the beginning of an arranging and scoring career that would ultimately replace Peake's session work.
- Beyond Blues: Scotty Moore's Raucous Rockabilly Licks - Premier ... ›
- Forgotten Heroes: Reggie Young - Premier Guitar ›
- Forgotten Heroes: Carol Kaye - Premier Guitar ›
- 'Reunion!' Bruce Forman’s Love Affair With Barney Kessel’s Guitar - Premier Guitar ›
An easy guide to re-anchoring a loose tuning machine, restoring a “lost” input jack, refinishing dinged frets, and staunching a dinged surface. Result: no repair fees!
Pardon my French, but I’m about to misethe hell out of some en scenein this article about do-it-yourself guitar repair. Buckle-vous up.
The Guitarist is in the middle of double-tracking a solo. It’s not quite right. Creative juices are flowing, but at any moment, the gate could slam shut. Their social media feed is stagnant, and the algorithm thirsts for content. The studio is 80 bucks an hour. That new boutique fuzz pedal would sound great on this track, surely? It would, of course, as these things are the cure for all problems, but it rests just out of reach.
Desperate for a solution, the Guitarist rests their perfect new guitar against the warm tube amp–only for a moment … but a horrible amplified bwaang from wood, string, and concrete’s violent meeting breaks the temporary silence as gravity muscles potential into the kinetic. The Guitarist breathes a defeated “aw, man,” like a loosened balloon farting hopelessly across an empty room. The gate closes, juices no longer loose, locked, impenetrable by any transistor-based effect. And it’s time to assess the damage.”
I bet you saw yourself in the opening scene of Twenty-Four-and-Three-Quarter-Inches of Woe, which may be the title of the screenplay I just started to write, most likely due to the fact that you’ve made a similarly boneheaded mistake with your instrument.
Unfortunately, my storytelling skills didn’t save a nice new Epiphone Casino from sliding off my amp, meeting the floor, and earning some damage on the way down. Yeah, that’s a true story, and I’m sure something similar has happened to you as well. It can happen to anyone who plays guitar for long enough, but there’s no need for despair yet.
If you’ve been victimized by gravity like I have, as long as the damage isn’t major, you can fix a lot of things yourself. I’ll use my felled Casino as an example. It suffered a loosened tuner, an input jack that fell inside the guitar, a damaged fret, and a few dents in the finish. While I work, I’ll provide some suggestions for supplies and tools to keep in your home repair kit, just in case you ever need them.
Tools for the Tasks
We ordered all of the tools we used in these repairs, excluding the painter’s tape and the toothpicks, which we picked up during lunch at Jack’s Bar-B-Que, from StewMac.
The essentials:
• ESP Multi Spanner
• Archtop Guitar Helping Hand
• Guitar Tech Screwdriver Set
• 3 Corner Fret Dressing Files
• Ultra Thin Master Glue
• GluBoost Fill n’ Finish
• Rectangular Sanding Kit
Can’t Tune It like That
First, let’s take care of the loose tuner, since it’s currently in no shape to reliably hold string tension. The tumble knocked it sideways, which loosened the screws holding in the key, which caused the wood around the screws to strip. It’s alarming to see, but this is a very simple fix.
Add to Repair Kit: Round toothpicks, water-thin CA glue, glue applicator tips, safety goggles
[Note: For the unfamiliar, CA is short for cyanoacrylate. It’s commonly referred to as “Super Glue,” but since that is a brand name, not the generic, I’ll refer to it here as “CA glue.”]
First, remove the tuner by backing the screws out, then pull the tuner from the headstock. My Casino’s tuning keys use a press-in bushing to hold the post straight in the headstock, so no further disassembly is required. However, if you experience this issue with a guitar with more modern-styled tuning keys, you’ll need to use an appropriately sized wrench or socket to remove the screw-in bushing before removing the key.
Next, break a toothpick in half, insert the thicker end into the hole where your mounting screw used to be. Break it off flush with the surface, and repeat the process with the other hole.
Safety goggles on: It’s CA glue time. Trust me, you do not want to squirt this stuff into your eye. Fit an applicator tip to the glue bottle and practice your squeeze on a scrap piece of paper or wood, far away from anything you don’t want glued to your guitar or yourself. This stuff is magic—it will bond things you never intended if you aren’t careful.
All you need is a very small drop, so practice until you can confidently flow out just a small controlled amount. Once you’ve mastered that, drop a small amount of water-thin CA glue into each filled hole. It will soak through the toothpick into the surrounding wood just enough for this quick fix. Let it cure for at least 15 minutes, but longer is even better.
Pop the tuner back in and drive the screws straight into the toothpick-filled holes. The screw will compress the toothpick into the existing wood and create new threads strong enough to hold your tuner in place.
Congratulations! You fixed it well enough to at least make it through a session. I’ve done this on several guitars that lasted years with no issues, so you should be confident in your work.
Hit the Road, Jack
Look, there’s no way to sugarcoat this. Fishing an output jack out of a hollowbody guitar is a pain. You can do this. All you need is patience and a few handy gadgets.
Add to Repair Kit: flashlight, multi-spanner, small drywall anchor, “helping hand,” small screwdriver
Your first task is to locate the jack inside the guitar. Odds are it didn’t fall far away from where it needs to be, since it’s probably wired to one of your control potentiometers. Use your flashlight to shine some light inside the f-hole to help find it.
I found mine wedged against the treble side of the rim, a little farther away than I can reach with my fingers. This is not zesty. I am unhappy but equipped and determined.
The tool I described as a “helping hand” becomes useful here. It’s essentially just a bent hook at the end of a handle made out of pliable heavy wire. Several guitar parts suppliers sell something similar. I got mine from StewMac for a reasonable price, but if you want to be thrifty about it, there’s no reason why you can’t cut and bend a wire coat hanger.
Take a few deep breaths, and working through the f-hole, use the hook end of your helping hand to gently pull the output jack back toward where it was mounted. Bend the helping hand however needed to reach the jack as easily as possible.
I managed to pull the jack back enough to put a small screwdriver through the jack’s mounting hole and then through the jack itself. That screwdriver will act as a guide while I lift the jack back into place with the helping hand.
You should expect this will take several attempts. Try not to get frustrated. With enough patience, you’ll be able to get the jack back where it belongs. Once you have the jack in place, carefully thread the washer and nut back onto the jack. It shouldn’t take much effort to thread it back on. Just be careful not to cross-thread the nut.
Now that the nut is threaded on enough so it won’t fall back in, the challenge is to tighten it without twisting the jack itself to avoid breaking any wires. I’ve seen and used a few different methods to accomplish this, but I came across one recently that I really like.
This is where you’ll use your drywall anchor. Get one small enough to fit inside the jack without using too much force, then tighten the screw in the anchor so that it spreads to fit tightly inside the jack. This will hold it steady enough to tighten the nut with a multi-spanner tool or an appropriately-sized wrench.
I like a multi-spanner for this job, because it’s always the right size and is slim enough to not be clumsy for operations like this. Like the helping hand, lots of suppliers sell something similar using different names. Mine is made by ESP and also arrived in my StewMac tool box. I use it all the time for all sorts of tasks.
Once the nut is tightened, unscrew the drywall anchor, remove it, and test the jack for sound by plugging your guitar into an amp. A positive result should be obvious at this point, but if you don’t hear any signal, or an excessive consistent buzz, get in touch with your local repair tech.
Got a Dent In My Fret, Man
Honestly, face-first is probably the best way a guitar like my Casino could have hit the ground. The damage could’ve been far worse. Check any forum for endless complaints about Gibson/Epiphone headstock breaks. But I do need to address some damage to a fret caused during the fall.
The issue here is that plain steel electric guitar strings—like your G, B, and E strings—are considerably harder than most frets (my stainless steel fret contingency, put your hands down and let me finish), so it’s possible for a string to leave a small sharp dent in a fret if you hit it with enough force. This specific issue might go unnoticed until it’s time to bend a note at that fret, then you’ll feel and hear the string catch it. No good.
Before we get started: Having allof your frets carefully levelled, recrowned, and polished is alwaysa better solution than partially levelling just a few frets. But considering the entire premise we’ve constructed, which is a situation where we just want the guitar back in action relatively quickly, a partial fret level on the upper frets is perfectly fine as long as it’s done carefully.
Add to Repair Kit: Crowning file (three-corner or rounded), assortment of sandpaper (400 grit to 800 should be fine), 0000 extra-fine steel wool (optional), fretboard conditioner, permanent marker.
First thing we need to do is identify which frets need the work. Let’s say you have a nick in your 17th fret on the treble side under the B string. The goal is to bring the height of that damaged fret and all the frets past it down until the nick disappears. After that, remove the strings before you begin working.
To accomplish this, mark the damaged frets and all frets past it with a permanent marker. A trusty black Sharpie works great for this, but any darker color works fine. For this repair, we only need to work on the treble side of the frets, so that’s all you need to focus on. Also, use some blue painter’s marking tape to protect the area of the guitar near where you will be working. Small slips of a file or sandpaper can cause some nasty injuries to the guitar’s surface.
Next, level the damaged fret and all frets past it (moving toward the bridge) with something stiff enough to not flex under pressure. I keep an old credit card—a nice sturdy one—with a bit of 400-grit sandpaper glued to one side along the shorter edge, 800 grit on the other side. Start with the 400 and work your way down, being careful not to use too much pressure. Let the sandpaper do the work.
You’ll notice the ink is removed as you sand. The way to make sure you’re keeping everything level is to stop frequently and observe the new clean areas on top of each fret. Each one should be about the same width.
This will take a while. A 400-grit sandpaper does not remove material quickly, 800 grit even less so. I’m suggesting this technique because working slowly makes it more difficult to get yourself in trouble. Several suppliers sell mini files for spot leveling, but I don’t recommend starting there because they remove fret material pretty aggressively.
Eventually you’ll notice the little divot in your 17th fret is almost gone. Now’s time to switch to 800 grit to finish the job. You guessed correctly: This will take even longer, but it’ll leave a nice finish without removing any more material than necessary.
Great! Now you have five flat-topped frets. That won’t sound very good, so now you need to re-crown them, giving them a rounded profile to match the other frets. I like to use a 3-corner file to slowly round over each side of the fret, working from the fretboard up, but if you feel like dropping some serious flow on a specialized crowning file, this job can be a lot easier. Be sure to get the marker back out, ink up each fret, and stop filing when just a tiny sliver of ink is left on top of each fret.
Use a piece of 800 grit paper to remove any file marks and smooth out each fret. If you have finer grits, you could work your way up to 1200 or so, but don’t go too hard or you could undo your work. You just want the frets clean and smooth. At this point, I like the way frets feel after a quick buff with 0000 steel wool, but the mess left behind does rightfully deter a lot of repair techs. If you opt in for this, be sure to tape off your pickups and consider finding a second location for this step.
Work in some fretboard conditioner if you like (skip it if you have a maple or synthetic board; no need for that here), put some new strings on, and check your work. Play every note on these frets, to make sure they ring out without any buzzes. It may not look perfect, but as long as the guitar sounds good, you’re okay until it’s time for a full level/crown/polish job.
Not Finished Until It’s, Uh, Finished
Now for the last souvenir from my Casino’s short journey to the floor. I noticed a few spots along the rim of the guitar where the finish was damaged. Specifically, it looks like the guitar hit something with an edge on the way down hard enough to put a couple of jagged dents in it, right along the binding.
Funny, that’s actually what binding is intended for–protecting edges and corners from damage. Anyway, we need to discuss a few things about guitar finishes.
For the purpose of this article, I’m only going to discuss repairs to the clear coat, since that’s where my damage is. Most guitars now are finished using polyurethane or lacquer for the top clear-coat layer.
Speaking verygenerally, lacquer finishes are softer and less durable, which makes hiding repairs a lot easier if you have the skills and patience. Polyurethane finishes are hard and tough in every way: hard to damage and tough to hide repairs regardless of skills or patience.
I happen to know that my formerly mint-condition Casino has a polyurethane finish, which means I’m going to lower my expectations with this repair. Instead of trying to make it look like it never happened, which will take a lot of work, I’ll just try to keep it from getting worse over time, which will take considerably less work.
It also means I won’t be discussing how to repair lacquer finishes, which is a bit more in-depth, requires a lot more patience and practice, and is therefore not really recommended for the average DIY’er—at least not in the scope of this piece. So if your guitar has a lacquer finish, I don’t think this part applies. Let someone else take care of it, or maybe skip this part and learn to love your guitar as is. The latter is still an admirable move.
Add to Repair Kit: Nothing! You already have what you need from the previous repairs. Feel good about that.
Since the damage is a pronounced dent with sharp edges in the clear coat, all I really need to do is seal it with an appropriate material. And the material appropriate for repairing polyurethane finishes is—you guessed it—CA glue, because it dries hard, clear, and quickly, much like polyurethane.
Step one: Use painter’s masking tape around the area of the damage, just in case the glue runs when applied. Step two: Put glue on the dented finish. CA glue will fill in all the small cracks within the damage and seal the existing finish. Be careful; use the smallest-drop-possible technique you perfected when fixing the tuning peg, and give it plenty of time to dry.
That’s it. That’s all I need to keep the finish from continuing to chip the more I play it. Yes, I saved the easiest one for last, as a little treat.
Obviously, this isn’t a particularly beautiful repair, so I could go above and beyond by using thicker CA glue—for example, GluBoost Fill n’ Finish—to fill it in completely, sand it level, and polish the area back to the original mirror gloss. Dan Erlewine has a few excellent YouTube videos outlining this exact method that are easy to find, and I encourage you to try if you’re so inclined. But for my purposes, this will do.
Accidents will happen if you’re actually playing your guitar, but they’re no cause for panic when they do. Even though the guitar isn’t perfect anymore, it’s perfectly playable, and I can get by with it for now. I broke it, so I fixed it, which is something I hope you feel empowered to do should you break yours.
Next time, I’ll use a good guitar stand.
The least exciting piece of your rig can impact your tone in a big way. Here’s what you need to know.
Hello, and welcome back to Mod Garage. This month, we will have a closer look at an often overlooked part of our guitar signal chain: the guitar cable. We’ll work out what really counts and how your cable’s tonal imprint differs from your guitar’s tone-control function.
Today, the choice of guitar cables is better than it’s ever been, and you can choose between countless options regarding color, stability, plug style, length, diameter, bending strength, shielding, etc. A lot of companies offer high-quality cables in any imaginable configuration, and there are also cables promising special advantages for specific instruments or music styles, from rock to blues to jazz.
Appearance, stability, longevity, bending stiffness, and plug configuration are matters of personal preference, and every guitarist has their own philosophy here, which I think is a great thing. While one player likes standard black soft cables with two straight plugs, their buddy prefers red cables that are stiff as hell with two angled plugs, and another friend swears by see-through coiled cables with golden plugs.
“We often want to come as close as possible to sounding like our personal heroes, but we fail because we’re using the wrong cable for a passive guitar.”
Regarding reliability, all these parameters are important. Who wants a guitar cable making problems every time you are on stage or in the studio? There are also technical parameters like resistance, capacitance, transfer resistance on the plugs, and more. Without making it too technical, we can summarize that, sound-wise, the only important technical parameter for a passive guitar circuit is the capacitance of the cable. Sadly, this information is often missing in the manufacturer’s description of a guitar cable, and there’s another thing we have to keep in mind: Most manufacturers try to offer cables with the smallest possible capacitance so the guitar can be heard “unaltered” and with a “pure” tone. While these are honourable intentions, they are self-defeating when it comes to making a guitar sound right.
Let’s take a trip back to the past and see what cables players used. Until the early 1980s, no one really cared about guitar cables—players simply used whatever was available. In the ’60s and ’70s, you could see a lot of ultra-long coiled cables on stage with players like Clapton, Hendrix, May, Townshend, Santana, and Knopfler, to name just a few. They used whatever was available, plugged in, and played without thinking about it. Ritchie Blackmore, for example, was famous for notoriously using incredibly long cables on stage so he could walk around. Joe Walsh and many other famous players did the same. Many of us have these players’ trademark sounds in our heads, and we often want to come as close as possible to sounding like our personal heroes, but we fail because we’re using the wrong cable for a passive guitar. So what are we talking about, technically?
It’s important not to look at the guitar cable, with its electrical parameters, as a stand-alone device. The guitar cable has to be seen as part of the passive signal chain together with the pickups, the resistance of the guitar’s pots (usually 250k or 500k), the capacitance of the wires inside the guitar, and, of course, the input impedance of the amp, which is usually 1M. The interaction of all these in a passive system results in the resonance frequency of your pickups. If you change one of the parameters, you are also changing the resonance frequency.
”Ritchie Blackmore, for example, was famous for notoriously using incredibly long cables on stage so he could walk around.“
You all know the basic formulation: The longer the cable, the warmer the tone, with “warmer” meaning less high-end frequencies. While this is true, in a few moments you will see that this is only half the truth. Modern guitar cables are sporting a capacitance of around 100 pF each meter, which is very low and allows for long cable runs without killing all the top end. Some ultra-low-capacitance cables even measure down to only 60 pF each meter or less.
Now let’s have a look at guitar cables of the past. Here, capacitances of up to 400 pF or more each meter were the standard, especially on the famous coiled cables. See the difference? No wonder it’s hard to nail an old-school sound from the past, or that sometimes guitars sound too trebly (especially Telecasters), with our modern guitar cables. This logic only applies to our standard passive guitar circuits, like those in our Strats, Teles, Les Pauls, SGs, and most other iconic guitar models. Active guitars are a completely different ballpark. With a guitar cable, you can fine-tune your tone, and tame a shrill-sounding guitar.
“No problem,” some will say. “I simply use my passive tone control to compensate, and that’s it. Come on, capacitance is capacitance!” While this logic seems solid, in reality this reaction produces a different tone. “Why is this?” you will ask. Thankfully, it’s simple to explain. You might be familiar with the typical diagrams showing a coordinate system with "Gain/dB" on the Y-axis and "Frequency/kHz" on the X-axis. Additional cable capacitance will shift the resonance frequency on the X-axis, with possible differences of more than one octave depending on the cable. A cable with a higher capacitance will shift the resonance frequency towards the left and vice versa.
Diagram courtesy Professor Manfred Zollner (https://www.gitarrenphysik.de)
Now let’s see what happens if you use your standard passive tone control. If you close the tone control, the resonance frequency will be shifted downwards mostly on the Y-axis, losing the resonance peak, which means the high frequencies are gone. This is a completely different effect compared to the additional cable capacitance.
Diagram courtesy Professor Manfred Zollner (https://www.gitarrenphysik.de)
To summarize, we can say that with different cable capacitances, you can mimic a lot of different pickups by simply shifting the resonance frequency on the X-axis. This is something our passive tone control can’t do, and that’s exactly the difference you will have to keep in mind.
So, let’s see what can be done and where you can add additional cable capacitance to your system to simulate longer guitar cables.
1. On the cable itself
2. Inside the guitar
3. Externally
In next month’s follow-up to this column, we will talk about different capacitances and how you can add them to your signal chain with some easy-to-moderate modding, so stay tuned!
Until then ... keep on modding!
Do you overuse vibrato? Could you survive without it?
Vibrato is a powerful tool, but it should be used intentionally. Different players have different styles—B.B. King’s shake, Clapton’s subtle touch—but the key is control. Tom Butwin suggests a few exercises to build awareness, tone, and touch.
The goal? Find a balance—don’t overdo it, but don’t avoid it completely. Try it out and see how it changes your playing!
An ode, and historical snapshot, to the tone-bar played, many-stringed thing in the room, and its place in the national musical firmament.
Blues, jazz, rock, country, bluegrass, rap.… When it comes to inventing musical genres, the U.S. totally nailed it. But how about inventing instruments?
Googling “American musical instruments” yields three.
• Banjo, which is erroneously listed since Africa is its continent of origin.
• Benjamin Franklin’s Glass Armonica, which was 37 glass bowls mounted horizontally on an iron spindle that was turned by means of a foot pedal. Sound was produced by touching the rims of the bowls with water-moistened fingers. The instrument’s popularity did not last due to the inability to amplify the volume combined with rumors that using the instrument caused both musicians and their listeners to go mad.
• Calliope, which was patented in 1855 by Joshua Stoddard. Often the size of a truck, it produces sound by sending steam through large locomotive-style whistles. Calliopes have no volume or tone control and can be heard for miles.
But Google left out the pedal steel. While there may not be a historical consensus, I was talking to fellow pedal-steel player Dave Maniscalco, and we share the theory that pedal steel is the most American instrument.
Think about it. The United States started as a DIY, let’s-try-anything country. Our culture encourages the endless pursuit of improvement on what’s come before. Curious, whimsical, impractical, explorative—that’s our DNA. And just as our music is always evolving, so are our instruments. Guitar was not invented in the U.S., but one could argue it’s being perfected here, as players from Les Paul to Van Halen kept tweaking the earlier designs, helping this one-time parlor instrument evolve into the awesome rock machine it is today.
Pedal steel evolved from lap steel, which began in Hawaii when a teenage Joseph Kekuku was walking down a road with his guitar in hand and bent over to pick up a railroad spike. When the spike inadvertently brushed the guitar’s neck and his instrument sang, Kekuku knew he had something. He worked out a tuning and technique, and then took his act to the mainland, where it exploded in popularity. Since the 1930s, artists as diverse as Jimmie Rodgers and Louis Armstrong and Pink Floyd have been using steel on their records.“The pedal steel guitar was born out of the curiosity and persistence of problem solvers, on the bandstand and on the workbench.”
Immigrants drove new innovations and opportunities for the steel guitar by amplifying the instrument to help it compete for listeners’ ears as part of louder ensembles. Swiss-American Adolph Rickenbacker, along with George Beauchamp, developed the first electric guitar—the Rickenbacker Electro A-22 lap steel, nicknamed the Frying Pan—and a pair of Slovak-American brothers, John and Rudy Dopyera, added aluminum cones in the body of a more traditional acoustic guitar design and created resophonic axes. The pedal steel guitar was born out of the curiosity and persistence of problem solvers, on the bandstand and on the workbench.
As the 20th century progressed and popular music reflected the more advanced harmonies of big-band jazz, the steel guitar’s tuning evolved from open A to a myriad of others, including E7, C6, and B11. Steel guitarists began playing double-, triple-, and even quadruple-necked guitars so they could incorporate different tunings.
In Indianapolis, the Harlan Brothers came up with an elegant solution to multiple tunings when they developed their Multi-Kord steel guitar, which used pedals to change the tuning of the instrument’s open strings to create chords that were previously not possible, earning a U.S. patent on August 21, 1947. In California, equipped with knowledge from building motorcycles, Paul Bigsby revolutionized the instrument with his Bigsby steel guitars. It was on one of these guitars that, in early 1954, Bud Isaacs sustained a chord and then pushed a pedal down to bend his strings up in pitch for the intro of Webb Pierce’s “Slowly.” This I–IV movement became synonymous with the pedal-steel guitar and provided a template for the role of the pedal steel in country music. Across town, church musicians in the congregation of the House of God Keith Dominion were already using the pedal steel guitar in Pentecostal services that transcended the homogeneity of Nashville’s country and Western clichés.
Pedal steels are most commonly tuned in an E9 (low to high: B–D–E–F#–G#–B–E–G#–D#–F#), which can be disorienting, with its own idiosyncratic logic containing both a b7 and major 7. It’s difficult to learn compared to other string instruments tuned to regular intervals, such as fourths and fifths, or an open chord.
Dave Maniscalco puts it like this: “The more time one sits behind it and assimilates its quirks and peculiarities, the more obvious it becomes that much like the country that birthed it, the pedal steel is better because of its contradictions. An amalgamation of wood and metal, doubling as both a musical instrument and mechanical device, the pedal steel is often complicated, confusing, and messy. Despite these contradictions, the pedal-steel guitar is a far more interesting and affecting because of its disparate influences and its complex journey to becoming America’s quintessential musical instrument.”