
Hi Jeff,
I have an older Fender Super-Sonic 60. I really like its sound, but I find the clean channel's Vibrolux setting a little too thin. Is there a way to fatten it up? Also, on the second/OD channel, I find I need to crank the bass knob all the way and turn the treble knob to only 2 or so to get a useable sound. Is there a way to make the burn channel's “noon" settings more balanced so I can get a warmer sound?
Thank you,
Pat Edwards
Hi Pat,
Thanks for writing. There are actually two versions of the Fender Super-Sonic amp: one from 2005, and another from 2009. The circuitry was improved for the 2009 model. (Yes, we all have bleak memories of the “improvements" Fender made during their CBS era, but these revisions really did upgrade the amp's sound and performance.)
I've already written a Premier Guitar column on the two versions of the Super-Sonic amp and the changes needed to update the earlier model [Modifying an Early Fender Super-Sonic 60, Aug. 2014]. No matter which version you have, your modification requests are above and beyond what I previously covered, but with both columns in hand you should be able to bend the Super-Sonic to your will. So let's get started!
First, let's address your complaint about the Vibrolux setting. This is part of the amp's vintage channel, which is switchable between Vibrolux and Bassman circuit simulations. As the schematic excerpt in Fig. 1 shows, relay K4-A in Vibrolux mode routes the signal from pin 4 to pin 6 through C10, and then through the C11/R22 resistor/capacitor network. Here, I believe, is where the signal becomes too thin for your liking.
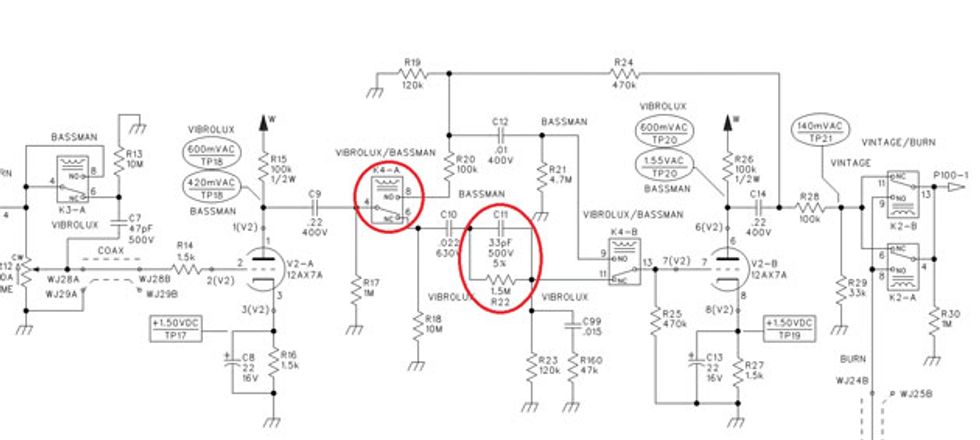
Fig. 1
To correct this, try removing C11. This capacitor passes highs across R22, and the ratio of highs passed relative to the total signal may be responsible for the sound you perceive as “too thin." Another possibility is that the signal is overly attenuated by R22, making the amp, for lack of a better term, wimpy. If this is the case, try decreasing the value of R22. Start with a 1M resistor and see how you like it. If that doesn't work, go lower. If you achieve a good, full sound, but one that could still use a bit more high end, try different values for C11. You might even replace R22 with a simple jumper wire, but be aware that if you do, C11 will no longer affect the sound. Anyway, this is a great spot to tailor the Vibrolux setting, but ultimately, it's all about trial and error to satisfy your personal taste.
Now that you can tweak the Vibrolux setting to taste, let's address your other concern. The amp's second channel is labeled burn, but I guess we need to balance that burn, so let's modify this channel's tone stack.
We focus on R46, as seen in the schematic excerpt in Fig. 2. This part governs the amount of signal passed to the bass and middle controls and is sometimes called the slope resistor. The stock value is an unusually large 120k. I suggest lowering the value to 82k to see if this brings you closer to the balance you desire. You can certainly go lower—68k, 56k, or even 47k—but be aware that this not only brings in more lows and mids, but also changes the curve, or “voice," of the tone stack. At some point you need to settle on a compromise where the amp sounds good, as opposed to having your controls at some arbitrary midpoint setting. The bottom line is to make the amp sound the way you want, not where the controls must be set to accomplish this.
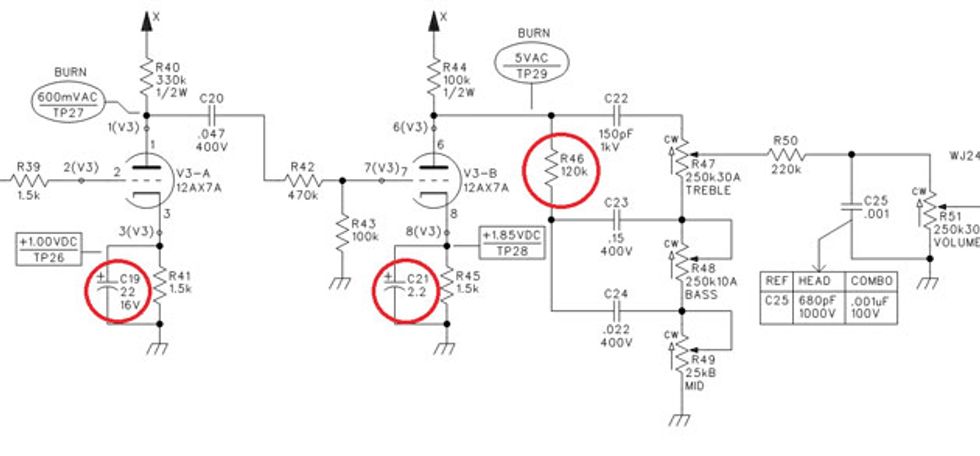
Fig. 2
Another possible modification: Reverse the position of the cathode caps (C19 and C21) in the two gain stages prior to the tone stack so that C19 is 2.2 µF and C21 is 22 µF. This may clean up the overdrive at very high settings in addition to feeding the tone stack stage a fuller signal from which to work.
Well, there you have it. I hope these tweaks make your Super-Sonic even more sonically super.