Recently a client brought a fairly new American Fender Strat into the shop. The neck had too much relief, but otherwise the guitar was in great shape. No problem, I thought. Tighten up the truss rod a bit and we’ll be good to go.
I unwrapped a new Fender hex key (more about the condition of your tools in a moment) and inserted it into the truss rod nut. But instead of finding a secure grip, I felt the tool spin around inside the nut. Oh, that sinking feeling: I realized the nut’s socket was stripped, which is very bad news for this particular Strat.
Why? The truss rod nut on this type of Strat is recessed into the neck and surrounded by wood (Photo 1), so when the socket that holds the truss rod tool is stripped out, you only have two options: perform major surgery to remove the stripped nut and replace it with a new one, or buy a replacement neck. Realistically, it would cost more to perform the extraction, so I advised my client to contact Fender about getting a new neck.
Fortunately, not all Fender guitars have a recessed truss rod nut—in fact, many guitars don’t. You can often replace a stripped truss rod nut, and it’s not a tricky repair if you know what you’re doing. Inexpensive replacement nuts are available from such suppliers as Stewart-MacDonald, Luthiers Mercantile, and Allparts.
Different types of truss rod nuts.
Before we discuss why a truss rod nut might fail and how to fix it, let’s explore several common types of nuts used on guitars. You adjust some nuts by inserting a tool into them, others by enclosing them with a nut driver or special socket wrench.
Using the wrong tool to adjust a nut is the most common cause of truss rod problems.
The nut placement varies too: On Taylor and Gibson instruments, for example, the truss rod nut is typically located at the headstock, under a plastic or wood cover. These are among the easiest to remove. Some Fender guitars have a “bullet” truss rod nut at the headstock; these are not recessed and can be removed without surgery. Older Fender guitars have a truss rod nut at the heel of the fretboard, and these are very easy to remove, once you take off the neck. Some modern electrics have an exposed “wheel” nut located at the heel, and these can be adjusted without removing the neck.
Some acoustics, such as Takamine and modern Martins, have a truss rod nut that you access through the soundhole by inserting the tool through a small hole in the upper top brace (located between the soundhole and neck block). In some cases, this hole is just big enough for a wrench to poke through, but not big enough to accommodate the nut. The brace can be removed, but that is considered a surgical procedure, which is why some luthiers opt to simply enlarge the hole to remove the nut.
Truss rod tools vary, as well.
Some require a hex key (Allen wrench), while others take a flathead or Philips screwdriver, a nut driver, a mini socket wrench, or a small metal rod. To learn more, read “Demystifying Truss-Rod Tools.”
Why truss rod nuts fail.
There are three main reasons why you might have a problem with a truss rod nut:
- Hardware defect.
- The wrong size tool was used in an attempted adjustment.
- The correct tool was used, but it was worn.
A manufacturing defect is pretty rare, but they happen. When you think about how many guitars are built (probably millions each year), there’s a good chance a few lemons are going to squeeze through. It usually comes down to poor quality metal or slight discrepancies in manufacturing tolerances.
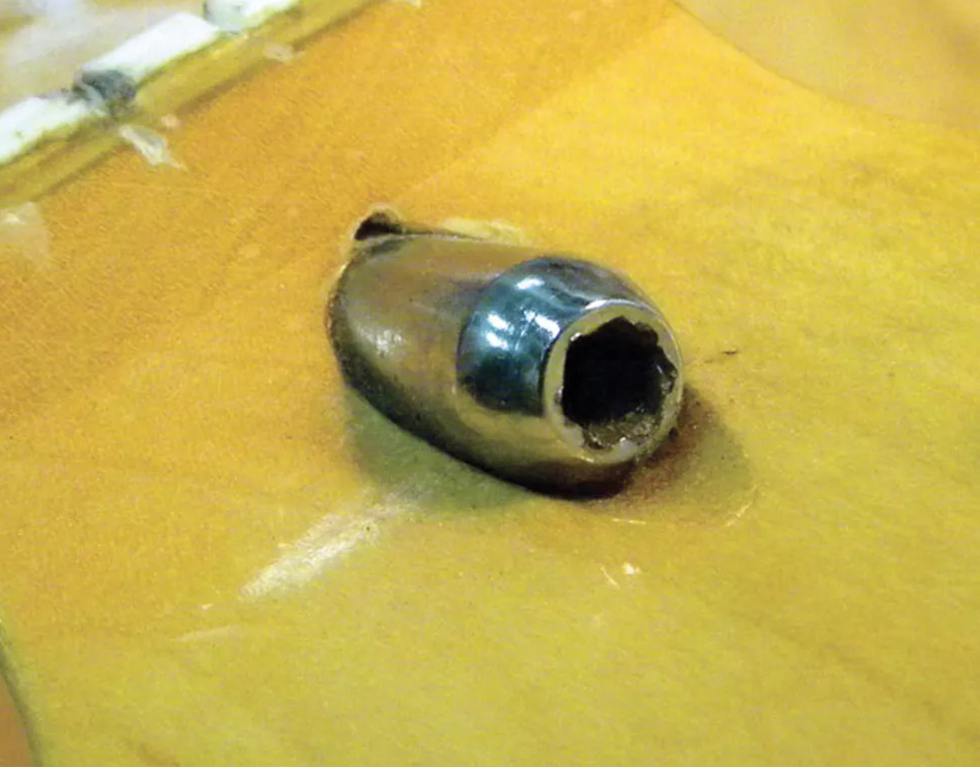
Photo 2
Using the wrong tool to adjust a nut is the most common cause of truss rod problems. I’ve seen many nuts that were ruined because someone decided to force the wrong tool around or into them. Photo 2 shows a Fender bullet nut that suffered this fate. Once a socket’s edges have been rounded like this, the hex key can’t grip the nut to turn it.
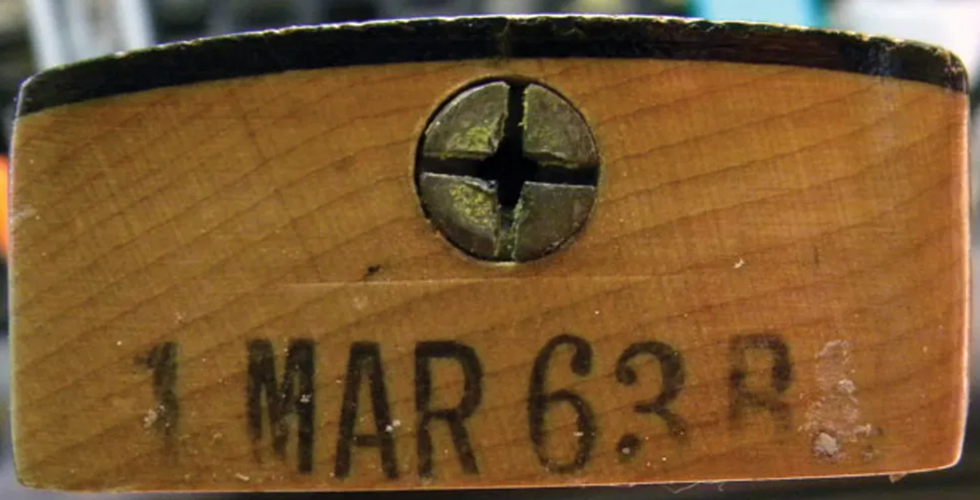
Photo 3
Recently I removed the neck on a client’s vintage Tele to adjust the truss rod. The nut looked like Photo 3, which illustrates what happens when someone uses a screwdriver that’s the wrong size. The slots get deformed, and this makes truss rod adjustments difficult. The good news is these nuts are easy to remove, even when they’re butchered like this, but unfortunately it’s nearly impossible to find a “period correct” replacement. Sure, there are plenty of aftermarket parts available, but for a vintage guitar, it’s imperative to use period-correct parts to maintain its value. I mention this simply to drive home the importance of using the correct truss rod tool—one that fits snugly.
Worn-out tools will also damage a truss rod nut. For example, if the truss rod requires a hex key and its edges have become worn and rounded, it can in turn round out the inside of the nut. It’s important to check your tools to ensure they won’t damage your guitar.
A basic guitar tech principle: Replacing worn tools is much cheaper than fixing the damage they can cause.
Tools for removing a stripped nut.
There are times when you can use the specified tool to remove the nut, but often you have to be creative. Once when working on a Gibson electric, I had to remove a hex nut that was so stripped that a nut driver wouldn’t grip it. Fortunately, a pair of needle-nose pliers did the job, but you must be careful to avoid stripping the nut more than it already is as you remove it. An improvised tool can easily damage the headstock, so proceed with caution.
Important: Always slacken the strings before you remove the truss rod nut.
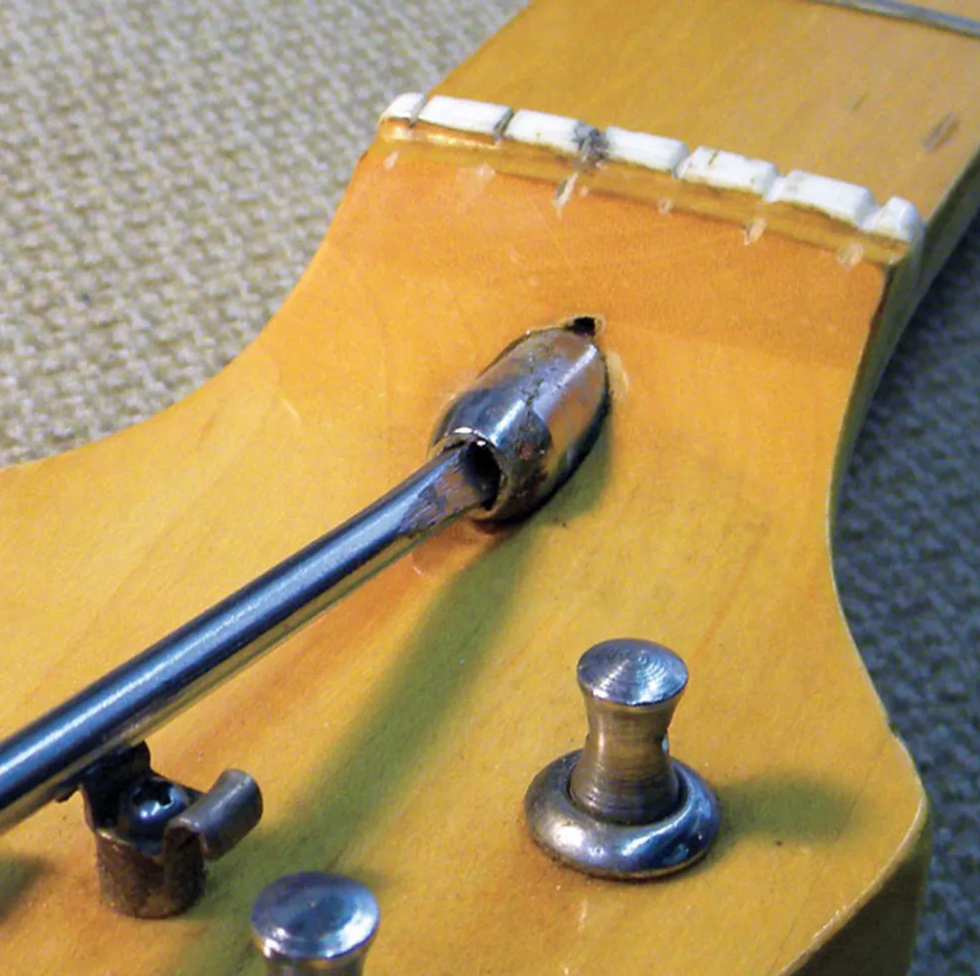
Photo 4
In other cases, I’ve used a small flathead screwdriver to extract a nut when a hex key wouldn’t work. For example, by gently tapping the screwdriver into this stripped bullet nut (Photo 4), I was able to get it to catch hold. I turned the screwdriver counter-clockwise and voilà, the nut came off.
I’ve also used a screw extractor, a tool that looks like a drill bit, but with a twist: Screw extractors have tapered, reversed cutting threads designed to dig into a damaged screw and grip it tighter as you turn the extractor counter-clockwise while carefully applying pressure. The counter-clockwise movement backs out the damaged screw—typically its head is mangled or broken off—even as the extractor bores deeper into the screw shaft. I do this manually using a T-handle, but you can also use vice-grips with a screw extractor. I’d advise against using a power drill for extraction, but some techs do, running the drill at slow speeds. Using an extractor to remove a stripped truss rod nut takes a lot of patience, but it’s doable. The trick is to be gentle but firm.
Installing the new truss rod nut.
This is the easy part. Just slide the nut onto the truss rod threads and turn it clockwise. Tighten the nut until it’s just a little snug. Tune the guitar up to pitch and check the relief in the neck. Depending on your playing style, .010" to .012" should be plenty of relief. Check out “Time for a Neck Adjustment?” if you’re not sure how to adjust the truss rod.
Averting disaster.
A stripped truss rod nut is bad news, but it can usually be replaced inexpensively. However, if you strip the threads or nut at the other end of the truss rod—where it screws into hardware embedded within the neck itself—that’s a different story. Also, if the exposed threads on a truss rod are stripped, a replacement nut will not help. In either case, the truss rod itself would need to be replaced—a very invasive and expensive repair. At that point you have to decide whether replacing the neck makes more sense than spending a fortune on major surgery. The bottom line is simple: When adjusting your truss rod, don’t over-tighten the nut.
If you’re not comfortable working with your truss rod nut, consult a qualified repair technician. Guitar techs and luthiers deal with these issues all the time, and paying them for their expertise can be a wise investment.
[Updated 1/25/22]


