Photo 1
We’re almost finished with the aging process on our project guitar. Let’s work on the fretboard, nut, and truss rod cover, and prepare the headstock for the last hurrah.
Hello and welcome back to Mod Garage. This month we’ll continue with our relic’ing project, taking a closer look at the front side of the neck and treating the fretboard and the headstock. We’ll work on the front side of the headstock in the next part, but first we must prepare it.
When we talk about a vintage Gibson fretboard from the ’50s, we’re talking about the mystic Brazilian rosewood (Dalbergia nigra) and its certain look and feel. Our Harley Benton doesn’t have a Brazilian rosewood fretboard. If it did, the fretboard material would cost more than the entire guitar because it’s so rare and limited today. Brazilian rosewood trade is restricted by CITES and almost no guitar companies use it anymore, except for some special custom shops. Other rosewoods or alternative woods are common substitutes.
Our Harley Benton fretboard is amaranth (better known as purpleheart), but sadly it was stained or painted black, giving the guitar a different look that’s closer to ebony rather than rosewood. So, there’s no way to get it brown or make it look like rosewood other than getting a new fretboard installed, which isn’t reasonable. Maybe it’s possible to get the black color out of the wood by using chemicals, but we don’t know what we’d find underneath, either. There could be another surprise waiting for us and all the work would be useless. On a budget guitar like this, we’ll have to live with this fretboard, loving it for what it is rather than hating it for what it’s not. The fretwork is surprisingly good and close to excellent, which is far from the industry standard in this price range.
The fretboard edges of well-played vintage guitars feel comfortable and round because the edges receive pressure from a player’s hand over decades.
But to show you the process of aging a fretboard, I chose a guitar with a rosewood fretboard, so you’ll know how to do this on a guitar with this type of fretboard if you want to. It’s not complicated so here we go.
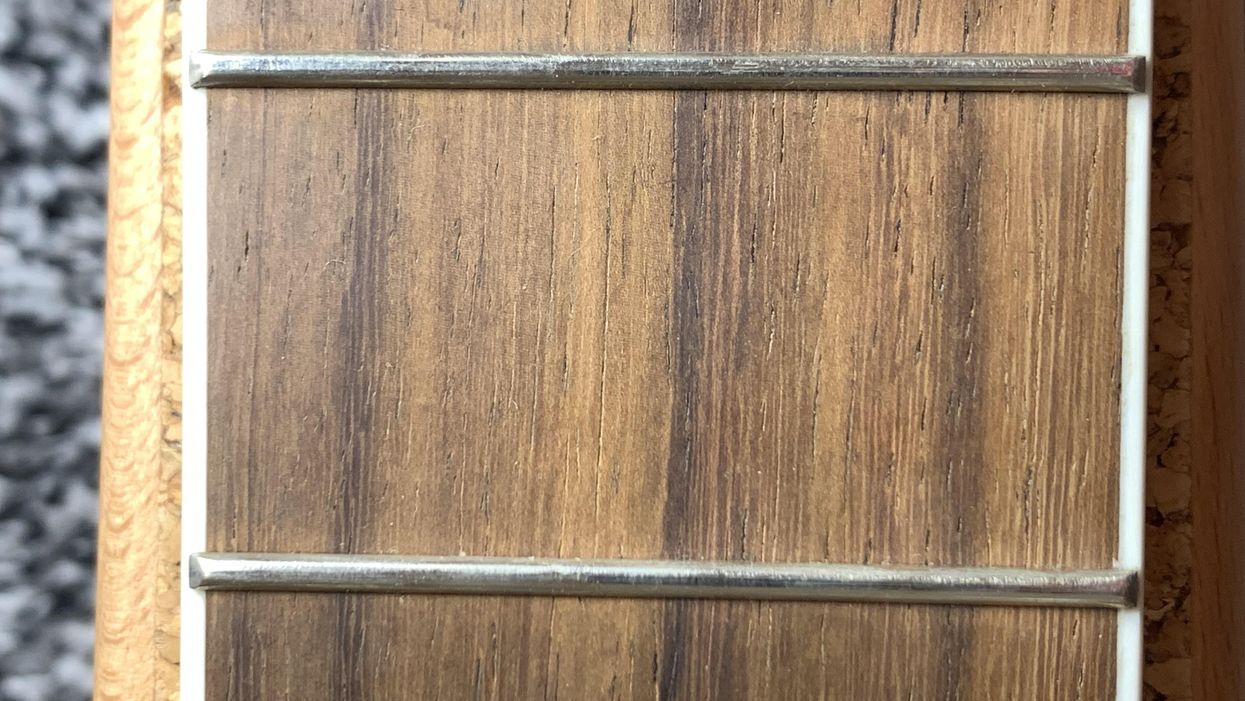
Look at the slightly pale and lifeless color of the rosewood in Photo 1. It has a nice grain but is rather dull. Brazilian rosewood has a rich chocolate brown color, which clearly shows the grain of the wood.
Let’s make it less boring:
Use some fine steel wool or sanding pads to sand the rosewood. Use a soft brush afterwards to get the dust off.
Use some naphtha or alcohol and a cotton cloth to degrease the wood and get all the fine dust and dirt out of it.
Use masking tape to protect the fretboard edges and the binding, if your neck has one. You don’t need to cover the frets. They’re easy to clean after the process. Use a Q-tip and some Vaseline to protect the fretboard dots from the dye.
You need a chocolate brown wood dye and a small soft brush to apply it.
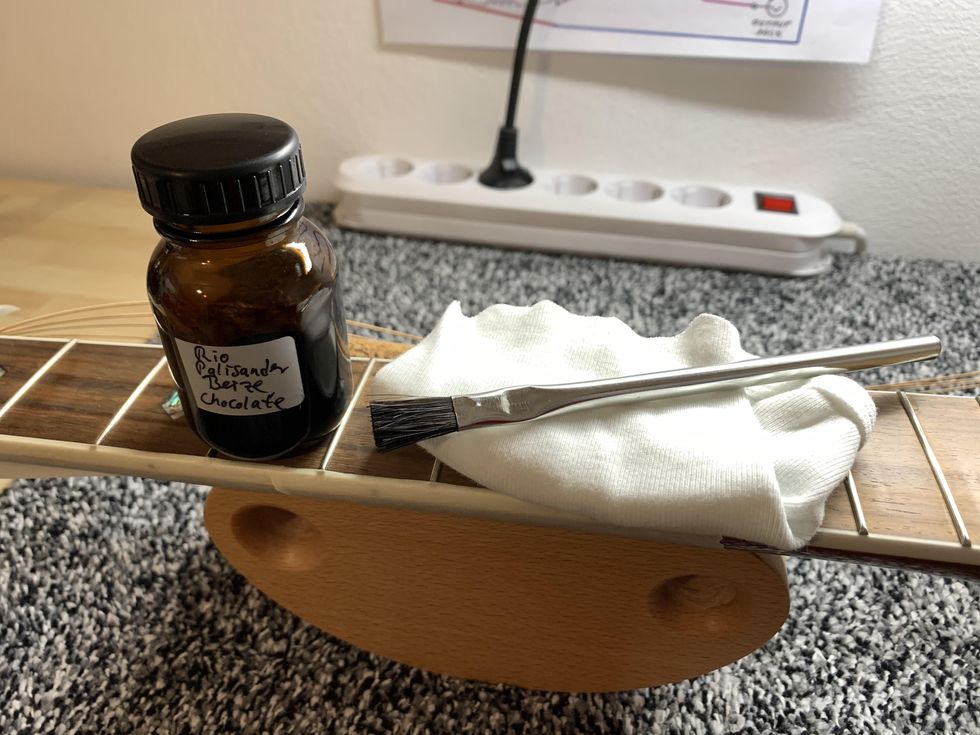
Photo 2
Some luthier supply stores offer special Brazilian rosewood dye in different shades of brown (Photo 2). I decided on a classic chocolate brown color on a solvent base for best results. Apply the dye thin and carefully and let it dry for some minutes.
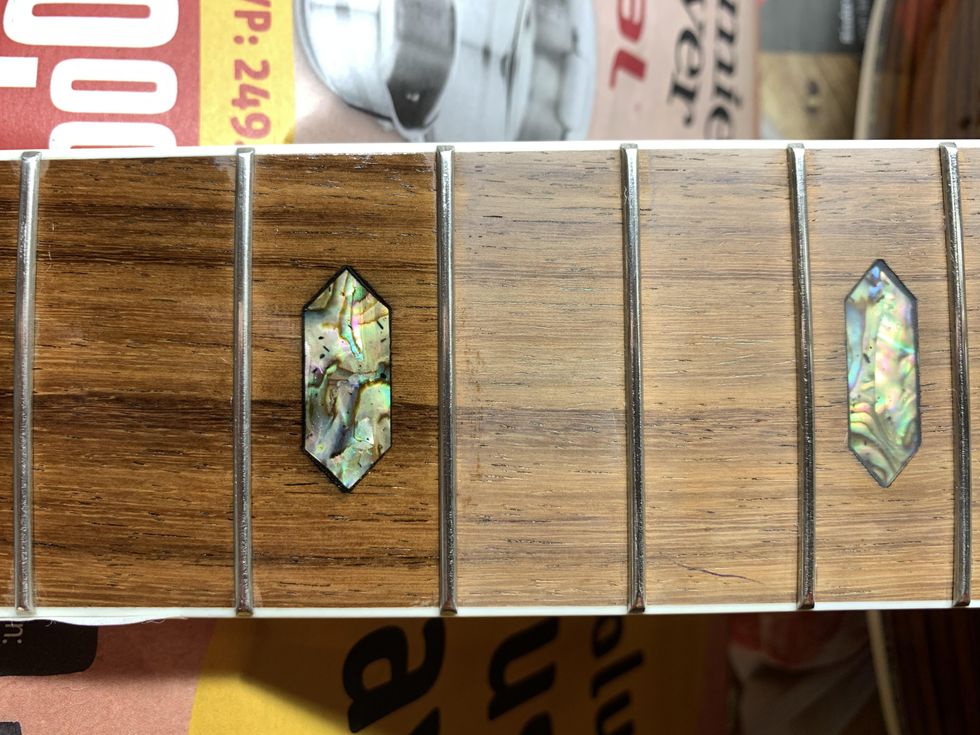
Photo 3
Now look at the difference in Photo 3. It’s easy to see! If you want your fretboard darker, repeat the process until you like it. Cover your workspace with old newspapers and have an old cotton rag nearby just in case. This dye will stain everything permanently and you don’t want it on your clothes or your kitchen table. Let the fretboard dry for a day and take off the masking tape.
Use some very fine steel wool to polish the fretboard and the frets, to get any dye off the fret material easily. Use a soft brush to clean the fretboard afterwards.
Use some naphtha and a Q-tip to carefully clean the fretboard dots from any Vaseline leftovers.
Then use the amber color from the last part of this series [“DIY Relic’ing: Hardware Continued”] together with a fresh Q-tip and apply the amber color to the dots until you like the shade.
Now that we’ve made this rosewood fretboard look much closer to Brazilian rosewood, it’s time to mimic the touch and feel of it. Brazilian rosewood has a certain smell and feel that can be described as greasy compared to most other rosewoods. This is because of the oil content of this wood. We can’t naturally “oil up” other woods, but we can get close to this certain feel by waxing the fretboard rather than oiling it. This is also an easy process so let’s go for it.
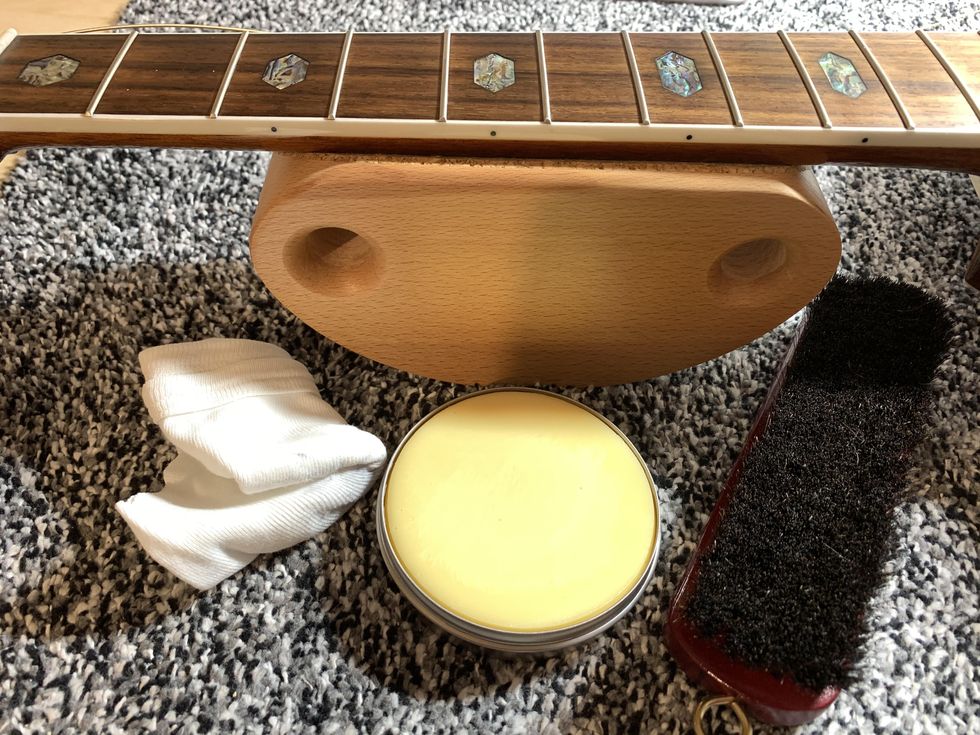
Photo 4
Get a clear, hard wax for fretboards and a soft polishing brush (Photo 4). Apply a thin layer of wax to the fretboard using a cotton cloth to massage it into the wood.
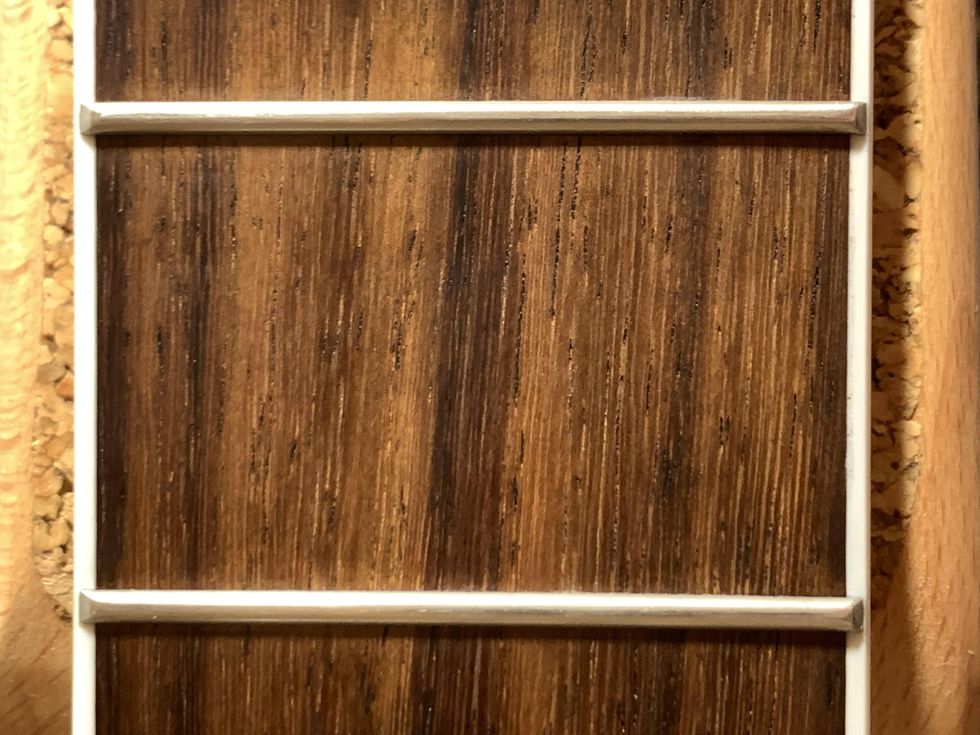
Photo 5
Let it dry for some time, then wipe off any remaining excess wax and use the soft polishing brush to get this greasy look and shine on your fretboard, as seen in Photo 5.
So far, so good. We’ve taken care of the color and the feel of the fretboard but there is another haptic thing to consider when talking about vintage necks: the broken-in feeling of the fretboard edges. The fretboard edges of well-played vintage guitars feel comfortable and round because the edges receive pressure from a player’s hand over decades. This is not what is called “rolled fretboard edge,” which is a common custom shop option, but it goes in the same direction only to a much lesser degree.
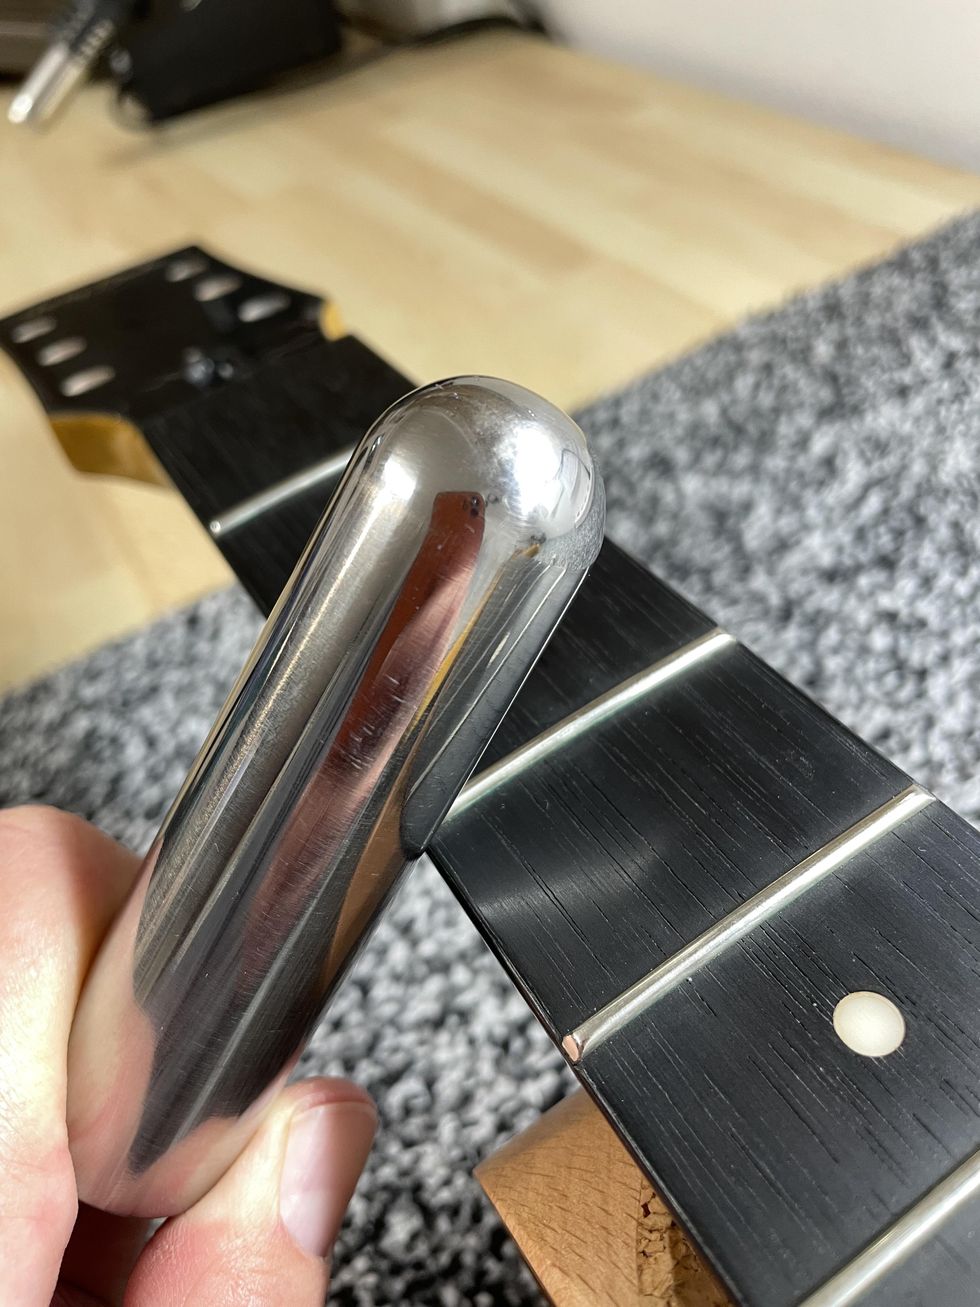
Photo 6
To bring this typical broken-in feeling to your neck, you don’t need much: just a round metal bar and some time. You can do this to any guitar neck. I prefer to use a massive metal slide for pedal-steel players, but you can also use a bigger screwdriver or something similar. If possible, clamp down your guitar and use the steel bar in a 45-degree angle to move it along the edge of the fretboard, applying pressure (Photo 6). What we’re doing with this is not making a rolled edge but compressing fibres, which is exactly the natural process over time. Repeat moving the bar while applying pressure for some time and check the result until you like it. This is not done within a minute, so take your time. With the metal slide, I usually need 10-15 minutes for each edge until I like it, but this depends a lot on how hard your fretboard material is.
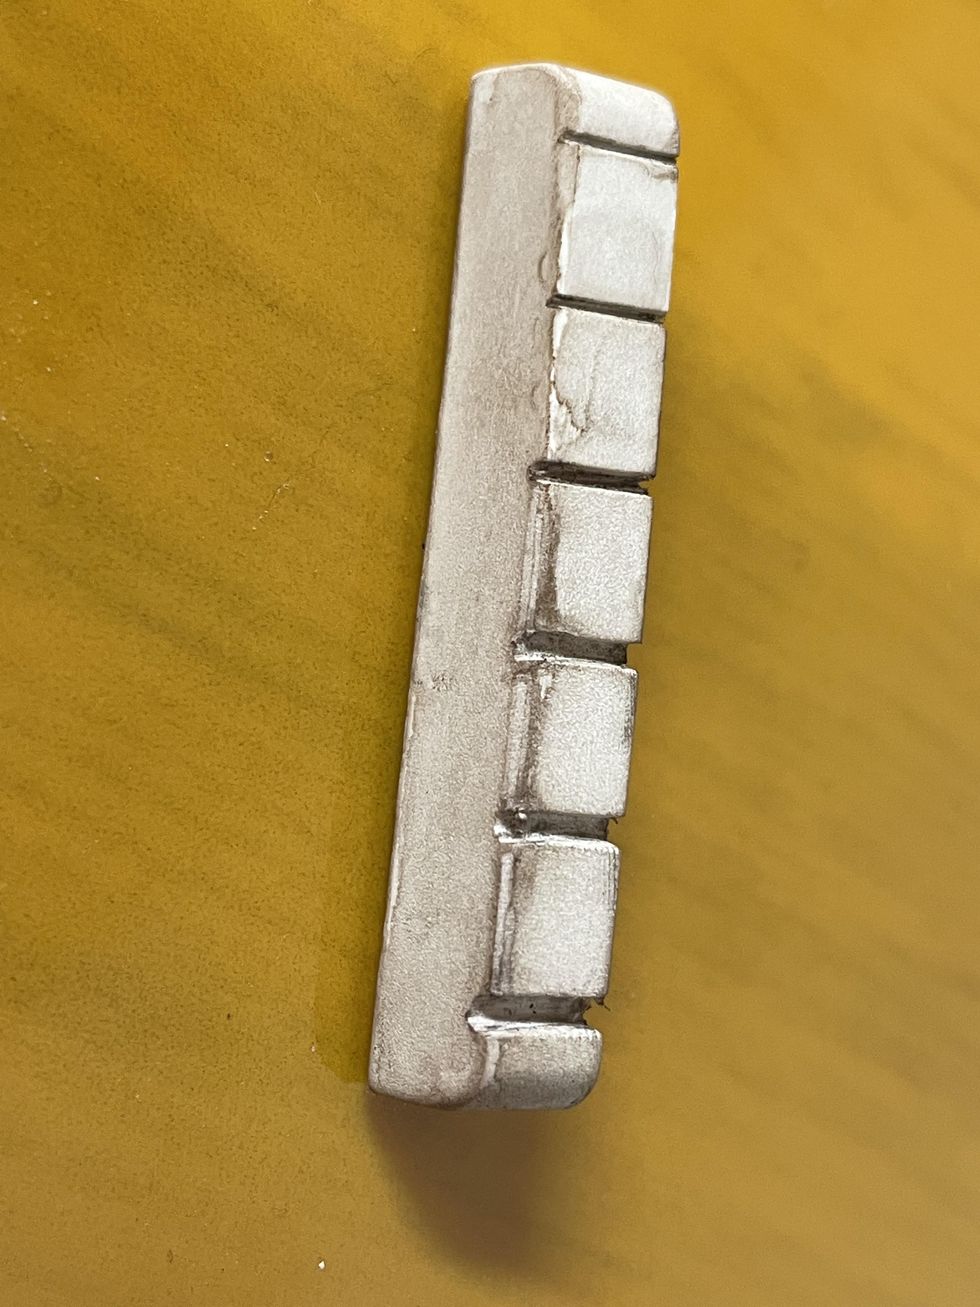
Photo 7
If you’re done with that part, excellent! You just finished your fretboard. Moving up the neck, the nut is our next task. The nut of our Harley Benton is pure white plastic, which not the best choice. If you want to keep it, you can sand it with some steel wool and apply some of the amber color with a Q-tip, followed with some of our mixture of dirt, dust, and ashes we used for the plastic buttons of the tuners [DIY Relic’ing Tuners, Part 2”]. Use your fingers to wipe on some of this mixture and you’re done. If you want to upgrade the nut, nylon is the historically correct material, and such nut blanks are available from numerous luthier supply stores. I decided to use an unbleached bone nut blank and make a new nut. Afterwards, I used some of the amber color and dust to make it look old (Photo 7).
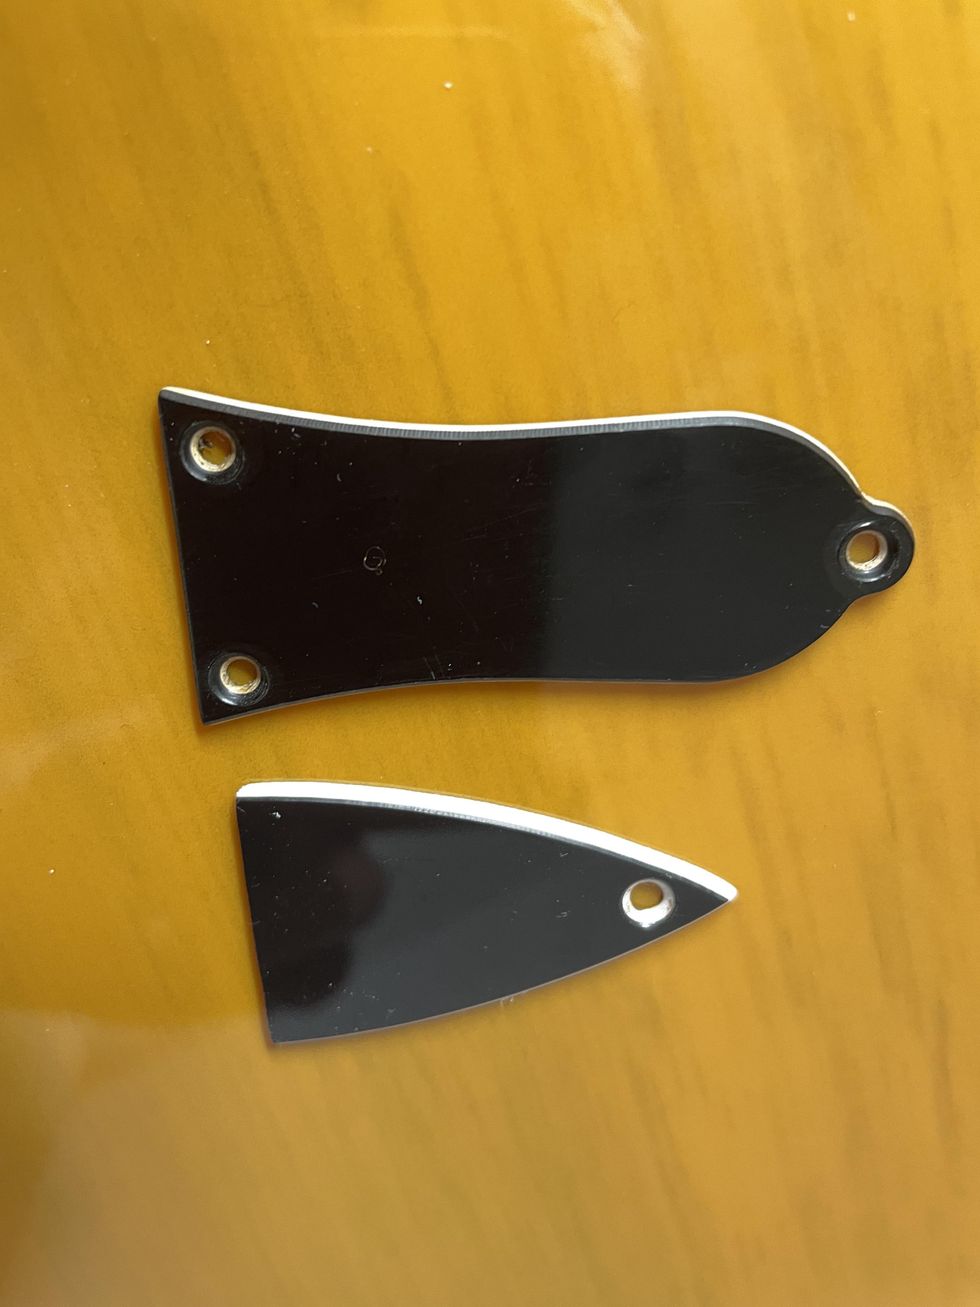
Photo 8
Further up the neck is the cover for the truss rod adjustment screw with its mounting screw. Harley Benton decided to use a modern shape for it, which doesn’t look very good to me. The typical Gibson-style covers with their bell-like shape look much different, so I decided to swap the cover for such a model, modifying it for a flat bottom so it covers the whole opening for the truss rod (Photo 8). To make it look old, you can use the exact steps we used on the jack plate: break the shine with some steel wool, add some light scratches, wipe on some amber color on the white part of the cover, and then rub in some dust and dirt. You already know how to age screws, having done it many times before in the earlier parts of this ongoing project. If you need a refresher on our aging process for screws, refer back to “DIY Relic’ing: Break the Shine” for guidance.
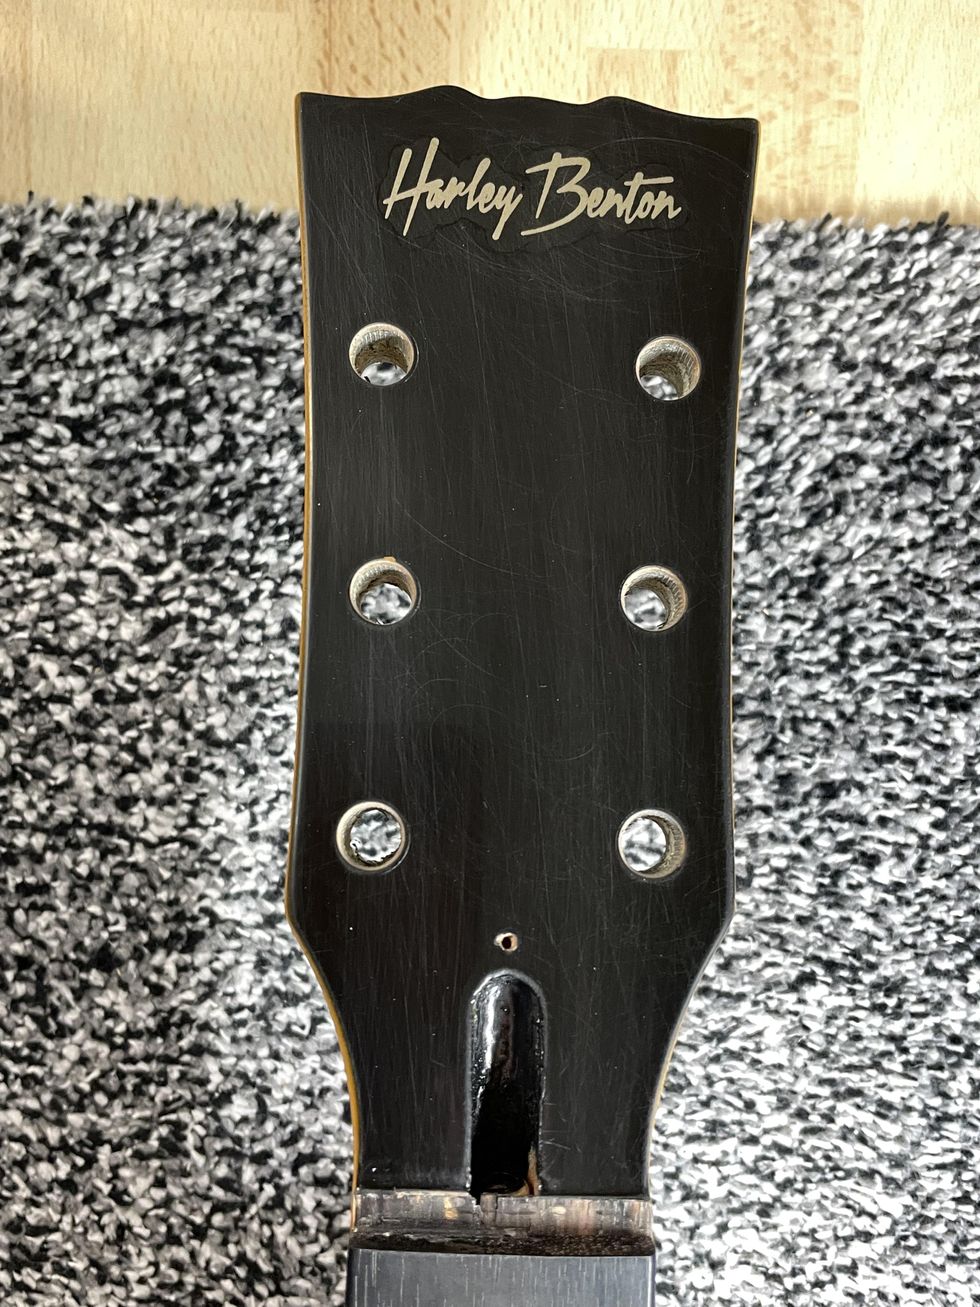
Photo 9
The last thing we’ll do today is begin to work on the headstock of the guitar, which is often a delicate task. A lot of modders try to reshape the headstock so it will look like it’s from a vintage guitar, and, even worse, replace the headstock logo with a fake logo from another company. I would never do that. This project is about aging a guitar and not about making it an exact copy of a vintage original. Personally, I really like the headstock shape of the Harley Benton. It looks at least a little bit Gibson-like, and I also think the Harley Benton logo looks cool the way it is (Photo 9). So, aging it is very easy: Break the shine with some steel wool and wipe off the dust. Use a Q-tip and apply some layers of the amber color to the logo until you like the shade. Adding dings, dongs, and scratches will come later. In the next part of this project, we’ll take care of the backside of the neck and the body by cracking the lacquer to mimic some old nitro lacquer.
That’s it for now. We’re almost finished with this relic’ing project, but before we wrap it up, we’ll return to guitar mods in the next issue. We’ll take a deeper look at putting vintage parts into new electric guitars, so stay tuned.
Until then ... keep on modding!
- Last Call: Someday You'll Regret That Relic Job - Premier Guitar ›
- Mod Garage: DIY Relic'ing—Aging a P-90 Pickup - Premier Guitar ›
- DIY Relic'ing: Break the Shine - Premier Guitar ›
- DIY Guitar Relic'ing: Let's Crack Some Lacquer Finish - Premier Guitar ›
- It’s Rosewood, But What Kind? ›
The country virtuoso closes out this season of Wong Notes with a fascinating, career-spanning interview.
We’ve saved one of the best for last: Brad Paisley.The celebrated shredder and seasoned fisherman joins host Cory Wong for one of this season’s most interesting episodes. Paisley talks his earliest guitar-playing influences, which came from his grandfather’s love of country music, and his first days in Nashville—as a student at Belmont University, studying the music industry.
The behind-the-curtain knowledge he picked up at Belmont made him a good match for industry suits trying to force bad contracts on him.
Wong and Paisley swap notes on fishing and a mutual love of Phish—Paisley envies the jam-band scene, which he thinks has more leeway in live contexts than country. And with a new signature Fender Telecaster hitting the market in a rare blue paisley finish, Paisley discusses his iconic namesake pattern—which some might describe as “hippie puke”—and its surprising origin with Elvis’ guitarist James Burton.
Plus, hear how Paisley assembled his rig over the years, the state of shredding on mainstream radio, when it might be good to hallucinogenic drugs in a set, and the only negative thing about country-music audiences.
Tom Bedell in the Relic Music acoustic room, holding a custom Seed to Song Parlor with a stunning ocean sinker redwood top and milagro Brazilian rosewood back and sides.
As head of Breedlove and Bedell Guitars, he’s championed sustainability and environmental causes—and he wants to tell you about it.
As the owner of the Breedlove and Bedell guitar companies, Tom Bedell has been a passionate advocate for sustainable practices in acoustic guitar manufacturing. Listening to him talk, it’s clear that the preservation of the Earth’s forests are just as important to Bedell as the sound of his guitars. You’ll know just how big of a statement that is if you’ve ever had the opportunity to spend time with one of his excellently crafted high-end acoustics, which are among the finest you’ll find. Over the course of his career, Bedell has championed the use of alternative tonewoods and traveled the world to get a firsthand look at his wood sources and their harvesting practices. When you buy a Bedell, you can rest assured that no clear-cut woods were used.
A born storyteller, Bedell doesn’t keep his passion to himself. On Friday, May 12, at New Jersey boutique guitar outpost Relic Music, Bedell shared some of the stories he’s collected during his life and travels as part of a three-city clinic trip. At Relic—and stops at Crossroads Guitar and Art in Gilbertsville, Pennsylvania, and Chuck Levin’s Washington Music Center in Wheaton, Maryland—he discussed his guitars and what makes them so special, why sustainability is such an important cause, and how he’s putting it into practice.
Before his talk, we sat in Relic’s cozy, plush acoustic room, surrounded by a host of high-end instruments. We took a look at a few of the store’s house-spec’d Bedell parlors while we chatted.
“The story of this guitar is the story of the world,” Bedell explained to me, holding a Seed to Song Parlor. He painted a picture of a milagro tree growing on a hillside in northeastern Brazil some 500 years ago, deprived of water and growing in stressful conditions during its early life. That tree was eventually harvested, and in the 1950s, it was shipped to Spain by a company that specialized in church ornaments. They recognized this unique specimen and set it aside until it was imported to the U.S. and reached Oregon. Now, it makes the back and sides of this unique guitar.
A Bedell Fireside Parlor with a buckskin redwood top and cocobolo back and sides.
As for the ocean sinker redwood top, “I’m gonna make up the story,” Bedell said, as he approximated the life cycle of the tree, which floated in the ocean, soaking up minerals for years and years, and washed ashore on northern Oregon’s Manzanita Beach. The two woods were paired and built into a small run of exquisitely outfitted guitars using the Bedell/Breedlove Sound Optimization process—in which the building team fine-tunes each instrument’s voice by hand-shaping individual braces to target resonant frequencies using acoustic analysis—and Bedell and his team fell in love.
Playing it while we spoke, I was smitten by this guitar’s warm, responsive tone and even articulation and attack across the fretboard; it strikes a perfect tonal balance between a tight low-end and bright top, with a wide dynamic range that made it sympathetic to anything I offered. And as I swapped guitars, whether picking up a Fireside Parlor with a buckskin redwood top and cocobolo back and sides or one with an Adirondack spruce top and Brazilian rosewood back and sides, the character and the elements of each instrument changed, but that perfect balance remained. Each of these acoustics—and of any Bedell I’ve had the pleasure to play—delivers their own experiential thumbprint.
Rosette and inlay detail on an Adirondack spruce top.
Ultimately, that’s what brought Bedell out to the East Coast on this short tour. “We have a totally different philosophy about how we approach guitar-building,” Bedell effused. “There are a lot of individuals who build maybe 12 guitars a year, who do some of the things that we do, but there’s nobody on a production level.” And he wants to spread that gospel.
“We want to reach people who really want something special,” he continued, pointing out that for the Bedell line, the company specifically wants to work with shops like Relic and the other stores he’s visited, “who have a clientele that says I want the best guitar I can possibly have, and they carry enough variety that we can give them that.”
A Fireside Parlor with a Western red cedar top and Brazilian rosewood back and sides.
A beautifully realized mashup of two iconic guitars.
Reader: Ward Powell
Hometown: Ontario, Canada
Guitar: ES-339 Junior
I’ve always liked unusual guitars. I think it started when I got my first guitar way back in 1976. I bought a '73 Telecaster Deluxe for $200 with money I saved from delivering newspapers.
I really got serious about playing in 1978, the same year the first Van Halen album was released. Eddie Van Halen was a huge influence on me, including how he built and modded guitars. Inspired by Eddie, I basically butchered that Tele. But keep in mind, there was once a time when every vintage guitar was just a used guitar—I still have that Tele, by the way.
I never lost that spirit of wanting guitars that were unique, and have built and modded a few dozen guitars since. When I started G.A.S.-ing simultaneously for a Les Paul Junior and a Casino, I came up with this concept. I found an Epiphone ES-339 locally at a great price. It already had upgraded CTS pots, Kluson tuners, and the frets had been PLEK’d. It even came with a hardshell case. It was cheap because it was a right-handed guitar that had been converted to left handed and all the controls had been moved to the opposite side, so it had five additional holes in the top.
Fortunately, I found a Duesenberg wraparound bridge that used the same post spacing as a Tune-o-matic. I used plug cutters to cut plugs out of baltic birch plywood to fill the 12 holes in the laminated top. I also reshaped the old-style Epiphone headstock. Then, I sanded off the original finish, taped the fretboard, and sprayed the finish using cans of nitro lacquer from Oxford Guitar Supply. Lots of wet sanding and buffing later, the finish was done.
I installed threaded insert bushings for the bridge, so it will never pull out. The pickup is a Mojotone Quiet Coil P-90 and I fabricated a shim from a DIY mold and tinted epoxy to raise the P-90 up closer to the strings. The shim also covers the original humbucker opening. I cut a pickguard out of a blank and heated it slightly to bend it to follow the curvature of the top.
All in all, I'm pretty happy how it turned out! It plays great and sounds even better. And I have something that is unique: an ES-339 Junior.
ENGL, renowned for its high-performance amplifiers, proudly introduces the EP635 Fireball IR Pedal, a revolutionary 2-channel preamp pedal designed to deliver the legendary Fireball tone in a compact and feature-rich format.
The EP635 Fireball IR Pedal brings the raw power and precision of the ENGL Fireball amplifier into a pedalboard-friendly enclosure, offering unmatched flexibility and tonal control for guitarists of all styles. This cutting-edge pedal is equipped with advanced features, making it a must-have for players seeking high-gain perfection with modern digital convenience.
Key Features:
- Authentic Fireball Tone – Designed after the renowned ENGL Fireball amplifier, the EP635 delivers the unmistakable high-gain aggression and clarity that ENGL fans love.
- Two Independent Channels – Easily switch between two distinct channels, with each channel’s knob settings saved independently, allowing for seamless transitions between tones.
- Built-in Midboost Function – Enhance your tone with the integrated Midboost switch, perfect for cutting through the mix with extra punch.
- Advanced Noise Gate – Eliminate unwanted noise and maintain articulate clarity, even with high-gain settings.
- IR (Impulse Response) Loading via USB-C – Customize your sound with user-loadable IRs using the included software, bringing studio-quality cab simulations to your pedalboard.
- Headphone Output – Silent practice has never been easier, with a dedicated headphone output for direct monitoring.
- Premium Build and Intuitive Controls – Featuring a rugged chassis and responsive controls for Volume, Gain, Bass, Middle, Treble, and Presence, ensuring precise tonal shaping.
SPECS:
- Input 1/4” (6,35mm) Jack
- Output 1/4” (6,35mm) Jack
- Headphone Output 1/8”(3,5mm) Jack
- 9V DC / 300mA (center negativ) / power supply, sold separately
- USB C