If you're a guitar modder, you probably already have most of the simple tools needed for this unique pedalboard project.
Hello, and welcome to my first DIY project for Premier Guitar. I'm going to explain how to make a battery-operated power supply for your pedalboard (Image 1). We'll be using a cordless drill battery for power and a few other items that you might already have lying around. All of the parts needed for this project can be easily found and purchased online.
Why would you want to use a drill battery to power your effects pedals? By powering your effects with a battery, you eliminate the potential for noise caused by bad wiring in your home or in a venue, it eliminates possible ground loops as well as a cord to trip over, and it expands your possibilities for placement of your pedalboard. Drill batteries are tough, easily rechargeable, and will last a really long time before needing a recharge. They just pop in and out of their charger and will pop in and out of your power supply. If you already have a couple spare batteries, the cost of this build is small. Spare batteries can be purchased online if you already have a charger, or you can even buy batteries and a charger.
If you've been modding the wiring of your guitars, you probably have the tools and skills necessary to build this project.
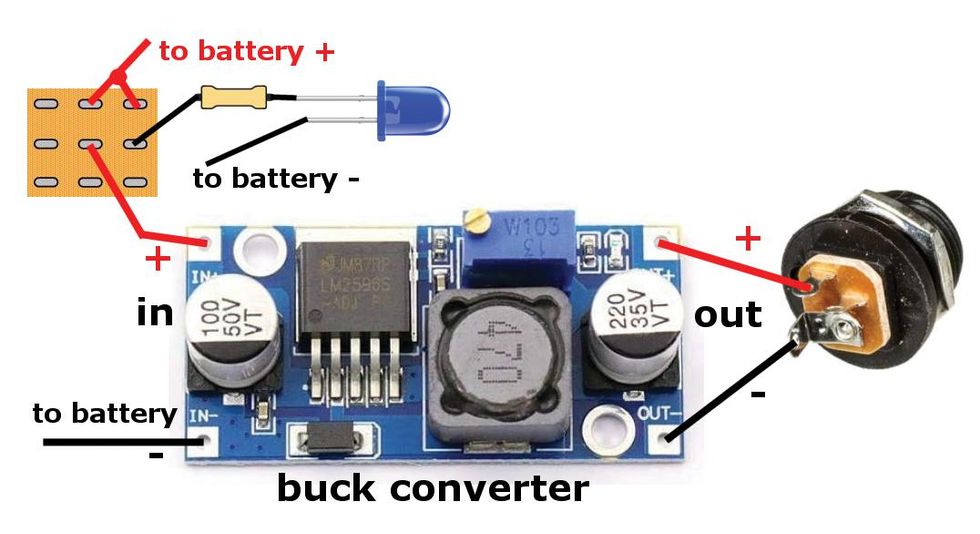
Image 2
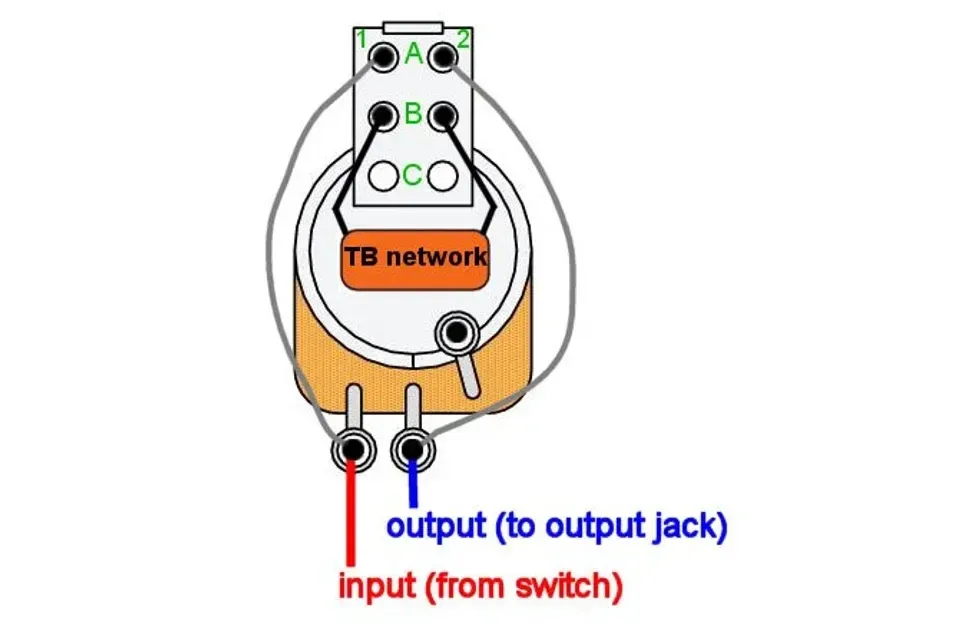
You'll need a good soldering iron and solder, a drill, needle-nose pliers, a multimeter, and, of course, eye protection. If you're like me, you'll also need reading glasses to see what you're doing. This build is pretty simple and easy to understand, as you can see in the wiring diagram shown in Image 2. The orange square is the back of the common 3PDT footswitch found in most boutique stompboxes. I used a 3PDT footswitch, but a 2PDT footswitch or any toggle switch will also work for this project.
The two most important items we need, other than a battery, are a battery adapter and a buck converter, sometimes called a voltage converter.
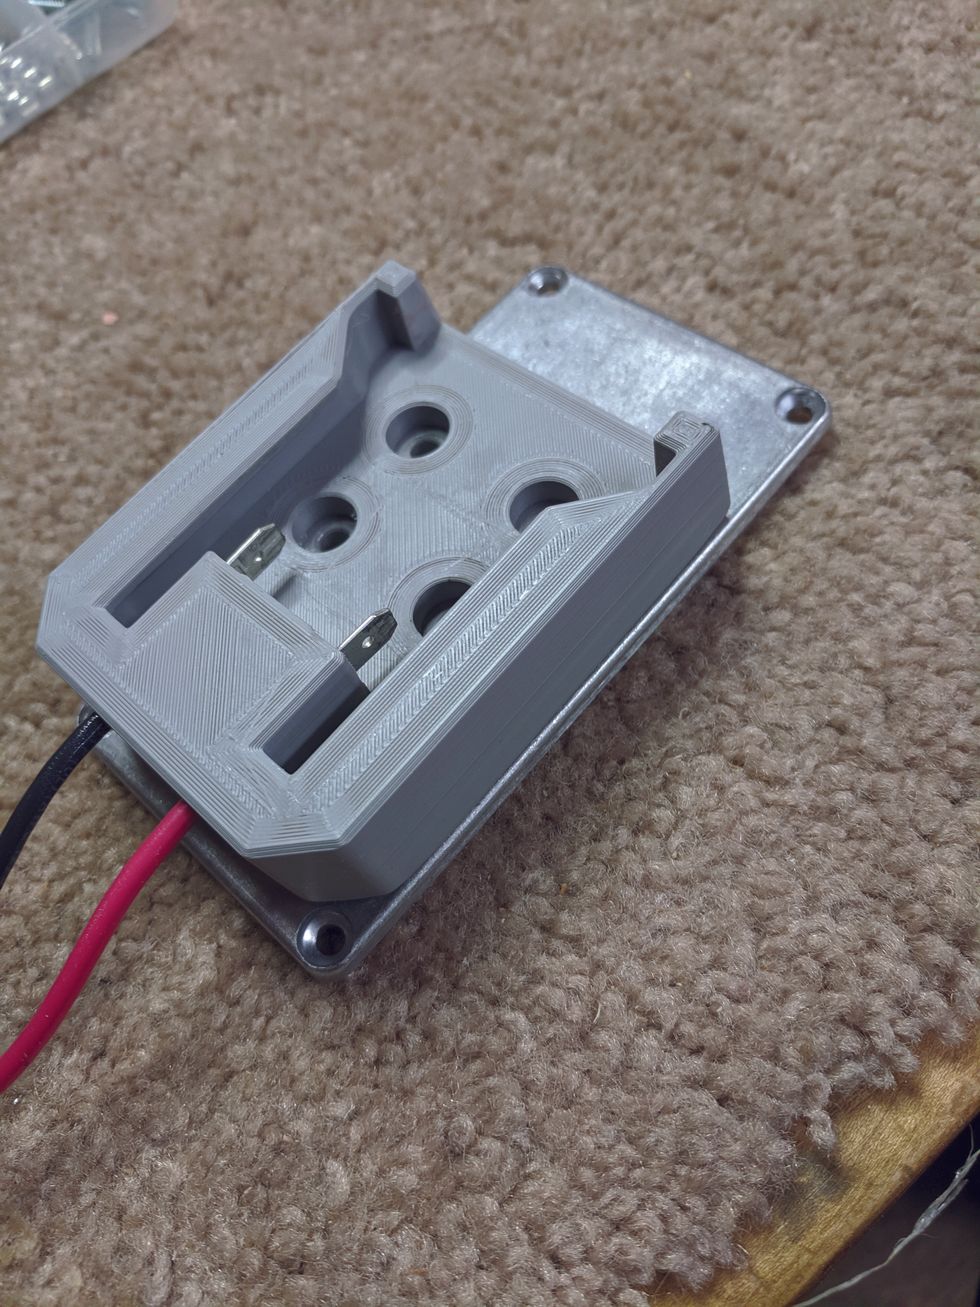
Image 3
The battery plugs into the adapter, just like it plugs into a drill, and has two wires that let us connect to the battery's power. Battery adapters are made for several brands of drill batteries. I use Milwaukee but Makita and DeWalt will also work for this project. I bought my battery adapter (Image 3) for about $16 from Amazon.
The buck converter lets you adjust (or "step down") the voltage coming from the battery to 9 volts, which is the voltage you want for most pedals. These units are also cheap. I bought a pack of four, just in case I ruined one. Get one that will handle at least 25 volts on the upper range and goes down past our target voltage of 9 volts. Also, check how much current it can handle: 3 to 5 amps should be plenty.
Get a buck converter that will handle at least 25 volts on the upper range and goes down past our target voltage of 9 volts.
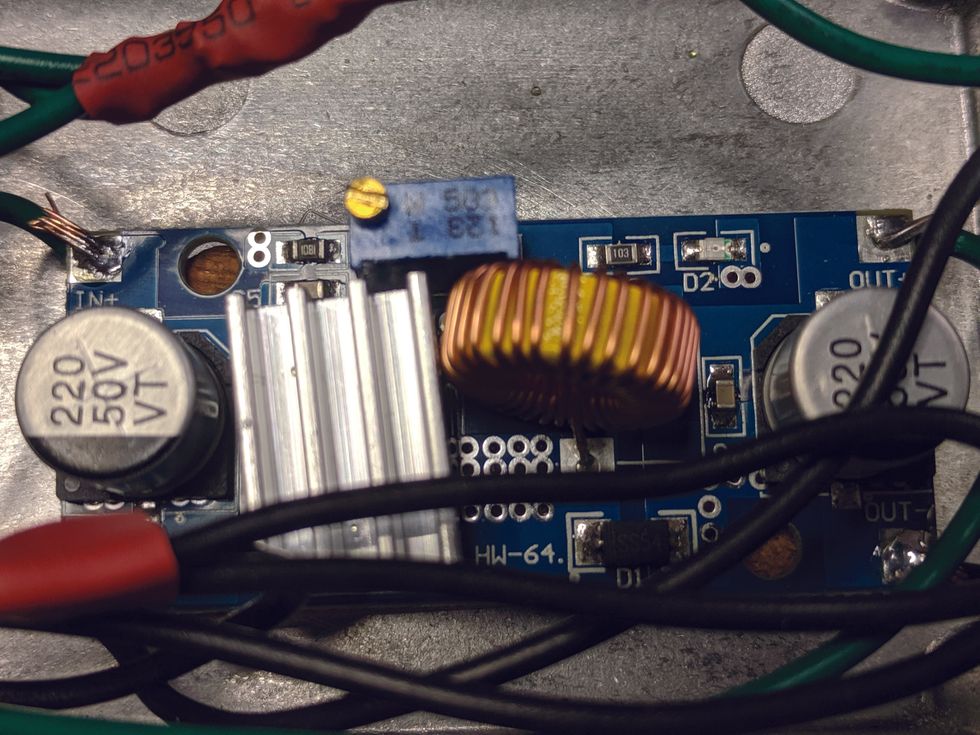
Image 4
The buck converter I bought is about 2" by 1" (Image 4), with connections for DC in and DC out. The small brass screw on top of the blue rectangular box is the adjustment. On mine, turning the screw counterclockwise drops the output voltage. It takes a really small screwdriver to fit the adjustment screw, and a lot of turns to get it down to 9 volts.
The buck converter I bought is good for 3 amps of electric current. So how much current will your pedals draw? I found a good list of different pedals and their power draw on Stinkfoot.se. The four pedals I've been using lately draw a total of 113 mA, or .113 of an amp. It's important to note that stompboxes draw power whenever there is a guitar cord plugged into them, even when switched off. The footswitch on a pedal just routes the signal around the circuitry and doesn't stop the power draw. This is why we're putting a footswitch on our project, so we can turn off the power. We'll also incorporate an LED to remind us when the power is on.
We'll use a basic stompbox enclosure for this project. I used one that measures about 2 1/4" x 4 1/4", and it came in a box of three. The box came with a special stepped drill bit that makes holes for things like jacks, switches, and LEDs, and a helpful list of which steps work for different parts. A piece of masking tape wrapped around the drill bit at the appropriate step will help you drill the right-sized hole without going too far.
What Else Will We Need?
- One 3PDT footswitch (a 2PDT footswitch will also work)
- An LED and mounting bezel
- One 4.7k (drop-down) resistor
- A barrel jack, compatible with your power cord
- Two colors of hookup wire, 22 AWG or 24 AWG
- Standoffs to mount the buck converter, or some silicone caulk
- Three or four nuts and bolts to mount the battery adapter
- And lastly, we will need that old daisy chain power cord I know you have lying around, to power your pedals.
Heat-shrink tubing is not strictly necessary, but it will make your build a lot neater than using electrical tape. Once you buy some, you'll find many uses for it and it'll come in handy often. I got a bag with a bunch of different diameter pieces for a couple bucks, and it's lasted me several years.
Bolt-mount the battery adapter to the bottom of the enclosure.
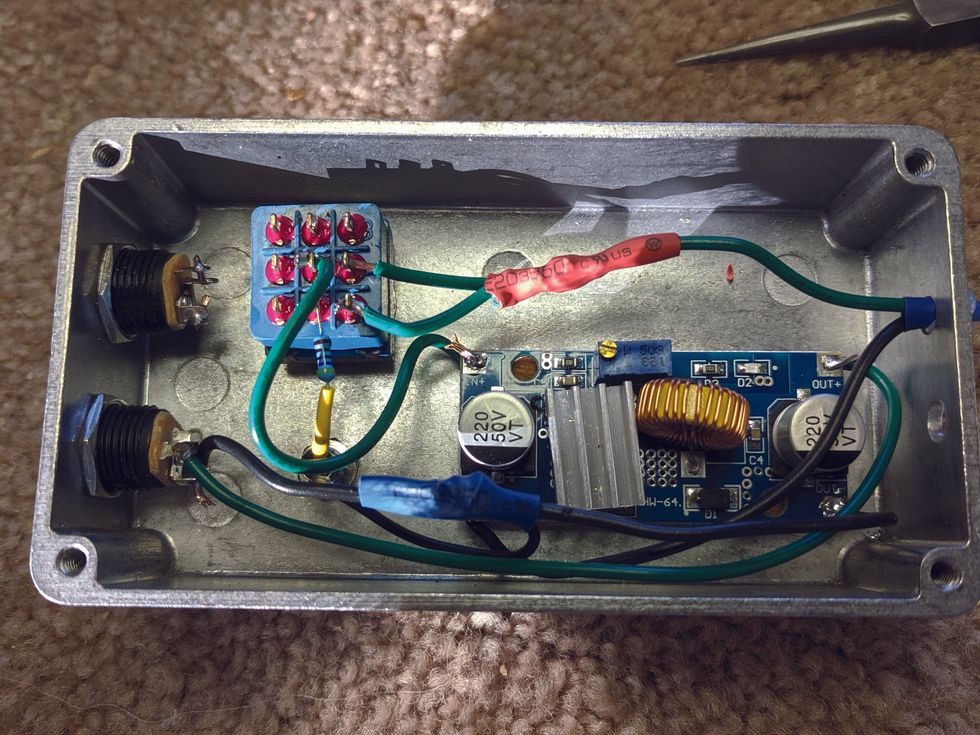
Image 5
Now let's get started. You can see all the parts and wiring fit in the enclosure pretty easily (Image 5). Mark where the holes go carefully. Use the shortest bolts you can, so they don't interfere with the wiring, making sure to leave room to access the screws that hold the enclosure together.
Next, mark where to drill the holes for the footswitch, LED, and jack.
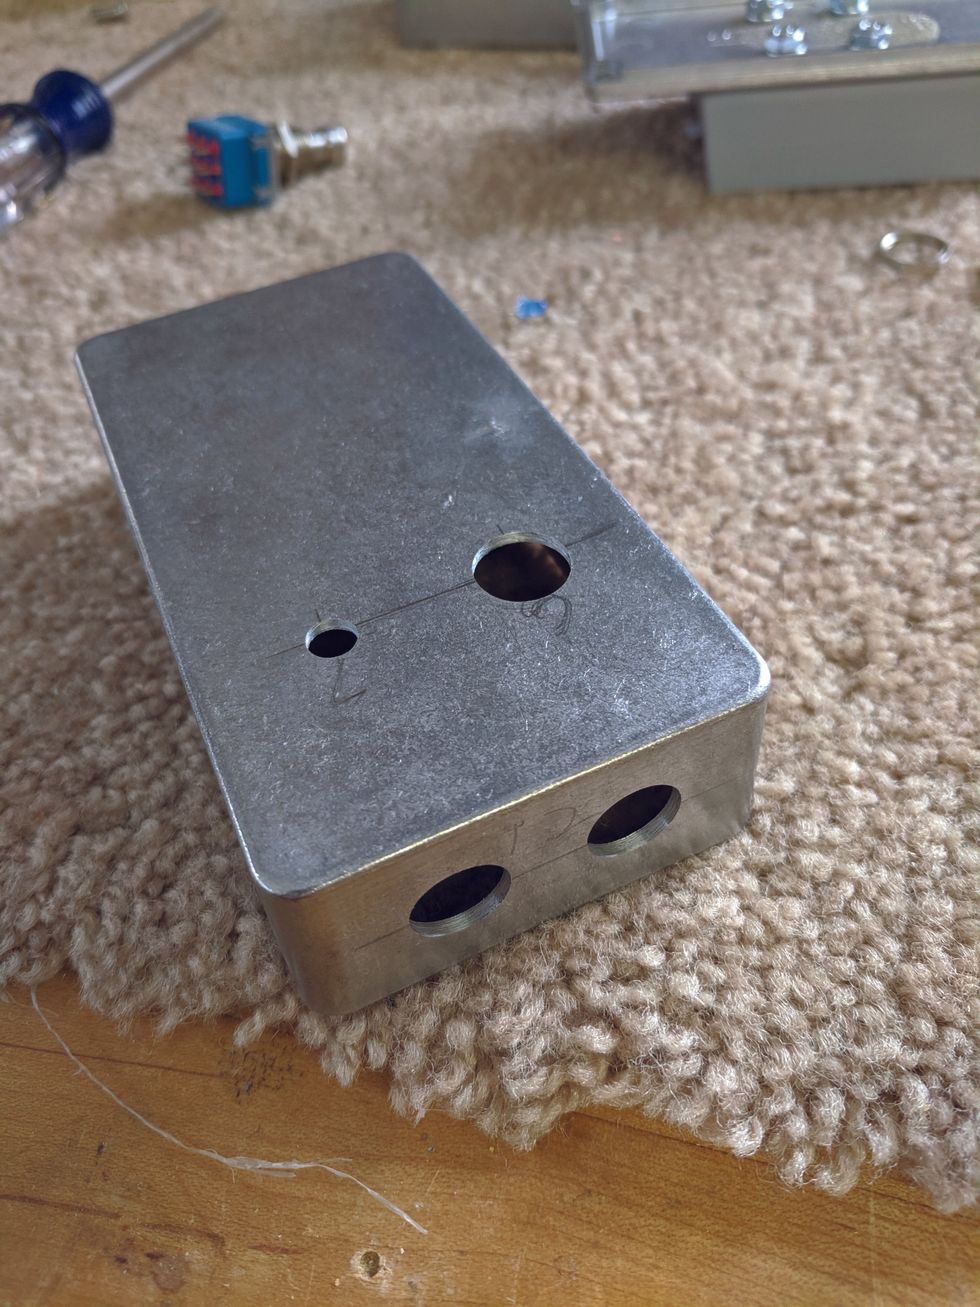
Image 6
You'll need one more hole to bring the wires from the adapter into the enclosure: Put that on the end opposite the jack. Make sure to sand this last hole nice and smooth around the edges so it won't abrade the wire. I put my jack hole about halfway between the top and bottom of the enclosure and that left me plenty of room for wiring. Make sure you leave enough room between the jack and footswitch (Image 6). Now we can mount the jack, footswitch, and LED bezel.
At this point, you just need to follow the diagram to wire things up. I used 22 AWG wire and found it a little bit cumbersome to fit it into a few of the tighter spaces and get it soldered. On that note, 24 AWG wire would probably be fine. It should be good for around 1.4 to 3.5 amps, depending on if it's stranded or solid core. To give you an idea, 1.4 amps is more than 10 times the current of what my four pedals draw.
I mounted another jack for 18-volt output, just in case I ever get an 18-volt pedal. (This would also require a second buck converter.) After wiring it up, however, I found my 18-volt batteries are actually around 20 volts, so I removed the wiring.
If you don't have standoffs for your buck converter, you need another way to mount it to the inside of your enclosure.
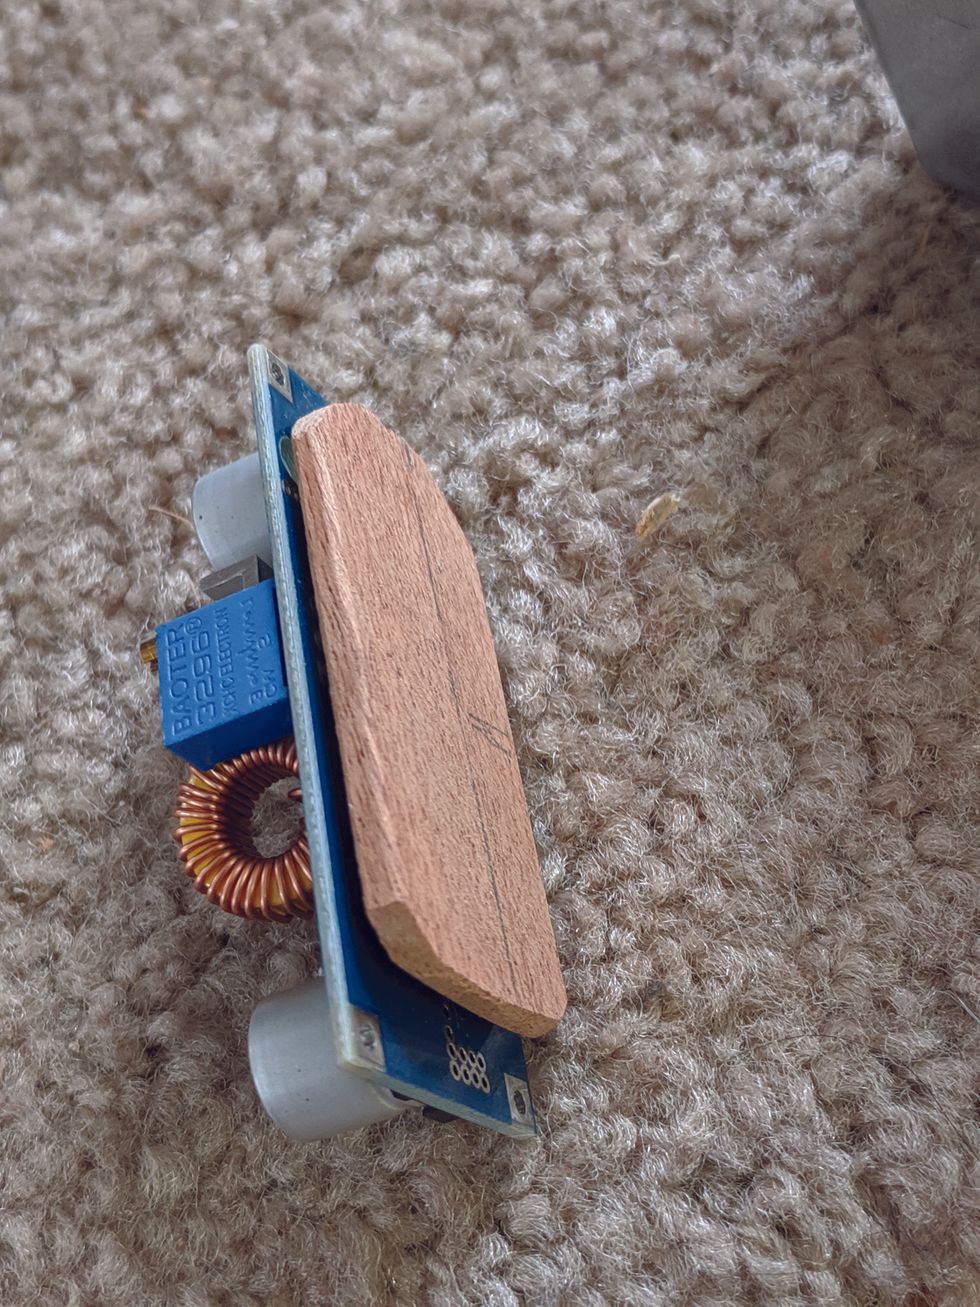
Image 7
I used silicone caulk to glue mine to a thin piece of wood. I used alcohol to clean the enclosure where I put the silicone, to make sure it would stick. After the silicone was dry and I wired up the converter, I used more silicone to glue it to the enclosure (Image 7).
Cut the wires from your battery adapter to a shorter length, feed the wires from the input of your buck converter through their hole in the enclosure, and solder them to the battery wires.
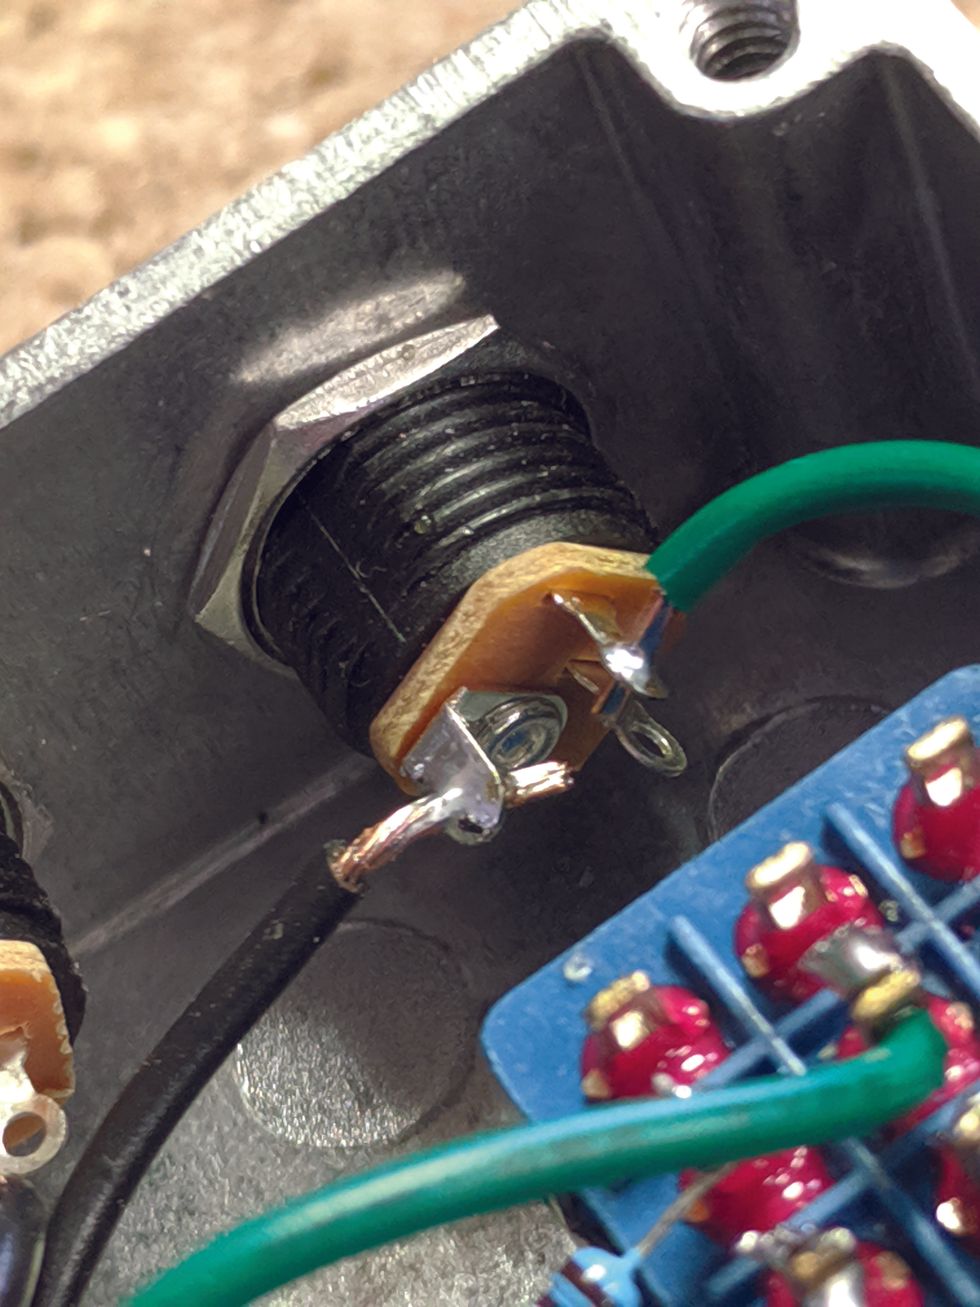
Image 8
This is where your heat-shrink tubing will come in handy. Use some more of that silicone to anchor the wires in the hole after you know everything works. And be sure that you wire your jacks so the center is negative (Image 8).
The LED needs a resistor soldered to the positive leg in series to operate.
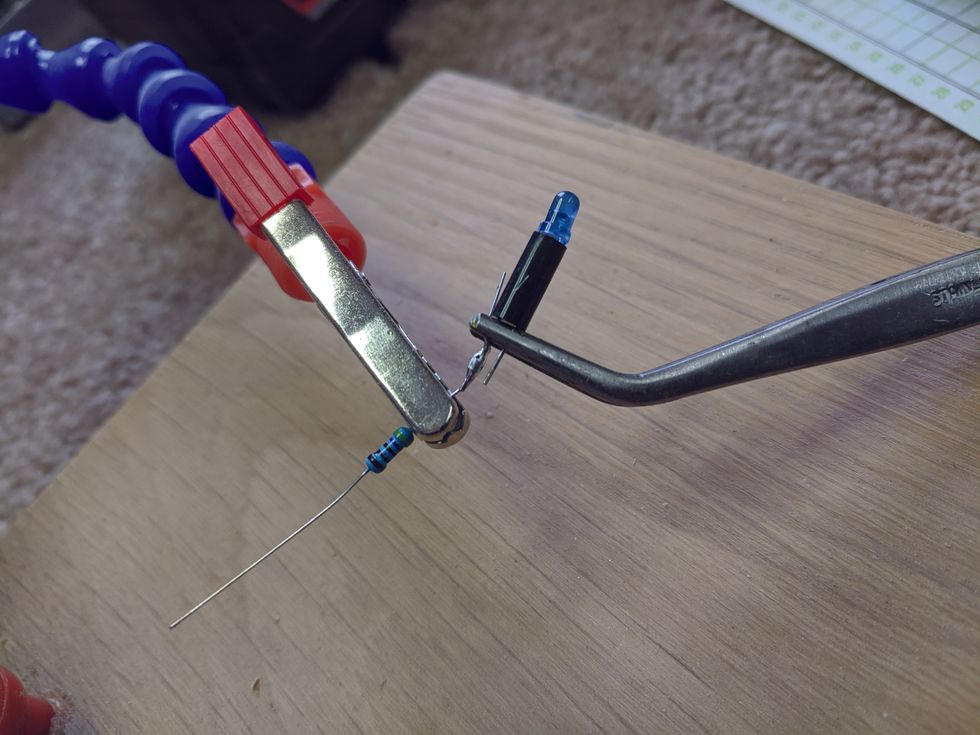
Image 9
The positive leg is the longer one. Fit the LED legs through the plastic-mounting sleeve that came with the bezel before you solder on your resistor (Image 9). The LED will then just push into the bezel. If your LED is close enough, you can solder the other end of the resistor to the switch, like I did. You can use wire if it's too far. The other lead from the LED goes to the ground from the battery. It's worth noting that the value of the drop-down resistor depends a lot on the type and color or LED. We're using a 4.7k resistor, which works fine with a blue standard LED. For all other LED colors and types, the resistor type can be recalculated online. A good resource for this is: https://www.muzique.com/schem/led.htm.
If you soldered everything up correctly, you should be good to go! I have two different-sized drill batteries, and even the small ones will power my pedals for nine hours. I would suggest turning your power supply on and testing with your multimeter before plugging in any of your pedals, taking care that the polarity of your output is correct.
How could you modify my design? You could use a larger enclosure and more jacks, allowing you to power each pedal with its own cable. Instead of a larger enclosure, you could make a separate box with lots of power jacks. A second buck converter could allow for 18-volt power. Maybe it would make sense for you to mount your battery adapter directly to your pedalboard and mount the stompbox enclosure separately. Let me know if you have other ideas in the comments section online.
For me, this was an enjoyable switch from my usual projects. I have a lot of leftover parts, so I guess it's time to start thinking about what to make next.PQ: "I would suggest turning your power supply on and testing with your multimeter before plugging in any of your pedals, taking care that the polarity of your output is correct."
[Updated 1/25/22]
- Powering Your Board - Premier Guitar | The best guitar and bass ... ›
- Tools for the Task: Pedalboard Power - Premier Guitar | The best ... ›
- Got Noise Issues? It Could Be Your Pedalboard's Power Supply ... ›
- DIY Pedalboard Build - Premier Guitar ›
- Got Noise Issues? It Could Be Your Pedalboard's Power Supply - Premier Guitar ›
- Powering Your Board - Premier Guitar ›
- Tools for the Task: Pedalboard Power Supplies - Premier Guitar ›
- The Power of a Good Supply: Pedalboard Power Supplies ›
This bass sports some original modifications made by Gary Kramer following the early-’70s departure of his partner Travis Bean.
Some instruments beg more questions than others. This 1978 Kramer 350B, with a headstock that looks like you could whack it on a table and hear a pure 440 Hz, practically shouts, “Please tell people why I am the way I am!”
The story of this bass starts in 1974 with Travis Bean, a colorful Californian experienced as a machinist, motorcycle racer, and rock ’n’ roll drummer. Bean believed that the stability of aluminum was going to revolutionize guitar design. He found a business partner in Gary Kramer, and Travis Bean Guitars began manufacturing high-end guitars and basses selling for around $1,000, which was quite a sum in the ’70s. The instruments had aluminum necks and a distinctive hollowed-out “T” shape in the headstock.
Kramer and Bean dissolved their partnership in 1975, but Kramer dreamed of his guitar company becoming the biggest in the country. Using the knowledge of guitar production that he gathered working with Bean, Kramer believed he could improve on the Bean design by placing wooden inserts to the aluminum necks. This not only reduced the instrument’s weight—addressing a common gripe about Travis Bean guitars—but also made the necks feel less cold to the touch. The T-shaped headstock was also substituted with a simpler “tuning-fork” design, which prevented it from being mistaken for a Travis Bean guitar and further reduced the weight. In 1976, Kramer Guitars sent out their first product brochure featuring the 350G, 450G, 350B, and 450B—two guitars and two basses.
After the dissolution of Gary Kramer and Travis Bean’s partnership in 1975, Kramer modified the design of the company’s guitars, substituting the hollowed-out-T-shape headstock with one that resembles a tuning fork.
Photo by Madison Thorn
This particular 350B belonged to the owners of Fanny’s, Pamela Cole and Leigh Maples. They recalled seeing the Travis Bean instruments when they started playing, and having one of these early Kramers was a nod to their musical adolescence. Even though relatively few Travis Bean instruments were made in the ’70s, this anecdote is not totally surprising given the instruments’ high-profile adoptees. That list includes such rockers as Roger Fisher of Heart and Peggy Foster of the Runaways, musicians from two groups that can be found among the many photos on the walls here at Fanny’s.
“These elements, combined with the wooden inserts on the neck, are what make playing this bass feel like playing a bass, as opposed to a spaceship.”
At nine pounds on the nose, this bass is no heavier than the average Precision Bass and is certainly a testament to Gary Kramer’s commitment to weight relief. It has Schaller tuners, a hardtail, top-load bridge, and a fretboard made of ebonol—a synthetic material named for its similarity to ebony. Because of the way ebonol is made, it has a tight, faintly visible grain structure. These elements, combined with the wooden inserts on the neck, are what make playing this bass feel like playing a bass, as opposed to a spaceship.
The pickups are another interesting feature as we make our way south. First, they are embossed with the Kramer logo of the period, which—calling all font nerds!—is a little reminiscent of an elongated take on Herb Lubalin’s 1970 typeface Busorama. The pickup is a single-coil, and the pickup height is adjusted from the back of the guitar. Placed in the middle of the body, it has a unique tone that is not overwhelmingly beefy, and not too bright either.
This model’s hardtail, top-load bridge has accumulated some rust over the years.
Photo by Madison Thorn
These early Kramers had another advantage over the Travis Bean Guitars: They were considerably more affordable. The 350B retailed for $499, and along with the 450B (and later, the 250B and 650B) proved to be a star of Kramer’s lineup. By the early 1980s, Kramer basses were outselling guitars four to one. In 1981, Kramer switched to producing wood necks, which kept production costs low and broadened their appeal to guitar players. The rest is history, as Kramer went on to become an iconic guitar brand of the 1980s.
A forked-headstock bass might not be for everyone. Perhaps you prefer not to have eagle-eyed members of the audience coming up to you inquiring, “What the heck is that?” after your show. But if you’re jonesing for a bit of American vintage-guitar history that doesn’t require you to fork over all your dough, these early Kramers are certainly worth a look.
Sources: Assorted Kramer ’70s and ’80s catalogs, Axeology.com, GaryKramerGuitar.com, Vintage Guitar, TheMusicZoo.com, Reverb, Guitar.com, VintageKramer.com.
Developing good, clean workshop practices will help you save time and money.
Who doesn’t like a sweet, sustaining, saturated guitar sound? I know I do, but I also love a clear and full clean tone maybe even more. Dirty or clean, to me a guitar sounds like a million bucks when the tubes are glowing and the playing flows. But most of the time I’m in the workshop making lots of dirt, and I don’t mean the overdriven amplifier kind. Making guitars can be a dirty business. Carving wood, plastic, and steel into a majestic instrument creates a lot of mess, and eventually you have to sweep your way clear.
Half a century ago, a mentor passed on this advice: The best way to clean up a mess is to not make one in the first place. Maybe this sounds quaint, but I assure you that it is good for business—any business. It doesn’t matter if you make pedals, guitars, amps, or even music, mess is money down the drain. Not only that, it’s a psychological strain on you that saps your energy and makes you careless.
When I worked at Fender, I was part of a team that was charged with revamping departments for efficiency, safety, and worker well-being. I can’t say that we made a huge difference, but I learned a lot that I could apply to my own shop and a host of other businesses. One thing there we didn’t have to fix was cleanliness. Despite the gargantuan scale of the enterprise, all of the factories are incredibly clean, especially considering the amount of materials that get processed. It reminded me of the race cars and shops of Roger Penske, who understood that a clean, organized workplace sets the tone for excellence. It’s also difficult to pinpoint problems when areas are cluttered, and you can’t see what’s going on clearly.
Beyond the obvious advantages of keeping things organized, there is another benefit created by keeping things clean, one that I’m surprised that more shops I visit (and see in videos) don’t understand. Sooner or later, you’re going to have to stop making your product and clean up. When you’re buried in debris, straightening up is time-consuming, and time is money. When you determine your cost per unit, whether it’s guitars, amps, or even rehearsal time, do you factor in the hours you spend cleaning up? It may not seem like much, but it can really add up. Regardless of if you own a shop or are in a band, if you create a tangle every time you work, the time you spend undoing it is time you could have been with your friends, family, or doing anything else.
A well-designed work area that reduces clutter will save your health and save you money. You don’t have to be a big organization to justify some basic cleanliness improvements like a good dust-collection system, either. It doesn’t have to be a huge investment. There are a slew of affordable mobile dust-collectors/vacuums with adjustable arms that can be rolled from task to task.
"When you determine your cost per unit, whether it’s guitars, amps, or even rehearsal time, do you factor in the hours you spend cleaning up?"
Stop blowing dust off your workbench or machinery onto the floor—picking it up later is like throwing profit away. Everybody benefits because cleanliness improves efficiency that reduces passing unneeded costs on to your customers. Over the course of a year, cleaning up 60 minutes a week adds up to almost seven days’ worth of time you could be using for something better, and who doesn’t want an extra week?
I’ve found that if you build cleanup time into your daily routine, it reduces stress as well. It’s important to create procedures that promote a constant state of improvement and order. After a gig, pro techs have a mandated way of breaking down and stowing gear that avoids confusion when the next setup happens. Daily routines of maintenance and cleanup catch problems before they stop the show or cripple production. If you habitually clean the spilled beer off your cables and amplifier, you’re making it easier for yourself in the long run. I know this all seems pretty obvious to some of you, but I’ve learned from master Kaizen practitioners that there’s always a higher level to reach for. If you are a one-person shop or a weekend warrior musician, those steps can really make a difference.
I suppose the reverse is true for me. If I apply this multi-tiered improvement regime to my guitar playing, I’d probably be a lot happier with my proficiency. An old dog can learn new tricks, and that’s exactly what I mean to do. So when I step on that distortion pedal, it will be the only dirt I deal with.The Jason Richardson signature includes HT humbucker pickups, 24 stainless steel frets, and custom tremolo.
Inspired by over a decade of guitar string research, HT pickups deliver an ultra-high-output, powerful low-end response while retaining a distinctively clean, clear tone and definition at lower volume levels. The HT pickups in the latest Jason Richardson model have been voiced specifically for Jason with unparalleled clarity, power, and output. Additional features include 24 stainless steel frets, a custom Music Man tremolo, and innovative electronics, including a push/push volume knob for a 20+ dB gain boost and coil splitting via the push/push tone knob. The Jason Richardson Artist Series Cutlass HT is available now in two new finishes:
- Kokiri Forest—a mesmerizing translucent green finish. Crafted with an alder body, a buckeye burl top, and a roasted, figured maple neck with an ebony fretboard.
- Venetian Red —a striking translucent finish. Crafted with an alder body, a maple burl top, and a white maple neck with a striped ebony fretboard.
“These new pickups are a level up! More body and fullness, effortless pinch harmonics. I’m stoked to have more variations for everyone to choose from with my models now!” “The KokiriForest might be my new favorite color! Absolutely stunning to see in person! The Venetian Red also adds a more diverse option between the woods we haven’t done with my line before, incredibly stoked on both these guitars!” -Jason Richardson
The Jason Richardson Artist Series Cutlass HT in Venetian Red is available exclusively in the Ernie Ball Music Man Vault and is limited-to-25 units in a 6-string and limited-to-25 units in a 7-string. The Kokiri Forest colorway is available at your local Ernie Ball Music Man dealer.
For more information, please visit music-man.com
Ernie Ball Music Man: The Jason Richardson Cutlass HT Artist Series Guitar Collection
One night, after a performance at an old inn in Pennsylvania, Ted saw a ghost—maybe. Oh, and happy early Halloween!
While this is our October issue, I know it’s a little early for Halloween, but why should Walmart and Target have all the fun? So, here’s a story about a haunted night on the road.
I used to play a chain of bars and inns in southeastern Pennsylvania, and the inns routinely put up the bands after the gig. A lot of those inns had a reputation for being haunted. One had photos of glowing orbs and whisps floating in mid-air taken in various rooms, and some were said to have spirits that played games with patrons, switching lights on and off, blowing in sleepers’ ears, playing tug of war with bedsheets, or the sound of long-gone steam locomotives whistling in the night. At the time, my band was a Mississippi-hill-country-inspired duo, called Scissormen, and several of my drummers experienced these things, but not me. I typically just slept as well as a chronic insomniac can.
Until one night at the Railroad House Inn in Marietta, Pennsylvania. During the gig, I noticed placards on the tabletops for regular meetings of the Pennsylvania Paranormal Association. After the show, I asked the owner, “Is this place haunted?” And he regaled me with ghost stories, noting that a couple staying in the room at the end of the second floor hall, where a gray lady dressed for an earlier century occasionally appeared, had a tug of war with this haint over their bed covers just the week before. Then he added, “I don’t even want to tell you what happened in your room.” Of course, I had to know. Turns out, over a hundred years ago a traveler had been brutally bludgeoned there for the contents of his purse.
Suddenly, I was less tired then I’d thought I was. So, my drumming compadre at the time, R.L. Hulsman, and I, thought it might be nice to sit on the second story back porch of this beautiful structure built in 1823 and enjoy the sweeping woodland view with a wee dram of Jameson—my other frequent traveling companion in those days. It was a warm but beautiful night, with the stars and moon filling the sky like poetry, and one hour quickly become another and another. R.L. and I could chew the fat for ages.
“I saw a gray figure wearing a bonnet, a Victorian skirt, and a frilled blouse go by. I was silent.”
Then, to my left, at the end of the porch, where the window to the haunted room stood uncurtained, I saw a gray figure wearing a bonnet, a Victorian skirt, and a frilled blouse go by. I was silent. Surely, John Jameson and his sons were playing tricks on me. But after about 20 minutes, Rob leaned in and said, gesturing toward that window, “Hey, did you see…?”
“Yes!“ I shouted back. And after a wee bit more liquid courage we decided to investigate.
The door to the allegedly haunted room was open, and we bumbled in, checking the closet, looking under the bed, tugging the bedcovers to see if we’d get a tug back, and checking for the cold spots that seem to be everywhere on paranormal-investigation TV shows. We sat on the bed for a while, but nuthin’. So, we left, and it was time for me to go back to my murder-scene room.
I changed into my PJs, put a glass of water on the bedside table, and spent some time reading a railroad magazine. (Yes, I am also a hardcore train nerd.) The breeze from the open window was delightful, and I soon fell asleep, waking up about 10 hours later, after one of the most wonderful rests I’ve ever had on the road. We lit out for the next gig, relaxed and ready to roll ’n’ rock, in that order.
If you expected a cataclysmic encounter with the souls of the dead, I’m sorry to disappoint. This doesn’t mean I discount others’ experiences, because I have seen and experienced some strange things, indeed. Maybe this spirit was kind, as well as playful, and gifted me the night’s sleep she knew I needed. And while I never played the Railroad House again, I do treasure this night and the memory of the sighting I either did or didn’t have—just another weird tale from decades spent on the road.