You can fine-tune families of instruments by boosting their volume with this handy technique.
Welcome to another Dojo! This month, I’d like to show you the benefits of creating and using VCAs (Voltage Controlled Amplifiers) when mixing, for added control and nuance. Tighten up your belts. The Dojo is now open.
Diving right in, what is a VCA? Think of it as a glorified volume-only control that uses voltage to adjust the amount of a signal’s/track’s volume when routed to its output.
Say you want to easily adjust the overall volume of your drum tracks within your mix. Perhaps you have several drum-loop tracks, drum machine soft synths with MIDI sequence tracks, and a full drum kit with multiple mics spread over multiple tracks (you know, a typical session). Or you might want to combine (sum) four individual rhythm-guitar track outputs into one VCA and be able to control the overall volume of all four from one channel. You can create a single VCA channel for all the drum tracks, another VCA for the rhythm-guitar parts, and then assign the outputs of those grouped tracks to their dedicated VCAs. Now, you can globally tweak the overall volume of all your drum tracks and all your rhythm guitars in your mix without changing the routing, plug-in levels, or effects sends, or the panning of any other tracks or groups.
The benefits of using VCAs really emerge after a mix has come together. For example, you might need to make an “all guitars up” version of the mix, or a “drums down 2 dB” version, etc. You may even want to automate volume rides in certain sections of a song—particular licks and fills, or even solos. You can also do this with vocals, background vocals, synths, etc.
Following the hypothetical example above, I’m going to show you how to create a VCA within Pro Tools and assign it to tracks of your choosing. Remember, every DAW has its own idiosyncratic way of creating and setting up a VCA channel, so be sure to consult your help section and/or read your instruction manual. Key commands may differ, but the process is essentially the same.
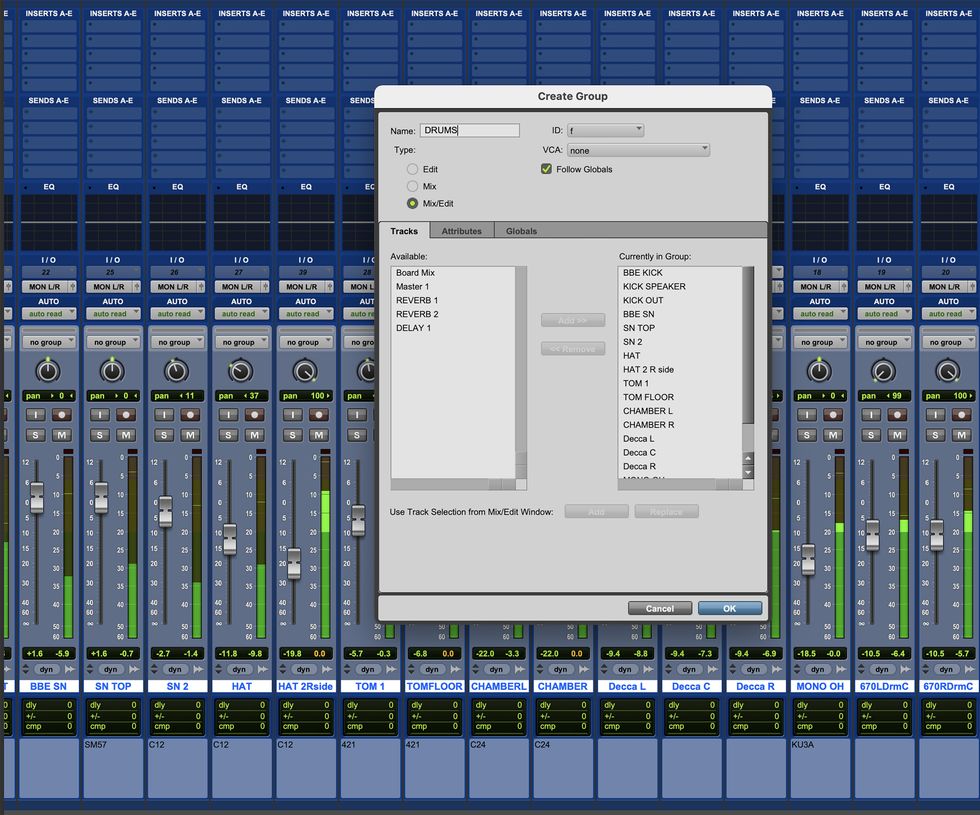
Fig. 1
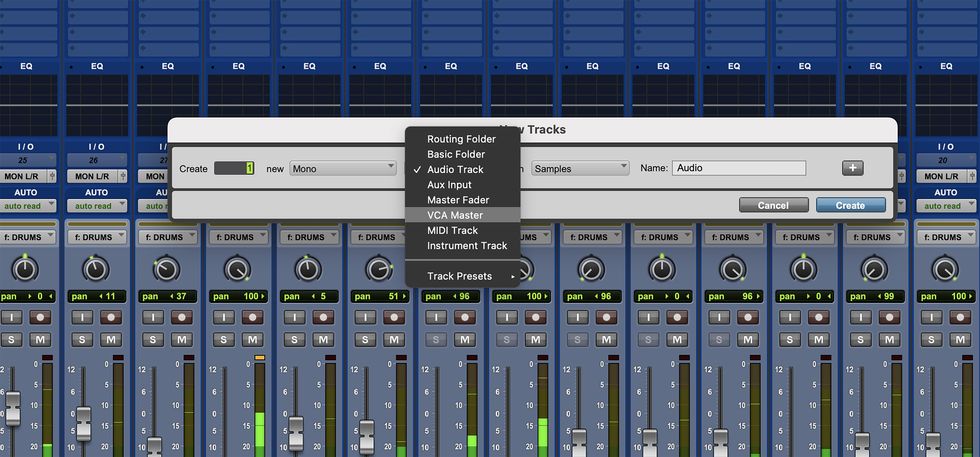
Fig. 2
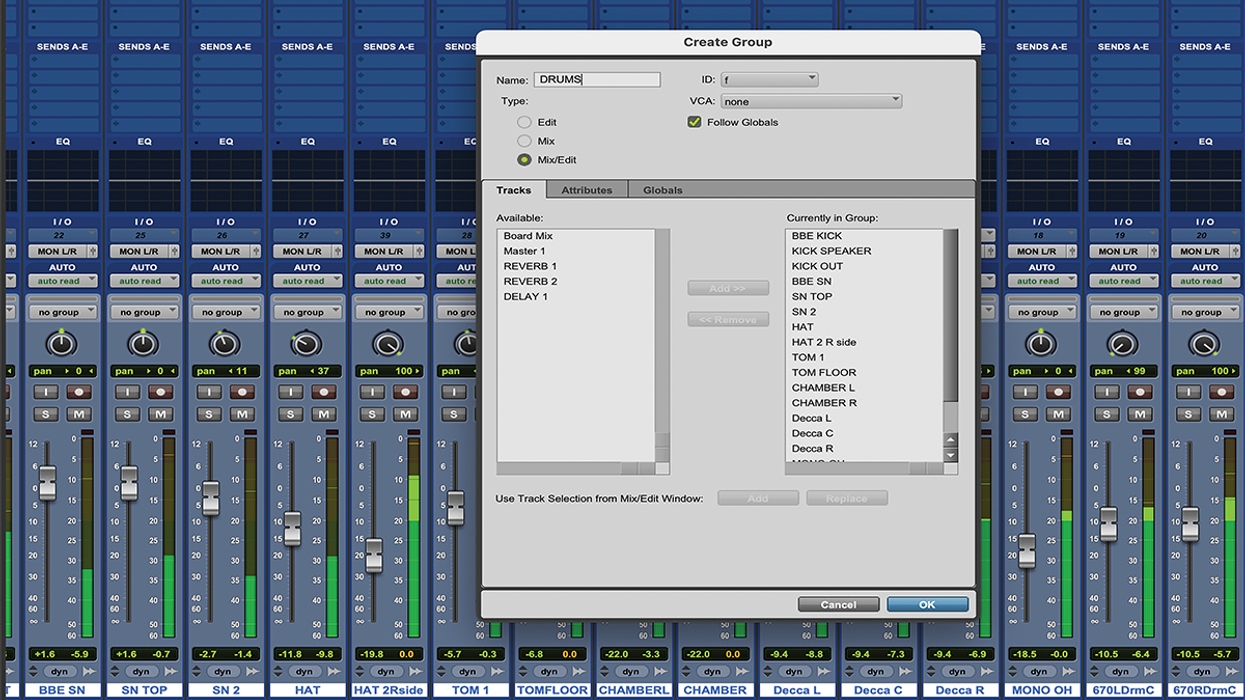
First, group (Cmd+G) all the tracks you want to be assigned to a VCA and name that group. I’ve named my group “DRUMS” [Fig.1]. Now, I’m going to create a VCA. Cmd+Shift+N, select VCA, and name it. I’ve named this “DRUMS” as well [Fig.2].
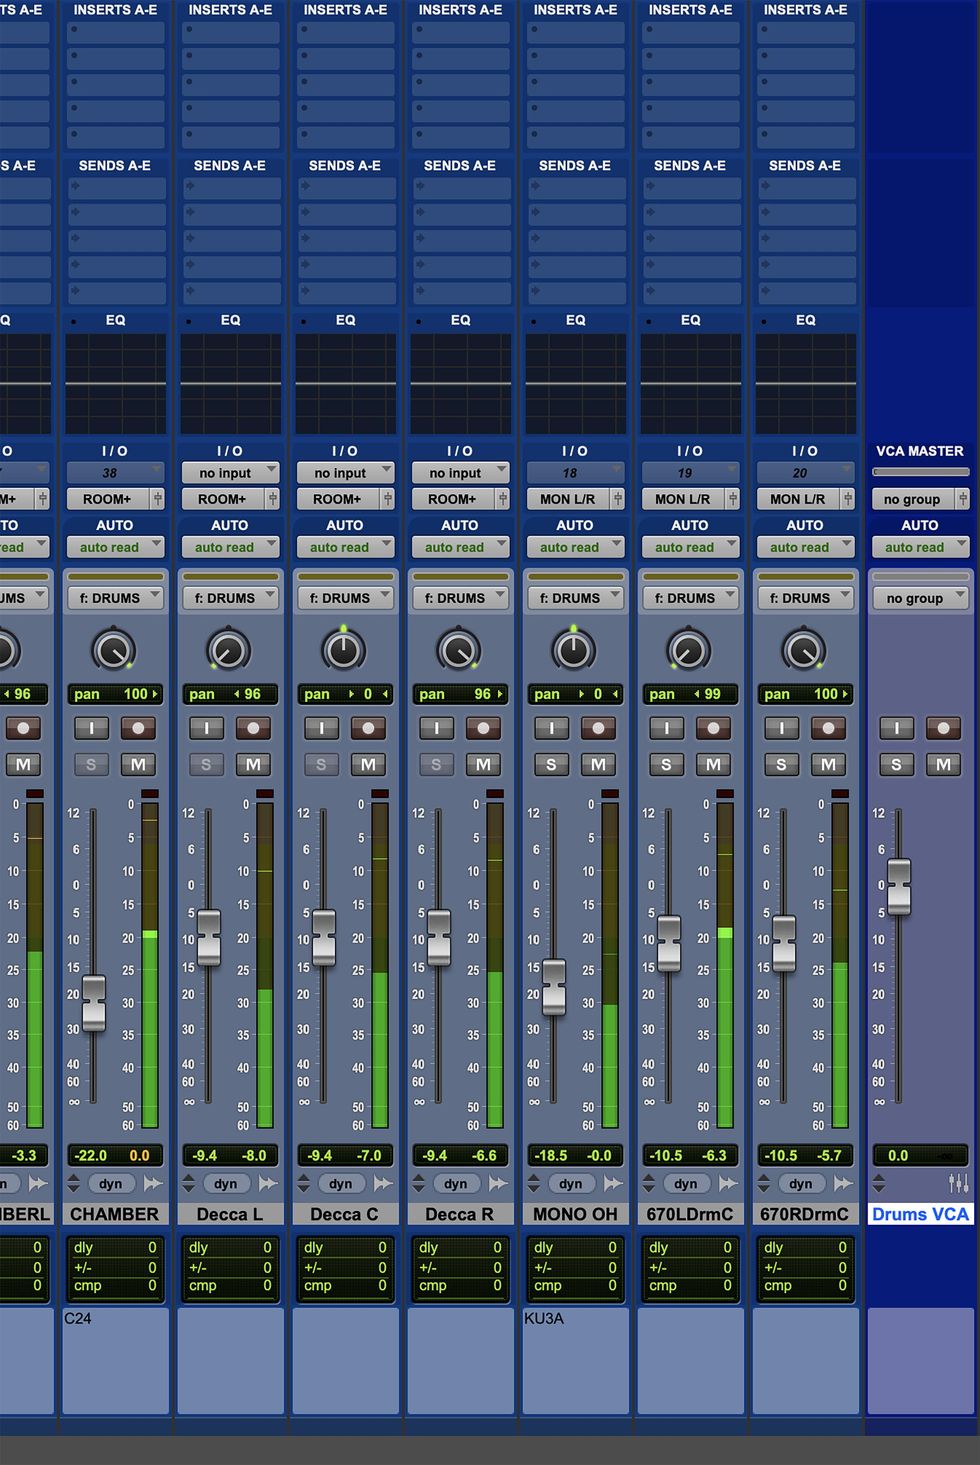
Fig. 3
Notice the new VCA channel and how there are no options for FX inserts, EQ, or panning [Fig. 3]? That’s exactly what we want, and it’s proof that we’ve set it up correctly.
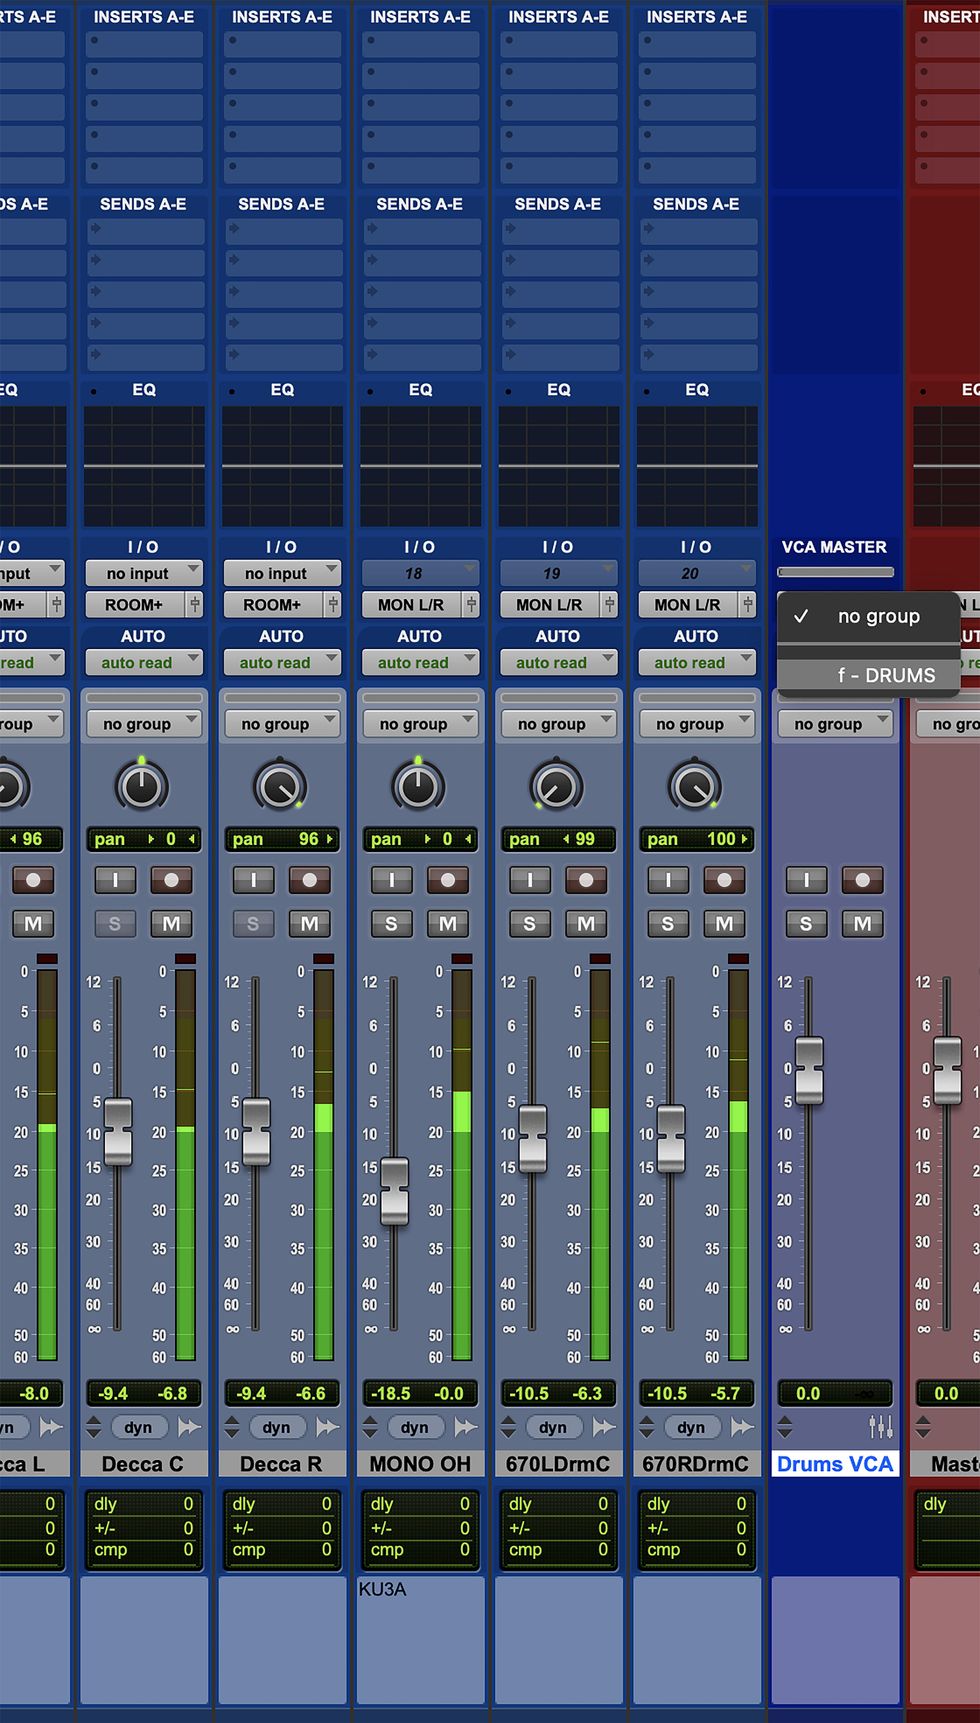
Fig. 4
Finally, I’m going to assign my drums into a single VCA by clicking on the “no group” button and selecting “DRUMS” from the dropdown list [Fig.4]. That’s it!
Now you can rinse and repeat as many times as you like for as many instrument groups as you like. This is where VCAs really shine and can help you fine-tune specific volume relationships of instruments (and groups therein) within the fluid environment of a mix.
If you’re new to using VCAs, allow me to offer some suggestions that will help you get the most out of employing them. I use VCAs after I’ve shed proverbial blood, sweat, and tears obsessing over all aspects of the mix. Only after I feel like I’ve worked out a solid approach to EQ, compression, effects, parallel processing, outboard gear, aux busses, and all automation do I start using VCAs. On a self-judged scale of 0 to 10, my mix should be hitting about a 9. Then, I’ll typically fold all drum tracks into a single VCA, all bass (synth, stringed, etc.), all electric guitars (minus the solos), all synths and keys, all background vocals, and then group the lead vocal(s) and instrument solo(s) if appropriate. In this case, I have six VCAs to control the entire mix from a high level, and I can automate gain (volume) rides as needed to get that extra bit of focus and excitement out of the mix.
Next month, I’ll be guiding you through how to use aux busses to make your mixes better at an earlier stage.
Blessings and keep rockin’! Namaste.
- Recording Dojo: The Case for Miking Your Electric Guitar - Premier ... ›
- Recording Dojo: How to Fix Ice-Pick-in-the-Forehead Tone, Pt. 2 ... ›
- Recording Dojo: Get Fuzzy! Tips for Doubling Down on Dirt ... ›
David Gilmour releases a special live version of the "The Piper's Call" from his solo album Luck and Strange.
"The Piper's Call Live Around The World" is a digital only release and was recorded at The Brighton Centre, Circus Maximus in Rome, the Royal Albert Hall in London, the Intuit Dome in Los Angeles and Madison Square Garden in New York and edited together by Gilmour, Charlie Andrew and Matt Glasbey to form one seamless track recorded throughout the Luck and Strange tour.
David Gilmour “On the Luck and Strange tour, I played with the best band I've ever had. Their personalities, playing abilities and enthusiasm for my new music have made for a fabulous experience for Polly and me. Romany's voice really stands out and has its own particular character, she brings a sense of mischief and fun to the live performance, which I think we needed. Thank you to everyone who attended the shows in Europe and America and thank you for buying 'Luck and Strange’. I hope you found as much enjoyment in the music as we did while performing it.”
Luck and Strange was recorded over five months in Brighton and London and is Gilmour's first album of new material in nine years. The record was produced by David and Charlie Andrew, best known for his work with alt-J and Marika Hackman. The album features nine tracks, including the singles' The Piper's Call', 'Dark And Velvet Nights', and a beautiful reworking of The Montgolfier Brothers' 1999 song, 'Between Two Points,' which features 22-year-old Romany Gilmour on vocals and harp; the lead-off track, 'The Piper's Call,' and the title track, which features the late Pink Floyd keyboard player Richard Wright, recorded in 2007 at a jam in a barn at David's house. The album features artwork and photography by the renowned artist Anton Corbijn.
The Luck and Strange tour began with two sold-out warm-up shows at the Brighton Centre before moving to Circus Maximus in Rome for six sold-out nights, followed by the same about at London's Royal Albert Hall before moving Stateside for sold-out evenings at the Intuit Dome and Hollywood Bowl in Los Angeles before concluding with five sold-out nights at Madison Square Garden in New York.
Learn more: www.davidgilmour.com.
Lollar Pickups introduces the Deluxe Foil humbucker, a medium-output pickup with a bright, punchy tone and wide frequency range. Featuring a unique retro design and 4-conductor lead wires for versatile wiring options, the Deluxe Foil is a drop-in replacement for Wide Range Humbuckers.
Based on Lollar’s popular single-coil Gold Foil design, the new Deluxe Foil has the same footprint as Lollar’s Regal humbucker - as well as the Fender Wide Range Humbucker – and it’s a drop-in replacement for any guitar routed for Wide Range Humbuckers such as the Telecaster Deluxe/Custom, ’72-style Tele Thinline and Starcaster.
Lollar’s Deluxe Foil is a medium-output humbucker that delivers a bright and punchy tone, with a glassy top end, plenty of shimmer, rich harmonic content, and expressive dynamic touch-sensitivity. Its larger dual-coil design allows the Deluxe Foil to capture a wider frequency range than many other pickup types, giving the pickup a full yet well-balanced voice with plenty of clarity and articulation.
The pickup comes with 4-conductor lead wires, so you can utilize split-coil wiring in addition to humbucker configuration. Its split-coil sound is a true representation of Lollar’s single-coil Gold Foil, giving players a huge variety of inspiring and musical sounds.
The Deluxe Foil’s great tone is mirrored by its evocative retro look: the cover design is based around mirror images of the “L” in the Lollar logo. Since the gold foil pickup design doesn’t require visible polepieces, Lollartook advantage of the opportunity to create a humbucker that looks as memorable as it sounds.
Deluxe Foil humbucker features include:
- 4-conductor lead wire for maximum flexibility in wiring/switching
- Medium output suited to a vast range of music styles
- Average DC resistance: Bridge 11.9k, Neck 10.5k
- Recommended Potentiometers: 500k
- Recommended Capacitor: 0.022μF
The Lollar Deluxe Foil is available for bridge and neck positions, in nickel, chrome, or gold cover finishes. Pricing is $225 per pickup ($235 for gold cover option).
For more information visit lollarguitars.com.
A 6L6 power section, tube-driven spring reverb, and a versatile array of line outs make this 1x10 combo an appealing and unique 15-watt alternative.
Supro Montauk 15-watt 1 x 10-inch Tube Combo Amplifier - Blue Rhino Hide Tolex with Silver Grille
Montauk 110 ReverbThis simple passive mod will boost your guitar’s sweet-spot tones.
Hello and welcome back to Mod Garage. In this column, we’ll be taking a closer look at the “mid boost and scoop mod” for electric guitars from longtime California-based tech Dan Torres, whose Torres Engineering seems to be closed, at least on the internet. This mod is in the same family with the Gibson Varitone, Bill Lawrence’s Q-Filter, the Gresco Tone Qube (said to be used by SRV), John “Dawk” Stillwells’ MTC (used by Ritchie Blackmore), the Yamaha Focus Switch, and the Epiphone Tone Expressor, as well as many others. So, while it’s just one of the many variations of tone-shaping mods, I chose the Torres because this one sounds best to me, which simply has to do with the part values he chose.
Don’t let the name fool you, this is a purely passive device—nothing is going to be boosted. In general, you can’t increase anything with passive electronics that isn’t already there. Period. But you can reshape the tone by deemphasizing certain frequencies and making others more prominent (so … “boost” in guitar marketing language). Removing highs makes lows more apparent, and vice versa. In addition, the use of inductors (which create the magnetic field in a guitar circuit) and capacitors will create resonant peaks and valleys (bandpasses and notches), further coloring the overall tone. This type of bandpass filter only allows certain frequencies to pass through, while others are blocked, and it all works at unity gain.
“You can’t increase anything with passive electronics that isn’t already there … but you can reshape the tone by deemphasizing certain frequencies and making others more prominent.”
All the systems I mentioned above are doing more or less the same thing, using different approaches and slightly different component values. They are all meant to be updated tone controls. Our common tone circuit is usually a variable low-pass filter (aka treble-cut filter), which only allows the low frequencies to pass through, while the high frequencies get sent to ground via the tone cap. Most of these systems are LCR networks, which means that there is not only a capacitor (C), like on our standard tone controls, but also an inductor (L) and a resistor (R).
In general, all these systems are meant to control the midrange in order to scoop the mids, creating a mid-cut. This can be a cool sounding option, e.g. on a Strat for that mid-scooped neck and middle tone.
Dan Torres offered his “midrange kit” via an internet shop that is no longer online, same with his business website. The Torres design is a typical LCR network and looks like the illustration at the top of this column.
Dan’s design uses a 500k linear pot, a 1.5H inductor (L) with a 0.039 µF (39nF) cap (C), and a 220k resistor (R) in parallel. Let’s break down the parts piece by piece:
Any 500k linear pot will do the trick, in one of the rare scenarios where a linear pot works better in a passive guitar system than an audio pot.
(C) 0.039µF cap: This is kind of an odd value. Keeping production tolerances of up to 20 percent in mind, any value that is close will do, so you can use any small cap you want for this. I would prefer a small metallized film cap, and any voltage rating will do. If you want to stay as close as possible to the original design, use any 0.039 µF low-tolerance film cap.
(L) 1.5H inductor: The original design uses a Xicon 42TL021 inductor, which is easy to find and fairly priced. This one is also used in the Bill Lawrence Q-Filter design, the Gibson standard Varitone, and many other systems like this. It’s very small, so it will fit in virtually every electronic compartment of a guitar. It has a frequency range of 300 Hz up to 3.4 kHz, with a primary impedance of 4k ohms (that’s the one we want to use) and a secondary impedance of 600 ohms. Snip off the three secondary leads and the center tap of the primary side and use the two remaining outer primary leads; the primary side is marked with a “P.” On the pic, you can see the two leads you need marked in red, all other leads can be snipped off. You can connect the two remaining leads to the pot either way; it doesn’t matter which of them is going to ground when using it this way.
Drawing courtesy of singlecoil.com
(R) 220k: use a small axial metal film resistor (0.25 W), which is easy to find and is the quasi-standard.
Other designs use slightly different part values—the Bill Lawrence Q-filter has a 1.8H L, 0.02 µF C and 8k R, while the old RA Gresco Tone Qube from the ’80s has a 1.5H L, 0.0033 µF C, and a 180k R, so this is a wide field for experimentation to tweak it for your personal tone.
This mid-cut system can be put into any electric guitar not only as a master tone, but also together with a regular tone control or something like the Fender Greasebucket, or it can be assigned only to a certain pickup. It can be a great way to enhance your sonic palette, so give it a try.
That’s it! Next month, we’ll take a deeper look into how to fight feedback on a Telecaster. It’s a common issue, so stay tuned!
Until then ... keep on modding!