Chops: Intermediate
Theory: Intermediate
Lesson Overview:
• Develop techniques to
milk everything from your
go-to phrases.
• Learn how to tailor each
phrase to specific chords.
• Create simple phrases over
more complex harmonies.
How many times have you left a gig or a jam session feeling less than inspired by your playing? After rehashing your stable of licks and ideas, you’re tired of hearing yourself, and everybody else’s ideas sound far more inspired than yours. I confess, I’ve felt this way many times. Instead of giving up though, I search for ways to remedy this problem. Typically, my initial thoughts are “I’m going to transcribe so-and-so’s entire album,” or “I’m going to shed 50 more ii-V licks.”
While these remedies may be beneficial, why abandon the licks you already know? Let’s look at a few ways we can increase the ROI (return on investment) of those old licks.
Move Around
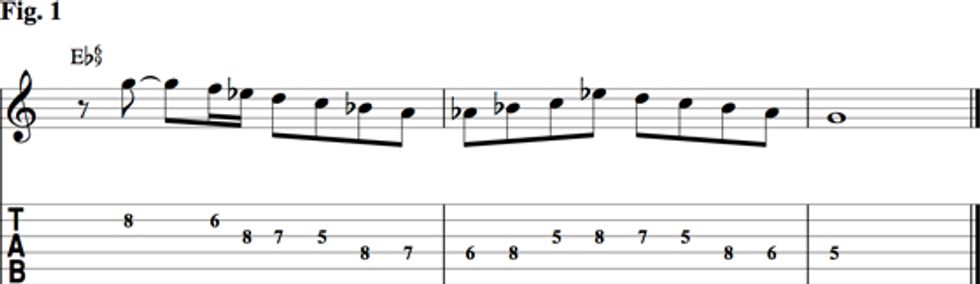
To breathe new life into tired licks, try moving
them around. Start by transposing the
lick into new keys, ideally all 12 keys. This
may seem obvious—and to some it will
be—but it’s an important step that must
not be overlooked. Fig. 1 is a lick that we
will spend some time with in this lesson, so
take a moment to get it under your fingers.
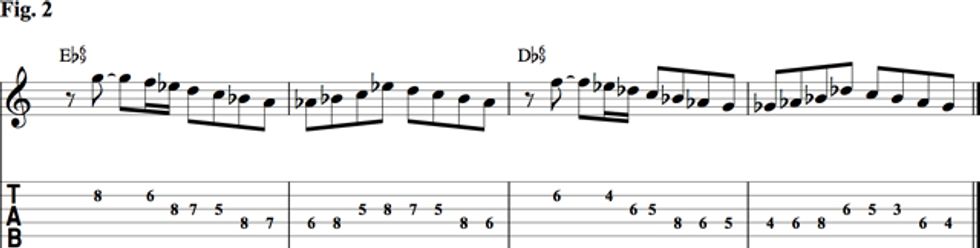
In Fig. 2 we see the chord progression of Eb6/9–Db6/9. To apply our lick from Fig. 1 to this progression we need to transpose it so that it will work over the Db6/9. While retaining the same fingering, shift the original lick down—towards the headstock— two frets and you’ve just transposed it to Db. Spending time transposing your favorite licks in to all 12 keys is a great way to increase a lick’s ROI.
Here are three suggestions for moving a lick to different places on the fretboard:
(1) Same pitches, different string group.
(2) Same pitches, different fingering. For example, if you start a lick with the 2nd finger, try starting it with the 1st, 3rd, or 4th finger.
(3) Move the original lick up or down one or more octaves.
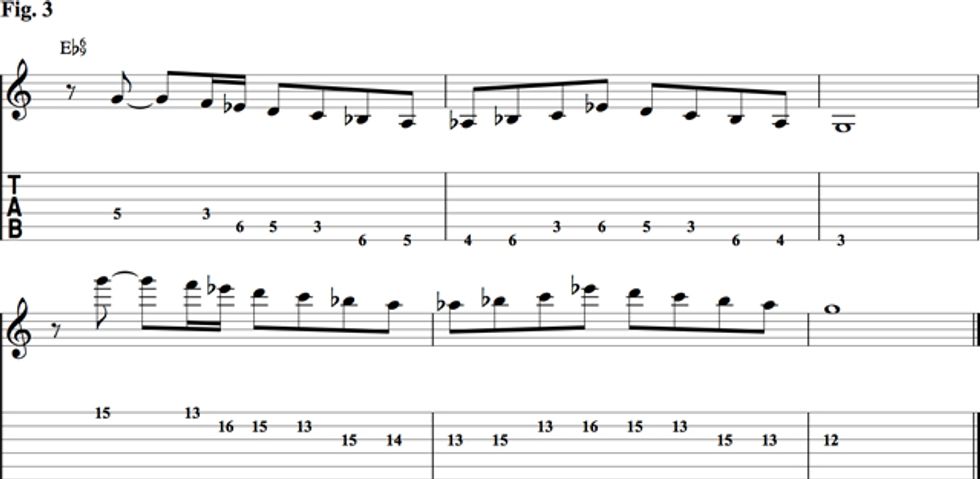
In Fig. 3, I’ve taken our original lick and played it in two different octaves. Mapping out a lick with the above suggestions and playing those variations in all 12 keys will greatly improve your mastery of the lick, increase the lick’s potential uses, and will expand your fretboard knowledge.
In and Out
Play through Fig. 2 again. At the points
where the chords change you may hear that
the line has a broken or jagged sound. This
is because the lick has simply been shifted
from one key to the next. This abrupt shift
breaks the flow of the musical line. To avoid
having your licks sound as though they’ve
been dragged-and-dropped into your solo
without considering the line’s musical continuity,
you’ll need to vary the way you play
into and out of the lick.
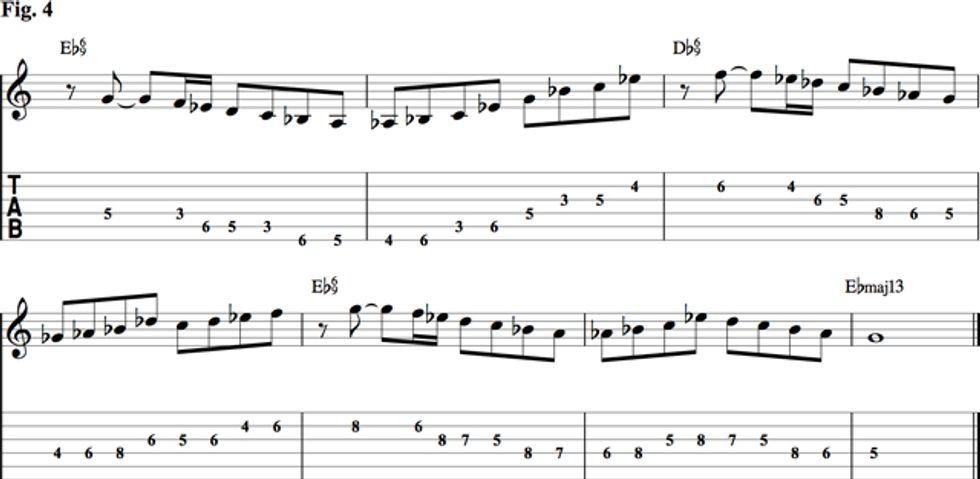
In Fig. 4, I’ve made a few adjustments to the original lick in an attempt to create a more musical line. The example begins with the lick transposed down one octave. However, the last four notes of the lick have been changed. Instead of keeping the shape of the original lick—where the end descends—I adjusted the lick so that it ascends to connect to measure three, where the lick is transposed to Db and is in the original octave. When the chord progression moves back to Eb from Db, there’s another adjustment to the original lick: At measure four, the end of the lick ascends to connect to G at the beginning of measure five. This finishes the example with the original lick. These few slight adjustments create a more cohesive musical statement.
Flavor to Taste
Our final investment strategy is what I’ll call
Flavor to Taste. To accomplish this, take a
lick and adjust it to fit the flavor, or sound, of
the given chord it will be played against. Let’s
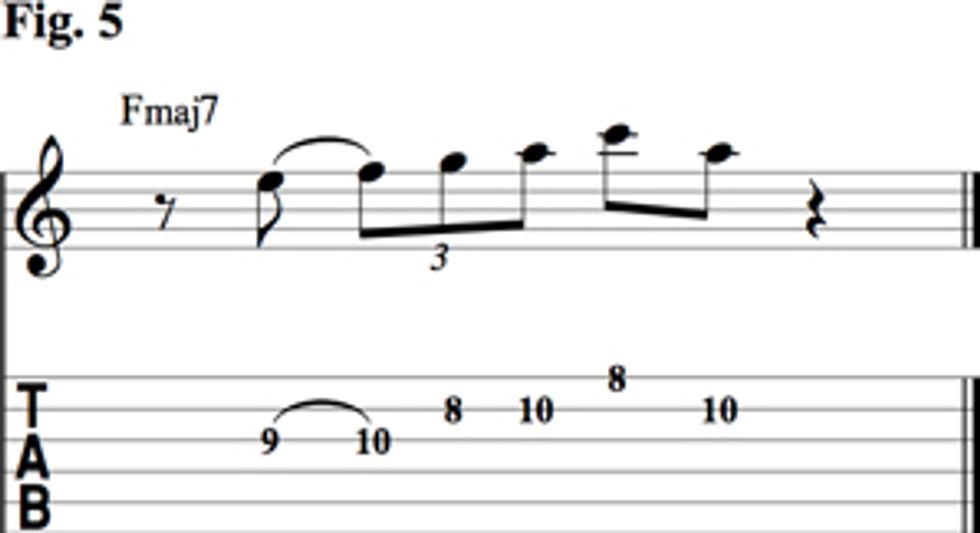
explore a new lick, Fig. 5, and start by identifying
all the notes. When we analyze them in
the key of F, we have the 7, root, 9, 3, and 5.
Why is this important? Well, if we want to change the flavor of the lick, we need an inventory of the notes that make up the lick, and we must know how those notes fit with the chord. We also need to know the harmonic formula of the new chord we’re going to make our lick fit over.
For example, to adjust Fig. 5 so it will fit over Fm11, we must know the formula for Fm11—1, b3, 5, b7, 11. Then we adjust the notes of the original lick to fit the formula of the new chord. Take a look at Fig. 6 to see the changes necessary to make the Fmaj9 lick fit over Fm11. By adjusting only the 3 and 7— lowering them a half-step—we’ve changed the flavor of our original lick from major to minor. Let’s apply this to a longer musical setting.
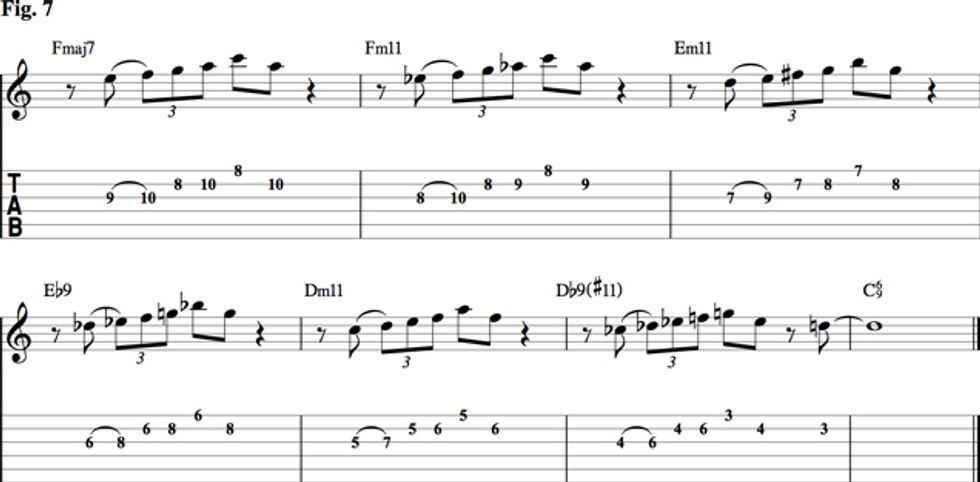
Fig. 7 is a common progression found in jazz standards like “All of Me”—specifically the last eight measures of the tune. By using chord formulas, we can make the necessary adjustments to the original lick so it will work over every chord in the progression. Take a look at the melody line in Fig. 7 for the results of this procedure. Note: Over the Db9(#11), I treated the 5 as a #11 and also ended the lick on the 9 to create a smoother resolution to the D of the C6/9.
So, the next time you’re feeling less than inspired by your playing, don’t ditch your go-to licks for something new. Instead, explore the suggestions I’ve presented in this lesson. By doing so, you not only increase the ROI of your existing licks, but I believe you’ll further develop your individual voice, your solos will sound more cohesive and compositional, and it may just put the spark back in your playing. Good luck and have fun!
 Mike Cramer is an award-winning performer and educator. A stylistically versatile multi-instrumentalist, Cramer has shared the stage with or opened for B.B. King, Tommy Castro, Chris Duarte, Gordon Goodwin, John Hartford, and Steve Kaufman. Cramer co-founded All 12 Notes, LLC where he has a private lesson studio, teaching guitar, mandolin, and electric bass. His most recent CD release, Open Spaces, is a collection of original and traditional acoustic pieces. For more information, visit all12notes.com.