An eighties dead-simple throwback that can really rock.
Download Example 1 | |
Download Example 2 | |
Download Example 3 |
An incredibly simple guitar by design—just one volume knob, one humbucker (maybe two) and a bolt-on maple neck with maple fingerboard— they were functionally solid and built to rock. Most bodies were constructed from alder or swamp ash and painted with wild custom colors and graphics, though to me, some of the coolest ones were the most basic, reminding me of an old Strat or Les Paul. Mind you, owning one of these guitars for most junior high students was just a mere dream—we tended to have guitars more like Memphis Les Pauls and Arbor or Hondo Strats. Owning a Charvel was being part of an elite and exclusive club for rock stars and that seemed worlds away from us kids in suburbia. I never did get one, but from time to time I was able to play a few that came through our local guitar shop for a setup. Damn, I wanted one of them!
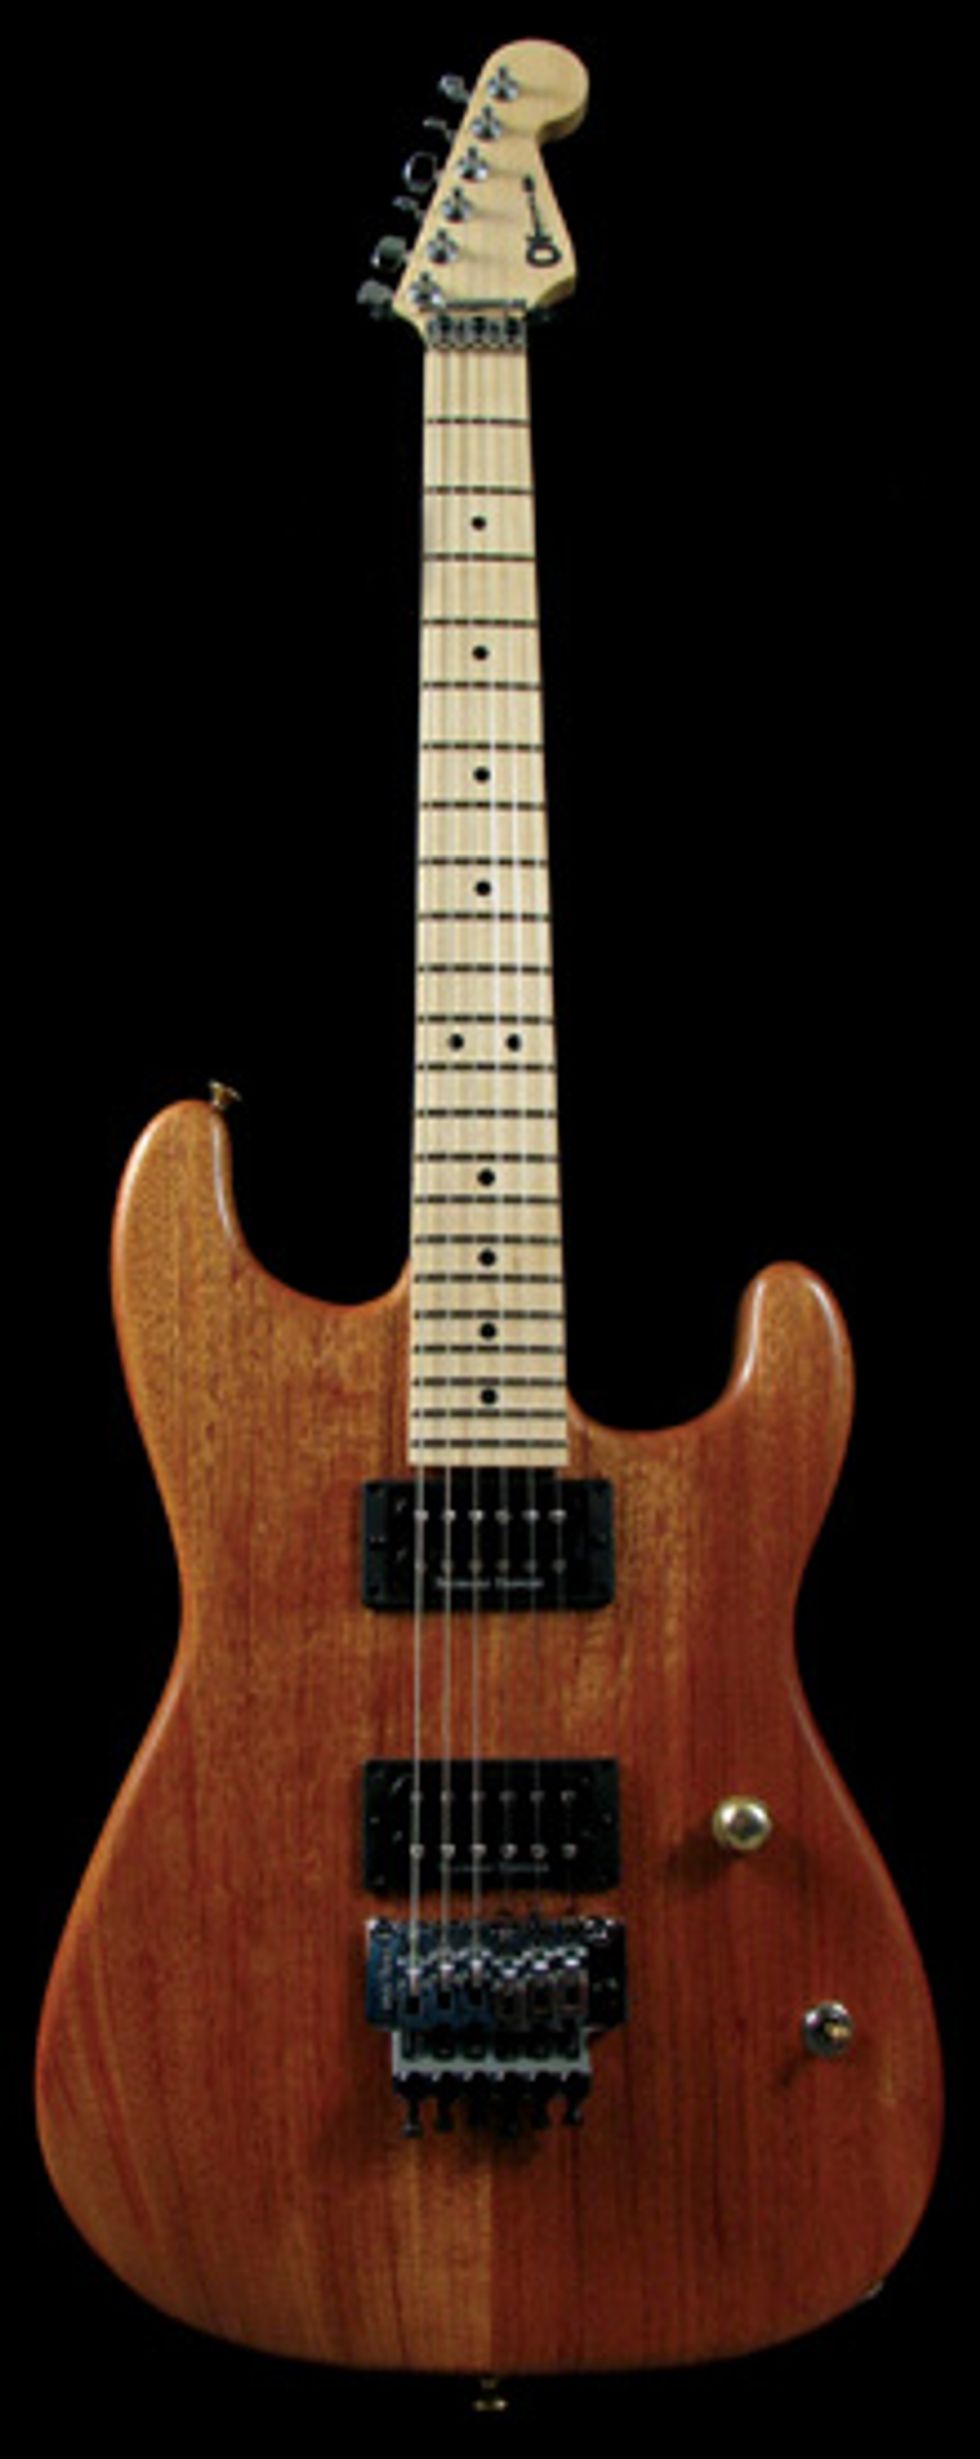
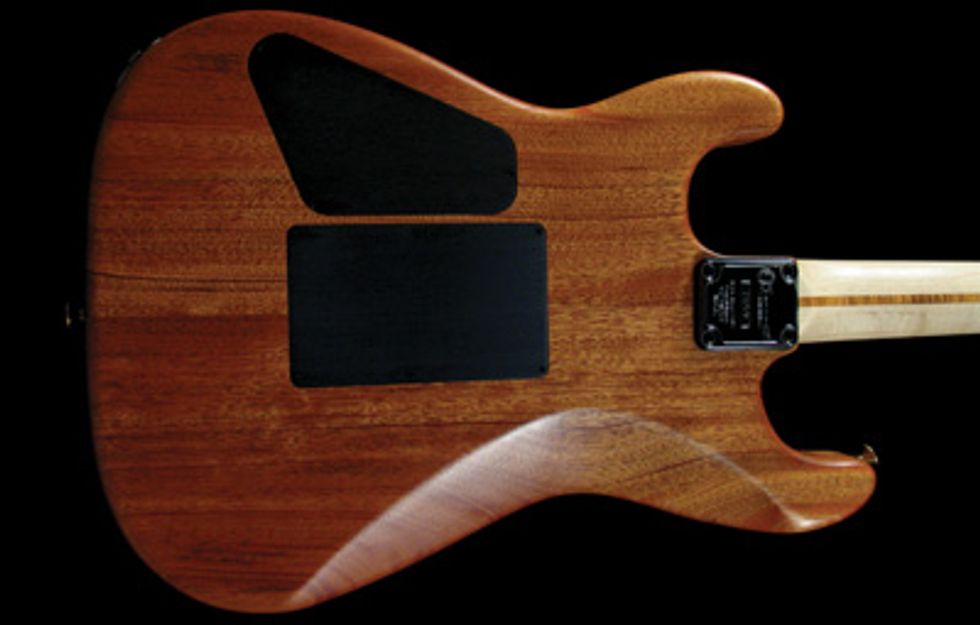
Fast forward to October of 2002, when Fender Musical Instruments bought the Charvel/ Jackson brand, and all of their existing inventory--and began building US-made instruments and custom guitars for the brand in Ontario California. Over the course of time many variations of the original Charvel Strats were brought out, including the EVH-style guitars in three different color schemes (black/white, red/ white, black/yellow). Then, one of the larger dealers of Fender and Charvel, The Music Zoo, put together an exclusive deal with Charvel to create the “Natural Series” Charvels. These guitars are a no-frills affair with either one or two pickups (H/S, H/H), a volume knob or two, Floyd Rose or NOS Charvel bridge and—as noted by the name—no paint! In place of the wild colors and graphics is a simple, oil finish applied to either a mahogany, koa or swamp ash body. And of course it goes without saying that the fastest profile neck in the history of the guitar is bolted right onto that oiled body, duplicated directly from the original and now infamous early-Charvel necks.
The Natural Series model reviewed is a two pickup shred machine. Mahogany body, maple neck, chrome Floyd Rose, two Seymour Duncan humbuckers (Custom 5-bridge, PAFneck), single volume knob and 3-way toggle switch. Simple and effective. In a somewhat bizarre twist, this particular model has both chrome and gold appointments. While the tuners, Floyd and jack are chrome, the knob and strap buttons are brass and the selector switch is chrome with a gold tip! I’m not too sure what the thinking was behind that, but aside from the somewhat odd look it certainly doesn’t affect the tone—it’s just an appointment issue. The neck is bolted on and seems to have a very tight neck pocket that doesn’t slide around or show any visible signs of shimming or unnecessary voids. The guitar comes set up with 10’s ready to rock, with uber-low action and enough float in the Floyd to pull back at least a step and a half. Nice! Sadly, the original detail of necessitating a neck removal for a simple truss rod adjustment is present in this model, which is too old school for this reviewer’s taste. Then again, with the locking nut at the top of the neck and a humbucker right up against the 22nd fret, it seems unlikely that there would be any other place to put the truss rod adjustment. As long as the strings stay at the same gauge it’s pretty much a set-and-forget detail anyway. Moving on…
I found the guitar to be a bit body-heavy due to the significant chunk of mahogany that it’s built from. Long recording sessions seated at the console tended to fatigue my leg a bit, but that’s sort of a cop-out considering this guitar was meant to rock, and rock it does. The set of Duncans really captured the spirit of the original models, even though the Custom 5 pickup didn’t exist back in the day. According to the Seymour Duncan website, it was developed by replacing the ceramic or Alnico 2 magnet in an SH-5 Custom or SH-11 Custom Custom with an Alnico 5. It turns out that it sounds like a PAF with more lows and highs and a bit more output. Plugged into my Lee Jackson-modified ’73 Superlead, I was immediately brought back to the days of shred and found myself playing “Round and Round” and “Mr. Scary” with a grin you couldn’t wipe off my face. The tone was at once searing, sweet and cutting without being shrill. Thanks to the mahogany body it was almost like the best of a Les Paul and a Strat but with the added bonus of being able to dive bomb for hours without going out of tune! Surprisingly, when rolling back the volume knob I was able to clean up the grit significantly, and switching over to the neck pickup I pulled off a convincing clean tone that was both warm and defined without farting out on the lowest notes. Perhaps the lack of a tone circuit helped keep the rolled-off tones from getting muddy. Either way, I never missed having a tone knob since this is a rock and roll machine that has no need for that kind of subtlety.
Probably the best part of the guitar was the killer neck. It took a bit of adjusting at first because it’s so slim and wide (1 11/16” at the nut), compared to a Les Paul or U-shaped Strat neck, but over time it began to show good reason for its design. The flat radius of the neck and speed of an unfinished maple really let me tear into everything from alternate to sweep picking, and bends to the moon. It was obvious why so many of the great metal players of that era were playing Charvels. In a way it bummed me out to see how much easier it was to dig into that style of playing—if I had had one of these back in the day, it would have pushed my playing ahead quite a bit faster due to the low action and ease of access to the notes. What would be near impossible to pull off on a Les Paul was second nature on the San Dimas model—kind of like somebody pulling the governor off a go-kart at Malibu Grand Prix!
I like this guitar a lot. Aside from a few things, like the mixed brass and chrome hardware, the heavy chunk of mahogany and lack of easy access to the truss rod, this guitar is all rock. Since there wasn’t an original Charvel Strat to compare this model to I can only speculate on how close they got to the original—but suffice it to say that the guitar plays and sounds fantastic, and is certainly in an affordable price range for what it accomplishes. Music Zoo did us a favor by teaming up with Fender and putting a unique spin on the Charvel San Dimas model by stripping the paint and letting the guitar breathe. The only thing I need to do now is start putting my favorite band’s bumper stickers all over the guitar to give it my own custom finish.
Buy if...
You wish it was 1983 and want an absolute no-frills shredder
Skip if...
You like pretty "ten tops" and don't miss the eighties.
Rating...
Street $1695 - Charvel - charvel.com |
In a career defined by evolution, Joe Bonamassa is ready to turn the page once again. The blues-rock virtuoso has just announced Breakthrough, his most adventurous and genre-blending studio album to date, out July 18th via his own J&R Adventures.
At the heart of the announcement is the release of the album’s powerful title track—“Breakthrough' —a soulful, hard-hitting anthem about letting go, moving forward, and finding your fire again, available today on all streaming platforms.
Crafted across multiple continents and infused with a world’s worth of inspiration, Breakthrough marks a bold new chapter for Bonamassa—one that leans on fiery solos, emotionally rich storytelling, groove-driven arrangements, and stylistic exploration. Produced by longtime creative partner Kevin Shirley (Iron Maiden, The Black Crowes, Journey), the album was shaped by sessions in Greece, Egypt, Nashville, and Los Angeles, resulting in a vibrant sonic tapestry that shifts effortlessly from funky blues and Texas swing to acoustic ballads and swaggering hard rock.
Joe Bonamassa “Breakthrough” - Official Lyric Video
Watch the official lyric video for "Breakthrough" by Joe Bonamassa
“I think this album, Breakthrough, marks a shift in the styling of Joe Bonamassa’s recording output,” says Shirley. “While there are plenty of guitar solos on this record, his emphasis has been on songs primarily. Each time Joe undertakes a new recording project, he seems to access a different part of his vast library of music genre from the jukebox-in-his-head! This album is a round-the-world musical trip—from Little Feat funkiness to Texas swing, from hard rock power to acoustic singer/songwriter-style songs.”
The newly released single “Breakthrough,” co-written with longtime collaborator Tom Hambridge (Buddy Guy, ZZ Top, Lynyrd Skynyrd), captures the emotional core of the record—an uplifting anthem about transformation, persistence, and letting go of the weight that holds us back. With gritty vocals, melodic guitar lines, and lush instrumentation, the track embodies Bonamassa’s signature blend of power and finesse while ushering in a bold new direction.
“Breakthrough” follows the success of Bonamassa’s recent singles “Still Walking With Me” and “Shake This Ground,” both of which hinted at the adventurous spirit behind the full album. “Shake This Ground” delivered a moody, introspective edge, while “Still Walking With Me” leaned into warmth, gratitude, and classic soul. Each track reflects a different facet of Bonamassa’s evolving songwriting approach, rooted in emotional honesty and anchored by his unmistakable guitar work.
The album announcement caps a stretch of extraordinary momentum for Bonamassa. Next up, Bonamassa recently began his extensive *European Spring Tour, followed by a June run with his powerhouse supergroup Black Country Communion* (featuring Glenn Hughes, Jason Bonham, and Derek Sherinian). After another round of summer dates across Europe—including sold-out shows in Ireland—he’ll return stateside for his just-announced* 2025 U.S. Summer Tour*, a limited amphitheater run featuring stops at The Greek Theatre, Red Rocks, and more iconic venues.
With over 50 albums, 28 #1 Billboard Blues albums, and a lifelong commitment to evolving the genre, Bonamassa shows no signs of slowing down. Whether headlining iconic venues, mentoring rising artists through Journeyman Records, or supporting music education via his Keeping the Blues Alive Foundation, Bonamassa continues to shape the future of blues-rock with every note.
For more information on Breakthrough, tour dates, and VIP packages, visit jbonamassa.com.
Patterns can be viewed as boring or trite, but a little bit of creativity can turn them into bits of inspiration.
Chops: Intermediate Theory: Intermediater Lesson Overview: • Learn different ways to arrange scales. • Combine various sequences to create more intersting lines. • Solidify your technique by practicing unusual groupings of notes. Click here to download a printable PDF of this lesson's notation. |
I want to offer some food for thought on making sequences musical. Using sequences in our playing helps develop our musicianship in various ways. It can help us tune into the fretboard, develop melodic ideas all around the neck, and further our improvisation and compositional skills. So, spending time with sequences is certainly not time wasted. Please note that I sometimes use the word “rule" in this column, this is only a pointer to keeping on track of our exploration of these concepts. The intellect is very useful, but intuition is where the creativity comes from. When in balance lots of great things can be done. Let's get stuck in!
It's simple to play a scale from bottom to top, or top to bottom, but we can develop a sequence by shuffling these notes around. In Ex. 1 we have a C Major scale (C–D–E–F–G–A–B) played in thirds followed by a sequence highlighting the diatonic triads of the major scale. By following a “rule" we can develop many different sequences. The options are endless and a little overwhelming.
Click here for Ex. 1
Lets start by simply combining an interval sequence with an arpeggio sequence. In Ex. 2, the first two beats of the first measure feature ascending thirds. This is then followed by a triad arpeggio starting from the third note on the string. The next set of thirds then starts on the “and" of beat 4. The entire sequence is a seven-note pattern that is created by combining two thirds and a triad. It gives us a nice bit of rhythmic displacement as the phrase is now starting in a different place in the measure.
Click here for Ex. 2
Ex. 3 is a descending idea in A minor that basically flips the sequence we looked at in Ex. 2. Here, we are starting with two descending thirds before the triad. I'm using pull-offs and economy picking to articulate the triads. This one works well over D minor as well if you want a D Dorian (D–E–F–G–A–B–C) flavor.
Click here for Ex. 3
You can see the effectiveness of combining different sequences and groupings of notes to create interesting runs. It's also really effective for making phrases. In Ex. 4 we take a small fragment from Ex. 3 and change the rhythm. In the sound example I repeat this a few times over some implied chords in my bass line: Am, F, and Dm. It's great to get more from one line by seeing the different chord types you can play it over.
Click here for Ex. 4
In Ex. 5 we're going to start using fourths and fifths. It starts with an ascending A minor triad (A–C–E) before leaping to the 9 (B) and then hitting a G major triad (G–B–D). A similar pattern leads into the C major triad (C–E–G). Throwing in these wider intervals alongside triads is very effective for creating a dramatic sounding runs.
Click here for Ex. 5
For our next example (Ex. 6), we will take fragments from Ex. 5 and space them out a bit. I wanted once again to show how these sequence ideas can also be helpful for developing melodic phrases. Once we have a cool sequence or fragment, all we need to do is be creative with how we play it. We can change the rhythm, harmonic context, dynamic, and much more.
Click here for Ex. 6
Before we move on, it's important to remember that we can add colorful notes to our triads. Let's begin with some seventh-chord arpeggios. Ex 7 features are diatonic seventh arpeggios in G minor (functioning as a IIm chord) to get a Dorian sound.
Click here for Ex. 7
Ex. 8 is a little gratuitous of me. It begins with an idea made of several different concepts. First, we start with an Am7 arpeggio (A–C–E–G), then descend down an A5 arpeggio. I follow that up with diatonic thirds and end with a pedal-point sequence. If that's not enough, we then take this bigger idea and fit it around a chord progression. I move it to G7, Dm7 and then I break my “rule" slightly and outline notes of a C6 arpeggio (C–E–G–A). However, it does keep the same melodic contour of the initial idea. I used my ear and fretboard to guide me. It's always healthy to have a fine balance between intellect and intuition.
Click here for Ex. 8
We dig into C harmonic minor (C–D–Eb–G–Ab–B-C) for Ex. 9's monster two-measure lick. It sounds evil! In composing this phrase, I kept to the basic concept of finding seventh-chord arpeggios within C harmonic minor in the 8th position. I followed my ear as well as my slowly developing intellect. However, if you look closely you can see I was following a mini chord progression through this line. We start out with a CmMaj9 arpeggio (C–Eb–G–B–D) in the first beat, followed by a G7b9 arpeggio (G–B–D–F–Ab). Here we have a very strong Im-V7 movement in C minor. I then move back to our CmMaj9 arpeggio and in the second measure we start descending down an Eb augmented triad (Eb–G–B). This is then followed by more CmMaj9 goodness.
Click here for Ex. 9
Ex. 10 is now taking Ex. 9 and extending it into a cool flamenco-inspired melody. The rhythms in this were inspired by the incredible Paco De Lucia. I follow the sequence from the previous example almost exactly, but I use a bit of artistic license to repeat certain fragments to fit into a “top line" or “head"-style melody.
Click here for Ex. 10
My aim here isn't to give you one rule to follow but instead to encourage you to take the sequences you know and love and start getting more out of them. Enjoy and stay safe!
Neutrik’s Timbre plug, made for toggling between capacitors.
This follow-up to May 2025’s column shows you a few basic techniques to inject some capacitance into your rig.
Hello, and welcome back to Mod Garage. This month, we will dive into the details of how to add additional guitar-cable capacitance—the right way. Time to get started!
Let’s begin with some typical additional capacitance values that certain lengths of cable (or capacitors) can bring to your system:
• 10’ vintage coiled cable (approx. 3 meters) -> 1 nF
• 15’ vintage coiled cable (approx. 4.5 meters) -> 1.5 nF
• 20’ vintage coiled cable (approx. 6 meters) -> 2.2 nF
• 30’ vintage coiled cable (approx. 9 meters) -> 3.3 nF
• Ritchie Blackmore-style, ultra-long vintage coiled cable -> 4.7 nF
I listed standard values here, so you should have no problem getting caps to match them in any local electronics store or online; the type of cap doesn’t really matter and will mostly be dominated by size, but I’ll share more about this in a minute.
Let’s quickly summarize the first installment of this column from last month’s issue: From a technical point of view, added capacitance shifts down the resonance frequency of the pickups, so they sound fatter, especially when using overdrive. This is exactly the reason why a lot of distortion and fuzz boxes with a vintage voicing use an additional cap at the input section; the resulting overdriven tone is fat and warm.
This month’s mod, which involves adding a capacitor to your signal, works best with vintage-flavored single-coil pickups (approximately 2.4 H inductance) or a typical old-school PAF-style pickup (approximately 3.8 H inductance). Modern high-output pickups are often sporting inductances of 6 H to 8 H, and don’t sound very good with this mod—when adding more cable capacitance to such pickups, the result is a dull and wooly tone without any clearness and definition. If you want to make your single-coil guitar sound more Les Paul-ish, you should try a 4.7n capacitor. It will shift the resonance frequency of your single-coil pickups down to the typical PAF ballpark, making for a very cool and usable old-fashioned guitar tone. It might feel a little muffled when playing clean, but ultra fat and punchy when using overdrive! In general, values higher than 4.7n are not recommended.
We have two options for where to install our cap.
On the Guitar Cable
This is the easiest location to add additional capacitance to your system, with several mod options:
1. The lightest mod ever isn’t a mod at all—it’s to simply buy a vintage guitar cable and plug it in whenever you need it! I don’t know of any company that offers modern guitar cables with intentionally high capacitance.
2. The Neutrik company offers a special angled plug, called the Timbre Plug, that you can solder to any guitar cable of your choice. The plug has a 4-way rotary knob on top to toggle between different capacitors. In addition to a bypass setting, the plug offers capacitances of 1nF, 2.2nF, and 3.3nF, letting you simulate different cable lengths on the fly.
3. You can add an additional capacitor to any guitar cable of your choice to convert it into a “longer-sounding” cable. You simply open one of the plugs to solder the cap between the hot and ground—that’s it. Small, 2.5 mm contact spacing ceramic caps are easy to put into a standard plug and are your weapon of choice here. It’s essential to only add the additional cap to one of the two plugs, but it doesn’t matter if you plug this side into your guitar, an effect, or your amp. This method allows you to build yourself some cables that simulate their older, longer relatives.
You can add an additional capacitor to any guitar cable of your choice to convert it into a “longer-sounding” cable.
Photo courtesy SINGLECOIL (https://singlecoil.com)
Inside the Guitar
You can also add a cap (or several) inside your guitar if you only need this mod for one instrument. If you’re looking for added capacitance with all your guitars, you’d be better off choosing one of the techniques mentioned above.
1. The easiest way is to solder your additional capacitor directly to your volume pot; this way it has a fixed value that can’t be changed and is always engaged. This operation is very simple to do, and you can use regular-sized caps for this.
You can add a cap (or several) inside your guitar if you only need this mod for one instrument.
Illustration courtesy SINGLECOIL (https://singlecoil.com)
2. If you want to make the cap switchable, such that you can run it either bypassed or engaged, you can install a SPST mini toggle switch or use half of a push-pull or push-push pot, which usually sport a DPDT switch underneath.
This drawing shows how to make your additional cap switchable.
Illustration courtesy SINGLECOIL (https://singlecoil.com)
3. If you want to use more than one cap to simulate different cable lengths, your weapon of choice is a rotary switch, setting up a kind of Gibson Varitone wiring without the inductor. Because we are switching capacitances, it is essential to run an additional 10 meg resistor in parallel to each of the caps, and to use a make-before-break, not a break-before-make, rotary switch to prevent loud popping noises when using the switch while your guitar is plugged into an amp. Leave the first lug of the rotary switch open for the bypass position without an additional cap.
If you want to use more than one cap to simulate different cable lengths, use a rotary switch.
Illustration courtesy SINGLECOIL (https://singlecoil.com)
4. If you want to make this mod even more flexible, you can add an additional “cable simulator pot” to your system. The pot should have the same resistance as your volume pot, and should be wired to your volume pot. This way, for example, you can add a 3.3nF or 4.7nF cap to the extra pot, and dial in as much cable capacitance as you like.
You can also add an additional “cable simulator pot” to your system.
Illustration courtesy SINGLECOIL (https://singlecoil.com)
On the Pedalboard
The idea of putting a rotary switch or cable-simulator-pot solution into an external unit to create a kind of extra-capacitance stompbox to use with all of your instruments is just around the corner, and yes, it’s possible! However, I don’t recommend this, because it’s physically located after the volume pot in the guitar, which means less volume (no unity gain) and less high end. But don’t worry: If you are looking for a pedalboard solution to simulate different cable lengths (which, as we defined earlier, means to shift the resonance frequency of the pickups), there are some active solutions on the market offering such a feature, usually in combination with a boost or buffer functionality. To name just a few, you should look into the Seymour Duncan Pickup Booster, Stellartone Micro Pedal, or the i2e Audio AG1.0 The PURR. Along with some other brands, these pedals will do the trick, and they’re not difficult to build if you are looking for a DIY solution.
So far, I’ve received several emails from readers asking for some more DIY guitar tools, so next month, we will look into some sustainable and environmentally friendly DIY guitar helpers—all of which you can build yourself easily by upcycling things you already have at home. Stay tuned!
Until then... keep on modding!
MayFly Le Habanero Review
Great versatility in combined EQ controls. Tasty low-gain boost voice. Muscular Fuzz Face-like fuzz voice.
Can be noisy without a lot of treble attenuation. Boost and fuzz order can only be reversed with the internal DIP switch.
$171
May Fly Le Habanero
A fuzz/boost combo that’s as hot as the name suggests, but which offers plenty of smoky, subdued gain shades, too.
Generally speaking, I avoid combo effects. If I fall out of love with one thing, I don’t want to have to ditch another that’s working fine. But recent fixations with spatial economy find me rethinking that relationship. MayFly’s Le Habanero (yes, the Franco/Spanish article/noun mash-up is deliberate) consolidates boost and fuzz in a single pedal. That’s far from an original concept. But the characteristics of both effects make it a particularly effective one here, and the relative flexibility and utility of each gives this combination a lot more potential staying power for the fickle.
“Le Habanero’s fuzz circuit has a deep switch that adds a little extra desert-rock woof.”
The fuzz section has a familiar Fuzz Face-like tone profile—a little bit boomy and very present in that buzzy mid-’60s, midrangey kind of way. But Le Habanero’s fuzz circuit has a deep switch that adds a little extra desert-rock woof (especially with humbuckers) and an effective filter switch that enhances the fuzz’s flexibility—especially when used with the boost. The boost is a fairly low-gain affair. Even at maximum settings, it really seems to excite desirable high-mid harmonics more than it churns out dirt. That’s a good thing, particularly when you introduce hotter settings from the boost’s treble and bass controls, which extend the boost’s voice from thick and smoky to lacerating. Together, the boost and fuzz can be pushed to screaming extremes. But the interactivity between the tone and filter controls means you can cook up many nuanced fuzz shades spanning Jimi scorch and Sabbath chug with tons of cool overtone and feedback colors.