Learn how to map out the fretboard and be able to play in any key using a few basic open-position chord shapes.
Beginner
Beginner
ā¢ Learn how to convert all open-position chords to moveable shapes.
ā¢ Identify the location of the root in each shape.
ā¢ Discover how to connect all five CAGED shapes to map out the entire neck in any key, starting on any one of the five shapes.
To get the most out of your guitar playing, you need to have a deep understanding of the fretboard. Wouldn't it be nice if the guitar was laid out in a logical fashion? Well, it is! Let me introduce you to the CAGED system and explain how it works as an organizing tool. Once you understand the CAGED system, I believe you'll be able to "crack the code" and see the fretboard's inherent logic.
Note: This system only works with standard tuning.
Instead of starting with a lengthy description of the CAGED system, I've found the best way to learn it is to immediately dive into the material. Think of this lesson as a hands-on tutorial. Step-by-step, I'll walk you through this time-tested approach while providing practical assignmentsāas if we were in a one-on-one lesson. We'll start with the basics and then work our way through more advanced applications. Grab your guitar and let's get to it!
The CAGED System
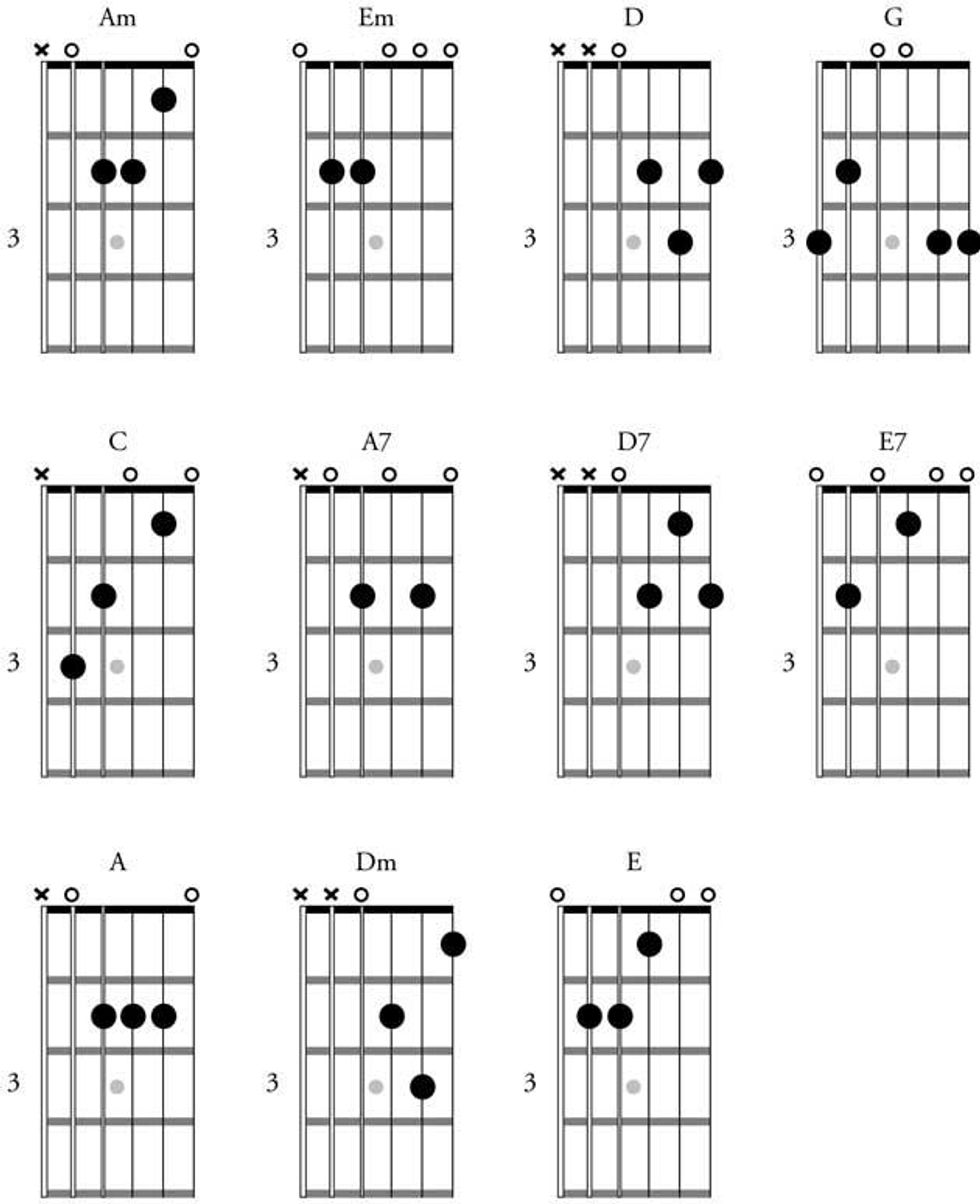
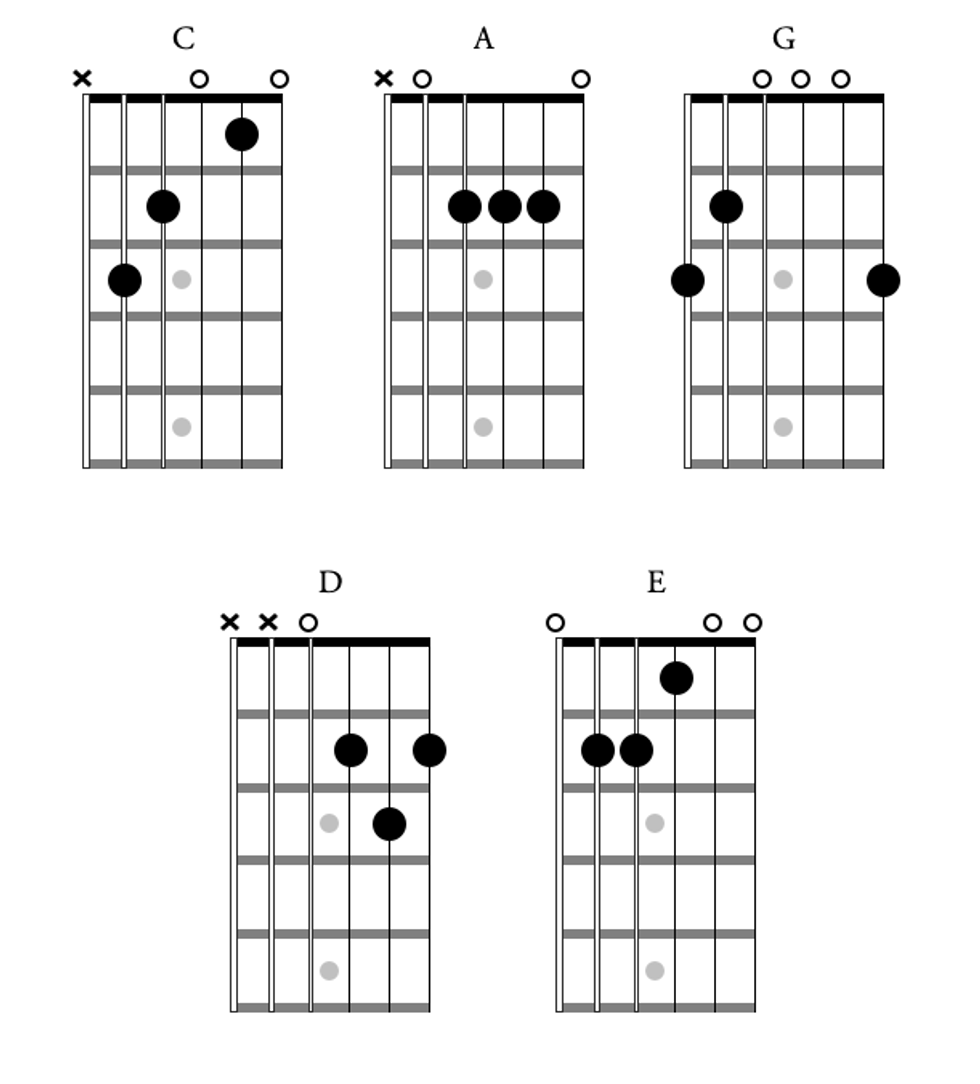
The CAGED system derives its name from five open-position chords: C, A, G, E, and D. To master the concepts in this lesson, you must know these five chords (Fig. 1).
CAGED Lesson Fig. 1
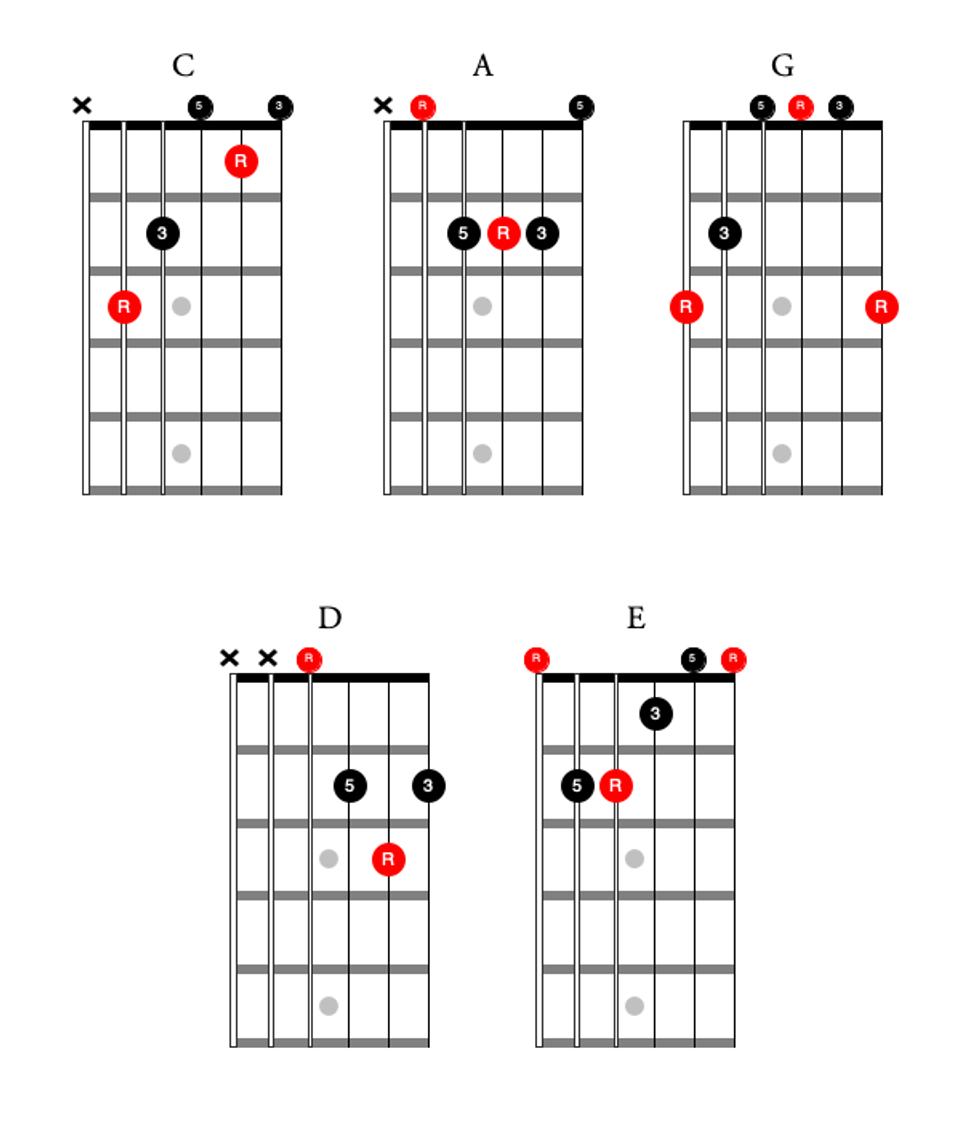
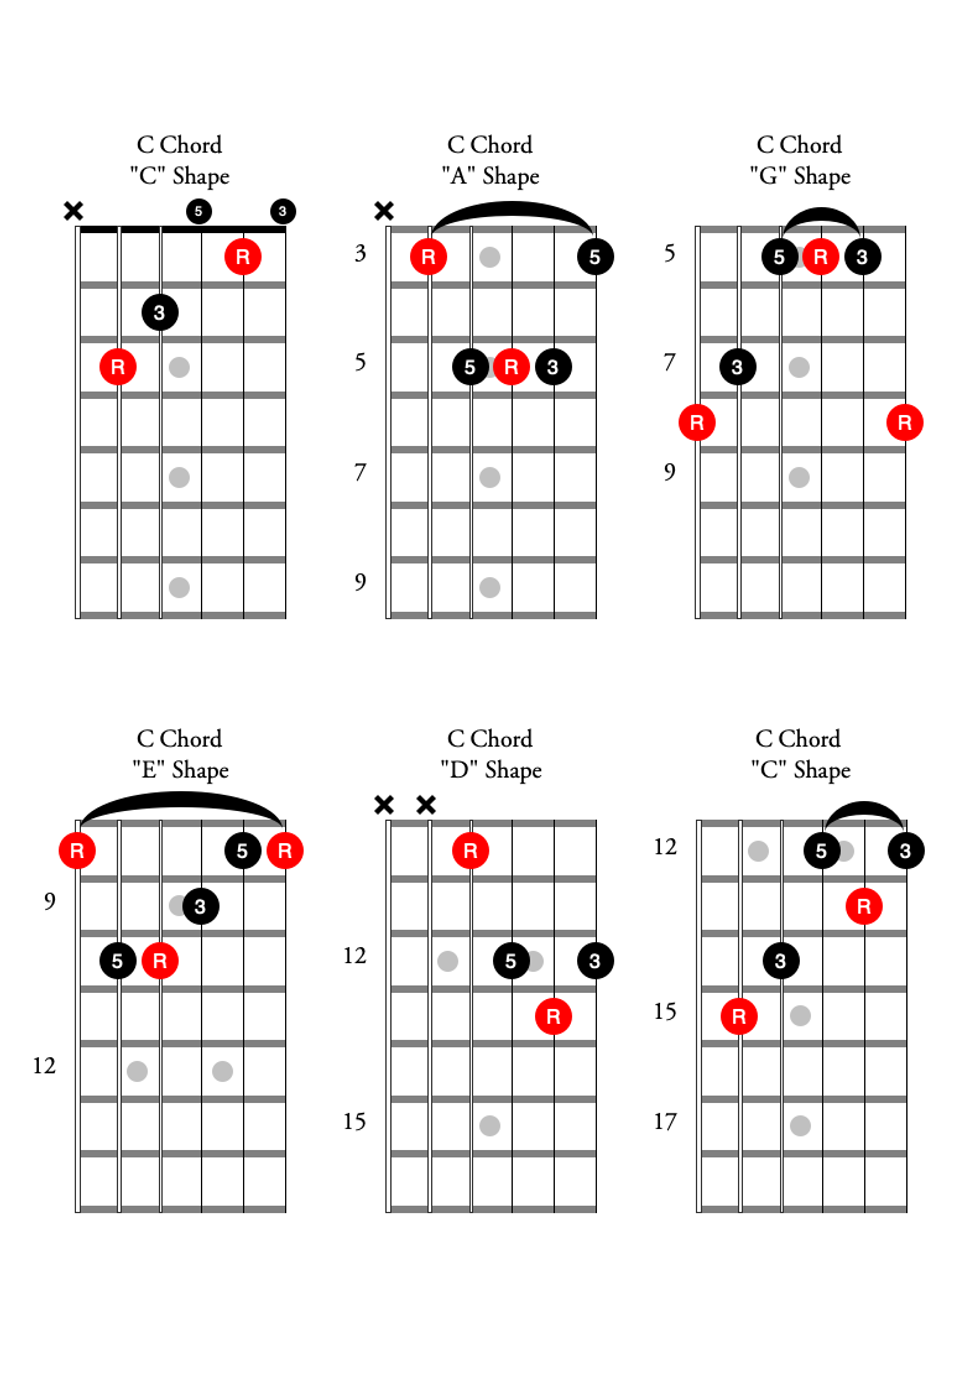
Next, you need to know where the rootāa chord's musical foundationāis located in each of the five shapes. The root of a C chord, for example, is C. Major chords, which we'll focus on first, are built by stacking the root, third, and fifth notes of their respective major scales. The notes of the C major scale are CāDāEāFāGāAāB. Therefore, the root, 3, and 5 of a C chord are CāEāG.
In Fig. 2, you'll find the five CAGED chords with the location of the root, 3, and 5 labeled in each chord diagram. To help you get visually oriented within each shape, the roots are marked in red. You'll notice that each shape contains more than one root. C, A, and D each have a low and high root; G and E each have three rootsālow, middle, and high.
CAGED Lesson Fig. 2
Assignment #1
Memorize the location of every root in each chord shape. For extra credit, memorize the locations of the 3 and 5.
Moving on Up
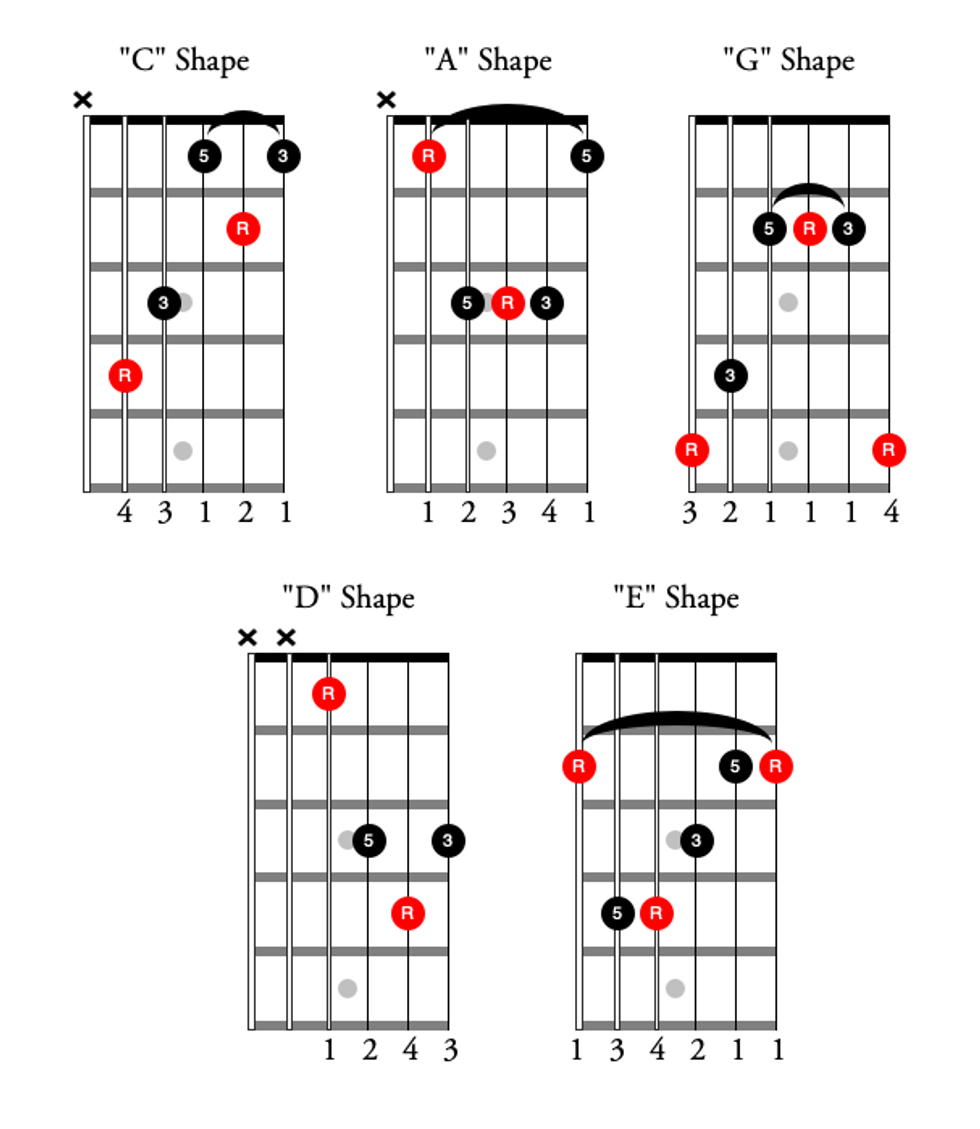
Now you know the shape of each chord in the basic CAGED system, as well as the location of their respective roots. The next step is to convert each open-position shape to a closed-position shapeāmeaning there won't be any open strings involved in playing the chord shape. To do this we must create barre chords out of each of the CAGED shapes.
Fig. 3 shows all the CAGED chords as barre chords. (Note: No barre is needed to play the "D" shape as a closed chord.) Some of these shapes may feel like old friends. The first barre chords most guitar players learn are the barre form of the "A" and "E" shapes.
CAGED Lesson Fig. 3
Two shapes that are less familiar and prone to spacing errors are the "G" and "D" shapes, and the common spacing error is to compress the fingering. Be sure to keep an empty fret between your first finger and the remaining fingers used to build the chord. Fig. 4 contrasts the incorrect, compressed fingerings with the correct ones for these two shapes.
CAGED Lesson Fig. 4
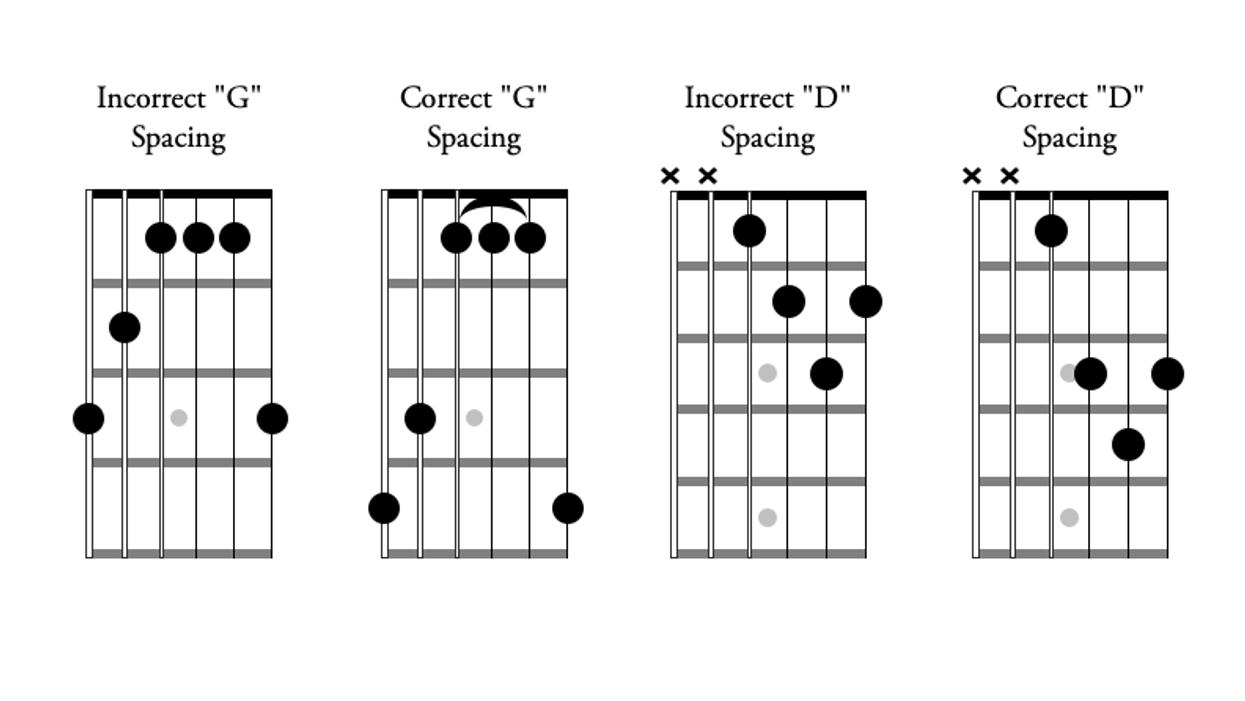
You may find a few of these shapes are difficult to grab due to the stretching involved. To minimize strain, don't wrap your thumb up and over the neck on the 6th-string sideākeep it behind the neck instead. Also, I encourage you to only barre the necessary notes. For example, when playing the "G" shape, don't barre across all six strings; you only need to barre the three notes found on the 2nd, 3rd, and 4th strings. Why create any extra work?
By converting each of the five CAGED shapes into barre or movable forms, you have exponentially increased your chord vocabulary. Each individual shape can become any major chord you need: Simply move the chord up or down the neck and place the shape's root on whatever note you wantāit's that easy. When you look at Fig. 5, you'll see that moving the "C" shape up one fret creates a C# chord, and moving it up one more fret creates a D chord.
CAGED Lesson Fig. 5
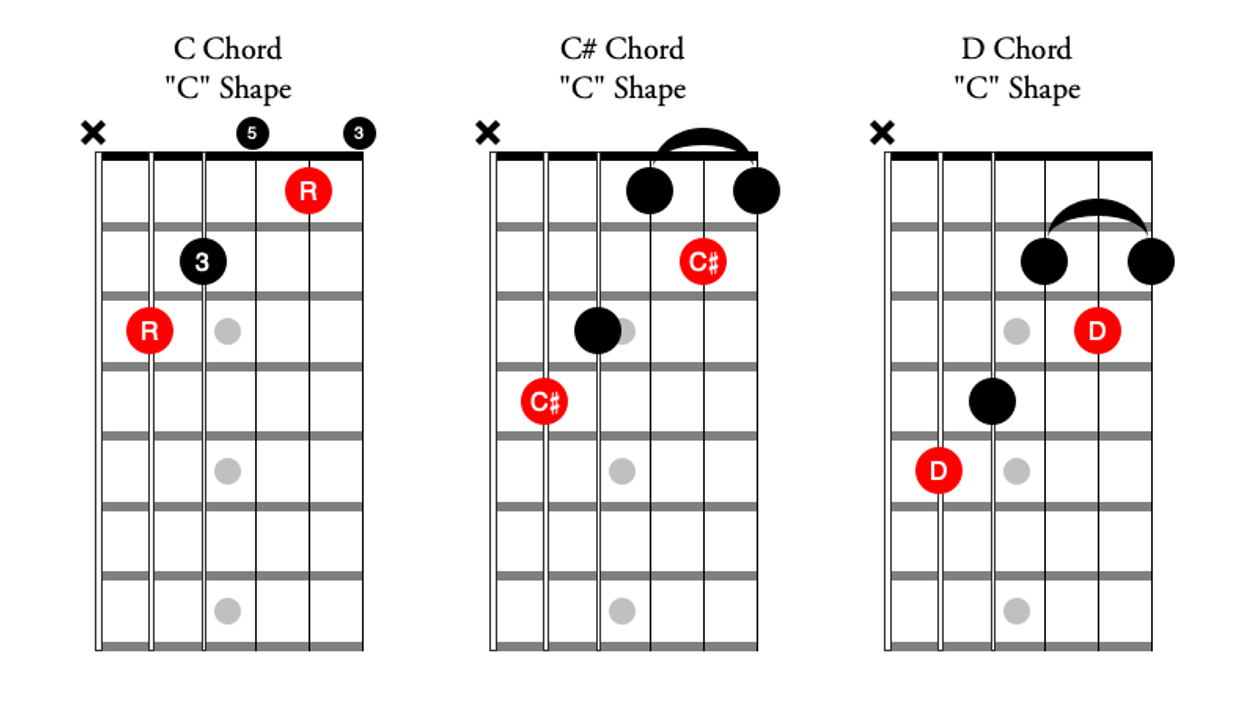
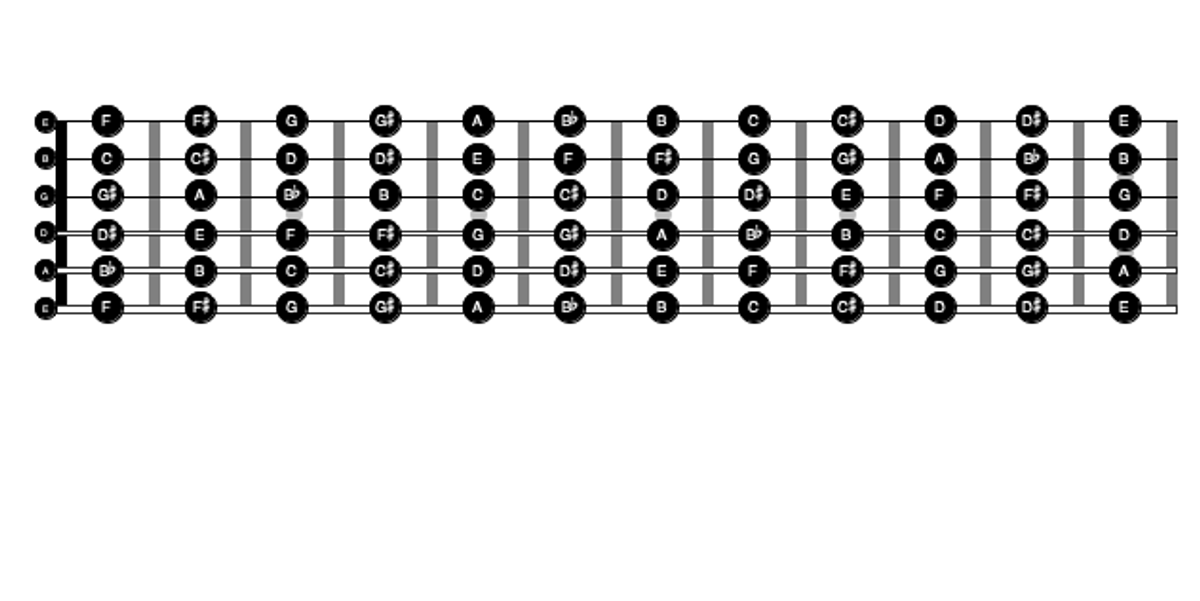
By knowing that the root is located on the 5th and 2nd strings in the "C" shape, and knowing the names of the notes on those two strings, I was able to correctly identify the actual chord I produced by shifting the "C" shape to these other locations. To do this with all five shapes, you need to know the location of the root within each shape and the names of the notes on the fretboard. Fig. 6 names all the notes on the fretboard.
Assignment #2
Move each shape up and down in half-steps (in other words, one fret at a time), while focusing on keeping the shape together and not collapsing the "G" and "D" shapes. The goal is to correctly name the chord at any place along the neck.
Whatās in a Name?
Up to this point, we've focused on acquiring the chord shapes and laying the foundation for realizing the full potential of the CAGED system. Think of each shape in the system as a puzzle piece: When all the pieces are connected, you will have mapped the entire fretboard. Again, the best way to see how this works is to experience it on your guitar. Play each of the chords listed in Fig. 7, paying attention to the fret markers and spacing of the shapes.
CAGED Lesson Fig. 7
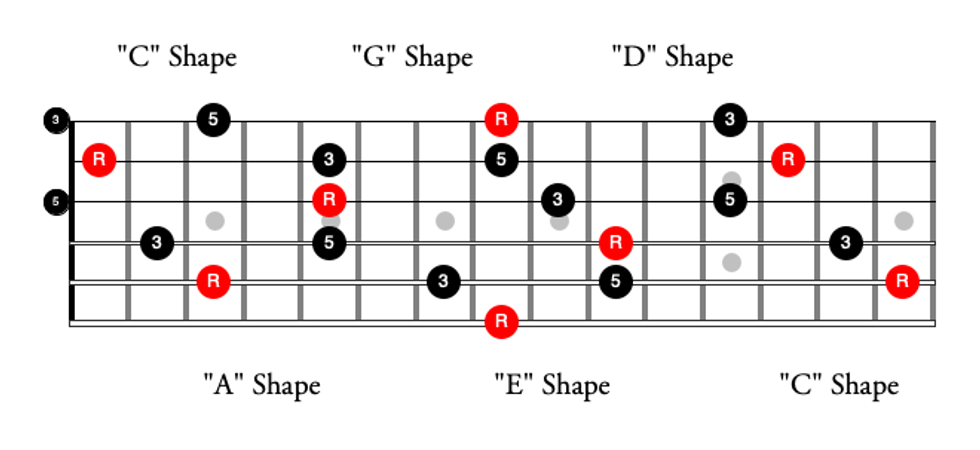
What did you notice? If you played this example correctly, you should have heard that they were all C chords. Hopefully you realized that you used all five shapes and you ended with the same shape you started with (assuming you have a cutaway on your guitar that allows you to access the higher frets).
By the way, did you notice the order of the shapes used in this example? The name CAGED not only tells you what chord shapes make up the system, but also the order in which the shapes connect to one another to map out the fretboard. Fig. 8 places all five shapes as C chords in one fretboard diagram.
CAGED Lesson Fig. 8
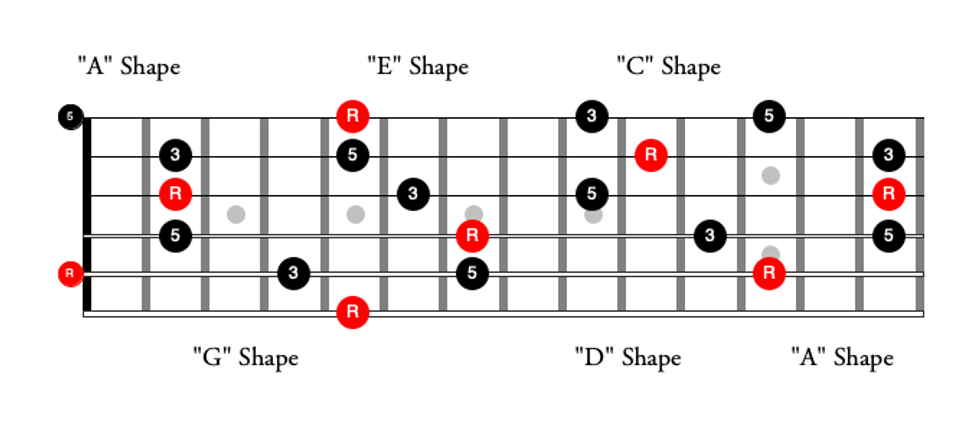
What if you want to map out the chords in the key of A the same way you did for C? To do this, start with the open position A chordāan A chord with an "A" shape. Then think of the spelling of CAGED and find the letter following A, which is G. So, play an A chord with a "G" shape. Then it's an A chord with the "E" shape, and so on until we return to the "A" shape. So in this example, our shape sequence is AGEDC. This sequence is mapped out in Fig. 9.
CAGED Lesson Fig. 9
Making Connections
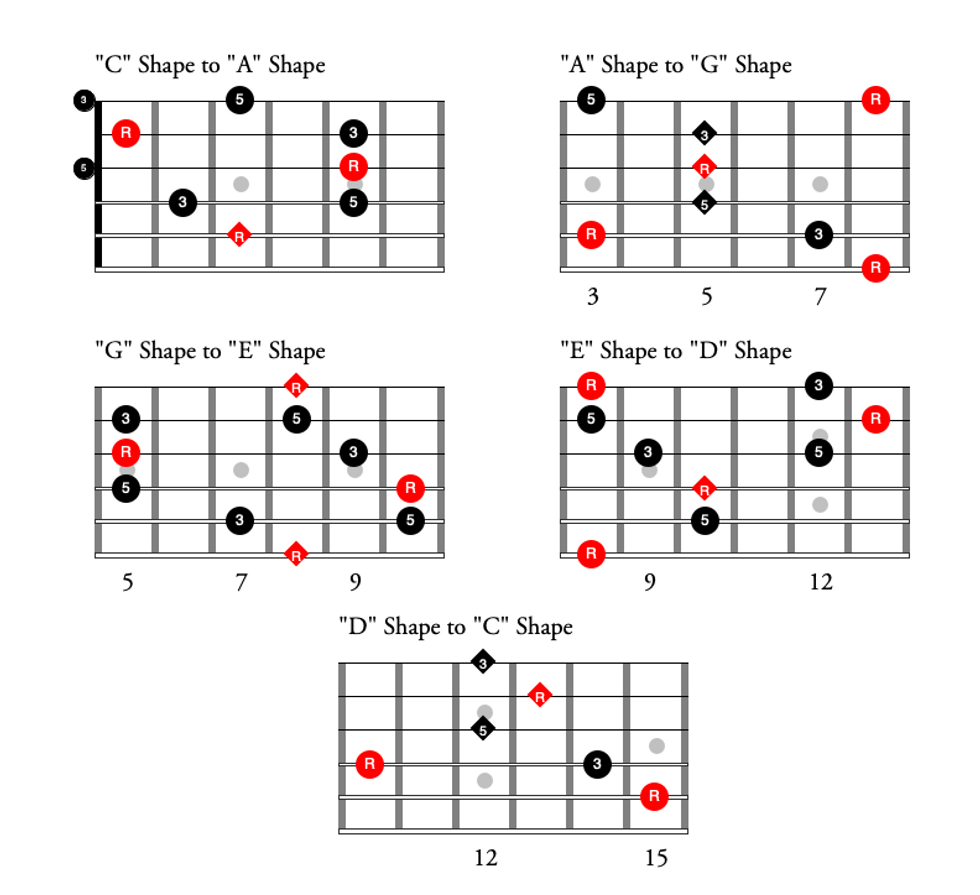
Earlier I suggested you think of the CAGED shapes as individual puzzle pieces that, when connected, map out the entire fretboard. By playing through the above examples, you've experienced this. When mapping out a chord, it is important to be visually aware of how two adjacent shapes connect to each other. A general rule to keep in mind: Between two adjacent shapes, there will always be at least one note that's common to both. In Fig. 10, I've diagrammed all pairs of adjacent shapes for the C chord. Notes that occur in both shapes are indicated with a diamond.
CAGED Lesson Fig. 10
Assignment #3
Play through the CAGED sequence starting on each of the CAGED chords in open position (like we did in Fig. 8 and Fig. 9, using the "C" and "A" shapes, only this time complete the series by working through the remaining three shapesā"G," "E," and "D"). Once you're comfortable with this, play the sequence in all keys. For example, start with a Bb chord using the "A" shape barred at the 1st fret, then play the CAGED sequence in the key of Bb. Pay attention to the common note(s) between two adjacent shapesāthis will help minimize errors in shifting and connecting shapes.
Congratulations, you've mastered the fundamentals of the CAGED system and covered a lot of territory! The CAGED system provides a logical way of visualizing the neck using basic chord shapes you've most likely known for quite some time. But it doesn't stop there: The CAGED system is just as useful for scales and licks. In fact, I think of the CAGED system as five buckets where I can stash fretboard information. New chords, scales, licks, and melodies can all be related to one of the five shapes, and this allows you to integrate this information into your playing quickly and efficiently.
- Beyond Blues: Bridging the Gap Between Chords and Arpeggios ... āŗ
- Chromatic CAGED | Premier Guitar āŗ
- Beyond Blues: Understanding CAGED and the V Chord āŗ
- Dunlop Pivot Capo Review - Premier Guitar āŗ
- Beyond Blues: Bridging the Gap Between Chords and Arpeggios - Premier Guitar āŗ
- Can You Twang with CAGED? - Premier Guitar āŗ
- PG Explained: CAGED Guitar Chord System - Premier Guitar āŗ
- Rig Rundown: Lake Street Dive - Premier Guitar āŗ
- Learn the CAGED System in 10 Minutes - Premier Guitar āŗ
The latest multi-effect from Wampler is a dreamy if sometimes difficult-to-master delay/reverb combo.
Great, instantly useable reverb and delay tones. Impressive breadth of sounds in one box. Solid construction. Good value.
Controls and operation can feel confusing.
$299
Wampler Catacombs
wamplerpedals.com
āModeling versus tubeā might be the gear world title fight of the 2020s, but āLED menu versus none on multieffectsā is a pretty riveting undercard. I have sympathies in both corners. The ocean-deep onscreen interface of theMeris Mercury X, for instance, was a bear to navigate, but it also yielded some of the most exciting and tweakable reverb Iāve ever heard. At the same time, Iāll always be partial to having every control I need at my fingertips, and every parameter a knob twirl away from just-right.In theory, the digitalWampler Catacombs fits into the second category, the one I prefer. Itās a super-loaded reverb and delay combo pedal, with seven delay algorithms and five reverb options that sound great. Though in practice, Catacombs sometimes turned out to be a bit more complicated to navigate than I expected.
Lost in the Catacombs
The Catacombs is one of those pedals that begs a dedicated read of the manual before you dive in. Wampler says that the interface enables users to ānavigate effortlesslyā without the use of onboard screens and menus. I was excited by this: Like I said, I donāt love getting lost down tiny LED display rabbit holes and would much rather have all I need at hand. The Catacombs technically satisfies that desire, but it also demonstrates tradeoffs involved with that design ethic. Iām alright with certain controls pulling double-duty, but when every single knob shares two functions, things can get hairy, and doing your preparation up front pays big dividends.
You have to press and hold the left footswitch for a second to access the alt controls (labeled in blue), including reverb selection on the main rotary knob. Though this doesnāt complicate matters too much when using a reverb or delay exclusively, it can be tricky when using a reverb and delay simultaneously. A few times, I scrambled to switch control modes to tame a super-loud runaway reverb or a self-oscillating delay, and the feeling of frantically spinning knobs with no impact because youāre not in the right control mode isnāt a good one. Additionally, you might not know where a given parameter is set because each knob is shared between the delay and reverb effect. The eight onboard preset slots take some of this guesswork away. And Catacombs would be a cinch in the studio once the control navigation becomes second-nature, but I got nervous thinking of trying to navigate any of these quirks during a set.
Entombed in Ambience
Catacombsā operational challenges donāt take too much away from the whole experience because it sounds so great. Each of the six delay programs, and each of the five reverbs, were instantly useable and familiar. Side by side with my Walrus Fathom and EarthQuaker Avalanche Run, the plate, hall, and spring reverb modes held their own, and something about the pedalās wet/dry mix made my playing feel especially alive, present, and cinematic at most settings. I was especially fond of the spring reverb with the decay maxed outāit was juicy and metallic in all the right ways.
The delay modules were just as satisfying. They include three algorithms for tape-style delays, two analog-style delays, and a single digital echo, and each mode offers a distinct texture and experience. The ability to quickly switch the effects from series to parallel offers fun and useful experimentation, letting you apply the reverb algorithm to just your dry signal, or to the repeats, too. I especially enjoyed sticking the plate reverb on my dry signal and leaving it off the delay, creating warped senses of space and continuity.
The Verdict
Though it sounds excellent, immersive, and inviting, I was flustered more than once while trying to bend Catacombs to my will. In some respects, I was reminded of a menu where youāre given three desirable options and have to pick just two. In this case, the options are affordability, sound quality, and user-friendliness. Catacombs is certainly reasonably priced and sounds excellent. But because it navigates a difficult middle path between skipping a cost-bumping digital menu and being more complex than more-straightforward, what-you-see-is-what-you-get units, you should make sure youāre comfortable with that compromise.
Celestion introduces a low-sensitivity, dual voice coil, attenuating speaker.
The Peacekeeper offers guitarists and other amplified musicians a simple and effective way to dial in the coveted "sweet spot" on their amplifiers while still performing at modest volume levels. The Peacekeeper will be on display, alongside a range of Celestionās key guitar and PA products at the companyās NAMM 2025 booth (Hall C, #6602).
The Peacekeeper is designed to work seamlessly with almost any amplifier, like a conventional guitar speaker, but itās in-built attenuating technology will significantly reduce output sensitivity. This enables musicians to drive their amplifiers harder while maintaining manageable volume levels.
Key features of the Peacekeeper include:
- Attenuation Technology: The Peacekeeperās innovative design effectively attenuates the amplifierās output, compared with conventional speakers, allowing players to achieve their desired sound at lower volumes.
- Uncompromising Tone: Attenuation is achieved āorganicallyā through the natural operation of the loudspeaker, enabling the Peacekeeper to preserve the Celestion tone that musicians love: the attenuation process adds no colouration or compromise.
- Seamless Integration: With its 12ā diameter, the Peacekeeper seamlessly integrates with any standard cabinet, offering a hassle-free solution for volume control.
- Widely Compatible: Offering 8Ī© impedance and a maximum power rating of 50W, the Peacekeeper is suitable for pairing with a wide range of amplifiers.
- Precision Built in the UK: Peacekeeper drivers are assembled at Celestionās UK-based loudspeaker research and manufacturing facility, and rigorously tested to meet exacting performance criteria.
For more information on the Peacekeeper, visit: https://celestion.com/product/peacekeeper/
Visit Celestion at The NAMM Show, January 23-25,2025 in Hall C, Booth #6602.
Across Frank Zappaās monumental body of work, he injected rock-based music with compositional techniques straight out of the modern classical handbook, as well as groundbreaking studio trickery and a teenagerās wit. To match his untamable creativity, he famously demanded an unmatched level of musical dedication from his players, and his own guitar playing balanced that discipline with off-the-rails experimentation.
When considering Zappaās legacy as a guitarist, we canāt separate it from his work as a composer, songwriter, producer, and all-around big personality. As a listener, you can love Zappaās chamber music and simultaneously not be able to handle his lyrics; you can adore his guitar playing but prefer he keep his opinions to himself. Our list of favorite Zappa guitar-centric recordings covers a lot of musical ground but keeps it all about his playing.
Is Frank Zappa to blame for the sound of jam bands? When was Zappaās best decade? And weāre looking at the connection between Zappa and Phish (who one of us calls āZappa liteā). In a bonus segment, weāre playing āDid They Get It Right?ā and examining the Grammysā former category for Best Rock Instrumental Performance.
This episode is sponsored by Dunlop.
Learn more: https://www.jimdunlop.com/products/electronics/cry-baby/.
An all-new line of solid body electric guitars, rooted in Eastmanās DāAmbrosio Series.
The FullerTone SC '52 and DC '62 represent the fusion of Eastmanās old-world craftsmanship and modular versatility, featuring their FullerTone two-bolt, long-tenon neck design first pioneered in the highly acclaimed D'Ambrosio Series. This innovative neck-to-body construction delivers more tone, sustain, and stability.
Through collaboration with renowned pickup builders ToneRider, both models deliver pure, pristine tone while maintaining exceptional warmth and projection. The SC '52 single-cutaway and DC '62 double-cutaway models draw inspiration from California's natural beauty, coming in three distinctive colorsāMoss Black, Desert Sand, and Ice Blue Metallicāeach complemented by industrial anodized aluminum pickguards and Eatmanās signature Truetone Satin Gloss finish, delivering a gust of modern refinement and graceful mojo.
Key features of the Eastman FullerTone Series:
- Eastmanās highly coveted FullerTone two-bolt, long-tenon neck system with three times greater neck-to-body contact, delivering more tone, sustain, and stability
- Custom ToneRider soapbar humbuckers with gold-foil covers and noiseless stacked single coils
- Premium-grade electronics
- Roasted black limba bodies with custom-designed staggered tuners for optimal string pull
āMy challenge for this design was simple: to create a modular bolt-on neck system that performed, looked, and felt better than what is commonly seen on the solid body bolt-on market. This led me to explore three-dimensional neck joints in solid-body guitars. The FullerTone neck system integrates a small structural heel and tenon hidden underneath the neck pickup. The matching geometry of the neck and body securely locks the two pieces into place and is mechanically fastened together. This design utilizes the best qualities of its main components,ā said Otto DāAmbrosio, Eastmanās master luthier and designer.
"With these guitars we have managed to break through various barriers without cutting any corners. Again, everything is top notch, as we always offer nothing but the best. This one is for everyone, we feel," said Pepijn 't Hart, Eastmanās director of fretted instruments.
The FullerTone Series is available through Eastman Authorized Dealers worldwide, offering unlimited possibilities for players ready to take their creative expression to new levels.