
There’s nothing quite so lonely as debugging your pedalboard on the gig. You can be surrounded by friends and well-wishers, but when you roll up that guitar volume, take those first tentative low-E-string stabs, and something’s gone wrong, it can feel as though the spotlight is on you alone and everyone else has receded into the blackness.
Maybe you’re lucky, and you’re greeted with the familiar sound of your guitar when you turn up. If not, your well-rehearsed opening riffs will be replaced by howling feedback, a deafening hum, or complete silence ... any of which announce to the audience, “I’m about to have a really bad time, and you get to watch!”
Probably the most important bit of advice is don’t panic. Pedalboards can get complicated and panic significantly lowers I.Q. In the heat of battle, even the most seasoned can be defeated by the simplest of things. We’ve had pro pedalboards come into the shop because “the board won’t pass signal,” and the output volume for an engaged effect was simply turned down. It happens to the best.
You must proceed methodically. If you don’t follow a plan, you’ll inevitably attempt whatever occurs to you in the moment, which quickly devolves into trying random things in rapid succession (and sometimes several times in a row). After which, you’ll be even more confused about the fixes you’ve attempted than when you started.
Plan A. First, plug your guitar directly into your amp. Checking that the guitar, instrument cable, and amplifier function correctly gives you a solid start. With sanity checked, plug your guitar into your board as you normally would.
Next, make sure every pedal has power and can be bypassed. Most effects have indicator lights displaying off/on status, or can be modified to have them. Cycle all the pedals sequentially to verify that each at least appears to operate normally.
If a true-bypass pedal doesn’t have power, it will only pass signal in bypass, and without an indicator light present and working, you may not know whether it is in bypass or not. If a buffered-bypass pedal doesn’t have power, it won’t pass signal in either state. If you have an effect that isn’t working properly but will pass signal in bypass, you can at least limp along until you have time for a more thorough debug session.
Plan B. Busted still? Time to dig deeper. When pedalboards malfunction, people typically blame cables; however, well-made soldered cables may be the least likely thing to fail. Footswitches and jacks are your usual suspects, and often not because they’ve mechanically failed, but because dirt has infiltrated their contacts. (One of the hazards of having an instrument you step on.) If you’re chasing an intermittent buzz and/or signal level drop, dirt and oxidation may be the cause. At the gig, putting your hand on every connector and simply rotating the connector back and forth or repeatedly cycling the stomp switch can get things re-connected well enough to continue playing. You can spray everything with contact cleaner when you have more time.
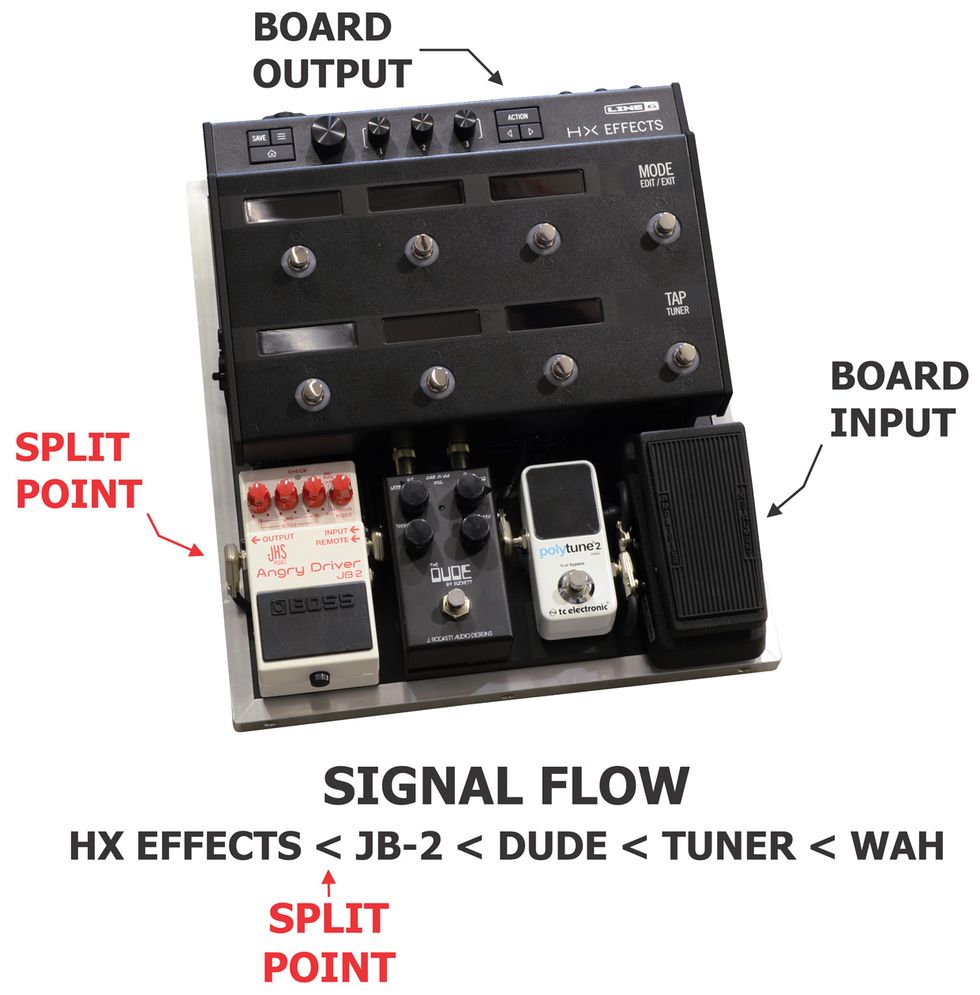
If you’re still broken, begin to narrow down where the problem may be. Imagine the pedalboard in the photo is yours. You can quickly split the board in half between the JB-2 (at left) and HX. The JB-2 sits close to the edge of the board with an accessible output jack. If you connect that output directly to your amp and have signal, you know that the first section of your board is good. Rock on with just your overdrives or start debugging the rest of the rig by plugging your guitar into your HX and monitoring the last pedal’s output with your amp. Use this same method to break even large boards down into smaller sections until you arrive at a single pedal that needs bypassing. A 1/4" female-to-female coupler can be used to replace an offending pedal, so carry one in your gig bag.
These simple techniques are a starting place for bringing your dead rig back to life. Invest in and maintain quality gear, and you’ll rarely have to use them, but everything breaks down eventually. The good news is that a complete and catastrophic failure is very rare; you’re almost certainly looking for one problem. One cable, one pedal, or one power source is responsible for your current flop sweat. Find it, and things will be cool again.