If you’re into maintaining, repairing, or modding guitars, odds are you already have a decent collection of tools. In addition to various screwdrivers and nut drivers, your toolkit will likely contain specialized files, precision rulers, truss rod wrenches, a power drill, and a soldering kit—the usual suspects.
But you know you’re hardcore when you have a Dremel rotary tool. (Okay, a rolling metal tool chest qualifies as hardcore, too.) An invaluable piece of equipment for any shop, a Dremel lets you accomplish many tasks, including engraving, routing, grinding, and polishing.
Dremel makes several different models of rotary tools. Mine is the variable-speed Moto-Tool 395 (Photo 1). With a top speed of 30,000 rpm, it’s a little workhorse with five different speed settings to handle any project. (Dremel has updated this model with the 3000 series.)
Let’s look at five ways to use a Dremel on a guitar. If you have a rotary tool, these projects may inspire you to haul it out and get busy. If you don’t, perhaps you’ll consider acquiring one. Most home improvement stores sell Dremels, and they’re often bundled in a kit with attachments—pads, wheels, and bits—that cover a multitude of guitar-oriented tasks. In addition, there are specialized attachments that are only available through such luthier suppliers as Stewart-McDonald or Luthiers Mercantile.
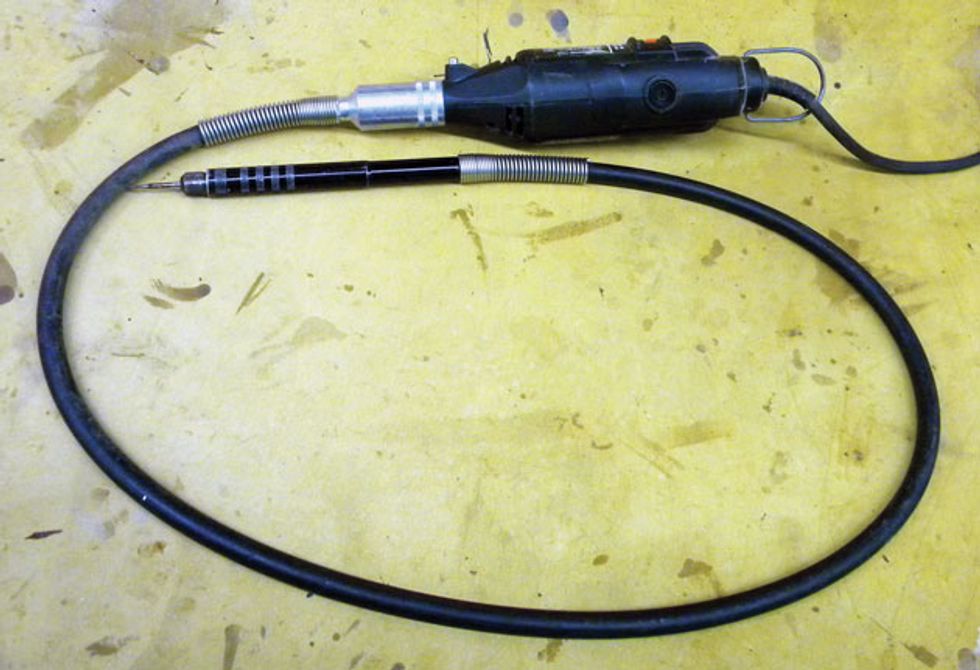
Photo 2
If you’re working on guitars, the Flex-Shaft (Photo 2) is a crucial Dremel accessory. It allows you to maneuver into positions that are difficult or impossible to reach with just the Dremel itself.
Okay, here are the five projects we’ll cover; they each require different attachments.
• Polishing frets on a maple fretboard.
• Removing burrs from tuning keys.
• Shortening height adjustments screws in Fender-style bridge saddles.
• Cutting string slots in an acoustic bridge.
• Grinding off sharp edges on an acoustic bridge saddle.
Tip: Before you fire up a Dremel—or any other power tool—always don safety glasses!
Polishing frets on a maple fretboard. You never want to use sandpaper or emery cloth—even if it’s ultra fine—to clean and polish the frets by hand on a maple fretboard with a glossy finish. It’s too easy to scratch or damage the surrounding finish.
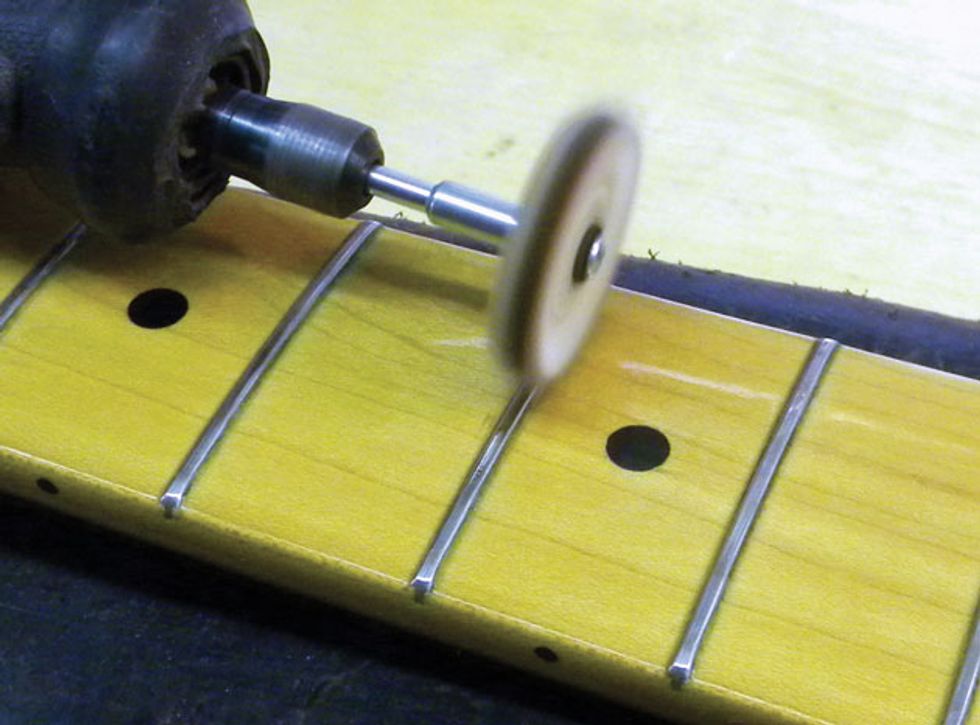
Photo 3
But a small buffing wheel mounted on a Dremel tool is ideal for the job (Photo 3). Just put a few drops of buffing compound on the wheel (I use Planet Waves Restore), and set the tool to a medium speed.
Gently glide the buffing wheel along the length of the fret. Don’t use a lot of pressure when buffing. If you force the wheel onto the fret, it can slip off and possibly burn the finish on the fretboard. A slow, steady, light touch will do it right.
After you’ve buffed all the frets, wipe down the fretboard with a clean polishing cloth.
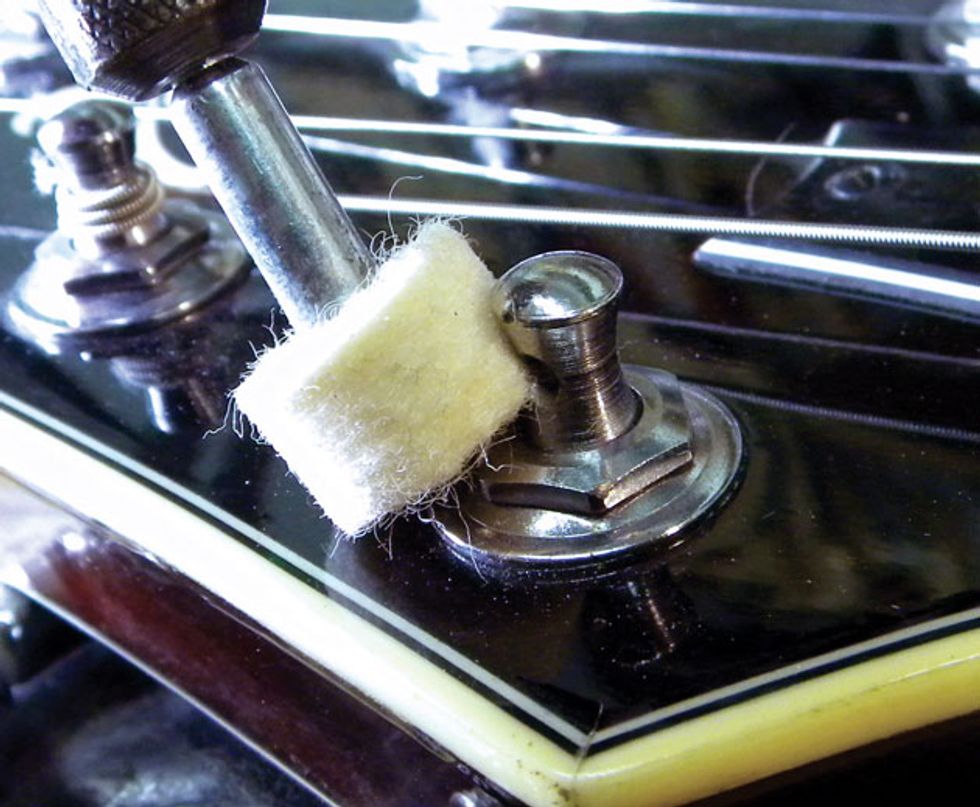
Photo 4
Removing burrs from tuners. Got a problem with breaking strings? Burrs or sharp edges around the hole in a tuner post can be the culprit. It’s a good idea to inspect these posts, and if you see any burrs in their holes, you can polish them out with a very small, thick buffing pad mounted on your Dremel (Photo 4).
You’ll want some buffing compound on the pad. I use Meguiar’s Mirror Glaze 85—it’s gentle enough to prevent damage to the post, but aggressive enough to clean off the burrs. Be careful to keep the pad off the headstock when you’re running the Dremel. If you want to protect the headstock, lay down a strip of painter tape on the area below the post hole.
Set the Dremel to high speed and apply moderate pressure against the outer edges of the hole in the tuning key post. If the burrs are really bad, first smooth them out with 400-grit sandpaper, then polish out the edges with the Dremel’s buffing pad.
Shortening saddle screws. Sometimes a few saddle height adjustment screws on a Fender-style bridge protrude above the saddle and catch your clothing or picking hand. Ouch! When a saddle screw is longer than necessary, you can’t cut it off at the top because that’s where the hex adjustment is located. The solution is to remove the saddle and shorten the offending screws by grinding down their bottom ends. Once the screws are recessed in the saddle, your hand can rest on a smooth surface, yet you’ll still be able to adjust the action.
First measure how much of the screw is poking up past the saddle. This will indicate how much you need to remove from the bottom of the screw. I use a red Sharpie to mark how much material I need to grind away. Make sure you measure several times before you cut! Next remove the saddle and place it in a vise with the screw bottoms facing out.
Tip: To avoid damaging the saddle or any other delicate guitar parts, glue thin leather strips onto the vise jaws.
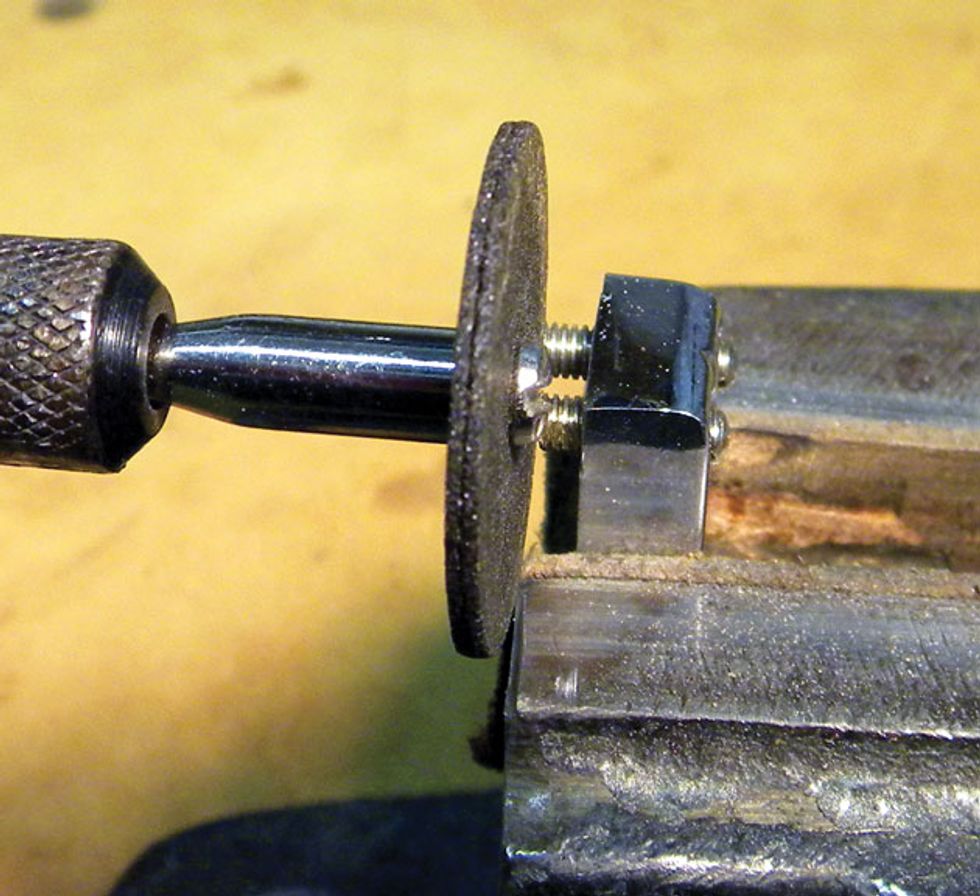
Photo 5
Mount a grinding wheel attachment onto your Dremel, and press it against the screws to grind away the excess metal (Photo 5). Use slow, even pressure and remember to wear eye protection.
Acoustic bridge string slots. The bridges on most flattops don’t have their string slots cut at the correct angle. As a result, the strings make a sharp bend between the pin hole and the saddle, and this can create tuning issues and string breakage. Cutting or resizing string slots in the bridge will reduce these problems. The objective is to create a small, angled channel so the string follows a gentle curve from the pin hole up to the bridge saddle.
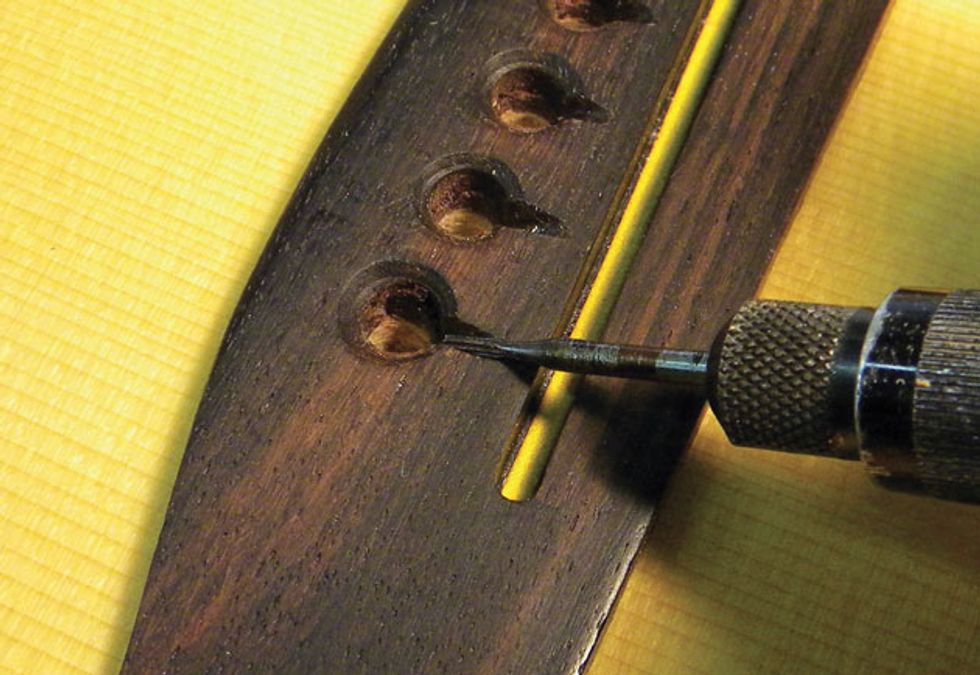
Photo 6
Start by fitting your Dremel with a Flex-Shaft attachment and a 1/16" cutting bit. Then remove the strings and bridge saddle. Next, carefully cut angled slots at the saddle-side edge of the pin hole by rolling the bit in the hole (Photo 6). It only takes one or two “swipes” to get it right. Avoid cutting the slots too deep—this can cause future problems with the bridge. Use a moderate speed while applying steady, gentle pressure.
Smoothing sharp edges on an acoustic saddle. It can be distracting or even painful if your picking hand hits the sharp edge of the bridge saddle on a flattop. Here’s an easy fix.
Note: Before you go any further, determine the saddle material. A Dremel spins from 5,000 to 30,000 rpm, and while that’s fine for bone, it can produce more than enough friction to melt synthetic materials. If you have a plastic, Micarta, or Tusq saddle, I recommend sanding or filing it by hand. However, if you’re just itching to do this with your Dremel, use the lowest speed to prevent a meltdown.
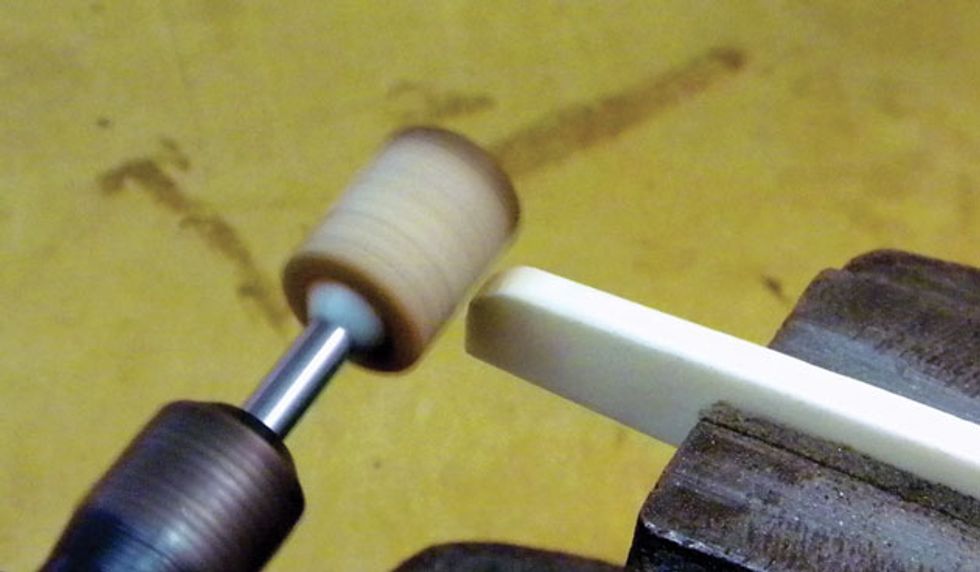
Photo 7
Remove the strings, pull out the saddle, and place it in a vice. Next, attach a small grinding stone to your Dremel. Set it to a medium speed and use the small stone to gently grind the edge to a rounded shape (Photo 7). Take your time and be patient.
Do not attempt this with the saddle still in the guitar’s bridge. The tool is spinning at about 15,000 rpm, and if you slip, you can permanently damage the bridge or soundboard.
Once you’ve done several of these projects, you’re likely to find other ways to put a Dremel tool to work on your instruments. Keep it handy and be creative!Acoustic bridge string slots. The bridges on most flattops don’t have their string slots cut at the correct angle. As a result, the strings make a sharp bend between the pin hole and the saddle, and this can create tuning issues and string breakage. Cutting or resizing string slots in the bridge will reduce these problems. The objective is to create a small, angled channel so the string follows a gentle curve from the pin hole up to the bridge saddle.
Photo 6
Start by fitting your Dremel with a Flex-Shaft attachment and a 1/16" cutting bit. Then remove the strings and bridge saddle. Next, carefully cut angled slots at the saddle-side edge of the pin hole by rolling the bit in the hole (Photo 6). It only takes one or two “swipes” to get it right. Avoid cutting the slots too deep—this can cause future problems with the bridge. Use a moderate speed while applying steady, gentle pressure.
Smoothing sharp edges on an acoustic saddle. It can be distracting or even painful if your picking hand hits the sharp edge of the bridge saddle on a flattop. Here’s an easy fix.
Note: Before you go any further, determine the saddle material. A Dremel spins from 5,000 to 30,000 rpm, and while that’s fine for bone, it can produce more than enough friction to melt synthetic materials. If you have a plastic, Micarta, or Tusq saddle, I recommend sanding or filing it by hand. However, if you’re just itching to do this with your Dremel, use the lowest speed to prevent a meltdown.
Photo 7
Remove the strings, pull out the saddle, and place it in a vice. Next, attach a small grinding stone to your Dremel. Set it to a medium speed and use the small stone to gently grind the edge to a rounded shape (Photo 7). Take your time and be patient.
Do not attempt this with the saddle still in the guitar’s bridge. The tool is spinning at about 15,000 rpm, and if you slip, you can permanently damage the bridge or soundboard.
Once you’ve done several of these projects, you’re likely to find other ways to put a Dremel tool to work on your instruments. Keep it handy and be creative!
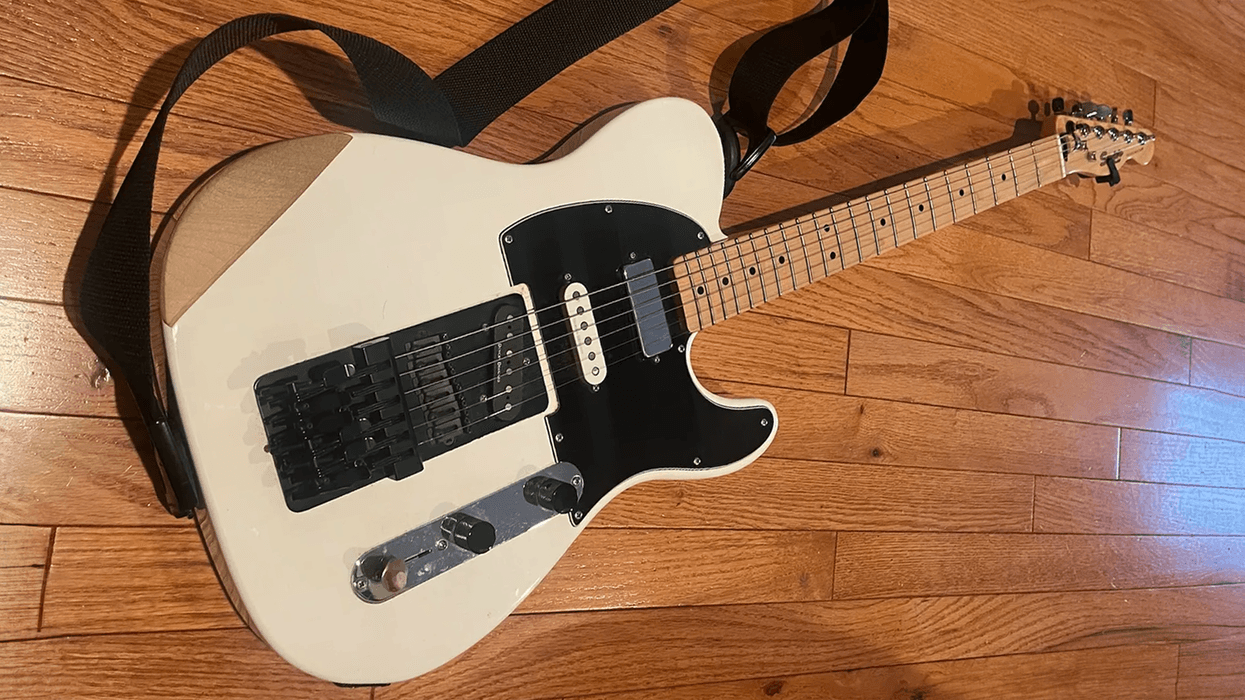
 Lydia began life as a 2007 Squier Vintage Modified Telecaster SSH—an already versatile guitar. With the addition of the Hipshot Trilogy Bridge it can move easily between different tunings.