
Chops: Intermediate
Theory: Beginner
Lesson Overview:
• Learn how to combine different chord inversions to create a better rhythm track.
• Use a capo to add another dimension to a guitar part.
• Discover how the best path to sonic drama might involve silence.
Click here to download a printable PDF of this lesson's notation.
Over the span of my musical career I’ve seen a lot of great bands and a lot of not-so-great bands. I’ve heard stellar recordings and recordings that are a big plate of spaghetti. Something we guitarists can do to sound great onstage and in the studio is to learn how to make guitar parts work together.
In professional sessions—my gold standard for what is “good”—it’s almost mandatory for the guitarist to take two passes at the song with the goal being to play two different things and have each complement the other. The art of double-tracking can help you work out compelling guitar parts for your live shows, too.
These examples feature two guitars—one panned hard left and one panned hard right, which is pretty normal in mixes. If you want to hear one of the guitars by itself, listen through only one ear of your headphones. Also, within SoundSlice you can isolate each part.
Before we start, if you’re trying to make the guitars work well together, it’s a good idea to make them sound different from each other. In these examples the left-side guitar is a Tele-style guitar through a Vox-style amp and the right-side guitar is a bridge humbucker through a Fender-style amp. Tonal differences between the two guitars help them sonically complete each other, rather than compete.
Alright, let’s jump in.
Capo Differently
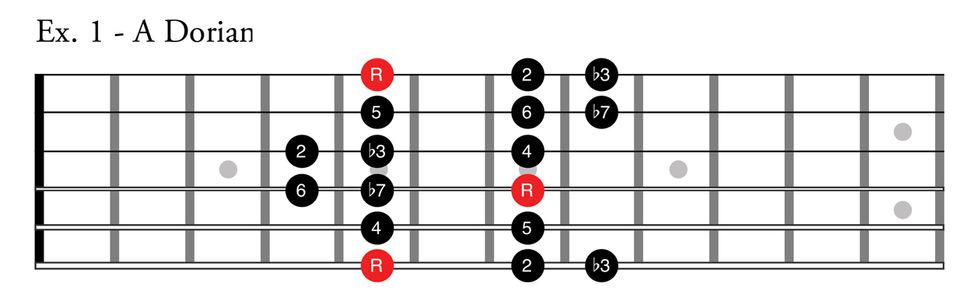
Remember, the goal is usually to have the two guitars sound different. Each element in a mix should have its own space, and using a capo in different positions will automatically make this happen. If the song is in G, it’s common for the guitar player to play the song with no capo for the first rhythm part, then capo at the third fret for the second rhythm part and play the song as if it was in the key of E. By doing this the guitarist is making sure each part has different textures because the go-to chords and licks in G aren’t the same as in E, or any other common key. Ex. 1 shows how you can make a simple chord progression work by not only varying the chord shapes, but the rhythms too.
Click here for Ex. 1
One High, One Low
When I’m playing a song for the first time in a session, or playing a live show with a new group of people, I’m always checking where the other guitarist’s hands are. Are they down low pounding on big open chords? Or are the up high playing a sustaining pattern? Whatever they’re doing, I try not to tread on their territory. Ex. 2 demonstrates how one part can provide the chord changes while the other part glides on top.
Click here for Ex. 2
To Mute or Not to Mute?
Palm muting works really well for verses, but it’s a risky move having two guitars palm mute at the same time because if either of them are off from the click or each other it sticks out in a bad way. To get around this, here’s a cool trick: Have one guitar do the intuitive thing and palm mute, while the other guitar quietly rings open (Ex. 3). The key word is quietly. The unmuted guitar needs to sit at a similar or lower level than the muted guitar in the mix. A loud ringing guitar in a subdued, palm-muted verse is more of a distraction than a supportive layer.
Click here for Ex. 3
Driving Toward the Diamonds
Let’s say there’s a big chorus or big solo where both rhythm guitars need to keep the pulse of the song moving, but also explode on the individual accented beats. One guitar can consistently pound on eighth-notes with some extra “oomph” on the strong beats, and the other guitar can just hit the strong beats and ring out (Ex. 4). The short tones drive the song forward and the long tones tie it together.
Click here for Ex. 4
Roots and Inversions
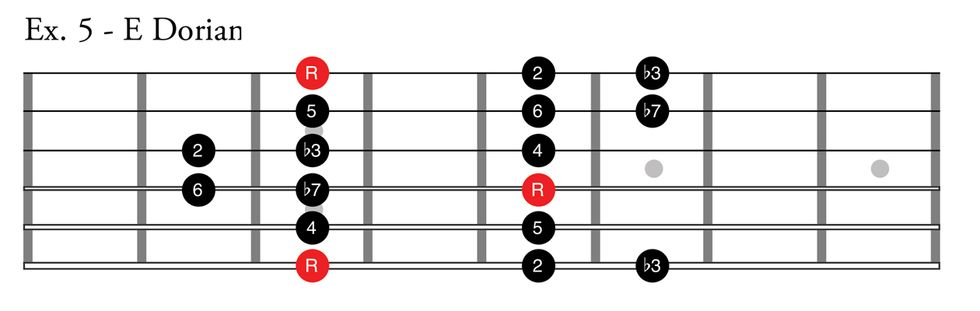
This technique can be combined with our previously discussed examples, or it can be used to get both guitars driving eighth-notes without sounding muddy. Again, if there are two electric guitars in a mix, they’ll likely be panned hard left and hard right, and to get a big, wide stereo image, the left and right sides should sound very different from each other. Having one guitarist do normal root-position chords while the other guitarist plays slightly higher first-inversion chords will get the mixing engineer and producer the wide stereo image they’re looking for. The first inversion track by itself (Gtr. 2) might sound a little weird, but the audience will never hear it in isolation. They’ll only hear it paired up with the other guitar and all the other instruments in a finished mix, so it’s more important for it to sound good in context (Ex. 5). Context is a powerful thing.
Click here for Ex. 5
Switch it Up
If you’re in a session with another electric guitarist, it can feel very natural to trade back and forth with each other. This give-and-take can be lost when a lone electric guitarist is in charge of doing a rhythm track and then overdubbing another rhythm track.
The first time around it’s a great idea to leave some spaces that may feel like dead air in the moment, but will be filled in on the second take. This will make the guitars feel much more responsive to each other and less disjointed. You can do this within a verse, or switch roles between verses (Ex. 6).
Click here for Ex. 6
Unison Lines
Commercial music played by professionals sounds like “we meant to do this,” rather than “we don’t really know what we’re doing.” The easiest, most fool-proof way to sound like the former is to play unison lines. This is when both guitars play exactly the same thing for a moment (Ex. 7). It usually works best in between the vocals in a verse and at the end of phrases—like in the last half of the fourth measure of a four-measure phrase.
Click here for Ex. 7
Octaves
This is the same concept as unison licks, except it takes slightly more planning because it requires a lower fingering on one guitar track and a higher fingering on the other. Most of the time, it works better and sounds bigger than unison lines (Ex. 8). Octave lines can be used more liberally than unison lines, too. Many smash hits have entire signature licks in the song’s intro where every note is played in octaves.
Click here for Ex. 8
“Guitarmonies”
Again, this is the same concept as unison and octave lines, but it’s a little more challenging to execute. Not only do harmony lines need to work with each other, but they need to work with the song’s chords, so it can be risky to dive into harmony lines in a session if you aren’t totally sure you’ll nail it. That said, if you have a little time, it can be a fun texture to work out. Just don’t overdo it—“guitarmonies” can wear out their welcome in a song quickly. It might be best to designate them for a specific section of the song, like the solo or the second half of the second verse (Ex. 9).
Click here for Ex. 9
Hello Silence, My Old Friend
Laying out on one or both parts during the first verse or first half of the verse can make the chorus kick harder, which is a great tool to have in your kit (Ex. 10). Since it’s hard to make a guitar part sound bigger than overdriven open chords, you create the perception of hugeness by dialing back the other parts of the song and saving the dirt for when it matters. This is probably the most important technique you have at your disposal … and the easiest one to pull off!