Hello and welcome to another Dojo! Since this issue is dedicated to all things acoustic, I thought I’d share a fun technique that I call “harmonic clouds.” It involves learning a section of your song backwards, recording it, reversing the new recording, and placing it back in the appropriate spot (or not!). I usually do this with acoustic guitars, but it can be applied with equal aplomb to electrics and can supercharge your creativity. Tighten up! The Dojo is now open.
We are all familiar with the sound of reverse delay. On the surface, you might be thinking, “I can do this already.” But you’d be missing out. The “harmonic clouds” technique offers many more possibilities and much more control than recording a guitar part with a reverse delay effect. In short, this technique is inspired more by the process and sounds of double tracking than using delays.
This initial track is the closest thing to a simple reverse delay but it’s not—because it is an entirely different performance, and all those subtle timing and timbral differences are there in all their glory.
By the mid-’60s, it was standard practice for the Beatles to sing all their lead vocals (and some background vocals) twice to thicken up their voices. The resulting deviations from each individual track heard together offered a slight, natural, chorusing effect as well as charming variations in timing of words, dynamics, and timbre. The net result was that the vocals stood out more on the final recordings.
However, it was time consuming. John Lennon, in particular, was always asking for a way to have the sound of “double tracking” without actually having to track the vocal twice. EMI’s brilliant studio engineer Ken Townsend devised an ingenious way of splitting the signal from just after the recording head on a Studer J37 tape machine (at 15 ips) and routing it through both recording and playback heads of the EMI BTR2 tape machine (at 30 ips), the sound from the BTR2 would then be heard at almost the same time as the sound from the Studer’s playback head [Fig. 1] With a little more help from a Levell oscillator, Townsend could varispeed the BTR2 machine with greater control (see my March 2022 article about varispeed). Thus, ADT (artificial double tracking) was born, and, FYI, Waves makes the Reel ADT plug-in ($29 street) as part of their Abbey Road Collection. But I’m going to take you a bit further than that, because we’re going to create new tracks that will increasingly differ from the original! Plus, you can always apply ADT to the new tracks later.
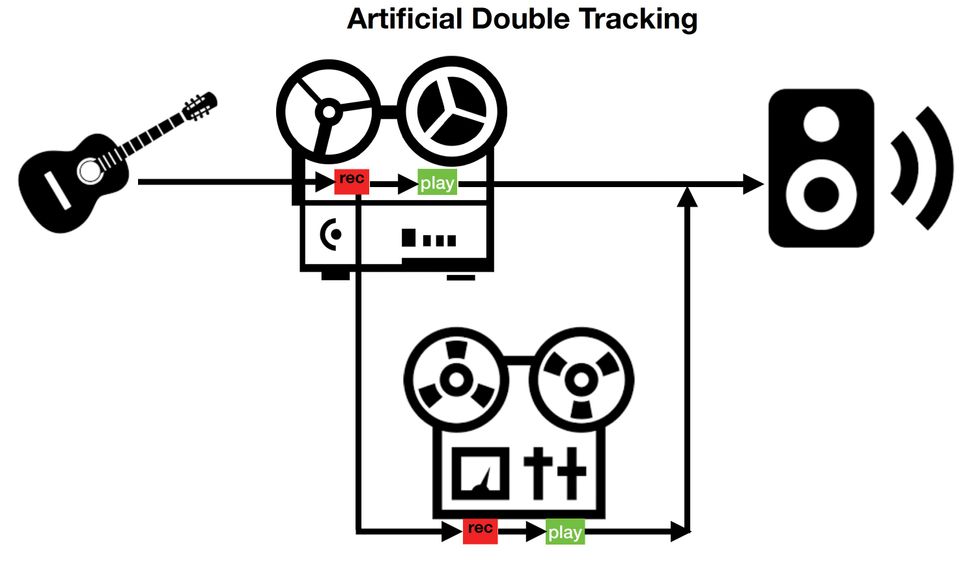
Fig. 1
Let’s get started. Here are the three basic steps:
Step 1 - Learn the Progression Backwards
Take the chords from a particular section of your song (perhaps the chorus or the bridge) and learn the progression backwards, including the rhythms as well. For this example, I was working on the bridge section of a song I wrote on my album that will be released this fall called Jacob’s Well. The way I do this is by writing a chart, then reversing the order and playing it until it feels natural.
Step 2 - Create a New Track
Create a new track and then record the “new” rhythm guitar part you just learned by muting all the other tracks and playing along with the click track.
Step 3 - Reverse the Track
Reverse the track you just recorded and listen to it. Before you unmute all the other tracks and listen to how it sounds, you may have to align it a bit depending on when you stopped recording. Feel free to experiment and play around with aligning the new track in different places rhythmically and listen to how it changes the section. This initial track is the closest thing to a simple reverse delay but it’s not—because it is an entirely different performance, and all those subtle timing and timbral differences are there in all their glory.
Step 4 - Explore Your Own Music
Now we’re ready to have some real fun. Create some new tracks and repeat steps one though three, but each time play the same reversed passage in different parts of the guitar (i.e., you can change the tuning, use a capo, use only power chords, add effects, etc). As the versions pile in and you get used to the process, I think you’ll be really surprised by the results. Who knows, you might even start trying this with all kinds of instruments! Just remember to always serve the song and stay true to the emotional content you want to use these tracks to achieve. Most often for me, less is more.
Until next month, blessings, and keep sharing your gifts with the world. Namaste.