Photo 1 — The essentials: a low-watt soldering iron, a stand, a small damp sponge, and a roll of “electronic silver solder” like this .020" 60/40 tin/lead rosin flux solder from Kester.
Learn to solder like a pro in this easy-to-follow demonstration.
Given the DIY nature of this issue, we thought it would be appropriate to address good soldering technique. If you’re willing to invest a few bucks in some modest tools and spend a little time practicing the basics, you can learn to wire up guitars, stomp kits, speaker cabinets, and even do some simple amp mods. Once you understand the fundamentals, you can save money and derive a lot of satisfaction from working on your own gear.
The tools.
You’ll want a decent soldering pencil (a small type of soldering iron) rated at least 25 watts, but no more than 60 watts. (Many guitar techs like a 30-watt soldering iron for working on guitars and amps, and a 15-watt iron for working inside stompboxes and on delicate printed circuit boards.) You’ll also want a stand to hold the hot iron when not in use, a damp sponge, and some rosin core solder made for electronic work (Photo 1).
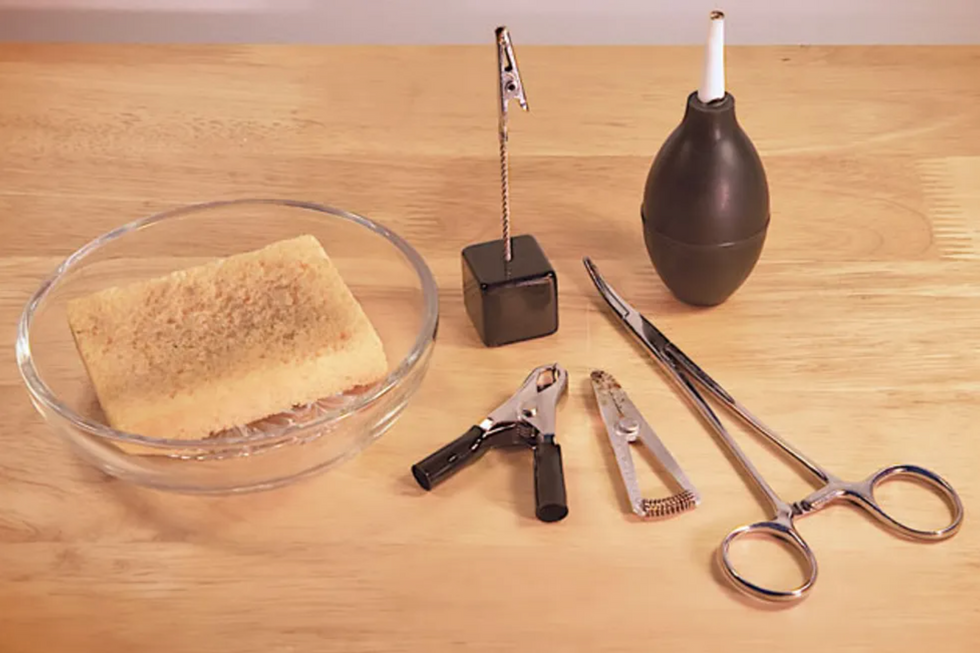
Photo 2 — If your soldering stand doesn’t house a sponge, just put a damp household sponge in a glass or ceramic dish. Other helpful tools: a hemostat and small clamps to hold parts still as you solder them, and a “solder sucker” bulb for removing solder.
You should also have some basic hand tools, such as wire strippers, needle-nose pliers, wire cutters, and something to hold the wire in place while a solder joint cools (Photos 2 and 3).
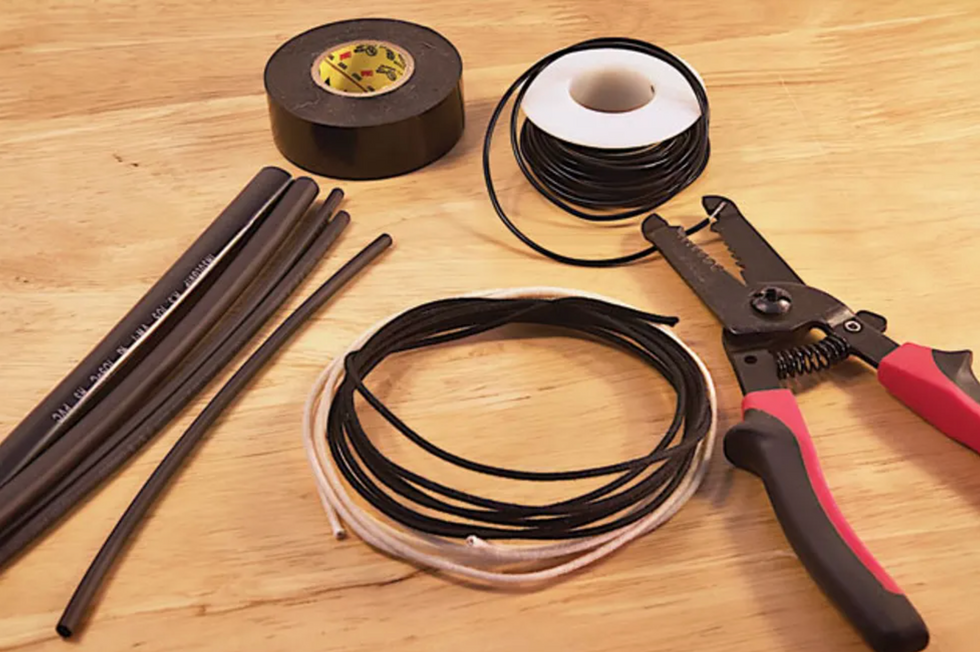
Photo 3 — In addition to hook-up wire, you’ll want wire strippers. Alternatively, luthier suppliers offer old-school “push-back” wire with a waxed cotton jacket (center) that eliminates the need for stripping off the plastic insulation from the end of the wire. Electrical tape and heat shrink tubing come in handy when you need to protect or insulate your work.
There are tools sold specifically for holding wires and parts, available through an electronics supply house.
Step 1: Prepare the Joint
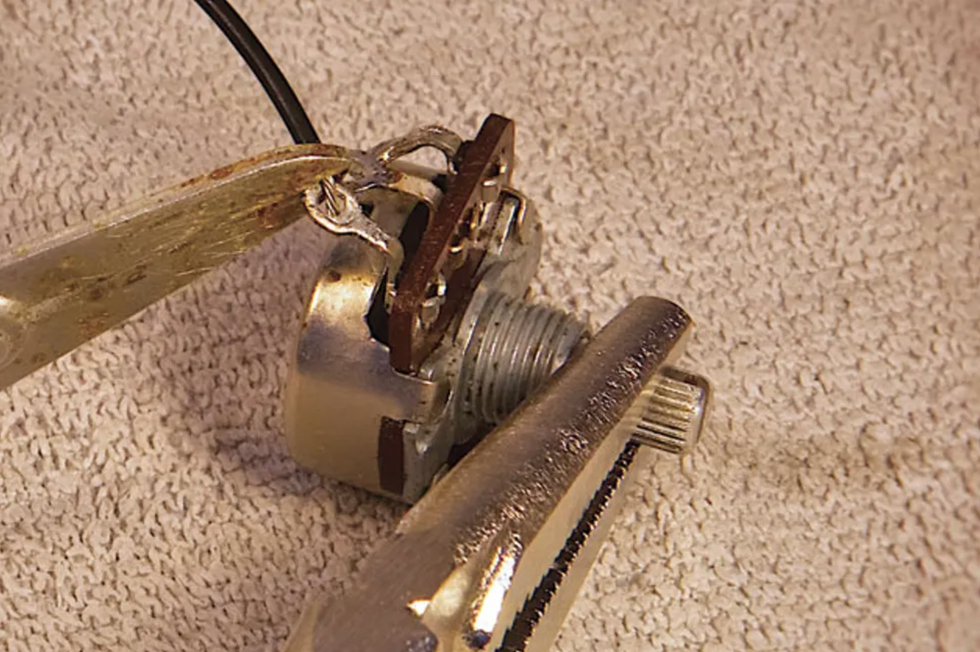
Photo 4 — Before you attempt to solder a connection, the wire and component must be secured to assure they remain absolutely motionless. Here, a spring-loaded heat-sink clamp holds the wire in place while a vice grip gently clamps the pot shaft.
For every joint, you need to find a way to hold the wire in position without using your hands (Photo 4). Wrap the wire through the solder lug once to make it hold tightly on its own, use tape to hold it in place, lay a pair of pliers on the wire to hold it firmly where you want it, or use a mechanical soldering aid to hold it. Use whatever works, except holding the wire manually. When you make a solder connection and rely on your hands to hold the soldered wire steady while the joint cools, you will fail—no human hands are steady enough to hold anything perfectly still, and you want the wire to remain absolutely motionless while it cools. If there is movement, the result will be internal fractures in the solder.
Step 2: Clean the Tip
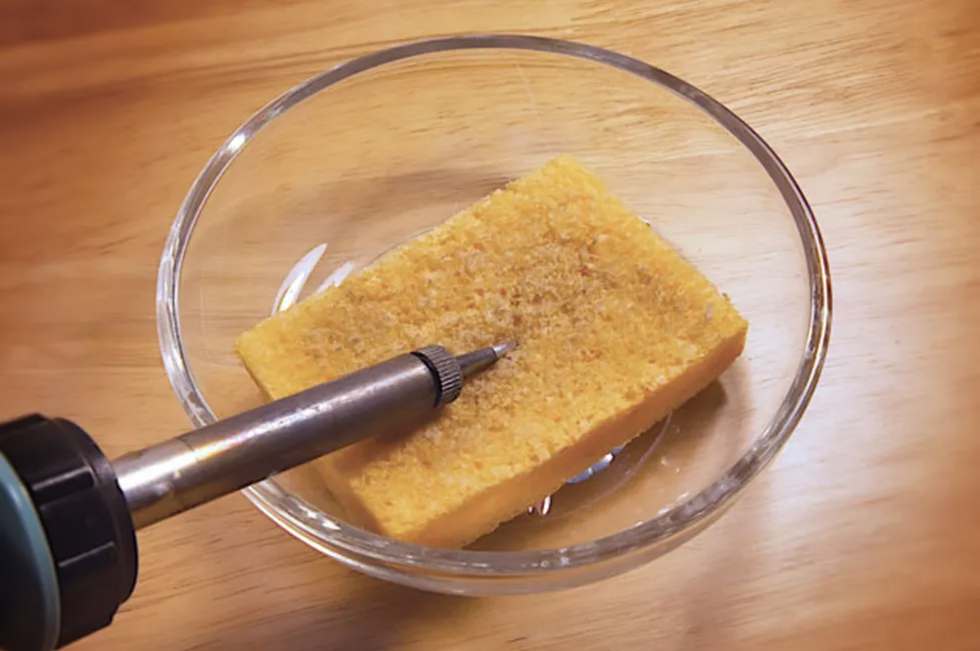
Photo 5 — Wipe the hot tip with a damp sponge to keep it clean.
The tip must be cleaned before each and every joint—you can use the damp sponge for this (Photos 5 and 6).
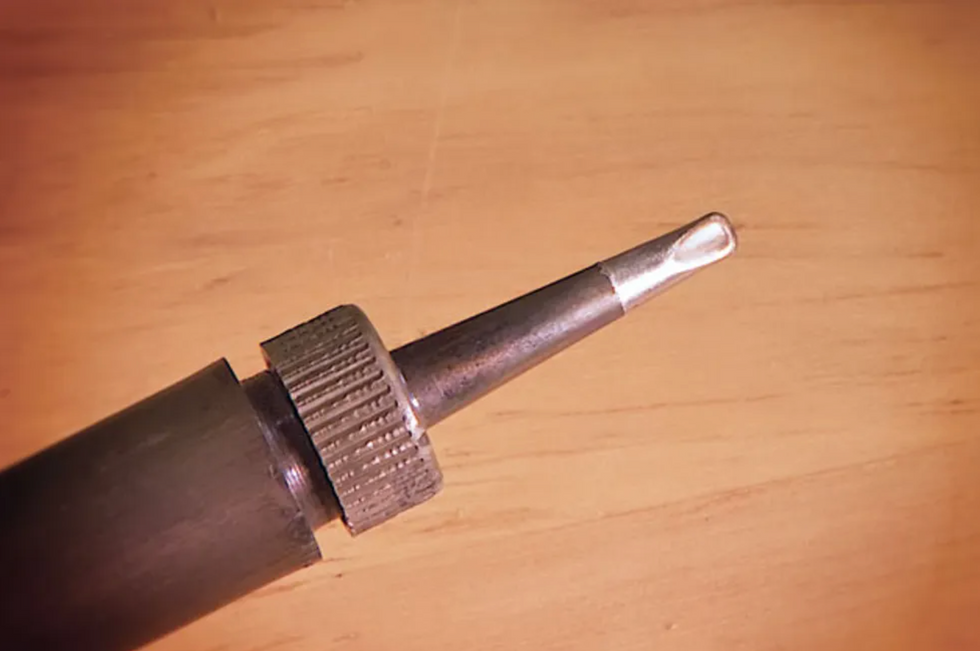
Photo 6 — A clean, dross-free tip looks smooth and shiny.
Solder produces a by-product called dross very, very quickly, and the dross fouls the tip, preventing good heat conduction and introducing waste material into your solder joints.
Step 3: Tin the Tip
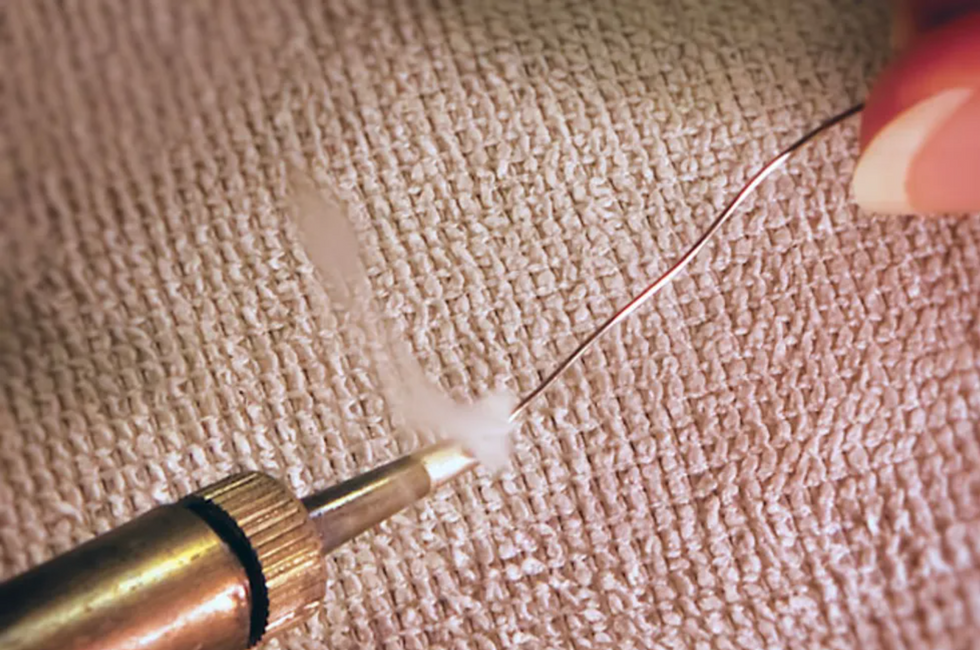
Photo 7 — Add a small amount of solder to a freshly cleaned tip just before you solder a connection. When you see this telltale puff of smoke, pull the strand of solder off the tip, shake off any excess, and then move quickly to the joint.
Immediately before you get on the joint with the heat, add fresh solder to the tip of the iron to “tin” it. Simply feed solder directly onto the tip so it’s completely coated (Photo 7). A tinned tip will provide much better heat conduction than a tip that’s clean but not tinned.
Step 4: Remove the Excess Solder
Shake off the excess solder after tinning—you want the tip coated, but not dripping. I have a fire-resistant container beside my soldering bench, and after tinning I tap the barrel of my iron on the edge of the container to knock excess molten solder into it. You can use any fire-resistant container for this, such as a tin can or ceramic bowl, but use care not to start a fire. Because solder melts at such a low temperature the risk of a fire is very low—molten solder is unlikely to ignite even highly flammable materials like paper—but use care anyway!
Step 5: Get on the Joint Right Away
As soon as you’ve removed the excess solder from the tip, get right on the joint. By “joint,” I mean the wire and the solder lug, or the wire and the back of the pot, or whatever it is you’re soldering. Dross will start to form on the tip very quickly, so as soon as the tip is prepared, get to work.
Step 6: Heat the Joint
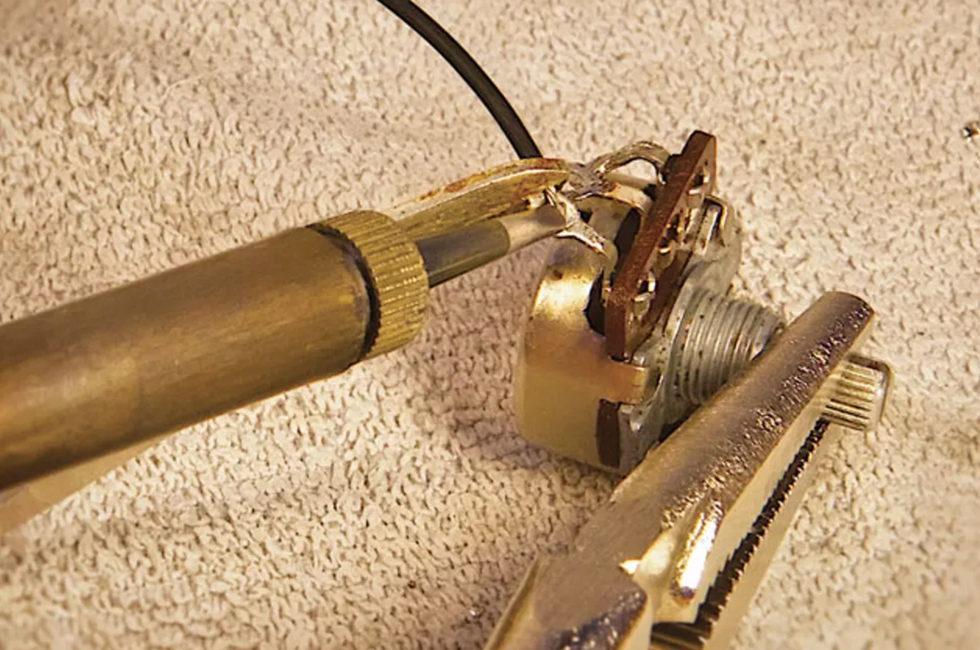
Photo 8 — Gently press the iron’s hot tip against the joint to heat it before you bring the solder into the equation. The goal is to make the joint itself hot enough to melt the solder.
Heat the joint, not the solder (Photo 8). You want the joint to be hot enough to melt the solder. It’s a given that the iron is hot enough to melt it—just feed a little onto the tip and you’ll see—but you also want the joint itself to be hot enough to do the same.
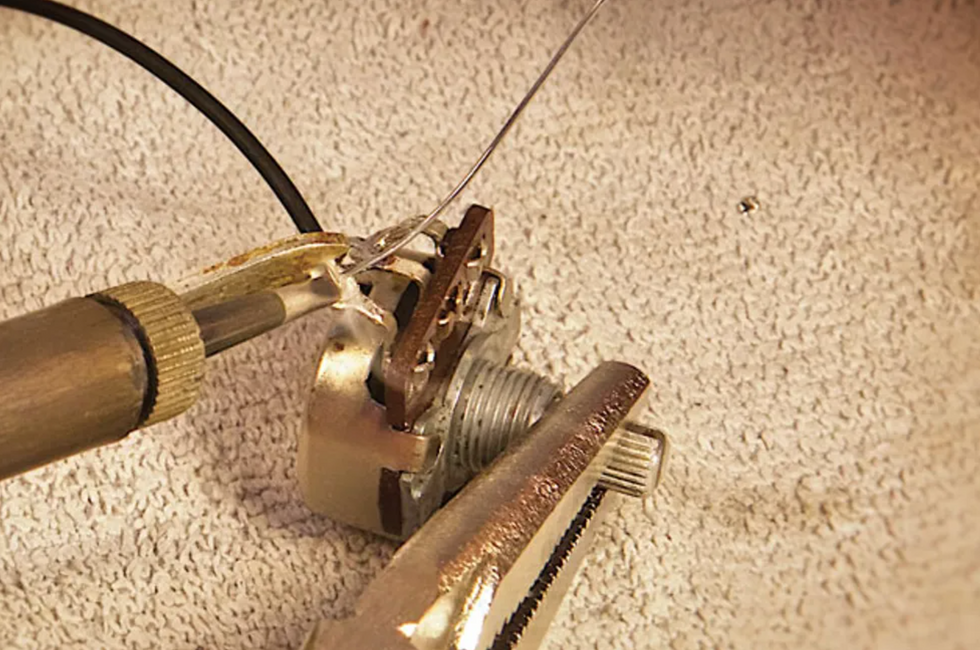
Photo 9 — While holding the tip against the joint, feed the solder onto the heated joint, not the soldering iron tip. Here the emerging puff of smoke indicates the solder is melting.
If you feed solder onto the joint without it touching the iron (Photo 9), the solder will melt and be attracted right to the joint. You can watch the solder actually wick out onto the surface you’re soldering to—this is what you want.
Step 7: Get off the Joint
As soon as the solder has flowed onto the joint properly, remove the heat from the joint. Most components can stand a fair amount of heat, but some are more susceptible to damage than others, so there’s no need to push your luck. Pots are fairly durable (unless it’s a cheap pot), so it’s highly unlikely you’ll damage one by trying to solder a wire to its back. But again, there’s no need to push your luck, so as soon as you’ve completed the joint, pull the iron away and let the joint cool with the components remaining motionless.
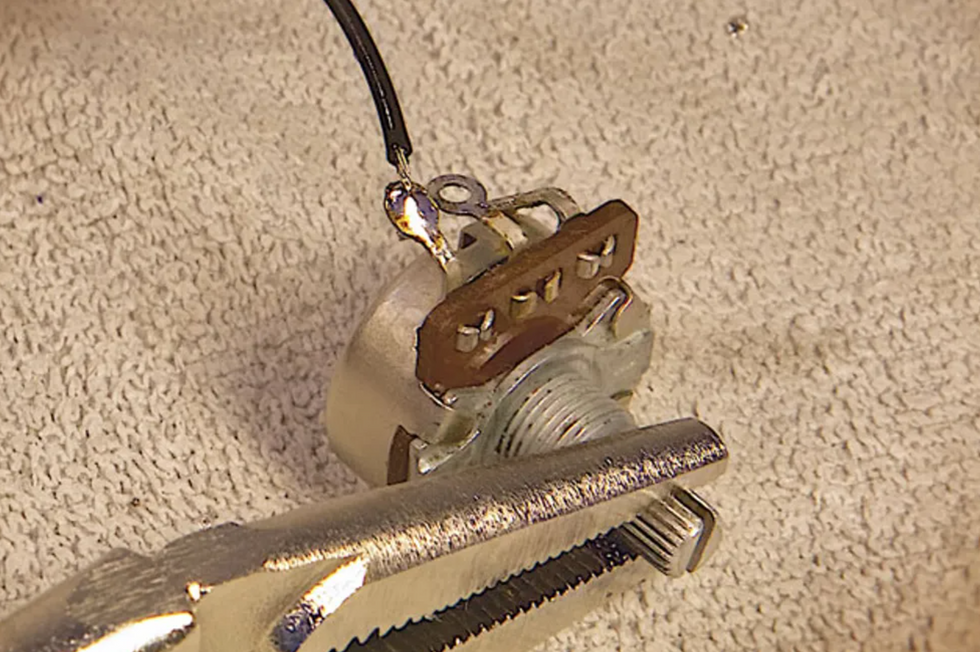
Photo 10 — When the molten solder has flowed into the joint, pull away both the solder and iron. Keep the joint motionless as it cools and don’t blow on it—the moisture in your breath will enter the cooling connection and potentially cause it to fail.
If you’re soldering to a ring-shaped solder lug, then you’ll want to fill it completely with solder (Photo 10). This will maximize the mechanical strength of the joint.
Like most skills, soldering proficiency is acquired through practice. Employing good technique will allow you to become competent all the more quickly, so follow these steps, and you’ll be soldering like a pro in no time. You should probably practice on projects that aren’t expensive or mission critical—you might want to think twice about rewiring your only guitar before that gig with Clapton tonight. But if you keep at it, you’ll be one step closer to being a consummate DIY’er.
Two Ways to Improve Your Soldering Projects
After you master the basics, there are two more skills to add to your bag of tricks: removing old solder and installing heat shrink tubing. There are plenty of occasions where you’ll wish you could remove old solder and re-use a part. For example, you might have rescued a volume or tone pot from a previous mod or project. If it’s a high-quality pot, like those from CTS, why toss it and buy a new replacement when you can put the old one back into service? It’s easy to reverse the soldering process and remove old solder and bits of wire. You simply need a solder removal tool. There are several types, including disposable braided wire that’s designed to wick molten solder away from a joint, and various vacuum pump tools and “solder suckers.” I prefer a simple rubber bulb with a heat-resistant Teflon tip.
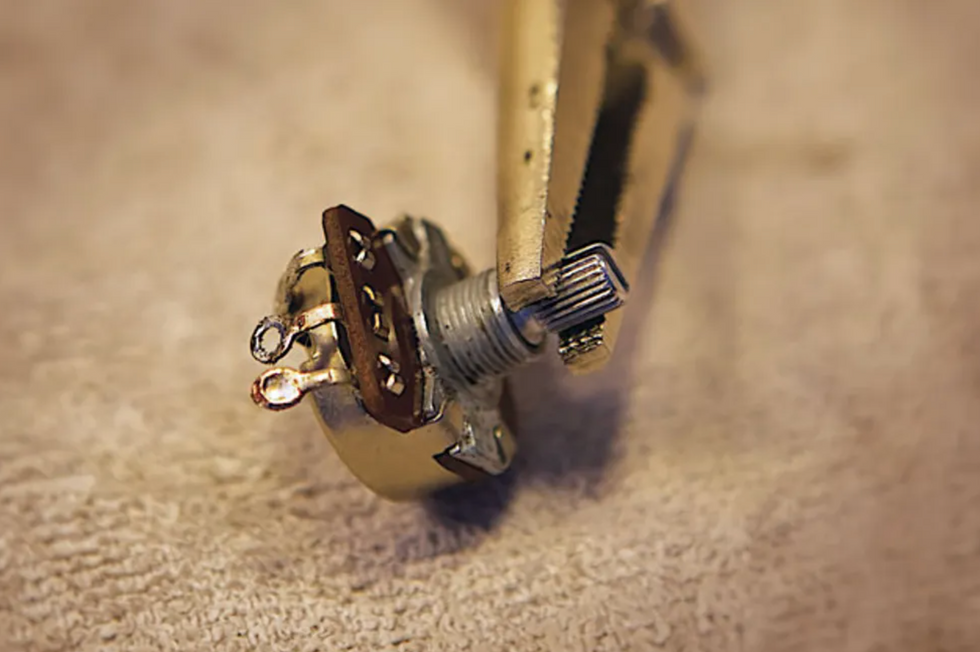
Photo 11
Here’s how it works: Stabilize your component, in this case, a pot (Photo 11). See how one lug is filled with solder? Let’s make that go bye-bye. Apply heat to the lug with a freshly cleaned soldering-iron tip.
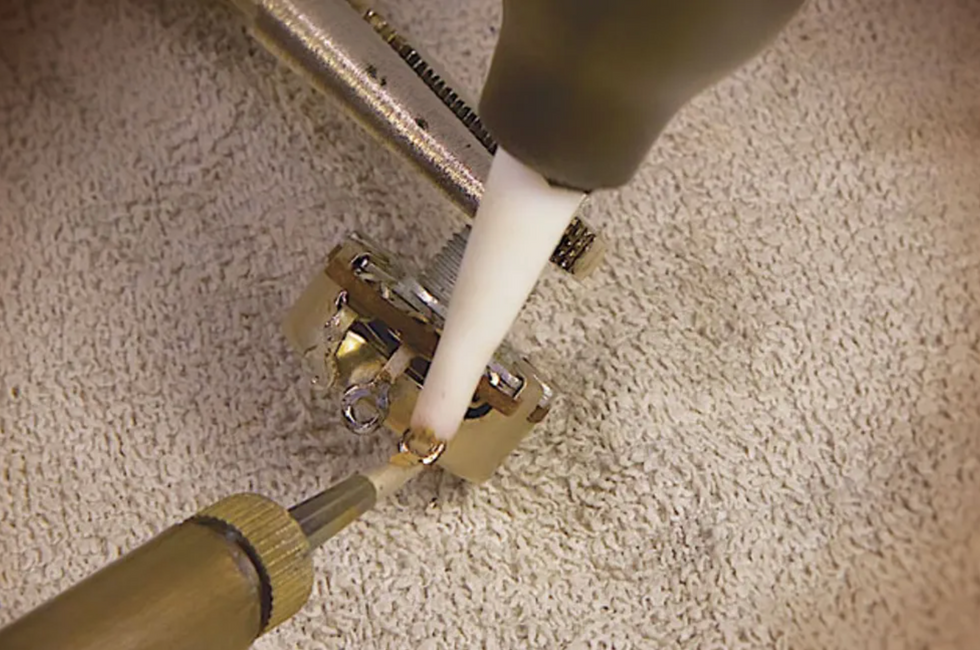
Photo 12
When you see the solder turn shiny and molten, hold the bulb away from the lug, squeeze and hold the bulb, and then bring its tip to the lug and release the bulb. Fffffft! The molten solder goes up the tip and into the bulb (Photo 12).
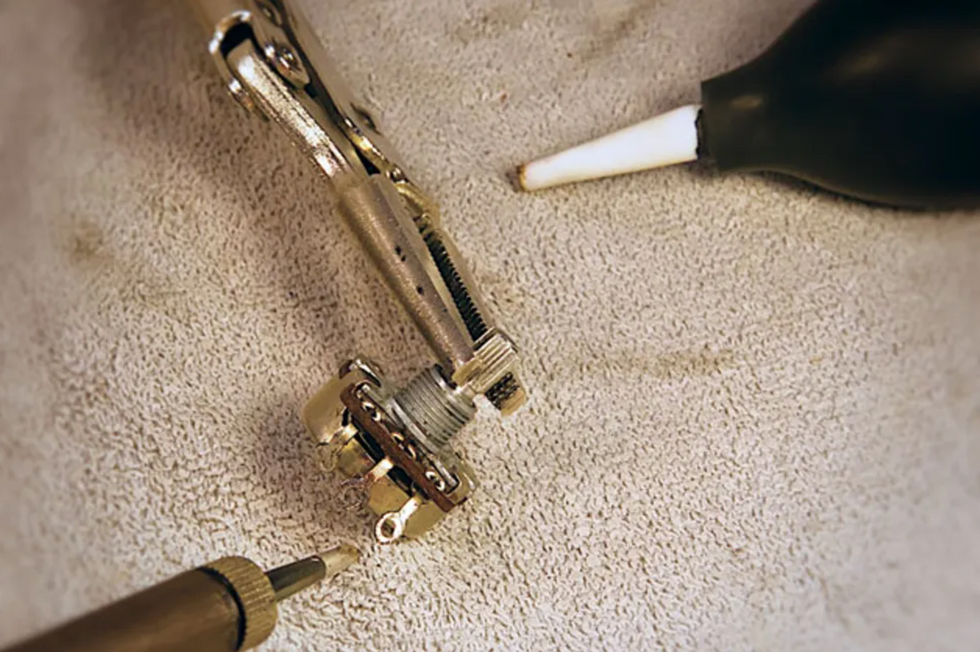
Photo 13
Look at that—a nice clean lug ready for its next mission (Photo 13).
Tip:It’s good to recycle pots and parts, but never try to reuse old solder. Clean it off and start fresh.
In case you’re wondering what happens to the old solder, every few months you simply work the tip out of the bulb, shake the collected cold solder beads into the trash, and reinsert the tip into the bulb. Good to go.
When you’re working with wire and electronics, you’ll often encounter instances where you need to insulate a connection from other wires or components. For example, you want to install a favorite old pickup into another guitar. However, the pickup leads have been cut back over the years and now they won’t reach the intended switch or pot, which means it’s time to splice short extensions to the pickup leads. No problem, except if the exposed wires touch each other or other components, they’ll create a short and you’ll hear only silence (or an annoying hum).
Electrical tape will do the job to insulate the splices, but heat shrink tubing—aka heat shrink—offers a more elegant solution. To make this work, you’ll need a heat source. Some folks use a lighter, but I prefer a heat gun because I like to avoid open flame in my workshop. Heat guns aren’t expensive and they get the job done efficiently and safely.
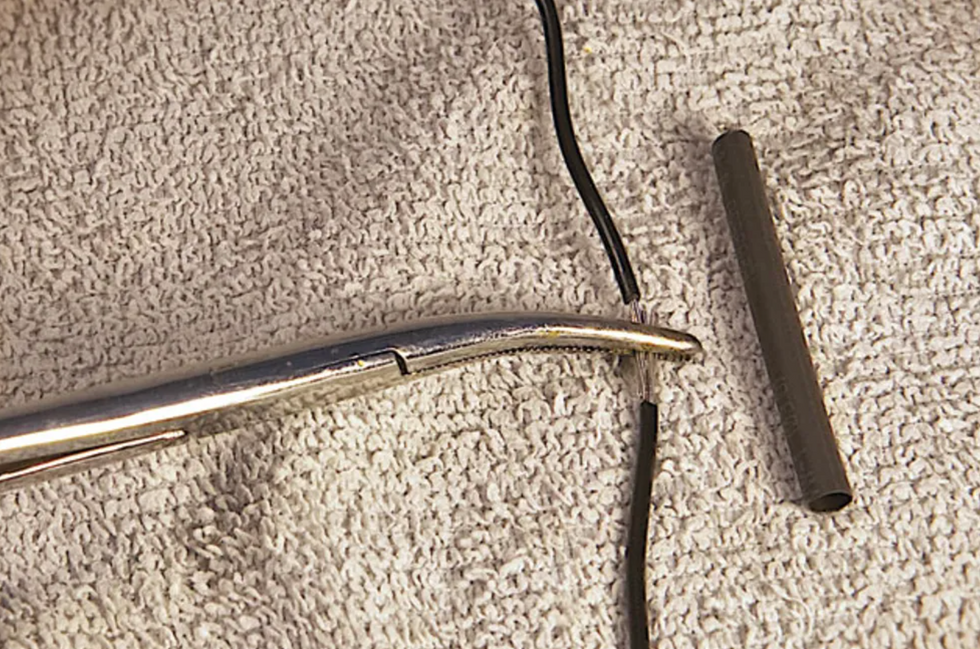
Photo 14
The details: Designed to slide over wire of different gauges, heat shrink comes in various diameters. After you select the right diameter to comfortably slip over your wire, cut off a piece that will straddle the solder splice or joint you plan to cover. The pros suggest a length that’s about three times as long as the exposed section. Use hemostats or a clamp to temporarily hold the ends together while you gauge the length you’ll need to cut (Photo 14).
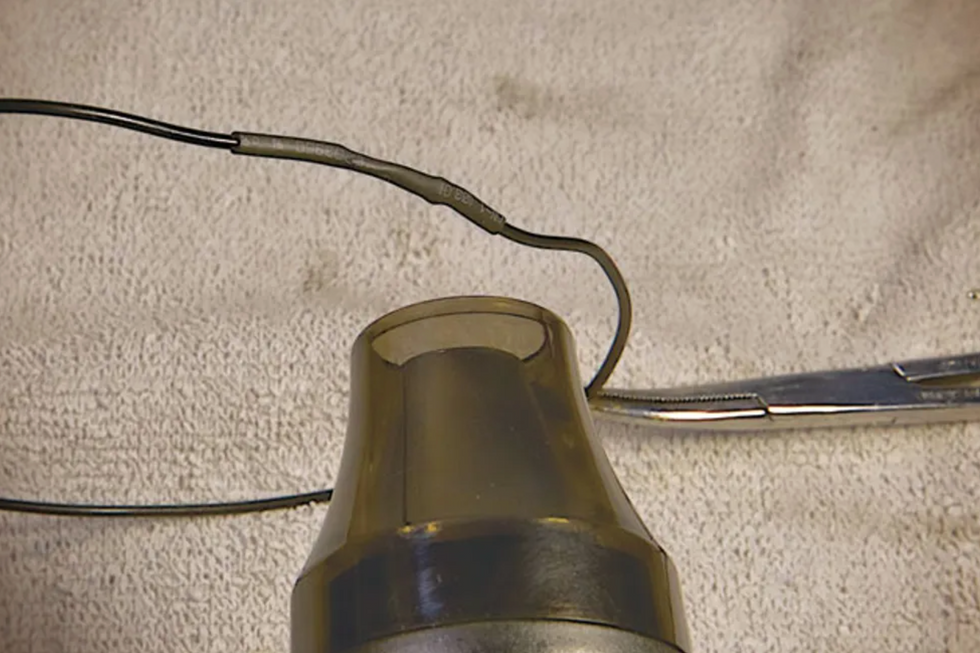
Photo 15
Next, remove the clamp, slide the heat shrink over one end of the wire (keep it far away from your hot iron) and solder the wires. When the solder has cooled, slip the heat shrink over the new joint, center it, and fire up the heat gun. The tubing will start to immediately contract around the joint (Photo 15). Don’t worry, air from the heat gun doesn’t get hot enough to compromise the solder joint. Once the tubing has completely closed up around the wire, you’re done. The joint now has a tough, new skin to protect it. —Andy Ellis
[Updated 1/13/22]
- Three Must-Try Guitar Wiring Mods - Premier Guitar ›
- The ABCs of Output Jacks - Premier Guitar ›
- The Stompbox-Builder's Secret Weapon - Premier Guitar ›
Onstage, Tommy Emmanuel executes a move that is not from the playbook of his hero, Chet Atkins.
Recorded live at the Sydney Opera House, the Australian guitarist’s new album reminds listeners that his fingerpicking is in a stratum all its own. His approach to arranging only amplifies that distinction—and his devotion to Chet Atkins.
Australian fingerpicking virtuoso Tommy Emmanuel is turning 70 this year. He’s been performing since he was 6, and for every solo show he’s played, he’s never used a setlist.
“My biggest decision every day on tour is, ‘What do I want to start with? How do I want to come out of the gate?’” Emmanuel explains to me over a video call. “A good opener has to have everything. It has to be full of surprise, it has to have lots of good ideas, lots of light and shade, and then, hit it again,” he says, illustrating each phrase with his hands and ending with a punch.“You lift off straightaway with the first song, you get airborne, you start reaching, and then it’s time to level out and take people on a journey.”
In May 2023, Emmanuel played two shows at the Sydney Opera House, the best performances from which have been combined on his new release, Live at the Sydney Opera House. The venue’s Concert Hall, which has a capacity of 2,679, is a familiar room for Emmanuel, but I think at this point in his career he wouldn’t bring a setlist if he was playing Wembley Stadium. On the recording, Emmanuel’s mind-blowingly dexterous chops, distinctive attack and flair, and knack for culturally resonant compositions are on full display. His opening song for the shows? An original, “Countrywide,” with a segue into Chet Atkins’ “El Vaquero.”
“When I was going to high school in the ’60s, I heard ‘El Vaquero’ on Chet Atkins’ record, [1964’s My Favorite Guitars],” Emmanuel shares. “And when I wrote ‘Countrywide’ in around ’76 or ’77, I suddenly realized, ‘Ah! It’s a bit like “El Vaquero!”’ So I then worked out ‘El Vaquero’ as a solo piece, because it wasn’t recorded like that [by Atkins originally].
“The co-writer of ‘El Vaquero’ is Wayne Moss, who’s a famous Nashville session guy who played ‘da da da’ [sings the guitar riff from Roy Orbison’s ‘Pretty Woman’]. And he played on a lot of Chet’s records as a rhythm guy. So once when I played ‘El Vaquero’ live, Wayne Moss came up to me and said, ‘You know, you did my part and Chet’s at the same time. That’s not fair!’” Emmanuel says, laughing.
Atkins is the reason Emmanuel got into performing. His mother had been teaching him rhythm guitar for a couple years when he heard Atkins on the radio and, at 6, was able to immediately mimic his fingerpicking technique. His father recognized Emmanuel’s prodigious talent and got him on the road that year, which kicked off his professional career. He says, “By the time I was 6, I was already sleep-deprived, working too hard, and being forced to be educated. Because all I was interested in was playing music.”
Emmanuel talks about Atkins as if the way he viewed him as a boy hasn’t changed. The title Atkins bestowed upon him, C.G.P. (Certified Guitar Player), appears on Emmanuel’s album covers, in his record label (C.G.P. Sounds), and is inlaid at the 12th fret on his Maton Custom Shop TE Personal signature acoustic. (Atkins named only five guitarists C.G.P.s. The others are John Knowles, Steve Wariner, Jerry Reed, and Atkins himself.) For Emmanuel, even today most roads lead to Atkins.
When I ask Emmanuel about his approach to arranging for solo acoustic guitar, he says, “It was really hit home for me by my hero, Chet Atkins, when I read an interview with him a long time ago and he said, ‘Make your arrangement interesting.’ And I thought, ‘Wow!’ Because I was so keen to be true to the composer and play the song as everyone knows it. But then again, I’m recreating it like everyone else has, and I might as well get in line with the rest of them and jump off the cliff into nowhere. So it struck me: ‘How can I make my arrangements interesting?’ Well, make them full of surprises.”
When Emmanuel was invited to contribute to 2015’s Burt Bacharach: This Guitar’s in Love with You, featuring acoustic-guitar tributes to Bacharach’s classic compositions by various artists, Emmanuel expresses that nobody wanted to take “(They Long to Be) Close to You,” due to its “syrupy” nature. But for Emmanuel, this presented an entertaining challenge.
He explains, “I thought, ‘Okay, how can I reboot “Close to You?’ So even the most jaded listener will say, ‘Holy fuck—I didn’t expect that! Wow, I really like that; that is a good melody!’ So I found a good key to play the song in, which allowed me to get some open notes that sustain while I move the chords. Then what I did is, in every phrase, I made the chord unresolve, then resolve.
Tommy Emmanuel's Gear
“I’m writing music for the film that’s in my head,” Emmanuel says. “So, I don’t think, ‘I’m just the guitar,’ ever.”
Photo by Simone Cecchetti
Guitars
- Three Maton Custom Shop TE Personals, each with an AP5 PRO pickup system
Amps
- Udo Roesner Da Capo 75
Effects
- AER Pocket Tools preamp
Strings & Picks
- Martin TE Signature Phosphor Bronze (.012–.054)
- Martin SP strings
- Ernie Ball Paradigm strings
- D’Andrea Pro Plec 1.5 mm
- Dunlop medium thumbpicks
“And then to really put the nail in the coffin, at the end, ‘Close to you’ [sings melody]. I finished on a major 9 chord which had that note in it, but it wasn’t the key the song was in, which is a typical Stevie Wonder trick. All the tricks I know, the wonderful ideas that I’ve stolen, are from Michael Jackson, Stevie Wonder, Lionel Richie, James Taylor, Carole King, Neil Diamond. All of the people who wrote really incredibly great pop songs and R&B music—I stole every idea I could, and I tried to make my little two-and-a -half minutes as interesting and entertaining as possible. Because entertainment equals: Surprise me.”
I share with Emmanuel that the performances on Live at the Sydney Opera House, which include his popular “Beatles Medley,” reminded me of another possible arrangement trick. In Harpo Marx’s autobiography, Harpo Speaks, I preface, Marx writes of a lesson he learned as a performer—to “answer the audience’s questions.” (Emmanuel says he’s a big fan of the book and read it in the early ’70s.) That happened for me while listening to the medley, when, after sampling melodies from “She’s a Woman” and “Please Please Me,” Emmanuel suddenly lands on “While My Guitar Gently Weeps.”
I say, “I’m waiting for something that hits more recognizably to me, and when ‘While My Guitar’ comes in, that’s like answering my question.”
“It’s also Paul and John, Paul and John, George,” Emmanuel replies. “You think, ‘That’s great, that’s great pop music,’ then, ‘Wow! Look at the depth of this.’”Often Emmanuel’s flights on his acoustic guitar are seemingly superhuman—as well as supremely entertaining.
Photo by Ekaterina Gorbacheva
A trick I like to employ as a writer, I say to Emmanuel, is that when I’m describing something, I’ll provide the reader with just enough context so that they can complete the thought on their own.
“You can do that musically as well,” says Emmanuel. He explains how, in his arrangement of “What a Wonderful World,” he’ll play only the vocal melody. “When people are asking me at a workshop, ‘How come you don’t put chords behind that part?’ I say, ‘I’m drawing the melody and you’re putting in all the background in your head. I don’t need to tell you what the chords are. You already know what the chords are.’”
“Wayne Moss came up to me and said, ‘You know, you did my part and Chet’s at the same time. That’s not fair!’”
Another track featured on Live at the Sydney Opera House is a cover of Paul Simon’s “American Tune” (which Emmanuel then jumps into an adaptation of the Australian bush ballad, “Waltzing Matilda”). It’s been a while since I really spent time with There GoesRhymin’ Simon (on which “American Tune” was first released), and yet it sounded so familiar to me. A little digging revealed that its melody is based on the 17th-century Christian hymn, “O Sacred Head, Now Wounded,” which was arranged and repurposed by Bach in a few of the composer’s works. The cross-chronological and genre-lackadaisical intersections that come up in popular music sometimes is fascinating.
“I think the principle right there,” Emmanuel muses, “is people like Bach and Beethoven and Mozart found the right language to touch the heart of a human being through their ears and through their senses ... that really did something to them deep in their soul. They found a way with the right chords and the right notes, somehow. It could be as primitive as that.
Tommy Emmanuel has been on the road as a performing guitarist for 64 years. Eat your heart out, Bob Dylan.
Photo by Jan Anderson
“It’s like when you’re a young composer and someone tells you, ‘Have a listen to Elton John’s “Candle in the Wind,”’ he continues. “‘Listen to how those notes work with those chords.’ And every time you hear it, you go, ‘Why does it touch me like that? Why do I feel this way when I hear those chords—those notes against those chords?’ I say, it’s just human nature. Then you wanna go, ‘How can I do that!’” he concludes with a grin.
“You draw from such a variety of genres in your arrangements,” I posit. “Do you try to lean into the side of converting those songs to solo acoustic guitar, or the side of bridging the genre’s culture to that of your audience?”
“I stole every idea I could, and I tried to make my little two-and-a-half minutes as interesting and entertaining as possible. Because entertainment equals: Surprise me.”
“If I was a method actor,” Emmanuel explains, “what I’m doing is—I’m writing music for the film that’s in my head. So, I don’t think, ‘I’m just the guitar,’ ever. I always think it has to have that kind of orchestral, not grandeur, but … palette to it. Because of the influence of Stevie Wonder, Billy Joel, and Elton John, especially—the piano guys—I try to use piano ideas, like putting the third in the low bass a lot, because guitar players don’t necessarily do that. And I try to always do something that makes what I do different.
“I want to be different and recognizable,” he continues. “I remember when people talked about how some players—you just hear one note and you go, ‘Oh, that’s Chet Atkins.’ And it hit me like a train, the reason why a guy like Hank Marvin, the lead guitar player from the Shadows.... I can tell you: He had a tone that I hear in other players now. Everyone copied him—they just don’t know it—including Mark Knopfler, Eric Clapton, Jimmy Page, all those people. I got him up to play with me a few times when he moved to Australia, and even playing acoustic, he still had that sound. I don’t know how he did it, but it was him. He invented himself.”
YouTube It
Emmanuel performs his arrangement of “What a Wonderful World,” illustrating how omitting a harmonic backdrop can have a more powerful effect, especially when playing such a well-known melody.
An overdrive and mangled fuzz that’s a wolf in a maniacal, rabid wolf’s clothing.
Invites new compositional approaches to riffs and solos. Gray Channel distortion is versatile and satisfying. Unpredictable.
Unpredictable. Footswitches for distortion and fuzz are quite close.
$199
Fuzz can be savored in so many ways. It can be smooth. It can be an agent of chaos. But it can also be a trap. In service of mayhem, it can be a mere noise crutch. Smooth, classy, “tasty” fuzz, meanwhile, can lead to dull solos crafted as Olympian demonstrations of sustain. To touch the soulful, rowdy essence of fuzz, it’s good to find one that never lets you get quite comfortable. The EarthQuaker Devices Gary, a two-headed distortion/overdrive and rabid, envelope-controlled square-wave fuzz designed with IDLES’ Lee Kiernan, is a gain device in this vein.
Gary is not exclusively a destruction machine. Its distortion/overdrive section is a very streamlined take on EarthQuaker’s Gray Channel, a versatile DOD 250-derived double distortion. Like any good circuit of the 250 ilk, Gary’s hard clipping OD/distortion section bites viciously in the high- and high-mid frequencies, supported by a tight, punchy low-mid output. You can play anything from balanced M.O.R. studio crunch to unhinged feedback leads with this side of Gary. But it’s the envelope-triggered pulse-width fuzz—which most of us will hear as a gated fuzz, in many instances—that gives the Gary its werewolf duality. Though practice yields performance patterns that change depending on the instrument and effects you use around the Gary, its fuzz ultimately sputters and collapses into nothingness—especially when you throw a few pitch bends its way. The cut to silence can be jarring, but also compels a player to explore more rhythmic leads and choppy riffs that would sound like sludge with a Big Muff. The Gary’s unpredictable side means it won’t be for everybody, but its ability to span delicioso distortion and riotous splatter fuzz in a single unit is impressive.
EarthQuaker Devices Gary Automatic Pulse Width Modulation Fuzz/Overdrive Pedal
Automatic Pulse Width Modulation Fuzz PedalFor anyone serious about mixing their own recordings, it’s a tool worth considering.
In the world of music production, the tools we choose profoundly influence the final sound of our recordings. I want to make the case for adding one tool that is rarely, if ever, in the “must have” or “sexy gear” spotlight but can deliver huge results to your mixes: the console summing mixer. Tighten up your belts—the Dojo is now open.
While digital audio workstations (DAWs) have revolutionized music production, offering unparalleled editing and flexibility, many producers, including me, still mix back into an analog console for the sonic character and three-dimensionality that it imparts. But buying a professional console isn’t cheap! This is where console summing boxes come into play, offering a unique way to enhance your mixes and elevate them to a professional level.
How Does It Work?
Very simply put, recording consoles have two basic sections: an input section (all the channels of mic pres, and EQ) and a center section (that sums all of the channels together and routes those signals to various configurable outputs such as inserts and aux buses). A console summing mixer is essentially the center section of a console and is designed to sum the individual audio channels, aux buses, stems, and submixes from your DAW in an analog domain.
In a DAW, digital summing—the process of combining multiple tracks and buses into a stereo mix—is handled through complex binary algorithms that, while precise, can sometimes lead to a mix that feels lifeless and one-dimensional, lacking the warmth, depth, and cohesion that analog consoles impart.
One of the most significant advantages of using a summing box is the introduction of harmonic distortion, a natural byproduct of analog circuitry. This isn’t like amp or pedal distortion, but rather a subtle harmonic saturation that adds richness and character to the sound. Low-end frequencies gain girth and definition, while high frequencies have a smooth, silky quality. You can achieve natural compression through subtle variations in phase and amplitude, but that depends on how hard you push the summing mixer box.
But the best benefit, in my opinion, is its ability to produce an undeniably open stereo image. Digital summing, while accurate, often lacks dimension or a sense of space. Analog summing introduces subtle variations in phase and amplitude, creating a sense of width and depth that makes each instrument feel like it occupies its own space in a more 3-D stereo field, which results in a more engaging and polished mix. I’ve also found summing boxes encourage a more deliberate and thoughtful approach to mixing, as it requires submixing certain elements.
API’s ASM164 ($3,195 street) is wildly flexible, offering VU meters, multiple inserts, two separate stereo mix options, and more.
For those who work “in-the-box” and aren’t in the market for a summing box, let alone a console, incorporating a summing box can also serve as a valuable learning tool. By running stems through a summing box and comparing the results to an entirely digital mix, you can train your ear to recognize the subtle qualities that make a mix feel warm, cohesive, spatial, and dynamic. This heightened awareness can then inform your in-the-box mixing decisions, even when you’re not using a summing box.
“Whether you want to add depth and dimension to your tracks, enhance your stereo image, or bring a touch of analog magic to your mixes, a summing box can be a gamechanger."
It’s important to choose the right summing box for your needs and budget, as different models offer varying sonic characteristics. Good summing mixers typically start around $2,000, such as Rupert Neve Design’s 5057 Orbit Summing Mixer. While more expensive, API’s ASM164 ($3,195 street) is wildly flexible, offering VU meters, multiple inserts, two separate stereo mix options, and more. The key here is to understand your needs.
Pairing a summing box with high-quality outboard processors, such as compressors or EQs, will allow you to shape your mix in ways that are impossible within a purely digital setup.
Whether you want to add depth and dimension to your tracks, enhance your stereo image, or bring a touch of analog magic to your mixes, a summing box can be a gamechanger. For anyone serious about mixing, it’s a tool worth considering—one that can make the difference between a mix that’s good and one that’s truly exceptional. Until next month, namaste
Guest columnist Dave Pomeroy, who is also president of Nashville’s musicians union, with some of his friends.
Dave Pomeroy, who’s played on over 500 albums with artists including Emmylou Harris, Elton John, Trisha Yearwood, Earl Scruggs, and Alison Krauss, shares his thoughts on bass playing—and a vision of the future.
From a very young age, I was captivated by music. Our military family was stationed in England from 1961 to 1964, so I got a two-year head start on the Beatles starting at age 6. When Cream came along, for the first time I was able to separate what the different players were doing, and my focus immediately landed on Jack Bruce. He wrote most of the songs, sang wonderfully, and drove the band with his bass. Playing along with Cream’s live recordings was a huge part of my initial self-training, and I never looked back.
The electric bass has a much shorter history than most instruments. I believe that this is a big reason why the evolution of bass playing continues in ways that were literally unimaginable when it began to replace the acoustic bass on pop and R&B recordings. Players like James Jamerson, Joe Osborn, Carol Kaye, Chuck Rainey, and David Hood made great songs even better with their bass lines, pocket, and tone. Playing in bands throughout my teenage years, I took every opportunity I could to learn from musicians who were more experienced than I was. Slowly, I began to understand the power of the bass to make everyone else sound better—or lead the way to a train wreck! That sense of responsibility was not lost on me. As I continued to play, listen, and learn, a gradual awareness of other elements came to the surface, including the three Ts: tone, timing, and taste.
I was ready to rock the world with busy lines and bass solos when I moved to Nashville in the late ’70s, and I was suddenly transported into the land of singer-songwriters. It was a huge awakening when I heard the lyrics of artists like Guy Clark, whose spare yet powerful stories and simple guitar changes opened up a whole new universe in reverse for me. It was a reset for sure, but gradually I found ways to combine my earlier energetic approach in different ways. Playing what’s right for a song is a very subjective thing.
“If the song calls for you to ramp up the energy and lead the way like Chris Squire, Bootsy Collins, Geddy Lee, Sting, Flea, Justin Chancellor, or so many others, trust yourself and go for it.”
Don Williams, whom I worked with for many years, was known as a man of few words, but he gave me some of the best musical advice I ever received. I had been with him for just a few months when he pulled me aside one night after a show, and quietly said, “Dave, you don’t have to play what’s on the records, just don’t throw me off when I’m singing.” In other words: It’s okay to be creative, but listen to what’s going on around you. I never forgot that lesson.
As I gradually got into recording work, in an environment where creativity is combined with efficiency and experimentation is sometimes, but not always, welcome, I focused on tone as a form of expression, trying to make every note count. As drum sounds got much bigger during the ’80s, string bass was pretty much off the table as an option in most situations. Inspired by German bassist Eberhard Weber, I bought an electric upright 5-string built by Harry Fleishman a few years earlier. That theoretically self-indulgent purchase gave me an opportunity to carve out a tone that would work with both big drums and acoustic instruments. It gave me an identifiable sound and led to me playing that bass on records with artists like Keith Whitley, Trisha Yearwood, Alison Krauss, Emmylou Harris, and the Chieftains.
In a world of constantly evolving and merging musical styles, the options can be almost overwhelming, so it’s important to trust yourself. Ultimately, you are making a series of choices every time you pick up the instrument. Whether it’s pick versus fingers versus thumb, or clean versus overdrive versus distortion, and so on … you are the boss of your role in the song you are playing. When the sonic surroundings you find yourself in change, so can you. It’s all about listening to what is going on around you and finding that sweet spot where you can bring the whole thing together while not attracting too much attention.
On the other hand, if the song calls for you to ramp up the energy and lead the way like Chris Squire, Bootsy Collins, Geddy Lee, Sting, Flea, Justin Chancellor, or so many others, trust yourself and go for it. Newer role models like Tal Wilkenfeld, Thundercat, and MonoNeon have raised the bar yet again. The beauty of it all is that the bass and its role keep evolving.
Right now, I guarantee there are young bassists of all descriptions we have not yet heard who are reinventing the bass and its role in new ways. That’s what bass players do—we are the glue that ties music together. Find your power and use it!