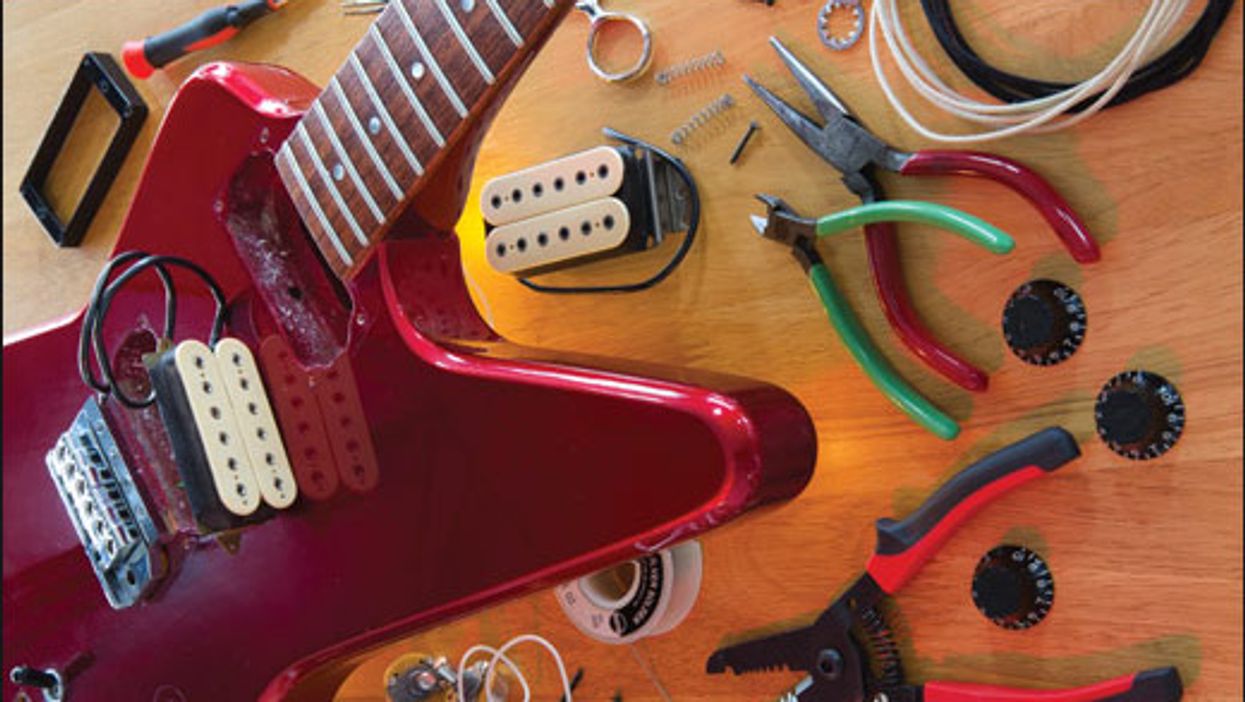
These DIY mods just may change the way you play.
All wiring mods are not created equal. Some add a bit of convenience or a subtle new shading, while others are radical departures that open new creative avenues for the adventurous guitarist.
Consider so-called “vintage" or “'50s-style" wiring, in which the tone pot and cap are connected to the middle lug of the volume pot rather than the usual third lug. Given the sheer number of posts the topic has amassed on guitar-geek sites, you'd think it was an earth-shaking option. Yeah, it's a cool mod that I happen to dig, but really, the sonic benefit is modest: just a bit less loss of brightness when you dial down the volume.
These projects aren't like that. Each one drastically alters your guitar's available tones and the ways you access them. They can literally change the way you play.
This article assumes you're familiar with basic soldering techniques. If not, check out a few YouTube soldering tutorials. I don't have to remind you to follow all suggested safety guidelines, do I? (Okay—you're reminded.)
Sometimes the best way to add power to your low tones is to remove a bit of bass.
Mod #1: PTB Tone Control
What it is: A variation on the two-band tone circuit that Leo Fender created late in his career for G&L guitars. It employs two tone pots: One cuts highs like a conventional tone control, while the other filters out lows. PTB stands for “passive treble/bass."
The benefits: This mod is a godsend for players seeking greater control over their distortion sounds, especially with humbuckers. When playing clean, the results are relatively subtle. But when you pour on the gain, even tiny adjustments to your signal's bass content can add clarity, punch, and welcome variation to your crunch tones.
Just ask any savvy stompbox builder or low-tuned 7-string player: Sometimes the best way to add power to your low tones is to remove a bit of bass. That's because the lowest frequencies in your signal disproportionately overdrive your amp and effects. Siphoning off just a bit of bass can add clarity and focus. At extreme settings, the filtering can produce sharp, squawking tones akin to those of a '60s treble booster pedal (not a bad thing). If you've ever grappled with high-gain tones that make your amp fart out, here's your flatulence remedy.
The cost: The original G&L scheme calls for alternate pot values, but the project here uses the 500K pots found in most humbucker guitars, so all you need are wire, solder, and a few capacitors. On a three-knob guitar, you wind up with one master volume control and two master tone controls, but you sacrifice individual volume controls for each pickup.On a four-knob guitar, you still have independent volume controls, but you lose the independent tone controls.
How it sounds: Ex. 1a demonstrates the treble-cut control—nothing surprising here. Ex. 1b features the bass-cut. With a clean tone like this, it's a bit subtle, though you can hear the difference if you focus on the low notes. But Ex. 1c adds a vintage-style germanium Fuzz Face with the gain and volume maxed. With the guitar's tone control wide-open, the signal easily overpowers my vintage Fender brownface—your typical Fuzz Face fart. As I gradually trim bass via the guitar, the tone acquires greater punch and clarity. I remain on the neck pickup throughout—the only thing changing is the guitar's bass pot setting. The extreme-cut settings near the end of the clip may sound harsh in isolation, but they can be perfect in a band context. At the end of the clip I max the bass pot again to underscore how much the tone has changed. It ain't subtle.
How it works — Diagram 1a depicts Leo's original schematic:
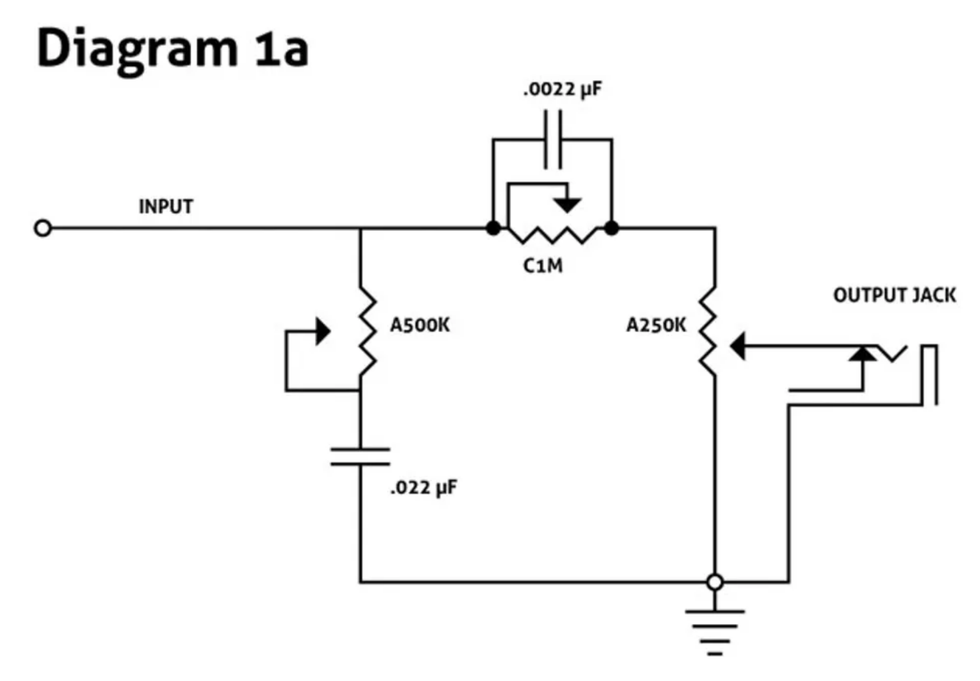
The signal from your pickups or pickup selector gets routed to two tone pots. The 500k pot and .022 µF capacitor provide a conventional treble-cut control. Meanwhile, the 1M pot and smaller .0022 µF cap filter out lows. (Pay careful attention to the zeros and decimal points in those cap values!) The treble cut creates its effect in the usual way: by diverting signal to ground. But the bass cut doesn't go to ground at all—the low-filtering cap is inline with your signal. Its output goes to the volume pot (250k in the original). Clever!
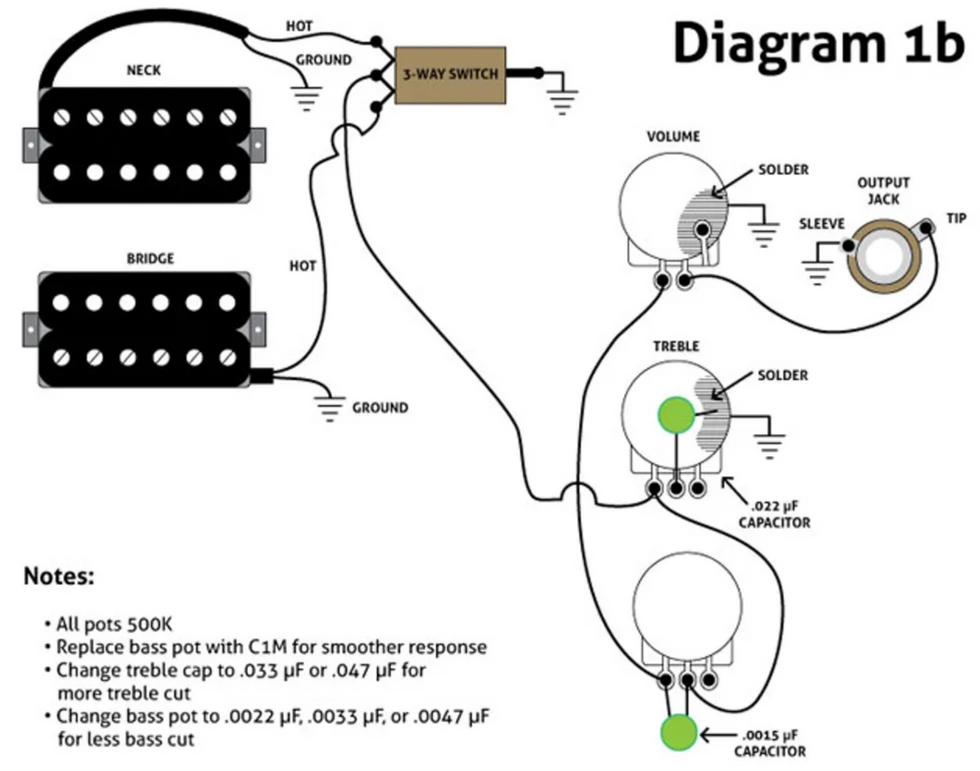
Diagram 1b shows my adaptation for three-knob humbucker guitars, using the extant 500k pots:
For visual clarity, I've indicated ground connections with a down-facing triangle. As you probably know, all ground wires must be electronically connected to each other. (One convenient method is to solder all pickup ground wires, the output jack ground, the pickup selector ground, and the bridge's ground wire to the back of the volume pot, and then run a jumper wire to ground the treble control. In conventional wiring, all pots must be grounded, but here, it's not necessary to ground the bass pot.)
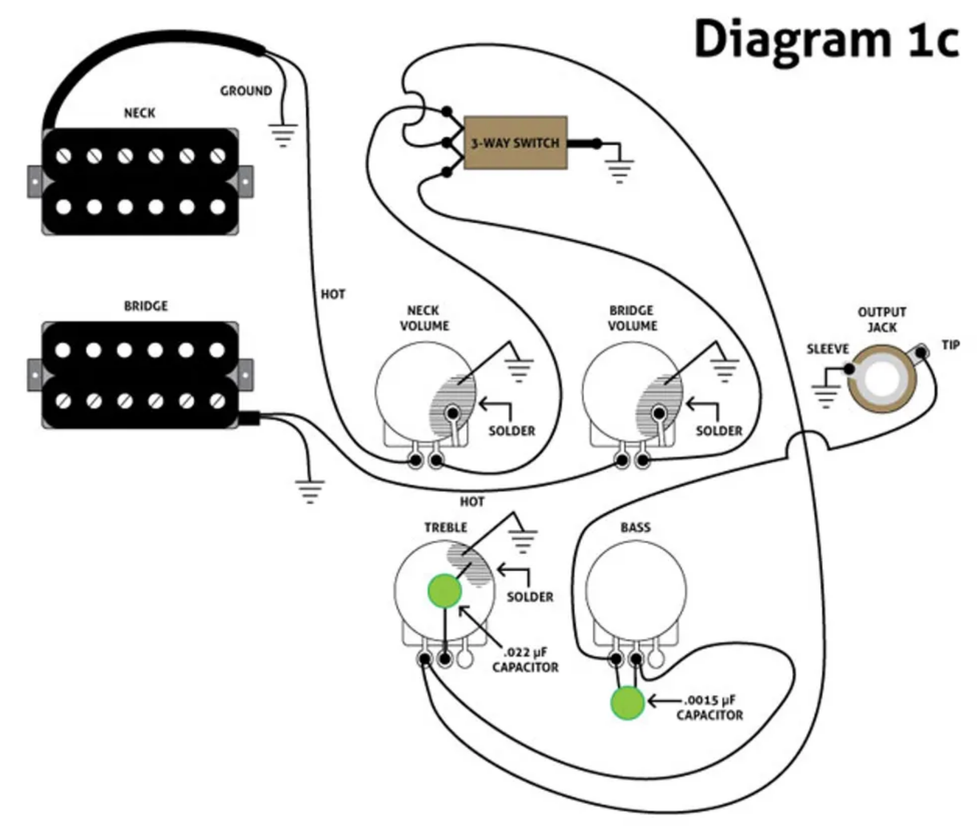
Diagram 1c is a version for four-knob guitars, such as traditional Les Pauls. The only difference: On three-knob guitars, the signal usually goes from the pickups to the pickup selector to the pots. But on four-knob guitars, the volume pots are upstream from the pickup selector to permit independent volume control per pickup.
DIY walkthrough: You don't necessarily need to perform the steps in this order—it's just one method.
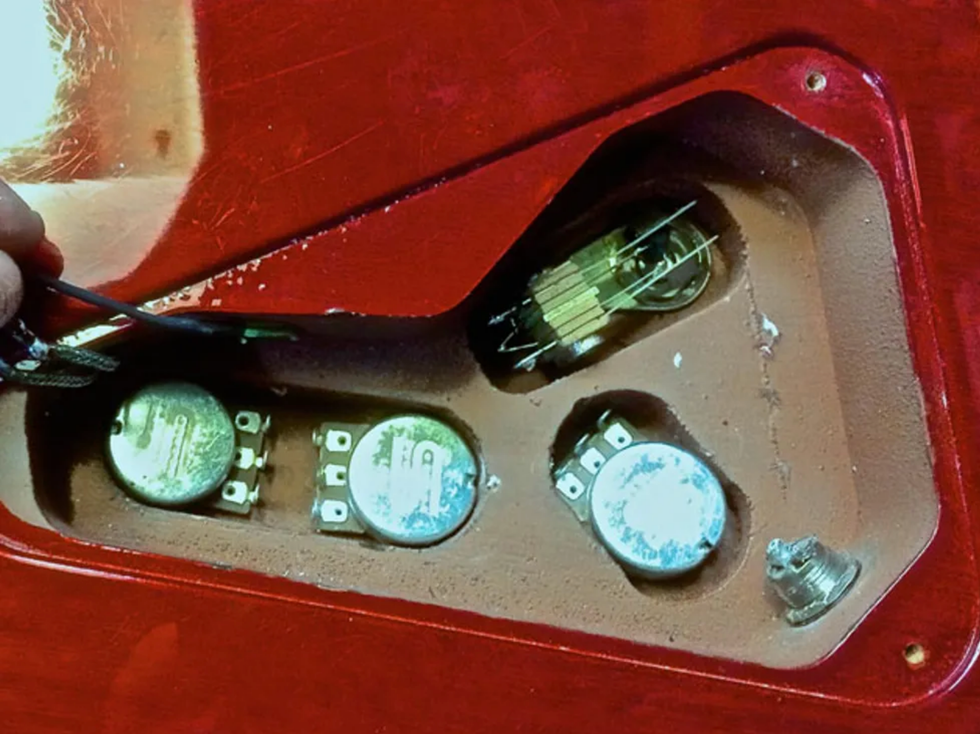
Photo 1a
Since I have no idea how your guitar is currently wired, I've started with a fresh set of pots. My demo guitar is a three-knob Hamer 20th Anniversary, which has its pickup selector in the control cavity alongside the pots [Photo 1a.]
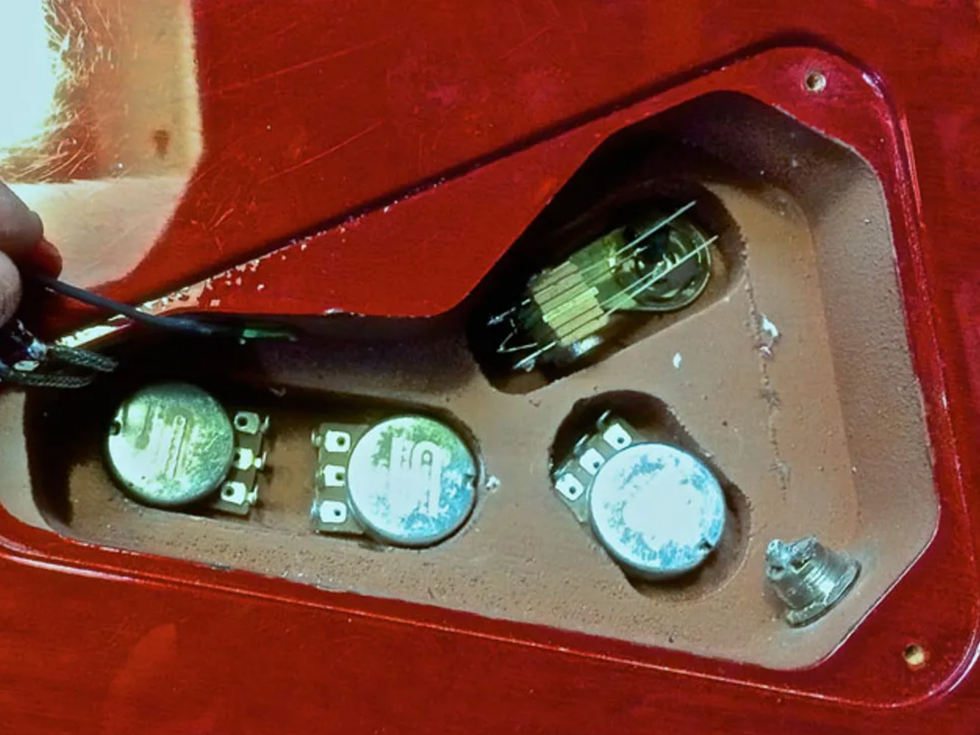
Photo 1b
In Photo 1b I've completed the ground connections as described above, though I've connected the output jack's ground to the back of the treble pot. The white wire is the pickup selector output, connected here to lug 3 of the treble pot. (Remember: When viewing pots from the back, lugs down, lug 3 is on the left, and lug 1 is on the right.) This wire usually connects to lug 3 of the volume pot, but this circuit routes the signal through the bass pot first.
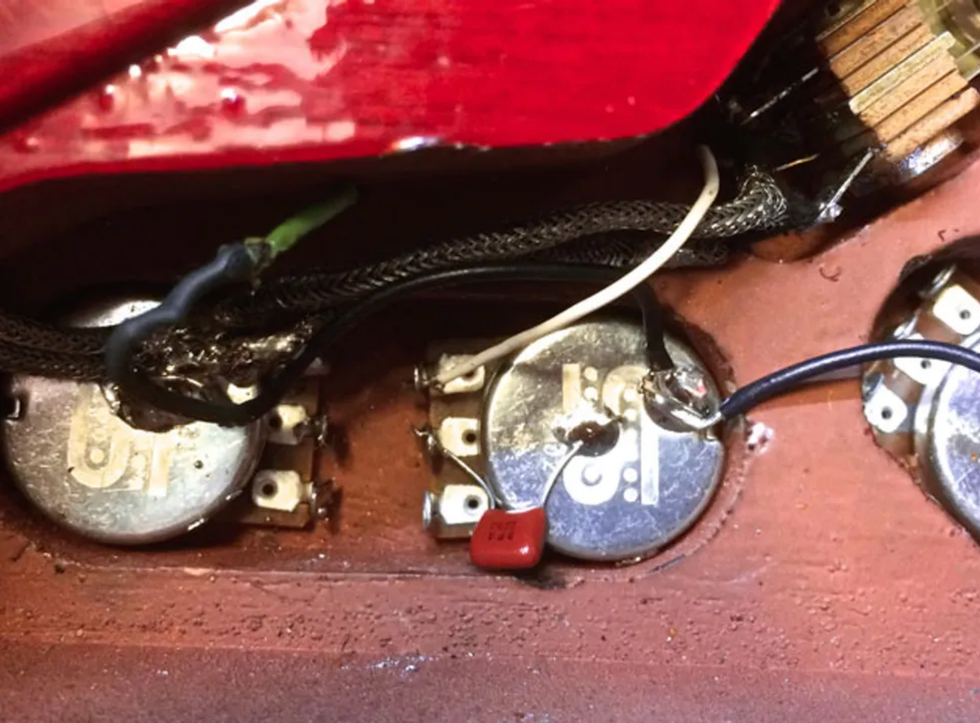
Photo 1c
In Photo 1c I've added the treble-cut capacitor between lug 2 of the treble pot and ground. I used a .022 µF (also known as a 223). For more cut, try a larger value, such as .033 µF (333) or .047 µF (473). The larger the cap, the greater the cut.
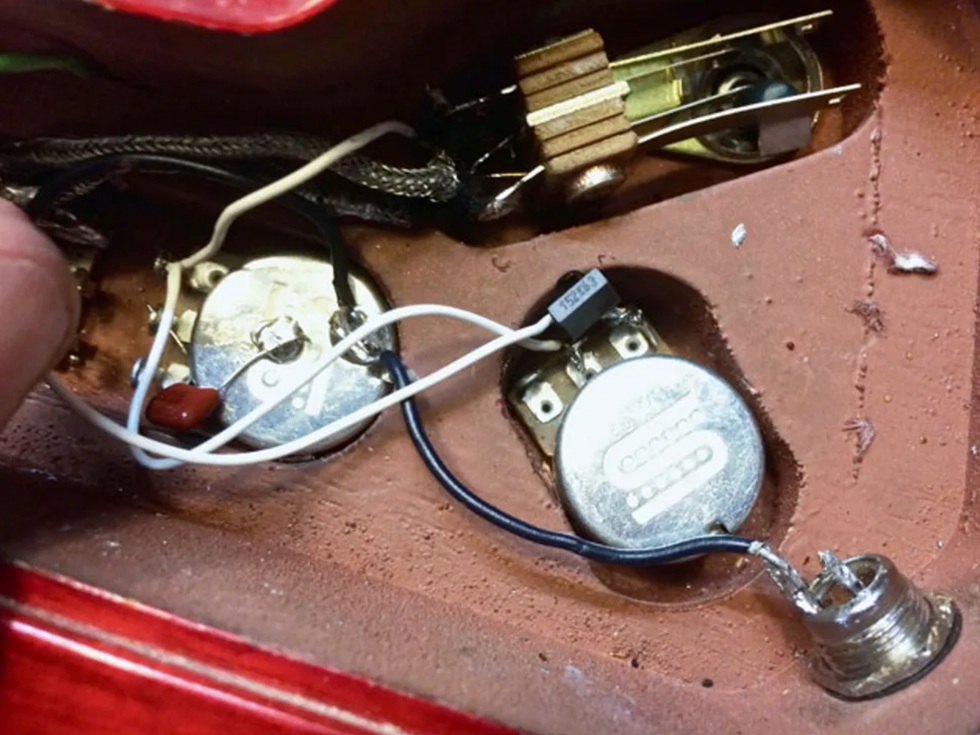
Photo 1d
Photo 1d adds the bass-cut components. Since the output from the pickup selector must feed both tone pots, I've run a wire from lug 3 of the treble pot to lug 3 of the bass pot. I've added a .0015 µF (152) cap between lugs 3 and 2. Here, pot values work in the opposite direction: the smaller the cap, the greater the bass cut. If the .0015 µF sounds too extreme, try stepping up to a .0022 µF (222). I've added a wire to the bass pot's lug 2, which connects to the volume pot's lug 3. Connect the volume pot's lug 2 to the output jack, and you're done.
A reverse-log bass pot? While you can get fine results using your guitar's extant pots, the original G&L circuit calls for a 1M reverse-log pot (the “C" in C1M signifies reverse-log). With a standard audio-taper pot, the effect comes on quickly near the top of the pot's range. With a reverse-log pot, you get a gradual onset of the bass cut that may be easier to fine-tune. The problem is, it's almost impossible to find a C1M pot in a standard 24 mm format. You can get a 16 mm version from stompbox parts suppliers, but it won't work in Les Pauls requiring long pot shafts. After experimenting with various options, I've gone back to a standard 500k pot, because when I reach for that control, I usually want the lows to evaporate quickly.
Mod #2: Nashville Strat
What it is: A Stratocaster version of “Nashville wiring," a trick Telecaster mod popularized by Music City's session cats. Some Tele players add a third pickup (plus a blend knob), expanding the range of combined-pickup tones. The same wiring performs brilliantly in a Strat—without the cost and hassle of installing a third pickup.
The benefits: Access to a stunning array of combined-pickups sounds, including the outer pickups together—a gorgeous color not available from conventional Strat wiring. Not only can you choose between four cool combined sounds, but you can also vary the blend for subtler effects than those of a traditional Strat's 2 and 4 positions.
No matter what position the pickup selector is in, you always have access to the so-called “out of phase" sounds via the blend pot.
The costs: This mod requires a Tele-style 3-position pickup selector in lieu of a Strat's usual 5-position switch. You also sacrifice the sound of the middle pickup alone. The middle knob becomes a pickup blend control, while the third knob serves as a global tone control.
How it sounds: Ex. 2 showcases an assortment of combined-pickup tones not available on a conventional Strat. (The demo guitar is a “parts" Strat with three lipstick-tube pickups. While their character differs from those of traditional Strat pickups, it's a good representation of the range of available tones.) You also have access to the traditional position 1 and 5 tones.
Playing guitars wired this way changed how I view combined-pickup sounds. Whatever position the pickup selector is in, you always have access to the so-called “out of phase" sounds via the blend pot. The blend control becomes something like a camera's aperture setting: In minimum position, sounds are direct and crisp. As you advance the knob, tones become softer, prettier, and more diffuse. I find this to be a more musical and intuitive approach to tone sculpting.
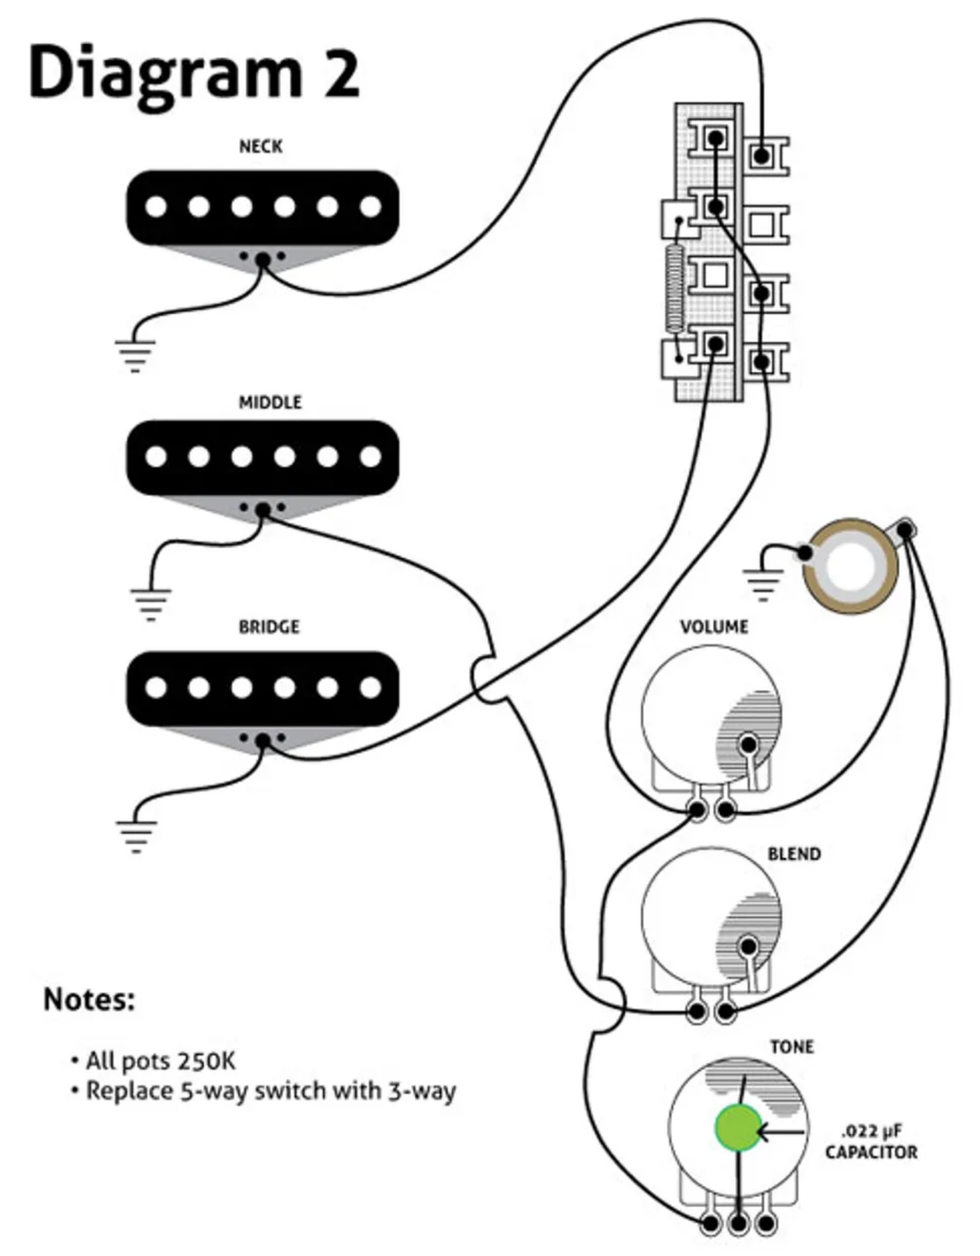
Diagram 2
How it works: The neck and bridge pickup are wired as on a traditional Tele, with the pickup selector's middle setting combining the two pickups. Meanwhile, the middle pickup is routed directly to the output jack, bypassing the tone and volume controls (Diagram 2).
That may seem counterintuitive: Wouldn't you want the tone control to affect both pickups in combined-pickup settings? But it just seems to sound better this way. Rolling back the treble on combined-pickup tones tends to rob them of their cool phase-cancelled character. This way, tones still get darker/warmer when you dial back the treble, yet retain a nice airiness. Try it and see!
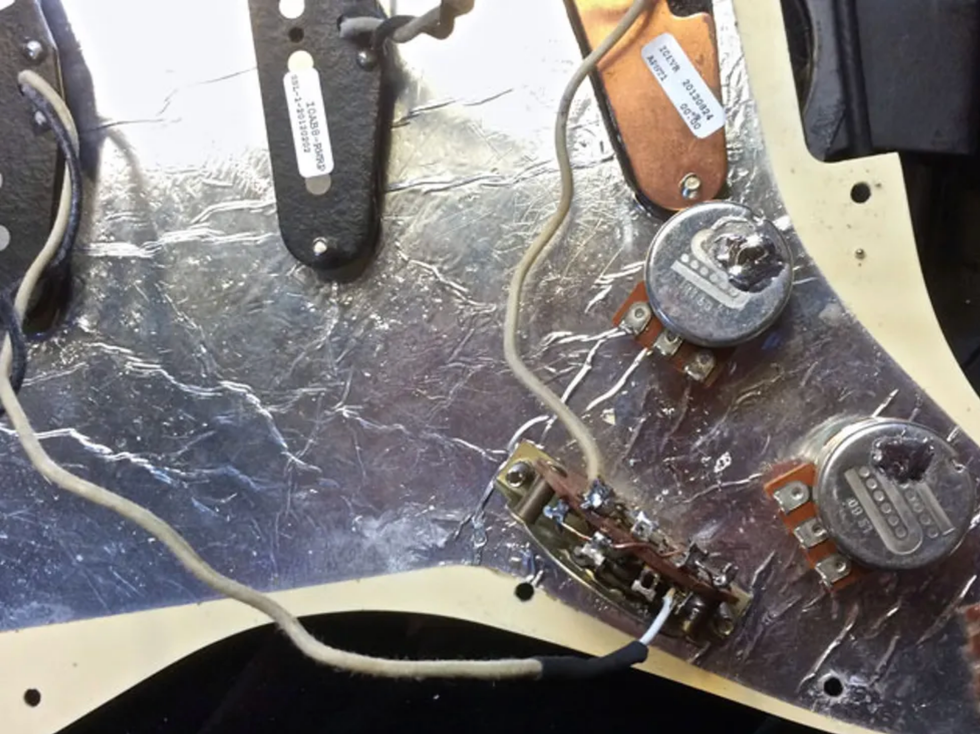
DIY walkthrough: In Photo 2a I've replaced the Strat's 5-way pickup selector with a Tele-style 3-way. I've threaded a wire through the two leftmost lugs of the selector's spring side and the two rightmost lugs on the opposite side. Additionally, I've connected the bridge and neck pickups as shown in Diagram 2.
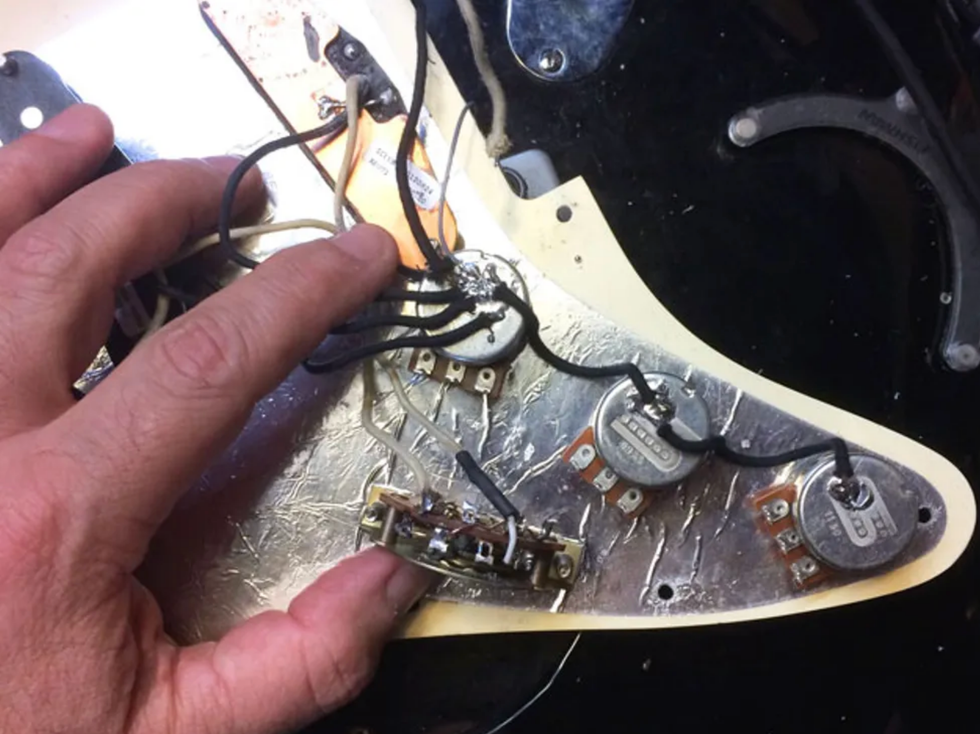
Photo 2b
In Photo 2b I've added all the ground connections. The three pickup ground wires, output ground, and bridge ground are all soldered to the rear of the volume pot, with additional wires grounding the blend and tone pots. (All pots must be grounded in this circuit. It doesn't matter where they connect physically, so long as they connect electronically.)
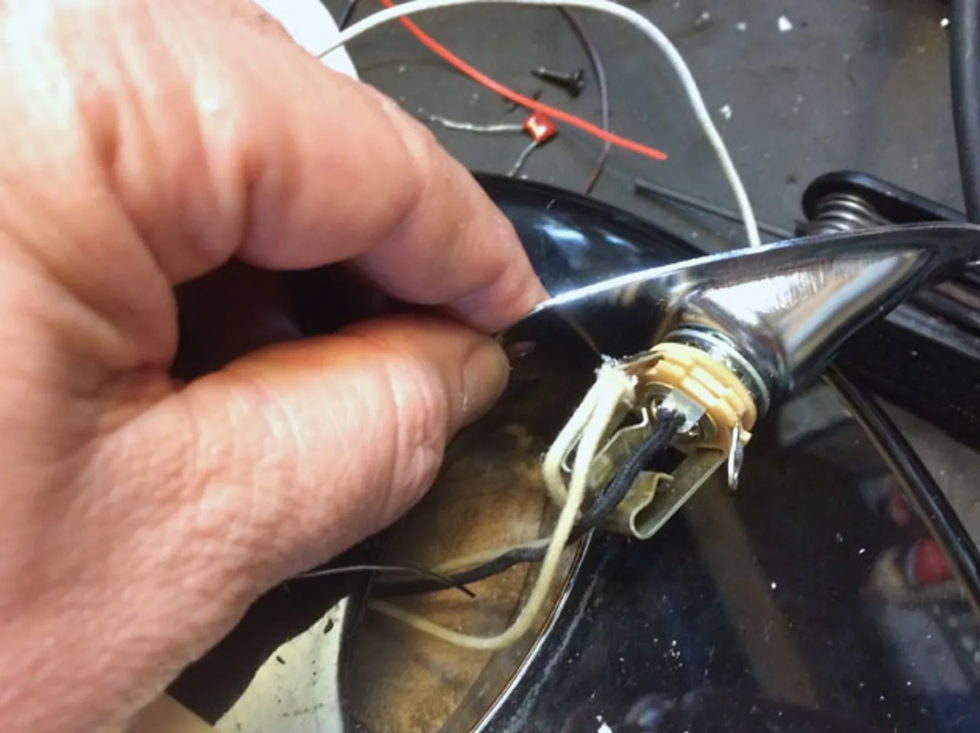
Photo 2c
You must connect both the volume and blend control outputs to the output jack. In Photo 2c I've removed the jack plate to install a second wire that will connect to lug 2 of the blend pot. (Alternately, you could add a Y-joint inside the main control cavity, reinforcing the connection with heat-shrink tubing.)
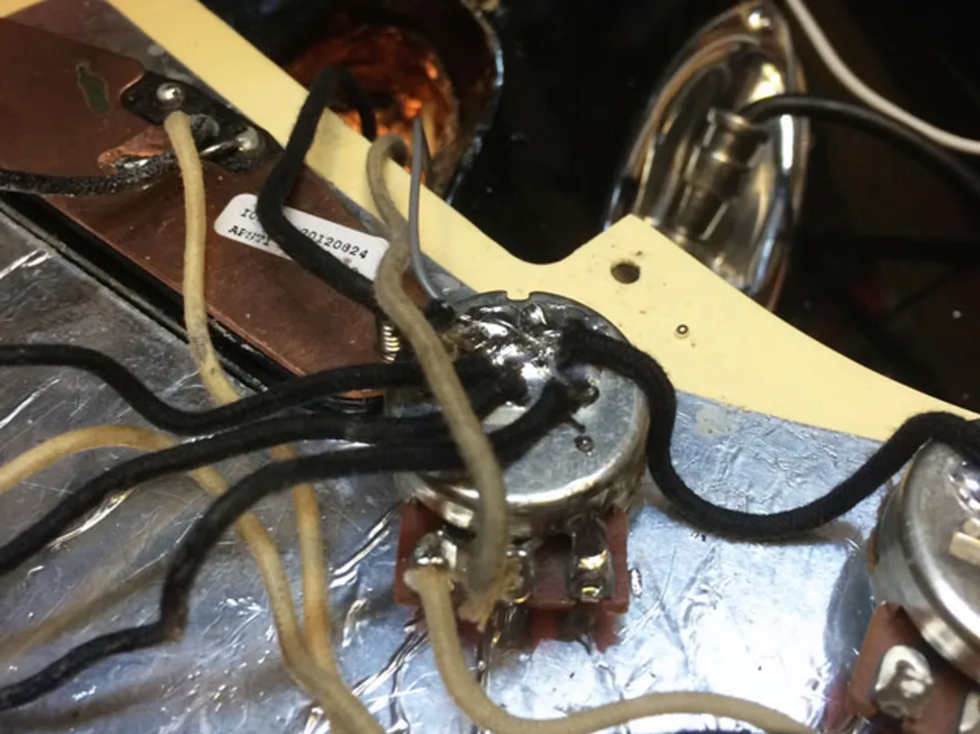
Photo 2d
Photo 2d shows the volume pot connections. One output jack wire connects to lug 2, while the pickup selector output (the rightmost lug on the non-spring side, as viewed in this orientation) connects to lug 3. Lug 1 is bent and soldered to the side of the pot for a ground connection, per usual.
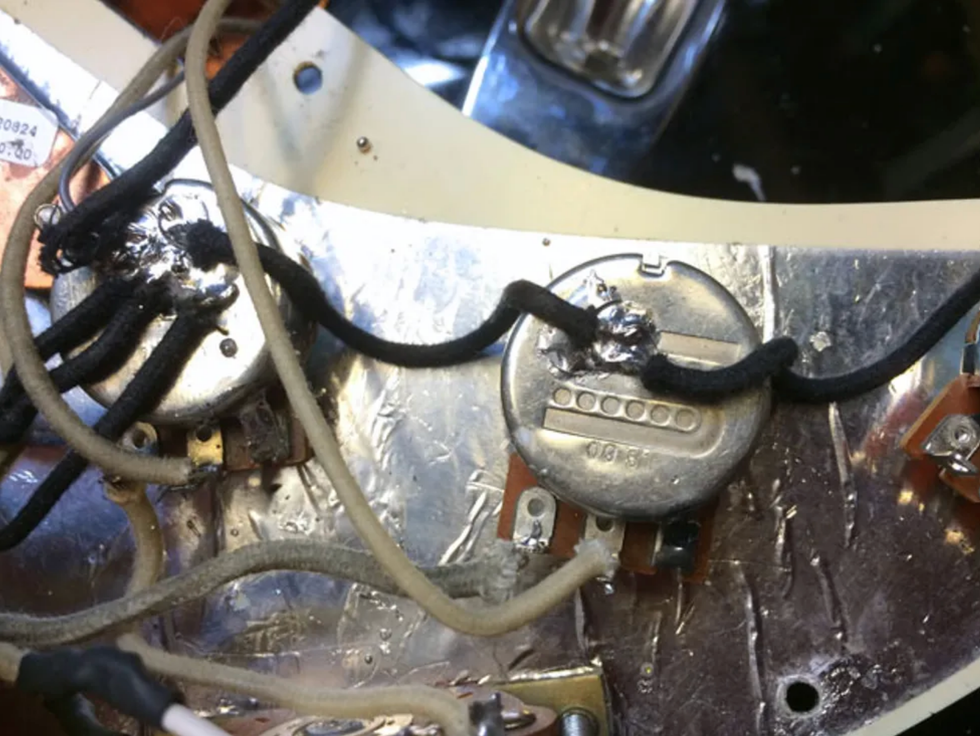
Photo 2e
The blend control wiring appears in Photo 2e. The hot wire from the middle pickup connects to lug 3, bypassing the tone and volume controls. The second output jack wire connects to lug 2.
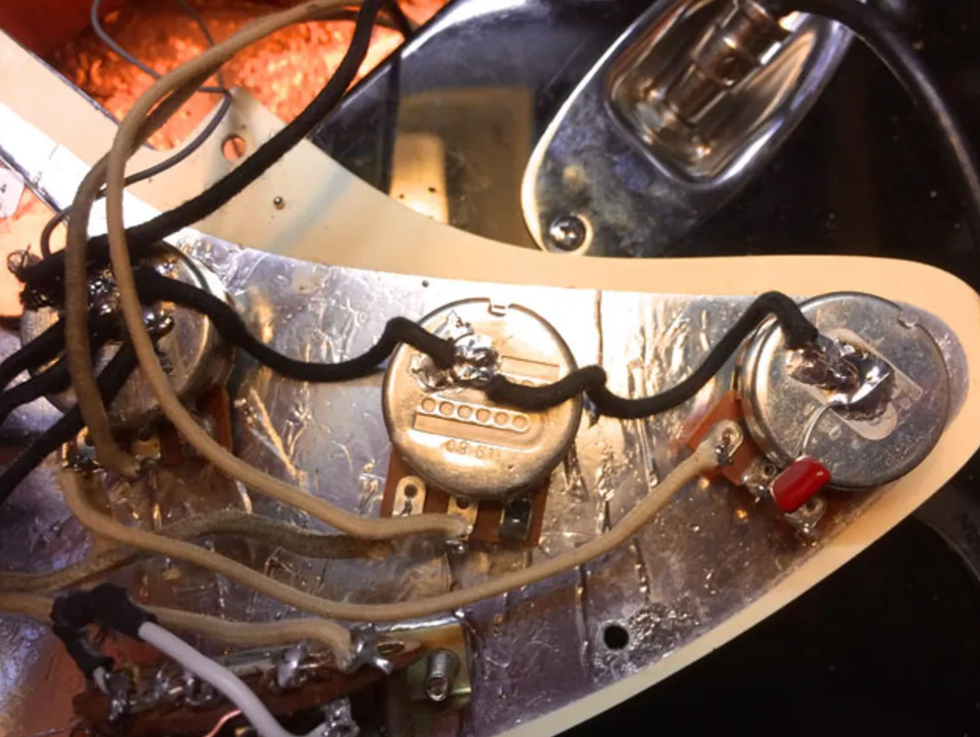
Photo 2f
Photo 2f shows the tone pot wiring. Lug 3 connects to the volume pot's lug 3. Solder one end of the tone-cut capacitor to lug 2, and the other to the back of the pot, grounding it. I've used a .022 µF (223), a standard value, though you can step up to .033 µF (333) or .047 µF (473) for a stronger effect—the larger the cap, the greater the treble cut. If you like the sound of your current tone cap, just reuse it here. And that's it!
Bonus bridge pickup tip: Like many Strat users, I have a love/hate relationship with the traditional bridge pickup. It works great when you want a clear, piercing sound, but tends to be short on mass. Some players remedy this by installing humbuckers or other higher-output pickups in the bridge position. But instead of trying to coax Gibson tones from a Strat bridge pickup, I prefer a Tele-style bridge pickup sized for Strats, such as the excellent Seymour Duncan Twang Banger. With its Tele-style metallic base plate, it provides tough, edgy tones with more mass than traditional Strat pickups—without relinquishing that fine Fender sizzle.
Capacitor Cheat Sheet
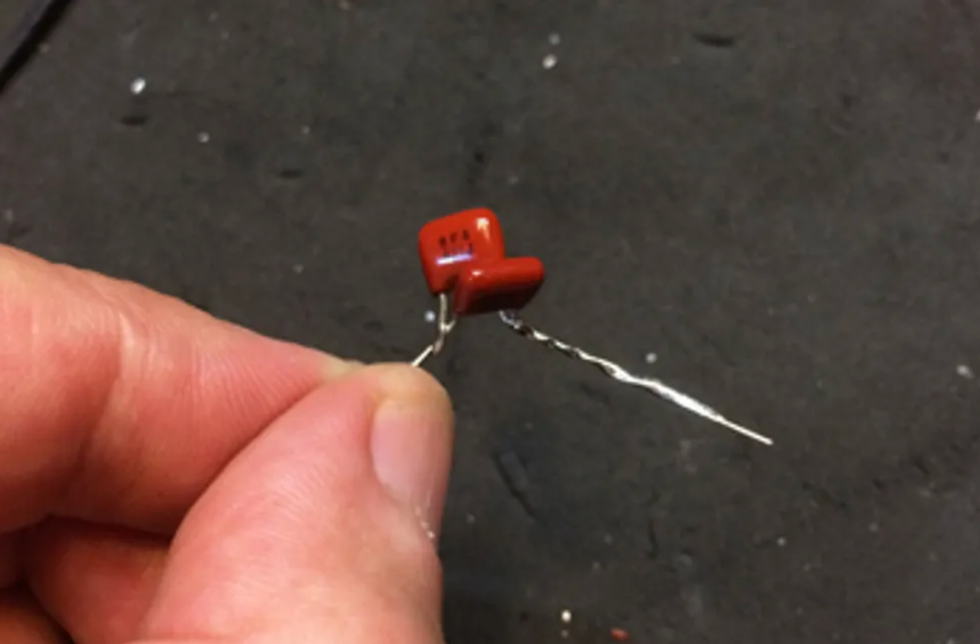
Are you confused by capacitor nomenclature? Join the club!
To gain a thorough understanding of how caps work and how they're labeled, Google “capacitor values." In the meantime, here's a handy cheat sheet showing the most common cap values for guitar applications.
The first number in each pair is the value in farads, the unit used to measure capacitance. The “µF" signifies microfarad—a millionth of a farad. People often substitute “uF" for “µF" to avoid the hassle of using a Greek letter. It's also sometimes written as “MFD."
The second number in each pair is the shorthand way of indicating these values, and that's usually the number you find on the caps themselves.
The values appear in ascending order. The ones highlighted in green are typical values for conventional treble-cut tone controls. The ones in red are good starting values for the bass-cut controls in these projects. If a particular value doesn't work for you, just step up or down in value till you hear what you like.
- .0001 µF (101)
- .00015 µF (151)
- .00022 µF (221)
- .00033 µF (331)
- .00047 µF (471)
- .00068 µF (681)
- .001 µF (102)
- .0015 µF (152)
- .0022 µF (222)
- .0033 µF (332)
- .0047 µF (472)
- .0068 µF (682)
- .01 µF (103)
- .015 µF (153)
- .022 µF (223)
- .033 µF (333)
- .047 µF (473)
- .068 µF (683)
- .1 µF (104)
Capacitor hacks. If you find yourself lacking the perfect cap value, remember that you can wire together two caps in parallel, as shown in Photo 1e.
Mod #3: Varitone Variation
What it is: The original Varitone, which appeared in such vintage Gibsons as the ES-345 and ES-355, is a controversial circuit. In lieu of standard treble-cut caps and pots, it employs a rotary switch, with each position routed through a different-sized capacitor. It also calls for an inductor, which creates a series of notch filters. (In other words, the circuit doesn't remove all signal above a certain frequency, but only a certain amount above and below that frequency.)
While the Varitone has its fans, it was never very popular. Detractors argue that it sucks tone, and its settings are too thin and “quacky" for many players. But even if you don't dig the original Varitone sounds, you can use its general concept to great effect. (For example, if you omit the inductor, you lose a bit of the peaky resonance that alienates some players.)
You might want to deploy your pots for something other than the traditional uses—controlling onboard effects, for example.
The benefits: Multiple capacitor schemes can provide instant access to a wide range of favorite settings, plus others not available from a conventional tone control. Instead of fiddling with a pot, you can leap to the desired tone with the flick of a switch.
The cost: When you replace a tone pot with a tone switch, you lose access to settings that “fall between the cracks" of the switch positions. You also need various switches and caps, depending on how you configure the mod.
How it sounds: I wired up a multi-cap, two-switch tone circuit in a “parts" Jazzmaster with P-90s and flatwound strings. Ex. 3a demonstrates my three treble-switch settings. You hear my three bass-cut settings in Ex. 3b. As with the PTB mod, the variations can be subtle with clean tones. But when I add a custom germanium booster in Ex. 3c, everything gets much more dramatic. The entire clip is performed on the bridge pickup—the only things changing are the tone switch settings.
Multi-capacitor switches let you choose your own set of cutoff frequencies, but once a capacitor is engaged, it's engaged all the way. So instead of cutting varying amounts of signal at a fixed frequency, you cut fixed amounts of signal at varying frequencies.
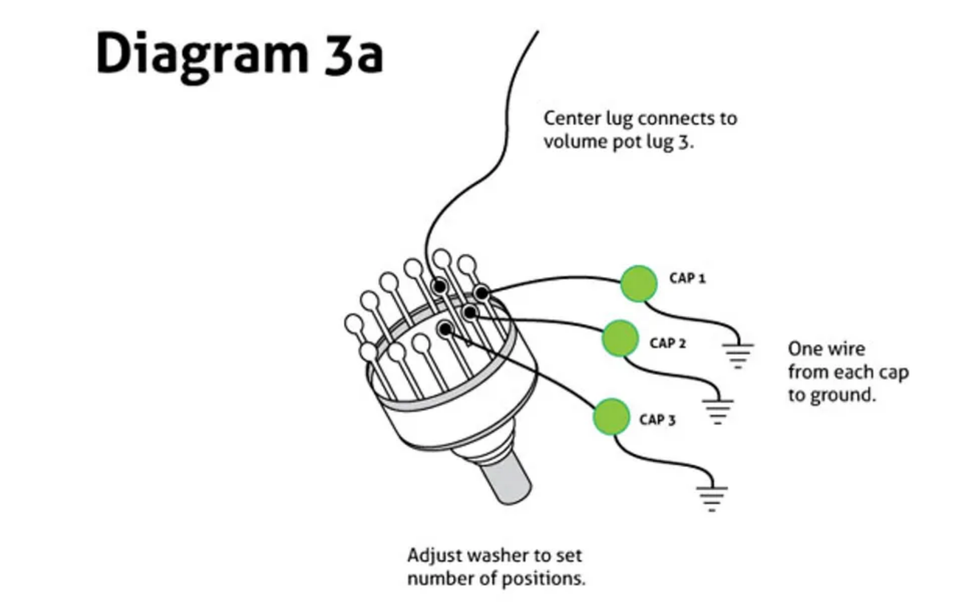
Diagram 3a
Diagram 3a shows the basic idea. The center lug of the rotary switch connects to lug 3 of your volume pot, like a conventional tone control. You weave capacitors of escalating value through the lugs lining the pot's perimeter, so that when you move the switch, a new cap is engaged. The other terminals of the caps go to ground—usually by bundling them together, wrapping them in heat-shrink tubing, and soldering the assembly to a ground point. (Most rotary switches let you specify the number of active positions via a notched washer on the pot's shaft.)
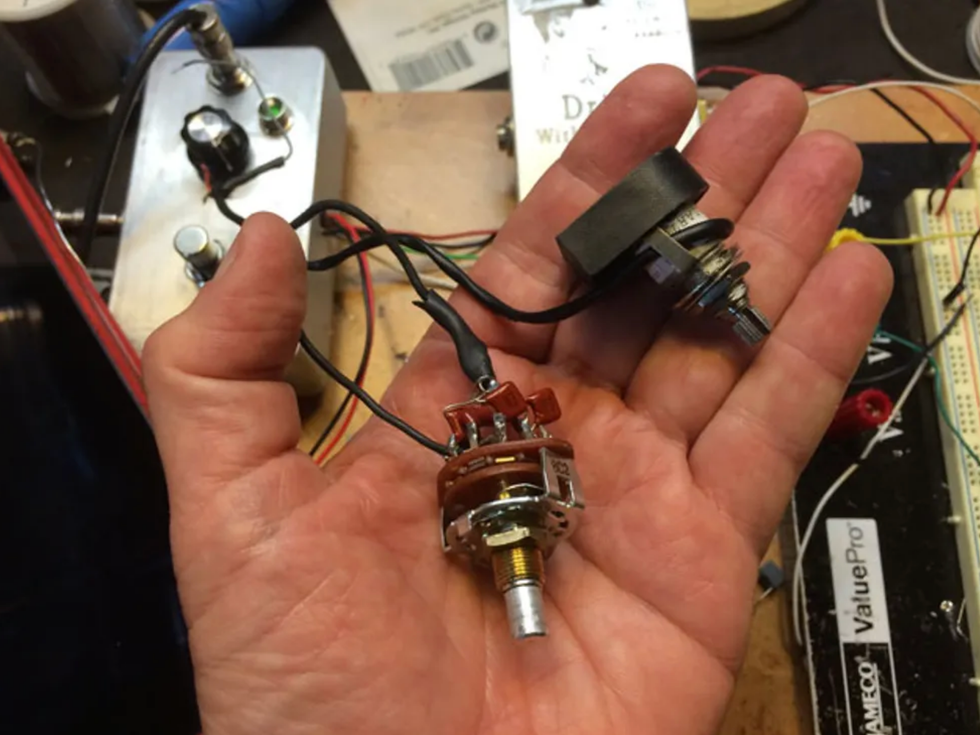
Photo 3a
This is a cool mod, but there's one good reason not to bother: Someone beat us to it. This is precisely how Stellartone's ToneStyler replacement tone pots work. They're fine products, and if you can afford the cost (models start at $75 street), I recommend them. Photo 3a shows my homemade part alongside a ToneStyler—which would you rather put in your guitar? (Plus, I hate the stiff, clunky feel of the commonly available rotary switches.)
Instead, let's look at an approach that uses mini-switches rather than a big rotary switch. These limit you to three settings per switch, as opposed to as many as a dozen from a rotary switch. But there are at least two good reasons to go this route: It's easy to install mini-switches on almost any guitar, while adding pots can be problematic. And there are times when you might want to deploy your pots for something other than the traditional uses—controlling onboard effects, for example. (Which, by the way, is the subject of an upcoming Premier Guitar article.)
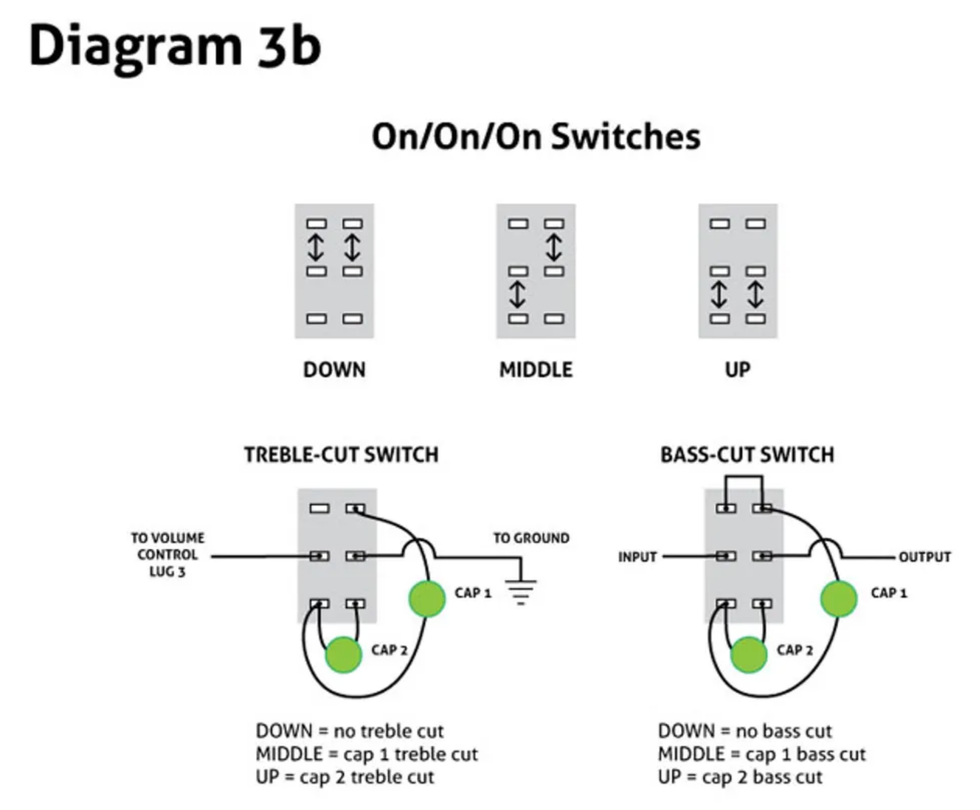
Diagram 3b
There are many types of mini-switches, but this project calls for the on/on/on DPDT variety, which have two rows of solder lugs and three switch positions. Diagram 3b shows how they work—and how to configure them as treble-cut and bass-cut controls.
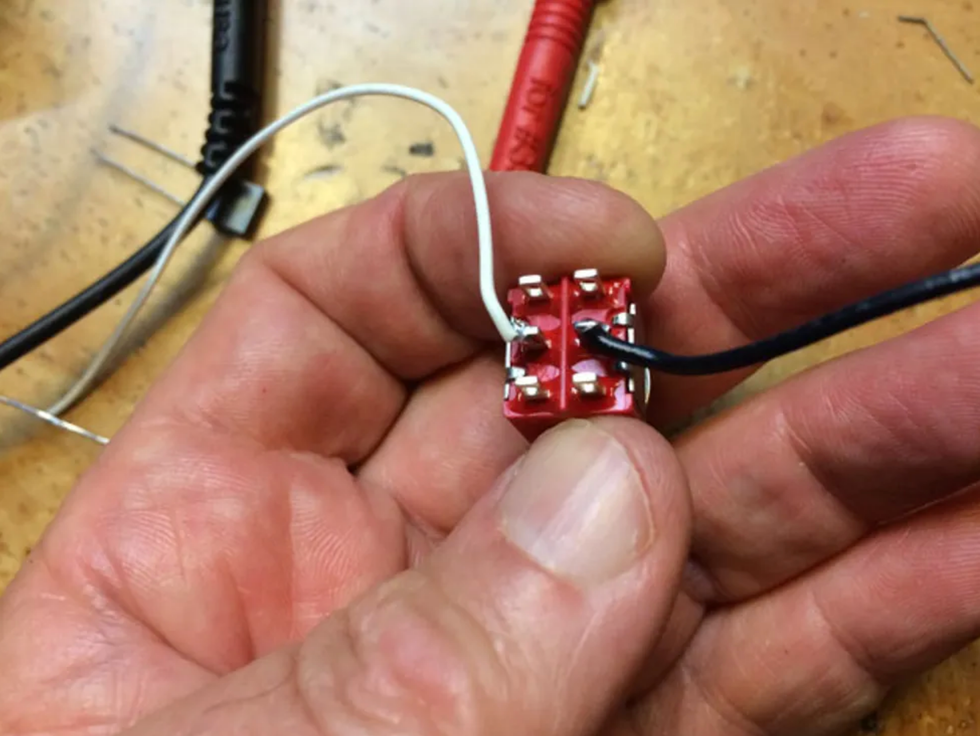
A 3-position treble-cut switch. For a treble-cut switch, connect the input to the left-center lug, and a ground wire to the right-center one, as shown in Photo 3b.
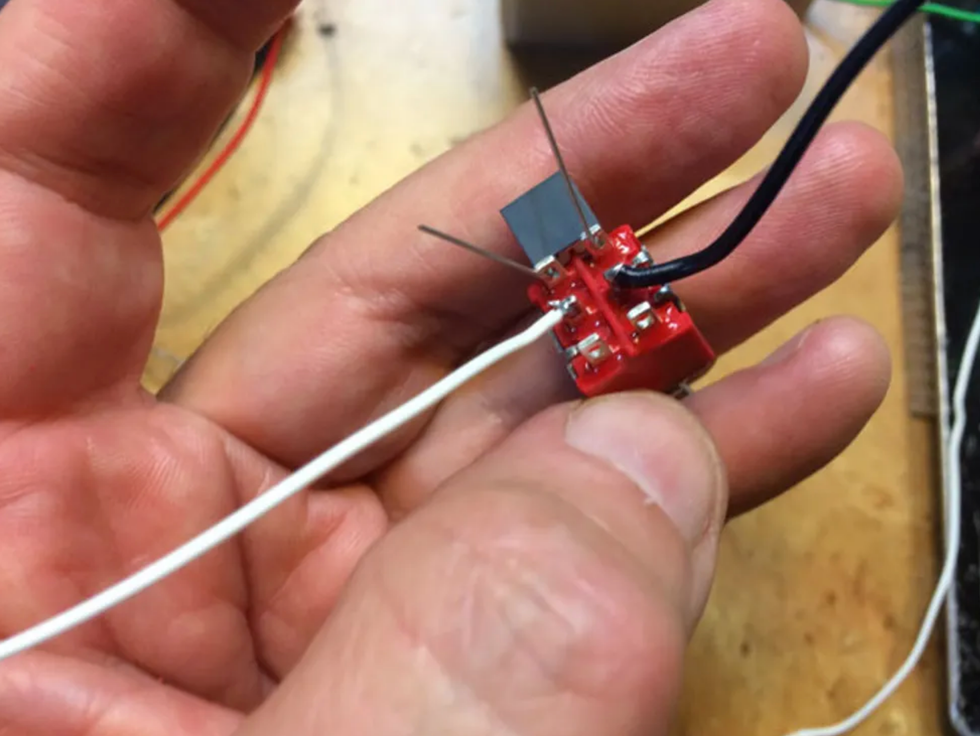
Photo 3c
With the switch in the down position, the signal gets routed through whatever you connect to the top two lugs. In Photo 3c I've threaded the first of two treble-cut caps—a .022 µF (223)—through the top lugs.
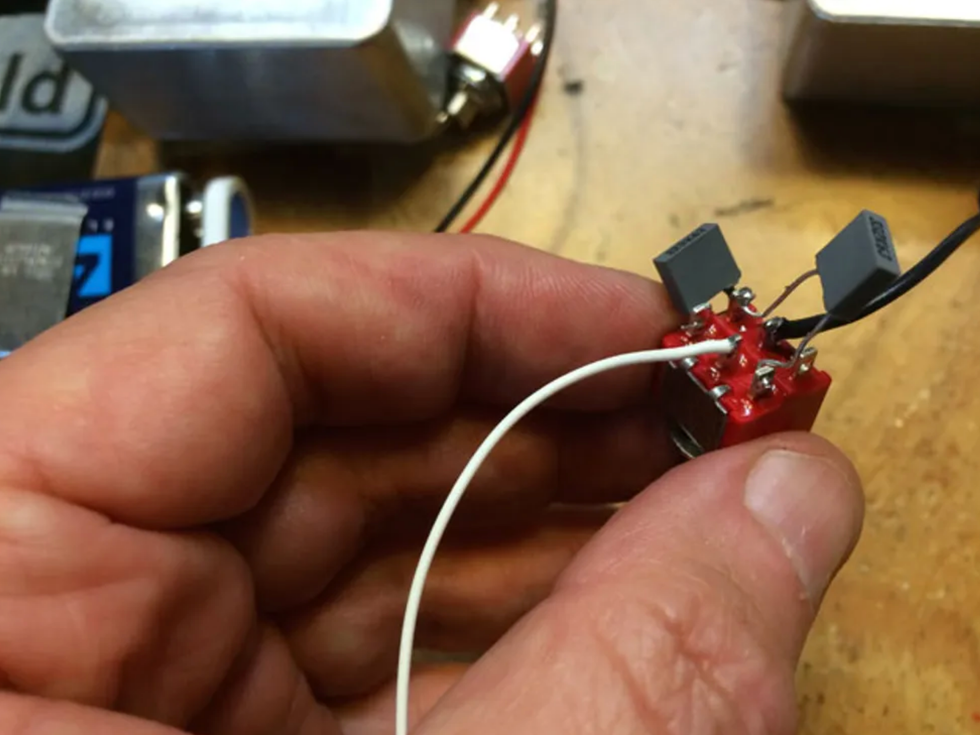
Photo 3d adds a second tone cap—a .0033 µF (332)—between the lower-left lug and the upper-right one. This is engaged when the switch is in the middle position. There's nothing between the two lower lugs—when the switch is in the up position, no tone cap is active, and your tone is wide-open.
My cap values are customized for the way I tend to use treble-cut controls: either to take off a bit of edge, or to get very dark. Configured this way, I get an open sound when the switch is down. In the middle position, there's a slight treble cut from the relatively small .0033 µF cap. And in the up position, I get a much darker tone via the larger .022 µF cap. You can vary these values to taste—just remember that larger caps cut more treble.
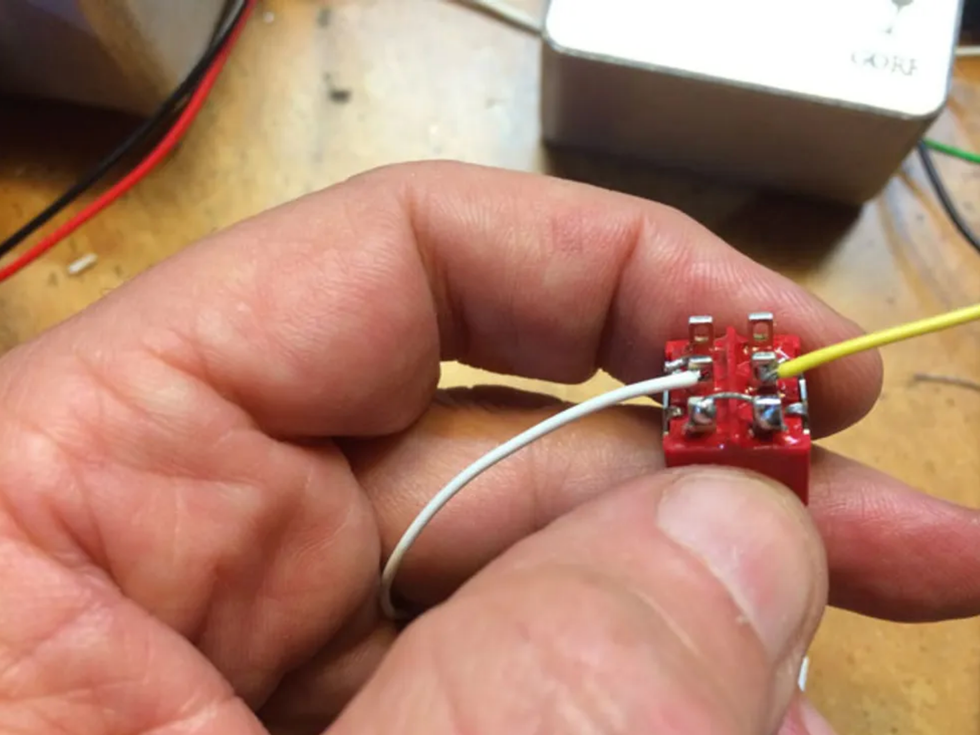
Photo 3e
A 3-position bass-cut switch. The wiring is similar for a bass-cut switch, but with one key difference: While the treble-cut routes signal to ground, a bass-cut must be inserted within the signal flow, just as in the PTB project above. The signal comes in via the left-middle lug, and exits via the right-middle one, as shown in Photo 3e. Also, I've added a jumper wire between the two lower lugs, so when the switch is in the up position, signal is routed through the switch without encountering a capacitor. (To reverse the orientation, just flip the switch 180 degrees.)
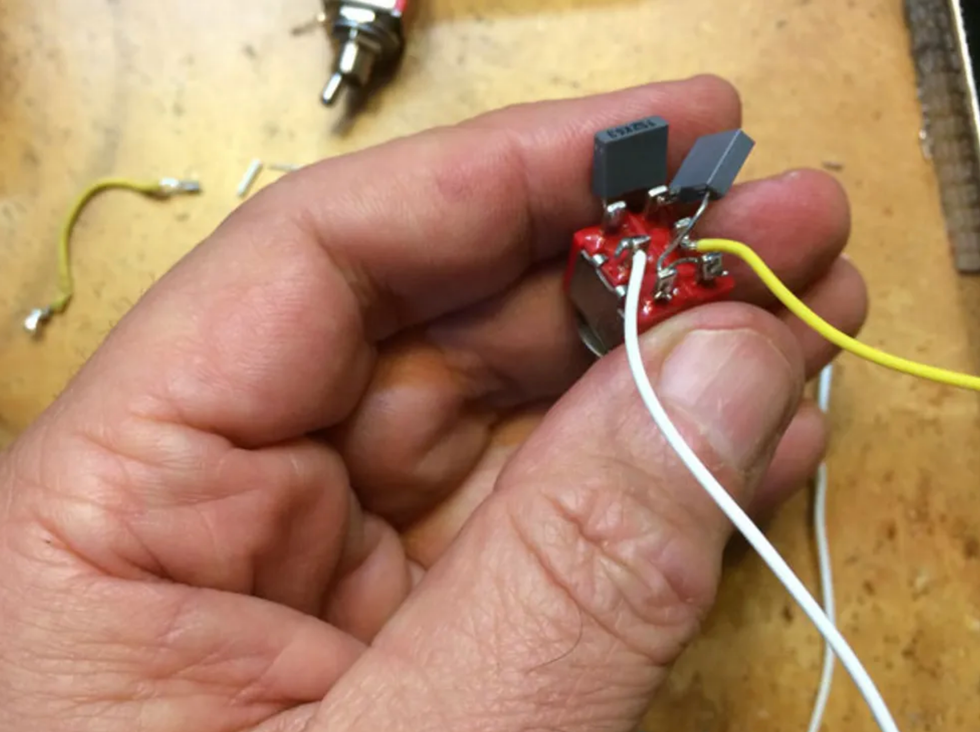
Photo 3f
In Photo 3f, I've added two capacitors, as in the treble-cut circuit. I used a .0033 µF (332) for a slight bass cut in the middle position, and a .0015 µF (152) for a more extreme cut. Choose your own cap values, bearing in mind that the smaller the cap value, the greater the bass cut.
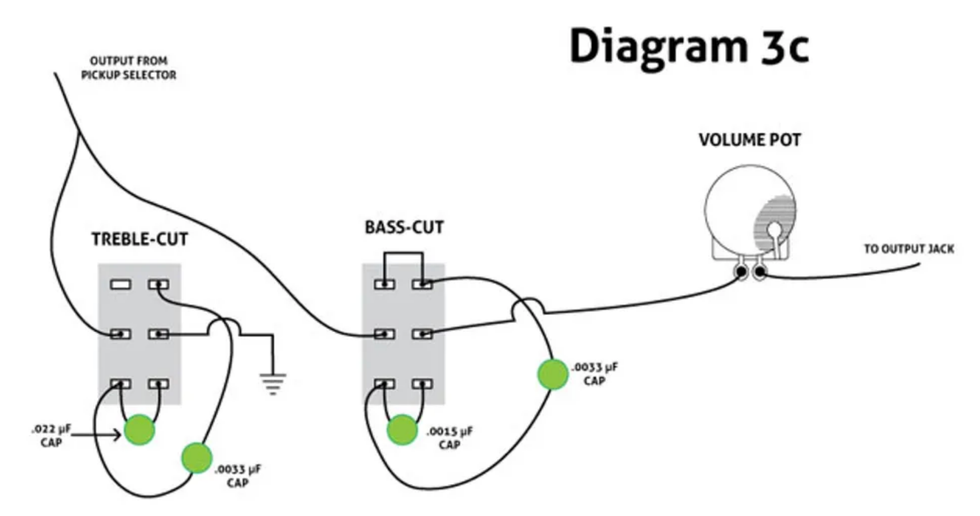
Diagram 3c
Finally, Diagram 3c shows my two-switch/six-setting tone control as heard in Ex. 3c. With the values I used, the result is similar to the PTB mod above, but with two added advantages: I can toggle quickly to the exact tone I desire. And by drilling two small holes in my pickguard to accommodate the mini-switches, I freed up my former tone pot for another task: controlling an onboard booster.
Mods à la mode. I urge adventurous solder jockeys to try all three mods. They're easily reversible (except for pickguard drill holes), and even if you don't dig the results, I'd be surprised if the process didn't suggest alternate ideas more to your taste. You'll learn volumes about guitar electronics as you uncover your ultimate mod.
[Updated 11/30/21]
- Grounding Passive Circuits, Part 2—Plus, How to Build a Solder Cage - Premier Guitar ›
- 10 Ways to Optimize Your Guitar for Under $100 - Premier Guitar ›
- DIY: All About Your Electric Guitar's Knobs and Switches - Premier Guitar ›
- How to Install and Maintain Your Guitar's Pots - Premier Guitar ›
- Tone Capacitors for Stratocasters, Part 1 - Premier Guitar ›
- Hot-Rod Your Electric: Tiny Tone Tweaks, Done Dirt Cheap - Premier Guitar ›
- Adding Series Switching To Your Strat - Premier Guitar ›
- Soldering 101: A Step-by-Step Guide - Premier Guitar ›
- How to Change Pickup Wires (& Why) - Premier Guitar ›
- Ditch Your Gain Pedals and Embrace a Clean Guitar Tone - Premier Guitar ›
- How to Wire a Guitar Output Jack in Your Electric Guitar - Premier Guitar ›
- Mod Garage: The HSS Auto-Split Mod, Pro Version - Premier Guitar ›
- How to Wire a Passive Treble and Bass Circuit for Guitar ›
- Elevate Your Sound: Exploring Chorus, Phaser, Flanger & Vibrato Effects ›
- Epiphone Al Caiola and Its 5-Switch Tone Expressor System - Premier Guitar ›
- Duane Betts and Readers’ Favorite Guitar Mods - Premier Guitar ›
See and hear Taylor’s Legacy Collection guitars played by his successor, Andy Powers.
Last year, Taylor Guitars capped its 50th Anniversary by introducing a new guitar collection celebrating the contributions of co-founders Bob Taylor and Kurt Listug to the guitar world. The Legacy Collection revives five of Bob Taylor’s classic acoustic models, curated by the legendary luthier and innovator himself. “To imagine that we’re doing guitars that harken to our past, our present and our future all at the same time,” Bob says, “I really like that.”
In developing the collection, Bob preserved the essence of his originals while integrating performance and playability upgrades introduced during his tenure as designer-in-chief. “It’s an up-to-date version of what those guitars would be,” Bob explains, “but with the same sound.”
Visually, these guitars feel classic—clean, understated and unmistakably Taylor. While Bob’s original aesthetic preferences are showcased in his Legacy models, the nod to the past runs deeper than trade dress.
From his earliest builds, Bob favored slim-profile necks because he found them easier to play. That preference set a design precedent that established Taylor’s reputation for smooth-playing, comfortable necks. Legacy models feature slim mahogany necks built with Taylor's patented New Technology (NT) design. “My first neck was a bolted-on neck but not an NT neck,” Bob says. “These are NT necks because it’s a better neck.” Introduced in 1999, the NT neck allowed for unprecedented micro-adjustability while offering a consistent, hand-friendly Taylor playing experience.
What makes this collection unique within the Taylor line is Bob’s use of his X-bracing architecture, favoring his time-tested internal voicing framework over more recent Taylor bracing innovations to evoke a distinctive tone profile. Since Andy Powers—Taylor’s current Chief Guitar Designer, President and CEO—debuted his patented V-Class bracing in 2018, V-Class has become a staple in Taylor’s premium-performance guitars. Still, Bob’s X-bracing pattern produces a richly textured sound with pleasing volume, balance and clarity that long defined the Taylor voice. All Legacy models feature LR Baggs VTC Element electronics, which Bob says “harkens back to those days.”
The team at Taylor thought the best way to demonstrate the sound of the Legacy guitars was to ask Andy Powers, Bob’s successor, to play them. A world-class luthier and musician, Andy has spent the past 14 years leading Taylor’s guitar innovation. In addition to V-Class bracing, his contributions include the Grand Pacific body style, the ultra-refined Builder’s Edition Collection, and most recently, the stunning Gold Label Collection.
Below you’ll find a series of videos that feature Powers playing each Legacy model along with information about the guitars.
Legacy 800 Series Models
First launched in 1975, the 800 Series was Taylor’s first official guitar series. Today, it remains home to some of the brand’s most acclaimed instruments, including the flagship 814ce, Builder’s Edition 814ce and new Gold Label 814e.
The Legacy 800 Series features the 810e Dreadnought and two Jumbos: the 6-string 815e and 12-string 855e. Each model serves up a refined version of the Dreadnought and Jumbo body shapes Bob inherited from Sam Radding—the original owner of the American Dream music shop where Bob and Kurt first met. “I was making my guitars in the molds that Sam had made at American Dream,” Bob recalls. “There was a Jumbo and a Dreadnought. That’s all we had.”
All three Legacy 800 Series guitars feature one of Bob’s favorite tonewood combos. Solid Indian rosewood back and sides are paired with a Sitka spruce top, yielding warm lows, clear trebles and a scooped midrange.
Aesthetic appointments include a three-ring abalone rosette, mother-of-pearl Large Diamond inlays, white binding around the body and fretboard, and Bob’s “straight-ear” peghead design. Both Jumbo models also showcase a mustache-style ebony bridge—a nod to Bob’s early Jumbo builds.
Legacy 810e
The 810 Dreadnought holds a special place in Bob Taylor’s heart. “My first 810, the one I made for myself, was a thrilling guitar for me to make,” he says. “It’s the one and only guitar I played. It didn’t matter how many guitars we made at Taylor, that’s the one I took out and played.” The Legacy 810e brings back that bold, room-filling Dreadnought voice along with the easy playability expected from a Taylor.
Taylor Guitars | Legacy 810e | Playthrough Demo
Legacy 855e
Taylor’s first 12-strings found an audience in 1970s Los Angeles. “I was making guitars that would find their way to McCabe’s in Santa Monica and Westwood Music,” Bob says, “and these guitars were easy to play. Twelve-strings were a popular sound in that music. It was a modern country/folk/rock music genre that was accepting our guitars because they were easy to play. They also liked the sound of them because our guitars were easier to record.” The Legacy 855e, with its resonant Jumbo body, slim neck and gorgeous octave sparkle, carries that tradition forward.
Taylor Guitars | Legacy 855e | Playthrough Demo
Legacy 815e
The Legacy 815e revives Taylor’s original Jumbo 6-string, delivering a big, lush sound with beautifully blooming overtones.
Legacy Grand Auditoriums
In the early 1990s, Bob Taylor heard a consistent refrain from dealers: “Not everybody wants a dreadnought guitar anymore.” Players were asking for something with comparable volume but different proportions—something more comfortable, yet still powerful. This feedback inspired Bob to design a new body style with more elegant curves, more accommodating proportions and a balanced tonal response. The result was the Grand Auditorium, which Taylor introduced in 1994 to celebrate its 20th anniversary.
Thanks to its musical versatility and easy playability, Bob’s Grand Auditorium attracted a wide variety of players. “We came into our own with our Grand Auditorium,” he says. “People were describing it as ‘all around.’ It’s a good strummer and good for fingerstyle, but it’s not totally geared toward strumming or totally geared toward fingerstyle.” Also referred to as the “Swiss-Army Knife” of guitars or the “Goldilocks” guitar, the GA quickly became a favorite among guitarists across playing styles, musical genres and different playing applications including recording and live performance. “That guitar made studio work successful,” Bob says. It gained a wider fanbase with the debut of the “ce” version, which introduced a Venetian cutaway and onboard electronics. “That became one of our hallmarks,” says Bob. “If you want to plug in your guitar, buy a Taylor.”
Today, the Grand Auditorium is Taylor’s best-selling body shape.
The Legacy Collection features two cedar-top Grand Auditoriums inspired by past favorites: the mahogany/cedar 514ce and rosewood/cedar 714ce. Both models incorporate Bob’s original X-bracing pattern for a tonal character reminiscent of their 1990s and 2000s counterparts. Shared aesthetic details include a green abalone three-ring rosette, ebony bridge pins with green abalone dots, a faux-tortoiseshell pickguard and Taylor gold tuning machines.
Taylor Guitars | Legacy 815e | Playthrough Demo
Legacy 514ce
The Legacy 514ce features solid mahogany back and sides paired with a Western Red cedar top, yielding a punchy midrange and dry, woody sonic personality that pairs beautifully with cedar’s soft-touch sensitivity and warmth. It’s a standout choice for fingerstyle players and light strummers who crave nuance and depth. Distinct visual details include faux-tortoise body and fretboard binding, black-and-white top trim, and mother-of-pearl small diamond fretboard inlays.
Taylor Guitars | Legacy 514ce | Playthrough Demo
Legacy 714ce
The Legacy 714ce also features a cedar top, this time matched with solid Indian rosewood back and sides. The result is a richly textured sound with deep lows, clear trebles and a warm, mellow response. Inspiring as it is, this specific wood pairing isn’t currently offered in any other standard Taylor model. Additional aesthetic details include green abalone dot fretboard inlays, black body and fretboard binding, and black-and-white “pinstripe” body purfling.
While the Legacy Collection spotlights Taylor’s past, newer models from the Gold Label, Builder’s Edition and Somos Collections show the company’s legacy is always evolving. Explore the Legacy Collection at taylorguitars.com or visit your local authorized Taylor dealer.
Taylor Guitars | Legacy 714ce | Playthrough Demo
Guest picker Ally Venable
Blues rocker Ally Venable joins PG’s editors to imagine what their dream late-night band would sound like.
Question: What’s your dream late-night show band?
Ally Venable - Guest Picker
By FifthLegend from Eagan, Minnesota, United States of America - Thundercat, CC BY 2.0, https://commons.wikimedia.org/w/index.php?curid=70617212
A: For my late-night show's house band, I’ve assembled a dream team. This ensemble inspires me with their unparalleled musical talents and diverse backgrounds. Chris Layton’s drumming is unmatched and he will provide a solid foundation. I’ll have Jon Batiste on keys. His creativity and energy is boundless. Eric Gales would be on guitar. I love how emotive his music is, and I strive for that type of connection within my playing as well. Finally, I’d have Thundercat on bass. His playing is infused with jazz and funk sensibilities that would tie the whole sound together in an interesting way.
Obsession: My current obsession is shifting my approach to playing—focusing on connection over applause. Instead of chasing technical perfection or crowd reactions, I’m leaning into the emotional and spiritual side of music. It’s about creating moments that resonate deeply, whether it’s with myself, my bandmates, or the audience.
David Saenger - Reader of the Month
A: I love the idea of supergroups and how each of the players would interact. On guitars I would have Nuno Bettencourt (Extreme) and Isaiah Sharkey. My drum and bass combo would be Stewart Copeland (The Police) and Mohini Dey. On keys and sax, I would have Herbie Hancock and Joshua Redman. My male and female vocalists would be Corey Glover (Living Colour) and Liv Warfield (Prince). All of these players are fantastic improvisers and really know how to put on an entertaining show in any genre.
Bassist Victor Wooten
Obsession: My current obsession has been bass. My 12-year-old daughter started playing electric and upright bass about two years ago, and it’s been a blast working with her. I’ve been really focusing on having a solid pocket, and it’s forced me to get better at reading bass clef. I’m taking her to see Victor Wooten next week. Can’t wait!
Jason Shadrick - Managing Editor
Jason Shadrick on the SNL stage.
A: The natural move would be to go for a high-energy party band decked out with multiple keyboards, horns, and vocalists. I’d go a different route. I’d go for a more rootsy vibe with Blake Mills leading a band consisting of Jay Bellerose on drums, esperanza spalding on bass, Bob Reynolds on saxophones, and a rotating guest each week. They could cover lo-fi Americana, funky open-tuned blues, and so much more.
Obsession: This month is slightly less obsession and more reflection as this will be my last issue as Managing Editor for PG. Over the last 15 years I’ve worked on 182 issues, which is kinda mind-boggling. I’ve been lucky enough to do some incredible things during my time at PG, including walking through the host door at SNL and spending a few minutes with Brian May. Never could have imagined it. I am very grateful.
Nick Millevoi - Senior Editor
A: I’ve long said that joining one of the late night bands would probably be my absolute top dream gig. So, if I were choosing my own late-night band, from any era, I would go no further than getting a chance to sit with Paul Schaffer and the World’s Most Dangerous Band or G.E. Smith-era Saturday Night Live Band.
Obsession: The late guitarist Jef Lee Johnson, who spent time in Schaffer’s band, had a heavy resume that included stars of all genres from Billy Joel to the Roots to McCoy Tyner. I got to see him play some low-key gigs around Philly, and each rearranged my molecules. It’s only now, years after his 2013 death, that I’ve become obsessed with his discography. Though much of his work was as a high-level sideman, his albums show the broad range of this masterful guitarist, whose tone, feel, and phrasing conveyed the instrument’s deepest emotional capabilities.
At its core is GTRS’ upgraded G151 intelligent system, offering 128 onboard effects, MNRS amp and cab sims, and even 17 guitar emulations—exclusive to this model. Everything is controlled via the eye-catching Super Knob, which changes color to match your preset, as well as through the Bluetooth-connectible GTRS app.
GTRS’ W902 features select tonewoods and construction: an alder body, poplar burl top, and a sleek bolt-on 5-piece neck made from roasted flame maple and rosewood, with satin natural finish and a rosewood fingerboard. The fanned fret design features 24 white copper frets and a stainless zero fret. A pair of GTRS Alnico V pickups and an HL-II bridge deliver a resonant tone, made particularly versatile thanks to the 5-way tone switch and tone knob.
The W902 offers a truly innovative choice for tech-savvy guitarists. Its features include a wireless transmitter, OTG recording, an 80-second looper, metronomes, and a drum machine, the app-supported guitar boasts up to 12 hours of playtime on a single charge (9 hours with the wireless transmitter in use).
The W902 is an upgraded version of the original W900 Intelligent Guitar, and the W902 most notably features an upgraded GTRS Intelligent Processor System, the G151, which even offers upgrades over the GTRS SL810's recently announced G150 system. The G151 system comes with a staggering 128 effects pre-installed, along with 10 of both MOOER's in-house MNRS amp and cabinet simulation profiles. Exclusive to the W902, the G151 system even includes 17 guitar simulation effects, allowing guitarists to emulate the tonal resonance of some of their favorite guitars.
To activate and browse through presets within the G151 system, which can be connected via Bluetooth 5.0, guitarists can use the guitar's Super Knob, which lights up in different LED colors depending on which preset is activated. Of course, users are able to get stuck into and edit the effects chains of presets through the GTRS app, enabling them to craft their own favorites through their mobile device. The guitar still functions without the G151 system; the Super Knob just needs to be turned off, and the W902 is usable as a regular electric guitar.
Within the GTRS app, there is even an 80-second looper, 10 metronomes, and 40 drum machine grooves built in, providing users with an all-in-one suite for guitar practice and composition. This is especially the case when combined with the W902's OTG-recording support, enabling on-the-go recording without the need for a hardware recording setup.
The W902 comes bundled with a GTRS Deluxe gig bag, three guitar wrenches, a USB 3.0 cable for charging, and a user manual. The guitar even contains a wireless transmitter and an integrated 4000mAh Li-ion battery, providing up to 12 hours of continuous use (9 hours with the transmitter in use), allowing users to enjoy the G151 system through headphones or an amplifier.
Guitarists who want to experiment further with the W902’s technology can connect the intelligent system to the GTRS GWF4 wireless footswitch, which is ideal for switching between presets in live scenarios when control through a mobile device isn't practical.
GTRS W902 Guitar construction features:
- Alder Body, 5-Piece Selected Roasted Flame Maple and Rosewood Neck with Satin Natural Finish (C-Shape)
- Bolt-on neck, 25-1/2" scale length, with dual action steel truss rod
- Rosewood fingerboard, 12” radius, 24 white copper (0 fret stainless) fanned frets
- Built-in wireless transmitter
- Super Knob, Volume Control Knob, and Tone Knob, 3-way tone-selection switch
- GLB-P1 Li-ion Battery (4000mAh, up to 12 hours of continuous use, 9 hours with the wireless transmitter in use)
- USB port for charging and OTG recording
- GTRS Deluxe gig bag, 3 guitar wrenches
GTRS G151 Intelligent Guitar System features:
- GTRS G151 Intelligent Processing System (and GTRS App)
- 128 effects, 10 MNRS amp (GNR) and cabinet (GIR) simulation models
- 17 guitar simulations
- 80-second looper, 40 drum machine grooves, 10 metronomes
- Bluetooth 5.0 connectivity
- GTRS GWF4 wireless footswitch support (sold separately)
The GTRS W902 is now available worldwide. For more information visit www.gtrs.tech.
Detail of Ted’s 1997 National resonator tricone.
What instruments should you bring to an acoustic performance? These days, with sonic innovations and the shifting definition of just what an acoustic performance is, anything goes.
I believe it was Shakespeare who wrote: “To unplug, or not to unplug, that is the question. Whether ’tis nobler in the mind to suffer the slings and arrows of acoustic purists, or to take thy electric guitar in hand to navigate the sea of solo performing.”
Four-hundred-and-twenty-four years later, many of us still sometimes face the dilemma of good William when it comes to playing solo gigs. In a stripped-down setting, where it’s just us and our songs, do we opt to play an acoustic instrument, which might seem more fitting—or at least more common, in the folksinger/troubadour tradition—or do we bring a comfy electric for accompaniment?
For me, and likely many of you, it depends. If I’m playing one or two songs in a coffeehouse-like atmosphere, I’m likely to bring an acoustic. But if I’m doing a quick solo pop up, say, as a buffer between bands in a rock room, I’m bringing my electric. And when I’m doing a solo concert, where I’ll be stretching out for at least an hour, it’s a hybrid rig. I’ll bring my battered old Guild D25C, a National tricone resonator, and my faithful Zuzu electric with coil-splitting, and likely my gig pedalboard, or at least a digital delay. And each guitar is in a different tuning. Be prepared, as the Boy Scouts motto states. (For the record, I never made it past Webelos.)
My point is, the definition of the “acoustic” or “coffeehouse” performance has changed. Sure, there are still a few Alan Lomax types out there who will complain that an electric guitar or band is too loud, but they are the last vestiges of the folk police. And, well, acoustic guitar amplification is so good these days that I’ve been at shows where each strum of a flattop box has threatened to take my head off. My band Coyote Motel even plays Nashville’s hallowed songwriter room the Bluebird Café as a fully electric five-piece. What’s key, besides a smart, flexible sound engineer, is controlling volume, and with a Cali76 compressor or an MXR Duke of Tone, I can get the drive and sustain I need at a low level.
“My point is, the definition of the ‘acoustic’ or ‘coffeehouse’ performance has changed.”
So, today I think the instruments that are right for “acoustic” gigs are whatever makes you happiest. Left to my own devices, I like my Guild for songs that have a strong basis in folk or country writing, my National for blues and slide, and my electric for whenever I feel like adding a little sonic sauce or showing off a bit, since I have a fluid fingerpicking hand that can add some flash to accompaniment and solos. It’s really a matter of what instrument or instruments make you most comfortable because we should all be happy and comfortable onstage—whether that stage is in an arena or theater, a club or coffeehouse, or a church basement.
At this point, with instruments like Fender’s Acoustasonic line, or piezo-equipped models from Godin, PRS, and others, and the innovative L.R. Baggs AEG-1, it’s worth considering just what exactly makes a guitar acoustic. Is it sound? In which case there’s a wide-open playing field. Or is it a variation on the classic open-bodied instrument that uses a soundhole to move air? And if we arrive at the same end, do the means matter? There is excellent craftsmanship available today throughout the entire guitar spectrum, including foreign-built models, so maybe we can finally put the concerns of Shakespeare to rest and accept that “acoustic” has simply come to mean “low volume.”
Another reason I’m thinking out loud about this is because this is our annual acoustic issue. And so we’re featuring Jason Isbell, on the heels of his solo acoustic album, a piece on how acoustic guitars do their work authored by none other than Lloyd Baggs, and Andy Fairweather Low, whose new solo album—and illustrious career—includes exceptional acoustic performances. If you’re not familiar with his work, and you are, even if you don’t know it, he was the gent sitting next to Clapton for the historic 1992 Unplugged concert—and lots more. There are also reviews of new instruments from Taylor, Martin, and Godin that fit the classic acoustic profile, so dig in, and to heck with the slings and arrows!