In the second episode of the Netflix documentary series Abstract: The Art of Design, the famed creator of the Air Jordan, Tinker Hatfield, muses on his years at Nike, where he seemingly pulled iconic shoe designs out of the very ether. From the AJ III to the AJ XIV, his work was universally acclaimed and the company couldn't keep the shoes on store shelves.
A dramatic shift occurred when the XV—the first release after Michael Jordan's retirement from basketball—hit the streets in 1999. Consumer reaction toward the stark black-and-Kevlar aesthetic of the new shoe was overwhelmingly negative, and they were critically panned. In the film, Tinker reflected on the shoe that nearly ended his career: "People struggle with stuff they don't understand—design that's different than what they're used to."
That sounds a lot like my favorite guitars.
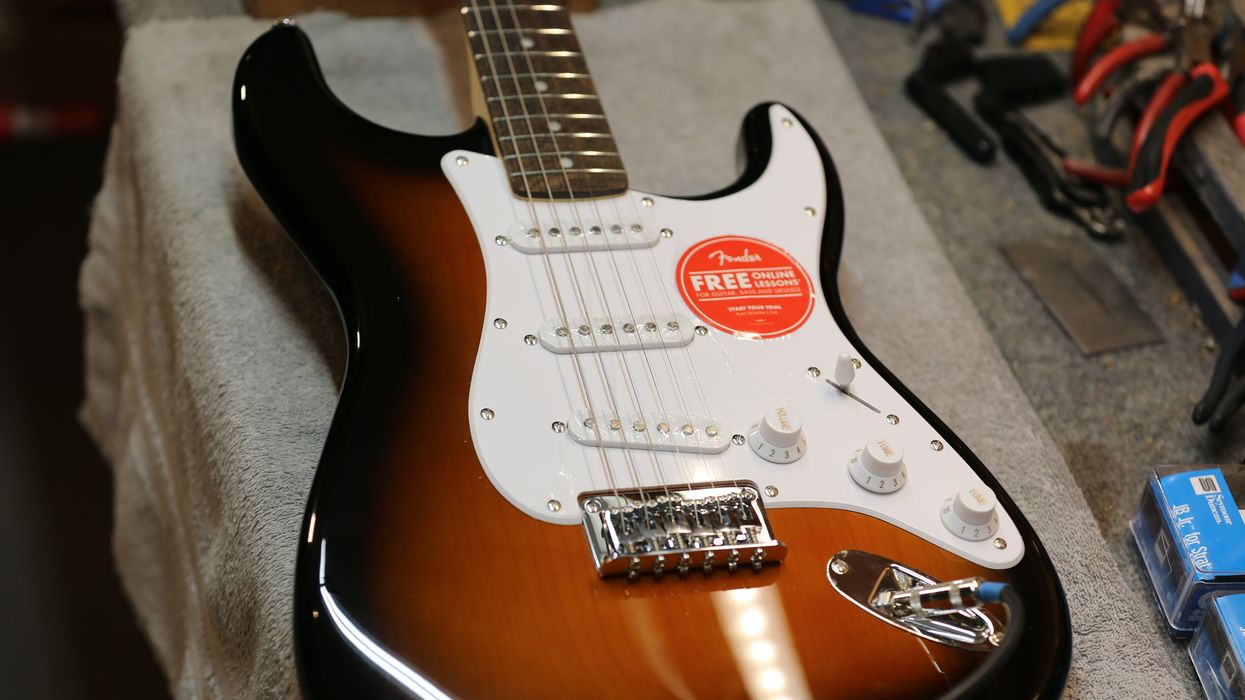
My heart goes out to the Jazzmaster; it really does. Introduced at a time when Fender was thinking of discontinuing the now-hallowed Stratocaster, what began as a top-of-the-line model eventually fell into obscurity, relegated to pawn shop bargain bins and sold to musicians who couldn't afford the upmarket prices of more familiar, more desirable guitars. For nearly 50 years they were misunderstood, maligned, and marred by stories of string slippage, tuning instability, and impossible intonation.
A well-maintained Jazzmaster possesses one of the most stable and dynamic non-locking vibrato systems on the market, and all that's needed for the guitar to operate as intended is a proper setup.
Convicted in the court of opinion, the Jazzmaster was viewed as a flawed experiment—a joke guitar that was nice to look at perhaps, but not to play. The sad truth of this underdog of Leo Fender's otherwise beloved instruments is that it's not the design itself that's problematic, but rather a lack of consumer education. That's where this article comes in. I'm here to help!
A well-maintained Jazzmaster possesses one of the most stable and dynamic non-locking vibrato systems on the market, and all that's needed for the guitar to operate as intended is a proper setup. What's hilarious is that decades of complaints and ire could have been avoided had anyone actually read the manual tucked into the case pocket.
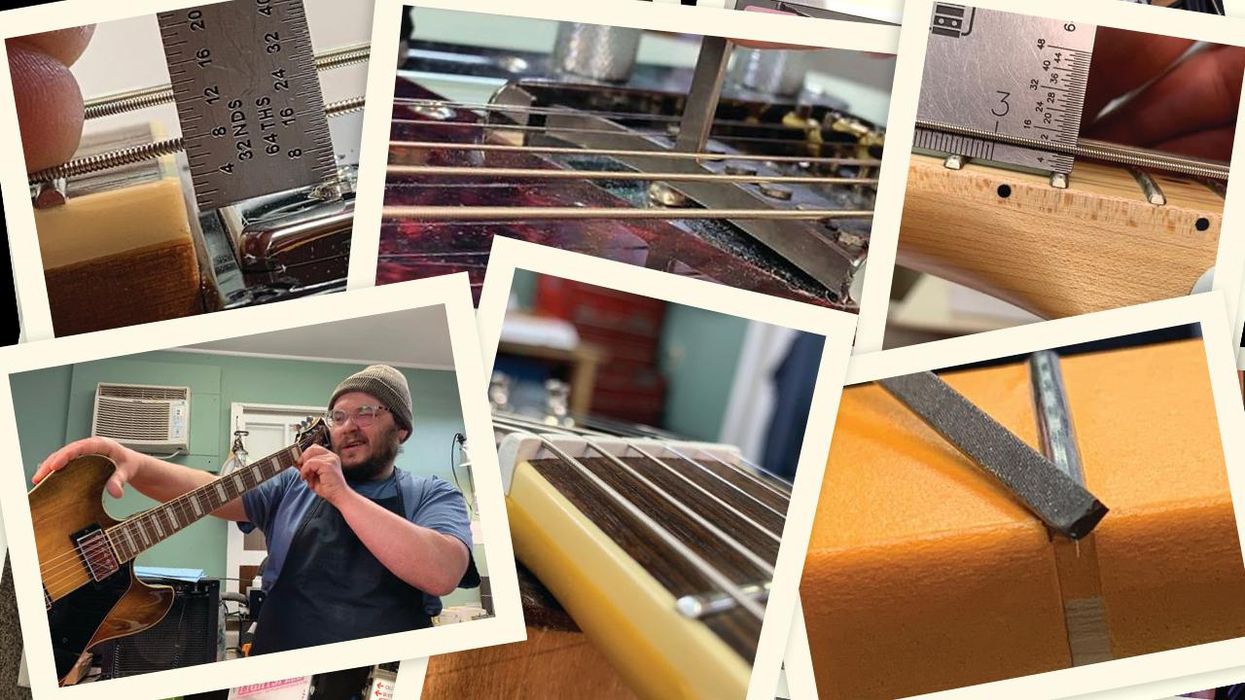
In this article, I'm going to give you some DIY tips for keeping your offset guitar in perfect working condition so you'll never have to worry about it again. But to truly understand this vexing vibrato system, we're going to have to go all the way back to 1957.
Jazz Odyssey
When Leo Fender began work on the Jazzmaster alongside designer George Fullerton and Hawaiian steel player Freddie Tavares, he set out to create a solidbody guitar with the geometry of an archtop acoustic. It was an effort to capture the jazz market, in which Gibson had enjoyed overwhelming success. Going through old patent drawings—one of which is now tattooed on my left forearm—his intent is obvious.
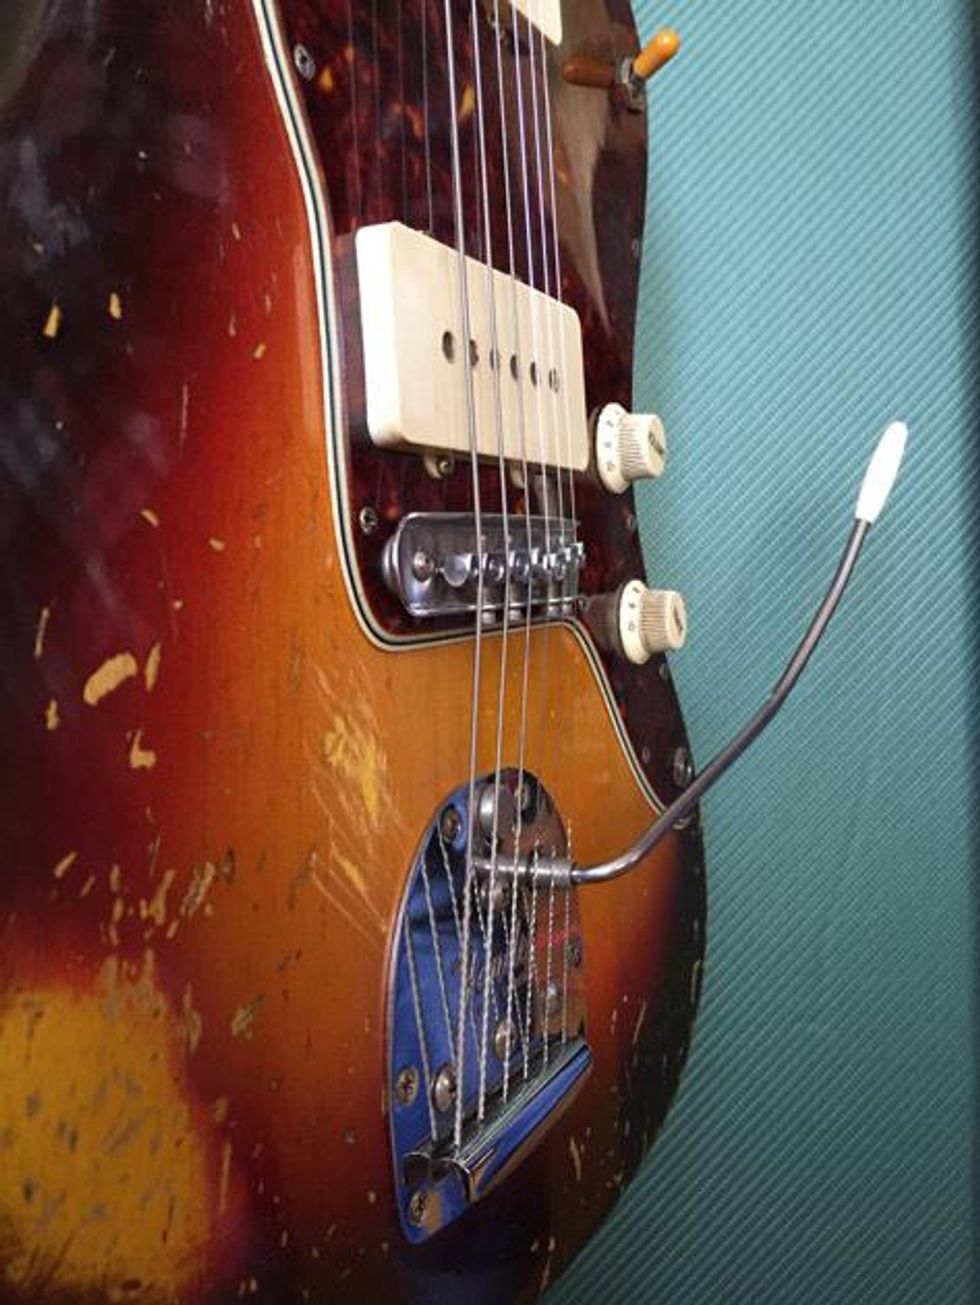
Photo 1
When viewed from the side, the string path of a properly set up Jazzmaster (Photo 1) is reminiscent of an archtop, such as a venerable L-5 or ES-175 (Photo 2). The strings flow from the tailpiece and break over the floating bridge at an angle, then plummet down a pitched-back neck toward the nut and tuning machines. In theory, the downward force exerted on the bridge keeps the strings in place while the bridge freely rocks back and forth with vibrato use.

Photo 2
It's important to keep all of this in mind when you're working on your Jazzmaster or Jaguar, as conventional setup techniques won't quite get the job done. Whereas most other models tend to need some bridge adjustment or a partial turn of the truss rod, to play their best these guitars need to be treated differently and considered as a whole.
String Selection
Being aimed at jazz players of the day, the Jazzmaster was built around the use of heavy flatwound strings. The extra tension of those sets helped keep the bridge in place, while the darker sound produced by flats paired well with the brighter nature of the Jazzmaster's wide, flat single-coil pickups. But this doesn't mean you have to use gigantic strings!
No, it's quite easy to achieve a perfectly playable Jazzmaster with lighter roundwound gauges. It just takes a bit more fiddling around with the setup. I use and recommend .011–.050 rounds as a good starting point, but if .010s are your thing, that's absolutely doable. I do find it interesting that complaints about bridge buzz started surfacing around the time that ultra-light gauges became more commonplace, in the mid-to-late 1960s.
When viewed from the side, the string path of a properly set up Jazzmaster is reminiscent of an archtop, such as a venerable L-5 or ES-175.
Neck Angle
Ensuring the proper amount of neck angle relative to the body is essential to getting the most out of your offset guitar. Although the archtops that inspired him were constructed with a permanently inclined set neck, the famously pragmatic Leo Fender addressed this by specifically designing the Jazzmaster with shims in mind. If you're not familiar with the process of shimming, it's simply a thin spacer placed between the neck and pocket of a bolt-on guitar, allowing its angle to be easily adjusted.
The goal here is to increase downward force on the bridge. As the neck is angled down away from the body—like a see-saw, imagine the headstock dropping slightly lower than the end of the fretboard—the bridge must be raised to achieve playable action. This causes the strings to pass over the bridge at a sharper angle (this is called break angle), and thus adequate pressure on the bridge is realized. This pressure helps keep the strings in place while also increasing resonance.
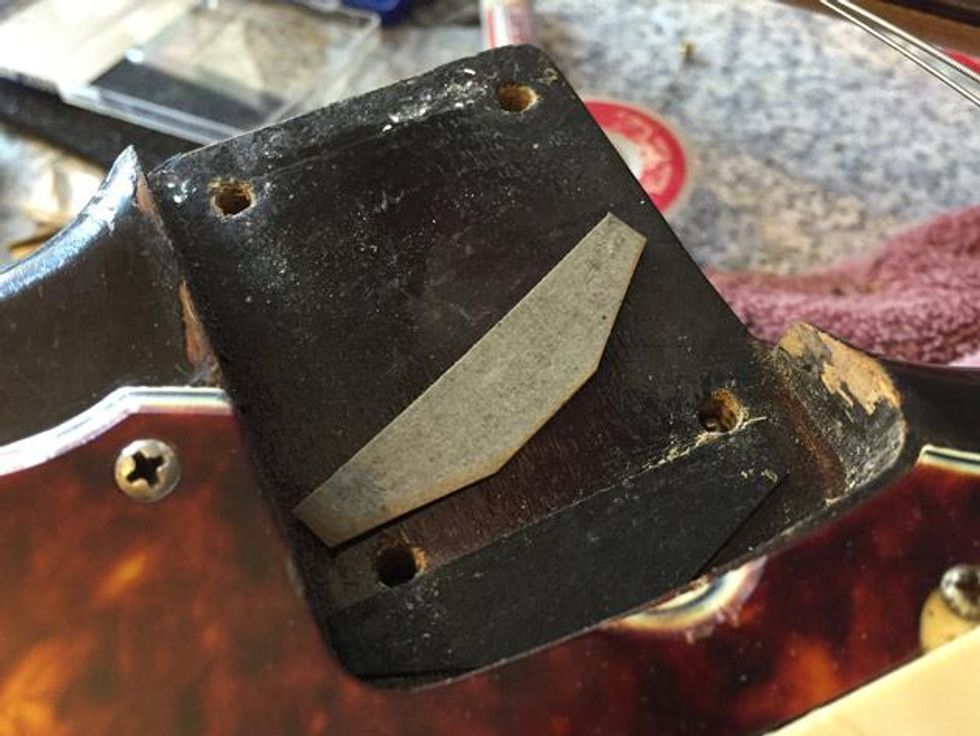
Photo 3
It's quite easy to perform this tweak yourself. Fender used to employ leftover fiberboard pickup bobbin material, but for DIY-ers, baseball or business cards will do just fine. Simply remove the neck, cut the material of your choice to fit (3/8" by 1 1/2" should do the trick), and then lay it down in the neck pocket, in the semi-enclosed area closest to the bridge (Photo 3). Position the 1 1/2" section so it lies across the neck pocket, parallel to the saddles. Reattach the neck, string up, and then raise the bridge until you find the action comfortable.
Manufacturing being what it is, there's no magic number of shims that works automatically. I usually start with two shims and add or subtract according to the needs of the individual instrument. It takes some trial and error at first, but the more familiar you become with the process, the better you'll be able to assess your guitar.
Note: If you happen to be using a Mastery or Staytrem bridge, one or two shims should work just fine. Newer Fender models such as the Classic Player and American Professional series even boast angled neck pockets, so if you have one of these, you likely won't need to worry about shimming at all.
The Bridge
When I got my first Jazzmaster, the bridge positively flummoxed me. It seemed that, no matter what I did, I could not get the thing to stop buzzing. It wasn't until I discovered shimming as part of the offset equation that I was able to quell the beastly noises coming from my guitar. Using heavier strings goes a long way to cure this.
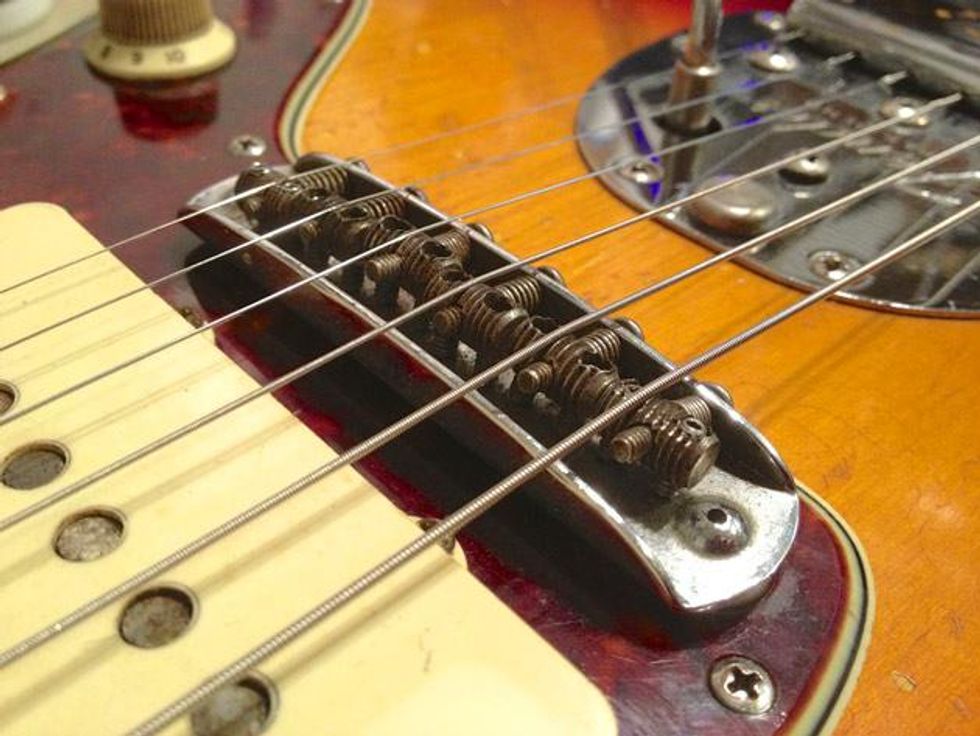
Photo 4
However, I also realized that with the original bridge, the intonation screws that poke through the middle of the saddles can be just as much of a pain (Photo 4). If the bridge isn't set up in exactly the right way, those screws can make contact with your strings, causing an unpleasant sitar-like noise.
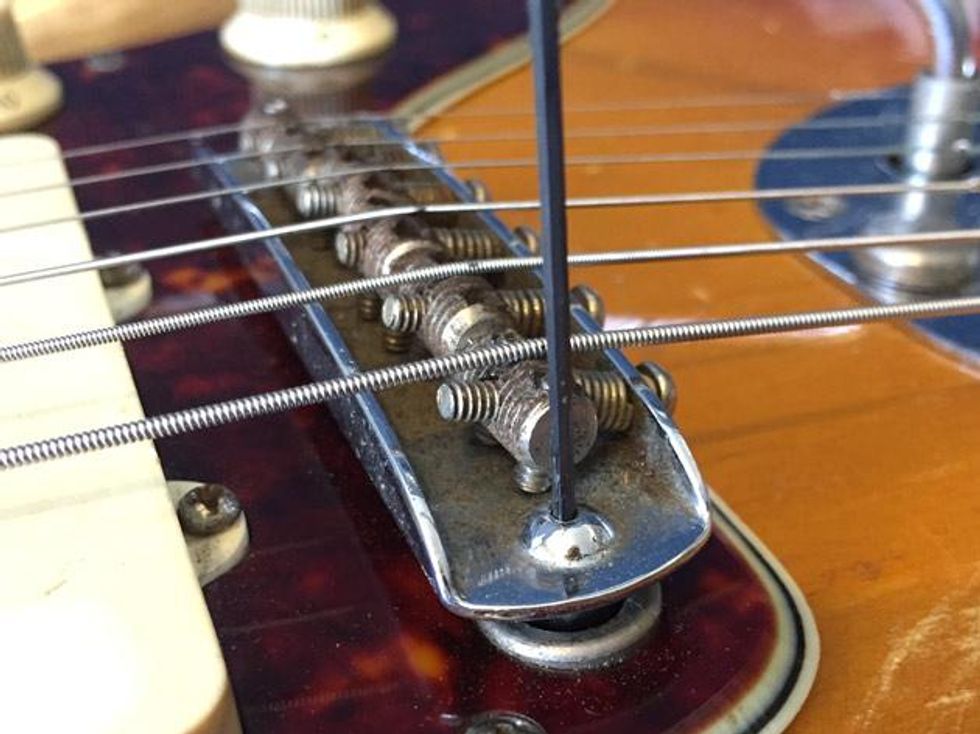
Photo 5
Every time I've seen this happen, it was because someone set the overall action with the individual saddles instead of the bridge posts. If you weren't aware, the offset bridge is height-adjustable by way of two grub screws concealed within the posts. Insert the appropriate hex key in the postholes on the face of the bridge and adjust the height of the treble and bass sides of the bridge to taste (Photo 5).
The saddles themselves should only be used to set radius. Doing so this way will keep the saddles low enough that the intonation screws won't hit your strings, and it'll make life easier down the road should you decide you want to change action. Two screws, after all, are much easier to adjust than 12.
String Slippage and Bridge Buzz
Photo 6
We've already addressed shimming as one possible solution for slipping strings, but with import bridges or worn saddles, it may be necessary to file a deeper groove in them. Aftermarket bridges such as the Staytrem deal with this by utilizing a single, deep slot on each saddle, while the string channels of the two-saddle Mastery Bridge guarantee your strings won't be going anywhere (Photo 6).
Another option is adding a Buzz Stop—an aftermarket part that bolts onto the vibrato plate and forces the strings down toward the body. This isn't my favorite solution, because it not only shoves the strings into the back of the bridge, it also introduces another point of friction between the vibrato and bridge, and this can upset the feel and stability of the system.
The Vibrato
The Fender offset vibrato is hands-down my favorite unit on the market. There's nothing out there that feels quite like it. With a wider range of pitch than Bigsbys, but not quite as immediate as the Stratocaster trem, it's my opinion that this is the most musical vibrato around.
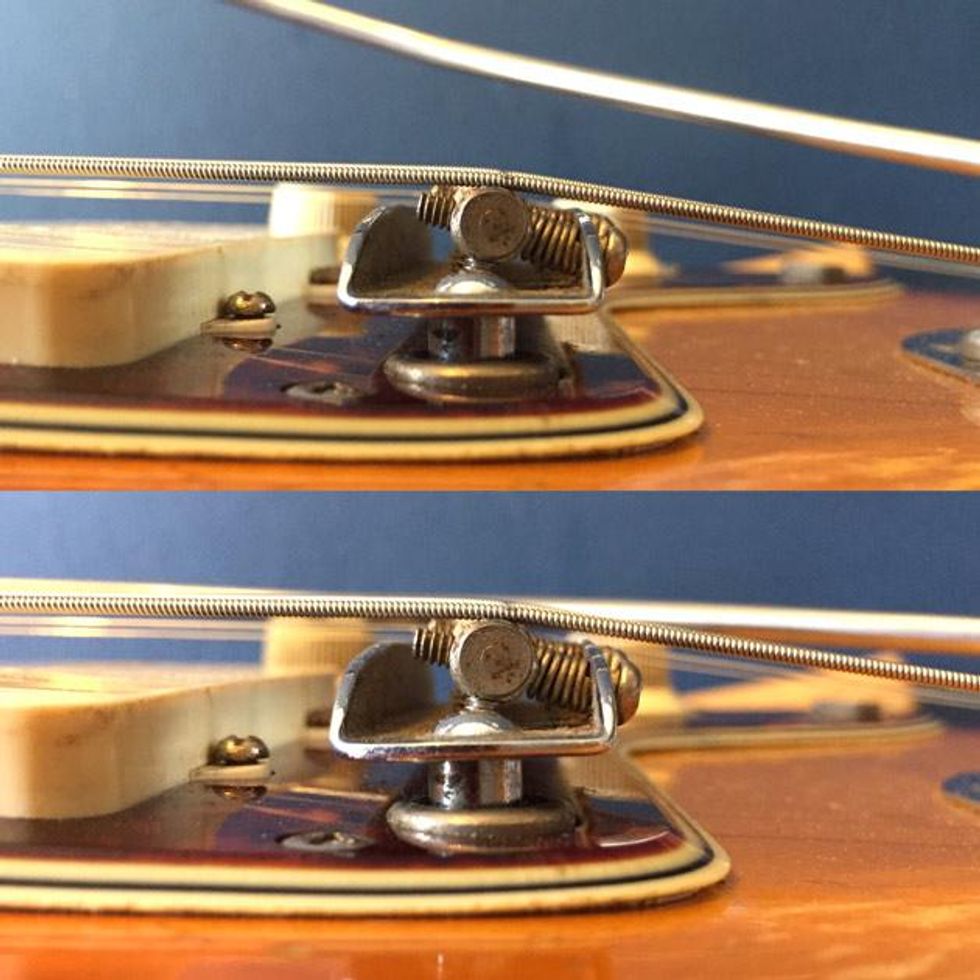
Photo 7
The original bridge is meant to work in tandem with the vibrato, rocking back and forth as the arm is actuated (Photo 7). This confounds some players, but believe me, it's supposed to be like that. The bridge should zero out, but if you're using lighter string gauges you may find this somewhat unreliable.
Photo 8
Wrapping the bridge posts with foil or electrical tape to stop the bridge from rocking is a common DIY mod (Photo 8). Of course, you could substitute a Mastery or Staytrem instead. If you've never removed the vibrato, what's going on under the plate may not be fancy, but it is effective. The strings anchor through the same plate as the collet for the arm and the spring, which has adjustable tension.
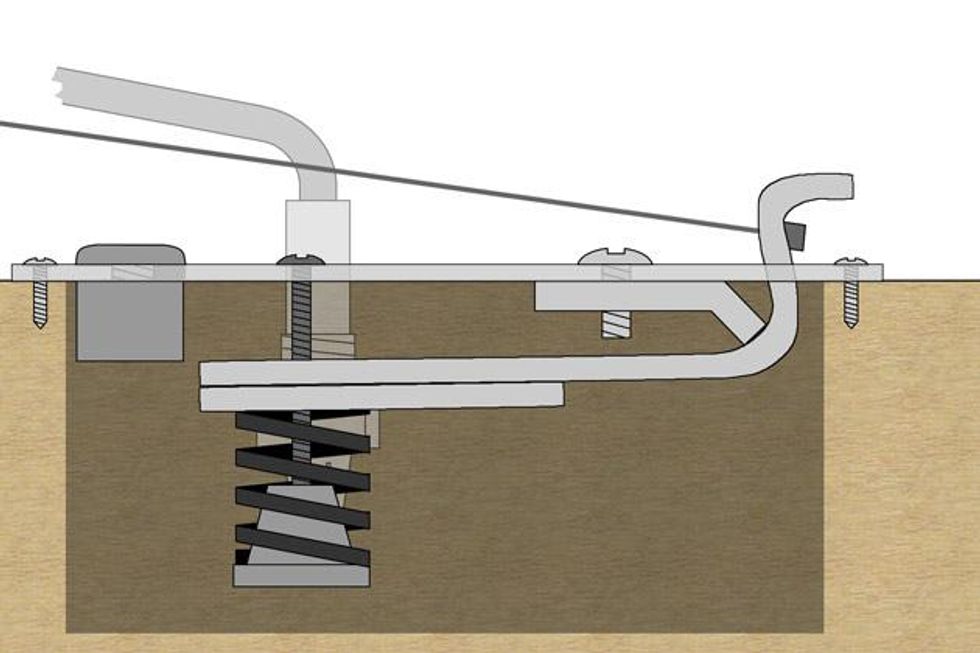
Fig. 1 — Diagram courtesy of Tom Arnold / offset.guitars.com
This assembly hinges on a pivot plate, which is attached to the face of the unit by three screws. When the bar is depressed, this pushes the anchor plate down toward the spring, which, in turn, pushes back (Fig. 1).
The Trem-lock
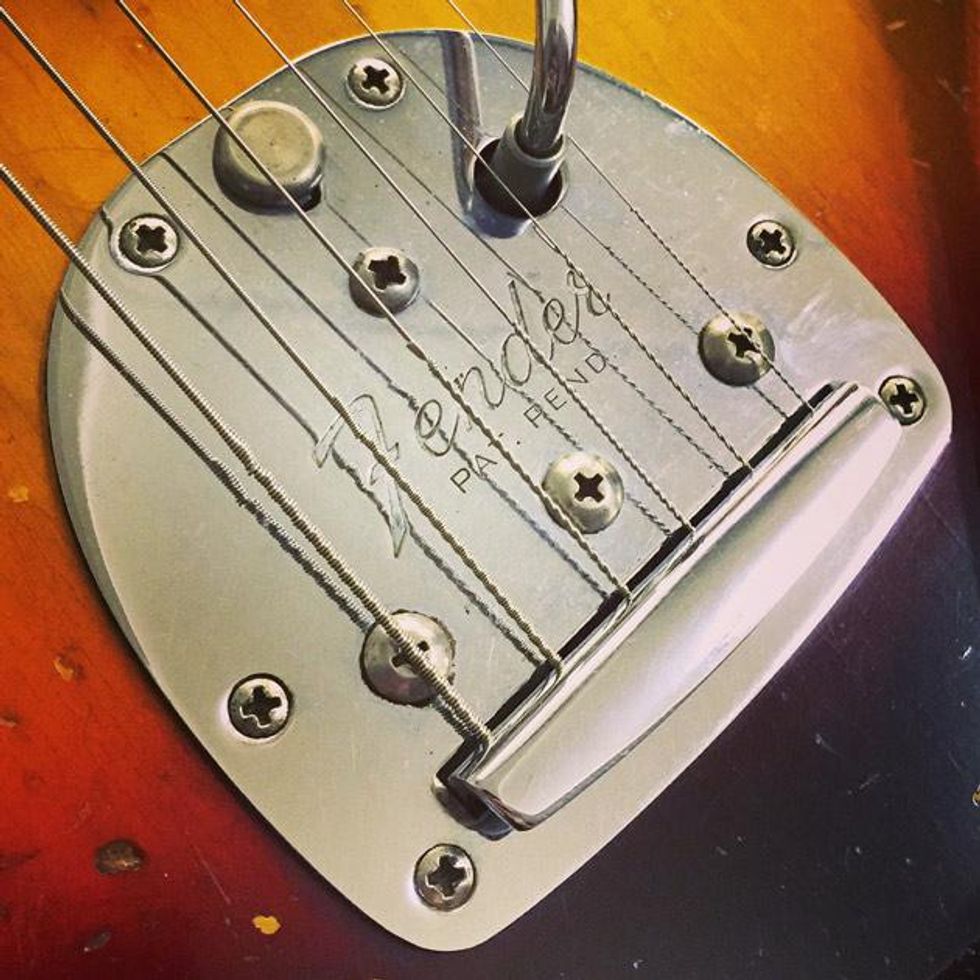
Photo 9
The most interesting feature may be the unassuming little button on the forward edge, known as the trem-lock (Photo 9). Many players erroneously believe that engaging this button effectively hard-tails the vibrato, but that's not at all correct. In fact, with it engaged, you can still depress the bar—you just can't pull up. And there's good reason for that.
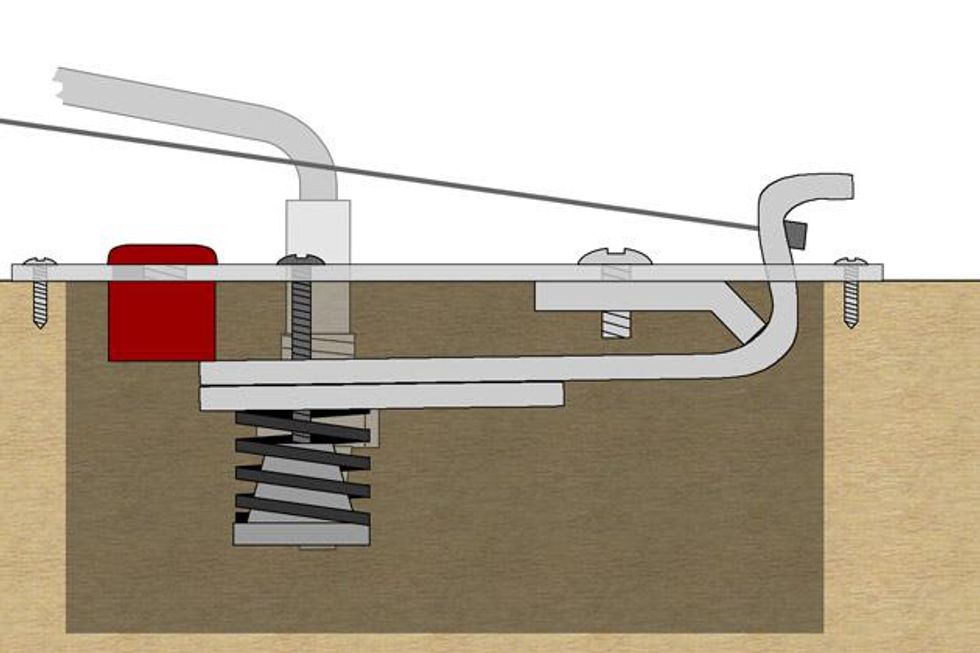
Fig. 2 — Diagram courtesy of Tom Arnold / offset.guitars
The actual intended purpose of the trem-lock button is as a sort of mechanical memory for when a string breaks. When a break occurs, the decreased string tension causes the unit to pull sharp. Sliding that button back (Fig. 2), the vibrato "recalls" the tension of the remaining strings, returning them to pitch automatically. It's all about balance.
To get the trem-lock working properly, make sure your strings are tuned, then depress the vibrato arm until you can slide the button all the way back. If you release the arm and the pitch is lower than it should be, you'll need to loosen the spring tension by turning the screw counterclockwise. Return your strings to pitch, and repeat until you've achieved balance. If you can easily slide the trem-lock button all the way back but still pull up on the bar, then you'll need to tighten the spring's tension by turning the screw clockwise.
Incidentally, setting up the trem-lock button is also useful as a guide for the overall feel and play of the vibrato. In my view, doing so brings out the best in the system, with plenty of upward and downward pitch variation. Of course, I recommend that players adjust their instruments according to their needs, so if what you want is maximum downward travel, then, by all means, tighten that spring.
String Breakage
If you break strings frequently on your Jazzmaster or Jaguar, it's probably happening in one of two areas of the vibrato itself. To properly diagnose these issues, it's important to pay attention to how the string is breaking.
If the string breaks at the anchor plate, this could mean that a burr has developed where the ball end rests. A visual inspection is usually all you'll need to confirm this. The best way to fix the problem is to use a small file to gently round off any sharp edges on the perimeter of the string-through hole. Mitchell's Abrasive Cord, sold by StewMac and most woodworking retailers, is a godsend in this regard—it's the Soap on a Rope of the sandpaper world! Thread it through the hole in question and then use it to "floss" the plate. It'll take care of this issue in no time flat.
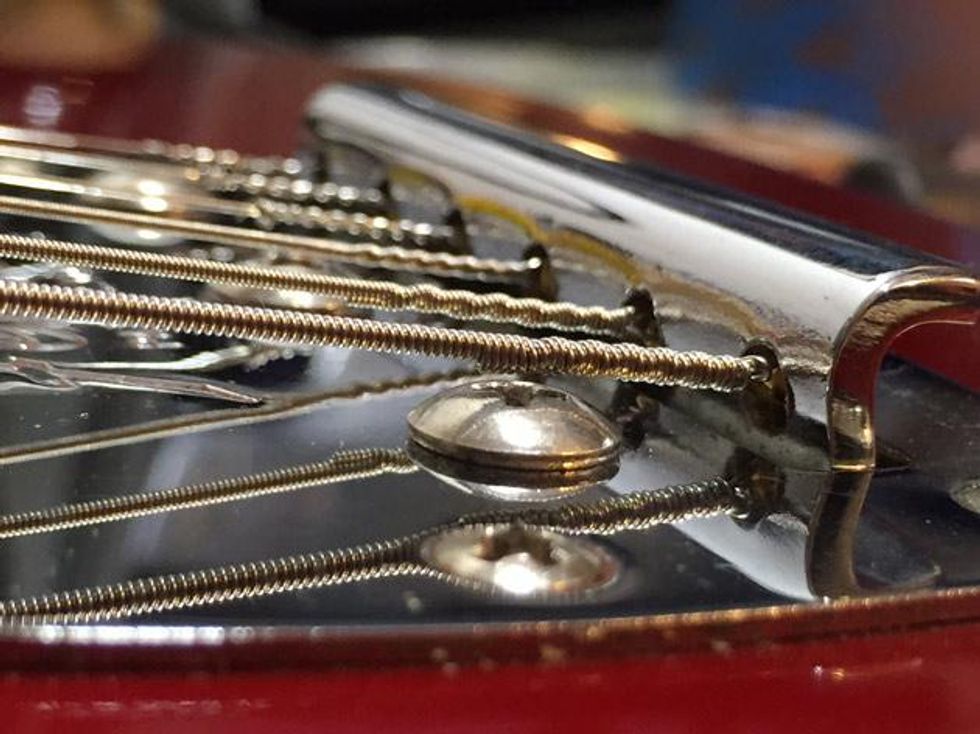
Photo 10
The other main source of frustration when it comes to string longevity is due to the E strings not having enough clearance over the outermost screws that secure the pivot plate. On vintage trems, these screws have a flattened dome and aren't an issue, but for some reason the American Vintage reissue vibratos have taller, fully domed screws, which causes big problems for the low E string (Photo 10). As the player uses the vibrato, the string rubs against the Phillips head of the screw, which eventually saws through the finish wrap of the string, causing it to unwind.
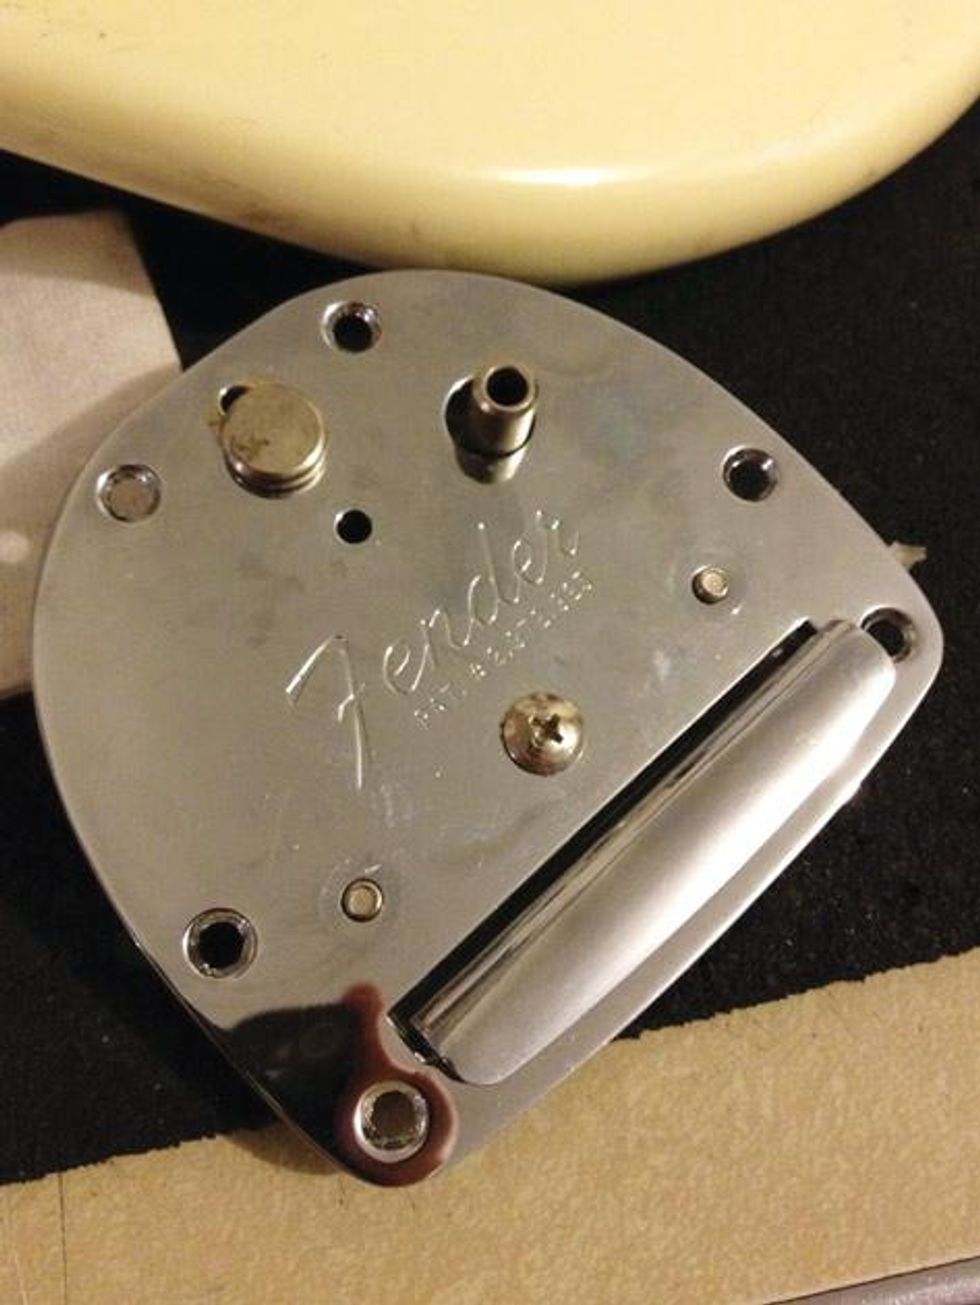
Photo 11
The two best ways I've found to address this are as follows. First, soldering the finish wraps of the strings reinforces them more than enough to withstand even heavy vibrato use. Or, if you're handy, flip the screws over. Simply remove the vibrato from the body, unscrew the spring and claw assembly, and set aside the anchor plate. Remove the offending outermost screws, re-insert them upside down, tighten them down, and then reassemble the entire unit as standard. With the heads hidden, the threaded ends of the screws will barely poke out of the body plate (Photo 11), leaving more than enough space for strings.
A Call to Arms
Issues with the arm itself seem to be universal, no matter which model you own. Often it swings freely and is prone to falling out of the guitar—a symptom of poor contact between the arm and its collet. Sure, you could order a Staytrem arm and replacement collet (which is amazing) or install a Mastery Vibrato with its adjustable arm tension (also amazing), but this article is all about that DIY lifestyle, so let's get our hands dirty, yes?
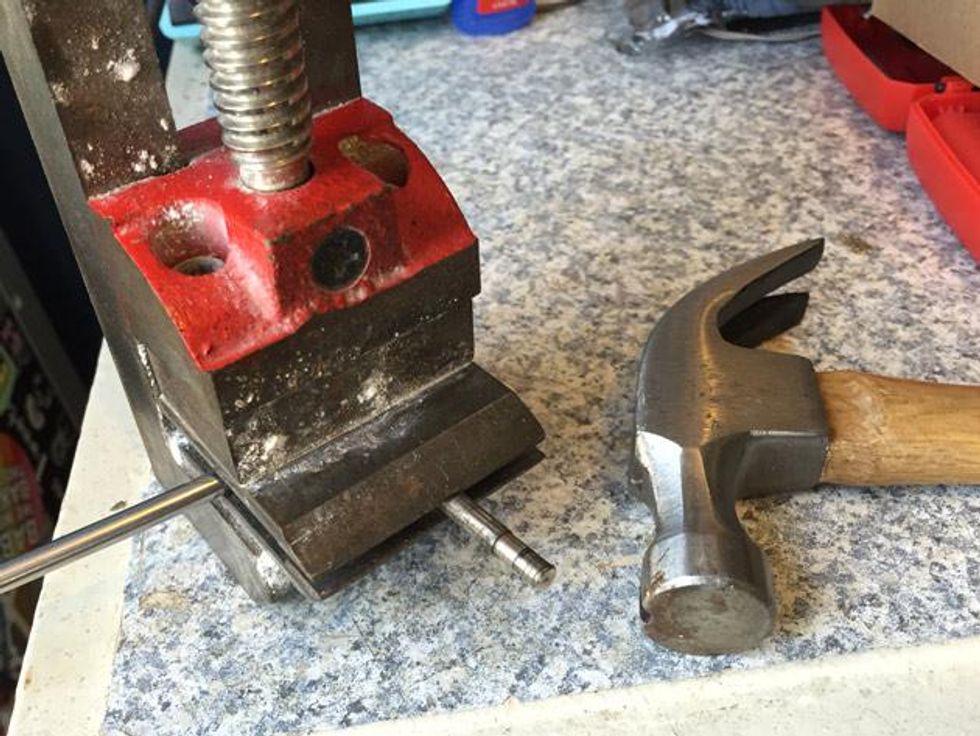
Photo 12
Put the arm in a vice and clamp it down with about 1" of the insert end sticking out (Photo 12). One good tap on that end with a hammer will put a nearly imperceptible bend in the end of the arm, and that's just enough to create some positive contact. Repeat a few more times if it's still not quite right or you want your arm to stay in place when you let go. This is legitimately one of my favorite and most-used tricks.
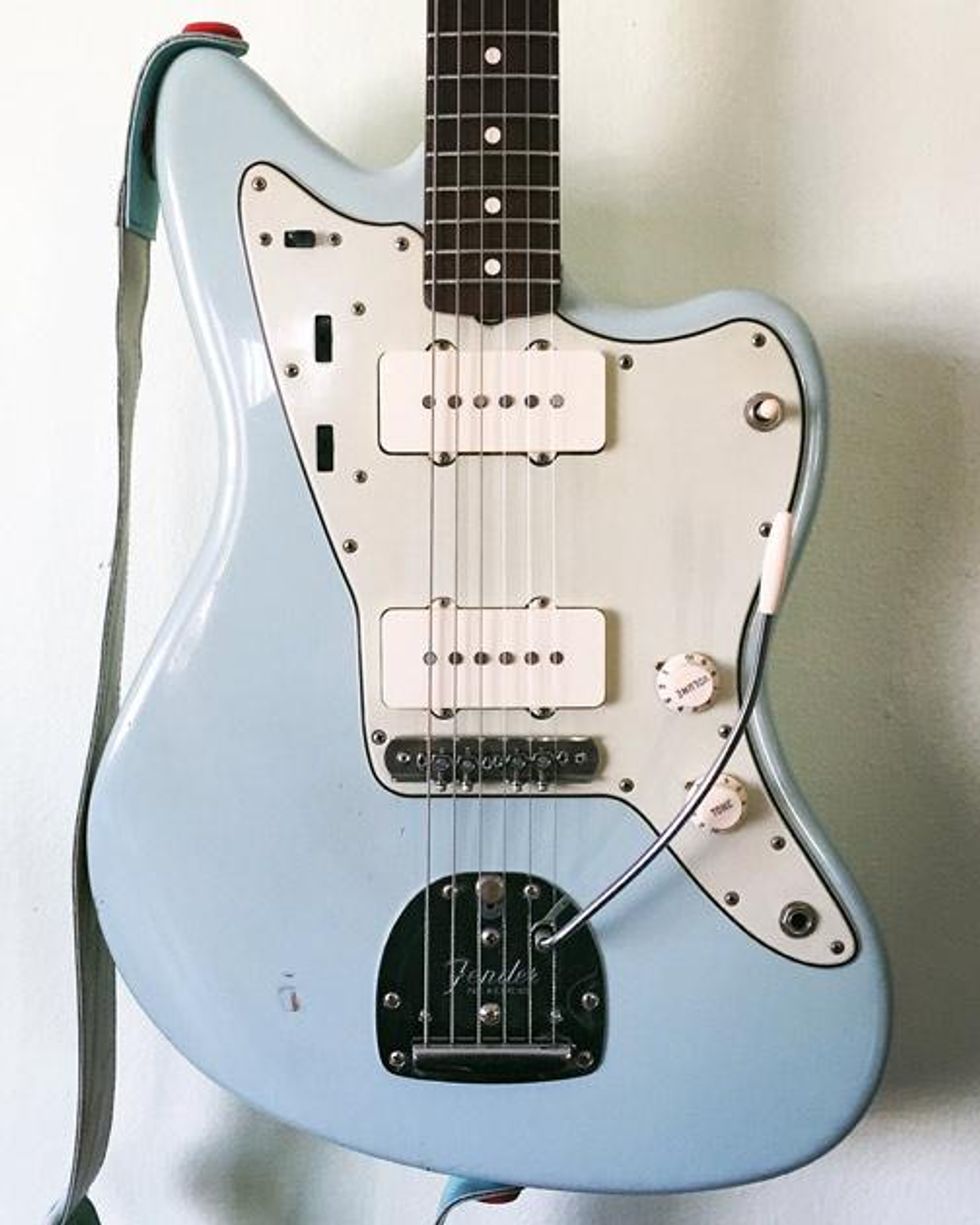
Photo 13
I'm often asked why my vibrato arms have such a graceful curve when they don't come like that from the factory. A lot of folks don't realize you can do that yourself! The first thing I do when I acquire a new instrument is bend the arm so it snakes around the bridge and the tip sits in my palm (Photo 13). Just hold the arm in your hands and use your thumbs to bend it. If you're worried about potential damage, use a heat gun to soften the metal first, but be careful not to burn yourself.
Look, I could go on. I really could. While there are countless other, more nuanced intricacies to discuss, it's my hope that this at least gives you a starting point for wrangling the obtuse beast that is the Jazzmaster. Good luck!
[Updated 9/15/21]