Photo 1
After replacing or upgrading a nut, finish the job with fast-acting cyanoacrylate adhesive.
In my previous column (“Using Super Glue in Guitar Repair”), we explored techniques for using fast-acting adhesive to seat frets and secure a string nut. We’re not quite done with this topic, but before we put super glue to work on another project, please take a moment to review the safety tips I outlined last time around. As I mentioned before, super glue can be your best friend or worst enemy, so before you start slinging the cyano, it’s important to refresh your memory of these crucial dos and don’ts. Right? Thought so.
String nut touch-up.
Super glue is handy for making small repairs to a guitar’s finish. Here’s an example: Most guitars have a little finish at either end of the string nut to create a smooth transition between the edge of the fretboard or binding and the nut itself. But after replacing the string nut—let’s say you’ve upgraded from a plastic nut to one made of bone—there’s usually a small edge or drop off where the nut meets the fretboard (Photo 1). As you may recall from our prior column, super glue is available in a variety of thicknesses. To smooth out the transition between the nut and where it joins the fretboard, you can fill that area using a few drops of medium viscosity or gel-formula super glue.
Make sure the area around the edge of the string nut and binding is absolutely level, because you don’t want the glue to pool on one side of the nut edge and create more work for you later.
But wait, there’s more! It’s common for the binding on older guitars to turn yellow over time. Stewart-MacDonald sells an amber-tinted formula that matches this aged look nicely. (Stew-Mac also offers tinted super glues in white and black, which can come in handy for other finish touch-up projects.) If your guitar has binding, using tinted medium super glue will accomplish two goals: You’ll fill the edges around the ends of the replacement nut and help it blend in with the binding.
Assume the position.
First, place the guitar on its side so the neck is horizontal to the workbench and one end of the nut faces up, the other down. To prevent an electric guitar or bass from tipping over, I use a quick release clamp on the body to stabilize it. Because acoustics have a thicker body, they’ll typically stay in place without a clamp. Balance the guitar on its tuner keys, not the neck, and use books or small boxes to support the guitar as it rests on it side. (In our shop, we use leather bags filled with buckshot for this and other stabilizing tasks.)
Make sure the area around the edge of the string nut and binding is absolutely level, because you don’t want the glue to pool on one side of the nut edge and create more work for you later. A bubble gauge comes in handy here.
Apply the glue.
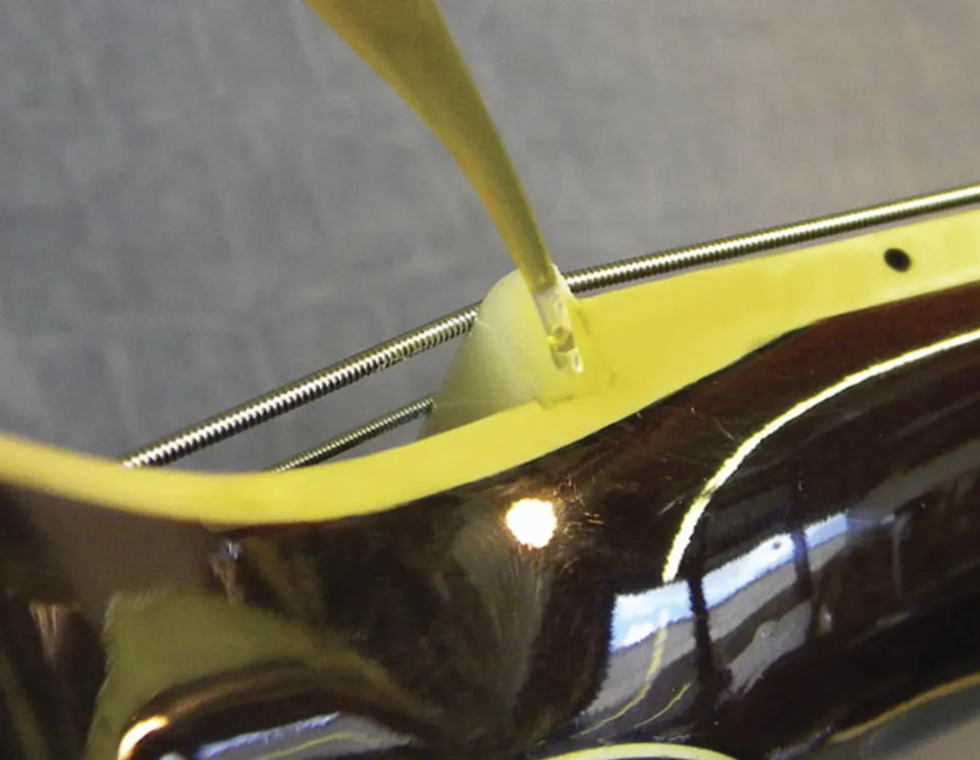
Photo 2
This is where you don your safety glasses. Once the guitar is stable, put a few drops of super glue on the end of the nut and let it dry (Photo 2). You only need to apply enough glue to cover the side of the nut and binding to build a smooth surface where they join together. A medium formula of glue, which is what we recommend, will take several minutes to dry. If you want to speed up the drying process, you can spray super glue accelerant on it. We’ve used GluBoost and NCF Quick brands in our shop, and they both work great.
Having a well-ventilated workspace will reduce accelerant fumes and minimize eye irritation. At the shop, we run a small fan to keep the air circulating when using super glues and accelerants.
Tip: Accelerants can cause what we call the “Swiss cheese effect.” This happens when you prematurely spray the accelerant on the glue. It causes a chemical reaction that results in the glue bubbling up into a white foam, which forces you to scrape away all the glue and start over. To avoid this, wait several minutes before blasting the glue with an accelerator. A little patience will save you a lot of time.
File it down.
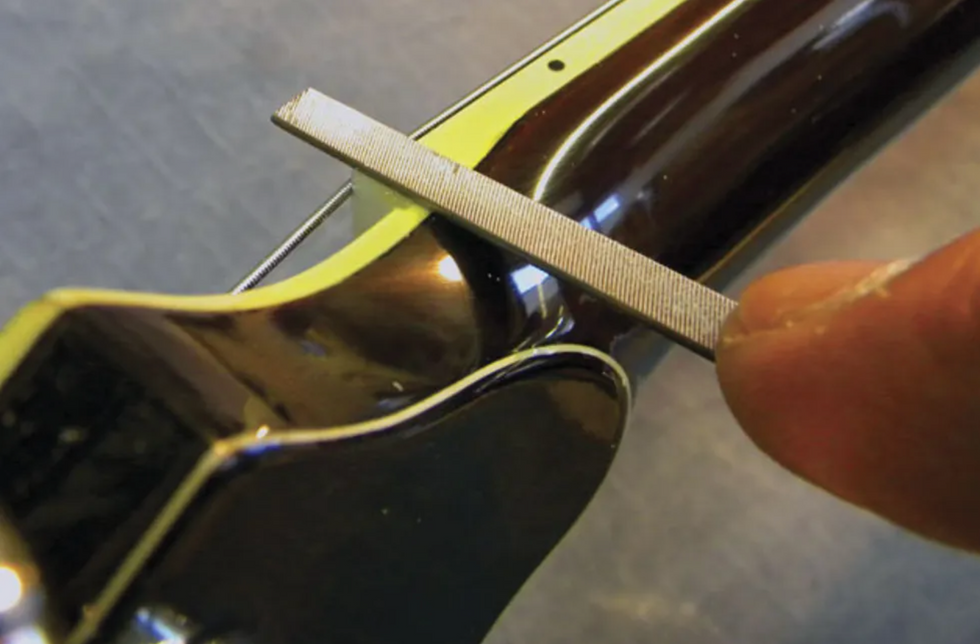
Photo 3
When the glue is dry, use a miniature file to gently file away any excess (Photo 3). Do this carefully to avoid damaging the original finish around the nut and binding. The object of the exercise is to file the glue flush with the nut and binding without disturbing the surrounding surfaces.
Sand and buff.
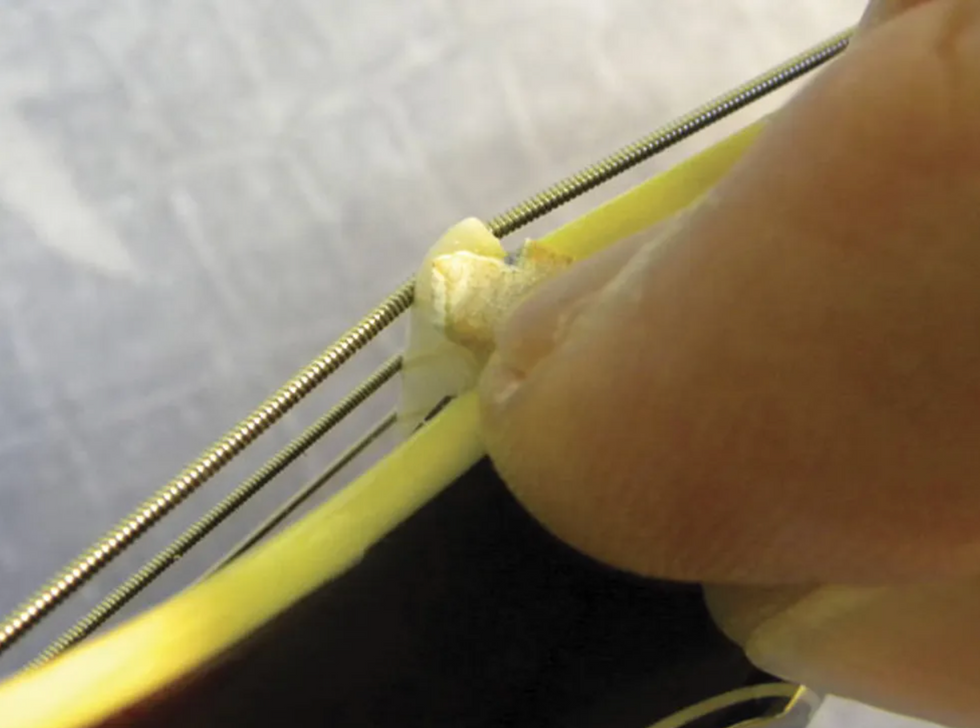
Photo 4
Next, lightly sand the glue-covered area with 600 grit paper to feather it to the edge of the fretboard or binding (Photo 4). Now gently sand it with 1500 grit paper to smooth out any scratch marks.
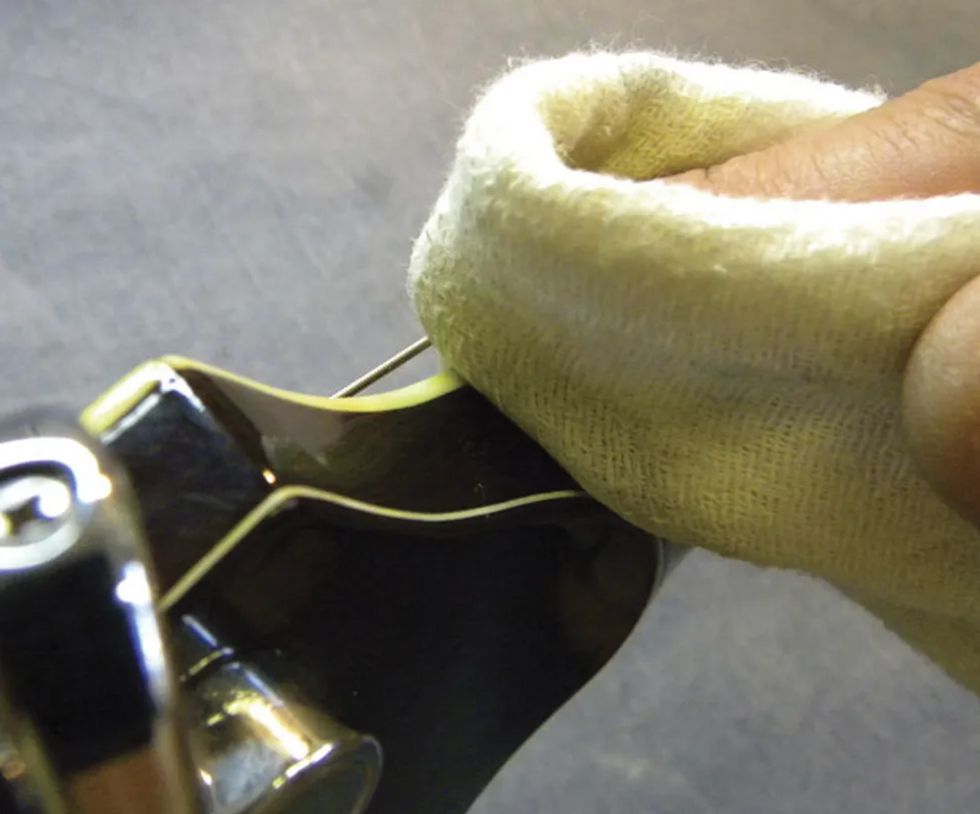
Photo 5
Finish this job using extra-fine buffing compound and a polishing cloth (Photo 5). I use Planet Waves Restore for this last stage, but you can find other buffing compounds at auto stores or online.
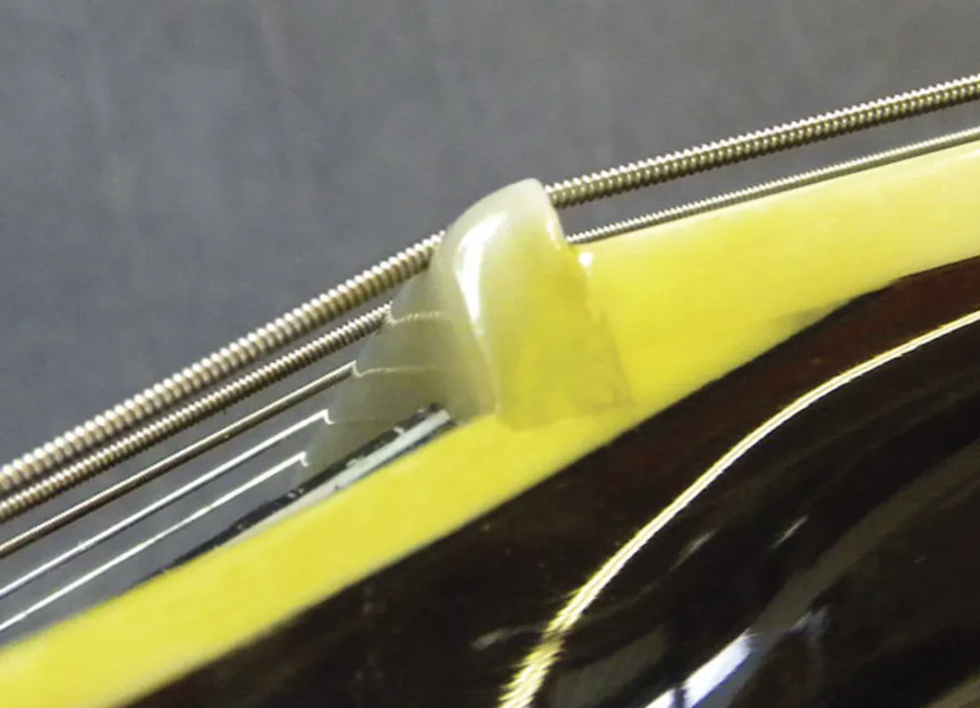
Photo 6
Now step back and admire your work, which should look similar to Photo 6.
After flipping the guitar over on its opposite side, position and secure it (remember to keep the neck perfectly level), and then repeat the process for the other end of the nut.
And that’s it—another task completed, thanks to super glue.
[Updated 1/20/22]
- Guitar Shop 101: Using Super Glue in Guitar Repair - Premier Guitar ›
- Guitar Shop 101: Dealing with a Stripped Truss-Rod Nut - Premier ... ›
- Guitar Shop 101: The Guitarist's Essential Toolkit - Premier Guitar ›
- Guitar Shop 101: Using Super Glue in Guitar Repair - Premier Guitar ›
-
Crank the heat! PG's John Bohlinger plugs into the boutique-built Sterling Vermin, a modern twist on the iconic Rat distortion. Hear it rip through Strats, Teles, and a Les Paul with classic snarl and smooth silicon/BAT41 clipping.
Sterling Vermin RAT
The Sterling Vermin was born from a desire for something different — something refined, with the soul of a traditional RAT pedal, but with a voice all its own.
Built in small batches and hand-soldered in ACT’s Jackson, Missouri headquarters, the Sterling Vermin is a work of pure beauty that honors the brand legacy while taking a bold step forward for creativity.
The Sterling Vermin features the LM741 Op-Amp and a pair of selectable clipping diodes. Players can toggle between the traditional RAT silicon diode configuration for a punchy, mid-range bite, or the BAT41 option for a smoother, more balanced response. The result is a pedal that’s equally at home delivering snarling distortion or articulate, low-gain overdrive, with a wide, usable tonal range throughout the entire gain spectrum.
The pedal also features CTS pots and oversized knobs for even, responsive control that affords a satisfying smoothness to the rotation, with just the right amount of tension. Additionally, the polished stainless-steel enclosure with laser-annealed graphics showcases the merging of the pedal’s vintage flavor and striking design.
From low-gain tones reminiscent of a Klon or Bluesbreaker, to high-gain settings that flirt with Big Muff territory — yet stay tight and controlled — the Sterling Vermin is a masterclass in dynamic distortion. With premium components, deliberate design and a focus on feel, the Sterling Vermin is more than a pedal, it’s a new chapter for RAT.
The Sunset is a fully analog, zero latency bass amplifier simulator. It features a ¼” input, XLR and ¼” outputs, gain and volume controls and extensive equalization. It’s intended to replace your bass amp both live and in the studio.
If you need a full sounding amp simulator with a lot of EQ, the Sunset is for you. It features a five band equalizer with Treble, Bass, Parametric Midrange (with frequency and level controls), Resonance (for ultra lows), and Presence (for ultra highs). All are carefully tuned for bass guitar. But don’t let that hold you back if you’re a keyboard player. Pianos and synthesizers sound great with the Sunset!
The Sunset includes Gain and master Volume controls which allow you to add compression and classic tube amp growl. It has both ¼” phone and balanced XLR outputs - which lets you use it as a high quality active direct box. Finally, the Sunset features zero latency all analog circuitry – important for the instrument most responsible for the band’s groove.
Introducing the Sunset Bass Amp Simulator
- Zero Latency bass amp simulator.
- Go direct into the PA or DAW.
- Five Band EQ:
- Treble and Bass controls.
- Parametric midrange with level and frequency controls.
- Presence control for extreme highs.
- Resonance control for extreme lows.
- Gain control to add compression and harmonics.
- Master Volume.
- XLR and 1/4" outputs.
- Full bypass.
- 9VDC, 200mA.
Artwork by Aaron Cheney
MAP price: $210 USD ($299 CAD).
PG contributor Tom Butwin reveals his favorite songwriting secret weapon: the partial capo. Watch how the Shubb C7 and C8 can simulate alternate tunings without retuning your guitar—and spark fresh creative ideas instantly.
Shubb C8b Partial Capo for Drop-D Tuning - Brass
The C8 covers five of the six strings, leaving either the low E or high E string open, depending on how it's positioned.
- Standard setup: Placed on the 2nd fret while leaving the low E string open, it simulates Drop D-style sounds—except you're still in standard tuning (key of E). You get that big, droning bass feel without retuning.
- Reverse setup: Flipping the capo allows the high E string to ring, giving you shimmering drones and new melodic options across familiar chord shapes.
- A flexible tool that lets you simulate alternate tunings and create rich sonic textures—all while keeping your guitar in standard tuning.
Shubb C7b Partial Capo for DADGAD Tuning - Brass
The C7 covers three of the six strings—either D, G, and B or A, D, and G—depending on how it's flipped.
- Typical setup (D, G, B): Creates an open A chord shape at the 2nd fret without needing your fingers. This frees you up for new voicings and droning notes in the key of A.
- Reversed setup (A, D, G): Gets you close to a DADGAD-style tuning vibe, but still keeps you in standard tuning—great for modal, spacious textures often found in folk or cinematic guitar parts.
Use it alone or stack it with the C8 for wild, layered effects and truly out-of-the-box inspiration.
PRS Guitars celebrates 40 years with the limited edition McCarty SC56. Featuring vintage-inspired design and modern innovations, this single-cutaway guitar pays tribute to Ted McCarty and his impact on the industry. With only 400 pieces available, this instrument is a must-have for collectors and performers alike.
PRS Guitars today announced the 40th Anniversary McCarty SC56 Limited Edition. With a classic PRS single-cutaway body shape and carefully chosen specifications, the McCarty SC56 is both a tribute to tradition and a reliable tool for the modern performer. Only 400 pieces will be made.
“The SC56, signifying Singlecut and 1956, model is our most recent tribute to my late mentor Ted McCarty and his impact on the guitar industry. We started with our take on a classic late ‘50s singlecut body. 1956 marks the year that Ted first had guitars made with his newly coined 'humbucker' pickups. It also happens to be the year I was born. Bringing vintage design into the modern era, we loaded this model with our McCarty III pickups, meticulously designed to deliver warm, clear, vintage tone with exceptional note separation and dynamics,” said PRS Guitars Founder & Managing General Partner, Paul Reed Smith.
Anchored by a maple top and mahogany back, the 24.594” scale length and 22-fret Pattern Vintage neck work with Phase III non-locking tuners and PRS two-piece bridge to promote its musical sustain. The PRS McCarty III pickups are controlled by a simple layout — two volume controls, two tone controls, and a three-way toggle on the upper bout.
Single-cutaway guitars are known to be heavier than their double-cutaway counterparts. The McCarty SC56 Limited Edition design incorporates weight-relief, decreasing the weight of the guitar by about 2/3 of a pound, while maintaining several points of attachment between the guitar top and back to eliminate the “hollow” sound of the cavities and promote tone transfer.
With appointments like binding on the fretboard, classic bird inlays, and a vintage-inspired nitrocellulose finish, the 40th Anniversary McCarty SC56 Limited Edition blends heritage and innovation into a timeless instrument.
PRS Guitars continues its schedule of launching new products each month in 2025.
For more information, please visit prsguitars.com.