Photo 1
Ready to tweak your 6-string for maximum musical versatility?
For decades, blues and rock guitarists have been laying glass or metal cylinders across their strings to add expressive riffs to their music. Unlike a Dobro or lap steel, which is played horizontally with a bar and has its strings jacked up way off the fretboard, a standard 6-string guitar can be set up for both fretting and slide work—if you know what you're doing.
Let's explore how to finesse a guitar so its strings sit high enough to keep a slide from crashing into the frets, yet remain close enough to the fretboard that you can play chords and riffs with your fingertips. Yes, you can have it all, as Duane Allman, Johnny Winter, Sonny Landreth, Ry Cooder, Derek Trucks, and many other greats have proven over the years.
It's not too hard to set up an electric guitar for dual duties, so that's what we'll focus on. It's more of a challenge with an acoustic, but with a little ingenuity, you can also adapt the following techniques to a flattop, so read on.
Project overview.
To illustrate the steps, I'll use a 2003 Gibson Les Paul Studio (Photo 1) a client brought in to have converted into a ripping slide guitar. He wanted to stick with his moderately light .010–.049 strings so he could comp and solo as usual, but he also wanted to augment his standard riffage with slide licks when the spirit moved him.
To make this happen, I suggested he use a lightweight, straight-wall glass slide—similar to Allman and Trucks—as opposed to the heavier brass or bottleneck slides that are often favored by acoustic resonator guitarists. Why? Using a lightweight slide, such as a Dunlop Derek Trucks Signature medicine bottle or the aluminum BigHeart Firecracker, makes it possible to use slinkier strings and keep the action reasonably low. Heavier slides can sound great, but they demand stouter strings and stiffer action. A light slide allows you to find that sweet spot in your setup where you can use the same guitar for two very different techniques.
Preliminary measurements.
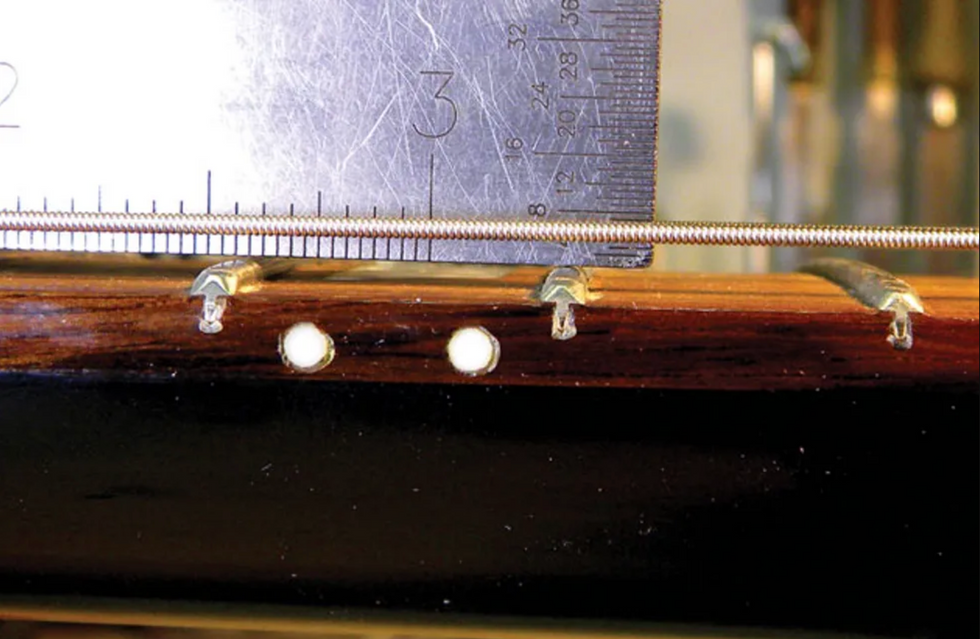
Photo 2
The first step is to measure three things: action at the 12th fret, neck relief, and string height at the 1st fret. These measurements will provide a baseline to work from.
Here's the process: To measure the action, first tune to pitch (this is crucial) and then place a capo on top of the 1st fret. Next use a precision metal ruler to measure the string height at the 12th fret. I use a String Action Gauge—a handy tool from Stewart MacDonald—(Photo 2) for this. You want to determine the distance between the top of the 12th fret and the bottom of both the 6th and 1st strings.
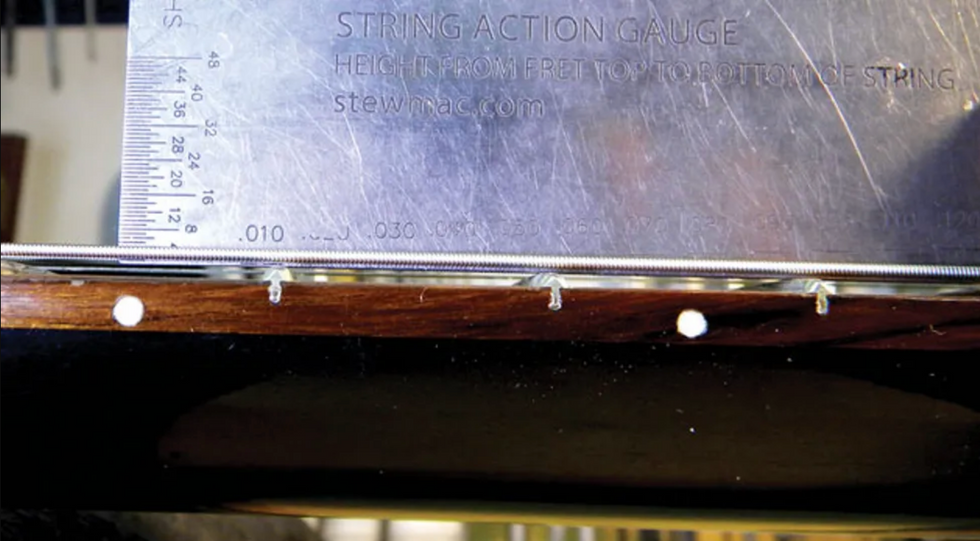
Photo 3
On this Les Paul, the gap was 3/64" for the 1st string and 4/64" for the 6th. This action is comfortable for my client, but too low for slide.
Now to measure the amount of relief. With the capo still on the 1st fret, hold down the 6th string at the last fret and measure the greatest distance between the bottom of the string and the top of the frets (Photo 3).
On my client's guitar, the relief was .012"—perfect for his current playing style and also fine for supporting a lightweight slide. If your guitar has less relief, you may need to loosen the truss rod very slightly to introduce a tad more forward bow. (Read "Time for a Neck Adjustment?" to learn more about working with a truss rod.) But before you take that route, first complete the setup I'm about to describe. It's quite possible these steps will be all you'll need to enter the slide zone.
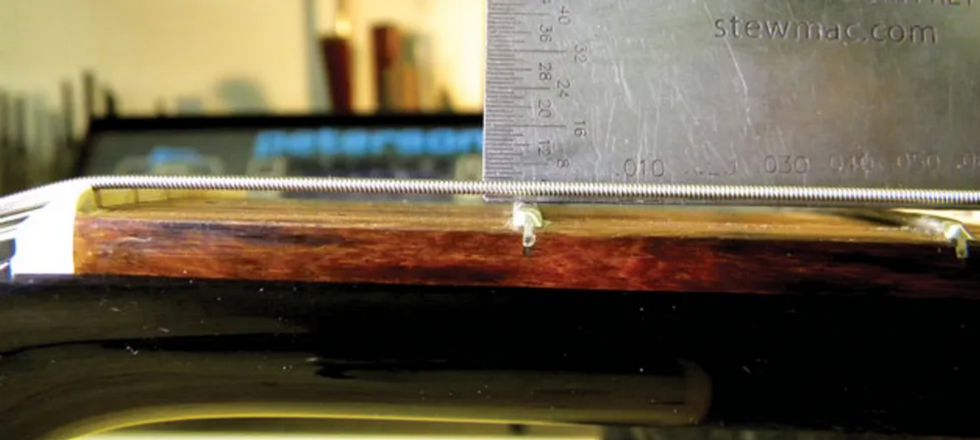
Photo 4
Next, remove the capo (it wouldn't hurt to confirm your strings are still at pitch) and measure the height of the 1st and 6th strings at the 1st fret (Photo 4).
In this case, the height was 1/64" and 2/64" for the 1st and 6th strings, respectively. While this is ideal for fretting chords and lines, it's too low for playing slide.
From these preliminary measurements, I was able to determine what would be required to give this Les Paul its new dual identity:
- Raise the action at the bridge and then adjust individual saddles.
- Raise the action at the nut by either shimming the stock nut or carving a new one.
- Adjust the pickups to balance string-to-string volume.
- Adjust the intonation.
Adjust the bridge.
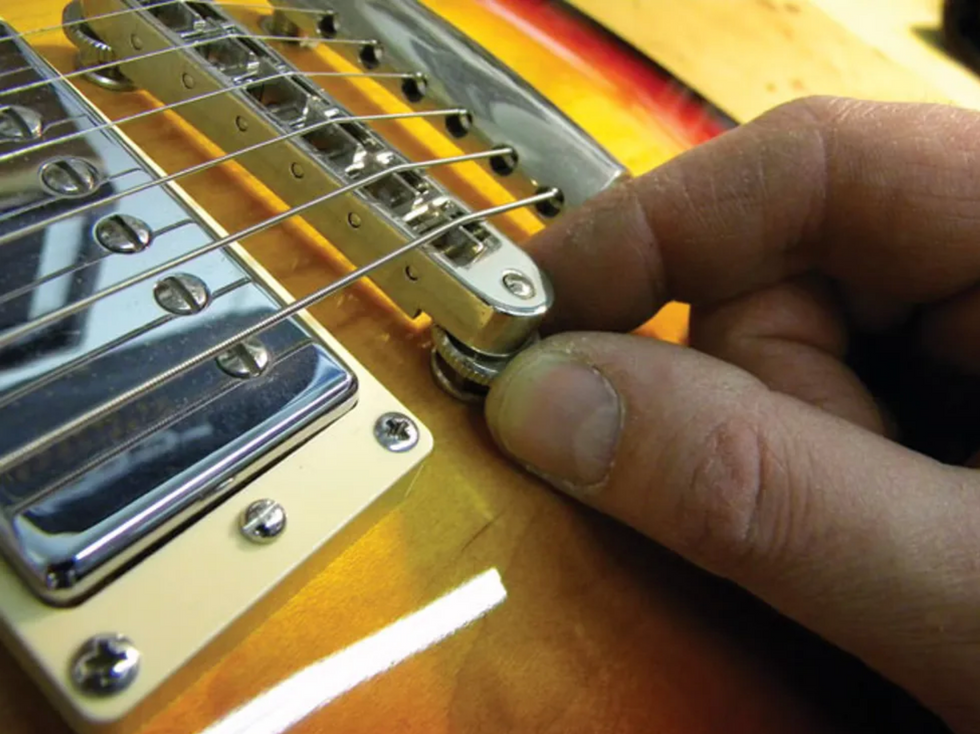
To raise the action on a Les Paul's Tune-o-matic bridge, turn the thumbwheels counter-clockwise (Photo 5). Do this in small increments, perhaps a quarter of a rotation for each thumbwheel. Retune the guitar, put a capo on the 1st fret, and then measure the action at the 12th fret again.
For starters, I suggest adjusting the action to 4/64" on both the 1st and 6th strings. Remember, you can always come back and raise the treble or bass strings a bit more if you find your slide is hitting the frets.
Adjust the saddles.
Now here's our first tricky part. Most lightweight slides (such as a glass or chrome tube, or the medicine bottle favored by Allman and Trucks) contact the strings in a straight line. However, on a guitar set up for fretting—including my client's LP—the strings follow the fretboard radius or curvature. In other words, strings 1 through 6 are subtly arched at the bridge so they sit at a consistent height above the frets.
Slide licks often incorporate two or three strings at a time. When your slide has a straight playing surface, yet the strings are arched, you'll wind up pressing some strings down more than others as you move across the fretboard. This can create subtle intonation problems within a chord or interval.
Yes, you can have it all, as Duane Allman, Johnny Winter, Sonny Landreth, Ry Cooder, Derek Trucks, and many other greats have proven over the years.
The solution is to flatten the string radius at the bridge so the strings sit in a straight line that corresponds to the slide's playing surface. On a guitar with individually adjustable saddles, like a Strat, it's easy to raise or lower each string to achieve the target 4/64" gap between the bottom of all the strings and the top of the 12th fret.
However, on a guitar with a fixed-radius bridge—such as a Les Paul with a Tune-o-matic—some saddle slots will need to be deepened slightly to create a flat line between strings 1 and 6. Typically it's the middle saddles that need attention, but your current bridge radius and string gauges will determine which slots require recutting and by how much.
Gauged nut slotting files, which are available from Allparts, Stewart-MacDonald, and other luthier suppliers, work great for this task because you can precisely size the slot to match the string. For example, knowing that my client plays a .010–.046 set, I'll use a .036 gauge nut file to deepen the notch for the .036 A string.
The process is pretty straightforward: After you've set the bridge so the 1st and 6th strings are 4/64" above the 12th fret, measure the 2nd string. If it's also 4/64" at the 12th fret, move onto the 3rd string. But if it's higher, carefully deepen the slot to bring the 2nd string down to 4/64".
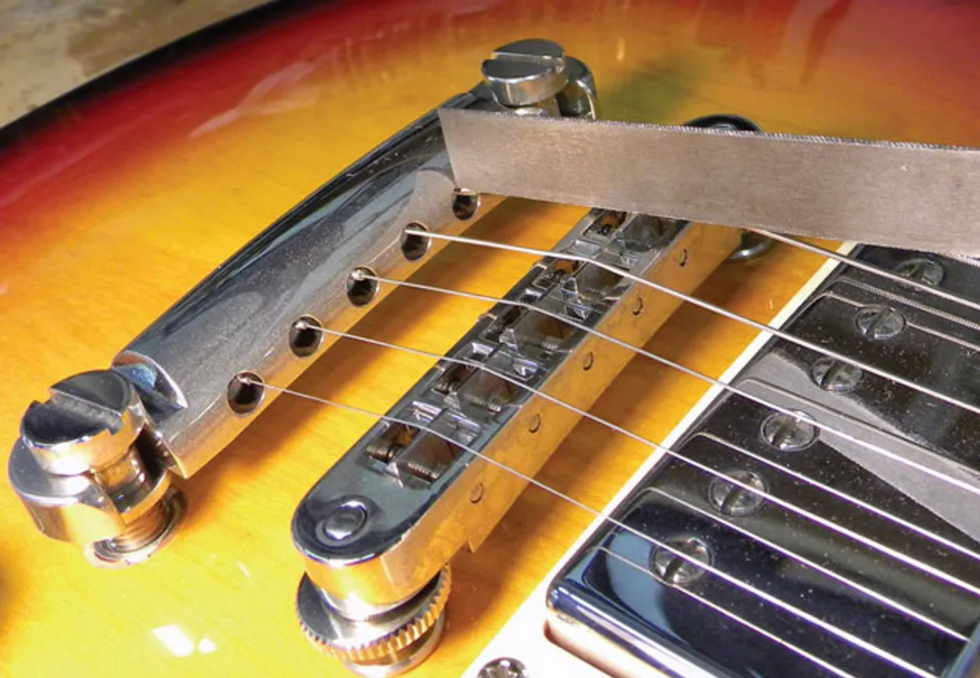
Photo 6
When re-cutting a notch, always follow the angle of the string as it emerges from the tailpiece up to the saddle (Photo 6). Go slowly, retuning and then measuring the action every few file strokes. Gently clean off any burrs on the front or back of the saddle using the nut file. This will prevent the string from getting caught up on the saddle and creating tuning issues.
Repeat the process on each inside string until you've achieved a uniformly level playing surface across all six strings. It's painstaking work, but the payoff in tone and feel will be worth the effort. Once you've flattened the radius and are satisfied with the overall action, you'll be ready to move over to the nut.
Raise the nut.
From experience, I knew that having the 1st string sit 1/64" above the 1st fret is too low for slide, so I'd need to raise the nut on this Les Paul. The trick, of course, is to get the nut high enough to accommodate slide technique, yet not make the guitar unplayable when fretting. Based on the owner's playing style, string gauges, and light glass slide, I decided on a uniform height of 2/64" for all six strings on his guitar.
There are only two ways to correctly and permanently raise the nut: You can shim it or carve a new one. The owner wanted to keep the stock Gibson nut, which was in excellent condition, so we elected to shim it.
Here's how that works: First remove the nut by gently tapping it on the fretboard side with a flathead screwdriver and small hammer (Photo 7). Next, clean up the nut slot by removing the excess glue with a small chisel or razor knife, and then scrape any glue off the nut.
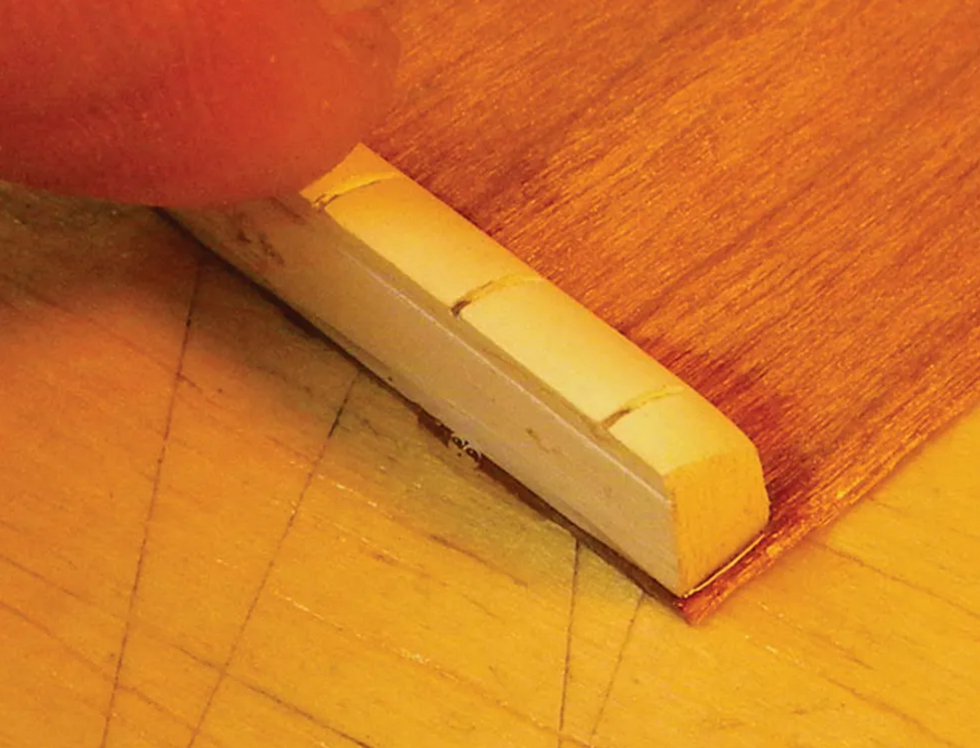
Photo 8
Now super-glue the nut onto a thin piece of mahogany (Photo 8). For this kind of shim, I use a .020" thick piece of wood.
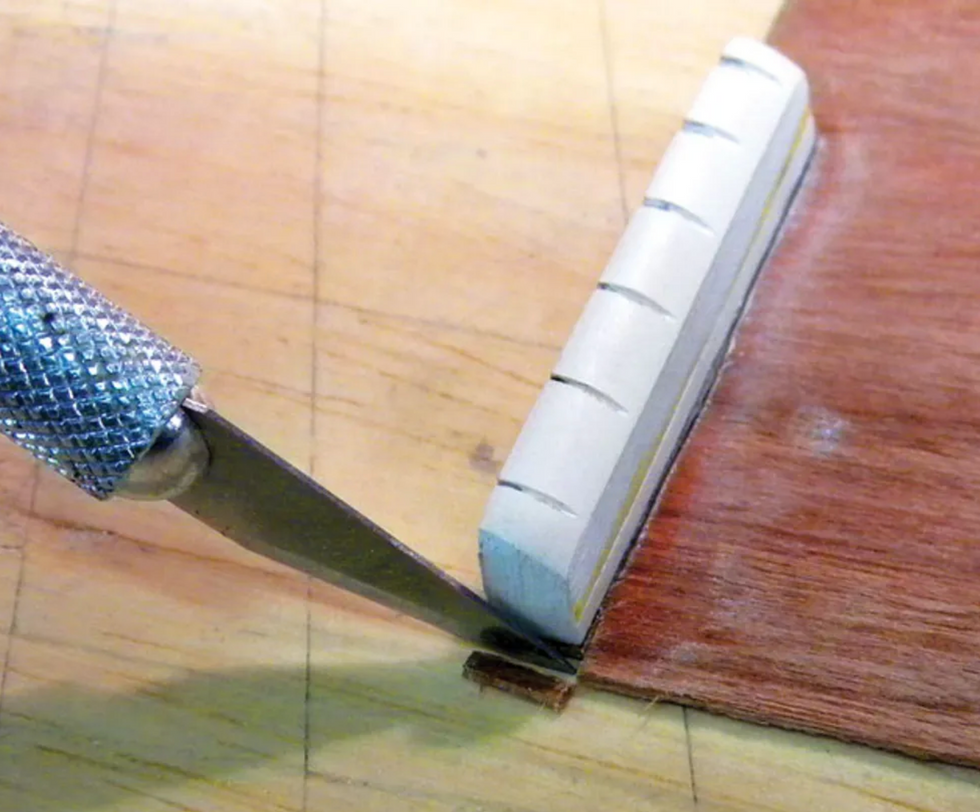
Trim off the excess wood around the string nut with a razor knife (Photo 9). Install the string nut and secure it with one drop of super glue on the face of the nut between the 4th and 3rd strings.
Adjust the pickups.
After you change the action on a guitar—especially to this degree—it's a good idea to adjust the pickups to make sure the treble-to-bass and string-to-string balance is how you want it.
First start with overall pickup height. Hold the 1st and 6th strings down at the last fret and measure the distance from the bottom of the strings to the top of the pickup. The distances in this table provide a good starting point for humbuckers.
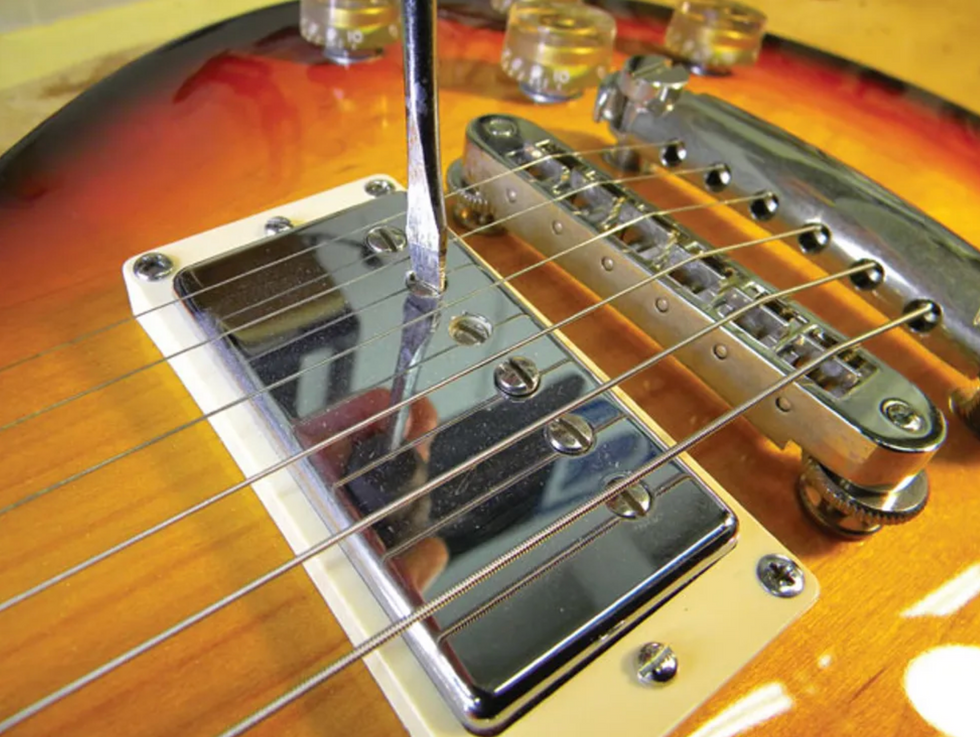
Photo 10
The next step is to adjust the individual pole pieces using a small flathead screwdriver (Photo 10). The goal here is to create an even and consistent string-to-string balance.
Begin with the 5th string pole piece and adjust it to match the volume of the 6th string. Raising the pole piece will make a string louder and vice versa. Then move to the 4th string and compare it to strings 6 and 5. Continue working across the strings, checking them relative to each other and making small tweaks as necessary. Typically, the 3rd string is the loudest, so don't be surprised if you wind up lowering it below the pickup cover to keep it in balance with the other strings.
It's a wrap.
The final step to complete the project is install a new set of strings, tune to pitch, and adjust the intonation. If you need instructions for checking and adjusting the intonation, read "How to Install a New Tune-o-matic Bridge."
With the string height and pickups adjusted for playing slide, our project Les Paul is ready to return to its owner. But before he carts it off, I'll listen to him play and see if the bridge height and pickup pole pieces are dialed in to his satisfaction. If you set up your own guitar for double duty, you may find yourself making small adjustments after playing it for a few days. That's the beauty of being your own tech, right? That said, if you're not confident you can safely work with glue, files, and other tools around your guitar, take it to your local pro.
[Updated 11/18/21]
- DIY: How to Set up Jazzmasters & Jaguars - Premier Guitar ›
- Mod Garage: Humbucker Height Adjustment - Premier Guitar ›
- Epiphone Prophecy SG Review - Premier Guitar ›
The two-in-one “sonic refractor” takes tremolo and wavefolding to radical new depths.
Pros: Huge range of usable sounds. Delicious distortion tones. Broadens your conception of what guitar can be.
Build quirks will turn some users off.
$279
Cosmodio Gravity Well
cosmod.io
Know what a wavefolder does to your guitar signal? If you don’t, that’s okay. I didn’t either until I started messing around with the all-analog Cosmodio Instruments Gravity Well. It’s a dual-effect pedal with a tremolo and wavefolder, the latter more widely used in synthesis that , at a certain threshold, shifts or inverts the direction the wave is traveling—in essence, folding it upon itself. Used together here, they make up what Cosmodio calls a sonic refractor.
Two Plus One
Gravity Well’s design and control set make it a charm to use. Two footswitches engage tremolo and wavefolder independently, and one of three toggle switches swaps the order of the effects. The two 3-way switches toggle different tone and voice options, from darker and thicker to brighter and more aggressive. (Mixing and matching with these two toggles yields great results.)
The wavefolder, which has an all-analog signal path bit a digitally controlled LFO, is controlled by knobs for both gain and volume, which provide enormous dynamic range. The LFO tremolo gets three knobs: speed, depth, and waveform. The first two are self-explanatory, but the latter offers switching between eight different tremolo waveforms. You’ll find standard sawtooth, triangle, square, and sine waves, but Cosmodio also included some wacko shapes: asymmetric swoop, ramp, sample and hold, and random. These weirder forms force truly weird relationships with the pedal, forcing your playing into increasingly unpredictable and bizarre territories.
This is all housed in a trippy, beautifully decorated Hammond 1590BB-sized enclosure, with in/out, expression pedal, and power jacks. I had concerns about the durability of the expression jack because it’s not sealed to its opening with an outer nut and washer, making it feel more susceptible to damage if a cable gets stepped on or jostled near the connection, as well as from moisture. After a look at the interior, though, the build seems sturdy as any I’ve seen.
Splatterhouse Audio
Cosmodio’s claim that the refractor is a “first-of-its-kind” modulation effect is pretty grand, but they have a point in that the wavefolder is rare-ish in the guitar domain and pairing it with tremolo creates some pretty foreign sounds. Barton McGuire, the Massachusetts-based builder behind Cosmodio, released a few videos that demonstrate, visually, how a wavefolder impacts your guitar’s signal—I highly suggest checking them out to understand some of the principles behind the effect (and to see an ’80s Muppet Babies-branded keyboard in action.)
By folding a waveform back on itself, rather than clipping it as a conventional distortion would, the wavefolder section produces colliding, reflecting overtones and harmonics. The resulting distortion is unique: It can sound lo-fi and broken in the low- to mid-gain range, or synthy and extraterrestrial when the gain is dimed. Add in the tremolo, and you’ve got a lot of sonic variables to play with.
Used independently, the tremolo effect is great, but the wavefolder is where the real fun is. With the gain at 12 o’clock, it mimics a vintage 1x10 tube amp cranked to the breaking point by a splatty germanium OD. A soft touch cleans up the signal really nicely, while maintaining the weirdness the wavefolder imparts to its signal. With forceful pick strokes at high gain, it functions like a unique fuzz-distortion hybrid with bizarre alien artifacts punching through the synthy goop.
One forum commenter suggested that the Gravity Well effect is often in charge as much the guitar itself, and that’s spot on at the pedal's extremes. Whatever you expect from your usual playing techniques tends to go out the window —generating instead crumbling, sputtering bursts of blubbering sound. Learning to respond to the pedal in these environments can redefine the guitar as an instrument, and that’s a big part of Gravity Well’s magic.
The Verdict
Gravity Well is the most fun I’ve had with a modulation pedal in a while. It strikes a brilliant balance between adventurous and useful, with a broad range of LFO modulations and a totally excellent oddball distortion. The combination of the two effects yields some of the coolest sounds I’ve heard from an electric guitar, and at $279, it’s a very reasonably priced journey to deeply inspiring corners you probably never expected your 6-string (or bass, or drums, or Muppet Babies Casio EP-10) to lead you to.
Kemper and Zilla announce the immediate availability of Zilla 2x12“ guitar cabs loaded with the acclaimed Kemper Kone speaker.
Zilla offers a variety of customization to the customers. On the dedicated Website, customers can choose material, color/tolex, size, and much more.
The sensation and joy of playing a guitar cabinet
Sometimes, when there’s no PA, there’s just a drumkit and a bass amp. When the creative juices flow and the riffs have to bounce back off the wall - that’s the moment when you long for a powerful guitar cabinet.
A guitar cabinet that provides „that“ well-known feel and gives you that kick-in-the-back experience. Because guitar cabinets can move some serious air. But these days cabinets also have to be comprehensive and modern in terms of being capable of delivering the dynamic and tonal nuances of the KEMPER PROFILER. So here it is: The ZILLA 2 x 12“ upright slant KONE cabinet.
These cabinets are designed in cooperation with the KEMPER sound designers and the great people from Zilla. Beauty is created out of decades of experience in building the finest guitar cabinets for the biggest guitar masters in the UK and the world over, combined with the digital guitar tone wizardry from the KEMPER labs. Loaded with the exquisit Kemper Kone speakers.
Now Kemper and Zilla bring this beautiful and powerful dream team for playing, rehearsing, and performing to the guitar players!
ABOUT THE KEMPER KONE SPEAKERS
The Kemper Kone is a 12“ full range speaker which is exclusively designed by Celestion for KEMPER. By simply activating the PROFILER’s well-known Monitor CabOff function the KEMPER Kone is switched from full-range mode to the Speaker Imprint Mode, which then exactly mimics one of 19 classic guitar speakers.
Since the intelligence of the speaker lies in the DSP of the PROFILER, you will be able to switch individual speaker imprints along with your favorite rigs, without needing to do extensive editing.
The Zilla KEMPER KONE loaded 2x12“ cabinets can be custom designed and ordered for an EU price of £675,- UK price of £775,- and US price of £800,- - all including shipping (excluding taxes outside of the UK).
For more information, please visit kemper-amps.com or zillacabs.com.
Featuring a preamp and Dynamic Expansion circuit for punch and attack, plus switchable amp simulations.
"Like a missile seeking its target, Heatseeker will give you the explosive sound of rock! Inspired directly from the gear setup used by Angus Young,it features the most important sonic elements to match the tone of the short-pants-rock-God.
It’s no secret that a major role to his sound, along with the Marshall-brick walls, played one of the first wireless systems for guitar that quickly became a classic among guitar greats, the Schaffer Vega Diversity System."
The preamp along with the Dynamic Expansion circuit found in the wireless transmitter/receiver gave it its distinct sound. Besides boosting the signal, the preamp tightens up lower frequencies and slightly accentuates mid frequencies while the Dynamic Expansion circuit enhances the dynamic response and harmonics of the signal giving punch and attack to ensure that it will cut through the mix. Instead of opting for a prefix setting for the Dynamic Expansion circuit as found in the original unit, we have re-imagined our version with the enhanced knob on the Heatseeker to have more control over the guitar tone’s dynamic response. Setting it around 10 o‘clock is a good starting point to add some extra sparkle. Max it out to bring back to life even the most dull and colorless sounds.
Utilizing an all-analog JFET circuit, running on 27 volts via an internal voltage boost (DO NOT plug higher than 9V DC power supply), we have captured the tone and feel of three British tube amplifiers, synonymous with the sound of rock and roll, with an excellent clean-to-mean dynamic response. With the flip of a toggle switch, you can capture the sound and feel of a JTM45, 1959 Super Lead, or JMP 2203. A smart switching circuit follows the signal path and respective gain stages tuned for each amp and combines them with an actual Marshall style EQ and power amp simula-tion circuit for thundering rock tones. Angus Young usually plugs into Channel 1 or High Treble input of his JTM45s and Super Leads so we opted for that sound when we started visualizing Heatseeker on the drawing board. We have also extended the range of the presence control beyond the original so that the user will be able to match the pedal to any amp or gear setup. The master volume offers plenty of output so that you can also use the pedal as a preamp and plug it into a clean power amp or straight to your DAW. Note that the pedal doesn’t feature any speaker simulation circuit so we recommend using a separate hardware or software guitar speaker simulation when going direct to DAW or a full-range speaker.
A new feature to our booster/drive + amp-in-a-box line of pedals, recreating legendary sounds, is the switchable WoS (Wall of Sound) circuit. We have carefully tuned this circuit at the output of the AMP section of the Heatseeker to open up the soundstage by increasing the output, adding thundering lows, and thickening high mid frequencies. Imagine standing in front of a wall loaded with Marshall amp heads and 4x12 speaker cabinets, grabbing your SG, and hitting a chord. You will be blown away by the sound projection! In combination with the tube power amp simulation and the enhanced circuit of the right section, we’ve made sure that the pick attack will be as dynamic as it gets, so¥er picking will produce clean and slightly crunchy sounds, and hard picking will give explosive distorted sounds! While primarily designed for Angus Young sounds, Heatseeker will definitely open the door to countless other guitar-great tones that use these Marshall amps and/or the Schaffer Vega Diversity System. Think of KISS, Peter Frampton, and Van Halen to name a few.
Like our other dual overdrive/amp-in-a-box designs, Heatseeker features a passive effects loop to give you the option to connect your beloved pedals between the preamp/enhancer and amp-in-a-box circuit or use the two sections as separate and independent effects when using an external bypass switcher/looper. SND is the output of the BOOST/ENHANCE section, RTN is the input of the AMP section. SND is connected to RTN when no instrument jacks are inserted in the effects loop. Note that all pedals inserted in the passive effects loop are still in the signal chain when any or both sections of the Heatseeker are in bypass mode.
Heatseeker features a power-up bypass/engage pre-set function for the footswitches. You can change the default function by holding down the footswitch(es) during power-up. That way you can select which state your pedal will go to when you plug the power supply. This function comes in especially handy to people who use remote pedal switchers/loopers as they only set the state of the pedal once and then operate from the controller.
Street/MAP Price: $279
For more information, please visit crazytubecircuits.com.
Creed extend their sold-out Summer of ’99 Tour with 23 additional dates.
Produced by Live Nation, the dates begin July 9 at Rupp Arena in Lexington, KY and wrap August 20 at the Scotiabank Saddledome in Calgary, AB with support from 3 Doors Down, Daughtry, Mammoth WVH and Big Wreck. *Check individual dates for lineup in each market.
When it kicked off in 2024, The Summer of ’99 Tour quickly became “one of the most anticipated tours of the summer” (USA Today) and “one of the hottest rock tickets of the year” (Billboard) for a return that “may be something this industry has never seen” (Pollstar). To date, CREED’s Scott Stapp, Mark Tremonti, Brian Marshall, and Scott Phillips have performed over 60 sold-out concerts throughout North America, selling over 800,000 tickets and breaking venue records in multiple markets.
“Thirty years in, it’s been a blessing to pick up right where we left off with longtime fans and to meet the next generation for the first time. It’s been an incredible ride, and we aren’t done, so here’s to a ‘Summer’ that never ends. We’ll see you on the road,” states Scott Stapp.
Creed will close out 2024 with shows in Las Vegas, NV (Dec. 30 & Dec. 31) and their newly announced dates in 2025 will follow their already sold-out Summer of ’99 and Beyond cruise sailing April 9– April 13 from Miami to Nassau with Sevendust, Hoobastank, Lit, Hinder, Fuel and more. Also in April, the band - whose audience has included fans of mainstream, rock, and country for over 25 years - will perform at Stagecoach.
For more information on all Creed tour dates as well as the opportunity to purchase entry into Mark Tremonti’s guitar clinic can be found at https://creed.com.
Tour Dates
CREED: SUMMER OF ‘99 TOUR 2025 DATES:
3DD – 3 Doors Down / D – Daughtry / BW – Big Wreck / MWVH – Mammoth WVH
Wed Jul 09 | Lexington, KY | Rupp Arena – 3DD/MWVH
Fri Jul 11 | Syracuse, NY | Empower Federal Credit Union Amphitheater at Lakeview – 3DD/MWVH
Sat Jul 12 | Camden, NJ | Freedom Mortgage Pavilion – 3DD
Tue Jul 15 | Wantagh, NY | Northwell at Jones Beach Theater – D/MWVH
Wed Jul 16 | Scranton, PA | The Pavilion at Montage Mountain – D/MWVH
Sun Jul 20 | Columbus, OH | Schottenstein Center – 3DD/MWVH
Tue Jul 22 | Hartford, CT | Xfinity Theatre – 3DD/MWVH
Thu Jul 24 | Charleston, SC | Credit One Stadium – 3DD/MWVH
Sat Jul 26 | New Orleans, LA | Smoothie King Center – 3DD/MWVH
Sun Jul 27 | Memphis, TN | FedExForum – 3DD/MWVH
Tue Jul 29 | Wichita, KS | INTRUST Bank Arena – D/MWVH
Fri Aug 01 | Lincoln, NE | Pinnacle Bank Arena – D/MWVH
Sat Aug 02 | Ridgedale, MO | Thunder Ridge Nature Arena – D/MWVH
Mon Aug 04 | Albuquerque, NM | Isleta Amphitheater – D/MWVH
Wed Aug 06 | Chula Vista, CA | North Island Credit Union Amphitheatre – D/MWVH
Thu Aug 07 | Palm Desert, CA | Acrisure Arena at Greater Palm Springs – 3DD/MWVH
Sat Aug 09 | Mountain View, CA | Shoreline Amphitheatre – 3DD/MWVH
Sun Aug 10 | Stateline, NV | Lake Tahoe Outdoor Arena at Harveys – 3DD/MWVH (Not a Live Nation date)
Wed Aug 13 | Ridgefield, WA | RV Inn Style Resorts Amphitheater – 3DD/MWVH
Thu Aug 14 | Auburn, WA | White River Amphitheatre – 3DD/MWVH
Sat Aug 16 | Vancouver, BC | Rogers Arena – BW/MWVH
Tue Aug 19 | Edmonton, AB | Rogers Place – BW/MWVH
Wed Aug 20 | Calgary, AB | Scotiabank Saddledome – BW/MWVH
Previously Announced CREED Dates:
Sat Dec 28 | Durant, OK | Choctaw Casino & Resort (Sold Out)
Mon Dec 30 | Las Vegas, NV | The Colosseum
Tue Dec 31 | Las Vegas, NV | The Colosseum
Apr 9 – Apr 13 | Miami – Nassau | Summer of ’99 and Beyond Cruise (Sold Out)
Sat Apr 26 | Indio, CA | Stagecoach