Photo 1
Ready to tweak your 6-string for maximum musical versatility?
For decades, blues and rock guitarists have been laying glass or metal cylinders across their strings to add expressive riffs to their music. Unlike a Dobro or lap steel, which is played horizontally with a bar and has its strings jacked up way off the fretboard, a standard 6-string guitar can be set up for both fretting and slide work—if you know what you're doing.
Let's explore how to finesse a guitar so its strings sit high enough to keep a slide from crashing into the frets, yet remain close enough to the fretboard that you can play chords and riffs with your fingertips. Yes, you can have it all, as Duane Allman, Johnny Winter, Sonny Landreth, Ry Cooder, Derek Trucks, and many other greats have proven over the years.
It's not too hard to set up an electric guitar for dual duties, so that's what we'll focus on. It's more of a challenge with an acoustic, but with a little ingenuity, you can also adapt the following techniques to a flattop, so read on.
Project overview.
To illustrate the steps, I'll use a 2003 Gibson Les Paul Studio (Photo 1) a client brought in to have converted into a ripping slide guitar. He wanted to stick with his moderately light .010–.049 strings so he could comp and solo as usual, but he also wanted to augment his standard riffage with slide licks when the spirit moved him.
To make this happen, I suggested he use a lightweight, straight-wall glass slide—similar to Allman and Trucks—as opposed to the heavier brass or bottleneck slides that are often favored by acoustic resonator guitarists. Why? Using a lightweight slide, such as a Dunlop Derek Trucks Signature medicine bottle or the aluminum BigHeart Firecracker, makes it possible to use slinkier strings and keep the action reasonably low. Heavier slides can sound great, but they demand stouter strings and stiffer action. A light slide allows you to find that sweet spot in your setup where you can use the same guitar for two very different techniques.
Preliminary measurements.
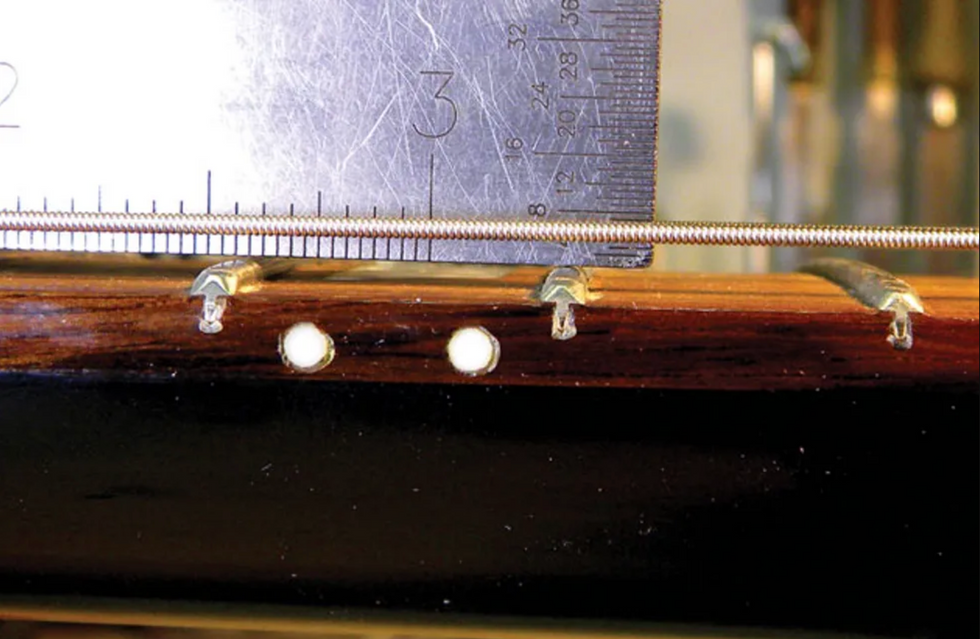
Photo 2
The first step is to measure three things: action at the 12th fret, neck relief, and string height at the 1st fret. These measurements will provide a baseline to work from.
Here's the process: To measure the action, first tune to pitch (this is crucial) and then place a capo on top of the 1st fret. Next use a precision metal ruler to measure the string height at the 12th fret. I use a String Action Gauge—a handy tool from Stewart MacDonald—(Photo 2) for this. You want to determine the distance between the top of the 12th fret and the bottom of both the 6th and 1st strings.
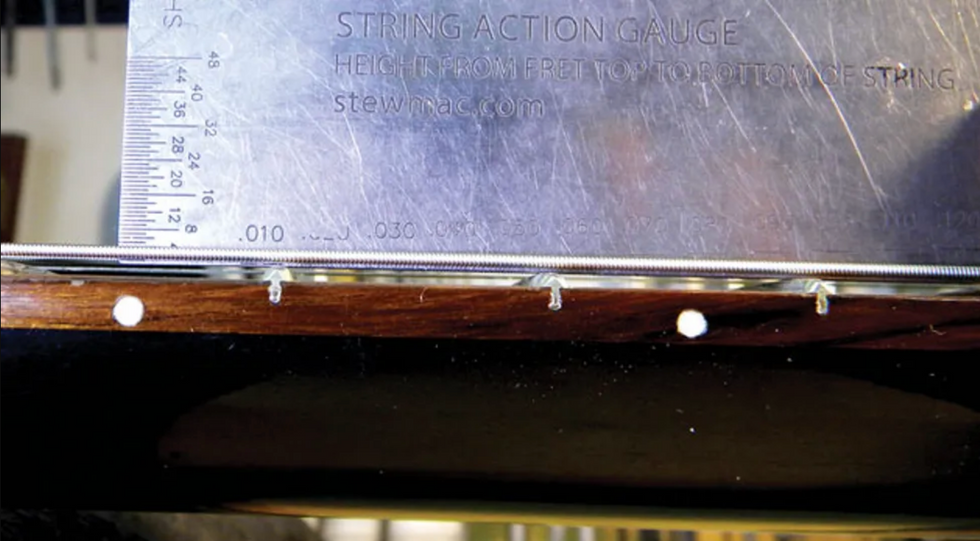
Photo 3
On this Les Paul, the gap was 3/64" for the 1st string and 4/64" for the 6th. This action is comfortable for my client, but too low for slide.
Now to measure the amount of relief. With the capo still on the 1st fret, hold down the 6th string at the last fret and measure the greatest distance between the bottom of the string and the top of the frets (Photo 3).
On my client's guitar, the relief was .012"—perfect for his current playing style and also fine for supporting a lightweight slide. If your guitar has less relief, you may need to loosen the truss rod very slightly to introduce a tad more forward bow. (Read "Time for a Neck Adjustment?" to learn more about working with a truss rod.) But before you take that route, first complete the setup I'm about to describe. It's quite possible these steps will be all you'll need to enter the slide zone.
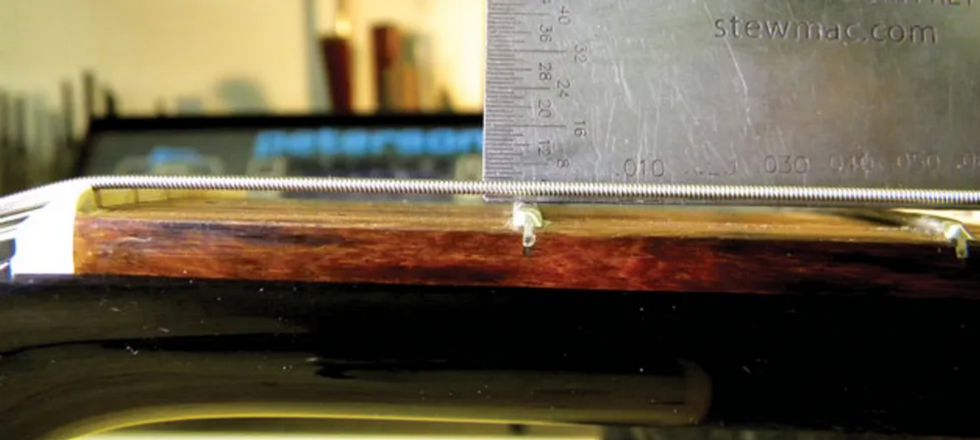
Photo 4
Next, remove the capo (it wouldn't hurt to confirm your strings are still at pitch) and measure the height of the 1st and 6th strings at the 1st fret (Photo 4).
In this case, the height was 1/64" and 2/64" for the 1st and 6th strings, respectively. While this is ideal for fretting chords and lines, it's too low for playing slide.
From these preliminary measurements, I was able to determine what would be required to give this Les Paul its new dual identity:
- Raise the action at the bridge and then adjust individual saddles.
- Raise the action at the nut by either shimming the stock nut or carving a new one.
- Adjust the pickups to balance string-to-string volume.
- Adjust the intonation.
Adjust the bridge.
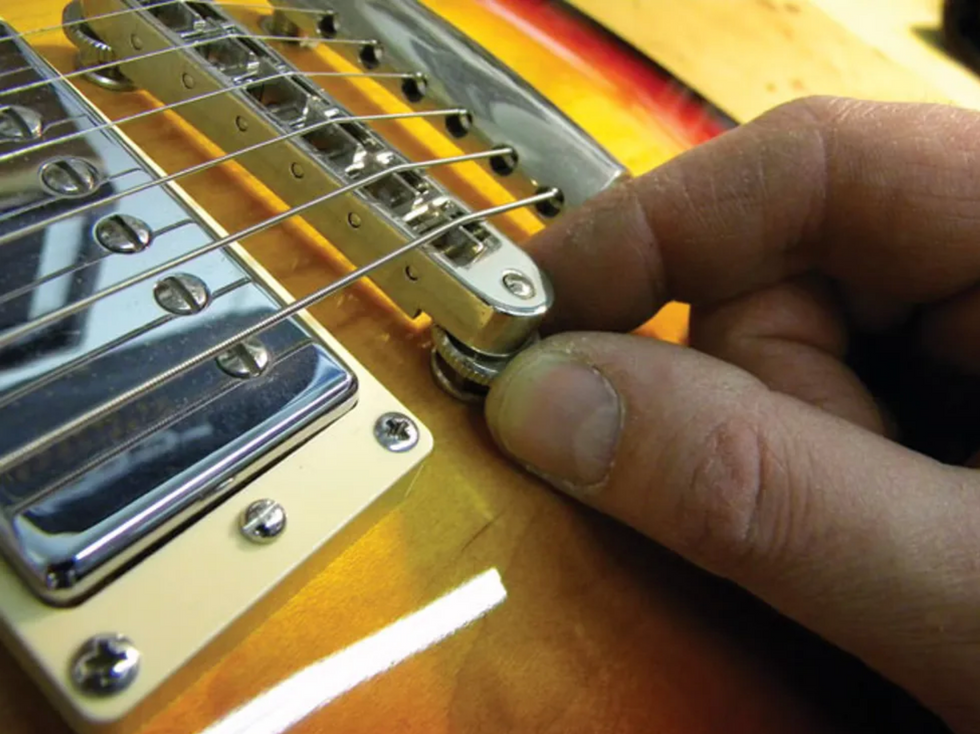
To raise the action on a Les Paul's Tune-o-matic bridge, turn the thumbwheels counter-clockwise (Photo 5). Do this in small increments, perhaps a quarter of a rotation for each thumbwheel. Retune the guitar, put a capo on the 1st fret, and then measure the action at the 12th fret again.
For starters, I suggest adjusting the action to 4/64" on both the 1st and 6th strings. Remember, you can always come back and raise the treble or bass strings a bit more if you find your slide is hitting the frets.
Adjust the saddles.
Now here's our first tricky part. Most lightweight slides (such as a glass or chrome tube, or the medicine bottle favored by Allman and Trucks) contact the strings in a straight line. However, on a guitar set up for fretting—including my client's LP—the strings follow the fretboard radius or curvature. In other words, strings 1 through 6 are subtly arched at the bridge so they sit at a consistent height above the frets.
Slide licks often incorporate two or three strings at a time. When your slide has a straight playing surface, yet the strings are arched, you'll wind up pressing some strings down more than others as you move across the fretboard. This can create subtle intonation problems within a chord or interval.
Yes, you can have it all, as Duane Allman, Johnny Winter, Sonny Landreth, Ry Cooder, Derek Trucks, and many other greats have proven over the years.
The solution is to flatten the string radius at the bridge so the strings sit in a straight line that corresponds to the slide's playing surface. On a guitar with individually adjustable saddles, like a Strat, it's easy to raise or lower each string to achieve the target 4/64" gap between the bottom of all the strings and the top of the 12th fret.
However, on a guitar with a fixed-radius bridge—such as a Les Paul with a Tune-o-matic—some saddle slots will need to be deepened slightly to create a flat line between strings 1 and 6. Typically it's the middle saddles that need attention, but your current bridge radius and string gauges will determine which slots require recutting and by how much.
Gauged nut slotting files, which are available from Allparts, Stewart-MacDonald, and other luthier suppliers, work great for this task because you can precisely size the slot to match the string. For example, knowing that my client plays a .010–.046 set, I'll use a .036 gauge nut file to deepen the notch for the .036 A string.
The process is pretty straightforward: After you've set the bridge so the 1st and 6th strings are 4/64" above the 12th fret, measure the 2nd string. If it's also 4/64" at the 12th fret, move onto the 3rd string. But if it's higher, carefully deepen the slot to bring the 2nd string down to 4/64".
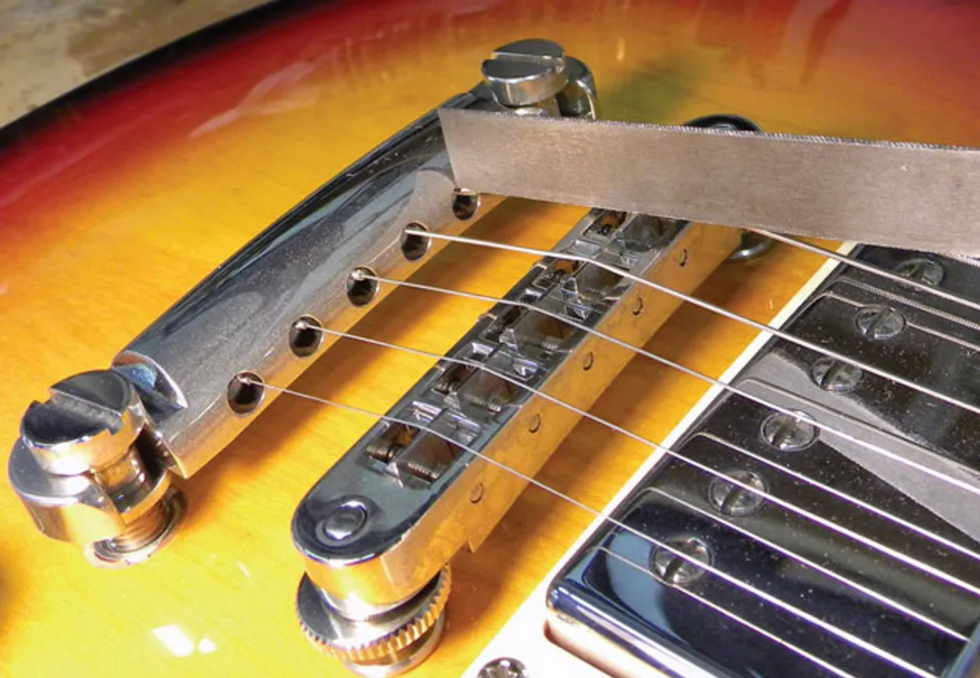
Photo 6
When re-cutting a notch, always follow the angle of the string as it emerges from the tailpiece up to the saddle (Photo 6). Go slowly, retuning and then measuring the action every few file strokes. Gently clean off any burrs on the front or back of the saddle using the nut file. This will prevent the string from getting caught up on the saddle and creating tuning issues.
Repeat the process on each inside string until you've achieved a uniformly level playing surface across all six strings. It's painstaking work, but the payoff in tone and feel will be worth the effort. Once you've flattened the radius and are satisfied with the overall action, you'll be ready to move over to the nut.
Raise the nut.
From experience, I knew that having the 1st string sit 1/64" above the 1st fret is too low for slide, so I'd need to raise the nut on this Les Paul. The trick, of course, is to get the nut high enough to accommodate slide technique, yet not make the guitar unplayable when fretting. Based on the owner's playing style, string gauges, and light glass slide, I decided on a uniform height of 2/64" for all six strings on his guitar.
There are only two ways to correctly and permanently raise the nut: You can shim it or carve a new one. The owner wanted to keep the stock Gibson nut, which was in excellent condition, so we elected to shim it.
Here's how that works: First remove the nut by gently tapping it on the fretboard side with a flathead screwdriver and small hammer (Photo 7). Next, clean up the nut slot by removing the excess glue with a small chisel or razor knife, and then scrape any glue off the nut.
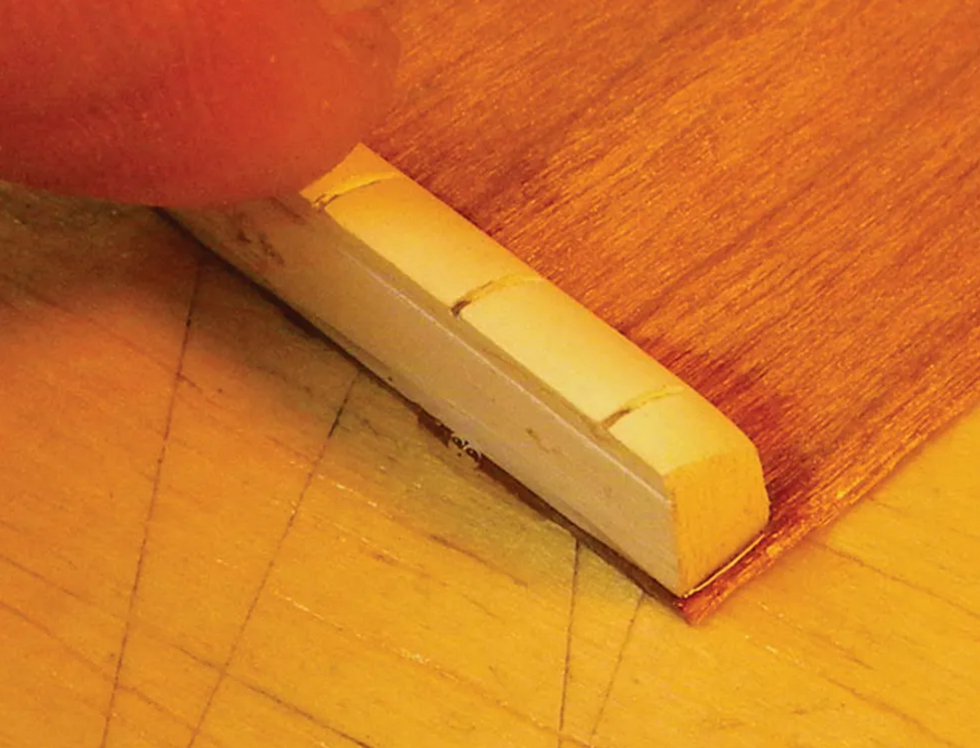
Photo 8
Now super-glue the nut onto a thin piece of mahogany (Photo 8). For this kind of shim, I use a .020" thick piece of wood.
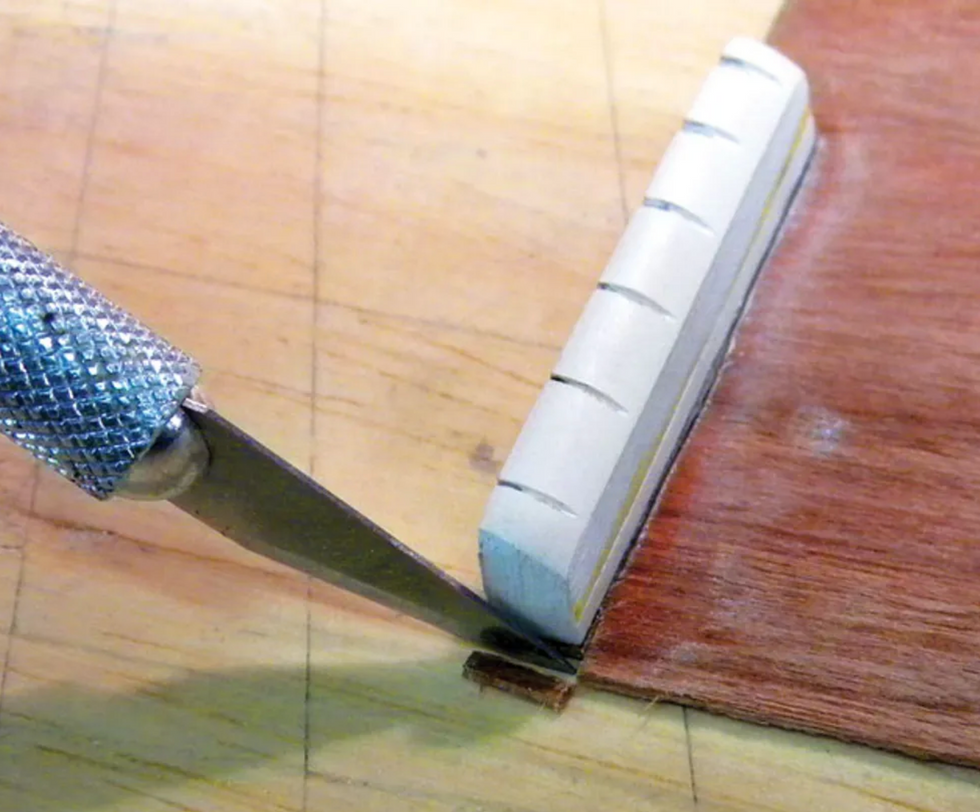
Trim off the excess wood around the string nut with a razor knife (Photo 9). Install the string nut and secure it with one drop of super glue on the face of the nut between the 4th and 3rd strings.
Adjust the pickups.
After you change the action on a guitar—especially to this degree—it's a good idea to adjust the pickups to make sure the treble-to-bass and string-to-string balance is how you want it.
First start with overall pickup height. Hold the 1st and 6th strings down at the last fret and measure the distance from the bottom of the strings to the top of the pickup. The distances in this table provide a good starting point for humbuckers.
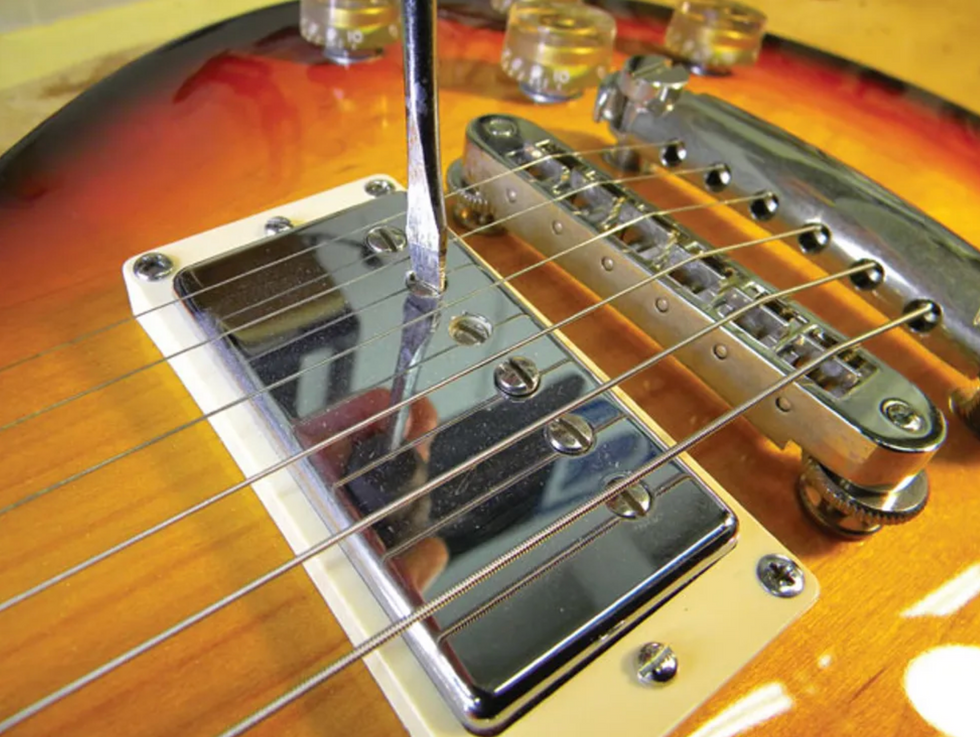
Photo 10
The next step is to adjust the individual pole pieces using a small flathead screwdriver (Photo 10). The goal here is to create an even and consistent string-to-string balance.
Begin with the 5th string pole piece and adjust it to match the volume of the 6th string. Raising the pole piece will make a string louder and vice versa. Then move to the 4th string and compare it to strings 6 and 5. Continue working across the strings, checking them relative to each other and making small tweaks as necessary. Typically, the 3rd string is the loudest, so don't be surprised if you wind up lowering it below the pickup cover to keep it in balance with the other strings.
It's a wrap.
The final step to complete the project is install a new set of strings, tune to pitch, and adjust the intonation. If you need instructions for checking and adjusting the intonation, read "How to Install a New Tune-o-matic Bridge."
With the string height and pickups adjusted for playing slide, our project Les Paul is ready to return to its owner. But before he carts it off, I'll listen to him play and see if the bridge height and pickup pole pieces are dialed in to his satisfaction. If you set up your own guitar for double duty, you may find yourself making small adjustments after playing it for a few days. That's the beauty of being your own tech, right? That said, if you're not confident you can safely work with glue, files, and other tools around your guitar, take it to your local pro.
[Updated 11/18/21]
- DIY: How to Set up Jazzmasters & Jaguars - Premier Guitar ›
- Mod Garage: Humbucker Height Adjustment - Premier Guitar ›
- Epiphone Prophecy SG Review - Premier Guitar ›
Just like guitarists, audiophiles are chasing sound. It may be a never-ending quest.
“What you got back home, little sister, to play your fuzzy warbles on? I bet you got, say, pitiful, portable picnic players. Come with uncle and hear all proper. Hear angel trumpets and devil trombones.”—Alexander DeLarge (Malcolm McDowell) in the film A Clockwork Orange.
We listen to recorded music for enjoyment and inspiration, but few of us expect recordings to rival the experience of live music. Most guitarists know that the average home sound system, let alone Bluetooth boomboxes, cannot reproduce the weight and depth equal to standing in a room with a full-blown concert guitar rig. Also, classical music lovers recognize that a home system won’t reproduce the visceral envelope of a live orchestra. Still, much like guitarists, audiophiles spend huge amounts of time and money chasing the ultimate “realistic” audio experience. I wonder if sometimes that’s misguided.
My exposure to the audio hobby came early, from my father’s influence. My dad grew up in the revolution of home electronics, and being an amateur musician, he wanted good reproduction of the recordings he cherished. This led him to stock our home with tube components and DIY electrostatic hybrid speakers that rivaled the size and output of vintage Fender 2x12s. I thought this was normal.
Later, I discovered a small shop in my hometown that specialized in “high end” audiophile gear. They had a policy: No sale is final until you are completely satisfied. I became an almost weekly visitor (and paying customer) and was allowed to take equipment home to audition, which was dangerous for a young man on a low budget. It was through this program I started to understand the ins and outs of building a cohesive system that met my taste. I began to pay much more attention to the nuances of audio reproduction. Some gear revealed a whole new level of accuracy when it came to acoustic or vocal performance, while lacking the kick-ass punch I desired of my rock albums. I was seeking reproduction that would gently caress the sounds on folk, classical, and jazz recordings, but could also slay when the going got heavy. This made me a bit of an odd bird to the guys at the audio shop, but they wanted to please. With their guidance I assembled some decent systems over time, but through the decades, I lost interest in the chase.
Recently, I’ve begun perusing online audiophile boards and they seem oddly familiar, with tube versus solid-state discussions that might feel at home to guitarists—except the prices are now beyond what I’d imagined. For the most part, they mirror the exchanges we see on guitar boards minus the potty-mouth language. Enthusiasts exchange information and opinions (mostly) on what gear presents the widest soundstage or most detailed high-frequency delivery, all in flowery language usually reserved for fine wines.
Speaking of whining, you’ll rethink your idea of expensive cables when you hear folks comparing 18", $1,700 interconnects for their DACs. Some of the systems I’ve seen are more costly than an entire guitar, amplifier, and studio gear collection by a serious margin. Mostly, the banter is cordial and avoids the humble-bragging that might go along with the purchase of a $10,000 set of PAF humbuckers. Still, I have a lack of insight into what exactly most are trying to accomplish.
If you’ve ever worked in a big-time studio, you know that the soundscape blasting out of huge monitors is not what most of us have in our homes. My experience rewiring pro-studio patchbays is that less emphasis is placed on oxygen-free, silver-plated, directional cables than the room treatment. I’ve found myself wondering if the people on those audio boards—who have spent many tens or even hundreds of thousands of dollars on their home systems—have ever been in a studio control room listening to music as loud as a 28,000 horsepower traffic jam of NASCAR racers. That might be an eye-opener.
One of my takeaways is that even though music recording began as an attempt to reproduce what actually happens in a room, it hasn’t been just that for a long time. With all our effects and sonic wizardry on display, recording is like playing an instrument itself, and much more complex. This is not a new revelation to Beatles fans.
What amazes me is that both audiophiles and guitar fanatics pursue the sounds we hear on recordings for differing reasons and with subjective results. It’s a feedback-loop game, where we chase sounds mostly exclusive to the studio. So, how do we determine if our playback is accurate? Will we ever be satisfied enough to call the sale final?
I’m not convinced, but just the same, I’ll continue my own search for the holy grail of affordable, kick-ass sound that still loves a folk guitar
Mooer Prime Minimax M2 Intelligent Pedal boasts 194 effects models, 80 preset slots, MNRS and third-party sample file compatibility, an 80-minute looping module, internal drum machine, high-precision tuner, Bluetooth support, and a rechargeable lithium battery.
Over the last few years, Mooer has released several Prime multi-effects devices, including the Prime P1, P2, S1, and most recently in 2024, the Prime Minimax M1. Excitingly, the company is kicking off 2025 with a brand new addition to the Prime family–the Prime Minimax M2 Intelligent Pedal.
Within this small multi-effects device, a whole lot of functionality is packed in, including an impressive 194 effects models, including overdrive, preamp simulators, cabinet models, delays, reverbs, modulation effects, etc., and more. In typical Mooer style, though, the company took things a step further by offering limitless flexibility through the support of its in-house MNRS sample files, as well as third-party IR sample files. Essentially, this means that users can download additional tonal emulations and effects from the Mooer Cloud and third-party sources to the device, which they can then save across 80 preset slots.
As with some past models in the Prime series, the M2 sports a convenient touchscreen design, facilitating easy browsing through the devices banks of presets. However, guitarists are not limited to interfacing with the pedal in this way, as it also features two footswitches, both of which can be used to switch between presets in each bank. There is even a MIDI jack built into the device, enabling users to connect their MIDI controllers to extend the control functions, and the MOOER F4 wireless footswitch support is also supported. Essentially, these augmentation options facilitate additional footswitches to ensure switching preset tones is always as quick and seamless as possible within any workflow.
While the Prime M2 Intelligent Pedal is primarily designed for effects and tonal simulations, it also comes packed with an array of other useful features. For example, it contains a looping module with a hefty 80-minute capacity, in addition to 10 recording save slots to ensure that any looping creations can be kept for future use in performances. Similar to past looper modules in Mooer's products, users are also free to overdub their recordings and even undo or redo their overdubs, offering a lot of real-time flexibility for creating loop-based musical structures.
As if the addition of a looper wasn’t enough, this feature is also synchronizable with an internal drum machine and metronome, a combination that includes 56 drum grooves and 4 metronome varieties. Ultimately, it’s a reminder that Mooer clearly recognizes and wishes to solve the struggles that musicians have when attempting to produce precise loops while staying in time. Upon commencing recording, the drum machine can produce four initial beats to serve as a count-in cue, and of course, this can be combined with the device's tap-tempo control for dynamic use. Best of all, this feature can also be applied to modulation and delay effects, ensuring that they work perfectly in time with any performance.
Extra features are included to complete this all-in-one pedal, including a high-precision tunerwith fully customizable frequency ranges. Guitarists can even leverage the M2’s built-inBluetooth input support, allowing them to practice, jam, and even produce looped musicalstructures over their favorite backing tracks, band prototypes, and musical pieces.
Perhaps unsurprisingly for existing Mooer product users, the Prime M2 also boasts an impressive variety of audio routing systems. As was previously mentioned, that includes Bluetooth input, as well as industry standards such as dual-channel stereo output, perfect for stereo delay and modulation effects. It also supports headphone output for those who wish to practice in silence, and even OTG recording, which means that guitarists can record their creations directly to their smartphone whilst on the go.
Speaking of on-the-go, Mooer is continuing its recent portable-play focus with the Prime M2Intelligent Pedal, as it is fitted with a built-in rechargeable lithium battery with a battery life of up to 6 hours. Ultimately, this means that even a lack of local power sources won’t get in the way of rehearsals and live performances. Combined with the pedal’s lightweight and small build, it truly is an ideal addition to the pedalboard of any traveling musician.
Overall, the Prime M2 Intelligent Pedal is set to be an impressive new addition to the Prime series. It features augmented functionality when compared to past models, yet still in a minimalist and easy-to-use package, keeping the size small and light yet still packing in footswitches, a touch screen, and other flexible control systems.
Features:
- 194 built-in effect models and tonal emulations
- 80 preset slots for storing downloaded MNRS and third-party sample files
- Compatibility with the MOOER Cloud tone-sharing platform
- Built-in 80-minute looping module
- Record, overdub, pause, delete, and playback functions for looping
- Internal drum machine module, stocked with 56 drum grooves
- 4 unique metronomes
- Synchronization between drum machine and looper
- Convenient count-in cue function support from the metronome
- High-precision and customizable tuner module
- 2 multi-function footswitches
- 1.28-inch touchscreen interface
- LED digital display
- LED charge indicator
- Portable USB/OTG recording
- Direct compatibility with the MOOER prime mobile APP and MOOER Studio desktop software for preset management
- Bluetooth 5.0 audio playback
- 3000mAh integrated lithium battery with up to 6 hours of use time
- DC 5V/2A power supply and charging
- 3 hours charging time
- Low weight of 228g
- Compact, at 74mm (L), 125mm (W), and 49mm (H)
- Sample rate of 44.1kHz
- Bit depth of 24bit
- Compatible with MOOER F4 wireless footswitch
- 3.5mm MIDI port
- Mono TS ¼” input
- Stereo TS ¼” output
- 3.5mm headphone output
- Power switch button
The Prime Minimax M2 Intelligent Pedal will be available from the official distributors or retailersworldwide.
For more information, please visit mooeraudio.com.
Here’s Chris Martin surrounded by a group of guitars created to commemorate his family’s 192-year history.
The home organ once ruled the world, only to go extinct. Is the acoustic guitar next?
When I was growing up, my Aunt Kate had a home organ in her living room. Back then, home organs were everywhere. They were sold at malls across America, and were a staple of post-WWII households. Brands like Lowrey, Magnus, and Hammond dominated the market. Lowrey, a division of Norlin (which eventually acquired Gibson), was especially massive. In fact, in a year where Gibson generated $19 million in revenue, Lowrey pulled in a staggering $100 million.
But like all booms, the home organ’s success was temporary. By the 1980s, it had gone bust. A huge contributing factor was the entrance of Casio: a more affordable, portable alternative that rendered the home organ obsolete.
Thankfully, the acoustic guitar has always had portability on its side. I’ve witnessed three major acoustic-guitar booms in my lifetime: the folk and folk-rock explosion of the late ’50s through the late ’70s, the MTV Unplugged resurgence, and most recently, the COVID-era surge.
The ’80s, however, were a tough time for acoustic guitar builders. That decade belonged to pointy electric guitars and hair metal. But the acoustic guitar came back. And unlike the home organ, it has not only endured, but thrived.
My great-grandfather capitalized on the demand for mandolins in the early part of the 20th century. We also tried to make and sell banjos. In addition to that, we made archtops, and although they weren’t as popular as some other brands, we did borrow the 14-fret neck.
While we were making 12-fret guitars with steel strings (the real benefit of that era was a dramatic improvement in the quality of steel strings), we discovered that many players wanted more access to the body and a slimmer profile. Starting with a 000-size guitar, we quickly converted many of our models to the new modern neck design, most notably our dreadnought model. The timing was right, as the dreadnought became the go-to guitar for country music. The steel-string flattop would lend itself to a fantastic melding of styles and types of music from around the world (and around the corner), becoming the driving voice of not just country, but also folk and many other genres.
Baby boomers (myself included) grew up with the sound of the acoustic guitar, and playing the music of our youth remains an essential part of any enthusiast’s repertoire. Our generation is not only large but also living longer, thanks to modern medicine and healthier lifestyles. Many of us have accumulated wealth, and for those of us in the business of making and selling guitars, that’s good news.
I mean no disrespect when I say, “Thank goodness I wasn’t born into the world’s most famous accordion-making family.” Accordions had their day, just as the home organ once did. Interestingly, accordions still have a niche following, whereas the home organ is now a historical artifact. While home organs were, for a time, all the rage, I doubt that even at the peak of their popularity anyone owned more than one. Quite a different situation when it comes to guitars and guitar collecting.
I do wish I could share with my ancestors how popular the guitar continues to be.
Every so often, someone writes an article with a headline like, “Is the Guitar Dead?” My answer is simple: no.
As long as we boomers—and everybody else—keep playing.
The collection includes Cobalt strings with a Paradigm Core, Tim Henson Signature Classical Strings, and the Tim Henson Signature FretWrap by Gruv Gear.
Engineered for maximum output, clarity, and durability, these strings feature:
- Cobalt with a Paradigm Core (not RPS) for added durability
- Nano-treated for maximum lifespan and corrosion resistance
- Gauges 9.5, 12, 16, 26, 36, 46 (Turbo Slinky set)
- Available individually or as part of the Tim Henson Signature Bundle
Tim Henson Signature Classical Strings
Crafted for dynamic, percussive tonality, these strings pair fluorocarbon trebles with silver-plated copper basses to deliver exceptional response and clarity.
- Gauges: 24, 27, 33, 30, 36, 42
- Available individually or as part of the Tim Henson Signature Bundle
Tim Henson Signature FretWrap by Gruv Gear
An essential string-dampening tool, the Tim Henson Signature FretWrap is designed for cleaner playing by eliminating unwanted overtones and sympathetic vibrations.
- Features Tim Henson’s custom ‘Cherub Logo’ design
- Size Small, fits 4-string basses, 6-string electric/acoustic guitars, and ukuleles
- Ideal for live performance and studio recording
- Ernie Ball collaboration with Gruv Gear
- Available individually or as part of the Tim Henson Signature Bundle
The Ernie Ball Tim Henson Accessory Bundle Kit
For players who want the complete Tim Henson experience, the Ernie Ball Tim HensonSignature Bundle Kit includes:
- Tim Henson Signature Electric Strings (9.5-46)
- Tim Henson Signature Classical Strings (Medium Tension)
- Tim Henson Signature FretWrap by Gruv Gear (Small)
- Tim Henson Signature Cable (Exclusive 10ft white dual-conductor cable, only available in the bundle)
The Tim Henson Signature String & Accessory Collection is available starting today, March 19, 2025, at authorized Ernie Ball dealers worldwide.
For more information, please visit ernieball.com.