(Originally published March 27, 2020)
Over the last few years, we've discussed the construction of potentiometers and diagnosed several potential problems with these essential, yet sometimes pesky, electric guitar components. (If you missed these, check out “The Trouble with Tribbles" and “Dealing with Knobs and Pots.")
Let's now consider problems that can occur when replacing pots, and then discuss ways to either avoid or solve these potential issues. Over the years I've analyzed virtual cries for help from hundreds of customers, and as a result I can safely say that non-working pots fall into one of two categories that account for essentially 100 percent of the problems: (1) mechanical damage while installing the pots, or (2) soldering damage when wiring them up. It's very, very rare that a pot comes DOA from the factory. Reputable manufactures have quality control systems to prevent this, so it's almost guaranteed that a problem with a potentiometer has to do with the end user. So let's take a look at these two scenarios.
Mechanical damage.
In this case, the most common damage is caused by overtightening the nuts, especially when installing pots into a guitar with a stiff wooden top like a Les Paul.When installing pots, forget the adage "the more, the merrier." Instead, keep this in mind: The next level beyond "tight" and "super-tight" is "broken." Guitar pots don't have to handle a lot of weight or withstand a nuclear strike, so they should only be screwed down tight enough to remain immobile when you rotate the knobs.
First and foremost, it's essential that you install the pots correctly. This might sound obvious or trivial, but you can't imagine how many guitars I've seen where pots have been installed in, shall we say, unusually creative ways.
Here's how to do it right: The first step is to slip the lock washer onto the pot shaft and then insert the shaft through the hole in your guitar's pickguard or top. With the shaft protruding through the other side, now put the flash washer on the shaft, followed by the hex nut, which you can initially thread with your fingers. Finally, use a socket wrench, small adjustable wrench, or an ESP Multi Spanner to carefully tighten the hex nut until it's snug against the washer and doesn't turn anymore.
If you discover that the pot sits too high on your pickguard or guitar top, you'll need to remove the pot and start over by first threading another hex nut on the shaft, followed by the lock washer, and then repeating the installation process. This "underside" hex nut will let you adjust the height of the pot to your individual wishes. Simply insert the shaft through the pickguard or top, eyeball the height, and adjust the hidden hex nut up or down on the pot threads as needed. Finally, add the flash washer and exterior hex nut to complete the process. The key here is to always remember the correct order of these parts.
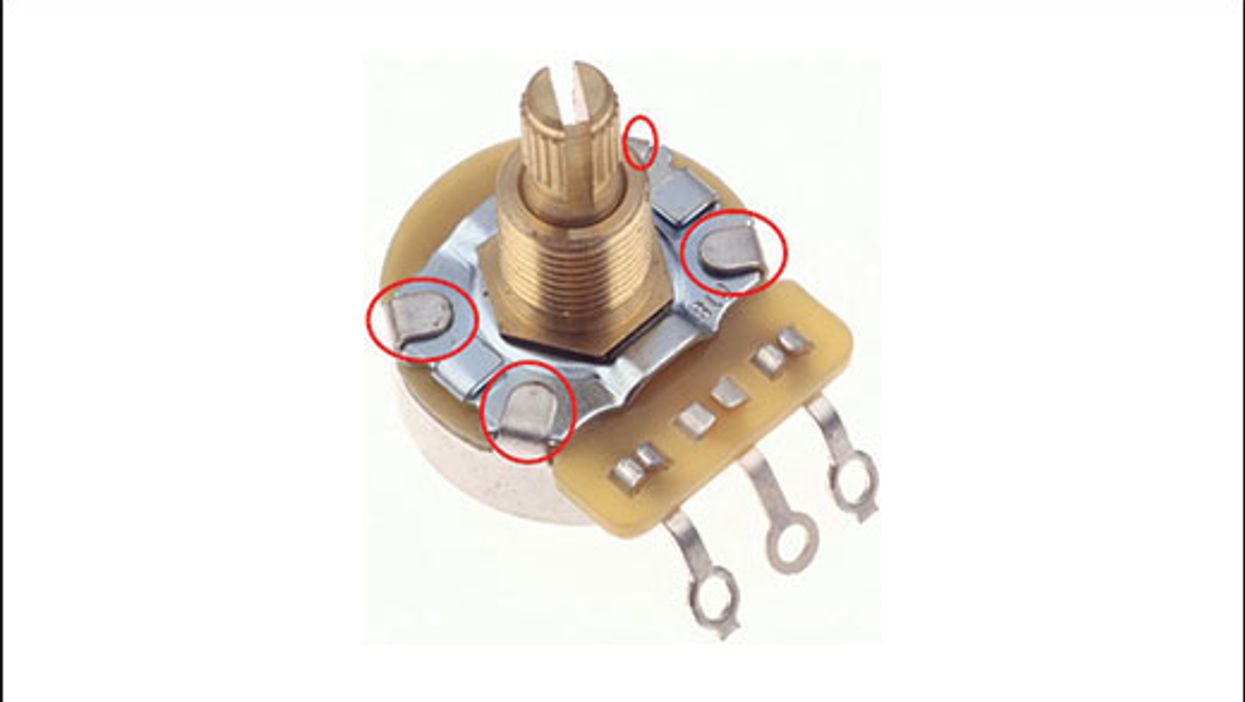
So what happens to a pot when you overtighten it? If the four tiny tabs that hold the little metal plate to the shaft, wiper, etc., are unable to withstand the force applied to the shaft when you torque down the hex nut, they'll bend and let the plate and the shaft rotate freely. Hmm, no good.
But don't worry, it's an easy fix: Use needle-nose pliers or a small flathead screwdriver to gently pull the tabs up a little more so you can rotate the plate and return it to its centered position. Then bend the tabs back into place so they hold the shaft securely (Photo 1). Done!
It's almost guaranteed that a problem with a potentiometer has to do with the end user.
Other mechanical damage is typically caused by trying to remove or install knobs that aren't made for a given pot's shaft. When you try to hammer down a non-fitting knob, you can easily break the shaft by forcing it through the knob bushing. (In most cases, this happens when trying to force a metric knob, measured in millimeters, onto a U.S. pot shaft, measured in fractions of an inch.)
If you try to remove a jammed knob that someone managed to "fit" using brute force—or even attach with superglue—chances are good you'll break the wiper inside the pot and pull out the entire shaft along with the knob.
Yet this is easy to avoid: Never try to force a knob onto the pot shaft; instead use one that fits. If you need to remove an improperly fitted knob, use a heat gun to soften the plastic or a saw to split it open. Don't use any upward or downward pressure—that will ruin the pot, for sure.
Soldering damage.
The easiest way to damage a pot is to overheat it, especially when attaching a ground wire to the back casing. It's a common mistake. When it comes to how long your soldering iron should be in contact with the pot, the golden rule is "as short as possible, but as long as necessary." It takes time to develop this skill, so you'll need to practice. Also, to avoid disaster it's crucial to have the right tools. Here are some helpful guidelines for soldering onto pots.
1. If you don't have a soldering station with an adjustable temperature control, you need at least two different handheld soldering irons: one rated at around 30 watts and the other around 60 watts. This is exactly what I use for any soldering job outside the shop. The 30-watt iron is for soldering on the pot terminals, pickup selector switch terminals, output jack terminals—those common tasks. The 30-watt iron is our daily go-to tool for all things guitar at the shop.
The 60-watt iron is for soldering to pot casings and Stratocaster tremolo claws. Don't try to solder to a pot's case with a 30-watt iron—the solder will need a very long time to flow and you'll expose the pot to a lot of heat. With a 60-watt iron, the solder will flow instantly and soldering time will be very short. This yields strong solder joints.
2. If you want to be on the safe side, remove the case from the pot before you solder to it. That's what I do when I want to avoid damaging vintage pots. To remove the case, gently bend the four metal tabs away from you. To reinstall the case, simply bend the tabs back into place. Take your time and go easy.
3. Always rub the metal casing with 180-grit sandpaper before soldering to it. Manufacturers use all kinds of greasy coatings to protect the case against oxidation, which can make a soldering job close to impossible. So sand the case until it's clean and shiny, and then clean it with naphtha. This will provide the perfect base for a good soldering joint. But don't do this to vintage pots! For those, it's paramount to preserve the patina that comes with age.
4. If you decide not to remove the pot's case, strive to avoid any unnecessary heat. Here are some helpful tips:
- Always turn the pot down to 0 before soldering to its case.
- Use a heat sink on the case. For this job, you'll need something bigger than just a standard clip. To enhance its effect, you can chill the heat sink in the fridge ahead of time.
- If you need to connect one of the terminals to ground, as on most volume pots, don't try to solder the terminal directly to the case by bending it back. This may look cool and vintage, but you'll need a lot of heat and good soldering technique to pull this off. Simply use a piece of solid-core wire and solder it to the terminal and from there to the case—this yields the same performance.
- After tinning the case, let it completely cool down before you solder the wire to it.
5. Don't apply excessive solder to a terminal—it will flow down the terminal's leg and find its way inside the pot.
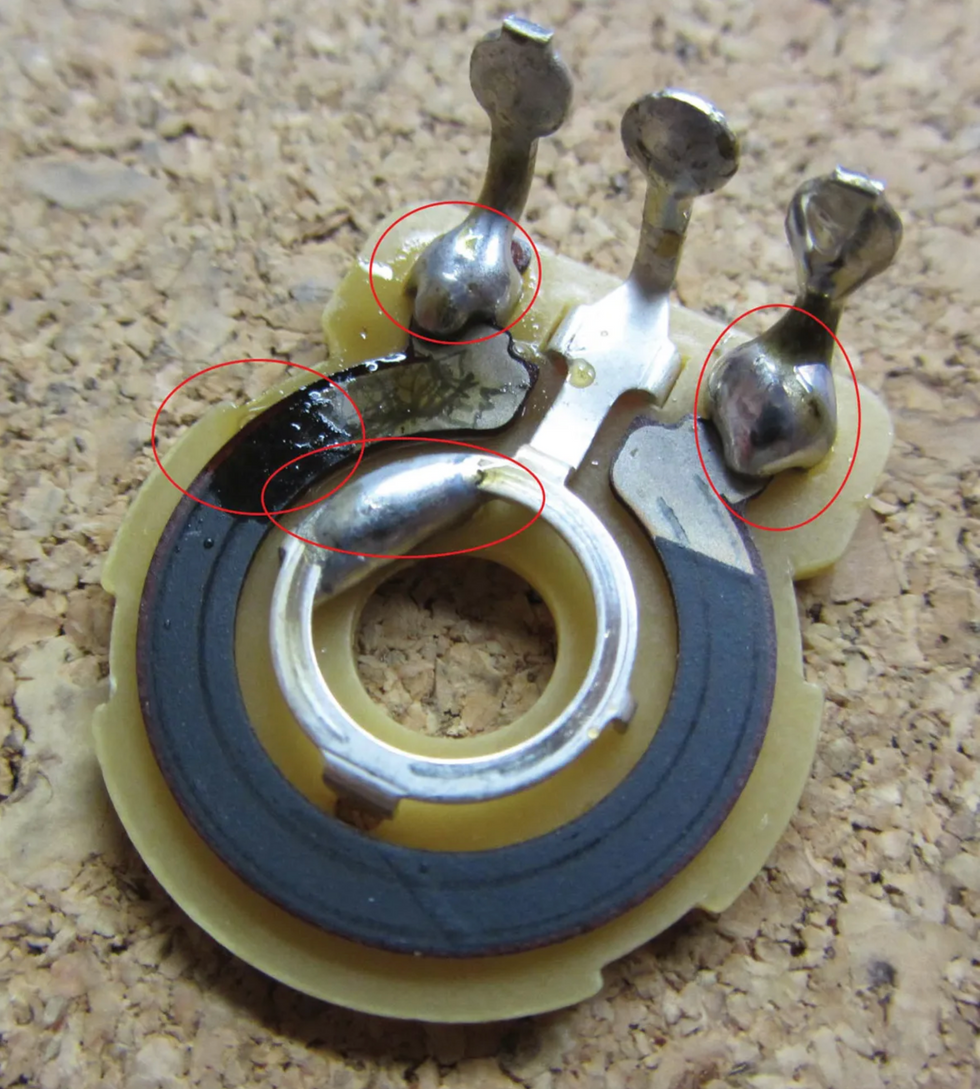
Photo 2 — Photo courtesy singlecoil.com
Photo 2 shows a pot from my "Hall of Shame" collection. Look at the two red marks at the end of the two terminals. These solder blobs are what happen when you apply way too much solder. There's also a big solder blob on the middle terminal's inner ring. How someone managed to get the solder inside there will forever remain a mystery. On the upper left, notice how the carbon is melted and buckled from too much heat. This poor little thing had to endure cruel treatment ... may it rest in peace!
Remember, if you don't solder regularly, there's no shame in having a professional guitar tech do the work for you—especially when you have a vintage guitar and need to work on its original pots. Retaining your guitar's value is an excellent investment. Soldering on pots isn't rocket science, but it requires the right tools, experience, and a steady hand.
Maintaining pots.
These are mechanical devices with a limited lifespan, and it's inevitable they'll start to wear out over time. Yes, it's possible to clean, repair, and renew the carbon inside, but this only makes sense for a vintage pot, not a modern one. Instead of trying to repair the latter, it's more cost-effective to simply replace it.
Typical pots are not completely sealed; they have open areas around the terminals, so moisture and dust can creep inside. To prevent this, you can buy pots that are completely sealed or cover standard pots with an additional dust seal. Usually a guitar's electronic compartment is closed and not directly exposed to contamination, so an additional dust cover isn't necessary for our applications.
Also, there's no need to maintain your pots. At a certain point, they'll begin to wear out and make scratchy noises when you turn them. This means it's replacement time! You can delay this a bit with contact cleaner, but this treatment is only temporary. Contact cleaner is cool for some applications, such as servicing hi-fi equipment, but it can't repair worn-out pots.
My advice? Never use contact cleaner on your pots because the cleaner will attract debris, and when it evaporates you're left with hard, dry crud—something you definitely do not want inside your pot. To combat this, you'll spray more cleaner and thus begin a destructive cycle. This results in replacing the pot much earlier than necessary, exactly the opposite of what you want. We all know the road to hell is paved with good intentions. If a pot is really dusty and making scratchy noises—maybe you took your Tele to Burning Man—the best thing to do is open it up and swab everything with Q-Tips soaked in naphtha.
Finally, when it comes time to replace a pot, pay attention to the specs. Some pots are designed for 2,000 rotations while others are tested to withstand 20,000. You get what you pay for, and this isn't a place to cut corners.
All right! Next month we'll examine the Peavey Omniac JD, Jerry Donahue's signature model T-style, and I'll show you how to transfer its sophisticated wiring scheme to your own guitar. Until then ... keep on modding!




![Rig Rundown: John 5 [2026]](https://www.premierguitar.com/media-library/youtube.jpg?id=62681883&width=1245&height=700&quality=70&coordinates=0%2C45%2C0%2C45)


![Rig Rundown: Russian Circles’ Mike Sullivan [2025]](https://www.premierguitar.com/media-library/youtube.jpg?id=62303631&width=1245&height=700&quality=70&coordinates=0%2C0%2C0%2C0)


