Image 1
If you're a guitar modder, you probably already have most of the simple tools needed for this unique pedalboard project.
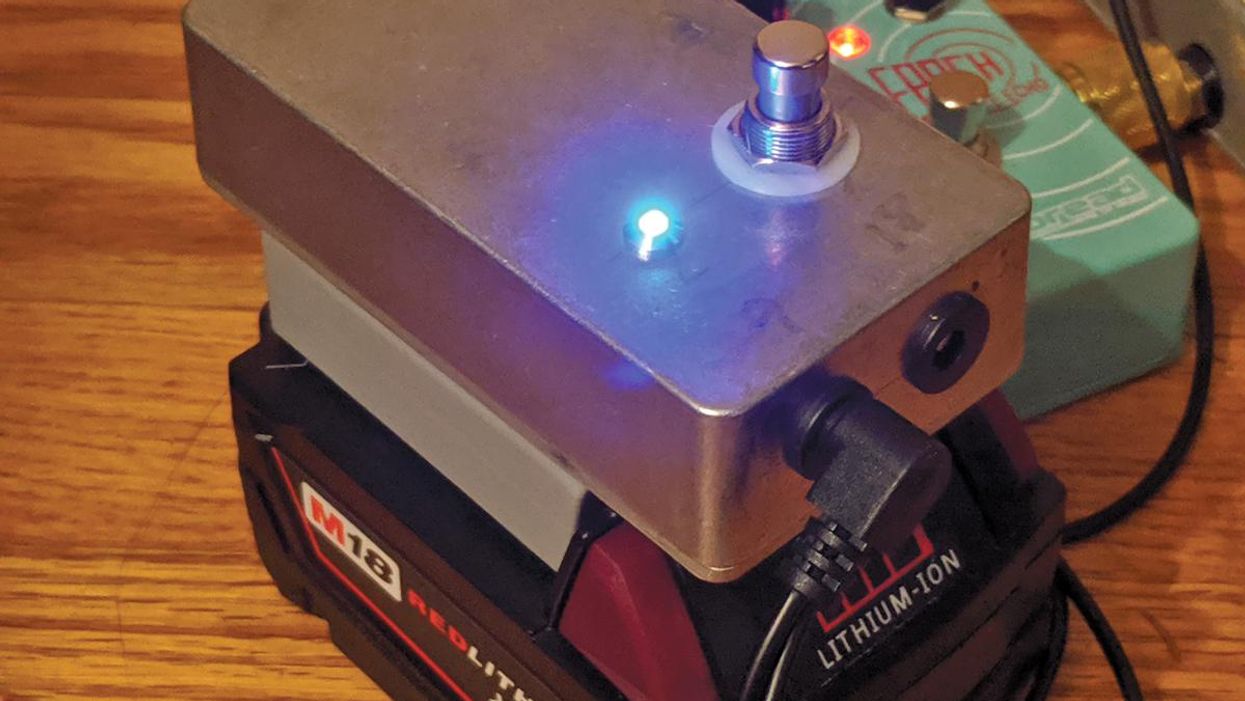
Hello, and welcome to my first DIY project for Premier Guitar. I'm going to explain how to make a battery-operated power supply for your pedalboard (Image 1). We'll be using a cordless drill battery for power and a few other items that you might already have lying around. All of the parts needed for this project can be easily found and purchased online.
Why would you want to use a drill battery to power your effects pedals? By powering your effects with a battery, you eliminate the potential for noise caused by bad wiring in your home or in a venue, it eliminates possible ground loops as well as a cord to trip over, and it expands your possibilities for placement of your pedalboard. Drill batteries are tough, easily rechargeable, and will last a really long time before needing a recharge. They just pop in and out of their charger and will pop in and out of your power supply. If you already have a couple spare batteries, the cost of this build is small. Spare batteries can be purchased online if you already have a charger, or you can even buy batteries and a charger.
If you've been modding the wiring of your guitars, you probably have the tools and skills necessary to build this project.
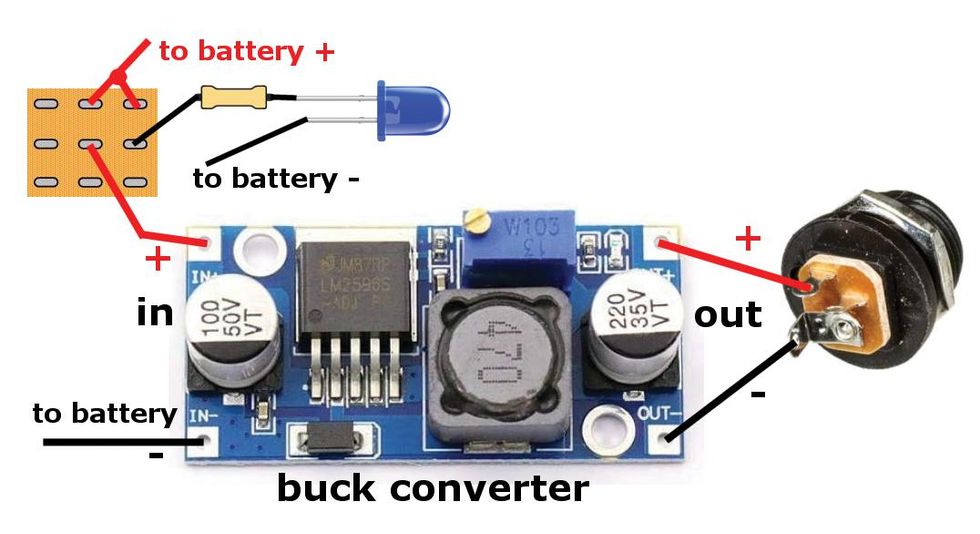
Image 2
You'll need a good soldering iron and solder, a drill, needle-nose pliers, a multimeter, and, of course, eye protection. If you're like me, you'll also need reading glasses to see what you're doing. This build is pretty simple and easy to understand, as you can see in the wiring diagram shown in Image 2. The orange square is the back of the common 3PDT footswitch found in most boutique stompboxes. I used a 3PDT footswitch, but a 2PDT footswitch or any toggle switch will also work for this project.
The two most important items we need, other than a battery, are a battery adapter and a buck converter, sometimes called a voltage converter.
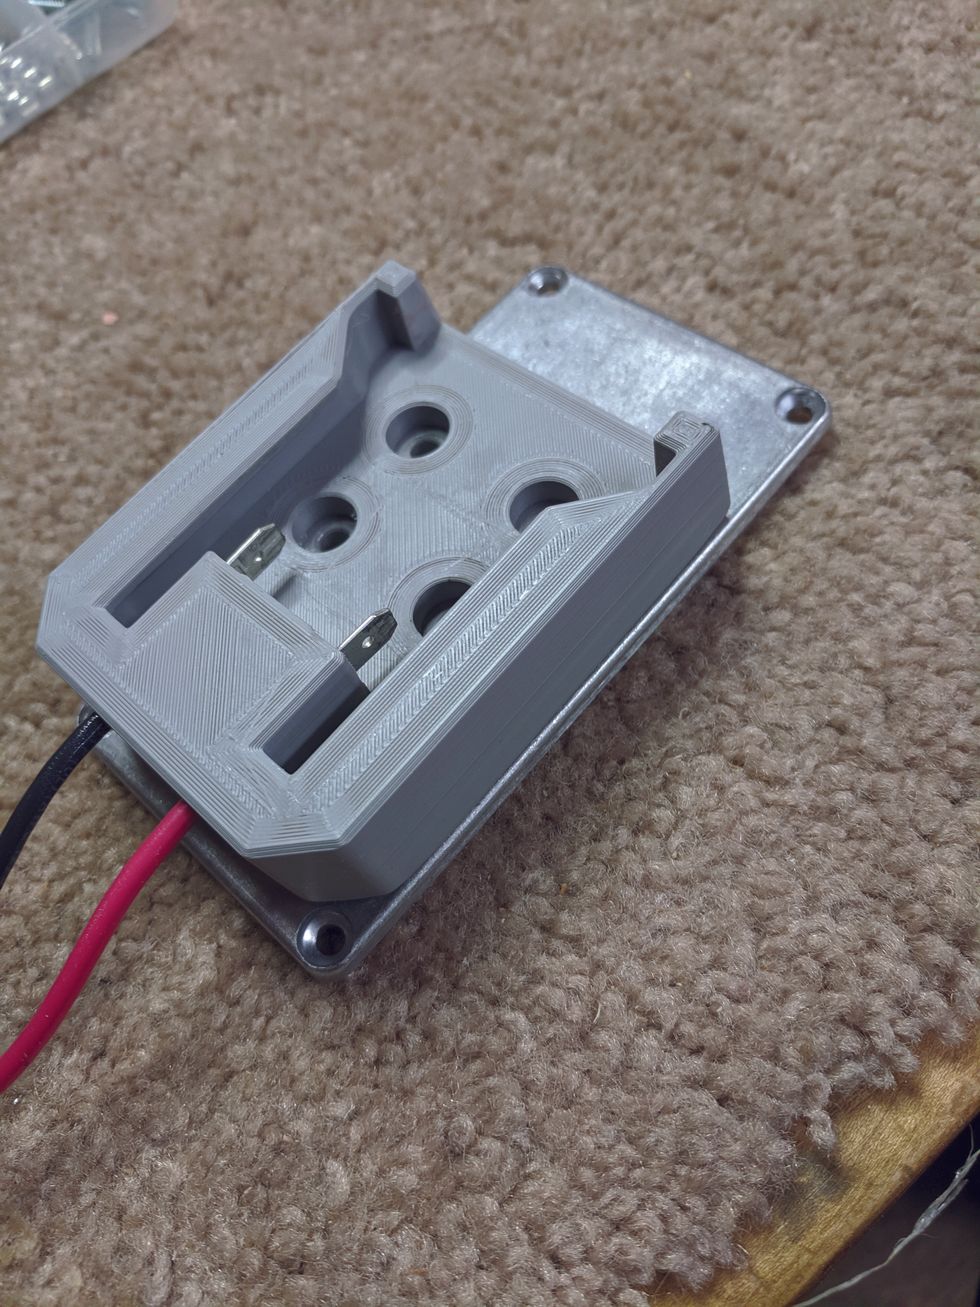
Image 3
The battery plugs into the adapter, just like it plugs into a drill, and has two wires that let us connect to the battery's power. Battery adapters are made for several brands of drill batteries. I use Milwaukee but Makita and DeWalt will also work for this project. I bought my battery adapter (Image 3) for about $16 from Amazon.
The buck converter lets you adjust (or "step down") the voltage coming from the battery to 9 volts, which is the voltage you want for most pedals. These units are also cheap. I bought a pack of four, just in case I ruined one. Get one that will handle at least 25 volts on the upper range and goes down past our target voltage of 9 volts. Also, check how much current it can handle: 3 to 5 amps should be plenty.
Get a buck converter that will handle at least 25 volts on the upper range and goes down past our target voltage of 9 volts.
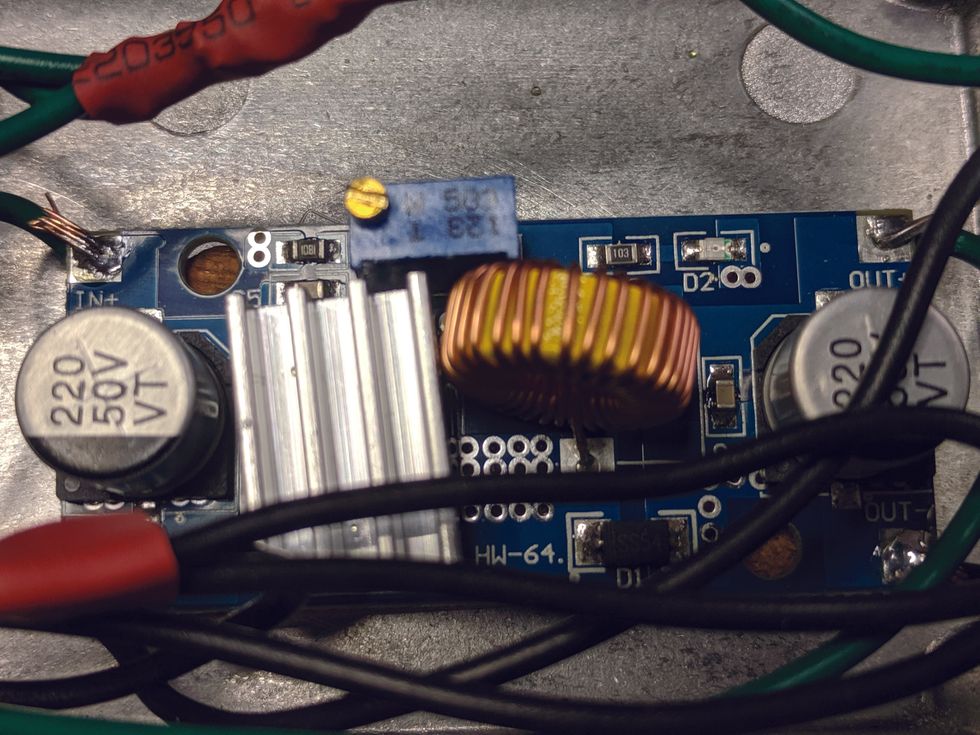
Image 4
The buck converter I bought is about 2" by 1" (Image 4), with connections for DC in and DC out. The small brass screw on top of the blue rectangular box is the adjustment. On mine, turning the screw counterclockwise drops the output voltage. It takes a really small screwdriver to fit the adjustment screw, and a lot of turns to get it down to 9 volts.
The buck converter I bought is good for 3 amps of electric current. So how much current will your pedals draw? I found a good list of different pedals and their power draw on Stinkfoot.se. The four pedals I've been using lately draw a total of 113 mA, or .113 of an amp. It's important to note that stompboxes draw power whenever there is a guitar cord plugged into them, even when switched off. The footswitch on a pedal just routes the signal around the circuitry and doesn't stop the power draw. This is why we're putting a footswitch on our project, so we can turn off the power. We'll also incorporate an LED to remind us when the power is on.
We'll use a basic stompbox enclosure for this project. I used one that measures about 2 1/4" x 4 1/4", and it came in a box of three. The box came with a special stepped drill bit that makes holes for things like jacks, switches, and LEDs, and a helpful list of which steps work for different parts. A piece of masking tape wrapped around the drill bit at the appropriate step will help you drill the right-sized hole without going too far.
What Else Will We Need?
- One 3PDT footswitch (a 2PDT footswitch will also work)
- An LED and mounting bezel
- One 4.7k (drop-down) resistor
- A barrel jack, compatible with your power cord
- Two colors of hookup wire, 22 AWG or 24 AWG
- Standoffs to mount the buck converter, or some silicone caulk
- Three or four nuts and bolts to mount the battery adapter
- And lastly, we will need that old daisy chain power cord I know you have lying around, to power your pedals.
Heat-shrink tubing is not strictly necessary, but it will make your build a lot neater than using electrical tape. Once you buy some, you'll find many uses for it and it'll come in handy often. I got a bag with a bunch of different diameter pieces for a couple bucks, and it's lasted me several years.
Bolt-mount the battery adapter to the bottom of the enclosure.
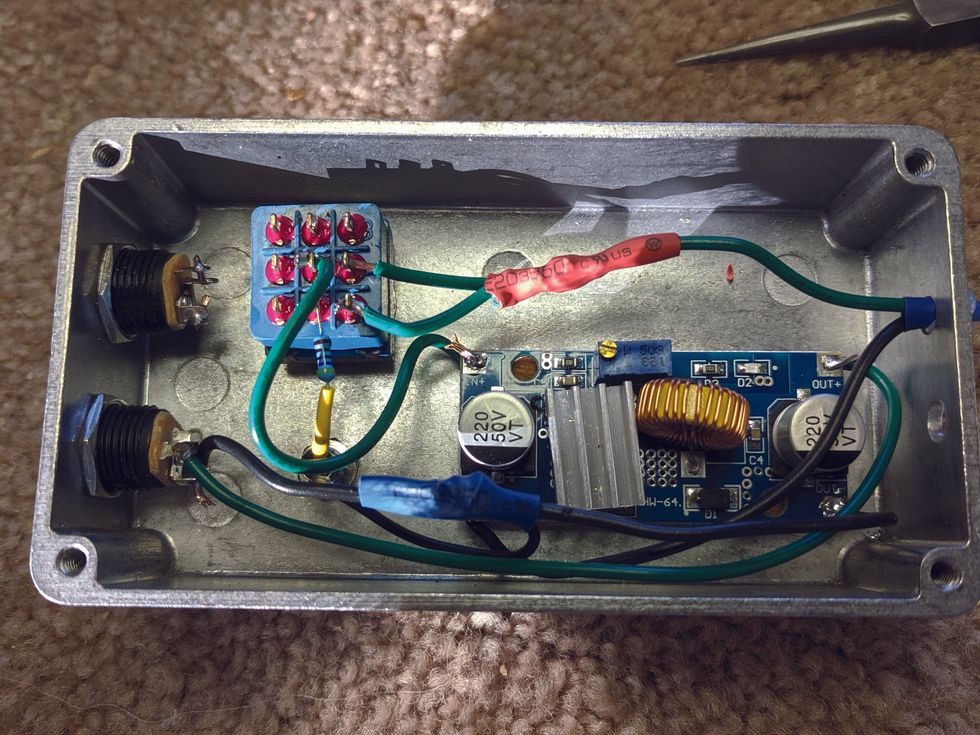
Image 5
Now let's get started. You can see all the parts and wiring fit in the enclosure pretty easily (Image 5). Mark where the holes go carefully. Use the shortest bolts you can, so they don't interfere with the wiring, making sure to leave room to access the screws that hold the enclosure together.
Next, mark where to drill the holes for the footswitch, LED, and jack.
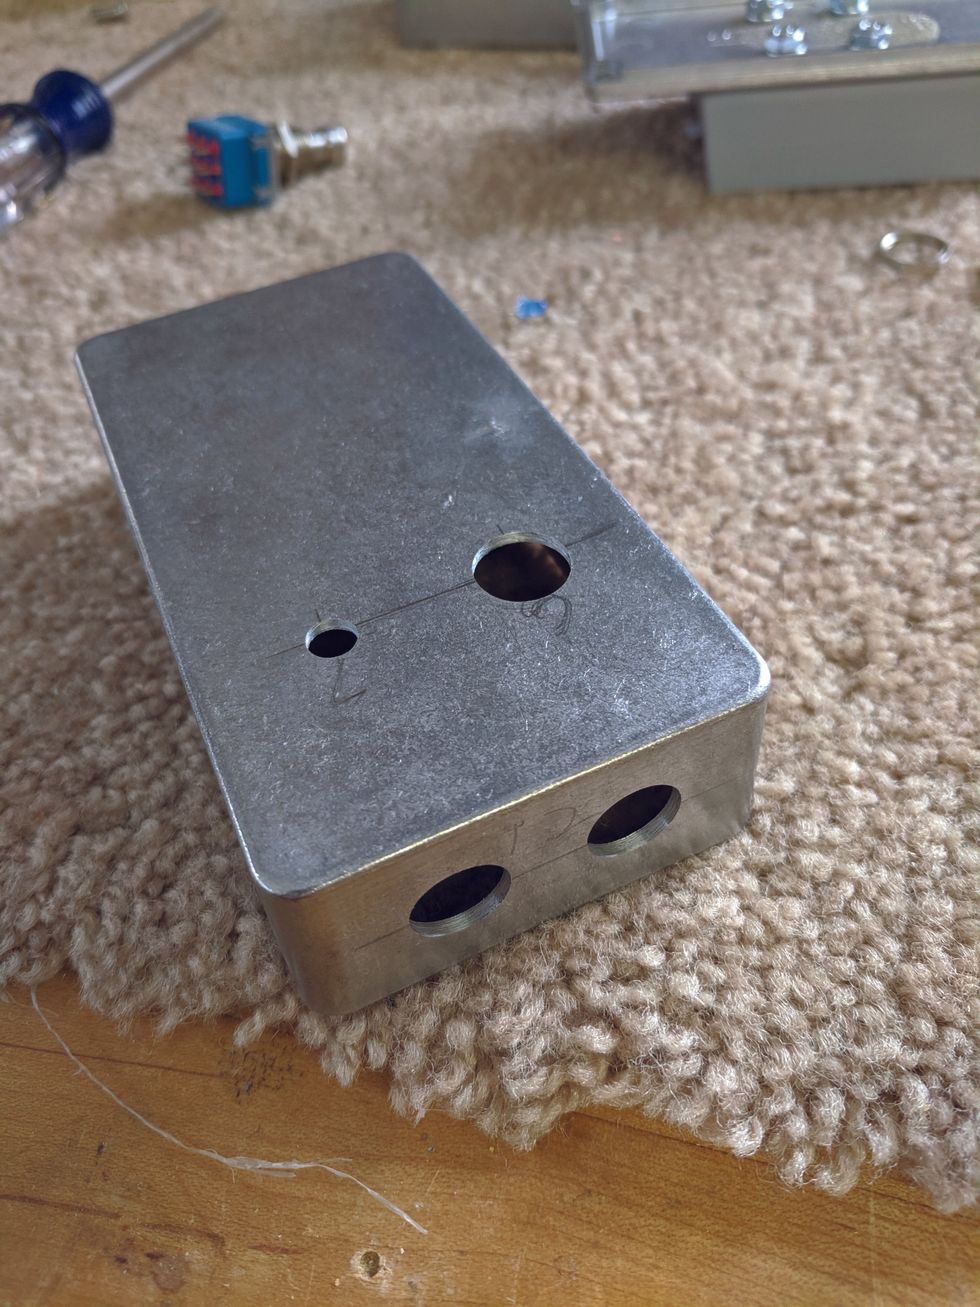
Image 6
You'll need one more hole to bring the wires from the adapter into the enclosure: Put that on the end opposite the jack. Make sure to sand this last hole nice and smooth around the edges so it won't abrade the wire. I put my jack hole about halfway between the top and bottom of the enclosure and that left me plenty of room for wiring. Make sure you leave enough room between the jack and footswitch (Image 6). Now we can mount the jack, footswitch, and LED bezel.
At this point, you just need to follow the diagram to wire things up. I used 22 AWG wire and found it a little bit cumbersome to fit it into a few of the tighter spaces and get it soldered. On that note, 24 AWG wire would probably be fine. It should be good for around 1.4 to 3.5 amps, depending on if it's stranded or solid core. To give you an idea, 1.4 amps is more than 10 times the current of what my four pedals draw.
I mounted another jack for 18-volt output, just in case I ever get an 18-volt pedal. (This would also require a second buck converter.) After wiring it up, however, I found my 18-volt batteries are actually around 20 volts, so I removed the wiring.
If you don't have standoffs for your buck converter, you need another way to mount it to the inside of your enclosure.
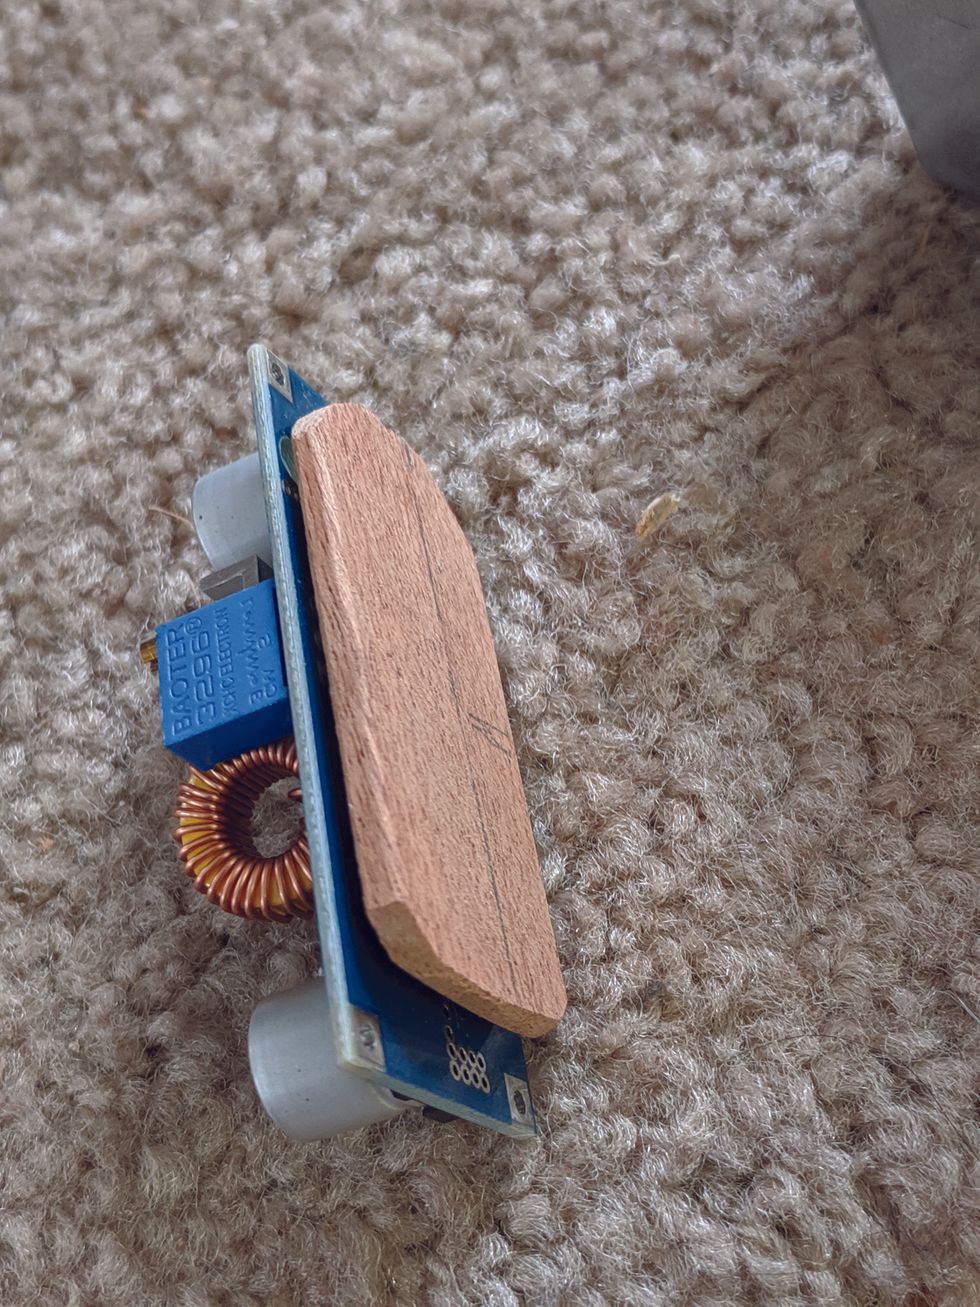
Image 7
I used silicone caulk to glue mine to a thin piece of wood. I used alcohol to clean the enclosure where I put the silicone, to make sure it would stick. After the silicone was dry and I wired up the converter, I used more silicone to glue it to the enclosure (Image 7).
Cut the wires from your battery adapter to a shorter length, feed the wires from the input of your buck converter through their hole in the enclosure, and solder them to the battery wires.
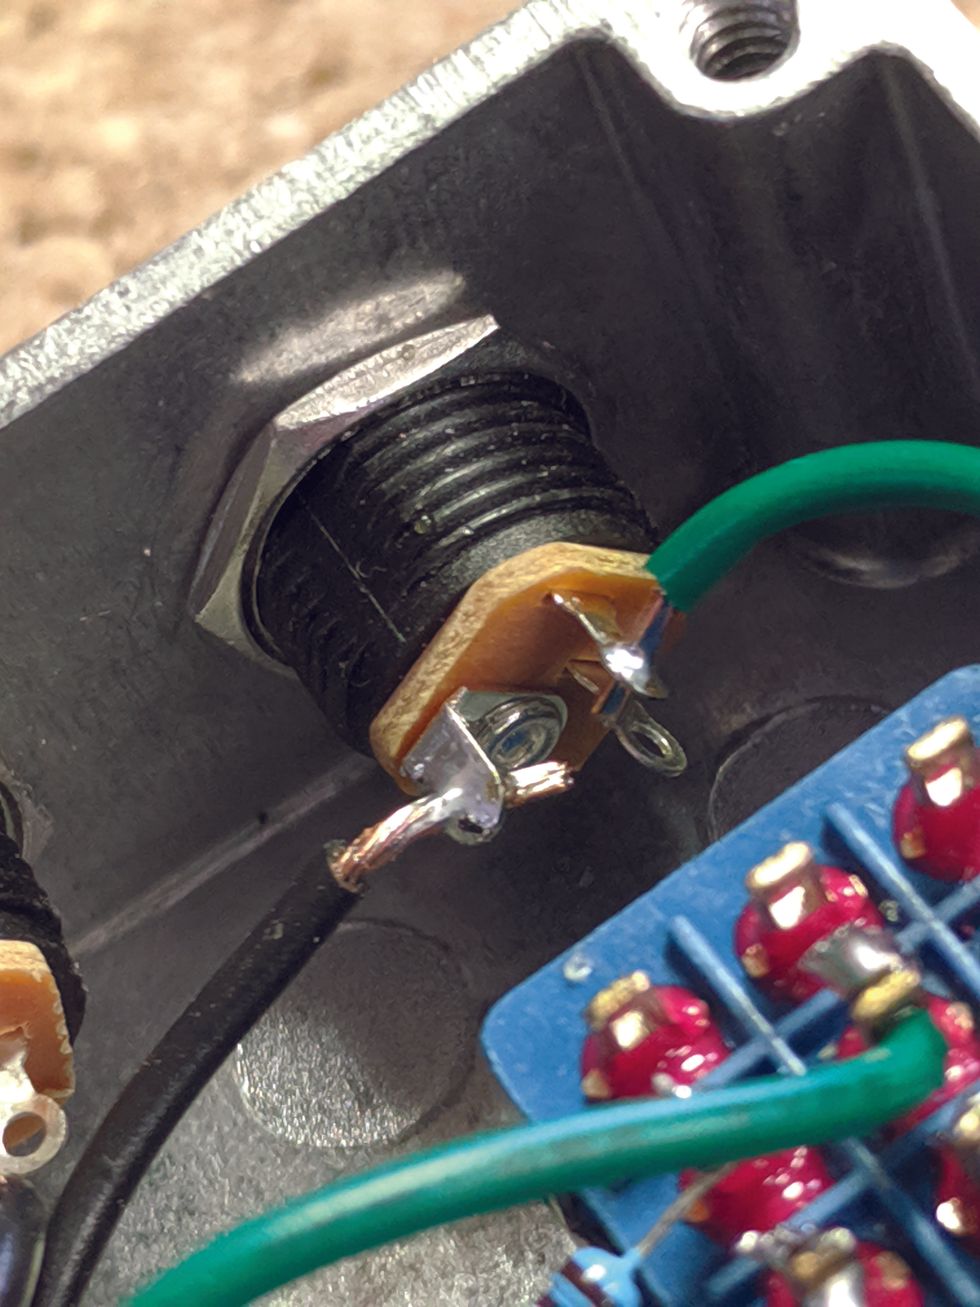
Image 8
This is where your heat-shrink tubing will come in handy. Use some more of that silicone to anchor the wires in the hole after you know everything works. And be sure that you wire your jacks so the center is negative (Image 8).
The LED needs a resistor soldered to the positive leg in series to operate.
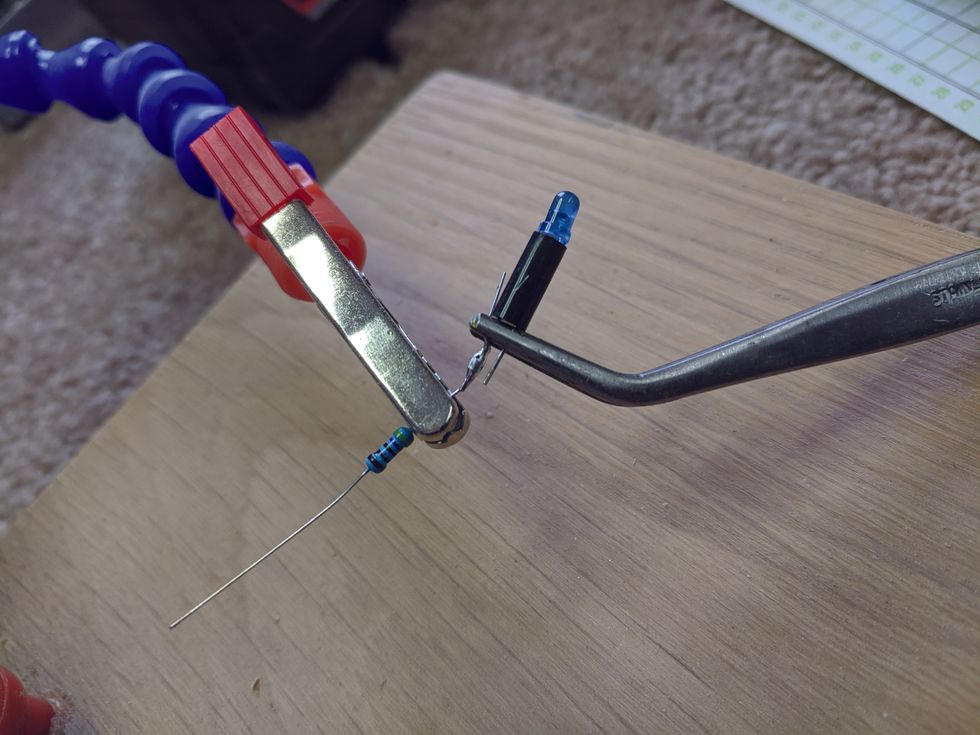
Image 9
The positive leg is the longer one. Fit the LED legs through the plastic-mounting sleeve that came with the bezel before you solder on your resistor (Image 9). The LED will then just push into the bezel. If your LED is close enough, you can solder the other end of the resistor to the switch, like I did. You can use wire if it's too far. The other lead from the LED goes to the ground from the battery. It's worth noting that the value of the drop-down resistor depends a lot on the type and color or LED. We're using a 4.7k resistor, which works fine with a blue standard LED. For all other LED colors and types, the resistor type can be recalculated online. A good resource for this is: https://www.muzique.com/schem/led.htm.
If you soldered everything up correctly, you should be good to go! I have two different-sized drill batteries, and even the small ones will power my pedals for nine hours. I would suggest turning your power supply on and testing with your multimeter before plugging in any of your pedals, taking care that the polarity of your output is correct.
How could you modify my design? You could use a larger enclosure and more jacks, allowing you to power each pedal with its own cable. Instead of a larger enclosure, you could make a separate box with lots of power jacks. A second buck converter could allow for 18-volt power. Maybe it would make sense for you to mount your battery adapter directly to your pedalboard and mount the stompbox enclosure separately. Let me know if you have other ideas in the comments section online.
For me, this was an enjoyable switch from my usual projects. I have a lot of leftover parts, so I guess it's time to start thinking about what to make next.PQ: "I would suggest turning your power supply on and testing with your multimeter before plugging in any of your pedals, taking care that the polarity of your output is correct."
[Updated 1/25/22]
- Powering Your Board - Premier Guitar | The best guitar and bass ... ›
- Tools for the Task: Pedalboard Power - Premier Guitar | The best ... ›
- Got Noise Issues? It Could Be Your Pedalboard's Power Supply ... ›
- DIY Pedalboard Build - Premier Guitar ›
- Got Noise Issues? It Could Be Your Pedalboard's Power Supply - Premier Guitar ›
- Powering Your Board - Premier Guitar ›
- Tools for the Task: Pedalboard Power Supplies - Premier Guitar ›
- The Power of a Good Supply: Pedalboard Power Supplies ›
- Voltage Cable Co. Unveils New Vintage Coil Cables - Premier Guitar ›
- Revolutionize Your Tone with Static Effectors Street Series - Premier Guitar ›
- Power Up Your Pedalboard Performance with These Top Supplies - Premier Guitar ›
Brent Mason is, of course, on of the most recorded guitarists in history, who helped define the sound of most ’90s country superstars. So, whether you know it or not, you’ve likely heard Mason’s playing.
Professional transcriber Levi Clay has done the deepest of dives into Brent Mason’s hotshot licks. At one point, he undertook the massive project of transcribing and sharing one of Mason’s solos every day for 85 or so days. Mason is, of course, on of the most recorded guitarists in history, who helped define the sound of most ’90s country superstars. So, whether you know it or not, you’ve likely heard Mason’s playing. Levi shares the insight he gleaned from digging deep, and he tells us what it was like when they shared a stage last year. Plus, Levi plays us some great examples of Mason’s playing.
PRS Guitars today launched five new three-pickup, 22-fret models across the S2 and SE series. The S2 Series release includes the S2 Special Semi-Hollow and S2 Studio, while the SE Series welcomes the SE Special Semi-Hollow, SE Studio, and SE Studio Standard.
“The distinctive pickup configurations of these five guitars deliver a versatile tonal platform, whether you’re exploring subtle textures or pushing the envelope. The deep dive into our Narrowfield technology is obvious with this launch. With both the S2 models made in our Maryland factory and the SE models made in Indonesia, our goal has been to create guitars that will inspire you and spark creativity, all at an exceptional value,” said PRS Guitars COO, Jack Higginbotham.
S2 Special Semi-Hollow
The PRS S2 Special Semi-Hollow features a pair of 58/15 LT humbuckers in the bass and treble positions and a PRS Narrowfield in the middle. A 5-way blade switch and two mini-toggles allow players to tap the humbuckers, creating twelve distinct pickup combinations for sonic exploration. The carved maple top and mahogany back encompass a semi-hollow body that adds a natural airiness and depth to the guitar’s tone while enhancing sustain.
S2 Studio
The PRS S2 Studio delivers a wide range of sonic possibilities through its distinctive single-single-hum configuration. Featuring two proprietary PRS Narrowfield pickups in the bass and middle positions and a 58/15 LT humbucker in the treble position, the S2 Studio offers a palette of sounds from single-coil clarity to vocal humbucker tones. This model also has a 5-way blade switch and push/pull tone control.
SE Special Semi-Hollow
The PRS SE Special Semi-Hollow is designed with the versatility of a hum/“single”/hum setup, bringing PRS’s Narrowfield DD pickup design to the SE Series in a classic maple-top guitar. The semi-hollow construction also enhances sustain and resonance, while the f-hole adds a classic aesthetic. The coil-tap switching system unlocks a wide range of tones through a pair of 58/15 LT “S” pickups in the bass and treble positions and a PRS Narrowfield DD “S” in the middle.
SE Studio
The PRS SE Studio’s “single”/”single”/hum pickup configuration provides a wide range of tonal options. This combination of PRS Narrowfield DD “S” bass and middle pickups with a PRS 58/15 LT “S” treble humbucker offers humbucking warmth, single-coil sparkle, and everything in between. The 5-way blade switch and push/pull tone control further enhance its versatility.
SE Studio Standard
The only bolt-on neck in this release group, the PRS SE Studio Standard brings the tone, playability, and versatility of the Studio model to the SE Series and into an all-mahogany design with a vintage-style pickguard aesthetic. At the heart of the SE Studio Standard is its versatile trio of pickups: an 58/15 LT “S” humbucker in the treble position with two Narrowfield DD “S” pickups in the middle and bass positions. The 5-way blade switch and push/pull tone control allow for an array of pickup configurations.
PRS Guitars continues its schedule of launching new products each month in 2025. Stay tuned to see new gear and 40th Anniversary limited-edition guitars throughout the year.
For the first time ever, two guitar greats, John 5 and Richie Kotzen will be heading out on the road this year. The tour will launch October 16 and run through November, hitting markets across the U.S.
Find the full tour itinerary right plus a link for tickets & VIP, including additional dates featuring John 5 only. Reserved seating tickets will go on sale Friday May 16 though a fan presale will begin today at noon local time and fans are strongly encouraged to buy early to get the best seats.
Meet and Greets for both artists will be available. For John 5 please go to: https://john5store.com/collections/vip.
Today, John 5 also announces more details of his anticipated new album. Called The Ghost, it will be released October 10 and is led by the new track “Fiend,” featuring Kenny Aronoff.
John 5 continues running public tours this month for his Knights In Satan’s Service Museum of KISS Memorabilia in Los Angeles, California. Guided tours are open to the public for one month only (with a possible expansion). Current dates available are May 12-16, May 19-23 and May 27-30. Each will be led by John 5 himself who will provide tons of rich detail and answer any questions. Secure your place HERE.
JOHN 5 continues to tour with Mötley Crüe including an upcoming residency in Las Vegas in 2025.RICHIE KOTZEN &
JOHN 5 FALL 2025 TOUR
October 16 El Cajon, CA @ Magnolia
October 17 Riverside, CA @ Fox Performing Arts
October 18 Roseville, CA @ Goldfield Trading Post
October 19 San Jose, CA @ The Ritz
October 21 Phoenix, AZ @ Celebrity Theatre
October 22 Albuquerque, NM @ KiMo Theatre
October 24 Dallas, TX @ Granada Theater
October 25 Leander, TX @ The Haute Spot
October 27 New Orleans, LA @ House of Blues
October 28 Memphis, TN @ Minglewood Hall
October 29 Nashville, TN @ Fogg Street Lawn Club
October 30 Atlanta, GA @ Variety Playhouse
October 31 Orlando, FL @ House of Blues
November 1 Fort Lauderdale, FL @ Culture Room
November 2 Clearwater, FL @ Capitol Theatre
November 4 Richmond, VA @ The National
November 5 Leesburg, VA @ Tally Ho Theater
November 6 Patchogue, NY @ Patchogue Theatre
November 11 Glenside, PA @ Keswick Theatre
November 12 Derry, NH @ Tupelo Music Hall
November 13 Foxborough, MA @ Six String Grill & Stage
November 14 Stroudsburg, PA @ Sherman Theater
November 15 Lorain, OH @ Lorain Palace Theatre
November 16 Columbus, OH @ The King Of Clubs
November 17 Warrendale, PA @ Jergels
November 19 Wyandotte, MI @ District 142
November 20 Flint, MI @ The Machine Shop
November 21 Fort Wayne, IN @ Piere’s
November 22 St. Charles, IL @ Arcada Theatre
November 23 Belvidere, IL @ Apollo Theatre
November 25 Denver, CO @ Oriental Theater
November 29 Pioneertown, CA @ Pappy & Harriet's*
*John 5 only
AEROSMITH guitarist and songwriter JOE PERRY is set to return to the road for a series of August performances with THE JOE PERRY PROJECT. The 8-date run kicks off August 13 in Tampa, FL and wraps August 23 in Port Chester, New York, with an August 19 performance in PERRY’s Boston hometown (see the itinerary below). For the North American trek—which marks the first solo shows for PERRY this year—the legendary guitarist will be joined by his Aerosmith bandmates Brad Whitford (guitar) and Buck Johnson (keys), along with The Black Crowes’ Chris Robinson (vocals), and Stone Temple Pilots’ Robert DeLeo (bass), and Eric Kretz (drums).
“Well…it’s time to let the music do the talkin again,” PERRY says. “I’m really excited about the JPP line up this year!!!! Most of these guys played with me at The Roxy in L.A. at the debut event for my latest solo album [Sweetzerland Manifesto] in January 2018. They’re all busy as hell but thankfully they’re able to carve out some time for this run. And I’m not only lucky enough to have Brad Whitford onstage with me but Chris Robinson of The Black Crowes! [who sang ‘Fortunate One’ on Sweetzerland Manifesto MKII], Robert DeLeo and Eric Kretz from STP!!! and Buck Johnson who plays keys and sings with Aerosmith, the Hollywood Vampires, and is also a solo artist in his own right.”
For the shows, the Rock and Roll Hall of Fame inductee says “the set list is gonna include my fav JPP cuts, STP, Black Crowes, and with Brad we’ll be hitting the Aero hits and some deep cuts and then ya never know!!!! Gonna be a BLAST, and if you’ve ever been to one of my shows you know the words GARAGE BAND on STEROIDS come to mind! See you there!!!!”
DATE | LOCATION | VENUE |
Wednesday, August 13 | Tampa, FL | Seminole Hard Rock - Tampa |
Thursday, August 14 | Hollywood, FL | Seminole Hard Rock - Hollywood |
Saturday, August 16 | Toronto, ON | HISTORY |
Sunday, August 17 | Muskoka, ON | Kee to Bala |
Tuesday, August 19 | Boston, MA | Wang Theatre |
Wednesday, August 20 | Hampton Beach, NH | Hampton Beach Casino Ballroom |
Friday, August 22 | Mashantucket, CT | The Premier Theater at Foxwoods Resort Casino |
Saturday, August 23 | Port Chester, NY | Capitol Theatre |