
Photo 1: Waves Audio IR-1
Defy the laws of physics by following Bryan Clark's tips for generating fresh and articulate sounds with reverb plug-ins.
Welcome back to another Dojo. Last month, I shed light on the benefits of room recording and using the natural reverb of given spaces. This time I'll briefly explain reverb's four main parameters in layman's terms (it's actually a very deep and complex subject), and, by tweaking those parameters, how to make new, interesting, and physically impossible spaces for use in your recordings.
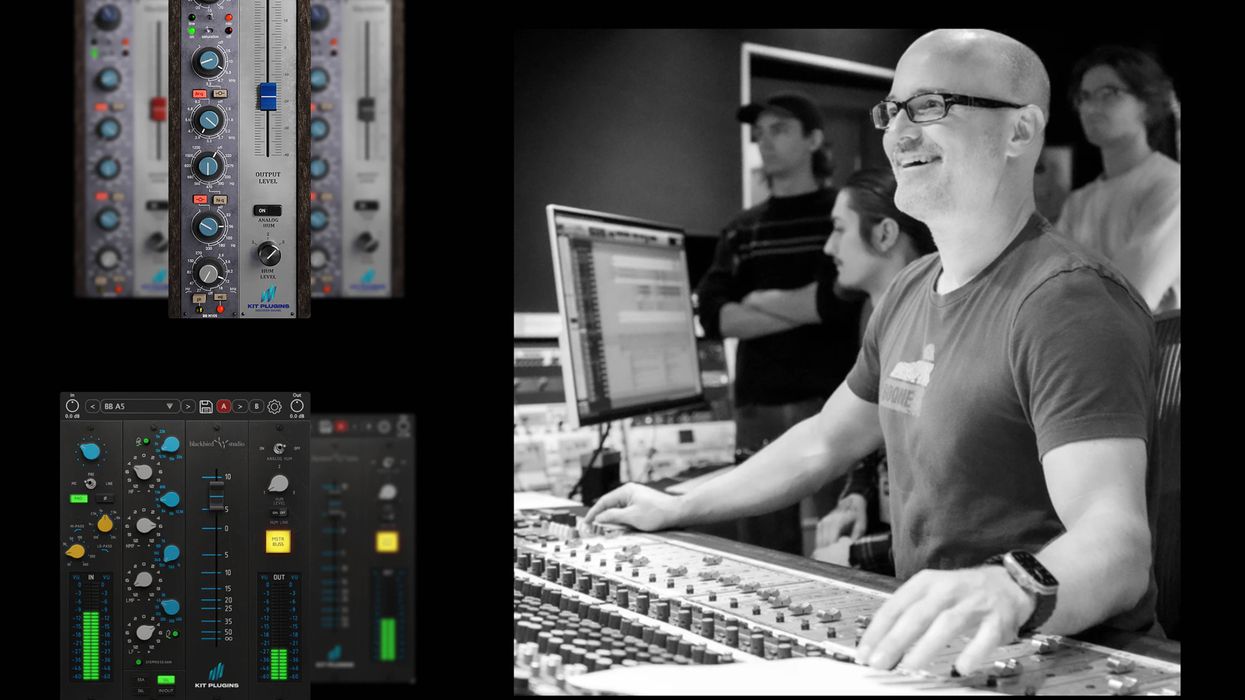
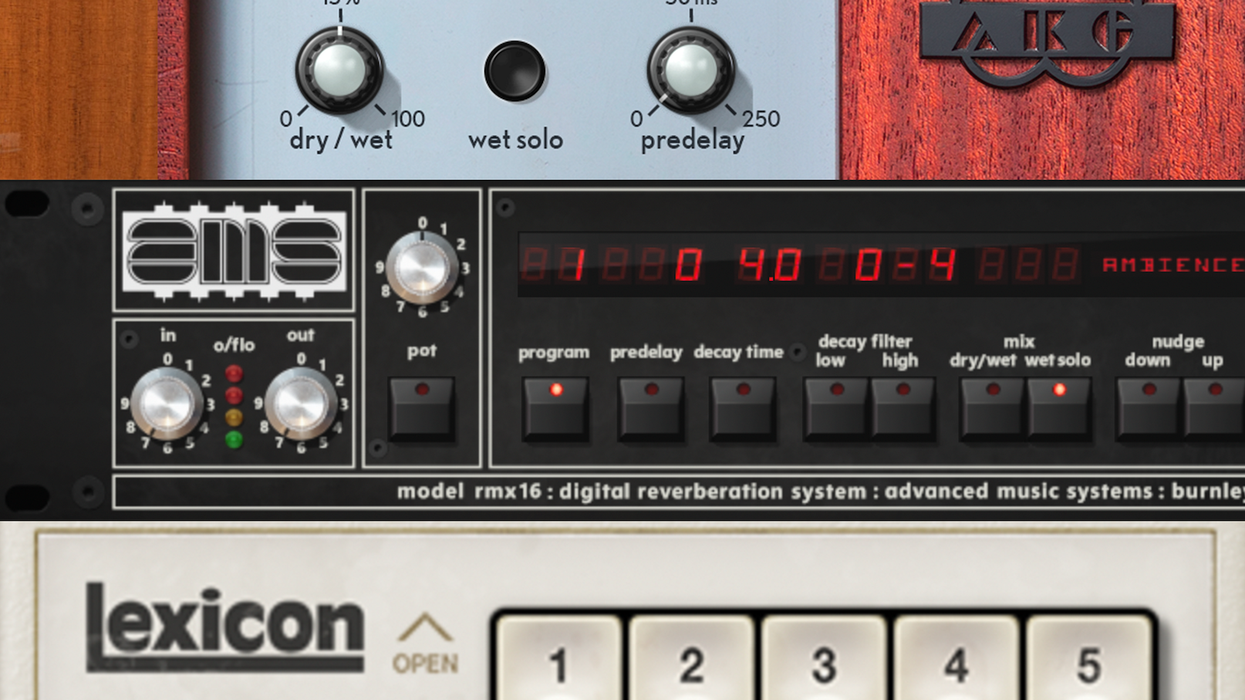
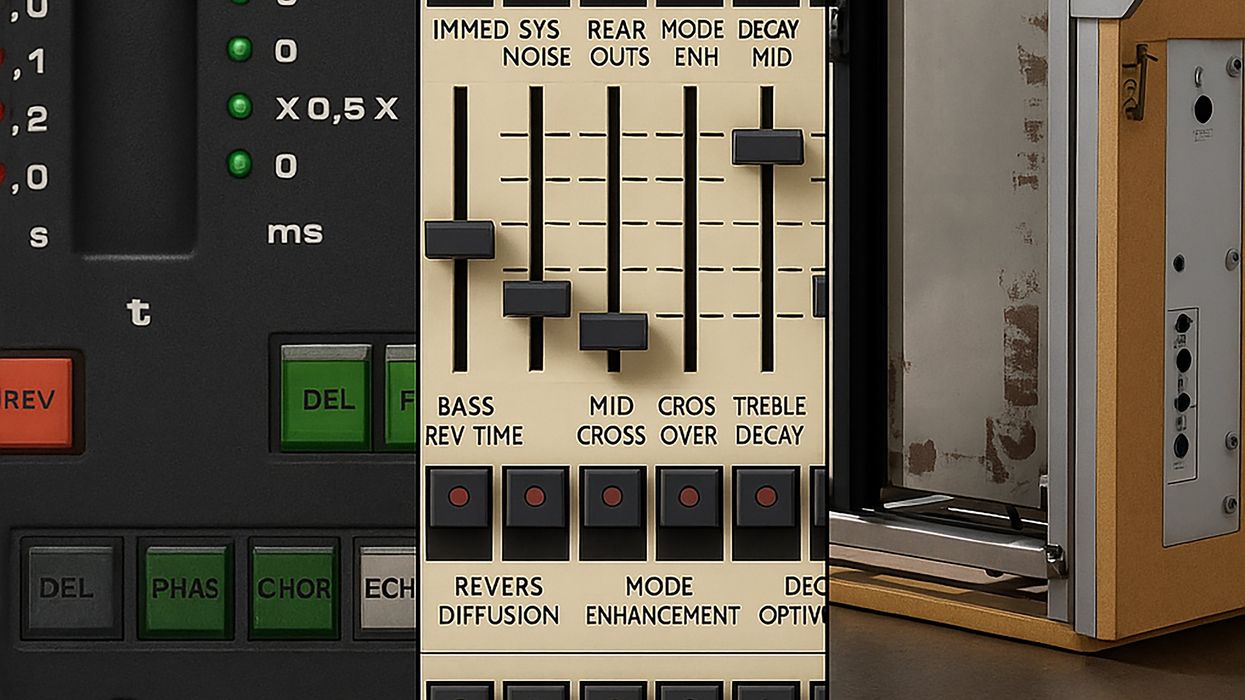
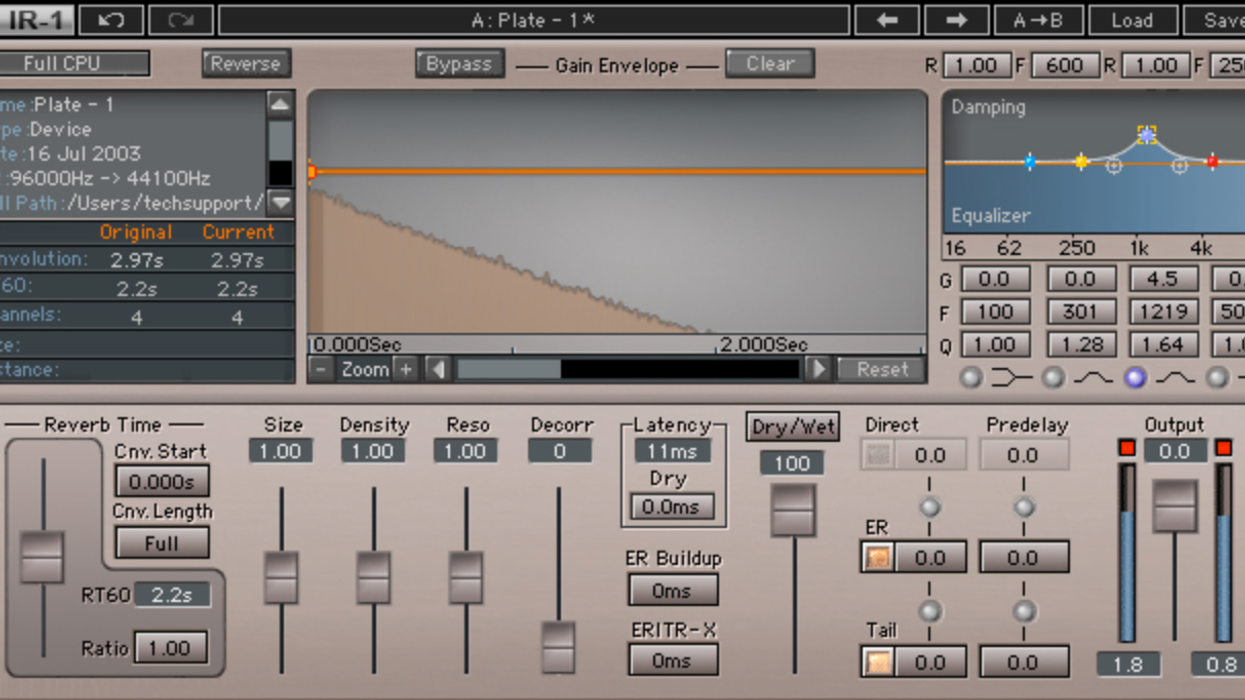
Most of us add reverb at some point in our recording process, and most of that is through digital plug-ins found in our DAW or by third-party makers (FabFilter, Waves, Universal Audio, etc.) or through rackmounted outboard gear. (Photos 1 and 2 provide a look at the Waves Audio's IR-1 and FabFilter's Pro R in action.) Whatever type of reverb you add, I'd be willing to bet that your process might be similar to this: pull up a reverb, set the amount of wet/dry, maybe tweak the overall time, and you're done. But there's so much more you can do!
I'd be willing to bet that your process might be similar to this: pull up a reverb, set the amount of wet/dry, maybe tweak the overall time, and you're done. But there's so much more you can do!
First, let's look at the main parameters of reverb. In any given space (size doesn't matter), something has to happen that sets sound pressure waves in motion. This is called an impulse function (a loud clap, popping a balloon, a righteous, single, 100-watt djent, etc.). The measurement of that impulse function is called the impulse response (IR). The impulse response contains four main parameters of what we generally call reverb.
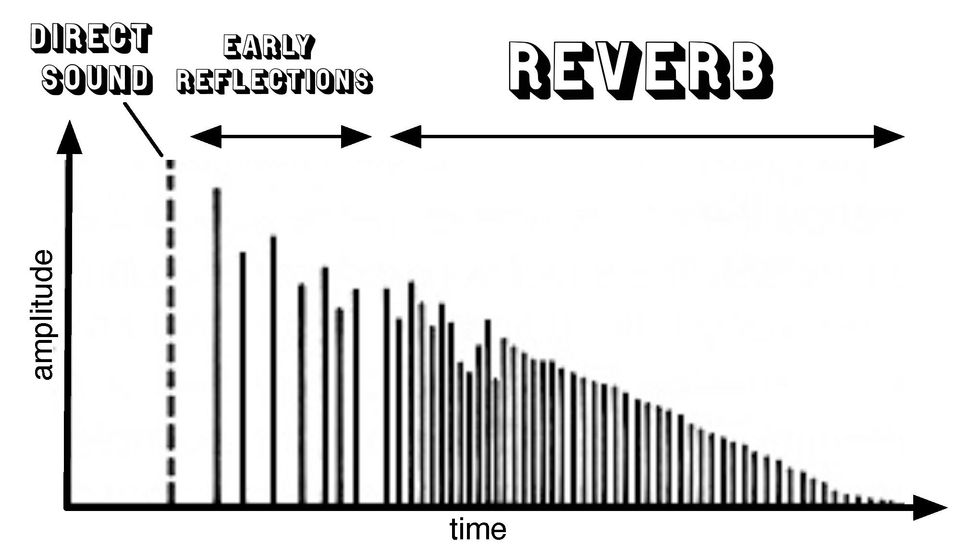
Fig. 1
Imagine Metallica is doing a soundcheck at your local stadium and they're going to perform "Damage, Inc." (Still one of my favorite songs!) You're in front-of-house position (FOH), where the mix engineer sits. After the layered reversed guitar intro (lasting 1:18, for those listening at home), the band kicks in with those devastating, staccato, "chunks." With each one, several things happen in rapid succession—remember, I'm relating this as simply as possible as it's really complex. Look at Fig.1. You'll see the:
- Direct sound: A certain amount of sound reaches your ears directly, without reflecting off anything. Obviously, you hear this first.
- Early reflections: These initial reflections are easy to hear and generally bounce off a few things before reaching your ears and arrive closely after the direct sound.
- Reverb: As more reflected sounds reach your ears with mosh-pit ferocity, the ears can no longer make out individual early reflections because of the buildup, and "reverb" starts.Length: Once reverb starts, the time it takes for the sound to bounce off the rafters and for the venue to eventually fall silent again is known as the reverb time or RT60. RT60 is generally the amount of time it takes for the IR to fade 60 dB and merge back with the inherent noise floor of the building.
- Length: Once reverb starts, the time it takes for the sound to bounce off the rafters and for the venue to eventually fall silent again is known as the reverb time or RT60. RT60 is generally the amount of time it takes for the IR to fade 60 dB and merge back with the inherent noise floor of the building.
Okay, now let's get down to business. Most reverb plug-ins allow you to adjust time, EQ, pre-delay, and mix (wet/dry). Some, like Waves IR-1 reverb ($29 street) and FabFilter's Pro R ($199 street) offer much more, but in very different ways.
Adjusting the Pre-Delay
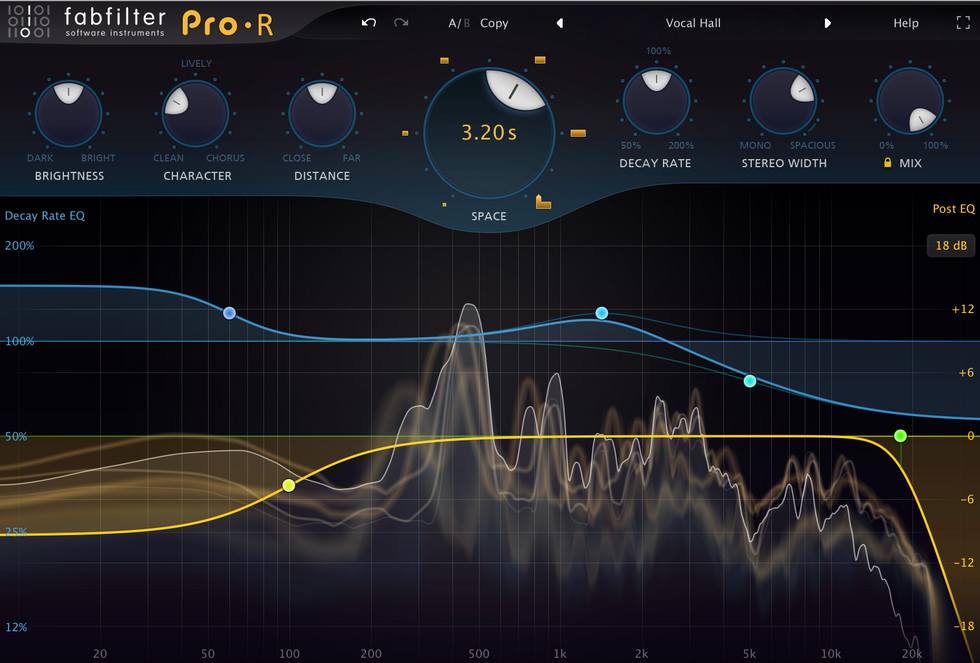
Photo 2 : FabFilter's Pro R
Increasing the pre-delay will postpone the arrival time of reverb. Which means that you can easily defy the laws of physics. Since sound travels at 1,125 feet per second (at 68 degrees Fahrenheit at sea level), by adjusting the pre-delay, you can move the arrival time of the reverb to a later point (that's not physically possible), yet when the reverb actually starts, it goes back to obeying the laws of physics. This trick is often used to bring clarity to an instrument's articulation and to subtle parameters that might be getting washed out in the original reverb. This works extremely well on vocals, snare drum, acoustic guitars, staccato power chords, etc. Further, some pre-delay settings can be synced (quarter-, eighth-, 16th-note, etc.) to the BPM of the song. FabFilter's Pro R does this, again violating the laws of physics. Adding even more violations to the properties of sound, Waves IR will allow you to add a pre-delay to the early reflections before reverb.
Adjusting the EQ
Adjusting the reverb's EQ can add another layer of complexity. Boosting top end to make it brighter can make a heavily pre-delayed reverb sound like it would if it were closer to the source, but, because of the pre-delay, it would organically sound dark and dull. One other thing to try is adding a narrow Q to a frequency band (or several) and tuning your reverb to the key or a specific harmony you wish.
I encourage you to play with all the available parameters as much as you can and see what kind of craziness you can come up with. I'll be sharing some of mine on my website, bryanclarkmusic.com, should you want to see and hear some more examples. Until next time, stay open-minded and keep rocking! Namaste.
Though Lou Reed seemed to only use a handful of chords, his shrewd right-hand strumming created limitless rhythmic variations.
Beginner to Intermediate
- Focus on syncopation.
- Add muted strums to enhance your rhythm playing.
- Learn how to modify complex rhythmic patterns into smaller, more comprehensible figures.
Though usually more lauded for his lyrics than his guitar playing, Lou Reed had a distinctive style of strumming that can make replication a challenge and seemingly impossible for beginners to comprehend. With a combination of syncopations and muted strums, Reed’s rhythm guitar—from his time with the Velvet Underground to his solo career—has a groove and feel that all guitar players can learn from.
We’ll start with a relatively simple strummed hook that shows Reed’s roots. Ex. 1 is a variation on “There She Goes Again” from The Velvet Underground and Nico, which was recorded in 1966 and released in 1967. This strum was clearly inspired by Marvin Gaye’s “Hitch Hike,” as it duplicates Gaye’s intro almost exactly, albeit in a different key. (It is worth mentioning that “Hitch Hike” also inspired the Beatles “You Can’t Do That.”)
Ex. 1
Ex. 2 is the samething but performed with cowboy chords instead of barres.
Ex. 2
With Ex. 3, a la “Sister Ray” from 1967’s White Light/White Heat, we get into Reed’s more syncopated strums. Note that after the first beat, the emphasis of each strum is on an upbeat, including the changes from G to F, then from F to C, followed at the end by a typical Lou Reed-ism of strumming while in mid-change (though in all fairness, many guitarists do this). Thus, the last upbeat notes, which imply a G chord, are in fact a byproduct created by the switch, not a specific chord.
Ex. 3
Ex. 4 is the same strum but capoed at the 5th fret, using cowboy chords instead of barres.
Ex. 4
Our final Velvet reference, Ex. 5, comes from “Sweet Jane” (Loaded, 1970), which is a song I loathe teaching to students as it is deceptively tricky—it was the inspiration for this lesson—and can make one feel demoralized. True, the song has only four chords, but the syncopated switching and muted strums can cause problems for many players, and not just beginners. Take your time to get the nuances of the switches and mutes.
Ex. 5
Better yet, start with Ex. 6, which is a simplified version of Ex. 5, using cowboy chords instead of barre chords, as well as a more straightforward strum. True, it does not conform completely to the original, but it is a worthwhile starting point. Once this is mastered, try playing Ex. 5 with the open-position chords before moving onto the barres.
Ex. 6
Solo Years
Ex. 7 is a take on “Walk on the Wild Side” from 1972’s Transformer, arguably the most famous Lou Reed song. Here we’ve graduated from eighth-notes to 16th-notes in the right hand. Once again, the muted strums play a vital role.
Ex. 7
Like the previous two examples, you might want to start with the simpler Ex. 8, although the only change is that the mutes have been omitted. This example demonstrates how essential the mutes are, as the feel changes completely when you leave them out.
Ex. 8
Ex. 9 also comes from Transformer and is a variation on“Vicious.” Additional syncopations and muted strums, both different from “…Wild Side,” complicate what should be carefree.
Ex. 9
Ex. 10 is, again, a simplified alternative.
Ex. 10
Examples 11 and 12 demonstrate two options for fretting chords, using Reed’s “Leave Me Alone” from Street Hassle (1978) as a vehicle.
Ex. 11
Ex. 12
Our last example, Ex. 13, is based on Reed’s late-’80s “comeback” hit, “Dirty Boulevard” from New York. Here we not only get syncopations, but a rhythmic variation in the chorus—same chords, different rhythms. Pay attention to that quick, almost-ghosted B note on the “and” of 1 in measure two. It almost seems like a mistake but it adds so much.
Ex. 13
The Lou Reed Legacy
When most fans think of Lou Reed, the first thing that comes to mind is his pioneering subversive, transgressive, and poetic lyrics. But, clearly, that is not all there is to his work. In truth, Lou Reed is an incomparable musician whose guitar playing should not be underestimated. So, take this lesson as a starting point and search out more of his idiosyncratic strums. You will be well rewarded.
Xotic revamps a classic Vox-boost-in-a-box pedal, creating a new one in the process.
Smart, feature-packed update on a classic. Nice size and price.
Small boost knob.
$180
Xotic Effects AC Booster V2
Xotic Effects newest version of the Vox-flavored AC Booster, the AC Booster V2, adds a second, footswitchable boost circuit (tweakable via a small, clear knob tucked among the four main-channel controls), plus a set of four dip switches on the box’s righthand side which engage compression, modern or classic voicing, low-mid boost, and high-mid boost.
This new suite of features packs significant extra functionality into V2’s still-diminutive enclosure. The Vox sounds are all there, and with the high-mids juiced and treble nudged, you’re squarely in clanging Top Boost territory. The modern voicing trades some furry mid-range chunk for a bit more aggression and clarity, while the compression is useful for leveling leads and smoothing out unruly playing.
The boost knob is a little difficult to access, situated as it is in the center of the primary four-knob array. I don’t have particularly big fingers, but even I had trouble twiddling it. That’ll annoy some. But it’s a small price to pay for such a pedalboard-friendly footprint. The boost doses you with a healthy bump in level and gain that’s great for stand-out leads and solos. And speaking of standing out, the upper-mid boost switch is a treat. I found that creating a greater disparity between the high mids from the low mids made for a more precise and satisfying tone-shaping experience than I would experience using a standard mids knob.
There are no shortage of pedals that ape Vox AC30 mojo, but I haven’t seen many that will give you the range of utility that the AC Booster V2 will, for less for $200. Xotic nailed a smart and versatile redesign here.
Stringjoy has introduced the Ariel Posen Signature String Set, a heavy-gauge Nickel Wound set designed in close collaboration with acclaimed slide guitarist and singer-songwriter Ariel Posen.
The Ariel Posen Signature String Set from Stringjoy
Ideal for B Standard, Open C, and other lower tunings, this set offers exceptional tone and feel for players who want to explore new sonic territory while maintaining their guitar's unique voice.
Each string in this set is built with Stringjoy’s trademark quality: wound at tension with high compression winds for maximum output, durability, and smooth playability. The result? Strings that hold up under pressure while delivering a natural, expressive voice—perfect for hybrid playing and expressive slide work.
Ariel Posen Signature Set Specs:
• .014 – .018p – .026w – .038 – .050 – .062
• Wound 3rd string
“If you didn’t know these were 14-62 gauges, you’d swear they were just 11s tuned down,” said Ariel Posen. “They feel like home and preserve the sound of the guitar, even in lower tunings. That’s the biggest thing—it still sounds like guitar.”
“We’ve spent ten years experimenting and testing together to find the right combination,” said Scott Marquart, Stringjoy Founder & President. “This release is more than just a new product—it’s the culmination of a shared journey between friends and musicians. Ariel’s set is uniquely him, and I think players will love how it feels and responds.”
Stringjoy’s Ariel Posen signature string set carry a street price of $13.99. Learn more at at stringjoy.com.
Nashville luthier and guitar tech Dave Johnson shows us the baker's dozen of tools he thinks any guitar picker requires to be a guitar fixer.
3. Guitar Tech Screwdriver Set - 3000
4. Nut File Set (for medium guitar strings) - 0882
8. String Spacing Ruler - 0673
9. Nut and Saddle Files - 4556
The Ultimate Guitarist's Tool Chest Giveaway
Whether you're setting up your first guitar or fine-tuning a custom build, these are the 13 tools every guitarist needs. Now you can win them all. We've partnered with our friends at StewMac to give away a complete pro-level toolkit valued at over $750.
Click here to enter