
This article is for recording guitarists eager to make the most of reverb plug-ins. We’ll explore the various reverb types, decode the controls you’re likely to encounter, and conclude with some suggestions for cool and creative reverb effects.
This is not a buyer’s guide, though you’ll hear many different products. Our focus is common reverb plug-in parameters and how to use them. Nearly all modern DAWs come with good-sounding reverbs. You can also add superb third-party plug-ins. But there are also plenty of free and budget-priced reverbs—just google “free reverb plug-in.”
Reverb = delay. Reverb is merely a delay effect. Sounds traveling through air eventually encounter surfaces. Some sound bounces off these surfaces, producing a complex network of echoes, made even more complex when the initial reflections bounce off secondary surfaces.
The controls on reverb plug-ins define how the software mimics this process. Function names can be confusing, but remember, everything relates to acoustic phenomena that you already understand intuitively. For example:
- The space’s size. (The further a sound travels before hitting a surface, the slower the echoes arrive.)
- The hardness of the reflective surfaces. (The harder the material, the louder, brighter, and more plentiful the echoes.
- The relative angles of the reflective surfaces. (A square room sounds different than a round one, which sounds different than a trapezoidal one.)
- The presence of other objects. (Soft surfaces like carpets, cushions, and acoustic foam diminish the reverb, usually affecting some frequencies more than others.)
- The listener’s location. (The further an ear or microphone from the sound source, the more reverberation is perceived.)
Understanding Reverb Types
By definition, all reverb plug-ins are digital. Most are either algorithmic or convolution-based. Algorithmic reverbs employ delay, feedback, and filters to mimic sounds bouncing around in space. Convolution reverb (also called impulse response or IR reverb) creates “snapshots” of actual sonic spaces and audio devices. In convolution, developers amplify a test tone in the targeted space (or through a target piece of audio gear) and record the results. The software compares the new recording to the dry test tone, and then it applies corresponding adjustments to any audio, making it sound as if it was recorded in the modeled space or through the modeled gear. (That’s how the speaker simulations work in most amp modelers.) Algorithmic and convolution reverbs often perform the same tasks, just via different methods.
But when we make musical choices, we rarely think, “This should be algorithmic and that should be convolution.” We’re usually trying to evoke a particular sound: a place, an old analog device, a freaky sound not found in nature. So, let’s take a whirlwind tour of reverb history, with thoughts about obtaining those sounds via plug-ins.
A Haul-Ass Reverb History
Real spaces. Before the 20th century the only reverbs were actual acoustic environments: caves, castles, temples, tombs. It wasn’t till the 18th century that people began constructing spaces specifically for their sonic properties—the roots of the modern concert hall.
Convolution reverbs excel at conjuring specific places. Most IR reverbs include libraries of such sounds. Some evoke iconic spaces and famed studios. IRs can also mimic small spaces, like a closet or compact car.
Clip 1 — A Guitarist’s Guide to Reverb Plug-ins by premierguitar
In Clip 1, you hear the same acoustic guitar snippet through IRs captured inside the Great Pyramid of Giza, the isolation block at Alcatraz prison, Chartres cathedral, and the interior of a VW Beetle, all using Audio Ease’s Altiverb library. (For demo purposes, reverb is applied rather heavily in all audio examples.)
Echo chambers were the earliest form of artificial reverb, though they aren’t all that artificial. The chamber is usually a room with hard, reflective surfaces. A loudspeaker in the chamber amplifies dry recordings, and a distant microphone records the results. It’s still “real reverb,” only it can be added and controlled independently from the original recording. This process evolved during the 1930s and ’40s. The first popular recording to use the effect was 1947’s “Peg o’ My Heart” by the Harmonicats, produced by audio genius Bill Putnam.
PEG O' MY HEART ~ The Harmonicats (1947)
During a recent recording session at Hollywood’s Sunset Sound, I shot Video 1 in the famed Studio A echo chamber, thanks to house engineer George Janho. You’ve heard this very room countless times. The Doors and Van Halen made most of their records here. You also hear this reverb on “Whole Lotta Love,” the vocal tracks on the Stones’ “Gimme Shelter,” Prince’s 1999 and Purple Rain, and countless other famous recordings.
Sunset Sound Chamber
Echo chambers are well represented in most IR reverb libraries. Most algorithmic reverbs do chambers as well, replicating the general effect without modeling a particular space. You can even find plug-ins dedicated to a specific chamber, like Universal Audio’s Capitol Chambers, which models the Hollywood chamber famously used by Frank Sinatra.
Spring reverbs. These were the first truly artificial reverbs. They initially appeared in pre-WWII Hammond organs, and by 1960 or so they had migrated to guitar amps. Fender wasn’t the first company to make reverb-equipped amps, but their early-’60s reverb units still define the effect for many guitarists.
The reverb effect is produced by routing the dry signal through actual springs, with a microphone capturing the clangorous results and blending them with the original tone. Springs generally sound splashy, trashy, and lo-fi, often in glorious ways. It’s an anarchic sound, best captured in a plug-in via IRs. Most of the spring reverb sounds in guitar modelers are IR-based. Meanwhile, reverb stompboxes—usually algorithmic—mimic the sound with varying degrees of success.
Plate reverb appeared in the late 1950s, initially in the Elektromesstechnik EMT-140, which remains a sonic gold standard. Plate reverb works similarly to spring reverb, but a massive metal sheet replaces the springs. It’s generally a smooth, sensuous sound relative to a spring.
Clip 2 — A Guitarist’s Guide to Reverb Plug-ins by premierguitar
In Clip 2, you hear the same acoustic guitar snippet through impulse responses of a Fender spring reverb unit and a vintage EMT-140 plate.
There are countless plate clones among today’s reverb plug-ins. Some are convolutions based on analog gear. But algorithmic reverbs also excel at faux-plate sounds. In fact, one of the initial goals of early digital reverb was to replace cumbersome mechanical plates. Speaking of which.…
Digital reverb (the algorithmic kind) arrived in 1976 via the EMT-250, also from Elektromesstechnik. Lexicon and AMS produced popular rivals. They focused largely on mimicking rooms, chambers, and plates. Sound quality has improved over the decades thanks to increased processing power and clever programming.
Today you can get far “better” algorithmic reverb from plug-ins. But ironically, those primitive digital ’verbs are trendy again in pop production. You can find precise clones of retro-digital hardware in plug-in form.
Convolution reverb debuted at the end of the century, popularized by Sony’s DRE S777 unit. Convolution reverbs often have fewer controls than their algorithmic cousins because most of the process is baked into the impulse response.
Most convolution reverbs have similar sound quality. The free ones can sound as good as the pricy ones. Higher prices are often based on the size and quality of the included IR libraries. Google free reverb impulse responses for gratis goodies.
Recent wrinkles. There are always interesting new reverb developments. For example, Things — Texture from AudioThings and Silo from Unfiltered Audio are anarchic granular reverbs that loop and manipulate tiny slices of the reverb signal to create otherworldly effects ranging from the brutal to the beautiful.
Clip 3 — A Guitarist’s Guide to Reverb Plug-ins by premierguitar
Clip 3 includes several granular reverb examples.
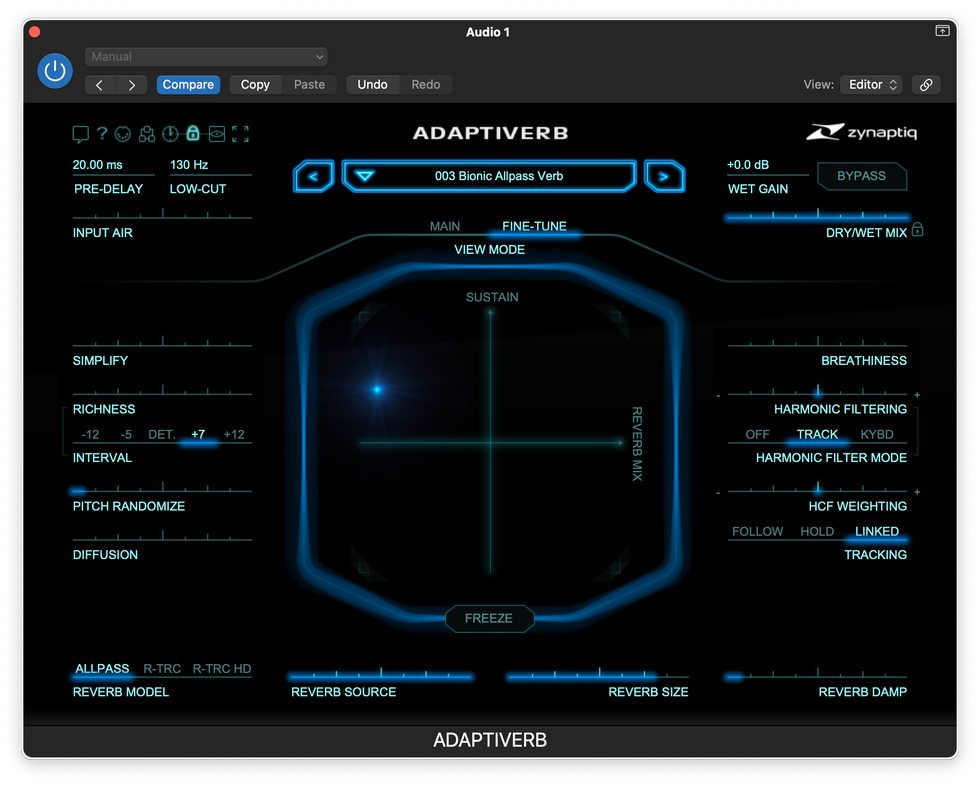
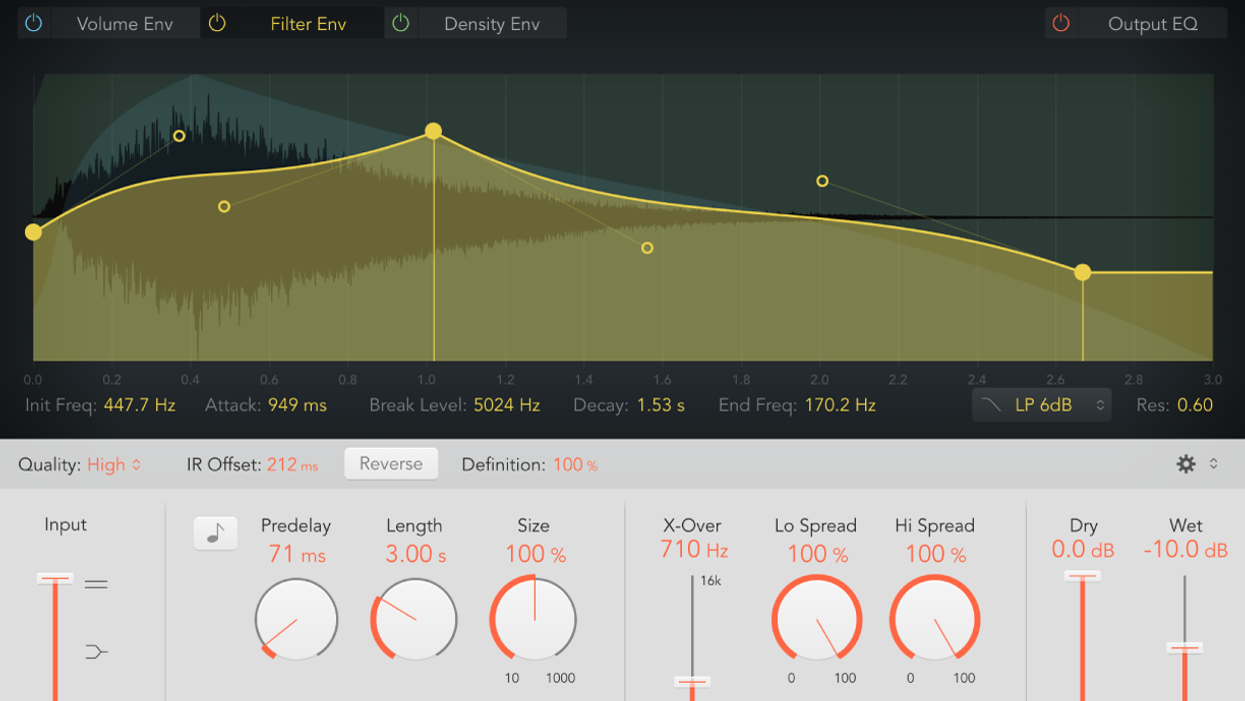
Image 2: Zynaptiq’s innovative Adaptiverb generates reverb via pitch-tracking oscillators rather than delays and feedback loops.
Some newer reverbs employ artificial intelligence to modify the effect in real time based on the audio input. iZotope’s Neoverb automatically filters out frequencies that can muddy your mix or add unwanted artifacts. And Zynaptiq’s Adaptiverb generates reverb in a novel way: Instead of echoing the dry signal, it employs pitch-tracking oscillators that generate reverb tails based on the dry signal. It, too, excels at radical reverbs suitable for sound design.
Clip 4 — A Guitarist’s Guide to Reverb Plug-ins by premierguitar
Clip 4 demonstrates a few of its possibilities.
Common Reverb Plug-in Controls
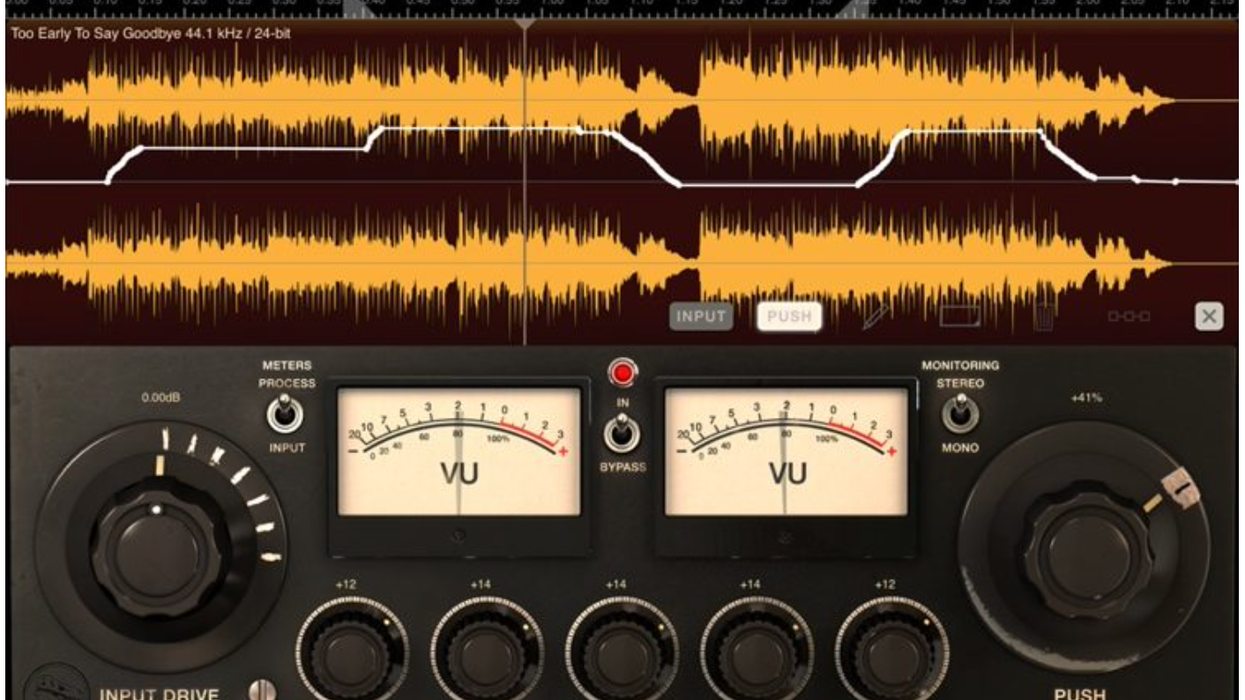
The knob names on a reverb plug-in can get confusing, but remember that they control variables that you already understand intuitively. Also, not all controls are equally important. The most essential ones are the wet/dry balance and the reverb decay time (how long it continues to sound). By all means learn the subtler functions, but don’t be surprised if you use them only rarely.
Video 2 walks you through most of the controls you’re likely to encounter on an algorithmic reverb plug-in. I used ChromaVerb from Apple’s Logic Pro DAW for the demo, but you’ll encounter similar parameters on most algorithmic reverb plug-ins.
Digital Reverb Walkthrough
Creative Reverb Ideas
Spring things. The single reverb knob on vintage amps is simply a wet/dry blend control. Some spring reverbs add a dwell control to set the amount of reverb input. Higher settings mean louder, longer reverberation.
But in the digital realm, you can deploy old-fashioned spring reverb in newfangled ways. For example:
- Pan the dry signal and spring sound apart for a broad stereo effect. (Traditional spring reverb is strictly mono.)
- Add predelay, inserting space between the dry and wet signals. (If the plug-in has no predelay control, just add the effect to an effect bus with a 100 percent wet, no-feedback delay upstream.)
- Route a guitar signal to two different spring reverb sounds, panned apart.
- Assign the reverb to an effect send, add a compressor to the effect channel, and then sidechain the compressor to the dry guitar sound. That way, the reverb is ducked when the guitar is loud, but swells to full volume during quiet passages.
- Apply digital modulation to the wet signal for detuned or pulsating effects.
Clip 5 — A Guitarist’s Guide to Reverb Plug-ins by premierguitar
Clip 5 starts with a straightforward spring sound before demonstrating the above options in order.
Fender-style reverb is so ubiquitous that simply using less familiar spring sounds can be startling.
Clip 6 — A Guitarist’s Guide to Reverb Plug-ins by premierguitar
Clip 6 is a smorgasbord of relatively obscure spring sounds from AudioThing’s Springs and Amp Designer, Logic Pro’s amp modeler.
Finally, it can be exciting to use springs on tracks that don’t usually get processed that way. For example, spring reverb is often considered too quirky and lo-fi to use on acoustic guitar or vocals.
Clip 7 — A Guitarist’s Guide to Reverb Plug-ins by premierguitar
But Clip 7 shows how attractive springs can sound on voice and acoustic. (You hear the dry sounds first.)
Unclean plates. In contrast to a spring’s lo-fi clank, simulated plate reverb is smooth and warm. Even if your track already has spring reverb, you might apply some plate ’verb to integrate it into a mix.
One creative avenue is deploying smooth plate reverb in relatively lo-fi ways. For example:
- Try placing the reverb before an amp modeler on a track to mimic a reverb stompbox. That way, the reverb is colored by both amp and speaker.
- Imagine a guitar amp with a huge metal plate inside instead of springs. If your amp modeler lets you use pure amp sounds without speaker modeling and vice-versa, try sandwiching a plate sound between two instances of amp modeler on the same track. Turn off the speaker sound on the first amp sim and use only the speaker sound on the second one. This way, only the speaker colors the reverb.
- Plate reverb also sounds great panned separately from the dry sound.
Clip 8 — A Guitarist’s Guide to Reverb Plug-ins by premierguitar
Clip 8 starts with a conventional plate sound before demoing the above ideas.
Liquid reverb. Reverb plug-ins have one big advantage over hardware: Everything can be automated within your DAW.
Automated Reverb
In Video 3 I’ve written automation for both the decay time and reverb damping for an evolving effect that would have been difficult on hardware.
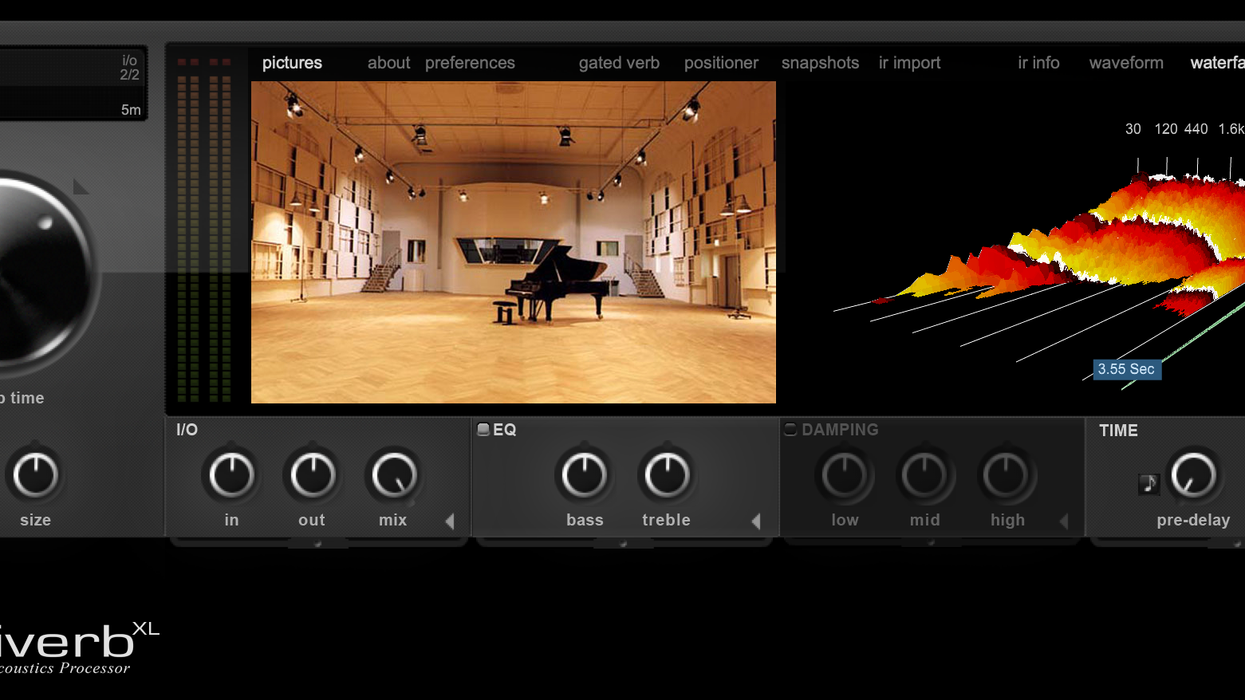
Oh, the places you’ll go. Convolution reverbs usually have fewer controls than their algorithmic cousins. You might do no more than adjust the wet/dry or fine-tune the decay time. But IR reverbs don’t have to be “plug and play”—especially if you create your own reverbs. It’s a surprisingly simple process. (Some IR reverbs, like Altiverb and Logic Pro’s Space Designer, come with an app to generate the needed signals and process the recordings for use.)
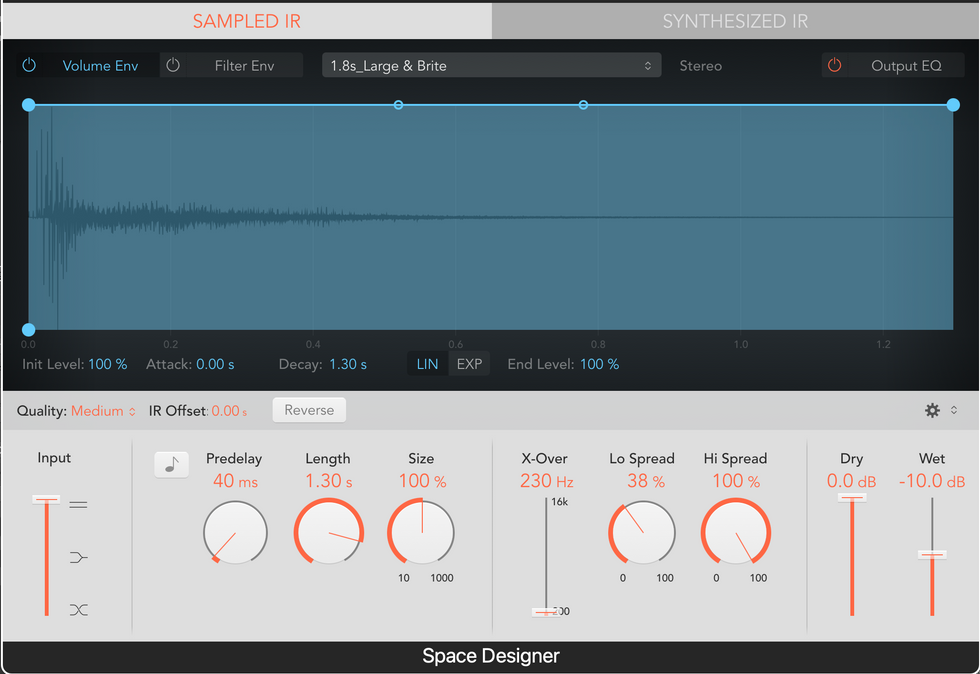
Image 3: You can get cool, if unpredictable, results by dropping random audio files into an impulse response reverb like Logic Pro’s Space Designer.
Theoretically, you need a hi-fi PA system to amplify the needed tones in the target space, and good microphones to capture the results. But not always! I’ve captured cool IRs in my travels with nothing more than an iPhone and a spring-loaded clipboard in lieu of the traditional starter pistol. I’ve even obtained decent results by clacking a couple of stones together.
Clip 9 — A Guitarist’s Guide to Reverb Plug-ins by premierguitar
Clip 9 includes quick and dirty IRs that I captured in a Neolithic cave painting site in France, a thousand-year-old ancient Anasazi ball court in Arizona, an ancient Greek stone quarry, a 19th-century limestone kiln in Death Valley, and the inside of an acoustic guitar.
You can also get interesting, if unpredictable, results loading random audio files into the IR reverb.
Clip 10 — A Guitarist’s Guide to Reverb Plug-ins by premierguitar
Clip 10 features a dry guitar snippet, followed by bizarre reverb effects generated by drum loops, synth tones, and noises.
New sounds, new spaces. Using reverb plug-ins can be incredibly simple. Often it’s just a matter of scrolling through factory presets, or making basic balance and decay time adjustments. You can also use them in endlessly creative ways. Whatever your goals, I hope this article helps you find exactly the sounds you seek.