Dutch experimental builder Yuri Landman creates a microtonal avant-rock playground for the former Sonic Youth axeman.
Perhaps it’s best if I start this article with a confession: I’m mostly known for being “the guy who built guitars for Sonic Youth.” Actually, I only built one guitar for one member of SY—Lee Ranaldo. Even so, I will probably live with this “stigma” for the rest of my life. Not that this worries me—it could be much worse. Here’s the story of how it happened.
(Be sure to check out the video of Dutch avant-garde luthier Yuri Landman delivering the DIY drone guitar he built for former Sonic Youth guitarist Thurston Moore. Bonus: see and hear Thurston demo this bad boy. Watch it all here.)
In 2006, I built a 12-string, zither-like instrument called the Moodswinger and donated it to Liars, an experimental band based in Los Angeles, as a form of mutual promotion. Full disclosure—this was a setup: I knew they had opened for Sonic Youth a few years before and that the connection might help me get my foot in the door with Lee and Thurston Moore. As soon as I finished that job, I contacted Sonic Youth’s management and offered them the same instrument deal. Within an hour I got a reply saying my request had been forwarded to Lee. The next day Lee enthusiastically replied that he was interested in such a project and proposed something like a harp guitar. The conversations with Lee eventually culminated in the 18-string Moonlander.
After that I did a third instrument called the Bachelor for Jad Fair of Maryland art-punk outfit Half Japanese—which meant I had my weird instruments in the hands of a fresh, hip young band, a famous veteran outfit, and a legendary cult act. They’re three of my favorite bands, for different reasons.
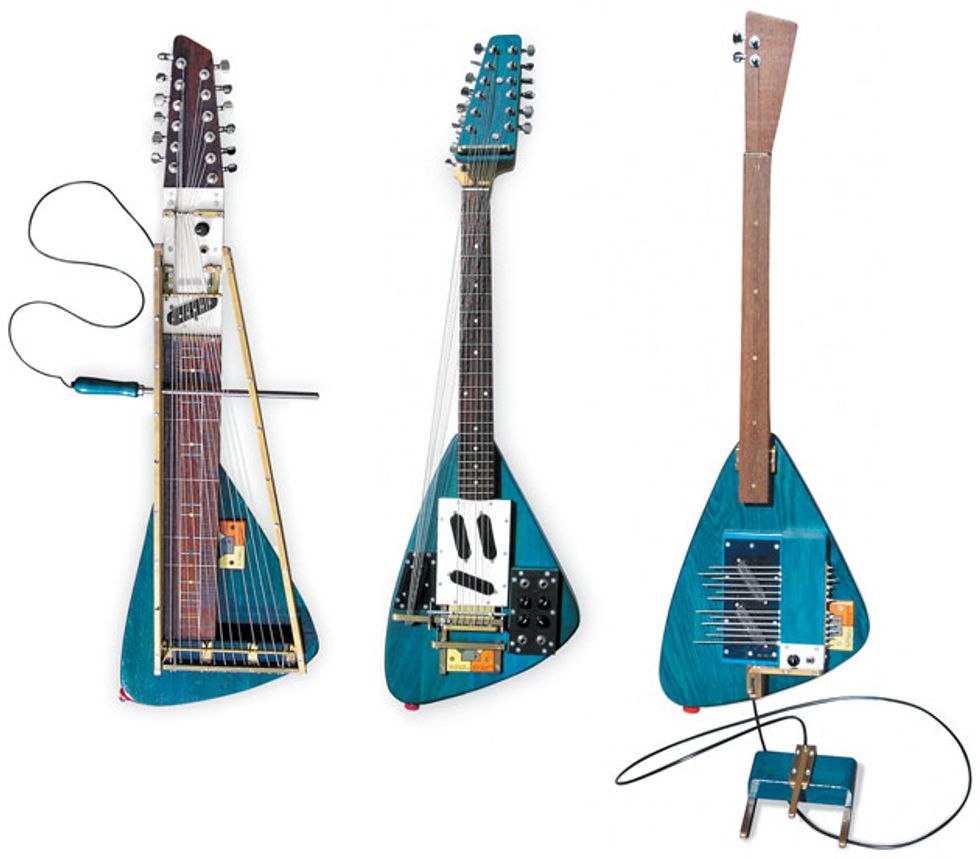
Left to right: The Moodswinger, Moonlander, and Bachelor.
Again, I stress that all three instruments were donations. I insisted on this, since I don’t possess the level of skills most expect from a bona fide luthier. I just have odd ideas and I’m not afraid to try them out. In order to both ensure that I didn’t get complaints and that I could maintain absolute autonomy in the builds, the first condition was not taking any money.
Regardless of this fact, media attention exploded almost immediately after all this happened. It first came from Pitchfork, then from basically every newspaper in my home country (the Netherlands), and then from the U.K.’s Guardian (which touted me as their “favorite luthier”—the latter being theirterm, not mine!). CNN then published an interview, which caused the whole media thing to spiral into a somewhat nervous situation for me: Bands starting asking me to build stuff—this time for money. But the strange reality was that nobody really played my instruments publicly! Liars did one track (“Leather Prowler,” on their album Liars), Blood Red Shoes did a couple of overdubs (“Colours Fade” and “When We Wake,” from Fire Like This), and the Luyas used it on three tracks (“Canary,” “Moodslayer,” and “Spherical Mattress,” on the album Too Beautiful to Work)—that’s probably the extent of it. My stuff and status was close to a big hoax.
Luckily, in 2009 I stumbled upon a suitable niche for my work—workshops and performances that revolve around my approach as a designer and musician. I dived underground and bid good riddance to the hysterical world of “indie pop,” where I really didn’t belong. I thrive in the world of research music, where there’s less media attention.
In 2012, Bart Hopkin and I published the guitar education book Nice Noise: Preparations and Modifications for Guitar, which soon prompted Premier Guitar to ask me to write an article about a crazy mod we ended up calling the Flying Double Dutchman Crunch. So I did: I trashed a cheap guitar and modded it in the rudest, fastest way possible. Predictably, the response was polarizing. Plenty of adventurous players were intrigued, but many others were livid that I would do such an evil thing. Personally, I think the guitar deserved it—it was a pretty bad Gibson copy in the first place.
Despite all the people up in arms about the Dutchman (me and the mutilated 6-string), I’ve been asked once again to walk the brave, courageous, and slightly crazy among you through another building project. But instead of damaging an existing guitar, this time I decided to do something to the best of my skills as a “luthier.” On top of that, I proposed to give it away to one of my favorite guitarists. Since I’ve already built something for Lee Ranaldo but not for Thurston Moore, I reached out to Thurston to see if he had any interest. He responded positively.
Both former Sonic Youth players are often credited for being exceptionally talented, but unlike many guitarists you’ll find on various best-guitarists-of-all-time lists, Lee and Thurston are not fast-playing virtuosos. They stand out from the crowd because of how they’ve worked out a wide range of extended techniques—banging their guitars with drum sticks, sticking screwdrivers under the strings to get strange sounds, strumming behind their Jazzmasters’ bridges, using radical alternate tunings, and doing whatever else they can think of to deconstruct traditional guitar playing. And they are capable of writing good songs with this “language.”
This new guitar I’ve built is based on many of those extended techniques, but even more specifically I hoped to achieve these four main goals on a single instrument:
Banjo-inspired drone strings. The 5th string on a bluegrass banjo starts at the 5th fret. So I figured, why not drill holes in the neck and add tuning pegs to the body—only our guitar will have four extra strings rather than just one! This allows you to play sets of drone-y open strings up to a certain fret position, and from there the extra strings go up the neck along with the normal strings. I’ve never seen a guitar with a mod like this.
More frets. I dislike that most guitars only have 21 or 22 frets (or 24 on some shred guitars). I understand frets get too narrow if you go beyond that, but I decided to add a few more frets that I think make particularly logical sense (while leaving out the in-between frets that are less likely to be used). These extra frets are on the body of the guitar, but they are not just “extra frets”: The added frets take the instrument into the microtonal, just-intonation realm used in a lot of non-Western music. In other words, the added frets will let the player access notes and harmonic intervals that are in-between the 12 notes typically heard in Western music.
Variable behind-the-bridge playing area. The Flying Double Dutchman Crunch guitar featured a behind-the-bridge playing area with an extra pickup behind the Tune-o-matic-style bridge and a new anchor point for all 6 strings at the butt end of the guitar. The scale length of the portion of the strings that extended from the Tune-o-matic to the new bridge/anchor was about a quarter of the guitar’s standard bridge-to-nut scale. I’m quite keen on this sort of setup, because it works excellent if you are hunting for dreamy, Sonic Youth-y overtone screams. Because of this, our new drone guitar features a similar behind-the-bridge playing area as well. However, here I’ve expanded the idea to include a metal bar that functions like a pivoting second bridge, altering the scale of the behind-the-bridge playing area so you can create a sky full of sparkling overtones at various positions.
Djent bars (sort of). Last year I performed at the Resonate music, visual-arts, and digital-culture festival in Belgrade, Serbia. During my soundcheck I met the experimental noise duo Senyawa from Indonesia. The “guitarist,” Wukir Suryadi, plays an incredible tube-shaped stringed instrument that he made from a piece of bamboo. Before he joined vocalist Rully Shabara to create Senyawa’s fascinating blend of folk, punk, and neo-tribal music, Wukir played the same instrument in metal bands. In addition to its strings, the bamboo guitar has three thin slices of steel that are mounted quite floppy on the instrument. When he dials in the parameters of his amp, he searches for an EQ setting that resonates with the pieces of steel and achieves the typical scooped-distortion djent sound of metal music. Instead of palm-muting his low E, he strums the metal bars to get a similar result. What a wonderful, efficient, and smart invention! I tried to copy that idea on this guitar by mounting three metal pieces (which have their own 1/4" output) above the low E string.
Okay, enough background info. The only other thing I’m going to point out before we begin is that all my measurements for materials, drill-bit sizes, etc. are in the metric units that we use here in Europe (and much of the rest of the world). For other readers, we’ve converted measurements to the simplest decimal equivalent in inches, but you may need to adjust some slightly to accommodate materials at your disposal.
All right—let’s dive in!
Stuff You'll Need
Guitar Parts and Raw Materials- One 25 1/2"-scale, Strat-style aftermarket neck
- Standard Strat-style neck plate
- One set of six-on-a-side (Strat-configuration) tuners
- Four open-gear acoustic tuners
- One 3'-long piece of .7"- thick (18 mm) meranti furniture paneling (real wood glued in rows of 2")
- One 2.4" x 4" (6 cm x 10 cm) piece of .27"-thick (7 mm) meranti board (or fretboard blanks of same size)
- One standard 10" x 16" pickguard blank
- 23.5" (60 cm) stainless-steel rod
- One 10" (25 cm) piece of .4” x .4" (10 mm x10 mm) brass
- One 10" (25 cm) piece of .08" x .4" (2 mm x 10 mm) brass
- One 6" (15 cm) piece of .08" x. 6" (2 mm x15 mm) brass
- One 6" (15 cm) piece of .08" x 1.2" (2 mm x 30 mm) brass (for the outputs)
- One 3'-long piece of round .04" (1 mm) spring steel
- One Duesenberg 12-string bridge (available from rockinger.com, product no. 3643N)
- Spool of preferred fretwire weight
- Full set of multi-colored acrylic paint OR colored dot stickers (for marking harmonic fretboard positions)
- Small can of brush-able or aerosol-spray acrylic varnish (for the body)
- Two strap buttons
- Three high-quality, Strat-style pickups (preferably with alnico magnets)
- Box of steel Phillips-head wood screws in sizes ranging from .4" to 1.4" (10 mm to 35 mm) in length
- 20 mm M6 headless Allen bolt
- Three 1/4" mono outputs
- One 250k volume pot
Tools
- Standard Phillips-head screwdriver
- One sheet of 60-grit sandpaper
- Belt sander with 60-grit sandpaper
- Drill press
- 2 mm / .08" drill bit (for new string holes)
- 3.5 mm / .14" drill bit (for screw holes)
- 5 mm / .2" drill bit (for bridge-post holes)
- 6.5 mm / .26" drill bit (for tuning-peg holes)
- 7 mm / .28" drill bit (for volume-pot hole)
- 9 mm / .35" drill bit (for 1/4"-output holes)
- 10 mm / .39" drill bit (for leg-rest and upright-stand steel bars)
- Electric screwdriver/drill
- Brush
- Wood saw or hacksaw
- Angle grinder
- Fret-slotting saw
- Nut-slotting files
- Standard adjustable wrench
- Wood glue
- One container of wood filler (just in case)
- Soldering iron
- Rosin-core solder
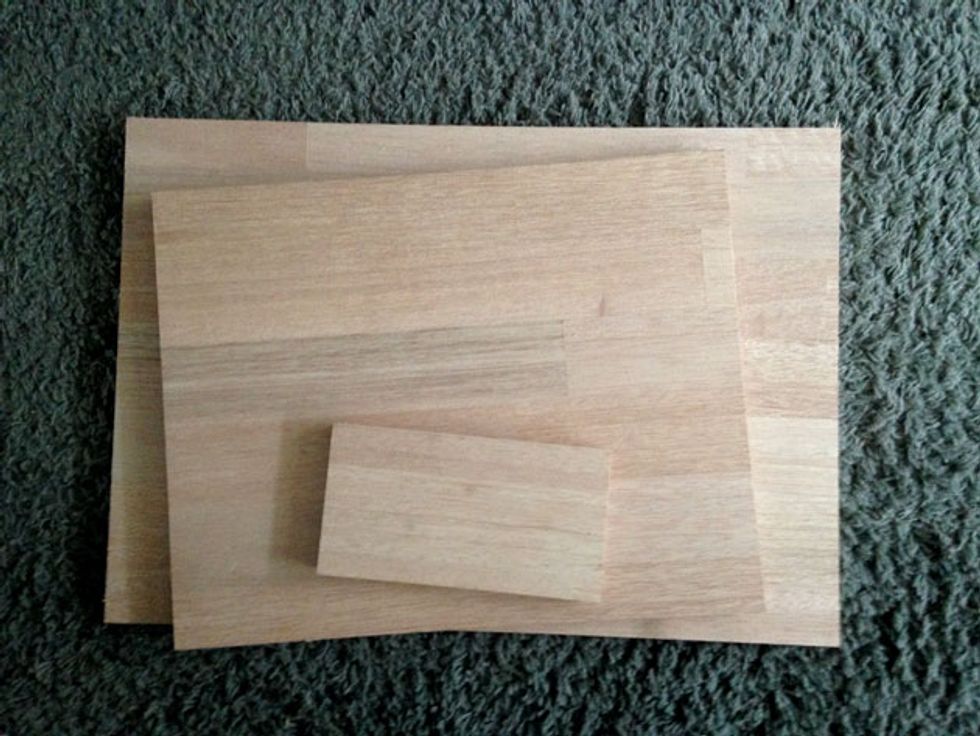
Photo 1 — The raw materials for our drone-guitar body: three pieces of .7" store-bought solid wood that we will
later glue together.
The Build
I’m not sure if every country has this, but in the Netherlands we have ready-made wooden plates called “furniture paneling” (Photo 1), and they come standard in 18 mm (0.7") sheets. I find them very handy, since you can simply glue two of them together for a perfect guitar-body thickness. The ones I bought are made of Shorea, a southeast Asian wood sometimes sold under the name “meranti” or “Philippine mahogany.”
Photo 2 — As I sketched out plans, I realized there wouldn’t be enough space to fit my four main design goals onto my previous favorite body style, a rough blank of which is shown here under our aftermarket neck.
I used to make guitars with a rather uncommon body shape (Photo 2)—a hybrid of two of my favorite guitars: the Vox Mark VI “Teardrop” and the Fender Jaguar. My design was kind of like a Mark VI with an offset waist.
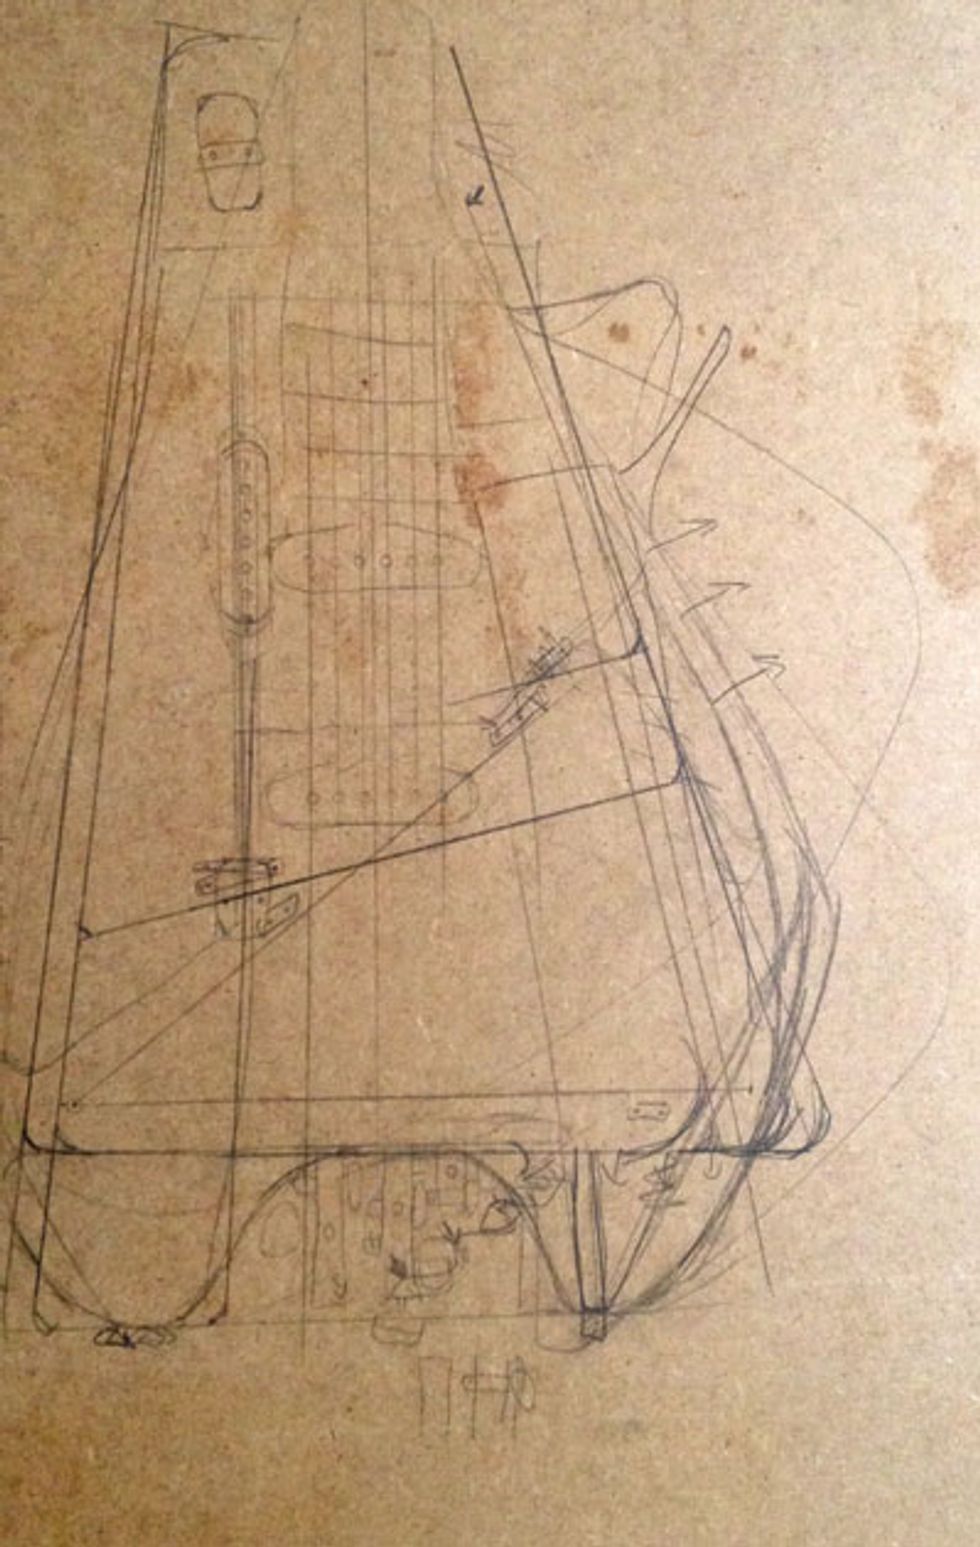
Photo 3 — I like to think of the shape as a cross between a Vox Mark VI and a Fender Jag.
During sketching for this project, I quickly found that my four previously mentioned goals wouldn’t work within that body contour, so I decided to go for a shape that’s more like a cross between Gibson’s Flying V and Explorer body styles (Photo 3).
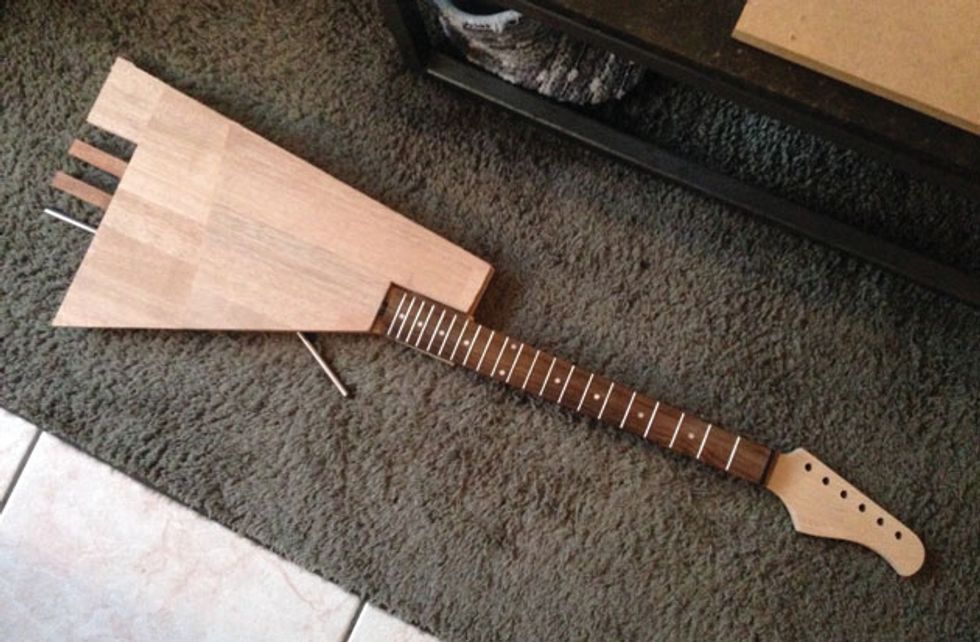
Photo 4 — The main body parts are cut and laid out to double-check overall fit.
After sketching for half an hour to arrive at the final shape and positioning for the various pieces and components, I cut the wooden panels according to the sketch and then laid the pieces out with our aftermarket neck to see if it looked good and still seemed like it would accommodate all our design goals (Photo 4).
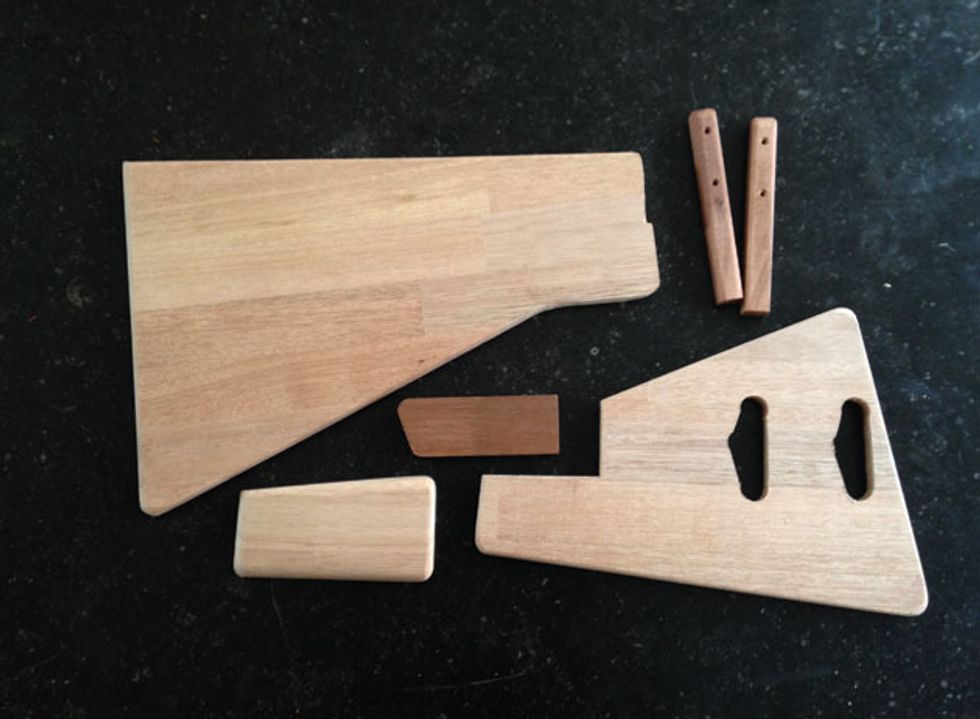
Photo 5 — Pickup cavities have now been routed, and the edges of the body pieces have been smoothed out for more comfortable playing.
Next, I routed holes for the pickups in the top body piece, smoothed out some rough edges on all the shapes, glued the body pieces together, and then smoothed and polished things again so it felt and looked nice (Photo 5).
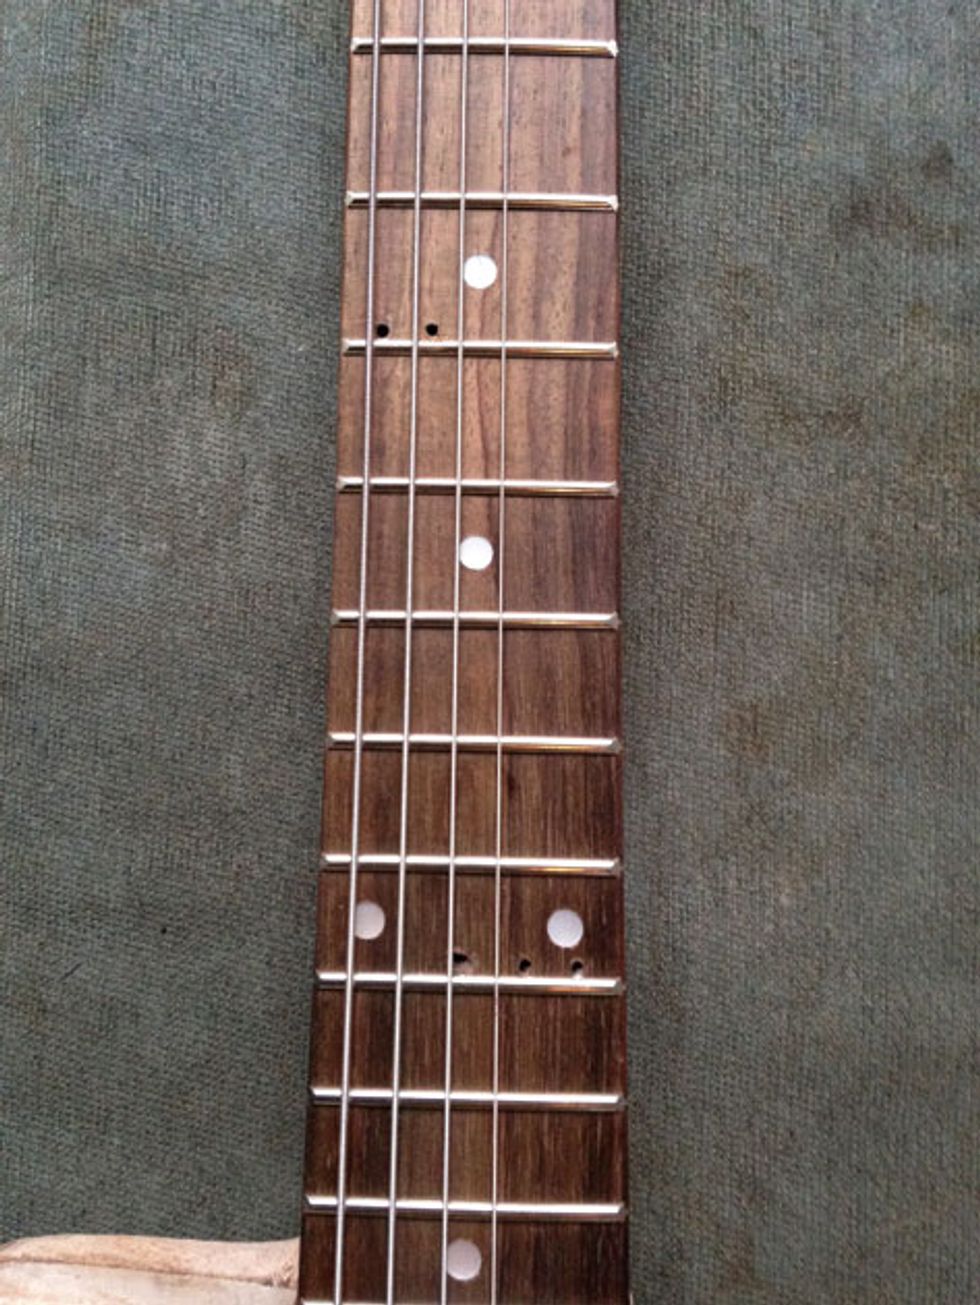
Photo 6 — I originally hoped to add 5 banjo-inspired strings, but as I drilled holes to rout the new strings through the 7th and 12th fret positions I realized there was no way to safely execute the hole at the middle of the 12th fret without damaging the neck’s truss rod. I later used standard wood filler to patch that hole.
After that I drilled holes in the neck for our four extra, banjo-inspired strings (Photo 6). Actually, I initially planned to add five extra strings by drilling holes between the six standard strings at a couple of different fret locations. I thought it might be possible to angle the middle hole a bit to avoid hitting the truss rod, but unfortunately this turned out to be impossible to accomplish, so I ended up filling that hole later.
Also, because I couldn’t decide which fret positions would work best while playing—this is uncharted territory, after all!—I decided to drill two holes behind the 7th fret for the low strings, and two holes behind the 12th fret for the high strings. Admittedly, there’s not a lot of logic about this choice, since only the final result will reveal whether it worked or not. On the bright side, it’s rather easy to fill holes and add more at desired positions if I wish. This is an experimental instrument, so we need not be afraid of taking chances!
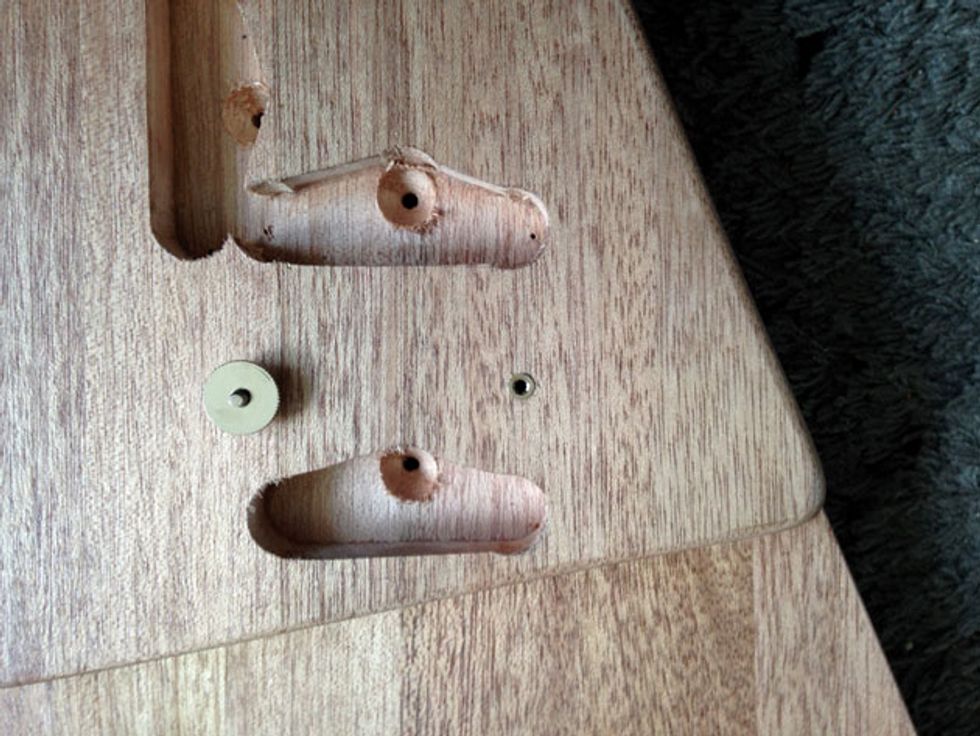
Photo 7 — With wiring holes now drilled for all three pickups, we can now install our 12-string bridge.
The next step was to attach our aftermarket neck and locate where to install the bridge—which is a 12-string Duesenberg model. Since our neck is intended for a 65 cm- / 25.5"-scale instrument, I carefully measured 25.5" from the nut to the body, marked the spots for the two bridge posts, drilled holes for the anchors, and began installing the bridge (Photo 7).
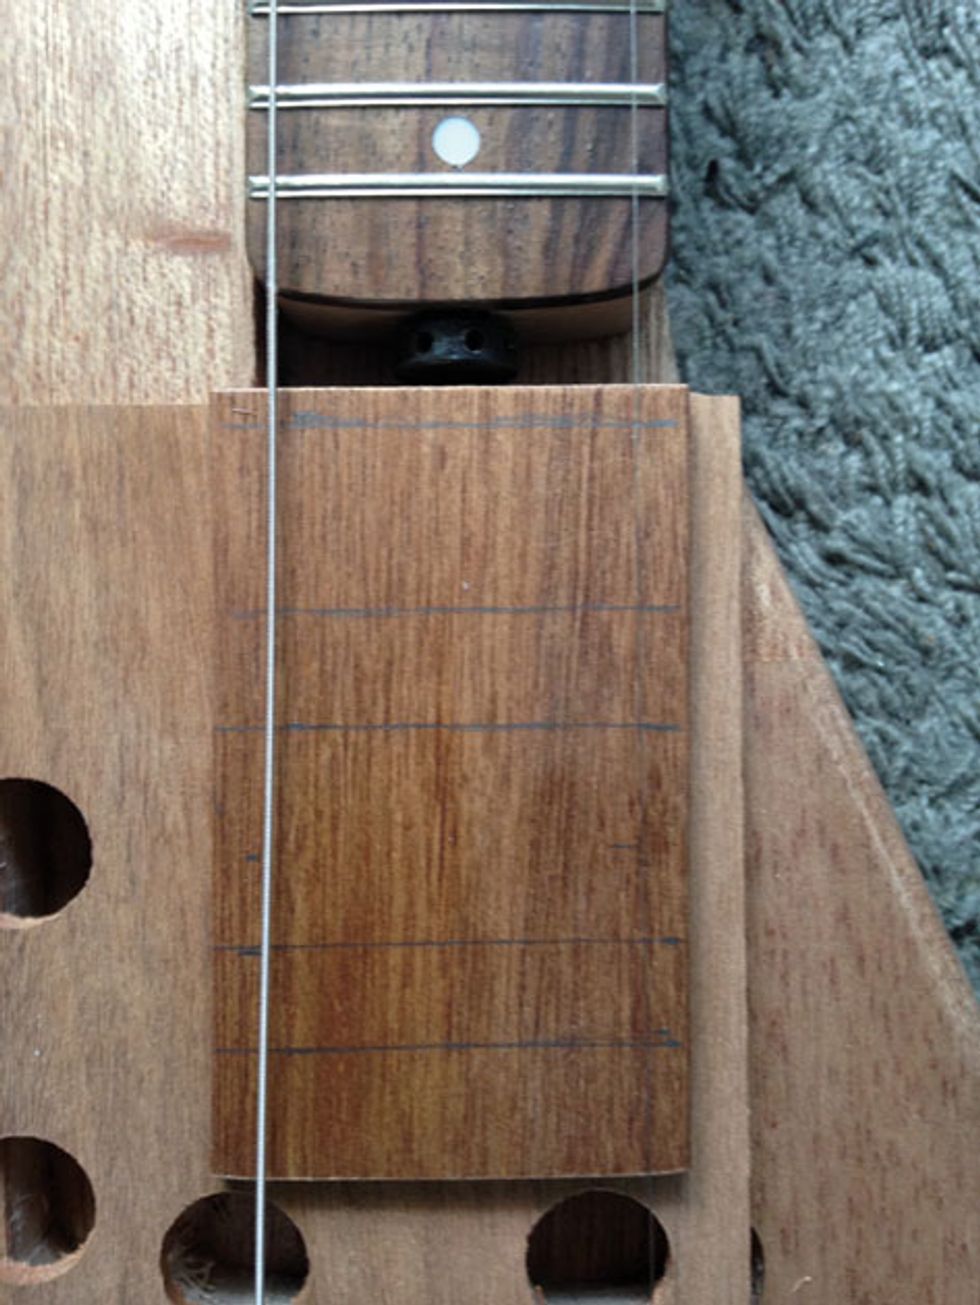
Photo 8 — Measuring and marking locations for five extra pieces of fretwire to be installed in an extra fretboard that will be mounted to the thin, pickguard-like piece of wood (shown here in rough, yet-to-be-shaped form with four guide holes for two perpendicularly mounted single-coil pickups).
Remember how my second goal (after adding the banjo-y drone strings) was to add extra frets to the body? That’s what I worked on next. The extra fretboard—which is simply a piece of .27"-thick (0.7 mm) 2.4" x 4" (6 cm x 10 cm) meranti—will sit atop a thin, almost-rectangular piece of wood that’s attached to the top body piece like a pickguard—except that A) we couldn’t care less about scratching the body of this delightful abomination, and B) it’s really only functioning as a base for the extended-range frets and as an anchor point for two of our three single-coil pickups (Photo 8). The faux-pickguard/pickup plate is made from a 5.7" x 4.7" (14.5 cm x 12 cm) piece of the same .27"-thick meranti, although you may opt to fashion yours out of a standard 10" x 16" pickguard blank.
For a 65 cm- / 25.5"-scale guitar, the first octave is, of course, at the 12th fret (approximately 32.5 cm or 12.8" from the bridge), while the second octave is 16.25 cm / 6.4" from the bridge. Once I determined where I’d attach our faux-pickguard/fretboard base, as well as where the new fretboard will attach to the base, I drew a line on the second fretboard at the 16.25 cm / 6.4" second-octave mark. I also added a line at the third octave, which is 8.1 cm / 3.2" from the bridge. I also drew marks for a minor third at 13.8 cm / 5.4" from the bridge, a perfect fourth at 12.3 cm / 4.8", and a so-called harmonic seventh. The harmonic seventh is not part of the 12-tone scale, but you can hear it when you pluck a harmonic between the 2nd and 3rd frets on the guitar neck. A harmonic seventh can be heard at 1/7 of the scale length, as well as at five other spots on the strings—2/7, 3/7, 4/7, 5/7, and 6/7 of the total scale length. The one I drew is the one closest to the bridge (the 6/7-scale one), which is about 9.3 cm / 3.6" from the bridge.
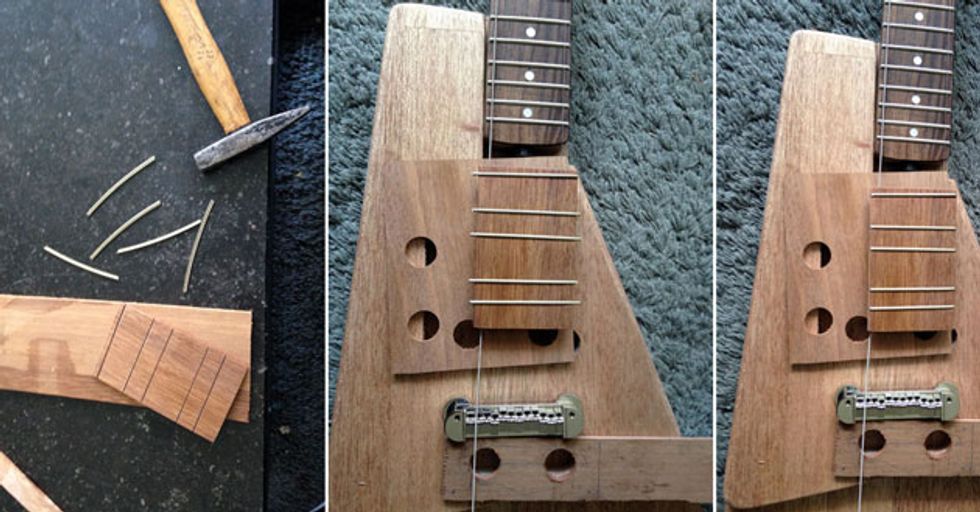
[Left to right] Photo 9 — Our extra fretboard after I used a fret saw to cut five new fret slots. Photo 10 — The extra fretboard after pounding in the new frets. Photo 11 — The new frets after beveling with a belt sander.
From there I secured our new fretboard blank with a set of clamps so I could use a fret saw to carefully carve out channels for our new fretwire (Photo 9). I then hammered them in (Photo 10) and sanded off the frets with my belt sander until they looked smooth enough to play comfortably (Photo 11).
Next I installed the drone guitar’s electronics. Naturally, the instrument’s unusual pickup arrangement could lead to an equally unusual control setup. However, I never work with complicated circuits, tone knobs, or switching like you’ll see on Fender, Gibson, or other mass-produced guitars. I once read that the guys in Sonic Youth used to strip out as much of their guitars’ electronics as possible in order to keep the signal fresh. That’s basically what I do, too, so our wiring is pretty simple: I installed three separate 1/4"outputs—one for each single-coil, and a single volume knob that only affects the main pickup in the standard body location. That’s right, there are no controls whatsoever for the pickups located behind the bridge and under the steel bars—they go straight to the output. I prefer separating the pickups’ outputs and combining them with an outboard mixer, and I use a tuner pedal’s muting function to switch additional nonstandard pickups like the ones on the drone guitar in and out of the mix. This enables me to dial in the exact amount of desired extra sound coming from different regions on the guitar. However, you could just as easily equip a similar instrument with a single output, individual volume knobs for each pickup, and either a master tone or tone knobs for each pickup.
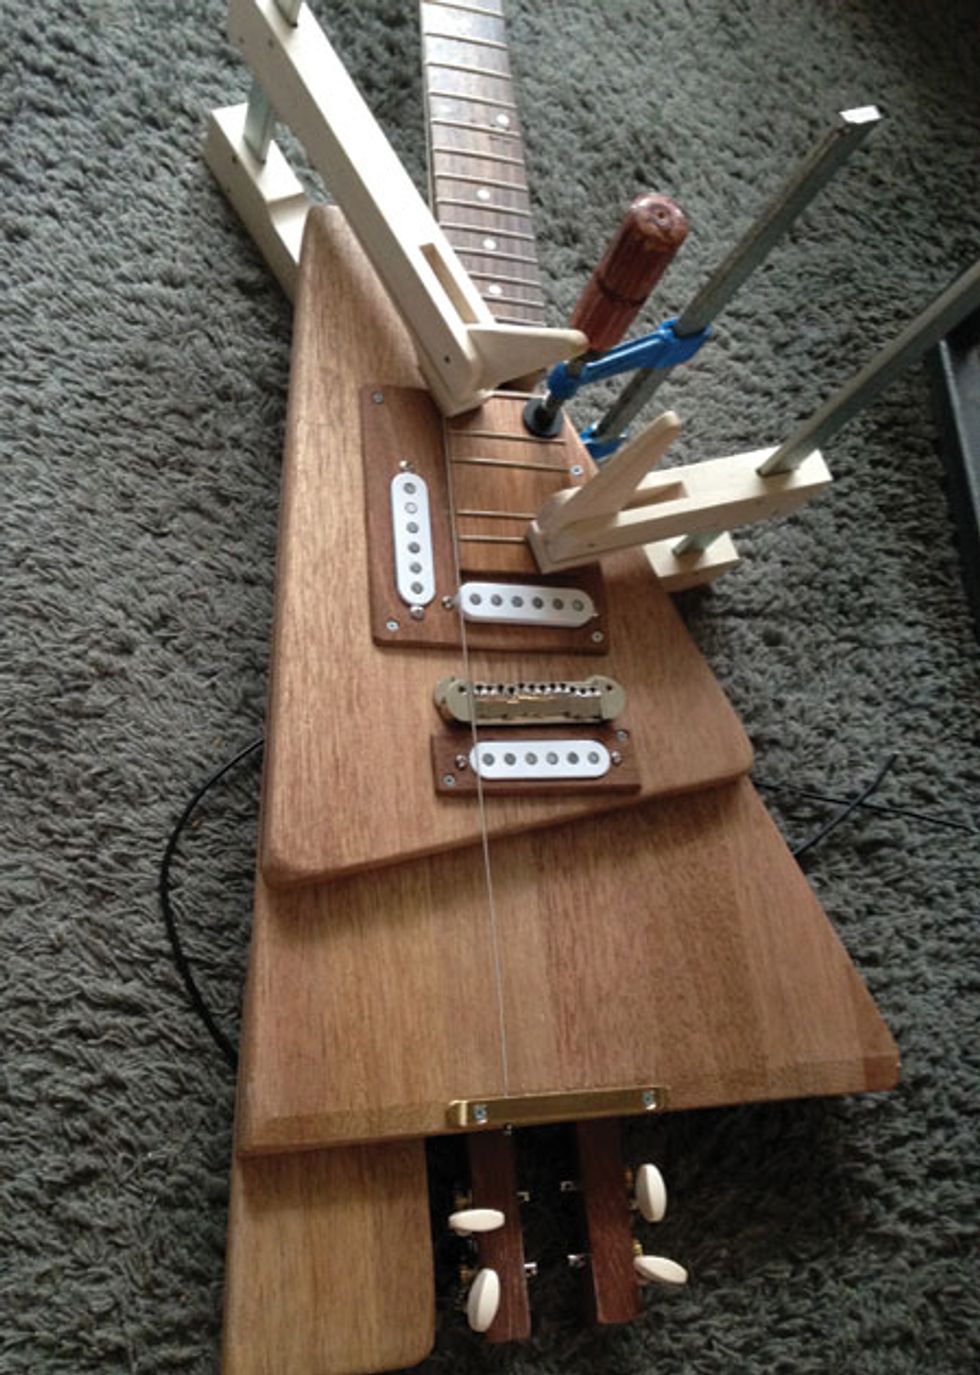
Photo 12 — Using three clamps to glue the extra fretboard to the wired-up and installed pickup plate.
After installing the electronics, I again used a set of clamps to glue the new fretboard to the pickup plate (Photo 12). After doing so, I realized that I needed to sand the pickup plate a bit thinner in order to get the action of these frets correct.
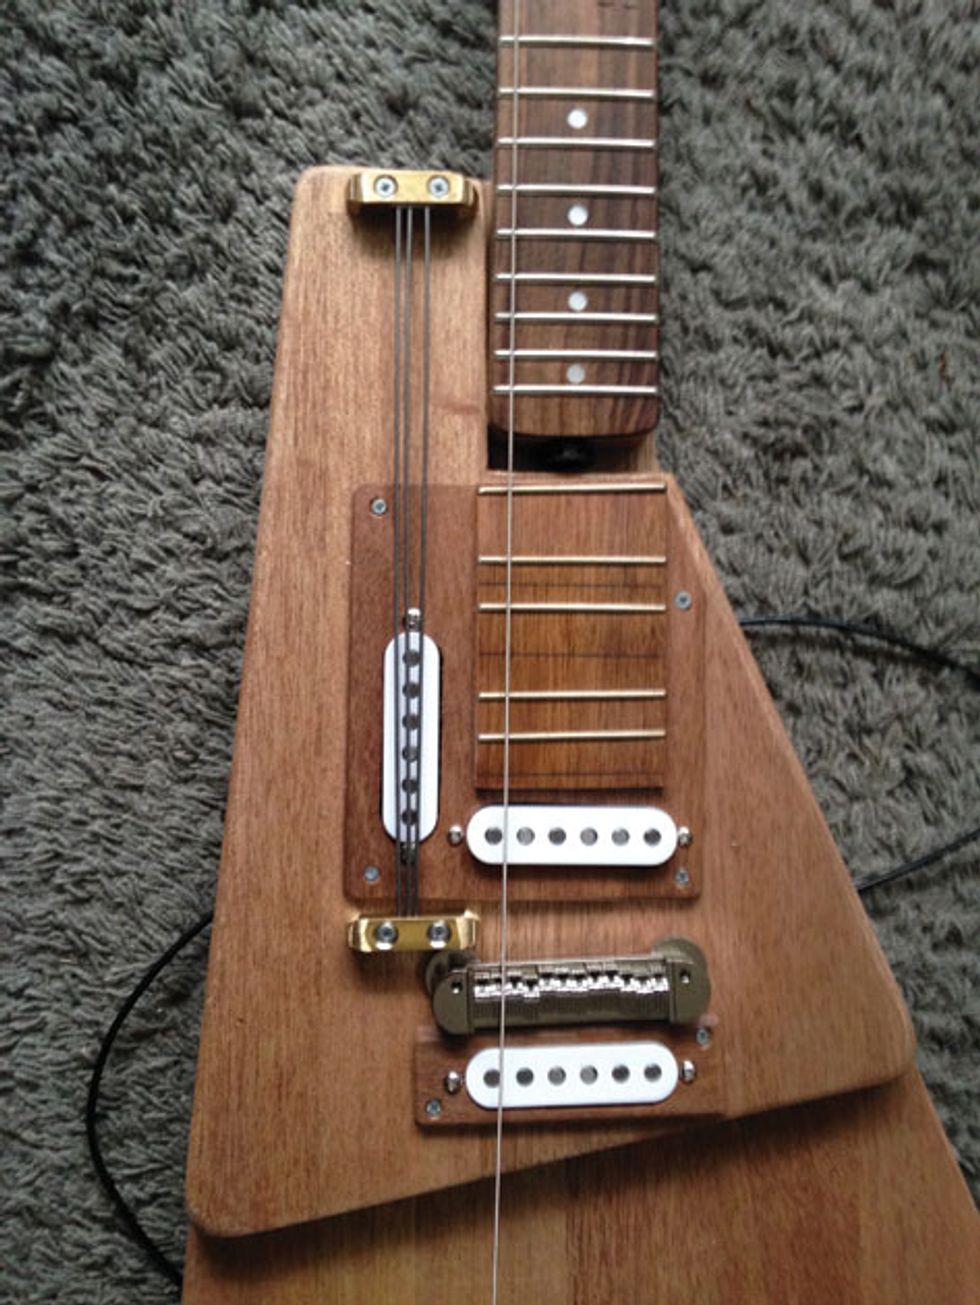
Photo 13 — Inspired by an instrument played by Wukir Suryadi in the Indonesian experimental duo Senyawa, I used brass tailpieces to mount three pieces of resonant spring steel above the standard playing area.
Next I worked on the djent-bars portion of the build inspired by Senyawa instrumentalist Wukir Suryadi’s bamboo “guitar.” I used an angle grinder to cut three .04" (1 mm) pieces of spring steel and mounted them to the body in a spot that felt easiest to access from a typical guitarist’s right-hand playing position. I again used the angle grinder to cut two 1.5" long (4 cm) pieces of brass—one that’s .4" x .4" (10 mm x 10 mm) and one that’s .08" x .4" (2 mm x 10 mm)—and then used four screws to mount the rods (Photo 13). I prefer brass because it’s strong, isn’t difficult to work with cleanly, and you can make screws thread in it (unlike aluminum, which is too soft). Steel is both harder to work with and prone to rust.
As I described earlier, my plan was to copy Wukir’s invention, but once I mounted the pieces I noticed the sound of the rods was more resonant—almost like hitting a metal fence. After some experimentation I found that the rods would need to be muted with foam in order to get the Senyawa sound. However, I found the “fence” sound just as interesting, so I decided to leave it as is. If Thurston decides he’d like to get a sound more like Wukir’s steel strips, I’ll advise him to prepare the steel with a piece of foam.
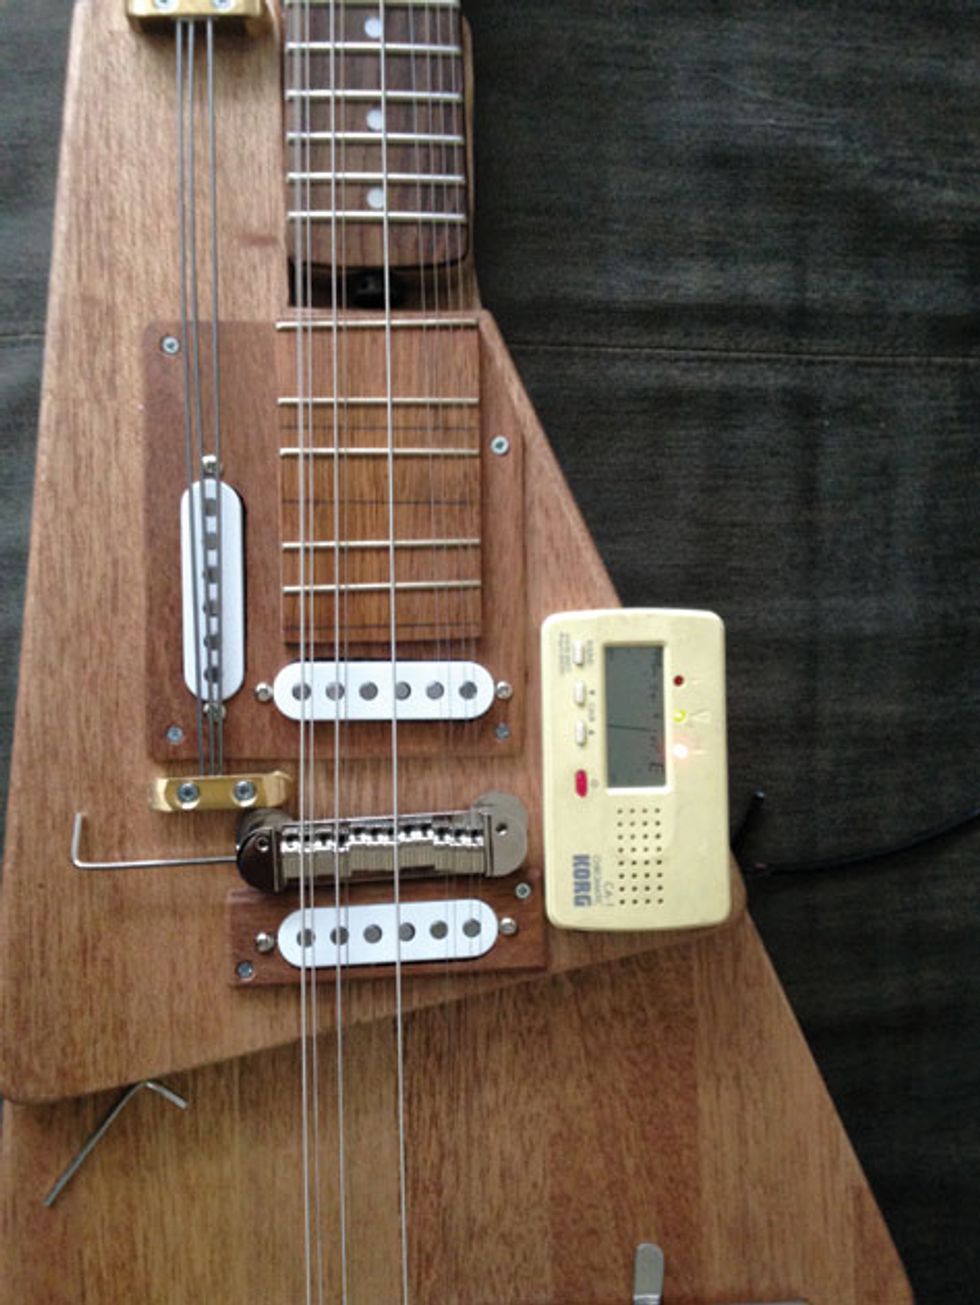
Photo 14 — Intonating our drone guitar’s nine strings.
After working on the steel rods, I moved on to stringing the instrument and setting intonation (Photo 14). Even though our modded guitar is only set up to accommodate 10 strings, I used a 12-string bridge because it allows me to easily vary string spacing at the bridge. Also, you’ll notice in the photo of the finished instrument (Photo 17) that I initially only installed nine strings instead of 10. I didn’t use the standard 5th-string tuner because I felt it would be easier for me to play that way. My choice of tuning was (from bass bout to treble bout): low E, mid E, low A, mid A, low E, high E, followed by all four top strings (two anchored at the headstock, and two extending from the new holes at the 12th fret) tuned to high E. In other words, when you press the 12th fret all four thin strings are the same pitch. Of course, there’s a good chance Thurston will add the 10th string or opt for a completely different stringing approach—that’s up to him. There are no rules for this instrument!
You’ll probably also notice that I abandoned the holes at the 7th fret and drilled extra holes in the headstock near the standard 6th- and 7th-string locations. Why? Unlike the thinner strings that begin at the 12th fret—which work very nicely and yield a dreamy, mandolin-like drone—I found the result with low strings starting at the 7th fret too impractical—a nasty, rumbly, out-of-tune situation that didn’t work with my playing skills.
As you can see, I drew three lines on the extra fretboard, but didn’t add frets in those locations. However, I did apply lacquer over the penciled-in lines to prevent them from fading. These lines represent harmonic positions. In the picture of the finished guitar you’ll also see a series of color-coded dots at different positions along the neck and extra fretboard. I use this system on my Moodswinger and Home Swinger instruments to indicate a harmonic series. A gray dot (which isn’t used on this drone guitar) indicates half of the string length, red indicates a third of the string length, orange indicates a quarter, yellow is a fifth, green is a sixth, aqua is a seventh, blue is an eighth, and purple is a ninth. Most frets on the extra fretboard correspond with the harmonic positions, except the ones on either side of the yellow dot. There’s no particular reason for this except that I often play melodies that involve the open strings in combination with the minor third and perfect fourth (frets 3 and 5 on the neck), so I included the 27th and 29th fret instead of the 28th fret that overlaps with the yellow dotted line.
Helpful hint: The harmonics available at these positions are much easier to get when you’re playing with heavy distortion rather than a clean signal. A loud, dirty tone should enable you to access a second octave at the orange dot, a minor third at the 2nd fret of the extra fretboard, a major third at the yellow dot, a perfect fourth at the 3rd extra fret, a perfect fifth at the green dot, a harmonic seventh at the aqua dot, a third octave at the blue dot, and a major second at the purple dot. (If you are a math geek, I recommend reading Genesis of a Music by microtonal composer Harry Partch. Its 400 nightmarish pages about math and musical harmony explain all of what I just described. If you are a soft science person, forget this info as soon as possible and just strum the strings and make music!)
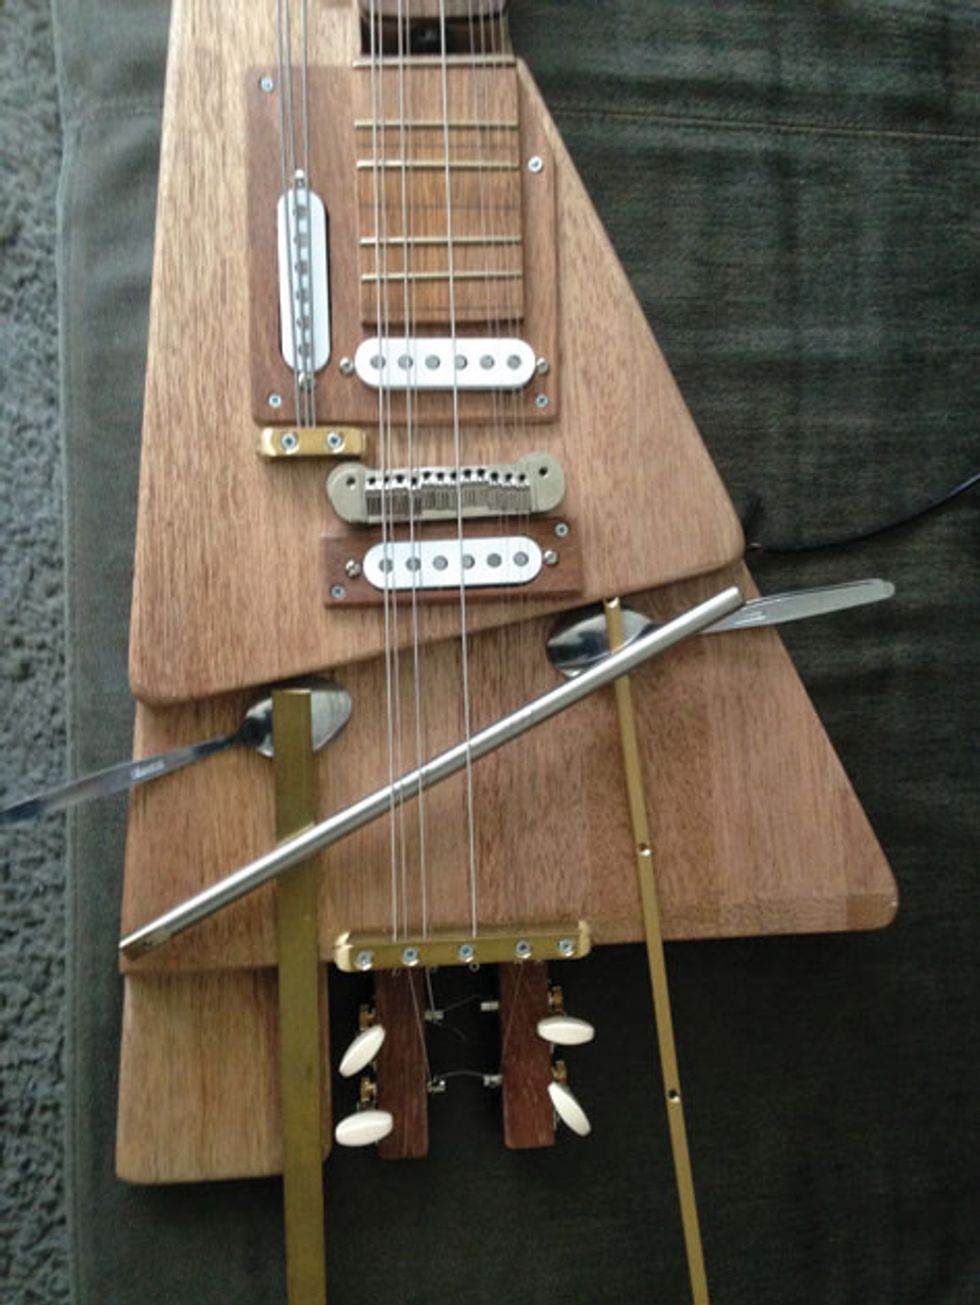
Photo 15 — Here I used a couple of spoons to help me determine the proper angle for two pieces of brass that will keep our pivoting, behind-the-bridge metal bar high enough to function as a second bridge.
Next up in this demented project is the movable rod that alters the scale of the behind-the-bridge playing area. To make this work correctly, I had to figure out a way to push it up a bit and make it function like a slide or a second, adjustable bridge. Spoons were handy tools in determining the proper angle: I propped one end of two raw brass blanks up with the spoons, then moved them around to determine the best angle and height for the bar (Photo 15). I thought I would need two brass guides, one on both sides of the strings, but after I installed the first one on the bass side I found that it worked just fine by itself. To hold the brass guide in place, I secured two pieces of brass that I fashioned with the angle grinder—a small one measuring 1.5" x .4" x .4" (4 cm x 10 mm x 10 mm) and a thinner, longer one measuring 4.3" x .08" x .6" (11 cm x 2 mm x 15 mm)—in a T-like arrangement using four wood screws: one at the tail end that’s .6" long (15 mm) and three others that are .8" long (20 mm). See Diagram 1.
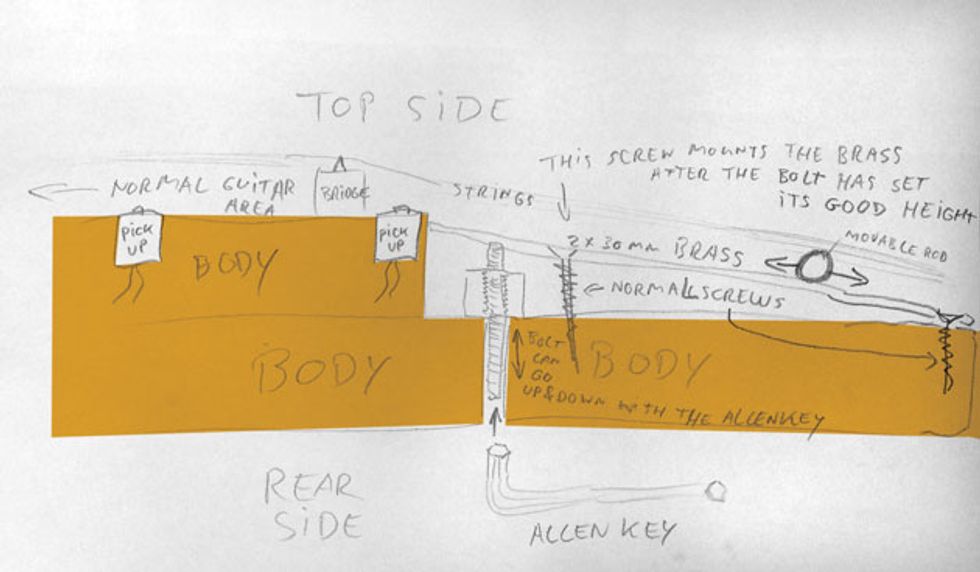
Diagram 1
On the bass side of the instrument, I secured the movable rod/bridge with a 1.4" (35 mm) wood screw and two metal washers to help achieve the proper height (Photo 16). Although you can’t tell from the photos, if you look again at Diagram 1 you’ll see that, underneath the portion of the two bars that’s closest to the bridge, there’s an M6-sized headless Allen bolt threaded through the bottom piece of brass. This setup allows me to alter the tension of the rod/bridge against the strings by adjusting both the Allen bolt and the brass-bar screw on the top of the guitar (the one nearest to the Allen bolt) in tandem with each other.
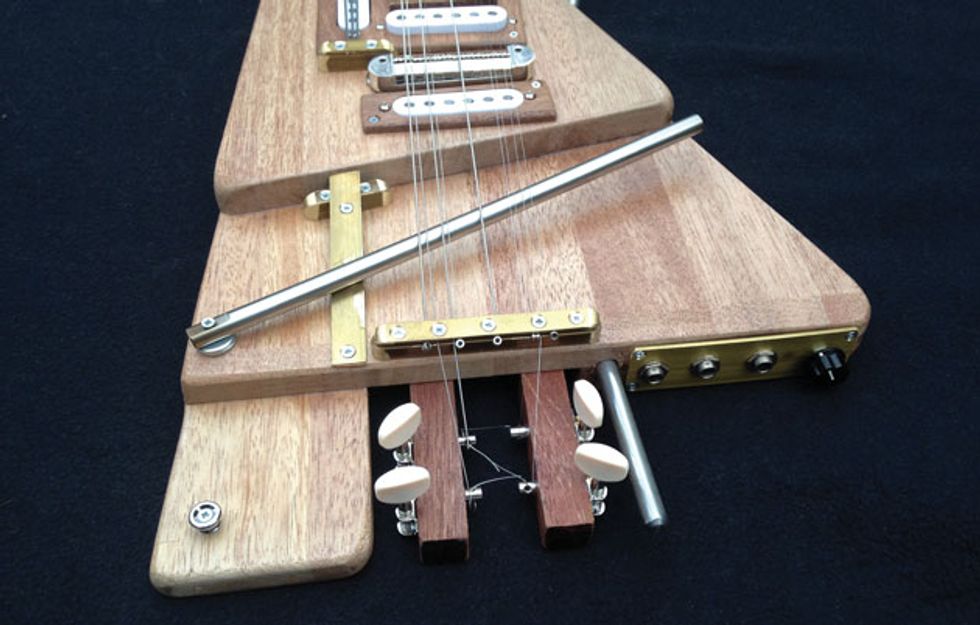
Photo 16 — After installing the first brass height “ramp” and attaching the bar at its pivot point, I realized that the second brass height ramp wasn’t necessary. Here you can see the tuner-protecting rod that also functions as a built-in stand, and the instrument’s control panel: a volume for the main pickup, and a 1/4" output for each single-coil pickup. The left output is for the steel bars’ pickup, the middle one is for the behind-the-bridge pickup, and the right output is for the main pickup.
Okay, let’s talk about the tailpiece I created at the butt end of the guitar. If you look closely, you’ll see that it’s a pretty handy string-mounting system. I used the angle grinder to cut two pieces of brass that sandwich the strings. The thicker base piece is 4" x .4" x .4" (10 cm x 10mm x 10mm). The thinner top piece is 4" x .08" x .4" (10 cm x 2 mm x 10 mm) and it screws to the guitar’s top using .8" (20 mm) wood screws. Between the two brass pieces are three M3-sized nuts that I drilled out a bit and use, basically, as washers, because standard washers aren’t thick enough and are too wide. The M3 nuts create space for the strings to fit between the brass pieces, as well as help keep their ball ends in place. I developed this system on my early Springtime guitars, and what I love about it is that it allows me to tweak string spacing. A series of holes would also work, but I think this is more flexible.
Photo 17 — The finished drone guitar.
After completing some minor touches that I’m sure you can figure out on your own (like adding strap buttons), I was pretty much done with the drone guitar. As you can see from Photos 16 and 17, I also added two steel rods that I cut with the angle grinder: one protects the rear tuning pegs and enables the guitar to stand up when placed against a wall or amp, and the other enables the guitar to rest on your leg so you can play more comfortably while sitting. I secured them by first drilling holes to the desired depth in the body, then drilling a 3.5 mm / .14" hole near one end of each rod; then driving a screw from the exterior through the hole and into the wood on the other side of the rod.
First Playing Impressions
So how do I feel about my first try at this crazy amalgam of ideas? Perhaps Thurston is the best one to ask. The extra holes in the fretboard obviously open new possibilities by accommodating new strings, but, of course, they also limit some of your fingering options in the same vicinity. The instrument was designed largely to open up lots of drone possibilities, but even for the average adventurous player it will probably only be feasible for one or two songs rather than for a complete repertoire—but the same can be said for the hordes of alternate-tuning guitars used by Thurston Moore and Lee Ranaldo. I’ll admit that the holes in the bass side of the neck didn’t work for me—although they might for Thurston and other players. I found the ones on the treble side more to my liking, with the holes near the 12th fret offering more playing freedom than the ones at the 7th fret.
Also, the Senyawa-inspired steel rods ended up sounding different from how I’d envisioned them. However, I liked the steel “fence” sound so much I didn’t mute the rods. As for the extra fretboard, to me it’s killer. Guitarists who prefer neck-pickup sounds will have to adjust to the fact that the extra fretboard must be located where a neck pickup would normally be, but I always play the bridge pickup anyway so the adjustment was no problem for me. It works perfectly for the way I play, and I’m certain it will appear on many of my future guitars.
The slider behind the bridge is great, too. I love having an onboard stick available at all times, instead of having to grab a drumstick or screwdriver. The disadvantage is that I had to abandon my plan for a vibrato arm. It would be nice to have both, so perhaps in a future design I’ll figure out how to combine both elements.
Thanks, PG and Thurston, for letting me try out this project!
IK Multimedia is pleased to announce the release of new premium content for all TONEX users, available today through the IK Product Manager.
The latest TONEX Factory Content v2 expands the creative arsenal with a brand-new collection of Tone Models captured at the highest quality and presets optimized for live performance. TONEX Tone Models are unique captures of rigs dialed into a specific sweet spot. TONEX presets are used for performance and recording, combining Tone Models with added TONEX FX, EQ, and compression.
Who Gets What:
TONEX Pedal
- 150 crafted presets matched to 150 Premium Tone Models
- A/B/C layout for instant access to clean, drive, and lead tones
- 30 Banks: Amp & cab presets from classic cleans to crushing high-gain
- 5 Banks: FX-driven presets featuring the 8 new TONEX FX
- 5 Banks: Amp-only presets for integrating external IRs, VIR™, or amps
- 5 Banks: Stompbox presets of new overdrive/distortion pedals
- 5 Banks: Bass amp & pedal presets to cover and bass style
TONEX Mac/PC
- 106 new Premium Tone Models + 9 refined classics for TONEX MAX
- 20 new Premium Tone Models for TONEX and TONEX SE
TONEX ONE
- A selection of 20 expertly crafted presets from the list above
- Easy to explore and customize with the new TONEX Editor
Gig-ready Tones
For the TONEX Pedal, the first 30 banks deliver an expansive range of amp & cab tones, covering everything from dynamic cleans to brutal high-gain distortion. Each bank features legendary amplifiers paired with cabs such as a Marshall 1960, ENGL E412V, EVH 412ST and MESA Boogie 4x12 4FB, ensuring a diverse tonal palette. For some extremely high-gain tones, these amps have been boosted with classic pedals like the Ibanez TS9, MXR Timmy, ProCo RAT, and more, pushing them into new sonic territories.
Combined with New FX
The following 5 banks of 15 presets explore the depth of TONEX's latest effects. There's everything from the rich tremolo on a tweed amp to the surf tones of the new Spring 4 reverb. Users can also enjoy warm tape slapback with dotted 8th delays or push boundaries with LCR delay configurations for immersive, stereo-spanning echoes. Further, presets include iconic flanger sweeps, dynamic modulation, expansive chorus, stereo panning, and ambient reverbs to create cinematic soundscapes.
Versatile Control
The TONEX Pedal's A, B, and C footswitches make navigating these presets easy. Slot A delivers clean, smooth tones, Slot B adds crunch and drive, and Slot C pushes into high-gain or lead territory. Five dedicated amp-only banks provide a rich foundation of tones for players looking to integrate external IRs or run directly into a power amp. These amp-only captures span clean, drive, and high-gain categories, offering flexibility to sculpt the sound further with IRs or a real cab.
Must-have Stompboxes
TONEX Pedals are ideal for adding classic effects to any pedalboard. The next 5 banks focus on stompbox captures, showcasing 15 legendary overdrive, distortion, and fuzz pedals. This collection includes iconic models based on the Fulltone Full-Drive 2, Marshall DriveMaster, Maxon OD808, Klon Centaur, ProCo RAT, and more.
For Bass Players, Too
The last 5 banks are reserved for bass players, including a selection of amp & cab Tone Models alongside a few iconic pedals. Specifically, there are Tone Models based on the Ampeg SVT-2 PRO, Gallien-Krueger 800RB, and Aguilar DB750, alongside essential bass pedals based on the Tech21 SansAmp, Darkglass B7K and EHX Big Muff. Whether it's warm vintage thump, modern punch, or extreme grit, these presets ensure that bassists have the depth, clarity and power they need for any playing style.For more information and instructions on how to get the new Factory
Content v2 for TONEX, please visit:
www.ikmultimedia.com/products/tonex
This story’s author played this Belltone B-Classic 3 and found its neck instantly appealing, the tremolo capable of taking abuse and staying in tune, and the Filter’Tron pickups possessed of hi-fi clarity. Also, the sky burst metallic finish is pure eye candy.
Custom designing an instrument and its appointments from a menu of options makes ordering a new axe easy. Four manufacturers share their process.
It’s never been easier for any player to get a guitar made to their liking, and without being an expert, or even an educated amateur in wood, wiring, and other aspects of lutherie. Sure, you can find a builder who will spec out a guitar for you from tree to neck radius to electronics, but for most of us, we’re looking for something easier, less costly, and, often, more familiar.
That’s where guitar-by-menu comes in. Think of it as Build–A-Bear for guitar players, but louder and with cooler options, like a coral pink sparkle finish or a trapeze tailpiece. A coterie of manufacturers offers such services, some with online pull-down menus that cover everything from pickups to, well, all that goes into a guitar. And the advantage here is that no particular expertise other than knowing what you love to play and why you love to play it is required. You dig a Tele or a Jazzmaster or an SG or a Firebird from a certain era, but want a specific bridge or pickup combination, a ’50s or late-’60s neck, a finish not available in production models? No problem. Or maybe you crave something a tad more distinctive, with a non-traditional body shape, no headstock, and a finish that draws from the color palette of Van Gogh’s The Starry Night. All you gotta do is ask … or, rather, pick, click, order, or email, perhaps with a phone call to confirm the details.
We spoke to a clutch of large and smaller guitar companies—Belltone, Kiesel, Fender, and Gibson—to see how they do it.
The Belltone Way
“I was always the guy who had to tweak the guitar no matter what it was,” says Belltone founder Steve Harriman. “I changed out the pickups, I changed the pickguards, tuners, whatever.”
Like former Gibson CEO James Curleigh, Belltone Guitars founder Stephen King Harriman was an apparel executive with Perry Ellis before starting the Florida-based company in 2016. But the gig he’s had since junior high school is guitarist.
“I was always the guy who had to tweak the guitar no matter what it was,” Harriman says. “I changed out the pickups, I changed the pickguards, tuners, whatever. I always had to make what I was playing, whether it was a Les Paul or a Tele, unique, so it would be personally mine.”
Initially, Belltone offered modded versions of Les Paul- and Telecaster-style guitars, but in 2019 he reframed his business, designing an ergonomically contoured pear-shaped body and distinctive 6-on-a-side headstock as a foundation, and establishing a group of craftspeople to bring his solidbody B-Classic One, B-Classic Two, and B-Classic Three variations to life.
Today, Belltone guitars are made for players looking for a similar mix of the fresh and the familiar, at $2,680 to $3,129, depending on appointments. And the range of appointments is impressive. Let’s start with the templates. The Classic One has a flat top with edge binding, an alder body, a rounded tapered neck pocket, the company’s signature Devil’s Tail bridge and angled switch-control plate, reverse-dome tall-boy knobs, and a 12" compound-radius neck (held on by four bolts), with 22 medium-jumbo frets. In contrast, the Classic Two has all of the above, except there are arm and body contours with no binding, and the Classic Three offers the same plus Belltone’s patented Back-Lip Tremolo System and top hat controls.
“I’m inspired by a lot of ’50s and ’60 car designs for the elements of my guitars.”—Belltone’s Steve Harriman
Then, there’s a rabbit hole of options. There are 36 finish choices, with 10 ’bursts—including gorgeous black cherry burst, sky burst metallic, and lemon burst shades—requiring an upcharge of $40. There are varied pickguards to choose from within Belltone’s distinctive “Deco” version, which comes in black, white, and brown tortoise. There are four neck combinations (standard C and ’59 roundback profiles, with maple or rosewood fretboards), four tuner options (locking tuners from Belltone, Sperzel, and Kluson, plus ratio tuners), and a set of any-gauge Stringjoys. And the selection of pickups is truly impressive—36 in all, from TV Jones, Benson, Rio Grande, Mojo, Lindy Fralin, Porter, McNelly, Righteous Sound, Gabojo, and the newly added Brickhouse Tone Works. And within those selections are standard and hum-cancelling P-90s, stacked humbuckers, PAF humbuckers, regular and noiseless single-coils, multiple Filter’Tron variations, and more. Further, via Belltone’s Tone-Sure program, if a customer feels they’ve made the wrong call on pickups after playing their guitar a while, Belltone will swap them out at no charge save for covering shipping and the additional cost of pricier units.
“I’m inspired by a lot of ’50s and ’60 car designs for the elements of my guitars,” Harriman attests. “If you look at my bridge, for example, it’s got kind of a tailfin look to it. For me, guitars need to not only play well and sound great, but look cool. Also, everything is designed by me and is machine-tooled. My bridge is machine-tooled aluminum with rounded contours, as your palm can get roughed up on the old-style stamped ashtray bridges. I take all the things that make players happy into consideration.” Including sturdy and handsome faux-alligator-skin cases.
A deliberative buyer could spend weeks contemplating all of Belltone’s options before pushing the “submit” button, and then, instead of being invoiced, they are contacted directly by Harriman to review it all again before his luthiers get to work.
Gibson’s Made to Measure
One of Gibson’s Made to Measure fantasies: an SG with three humbuckers in a crimson sparkle finish.
The 131-year-old Gibson company’s Made to Measure (MTM) program is a bit more conservative … but only if you’d call a hot-crimson-sparkle SG with three humbuckers, a burgundy Les Paul Standard with a full-fretboard vine inlay, a champagne-pink-sparkle Les Paul, or a 3-pickup Firebird with a P-90 in the middle conservative.
There are two ways to initiate an order for an MTM guitar. You can fill out the online questionnaire on the Gibson Custom Shop’s Made to Measure page or stop by the Nashville or London locations of the Gibson Garage in person. I visited the Nashville Garage for this story, where I spoke with Dustin Wainscott, director of the Made to Measure program, and Matt Boyer, the sales associate you’d likely encounter if you walked into the Music City shop. They brought a clutch of recent MTM examples. And a wall of the MTM room was covered in slabs of wood, available for the choosing, and various bridges, tuners, pickups, and other parts for inspection and selection. Of course, some of the on-location fun is speaking with MTM program leaders like Boyer and Wainscott, who love guitars as much as you do and are happy to swap stories.
Whether by email, which will likely be followed up by a call from Boyer, or in person, the conversation that starts a MTM order begins with questions about body style, neck preference, electronics configuration, and the finish type and treatment.
“On the cosmetic side, we can go as far as you want to, with any color or finish you want.”—Gibson’s Dustin Wainscott
At the Gibson Garage Nashville, Dustin Wainscott, director of the Made to Measure program, and Matt Boyer, the sales associate in charge of MTM at that location, brandish a pair of custom-ordered instruments.
Photo by Ted Drozdowski
Essentially, any Gibson body currently in production and most historic appointments from that model’s history—and some from other compatible Gibson models—can be used for an MTM order. After selecting the white wood, as slabs are called in lutherie, “figuring out the pickup layout, the neck profile, and the tailpiece you want is the next step,” says Wainscott. “Then you get into the electronics and the look of the guitar: pickup selection, coil-splitting, what color or finish hardware, a glossy or flat finish, any Murphy Lab aging.
“Non-proprietary parts can sometimes be a roadblock. Typically, we’d use our pickups, for example, so if somebody makes a request for a pickup outside of Gibson’s, I try to steer them toward something we have that’s similar. You’ve got to play in the Gibson sandbox.” Stepping outside of historic model-design parameters, which would require re-engineering, is also a no-fly. That means don’t ask for a Les Paul with a Firebird neck, or an Explorer with a 3-on-a-side headstock. That said, there is a lot of wiggle room within the company’s catalog, and “on the cosmetic side, we can go as far as you want to, with any color or finish you want,” adds Wainscott. Personalized headstocks are also a popular option.
A Made to Measure order’s price starts with a $500 charge on top of a model’s current tag, and can increase depending on the complexity of wiring, finish, inlays, etc. Wainscott notes that about 30 percent of the Custom Shop’s business is Made to Measure.
“We also do a lot of recreating of models you’ve seen in the past that aren’t available now,” adds Boyer. “So, we can’t make a Jimmy Page Les Paul with his name on it, per se, but if you want a Les Paul Custom with three pickups, a Bigsby, a 6-position switch, and all that, we can do it for you.”
Kiesel’s Family Style
Kiesel can get as rad as you wanna be, including characterful flourishes like this naturally figured wood with pools of radiant blue finish and an organically striking neck.
Kiesel Guitars has essentially always been a custom-order builder, even if its name and line of business has evolved. The L.C. Kiesel Company was founded in 1946 by Lowell Kiesel as a manufacturer of pickups he sold from the back pages of magazines. As it grew, he renamed it after two of his sons, Carson and Gavin, as the well-known brand Carvin, which became famous as a maker of quality guitars, amps, and instrument parts. In 2015, the company split, Lowell’s son Mark and his son Jeff established the guitar-building operation under the Kiesel name. Today, thanks to their high-caliber construction and endorsees like Allan Holdsworth, Devin Townsend, Craig Chaquico, Jason Becker, and Johnny Hiland, the company makes more than 4,000 custom-order guitars a year.
“We have four types of construction: bolt-on, set-neck, set-through, and neck-through,” explains VP Jeff Kiesel. The company also offers the unusual choice of nine different headstocks, which most manufacturers limit to one style as part of branding, and sans-headstock models, which Kiesel began making in 2012 with the debut of its Allan Holdsworth model. All Kiesel headstocks have an 8 1/2-degree tilt, to create a steeper string angle over the nut, which can potentially improve tone and sustain.
At work on a body in the Kiesel factory, which produces about 4,000 custom-order guitars annually.
“We’re appealing to everybody because we do so many different things.”—Jeff Kiesel
“We never build the headstock separate from the neck and then scarf joint them in—it’s all one piece,” Kiesel adds. Necks are also quarter-sawn, with a two-way truss rod, dual carbon-fiber reinforcement rods, stainless steel frets, and Luminlay side dots.
After that, ordering a Kiesel is all about options. There are 56 models, including signatures, to choose from. Once you select a model on the company’s website, you’re taken to a page that includes a builder menu. Kiesel’s lowest-priced models, including the Delos, start at $1,649, while the top-priced, flagship K-Series model starts at $4,399.
The Aries, one of Kiesel’s most popular guitars, starts at a base of $1,699 with a bolt-on neck and has a menu that includes, under general options, right- or left-hand orientation; the choice of 6, 7, 8, or 9 strings; multiscale necks; and 25 1/2", 26 1/2", or 27" scale lengths. Under body options, you can select beveled or unbeveled edges, and eight different body and 16 different top woods. There are more than 80 finishes to choose from, and 14 variations on the Kiesel logo. The neck options are equally rich, with five fretboard radius selections plus choices for neck wood, three neck profiles, inlays, truss rod covers, and more. The electronic options boast four pickup configurations, five different Kiesel neck and bridge pickup models, and additional alternatives. It’s easy to get lost in the woods, but when you emerge, an image of your guitar with all its appointments, generated as you make your choices, is waiting for you.
“Our lead time is seven to 12 weeks,” Kiesel says, “and we offer a 10-day trial period unless somebody gets too wild on their options.” Anyone ordering a guitar is welcome to phone the company to talk over their order, and Kiesel highly recommends that first-time buyers call.
While Kiesel Guitars once had a reputation as a shredder-axe factory, Jeff Kiesel explains that’s changed over the past decade. “Our demographic is not set anymore,” he shares. “We’re appealing to everybody because we do so many different things. We can build a very classy jazz-style neck pickup on a semi-hollow guitar that you can play some amazing Frank Gambale licks on. And then we can turn around and build a guitar that will do some really technical modern metal, like Marc Okubo. We can build really wild or really classy, and that’s created so much growth within our company.”
Fender’s Mod Shop
Ted created this “dream Strat” with a silverburst finish, noiseless single-coils, and a 2-Point Deluxe Synchronized Tremolo Bridge using Fender’s Mod Shop online tool.
Like Gibson, Fender’s Mod Shop is about personalizing classic templates—in this case, the Strat, Tele, Jaguar, Jazzmaster, P and J basses, and Acoustasonic Telecasters and Jazzmasters. And while the program was birthed in 2014 as the American Design Experience, it evolved into the Mod Shop and has continued to improve, most recently with an update this April that made the online menu easier to use and added more options.
“We know that 80 percent of customers will be loyal to brands where they can personalize and customize,” says Shannon Stokes, Fender’s VP of eCommerce. “So the whole online user experience has been finessed. It’s much easier to navigate on both desktop and mobile. You move through it choosing the orientation of the guitar, the finish … everything through the pickguard, the hardware.”
Justin Norvell, Fender’s VP of product, observes, “This is a playground, and you’re able to just mess around and see what appeals to you. We allow people to save their configurations to PDFs, and they can share them and send them out,” akin to trading cards. “There’s an exponential number of people that might sit on their favorite design for a year before they actually place an order.” Some hardcore fans buy multiple variations of a favorite-style guitar over time, “because you can engrave the neck plate, collect multiple finishes, and other cool stuff. This is an area where selection runs wild for lefties, too,” he adds.
Fender’s Justin Norvell with his own dream machine: an American Professional Jazzmaster in mystic seafoam.
“This is an area where selection runs wild for lefties, too.”—Fender’s Justin Norvell
“What’s amazing to me,” says Shannon Stokes, Fender’s VP of eCommerce, “is the number of people ordering black, white, and sunburst. I would think the rarer colors would be the thing.”
The cost of a Mod Shop guitar is an upcharge of several hundred dollars, with certain customizations increasing the tab. I decided to jump in and outfit a Strat, with a base price of $2,085, to my taste. After selecting the right-hand player’s orientation, I chose an alder body with a silverburst finish from a palette of nearly 50 colors and wood offerings that also included chambered ash, mahogany, and roasted pine. For the neck, I went with solid rosewood with Fender’s deep-C profile. Eight maple variations were also available. That neck option automatically led me to a rosewood fretboard, and then I hunted through 16 pickup configurations before stopping at the Generation 4 Noiseless Stratocaster set. I opted for a 4-ply black pearl pickguard, and aged white plastic controls and pickup frames. Next, from three bridge choices I tapped a 2-Point Deluxe Synchronized Tremolo Bridge. Chrome Fender strap lock buttons would do the job, since I’ve had un-strap-locked guitars fall to the stage at gigs in years past. For strings, a set for .010s, and the only case option is deluxe molded plastic with a fuzzy interior. Total cost: $2,175, which is not bad for those modest-but-swell appointments. I also downloaded a PDF, so you can see what I designed. Unhappy with the purchase? It can be returned within 30 days for a refund or exchange, plus shipping.
There’s about a half-dozen builders in the Mod Shop, but workers from the normal production line can be called in when there is an uptick in commissions, Norvell explains.
“What’s amazing to me,” says Stokes, “is the number of people ordering black, white, and sunburst. I love the satin orange because it’s vibrant, different. I would think the rarer colors would be the thing.” But players often look for instruments that are evocative of classic guitars they’ve seen. And 6-string dreams do come in all shades.
Well-designed pickups. Extremely comfortable contours. Smooth, playable neck.
Middle position could use a bit more mids. Price could scare off some.
$2,999
Ernie Ball Music Man StingRay II
A surprise 6-string collaboration with Cory Wong moves effortlessly between ’70s George Benson and Blink-182 tones.
Announced at the 2025 NAMM show, Cory Wong’s new collaboration with Ernie Ball Music Man scratched an itch—namely, the itch for a humbucker-loaded guitar that could appease Wong’s rock-and-R&B alter ego and serve as complement to his signature Fender Strat. Inspiration came from no further than a bandmate’s namesake instrument. Vulfpeck bassist Joe Dart has a line of signature model EBMM basses, one of which uses the classic StingRay bass body profile. So, when Wong went looking for something distinctive, he wondered if EBMM could create a 6-string guitar using the classic StingRay bass body and headstock profile.
Double the Fun
Wong is, by his own admission, a single-coil devotee. That’s where the core of his sound lives and it feels like home to him. However, Wong is as inspired by classic Earth, Wind & Fire tones and the pop-punk of the early ’90s as he is by Prince and the Minneapolis funk that he grew up with. The StingRay II is a guitar that can cover all those bases.
Ernie Ball has a history of designing fast-feeling, comfortable necks. And I can’t remember ever struggling to move around an EBMM fretboard. The roasted maple C-shaped neck here is slightly thicker in profile than I expected, but still very comfortable. (I must also mention that the back of the neck has a dazzling, almost holographic look to the grain that morphs in the light). By any measure, the StingRay II’s curves seemed designed for comfort and speed. Now, let’s talk about those pickups.Hot or Not?
A few years ago EBMM introduced a line of HT (heat-treated) pickups. The pickups are built with technology the company used to develop their Cobalt and M-Series strings. A fair amount of the process is shrouded in secrecy and must be taken on faith, but EBMM says treating elements of the pickup with heat increases clarity and dynamic response.
To find out for myself, I plugged the StingRay II into a Fender Vibroverb, Mesa/Boogie Mark VII, and a Neural DSP Quad Cortex (Wong’s preferred live rig). Right away, it was easy to hear the tight low end and warm highs. Often, I feel like the low end from neck humbuckers can feel too loose or lack definition. Neither was the case here. The HT pickup is beautifully balanced with a bounce that’s rich with ES-335 vibes. Clean tones are punchy and bright—especially with the Vibroverb—and dirty tones have more room for air. Individual notes were clear and articulate, too.
Any guitar associated with Wong needs a strong middle-position or combined pickup tone, and the StingRay II delivers. I never felt any significant signal loss in the blended signal from the two humbuckers, even if I could use a bit more midrange presence in the voicing. The midrange gap is nothing an EQ or Tube Screamer couldn’t fix, though. And not surprisingly, very Strat-like sounds were easy to achieve for having less midrange bump.
Knowing Wong’s love for ’90s alt-rock, I expected the bridge pickup to have real bite, and it does, demonstrating exceptional dynamic range and exceptional high-end response that never approached shrill. Nearly every type of distortion and overdrive I threw at it sounded great, but especially anything with a scooped-mid flavor and plenty of low end.
The Verdict
By any measure, the StingRay II is a top-notch, professional instrument. The fit and finish are immaculate and the feel of the neck makes me wonder if EBMM stashes some kind of secret sandpaper, because I don’t think I’ve ever felt a smoother, more playable neck. Kudos are also due to EBMM and Wong for finding an instrument that can move between ’70s George Benson tones and the hammering power chords of ’90s Blink-182. Admittedly, the nearly $3K price could give some players pause, but considering the overall quality of the instrument, it’s not out of line. Wong’s involvement and search for distinct sounds makes the StingRay II more than a tired redux of a classic model—an admirable accomplishment considering EBMM’s long and storied history.
Ernie Ball Music Man StingRay II Cory Wong Signature Electric Guitar - Charcoal Blue with Rosewood Fingerboard
StingRay II Cory Wong - Charcoal BlueThe Melvins' Buzz Osborne joins the party to talk about how he helped Kurt Cobain find the right sounds.
Growing up in the small town of Montesano, Washington, Kurt Cobain turned to his older pal Buzz Osborne for musical direction. So on this episode, we’re talking with the Melvins leader about their friendship, from taking Cobain to see Black Flag in ’84 to their shared guitar journey and how they both thought about gear. And in case you’ve heard otherwise, Kurt was never a Melvins roadie!
Osborne’s latest project is Thunderball from Melvins 1983, something of a side trajectory for the band, which harkens back to this time in Osborne’s life. We dig into that and how it all relates and much more.