A client wanted her D-12-20 to fret in tune all along the fretboard. Can it be done?
Intonating a flattop’s bridge saddle is tricky, and that’s especially true when it comes to vintage 12-string guitars. Back in the day, it was rare to find an acoustic 12-string with a compensated bridge saddle. In fact for many players, the slightly out-of-tune jangle was a big part of a 12-string’s aural mystique. But times have changed, and as music and recording technology have evolved, most musicians and producers expect a 12-string to play reasonably in tune all along the fretboard.
Intonating a flattop 12-string with a straight bridge saddle involves filing unique break angle and intonation points for each string—an operation that requires skill and patience. Let’s investigate and see exactly what’s involved.
We’ll use a beautiful 1972 Martin D-12-20 as our project guitar. The guitar was in good shape when its owner brought it into the shop, but it didn’t play even remotely in tune and the action was uncomfortably high. Many old 12-strings require a neck reset (an expensive proposition), but I checked the neck angle and it was fine. Fortunately for the guitar’s current owner, the problem was rather simple. Somewhere along the line a previous owner or tech had installed a saddle that was both too high and incorrectly radiused (Photo 1).
My job was twofold: lower the action by reshaping the bridge saddle and then intonate each string. I knew that once I completed these tasks, the D-12-20 would play better than ever and sound more in tune at the higher frets.
Requisite tools. To intonate a 12-string, you need a few specialized luthier tools. These include a string action gauge, radius gauges, and a radius block (the latter must match the fretboard radius). You’ll also need a mechanical pencil, a capo, self-adhesive 80-grit and standard 400-grit sandpaper, and flat, single-cut miniature needle files.
You can estimate where each string should rest on the saddle, but it’s nearly impossible to get it perfect on the first try.
Preliminary check. Before starting this kind of work on a guitar, it’s important to tune to concert pitch and take measurements. These specs provide a baseline to help gauge your progress. You’ll be taking several measurements, so write them down as you go.
First, put a capo on the 1st fret and measure action at the 12th fret with a string action gauge. Take this measurement for both the 1st and 11th strings—the first of the doubled high Es and the low E string. (We’ll assume your 12-string has the standard octave-string configuration, i.e., the octaves in each pair are closer to you than their wound partners. Some electric 12s, notably Rickenbackers, reverse this order.) Measure the distance between the bottom of the string and the top of the 12th fret.
Next measure the relief: With the capo still on the 1st fret, hold the 11th and 12th strings down at the 14th fret and measure the greatest gap between the bottom of the 11th string and the top of the frets. Typically this occurs around the middle of the fretboard, somewhere between the 7th and 9th frets. You can identify this gap by tapping the 11th and 12th strings against the frets while still pressing them down at the 14th fret.
Now remove the capo and check the action at the 1st fret.
Finally, using a strobe tuner, check the intonation for each string. (Naturally, this is tricky on a 12-string because you have to pluck each individual string of the six pairs.) Starting with the 1st string, play the 12th-fret harmonic—make sure it’s in tune—and then fret the same note. If the fretted note is sharp or flat compared to the reference harmonic, write down how many cents it’s off and in which direction. Repeat the process until you’ve documented the intonation at the 12th fret for all 12 strings.
Our 12-string’s preliminary specs. Here’s how the D-12-20 measured up: The action at the 12th fret was 6/64" for the 1st string and 7/64" for the 11th string. Too high to play! The relief was .012"—perfect for my client’s playing style. At the 1st fret, the 1st string was 1/64" and the 11th string was just over 2/64" above the fret. Again, perfect action at the string nut. At this point, I knew my job would simply entail lowering the action at the bridge saddle.
When I checked the intonation with a strobe tuner, and compared the 12th fret harmonics to their corresponding fretted notes, I found most of the fretted notes were from two to six cents sharp, although the G and D pairs were flat by about three cents.
With these measurements in hand, I was ready to get to work.
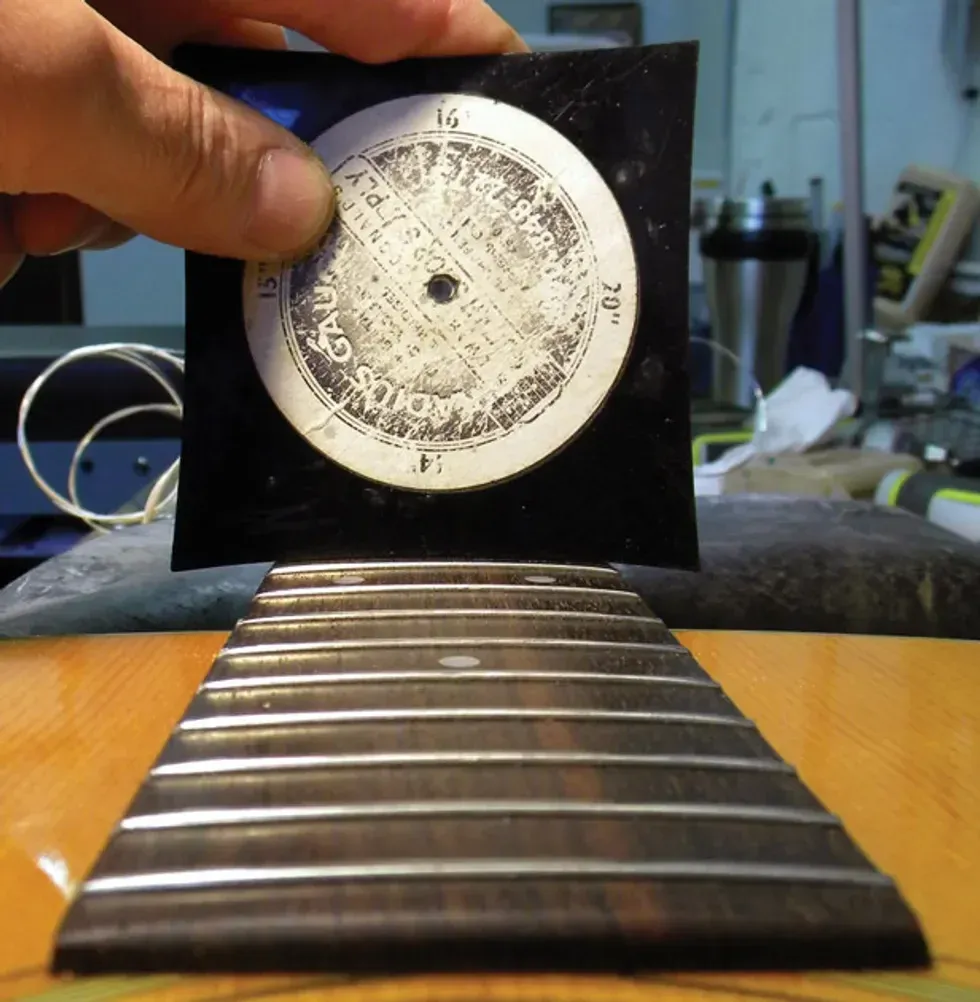
Photo 2
Sanding the bridge saddle. My next step was to check if the saddle’s radius matched the fretboard radius. My radius gauge revealed what I’d suspected—it wasn’t even close. The fretboard had a 14"radius (Photo 2), but the bridge saddle was around 8". This meant the saddle had a much more pronounced arch than the fretboard. I knew if I didn’t reshape the top of the saddle to match the fretboard, the D and G pairs would be radically higher than the other strings.
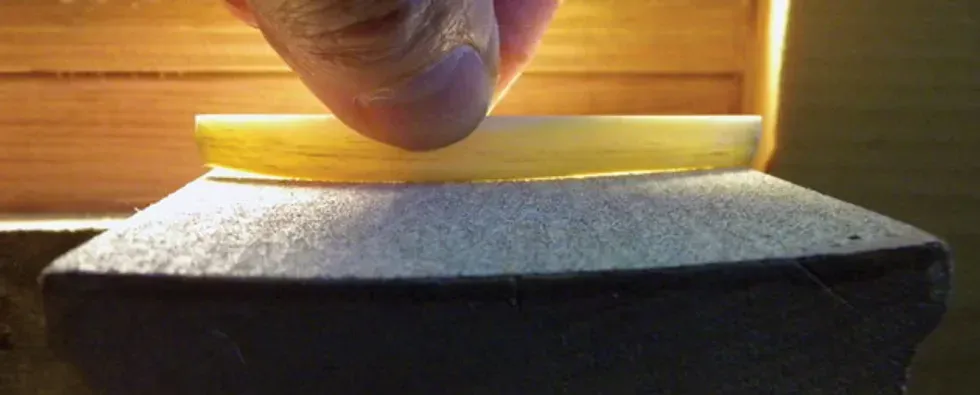
Photo 3
Using a 14" radius block and self-adhesive 80-grit sandpaper, I sanded the top of the saddle until it matched the block’s radius. Here’s the most accurate way to reshape the top of the saddle: Place the radius block in a vise with the radius side up and affix the self-adhesive sandpaper to the block. Now remove the saddle from its bridge slot, turn it upside down, and gently sand its top in the block’s concave area. If you shine light behind the saddle, you’ll be able to see how much material you’re removing from the saddle and make sure its radius matches the block (Photo 3).
Since the action was pretty high on our 12-string, I removed about 1/32" from the top of the saddle at both E string pairs. I removed quite a bit more from the middle of the saddle to flatten out the arch.
Once the saddle is correctly radiused, slip it back into the bridge and grab your mechanical pencil.
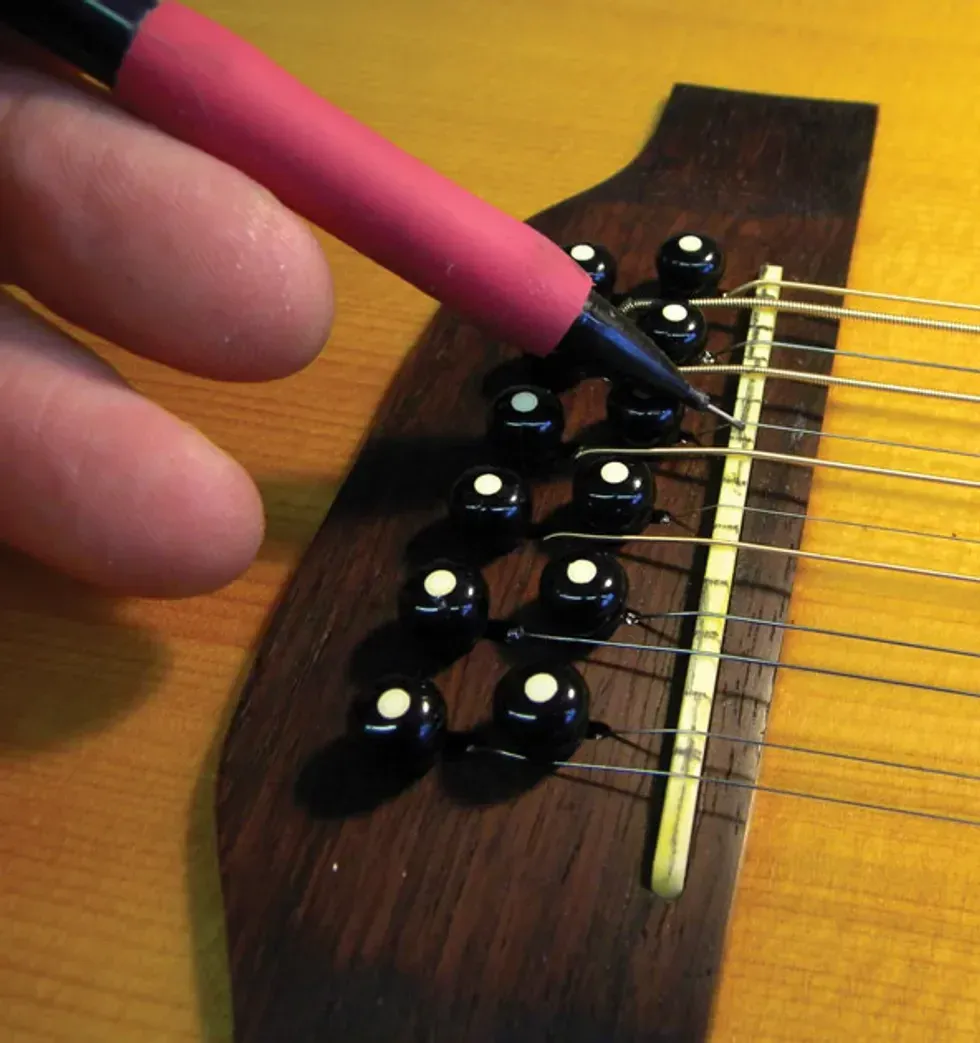
Photo 4
Marking the saddle. Now it’s time to draw guidelines on the saddle crown for both the individual intonation points and the various angles needed to guide the strings as they emerge from the pin holes (Photo 4). But before you start drawing lines, let’s take a moment to discuss where the strings should sit on the top of the saddle. First we’ll deal with the intonation points, then the string angles.
Fair warning: Setting the intonation entails some trial and error. You can estimate where each string should rest on the saddle, but it’s nearly impossible to get it perfect on the first try.
For this task, it’s helpful to mentally divide the 12 strings into three groups:
• The six E, A, D, G, B, and E strings you’d find on a regular flattop. We know the lowest four are wound, and the top two are plain. So far, so good.
• The plain octave strings (E, A, D, G) that pair with the wound E, A, D, and G strings.
• The doubled unison B and high-E strings. Just like their mates, these are plain.
Okay, think about the first group—our standard 6-string. As a general rule, both the low E and B strings intonate best at the rear edge of the saddle (closest to the bridge pins). The G string’s intonation point is typically at the very front of the saddle (closest to the soundhole).
That leaves the high E, D, and A strings to be accounted for. The high E will typically fall between the B (remember, that’s at the rear of the saddle) and the G (at the front of the saddle). The D and A strings usually create a stair-step pattern between the G and low E strings, with the D closer to the G, and A closer to the low E.
The four plain octave strings are a different story. Both the low E’s octave and the G’s octave points will be at the front of the saddle. The octave strings for A and D will be further back toward the bridge pins.
As you’d expect, the unison B and E strings sit at exactly the same point as their siblings.
Now consider how each string travels from the pin hole in the bridge to the top of the saddle—the intonation point. On this Martin, the six primary strings—those that correspond to a standard flattop—are set back toward the rear of the bridge. The six additional strings, the four octaves and two unisons that make a 12-string such a beautiful beast, emerge through the soundboard and bridge right behind the saddle.
On the rear of the saddle, you need to file individual angles (think of them as ramps) that allow each string to reach its intonation point without encountering a sharp edge. Correctly filed angles minimize string breakage and maximize sustain. The angle for the primary strings will be shallower than the six extra strings.
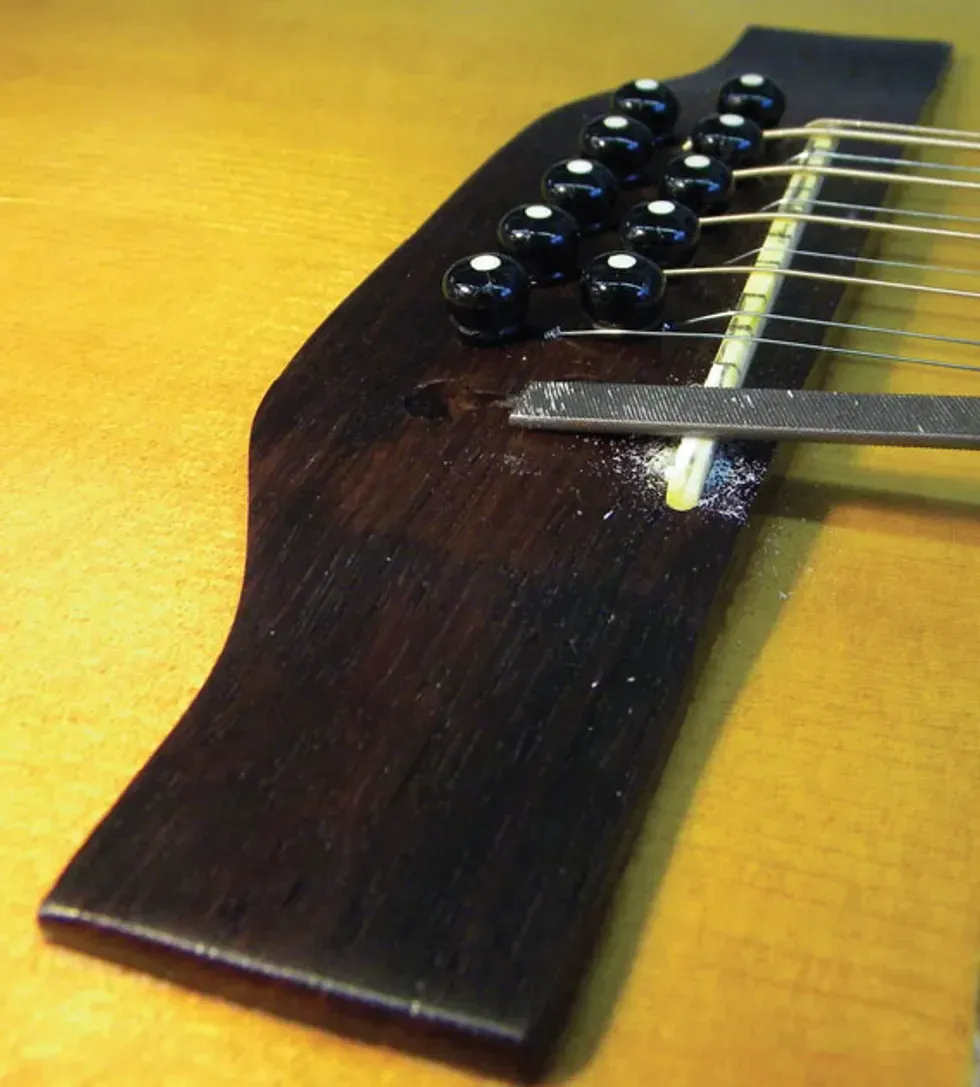
Photo 5
On the rear of the saddle, you need to file individual angles (think of them as ramps) that allow each string to reach its intonation point without encountering a sharp edge. Correctly filed angles minimize string breakage and maximize sustain. The angle for the primary strings will be shallower than the six extra strings.
Filing the saddle. This is where your inner artist gets a chance to shine. Using a miniature flat file, carve each string’s intonation point and rear angle, based on your markings (Photo 5). Go slowly, and to prevent any sitar-like buzzing, be sure each string leaves the saddle from a crisp, defined peak as it heads toward the soundhole.
Checking intonation. As I mentioned earlier, there’s a lot of trial and error involved with intonating a 12-string. Once you’ve done the first pass of filing, put on a fresh set of strings, tune them to pitch, and check the intonation.
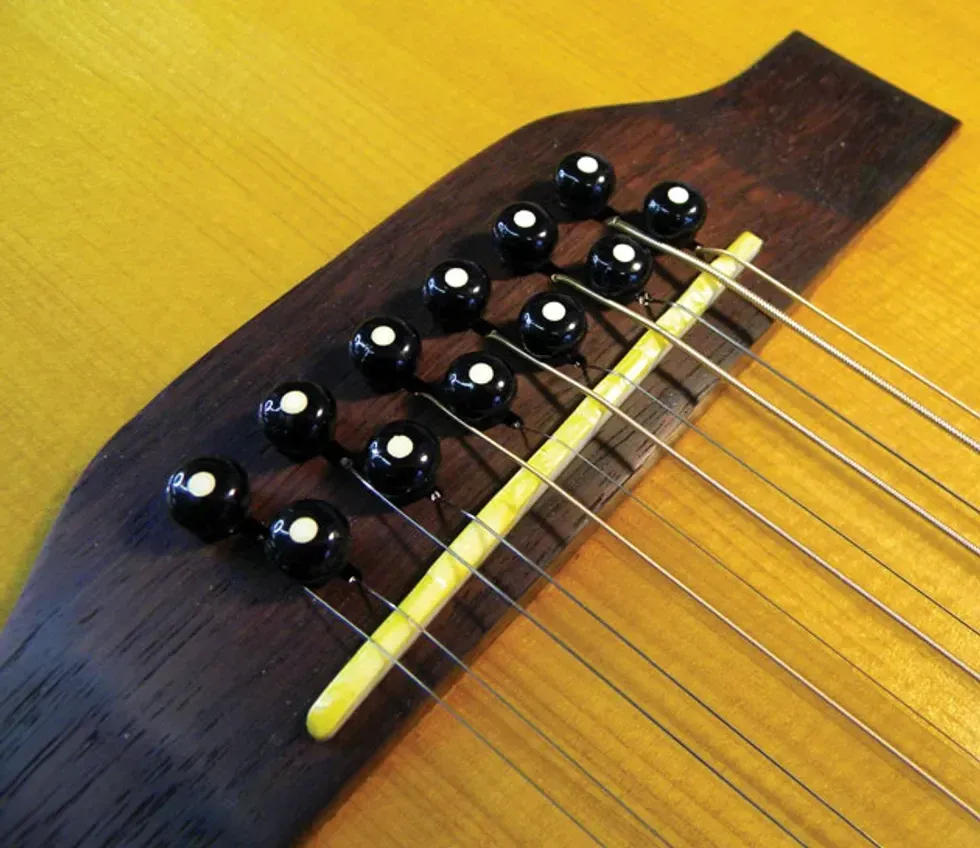
Photo 6
The goal is to have the fretted note at the 12th fret match the corresponding 12-fret harmonic. Use a tuner to keep track of how close the fretted note comes to its reference harmonic. If the string frets sharp, file the intonation point back toward the rear of the saddle. Conversely, if the fretted note is flat, carve the intonation point forward toward the front of the saddle. When you’re done, the saddle should look similar to Photo 6. Don’t be dismayed at how many times you’ll need to slacken and remove the strings, file the saddle, restring, retune, and recheck the intonation.
Wrap it up. When you’ve got the intonation dialed in to your satisfaction, take off the strings one last time, pop out the saddle, and then polish it with 400 grit sandpaper, followed with a polishing cloth. Restring, retune, and you’re good to go.
This process takes a long time to master, but in the end, it’s worth it when your 12-string plays in tune all the way up the neck.
We chat with Molly about Sister Rosetta’s “immediately impressive” playing, which blends jazz, gospel, chromaticism, and blues into an early rock ‘n’ roll style that was not only way ahead of its time but was also truly rockin’.
In the early ’60s, some of the British guitarists who would shape the direction of our instrument for decades to come all found themselves at a concert by Sister Rosetta Tharpe. What they heard from Tharpe and what made her performances so special—her sound, her energy—must have resonated. Back at home in the U.S., she was a captivating presence, wowing audiences going back to her early days in church through performing the first stadium rock ‘n’ roll concert—which was also one of her weddings—and beyond. Her guitar playing was incendiary, energetic, and a force to be reckoned with.
On this episode of 100 Guitarists, we’re joined by guitarist Molly Miller, who in addition to being a fantastic guitarist, educator, bandleader, and performing with Jason Mraz, is a bit of a Sister Rosetta scholar. We chat with Molly about Sister Rosetta’s “immediately impressive” playing, which blends jazz, gospel, chromaticism, and blues into an early rock ‘n’ roll style that was not only way ahead of its time but was also truly rockin’.
Featuring the SansAmp section, Reverb/Delay/Roto effects, and OMG overdrive, with new additions like a switchable Pre/Post Boost and Effect Loop. Pre-configured for the RK Killer Wail wah, this pedal offers versatile tones and unmatched flexibility.
Since the debut of the original RK5 in 2014, Richie’s needs have changed, both on and off the road. The RK5 v3 retains the same SansAmp section, Reverb/Delay/Roto section, and Richie’sSignature OMG overdrive. New features include a switchable Pre/Post Boost to beef up drive and distortion or increase the overall volume to punch up fills and solos, along with the addition of an Effect Loop. It has also been pre-configured to provide phantom power for Richie’s Tech21 Signature RK Killer Wail wah.
The all-analog SansAmp section of the RK5 focuses on clean tones within the tube amplifier sound spectrum. It includes 3-band active EQ, and Level and Drive controls. To dirty things up, you have the flexibility of using the Drive control, and the Boost function, or you can add overdrive from the OMG section. Or all three. Each method achieves different tones. The OMG section is based upon the Richie Kotzen Signature OMG pedal, which provides a wide range of overdrive, from clean to aggressive. You can add personality to a clean amp or use it for extra punch with a dirty amp tone. Controls include Drive for the overall amount of gain and overdrive and Tone with specialized voicing for adjusting the high-end and mid-range. A Fuzz switch changes the character and attack of the overdrive to a fuzz-style tone, making it thicker and woolier.
Other features include an independent foot-switchable Reverb witha choice of large and small“room sizes;” Tap Tempo Delay, which can be transformed into a rotating speaker effect; included Tech 21 Model #DC9 universal self-adjusting 9V DC power supply, with interchangeable international prong assemblies for use anywhere in the world. Anticipated availability: January 2025
For more information, please visit tech21nyc.com.
OM-balance and comfort suited for the fingerstylist on a budget.
Comfortably, agreeably playable. Balanced dimensions. Nice fretwork.
Lighter mahogany top looks less classically mahogany-like. Some compressed sounds in heavy-strumming settings.
$299
Guild OM-320
guildguitars.com
The Premier Guitar crew is spoiled when it comes to hanging out with nice flattops. But while those too-brief encounters with acoustics we can’t afford teach us a lot about the flattop at its most refined, they also underscore a disconnect between the cost and the acoustic guitar’s status as a true folk instrument of the people.
Guild’s OM-320, from the company’s new 300 series, sells for $299, which isn’t much more than a good-quality, entry-level flattop cost in the 1980s. Strikingly, there’s a lot of competition in this price class. Even so, the OM-320’s nice build quality and pretty tone in fingerpicking applications stand out in a very crowded price segment.
The United Guild of Deal-Seeking Pickers
Though Guild, in all its incarnations, has always made accessible guitars a part of their offerings, a $300 instrument with the company’s logo might give pause to players familiar with guitars from their various U.S. factories. Quality can be hit-or-miss on any guitar from any brand at the entry level. What’s more, a lot of guitars with different brand names come from just a few OEM facilities—lending a certain sameness on top of irregular quality. But the recent acquisition of Guild by Yamaha, who has a reputation for solid entry-level instruments, inspires confidence as far as these concerns go.
So, too, does the integrity of the OM-320 at the nuts-and-bolts level. I couldn’t find any overt lapses in quality control. And in many spots where that really counts, like the fretwork, the execution is especially good. Little details like the Guild logo overlay (rather than a simple decal) add a soupçon of luxury. So do the Guild-branded, Grover Sta-Tite-style butterbean tuners, which look stylish and feel sensitive and accurate.
“The neck inhabits a comfortable zone between C and D shapes that’s super agreeable and, at least in my case, a nice antidote for hand fatigue.”
Though the body is built from layered mahogany on the back and sides and a solid mahogany top, the latter is much lighter and amber- or honey-toned than the rich cocoa-hued mahogany tops you’d associate with a vintage Guild M-20, or, for that matter, theM-120 from the company’s contemporary Westerly line. As a result, you see a little more contrast in the grain and a little dimpling in certain sections of the wood. The lighter wood isn’t unattractive, it just looks less trad, if you’re chasing Nick Drake’s Bryter Layter style. If that’s important, you should adjust the “design/build” score appropriately.
Sit and Stay Awhile
Barring being covered in porcupine spines, almost any OM or 000 will qualify as a pure-comfort title finalist. It’s not too thick, too wide, nor too petite—a size and profile that also pays unique, civilized sonic dividends. Here, the OM body is complimented by a neck that feels like an especially natural match. I don’t have a bunch of inexpensive OMs on hand to compare, and there isn’t anything wildly unique about the shape, but the neck profile feels very proportionate to the body. It also, depending on your own sense of such things, inhabits a comfortable zone between C and D shapes that’s super agreeable and, at least in my case, a nice antidote for hand fatigue. The neck is not classically OM-like in terms of nut width. The M-320’s nut measures 1 13/16", which is typical of a 000, rather than the 1 3/4" associated with OMs. The extra width, of course, would make the guitar more appealing to some fingerstylists that need the space. At no point, however, did I feel anything close to cramped; it’s just very comfortable.
The combination of layered back and sides, OM/000 dimensions, and mahogany mean the OM-320 feels and sounds less than super-widescreen in terms of tone spectrum and power. Nevertheless, it sounds balanced and pretty—particularly with a droning, dropped 6th string and other more-elastic tunings where the guitar can exercise the lower extremes of its voice. Tuning to standard has the effect of highlighting midrange emphasis, which can get boxy and render the 3rd and 4th strings a bit less potent and present. That said, it’s still balanced and almost never collapses into a distorted harmonic blur. The bottom end maintains an appealing growl and, as long as you use a gentler picking approach, you can use the highest four strings in very dynamic ways. Using a capo emphasizes other cool, high-mid-focused voices in the guitar that coexist well with most strumming approaches.
The Verdict
Inexpensive guitars that feel great can make up for a lot of shortcomings in tone. But the OM-320’s deficiencies in the latter regard are few, and some perceived limitations, like midrange emphasis, are intrinsic to guitars with OM dimensions. So, while forceful strumming is not the OM-320’s strength, the comfortable playability might just lead you to those places anyway. And if you compensate accordingly with touch dynamics, you can conjure many sweetly chiming tones that might sound extra sweet given the bargain price
Featuring vintage tremolos, modern slicer effects, and stereo auto-panners, the update includes clever Rate and Tempo controls for seamless syncing and morphing.
Today Kemper announces the immediate availability PROFILER OS 12.0 including the highly anticipated collection of advanced Tremolo and Slicer FX for the entire range of KEMPER PROFILER guitar amps.
The Collection features three vintage tremolos, two modern slicer effects, and two stereo auto-panners, that have been derived from the slicer effects. They all feature a clever Rate and Tempo control system, that allows for syncing the tremolo to the song tempo, retriggering the timing by simply hitting the TAP switch, and changing or morphing the tremolo rate to different note values,
The new Advanced Tremolo Modules in Detail
- The Tube Bias Tremolo is the familiar Tremolo in the Kemper Profilers. Formally named "Tremolo“ and available in the PROFILERs since day one, it is a reproduction of the famous Fender Amp tremolos from the 50‘s. Placed in front of the amp it beautifully interacts with the amp distortion.
- The Photocell Tremolo dates back to the 60‘s and features a steeper pulse slope, and its width varies with the intensity.
- The Harmonic Tremolo also dates back to the 60‘s and was introduced by Fender. The low and high frequencies alternate with the tremolo rate.
- The Pulse Slicer is a modern slizer or stutter effect that will continuously transition from the smoothest sine wave to the sharpest square wave, using the "Edge“ parameter. The "Skew“ parameter changes the timing of the high level versus the low level, sometimes also called pulse width or duty cycle.
- The Saw Slicer creates a ramp like a saw wave. The saw wave has a falling ramp when "Edge“ is at full position, and a rising edge at zero position. Towards the middle position a rising and falling ramp are forming a triangle wave. The „Skew“ parameter changes the slope of the rising and falling ramp from a linear trajectory to a more convex or concave shape.
- The Pulse Autopanner and the Saw Autopanner are derivates from their respective Slicers, they spread their signals in the stereo panorama. The "Stereo“-control parameter is included in many effects of the PROFILER. Here, it introduces a novel "super-stereo" effect that lets the Autopanner send the signal well outside the regular stereo image. This effect works best if you are well positioned in the correct stereo triangle of your speakers. When you move the “Stereo” soft knob beyond the +/-100% setting, the super-stereo effect comes into place, reaching its maximum impact at +/-200%.
- A single press on the TAP button at the beginning of the bar will bring the rhythmic modulation effects, such as Tremolo or Slicer, back into sync with the music without changing the tempo. The sync will happen smoothly and almost unnoticeable, which is a unique feature. Of course, tapping the tempo is possible as well.
- Modulation Rate - The “Rate” control available in many modulation effects is based on a special philosophy that allows continuous control over the speed of the modulation and continuous Morphing, even when linked to the current tempo via the To Tempo option. The fine Rate resolution shines when seamlessly morphing from, e.g., 1/8 notes to 1/16 notes or triplets without a glitch and without losing the timing of the music.