Fender’s silver-panel amplifiers have a mixed reputation. Some people will happily bend your ear about how they can’t compare to their counterparts from the tweed, black-panel, or drip-edge eras, while others will tell you they simply sound great. And some are in between—admiring the silver-panel amps for exactly the reliable, powerful, and plentiful specimens they are.
Not too long ago, you could easily find low asking prices on silver-panels of all types, earning them a designation as vintage amps for working musicians (prices have gone up, but you can still find a deal with a little effort). Yet thanks to those more affordable tags and their reputations, the years haven’t always been kind. These amps have been put through the ringer and subjected to their share of mods: everything from tweaks to increase midrange to ill-advised attempts to turn them into Marshalls and Voxes. Still, so many have survived the test of time—a testament to their durability.
“What we see today is from 50, 60 years of things becoming the industry standard. Back in the ’50s or ’60s, everything was new. They were just throwing things out there.”—George Alessandro
If you own a silver-panel model, you know that there’s a lot of subjective information floating around between the internet and our local amp-repair shop. If you’re not a tech, and you just want an amp that works well and sounds good, it can be a lot to unpack—suggestions about mods, restorations, and other tweaks can really leave your head spinning. It might seem like the easiest path is to never change anything and just fix what’s broken when it’s time to service yours, but that’s not always possible. Vintage examples of these amps have been rocking for so long that many of them are likely to need quite a bit of maintenance or have received extensive servicing over the years, and possibly not at the highest level.
So, when it comes time to fix your amp, what’s the best way to proceed? Do you restore your amp to factory spec? And will you even like the way that sounds? Considering how much time has passed, there’s a good chance it could make for a dramatic difference. And are some modifications to the circuit in order?
I’m no tech. I’m just a player who has an appreciation for these amplifiers and has owned my share of ’em. So, with all these questions in mind, I hit up a couple experts who know their way around a Fender amp in order to set the record straight on how to proceed with servicing our silver-panel amps and getting the best, most reliable tones out of them.
What’s the Deal with Silver-Panel Amps?
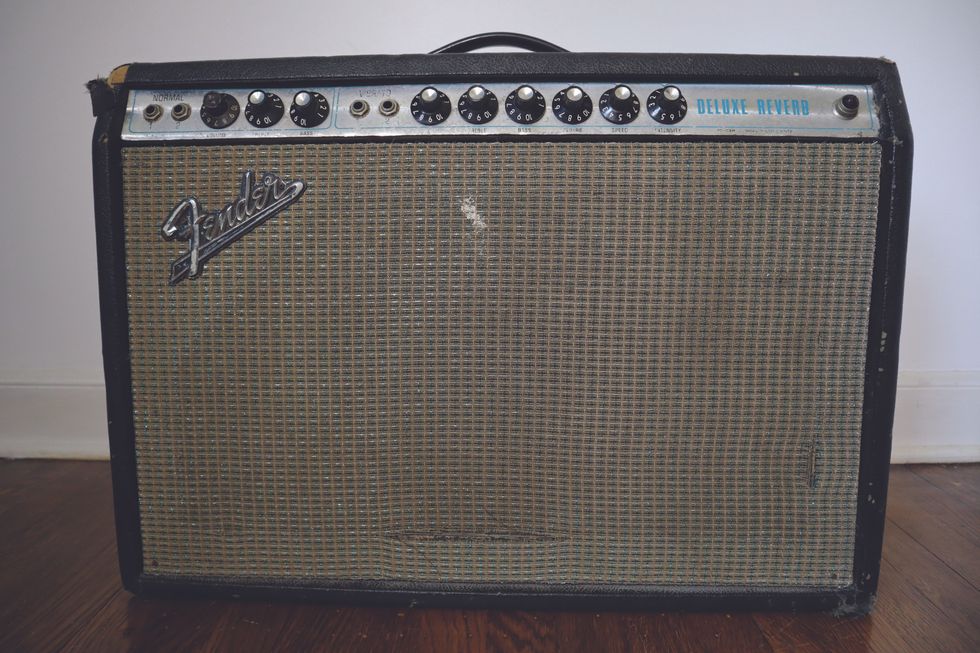
The author’s beloved 1971 Deluxe Reverb shows some wear after 51 years of heavy use. Except for a replaced speaker—now a Celestion Vintage 30—this amp is up to original spec.
Through 1965, Fender kicked out one iconic, revered amp design after another. After CBS took over, those circuits slowly changed over the course of the transitional late-’60s “drip-edge” era of amps. By the ’70s, the entire line had evolved into the silver-panels. This was Fender’s first era to really draw significant negative feedback from players. (When’s the last time you read a piece about modding a tweed Deluxe!?) One big point of criticism is that, during this phase, the company was looking for cheaper ways to build their amps—choices often blamed on the accounting department rather than their engineers—which affected everything from speaker quality to the type of wire used inside the circuits.
But there’s more to it than just skimping on parts. “They were just trying to keep up with the times,” explains George Alessandro of Alessandro High-End Products. In addition to his own amps, which are famously used by artists like Derek Trucks, Eric Clapton, and John Mayer, Alessandro also rebuilds plenty of vintage models for some of those same players. While some parts were of a lesser quality in the silver era, he points out that “Fender’s raw materials were still relatively good quality. By the ’70s, the caps were still good, the transformers were still authentic, the chassis were still right.”
“I find that the silver-panel amps, even if they are 10 years newer than the black-panel amps, are usually in much worse condition because they are stacked away in a moist basement or garage.”—Jens Mosbergvik
A big reason that silver-panel amps don’t live up to the reputation of their older siblings is that “their focus was more on getting output than tone.” Alessandro explains, “By the mid-60s, things were getting louder. PAs were just coming into play. Concerts were getting bigger. So, amplifiers had to get much larger and louder.” This eventually amounted to larger transformers in some models and other changes to boost power and bass response.
“At the time, there was no set rule,” he continues. “What we see today is from 50, 60 years of things becoming the industry standard. Back in the ’50s or ’60s, everything was new. They were just throwing things out there.”
But the lesser-than reputation of the silver-panel amps is often not exclusively about choices that Fender made back in the ’70s. It’s also about how these amps have been treated in subsequent decades. Once “pre-CBS” became a revered term, that solidified the reputation of anything Fender built before 1965, and those amps were often treated differently than the silver-panels. “The thing with silver-panel amps,” says Jens Mosbergvik, PG’s own Fender expert and author of our Silver and Black column, “is that they have been less looked after than black-panel amps because they were considered cheap amps. I find that the silver-panel amps, even if they are 10 years newer than the black-panel amps, are usually in a much worse condition because they are stacked away in a moist basement or garage.” With its lesser status, a silver-panel amp is also more likely to have been either serviced poorly or modified.
What’s in a Mod?
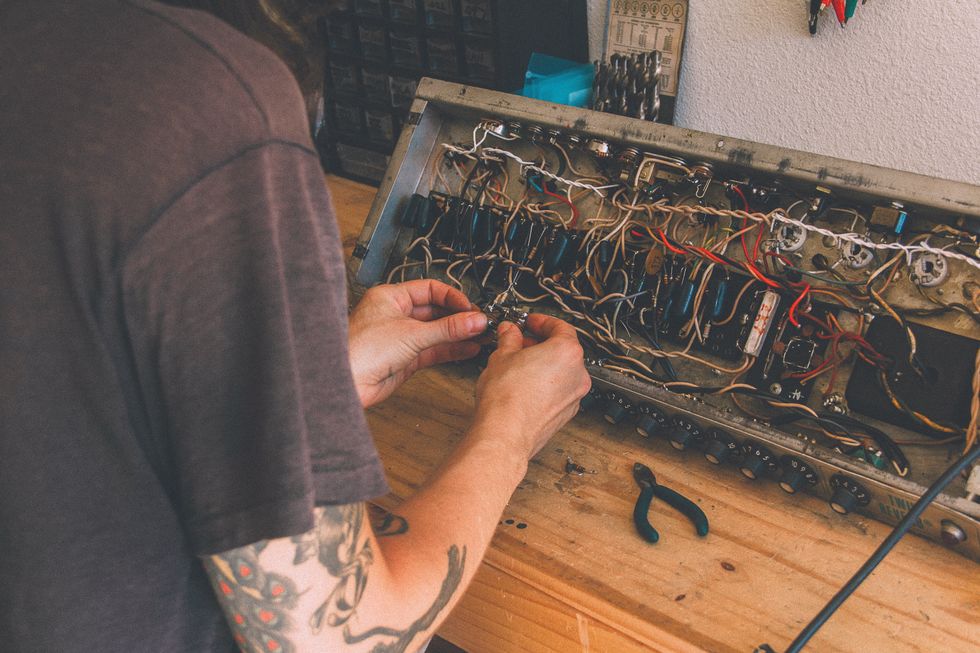
Colleen Fazio works on a silver-panel Twin Reverb. “Fender amps are so nice and so well designed,” she says, “it’s pretty easy to bring them back to stock if you want to.”
Photo courtesy of Colleen Fazio
Nowadays, plenty of players love silver-panel amps. They might not always deliver the hallowed tones of their pre-CBS siblings, but these models certainly hold their own when stacked against many modern amps that command similar prices. If you own one that hasn’t been restored, when you service it or take it to get serviced, you’ll have some decisions to make.
The most important thing to do is consider your expectations. Los Angeles guitar tech Colleen Fazio, who posts extensive and informative vintage amp repair and restoration videos to her YouTube channel, calls herself a “minimally invasive” tech and says, “I always tell people, ‘If you want your amp to sound like a different amp, you should probably just get a different amp.’ Because each amp is designed to do its own thing.”
Vintage Fender Deluxe Reverbs: 1965 Black-Panel Vs. 1974 Silver-Panel
Watch the author test out these two vintage gems.
“My philosophy with vintage amps is do no harm. I don’t like mods,” says Alessandro. “I’m really against mods, because almost 100 percent of the time it ruins what something is supposed to be.” He also warns against any sort of modification that will change an amp’s intended character. “I do more un-modding of vintage amps than you can imagine. A Deluxe Reverb is not going to be a tweed Deluxe. It’s not going to be a little Bluesbreaker. It’s gonna be a Deluxe Reverb. Try and make it the best it is supposed to be.”
Alessandro advocates looking at the changes made by Fender in the silver-panel era with perspective and hindsight. “That circuit from ’64, ’65 is right,” he says. “So, when Fender started changing it through the years, they were making it less right.” When it comes to restoring a silver-panel amp to black-panel specs, Alessandro doesn’t necessarily consider that to be a mod, but, rather, “restoring from what their engineers changed and making it what it’s supposed to be.” He adds, “It’s kind of like an old computer. What do you do when your new software doesn’t work? You revert back to the old one.”
“I always tell people, ‘If you want your amp to sound like a different amp, you should probably just get a different amp.’ Because each amp is designed to do its own thing.”—Colleen Fazio
Some Black-Panel Mods
Whatever you’re doing, whether it’s servicing or making changes to the circuit, Alessandro stresses using the correct components. “People go in there and replace all the parts,” he says, “because this resistor is supposed to be 100k, and it’s reading 112. But it’s not that it’s reading 112 that’s the problem. It’s when they replace it with a 100k resistor and it’s not the right type.”
To get the most from your amp, Mosbergvik says “there are only a few solid things you should do that will really improve the amp in terms of tone.” While different models and years will have their own idiosyncrasies—including the push-pull boosts, master volumes, and larger transformers found in models from the latter part of the decade—here are a few things you or your tech might consider.
Speakers
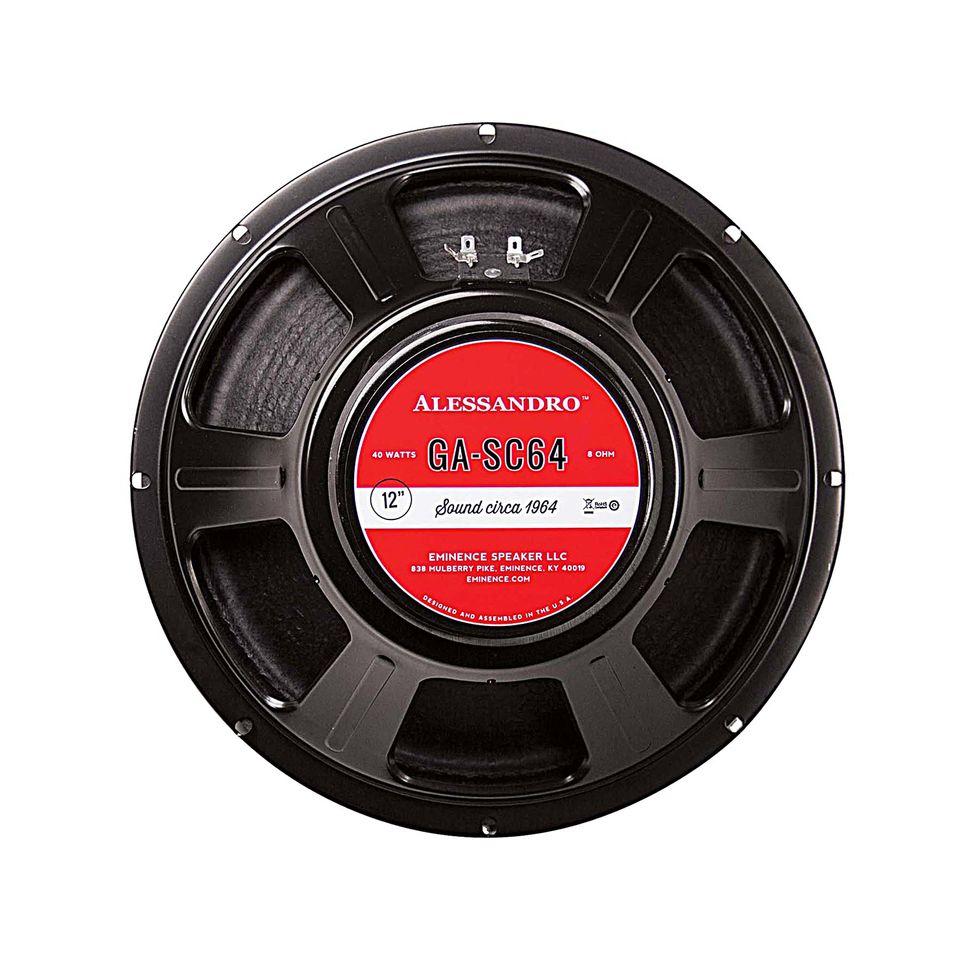
Mosbergvik’s favorites for amps with 10" speakers are Weber 10A100s ($114 street), which he says are “pretty close to the Jensen P10R or CTS alnicos in 1964 black-panel Super Reverbs,” or Weber 10A125s ($119 street) “for a tad more punch and bigger/cleaner bottom end.” For ceramic speakers, he likes Weber’s 10F125s ($108), which he says are “like the CTS ceramics in some ’65 Super Reverbs.”
For amps loaded with 12s, George Alessandro specially designed the GA-SC64 ($144 street) with Eminence to capture the black-panel-era sound.
Bias Circuits
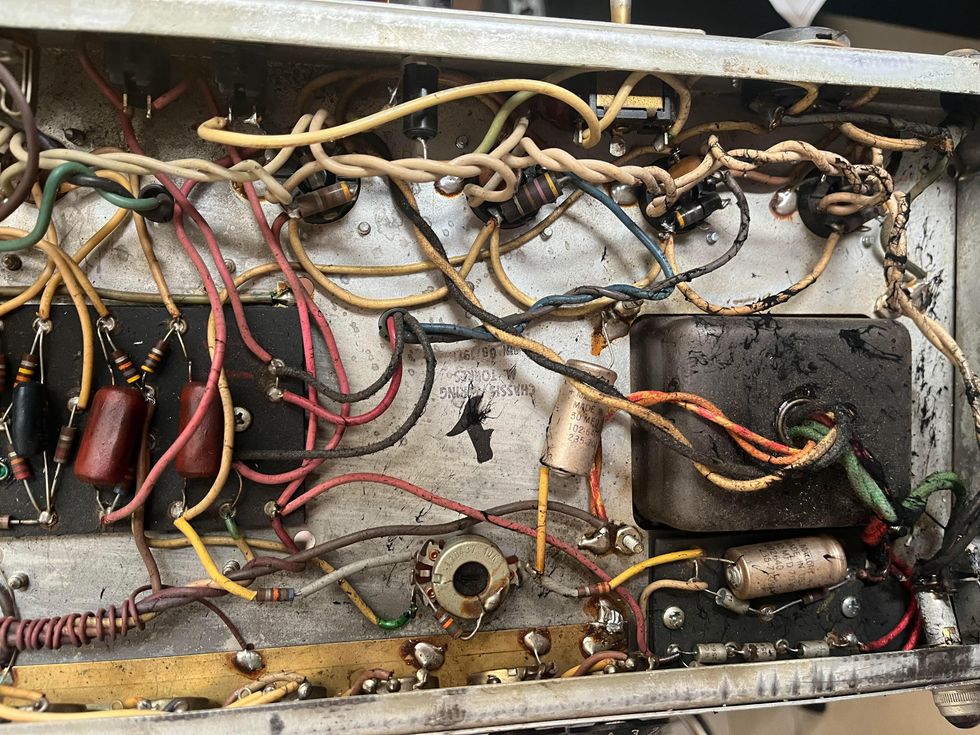
The gory guts of a pre-overhaul silver-panel Twin Reverb.
Photo by Colleen Fazio
By the ’70s, Fender switched all their fixed bias amps from a standard bias control, which allows users to raise or lower the bias on the power tubes but requires a matched pair, to a balance-style control, which accommodates non-matched power-tube pairs yet might not give those tubes the power they need. This creates bigger problems than simply purchasing a matched pair of power tubes and can have a negative effect on an amp’s tone.
“You can re-wire the control to be like the ’60s control, so you’re adjusting the bias,” says Fazio. “It’s a pretty simple re-wire. I would probably include that with a service. You’re not replacing any parts, you’re just re-wiring the configuration.”
Baffle Boards
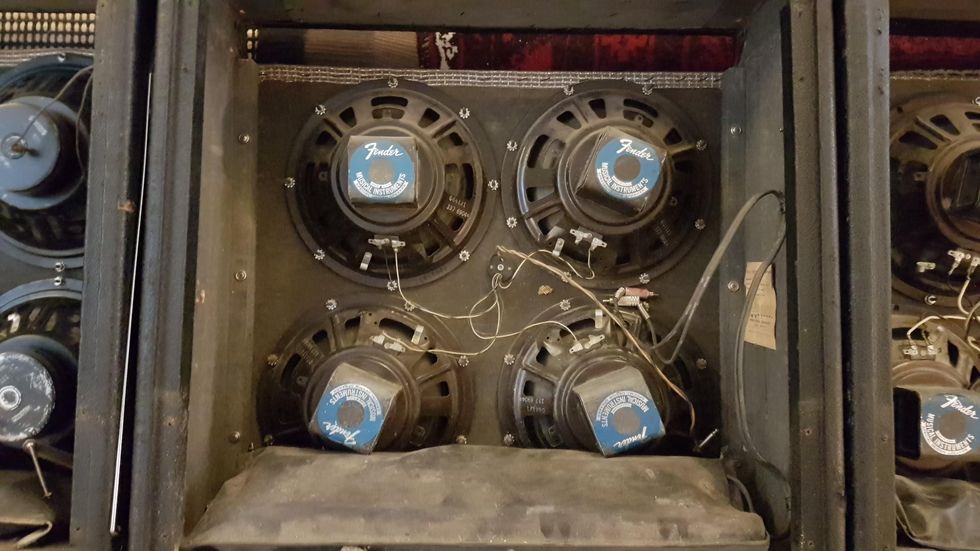
Look at the sides to spot the differences. This Super Reverb has a screwed-in style baffle board.
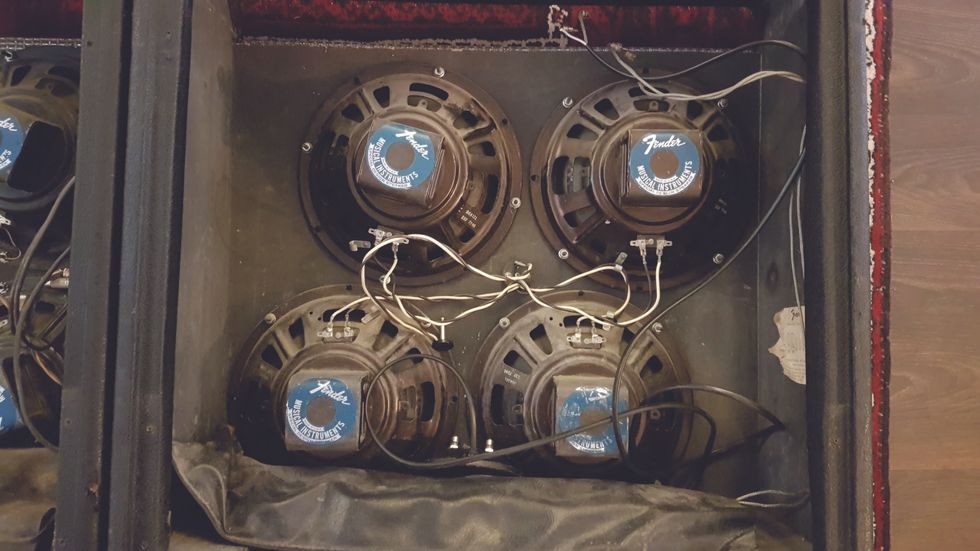
This Super Reverb offers an example of a glued-in baffle board for speaker mounting.
“Try and make it the best it is supposed to be.”—George Alessandro
Early in the ’70s, Fender switched from using a screwed-in baffle to a glued-in baffle, so removing them can be tricky on the latter models. Mosbergvik says the glued-in design sounds “unbalanced” to his ears and points out that it is possible to switch back to the early screwed-in style if you’re already removing the baffle. “You’ll need to work to get it screwed in,” he explains. This includes adding supports to screw the baffle into. “It’s a lot of dirty work.”
If the baffle needs to be replaced, you’ll have to decide between a plywood baffle, a popular choice for many players who believe it changes the tone for the better, or stick with the original particle-board style, which is consistent with both silver- and black-panel models.
Phase Inverter Changes
All that is easy enough for us non-techs to wrap our heads around. But Fazio points out there are some finer differences to be found by looking at schematics.
The coupling capacitor is in the part of the circuit that connects the preamp signal to the output section. “A bigger value in the silver-panel amps increased the bass response. If you want tighter bass like the ’60s amps, you lower the value of that capacitor back to the ’60s specs, which is .001 µF, and a lot of the silver amps are .01. There are some exceptions, but those are common values to find.”
She also points out that the values of the plate resistors on the phase-inverter tube were lowered in the silver-panel amps to reduce gain, and those can be changed to original spec.
Good, Clean Work
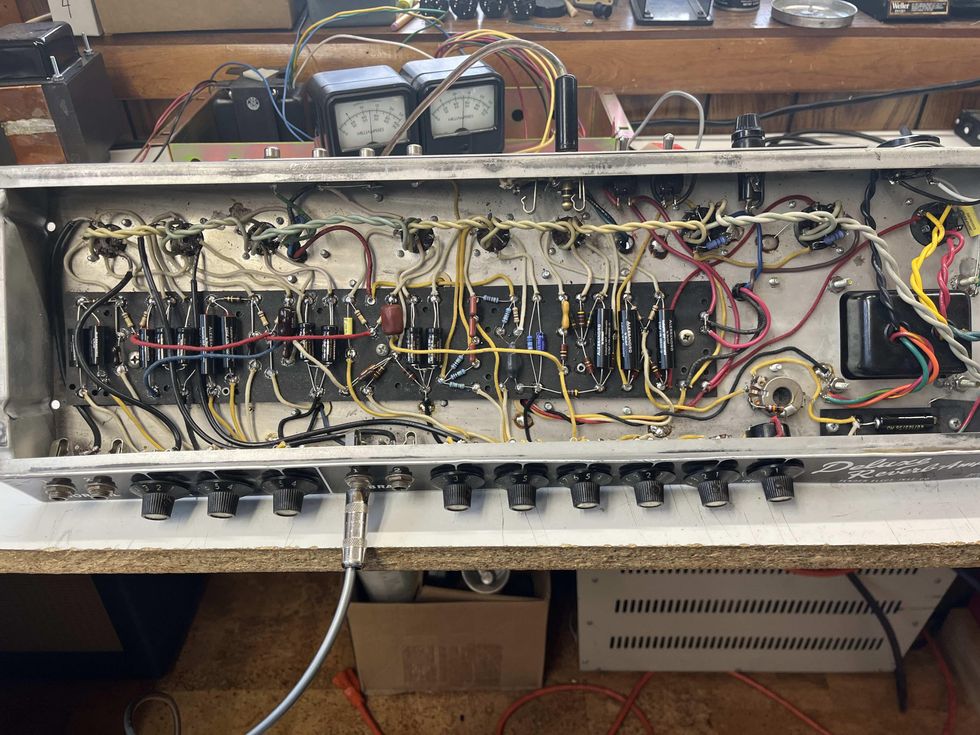
This modern Deluxe Reverb has been hand re-wired to black-panel specs by George Alessandro, offering a great example of a clean, tidy circuit.
Photo courtesy of George Alessandro
It’s always good to remember that any change you make to your amp will affect the way it sounds and feels. If you have an amp you already like, you should especially keep that in mind and don’t feel any pressure to make changes that aren’t necessary. “If it has been modified and you like how it sounds, that’s cool. Silver-panel amps sound really good as they are, and I’ve heard really good modified ones, too,” says Fazio.
If you’re looking to purchase an amp that has been modified, it can be helpful to take a look at the circuit, when possible, even if you’re not a tech. Mosbergvik suggests inspecting to see “if it’s done tidy and properly, with twisted wires, and if the soldering work is done properly—the wires are cut to correct length, they are soldered with enough lead, etcetera.” This will at least help you decide the quality of work that has gone into the amp over the course of its decades of servicing.
One of the great things about these vintage specimens is that they’re easy enough to work on and it’s not hard to source parts. “Fender amps are so nice and so well designed,” says Fazio, “it’s pretty easy to bring them back to stock if you want to.” So, there’s a good chance you’ll be able to keep your amp in good working order for many years to come. And with some of these tips, you’ll be able to have it sounding better than ever.
1971 Fender Twin Reverb | Vintage Amp Repair | The Electric Lady
Watch as Colleen Fazio overhauls a 1971 Twin Reverb.




![Rig Rundown: AFI [2025]](https://www.premierguitar.com/media-library/youtube.jpg?id=62064741&width=1245&height=700&quality=70&coordinates=0%2C0%2C0%2C0)
