Recently a client brought in a 1995 Fender Strat and asked me to replace its two humbucking pickups (Photo 1). The original pickups had been upgraded years ago with a set of Seymour Duncans—a JB in the bridge position and a Jazz in the neck slot. These are excellent pickups and typically sound great in most guitars, but my client said they were too dark for the type of music he plays.
It was tempting to sell him a new set of pickups, but instead I recommended we rewire the pickups in parallel (more on this in a moment) to see if that would provide the brighter tone he was looking for. Because both pickups have a 4-conductor harness, I knew we could pull this off using the existing 3-way blade switch and without adding any extra switches to this guitar—an important consideration for the owner.
Each guitar has its own resonant frequency. Some guitars are bright, some are darker, and some are just flat-out midrange heavy. In large part this has to do with the density of the wood and the quality of the hardware, which helps explain why certain makes and models of pickups can sound fabulous in one guitar, but not so good in another. If your humbuckers sound too dark, rewiring them could be the perfect solution. It’s certainly worth trying before you replace them.
Some background. The two coils in a humbucker are typically wired in series. This produces the highest output, but also the darkest tone. If a humbucker has a 4-conductor harness, its coils can easily be wired in parallel. In this configuration, you lose about 20 percent of your volume, but the tone is brighter and cleaner.
When a humbucker’s coils are connected in series, the signal path of the first coil flows through the second coil and then on to the pickup selector switch, volume pot, and output jack. When wired in parallel, the two coils still operate together, but the signal path doesn’t travel from one coil into the other.
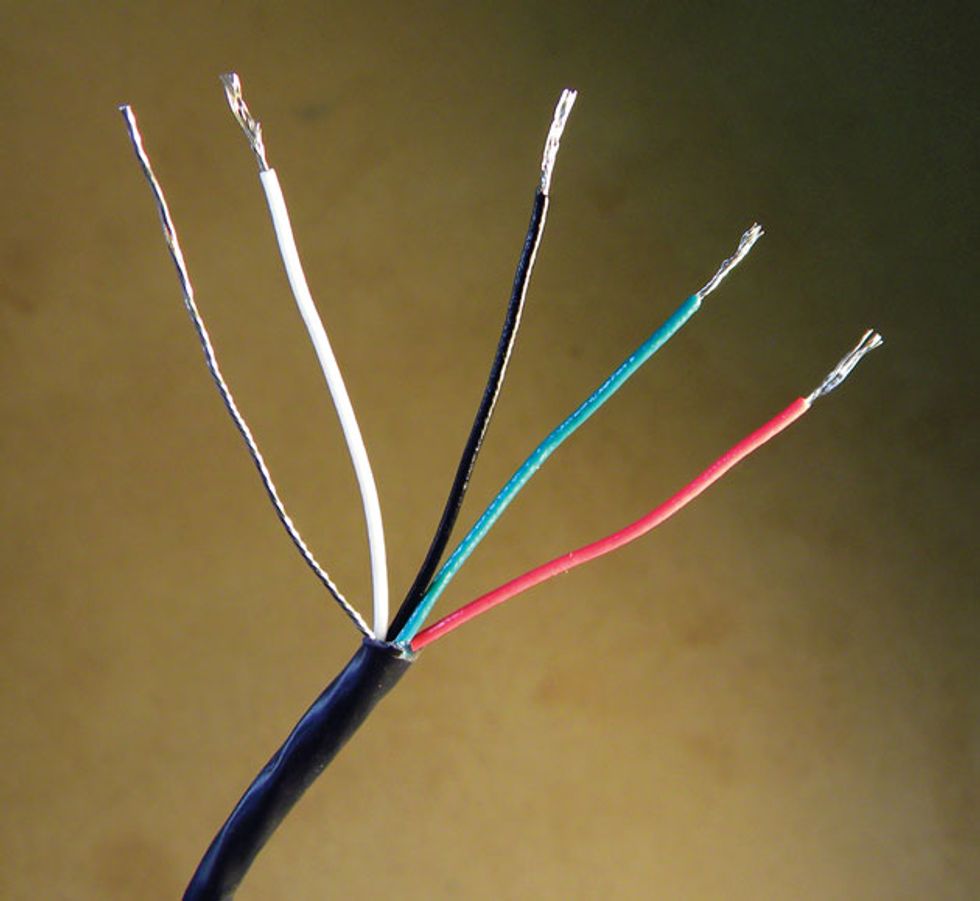
Photo 2
Planning the procedure. Stock Seymour Duncan JB and Jazz humbuckers are wired in series. Before we can modify the 4-conductor harness to wire the coils in parallel, we need to understand the Duncan color codes (Photo 2). Except for the bare ground wire, each colored wire is either the “start” or “finish” of a coil. How these wires are connected determines whether the pickup is wired in series or parallel. Here’s the breakdown:
• Black is the start of coil 1.
• White is the finish of coil 1.
• Green is the start of coil 2.
• Red is the finish of coil 2.
• Bare wire is always the ground.
Note: This applies only to Duncan pickups—other manufacturers use different color-coding schemes. See “Obey Your Color Codes” for more details.
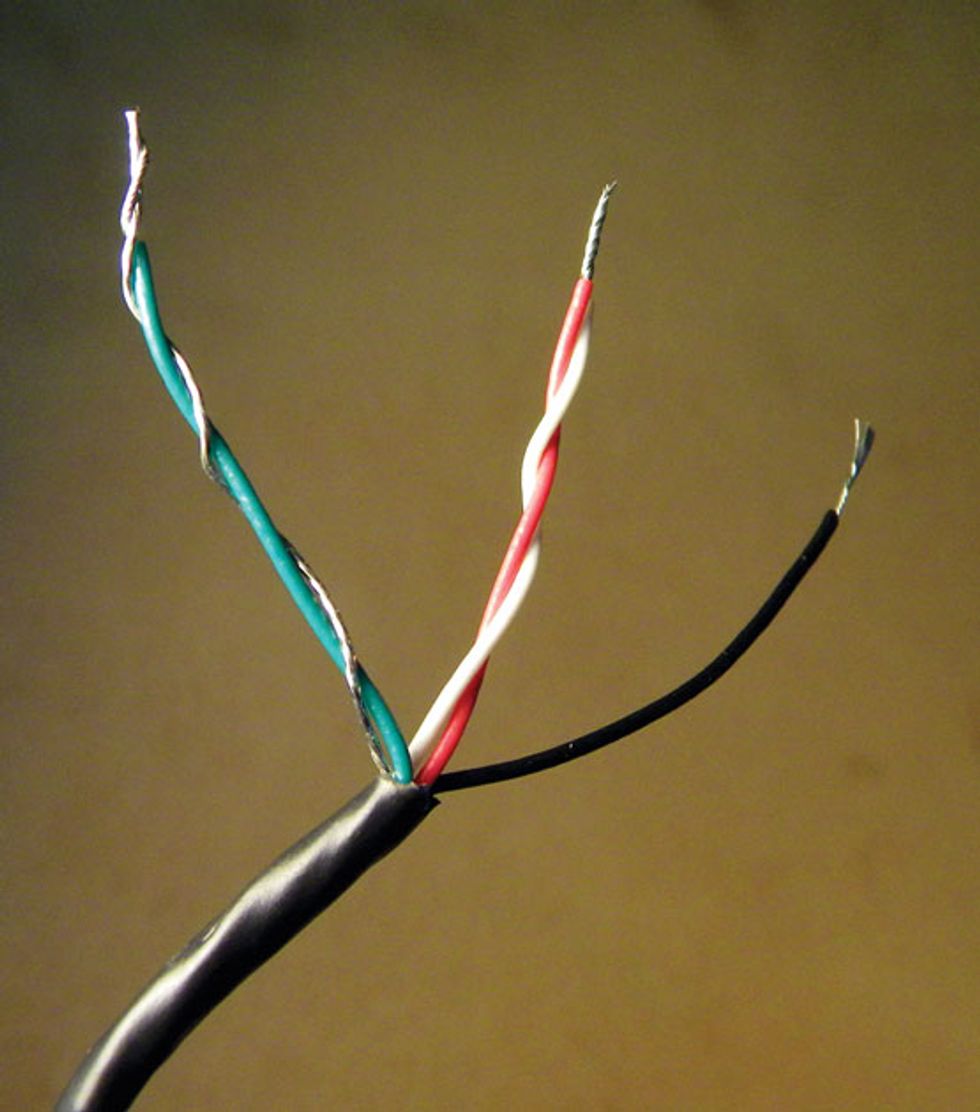
Photo 3
Photo 3 shows these five wires connected in a series configuration. We have the black wire acting as the hot or primary lead, and the red and white wires are soldered together to create the series link (that is, they connect the two coils).
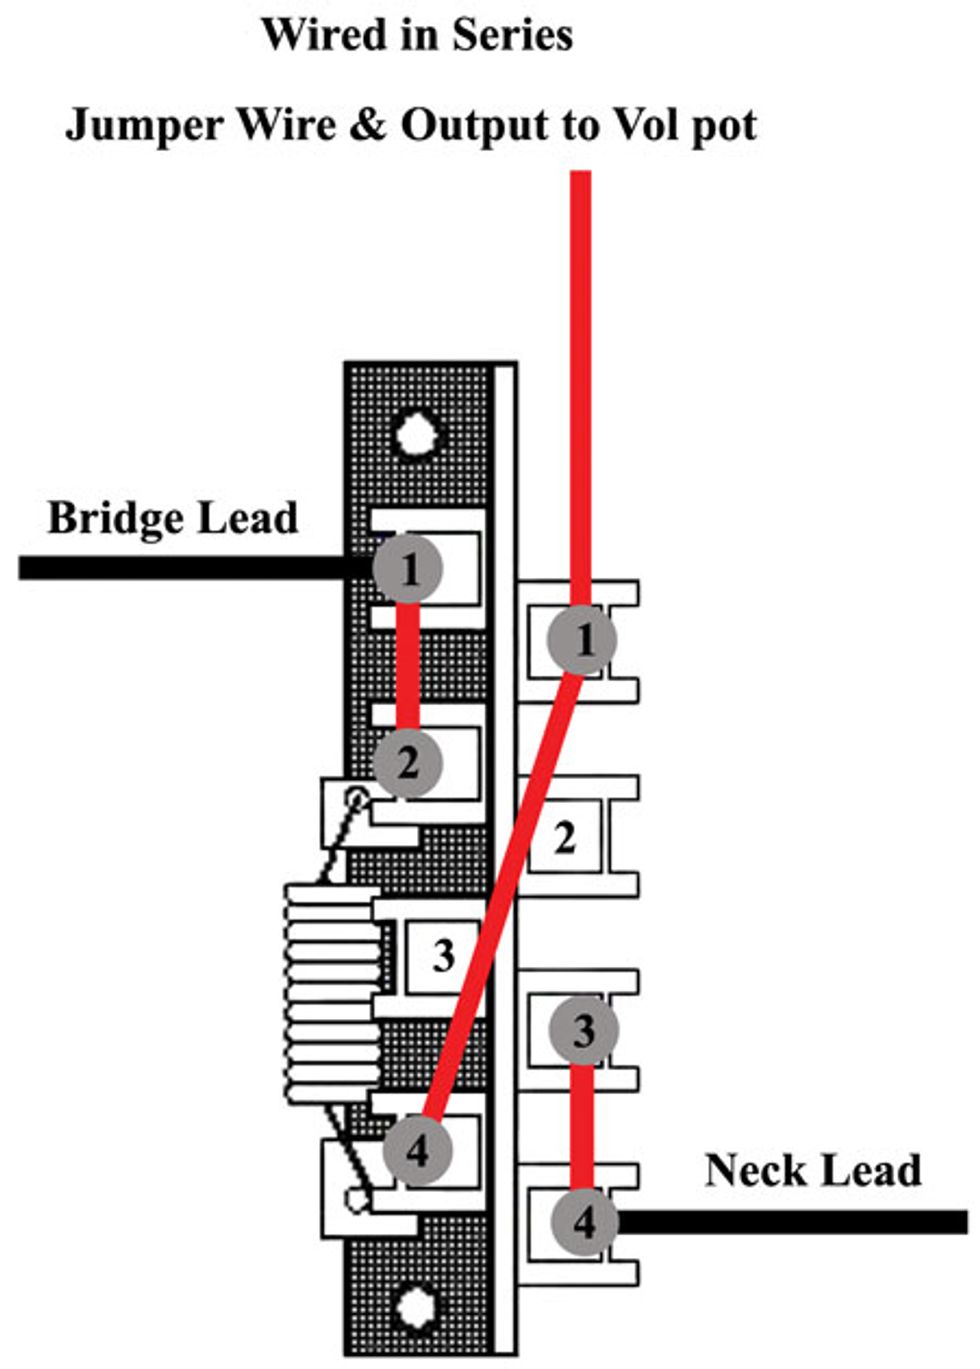
Fig 1
The green wire is connected to the bare wire and then soldered to the back of a pot to create a ground. Figure 1 shows how the hot wires connect to the 3-way blade switch for series wiring, and how the switch itself is configured.
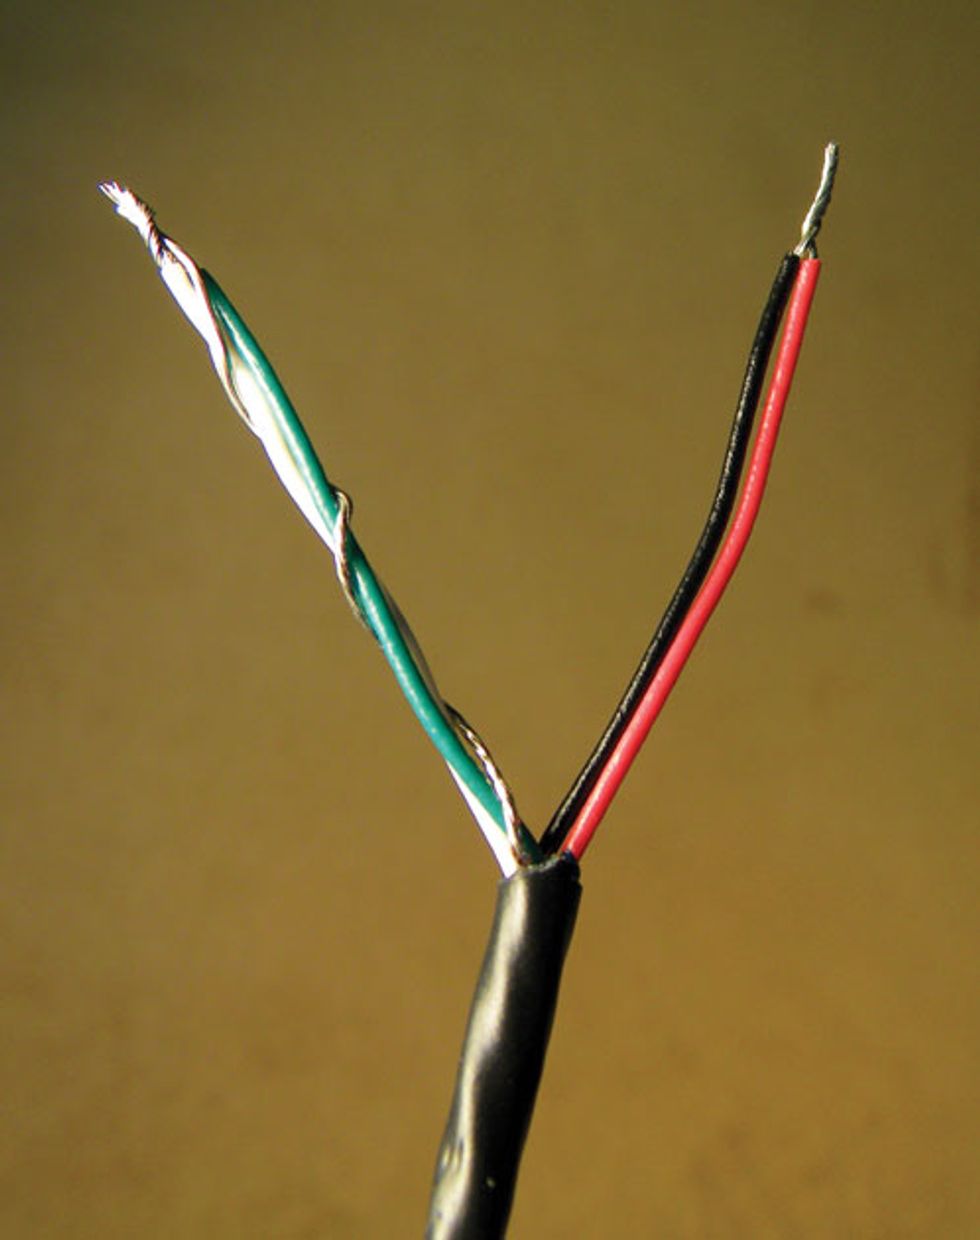
Photo 4
Photo 4 illustrates how to connect the wires of a 4-conductor Duncan humbucker in a parallel configuration. As you can see, black and red are joined—they become the hot or primary lead. White and green are connected to the bare wire to become the ground, and all three are soldered to the back of a pot. The parallel wiring diagram for the 3-way switch is show in Figure 2.
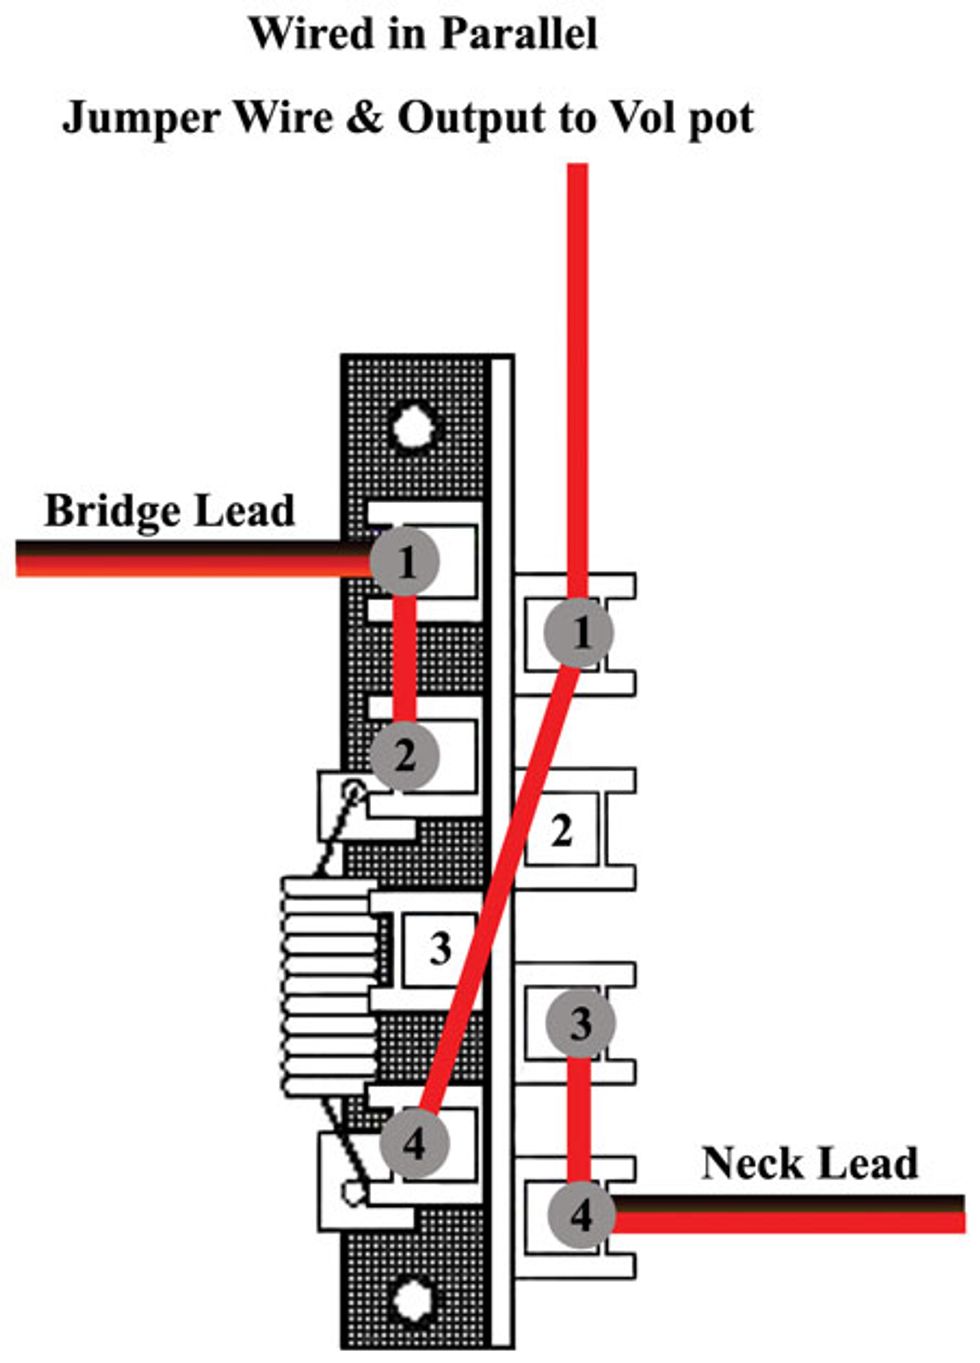
Fig 2
By wiring the humbucker in parallel, we have connected the start of coil 1 to the finish of coil 2. For the ground, we have connected the finish of coil 1 to the start of coil 2 and both are joined to the bare wire.
Doing the deed. After removing the strings and pickguard, unsolder the pickup wires from the switch and pots, being careful not to overheat them. Separate the wires from each other with your soldering iron. Next, twist and solder the black and red wires together. Do the same for the green and white wires, and join them to the bare wire. Now solder the black and red to the input lug on the 3-way switch, and the green, white, and bare wires to the back of one of the pots.
That should do it. Put the pickguard back on, restring, and test out your new tones.
Obey Your Color Codes
Different pickup manufacturers use different color codes for their 4-conductor humbuckers, so before you start brandishing that hot soldering iron, make sure you’ve got the right color codes and have figured out how to connect the wires. Here are a few parallel wiring combinations for several other popular pickup manufacturers.- DiMarzio: Red and white are hot, black and green are ground.
- Gibson: Black and white are hot, green and red are ground.
- Jackson: Green and red are hot, white and black are ground.