
Modern stomps offer more sounds than ever before, but a laptop can help you delve into an even deeper world of live sonic manipulation. Here’s what you need to know to get started.
The beauty of a great guitar plugged straight into a great tube amp is undeniable. Still, some might say the full potential of an electric guitar is realized only when processing that signal. Of course, some of the most groundbreaking players of all time—from Jimi Hendrix to The Edge—have illustrated this point, and the current deluge of new pedals and thriving builders seems to bear this out.
If you are into processing, pedals might be plenty for you, especially in this era of stompboxes that do things even top studio gear couldn’t manage a decade ago. Still, there is a portal to another world of sound available for live use—a world explored by guitarists like Adrian Belew, John McLaughlin, Eivind Aarset, Fennesz, Dan Phelps, the late Andy Gill, and others. It’s a portal you may be looking at as you read this. I am talking about a laptop computer.
I was introduced to the concept of guitar and laptop performance through the series of Warper parties— gatherings dedicated to computer-based music—I attended in New York City. At the very first one, I encountered a guitarist with a computer built into his guitar and another playing jazz fusion through his laptop to backing tracks, also on computer. Yet a third player was performing arrangements of TV themes, playing guitar with one hand and keyboards with the other—all through a laptop.
Plug-ins offer sonic shaping and effect routing that is difficult or impossible to achieve with pedals. Even if you could, it would require a pedalboard the size of the entire stage and a router/switching system of NASA-level complexity.
For me, performing solo with a laptop let me privilege the kind of sonic fairy dust I had been offering as a side musician, shifting the lush pads and textures I had delivered to singer/songwriters for years out from the background and into the focus of attention. Plus, as someone who does not sing or play typical solo guitar, playing through a laptop let me take control of my performance opportunities: no pesky bandmate schedules to consider for rehearsal or booking.
Many guitarists already use a laptop to record everything from demos to final releases. These days, all it takes is a guitar, an audio interface, a DAW (Digital Audio Workstation), and a pair of speakers or even good headphones, and you are ready to make your next masterpiece. If you have worked this way, you have likely discovered plug-ins. Instantiated in a DAW, plug-ins offer sonic shaping and effect routing that is difficult or impossible to achieve with pedals. Even if you could, it would require a pedalboard the size of the entire stage and a router/switching system of NASA-level complexity. Multi-effects units might get you part of the way there but as yet cannot offer the range of potential sounds available with a computer.
With a wealth of creative software, a laptop lets you easily take lush reverbs and mangle them with filters or distortion. You can sequence effects to automatically appear and disappear over the course of a song or composition. If that sounds interesting, you might want to consider transporting your laptop, DAW, and plug-ins to the stage, either as your sole processing system or in conjunction with pedals. Here’s what you’ll need to get started.
Hardware
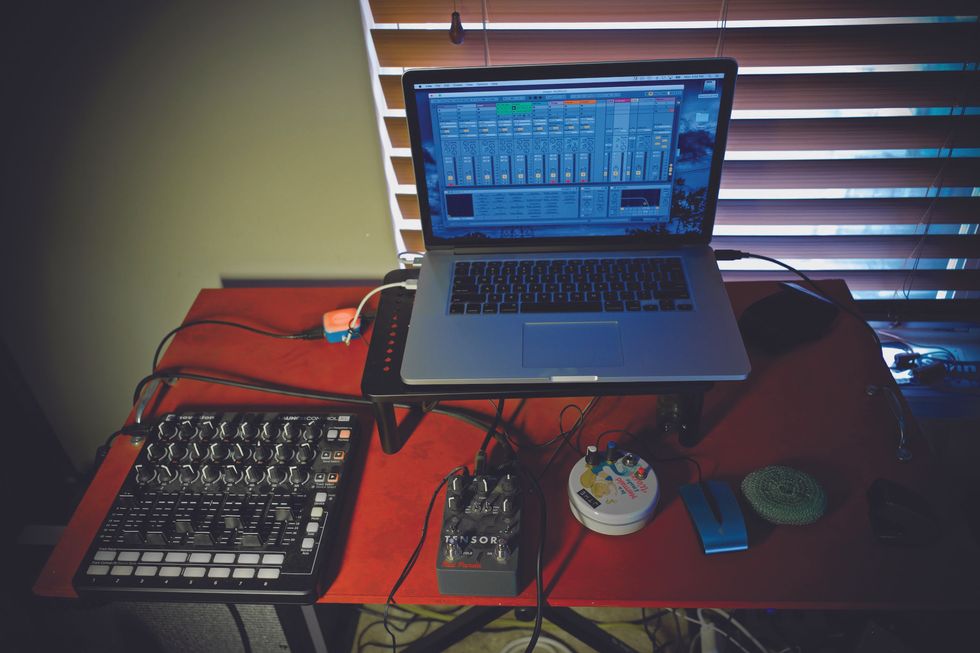
A MIDI controller, like the Novation Launch Control ($159 street) seen here, isn’t necessary to use Ableton Live, but using one increases interactive functionality.
Because live performance has different requirements than recording, ultra-high audio specs are not quite as important, but portability, reliability, build quality, and low latency are crucial. Latency is the time it takes for your signal to go into the audio interface, pass through the software on the laptop, go back into the interface, and travel out to the speakers, as measured in milliseconds. You will want the latency low enough that you don’t hear the sound reaching your ears noticeably after you hear/feel your pick hit the strings. Ideally, you will want the most powerful laptop you can afford in order to have access to the fastest processor possible. Plenty of RAM and a solid-state drive will contribute to the computer’s speed.
There are factors that affect latency. One is buffer size, delineated in samples. Without getting too technical, the lower you can set the buffer in your DAW, the less latency you will hear. How low you can set it, without getting dropouts and other unwanted glitches, is determined by the number of plug-ins you are running and the power of your computer. With virtually any of the current Apple M1 powered laptops you should be good to go. If you can’t afford a new computer, don’t worry. I was performing with a MacBook Pro over a decade ago with no problems. You can attempt this with a non-Apple computer, but virtually every major touring act uses Macs thanks to their reputation for reliability.
Here I have the buffer size set to 128, where I find I can record tracks without latency issues. With modern computer power and minimal plug-ins, you can probably set this even lower.
To plug your guitar into your computer, you will need an interface, which converts your signal from analog to digital. There are many available options, including the Universal Audio Arrow (available used for $350-$399) or Focusrite Scarlett ($179 street). You only need one input, unless you use both electric and acoustic guitars, which have different input requirements. The number of outputs will depend on your signal chain.
A MIDI controller of some sort—foot switcher, tabletop controller, or both—is a good idea because, as with pedals, you will want to turn effects on and off and have access to parameters. Akai, Korg, and others make a variety of tabletop controllers, ranging from $119 street and up, with knobs and switches that will let you turn on, blend, and manipulate the parameters of the plug-ins in your DAW.
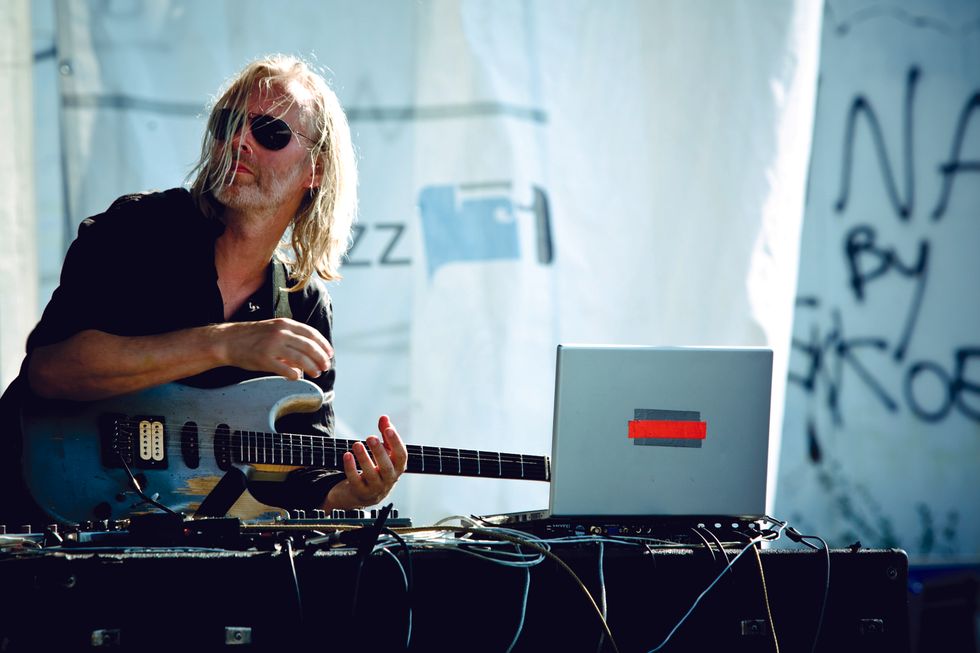
Eivind Aarset is among the group of creative guitarists who bring a laptop into the mix for all gigs.
Photo by soukizy.com
You might be thinking, “Aren’t my hands otherwise occupied playing my guitar?” That’s true, but one of the advantages of laptop guitar is advanced looping. Once a loop is created, a tabletop controller lets you easily route that loop through myriad effects—filters, resonators, delays, reverbs—in ways that are impossible with hardware loopers. A footswitch-style MIDI controller is helpful if you want to do sync’d rhythmic loops, though it’s not as necessary for ambient looping.
Software
To process your guitar in the computer, you can use any software that hosts plug-ins: Logic, Pro Tools, GarageBand, Logic MainStage, and others. As a performing tool, Ableton Live (starting at $99 street for an introductory version) is the most ideal and offers a number of unique features. With Ableton, you can tap in tempo, easily syncing all your effects and loops at once, and there are “nudge” buttons that let you move the tempo of loops slightly up or down to match a drummer’s shifting time without changing their pitch. The “link” feature lets you wirelessly sync your effects with your keyboard player’s laptop, your drummer’s loops, and even the computer running the show’s backing tracks and light show.
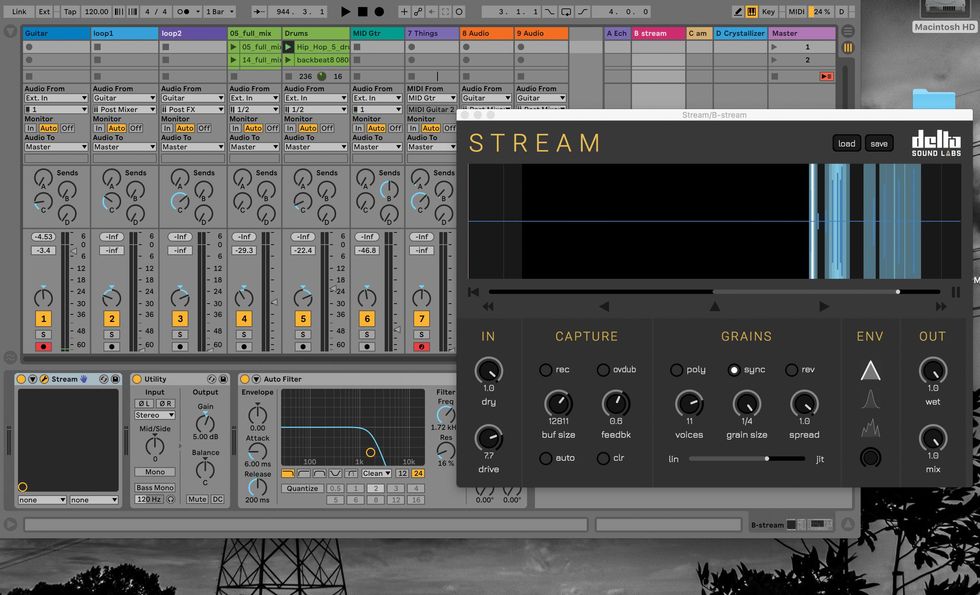
This is my performance setup in Ableton Live. It includes the Jam Origin MIDI Guitar plug-in ($149 street) that lets me control spoken-word recordings in a sampler without any kind of MIDI pickup on my guitar. Also shown is a great granular processing plugin, Stream, from Delta Sound Labs ($49 street).
Live’s native plug-ins will let you create a custom amp-modeling system; emulate digital, analog, and tape delays; and add stutter, granular, or bit-crushing effects. Plus, if you are performing solo using backing tracks and running through a PA, you can easily set a dedicated track to resampling and it will record your entire evening’s performance.
Live lets you loop in two different ways via the looper plug-in and “clip” system. The looper plug-in is great for overdubbing ambient soundscapes, but can also provide timed rhythmic parts, while the clip system is perfect for making multiple rhythmic-based loops that can then be triggered by a MIDI footswitch and/or tabletop controller. While you can’t overdub on a clip, you can set up multiple clip loop tracks where you are able to, for example, record all your verse parts in one row, your chorus parts in a second row just below, and create a third row for the bridge. You can then trigger these rows as scenes.
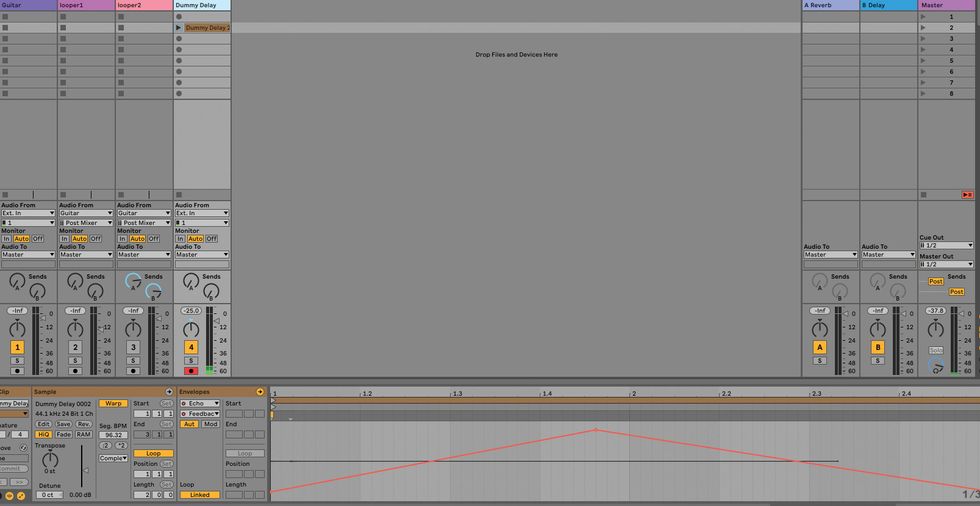
Here is a dummy clip set to raise and lower the feedback of the Ableton echo plug-in.
Live also lets you make “dummy” clips with no audio that can be set to modify effects parameters over time. For example, you could set a dummy clip to increase a delay plug-in’s feedback to just under runaway levels while simultaneously shortening the delay over a period of two bars, and then reverse the process over the next two bars. Try that with pedals!
Would you like to hear two great examples of guitarists using Ableton Live onstage? Check out any video with Eivind Aarset performing. Aarset uses it for a variety of sounds, including ambient reverbs and delays and looping. John Scofield collaborator Avi Bortnick also uses Live for myriad sounds and textures, one of which includes using his guitar to open a noise gate that lets rap vocals cut through only when he plays.
Signal Path
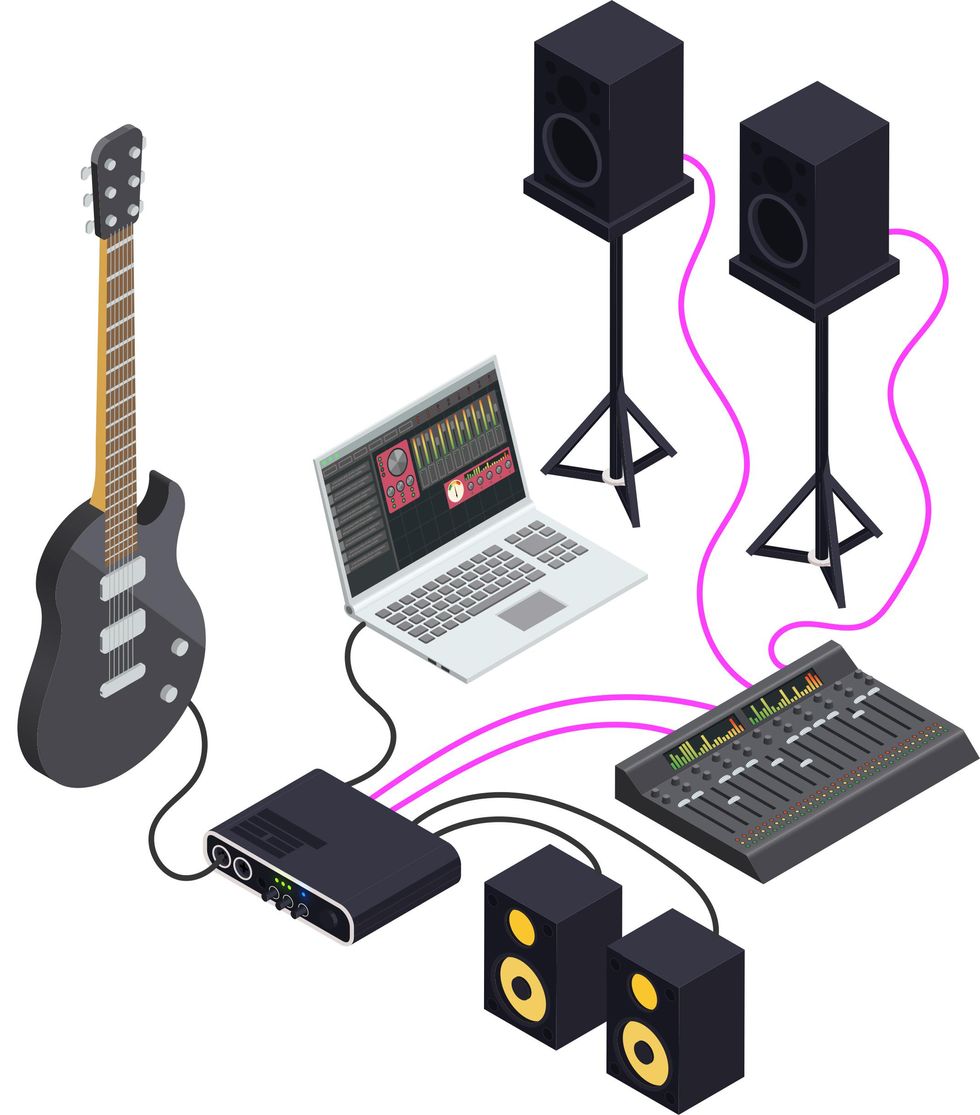
Fig. 1 (*Magenta cables indicate additional or alternative signal path.)
There are multiple ways to insert a laptop into your signal chain. You can run everything through your computer, employing amp modeling software—like Bias FX 2 ($49 street), Guitar Rig ($199 street), or AmpliTube ($99 street)—and running the signal from your audio interface to the house PA or a pair of powered monitors (Fig. 1).
Fig. 2
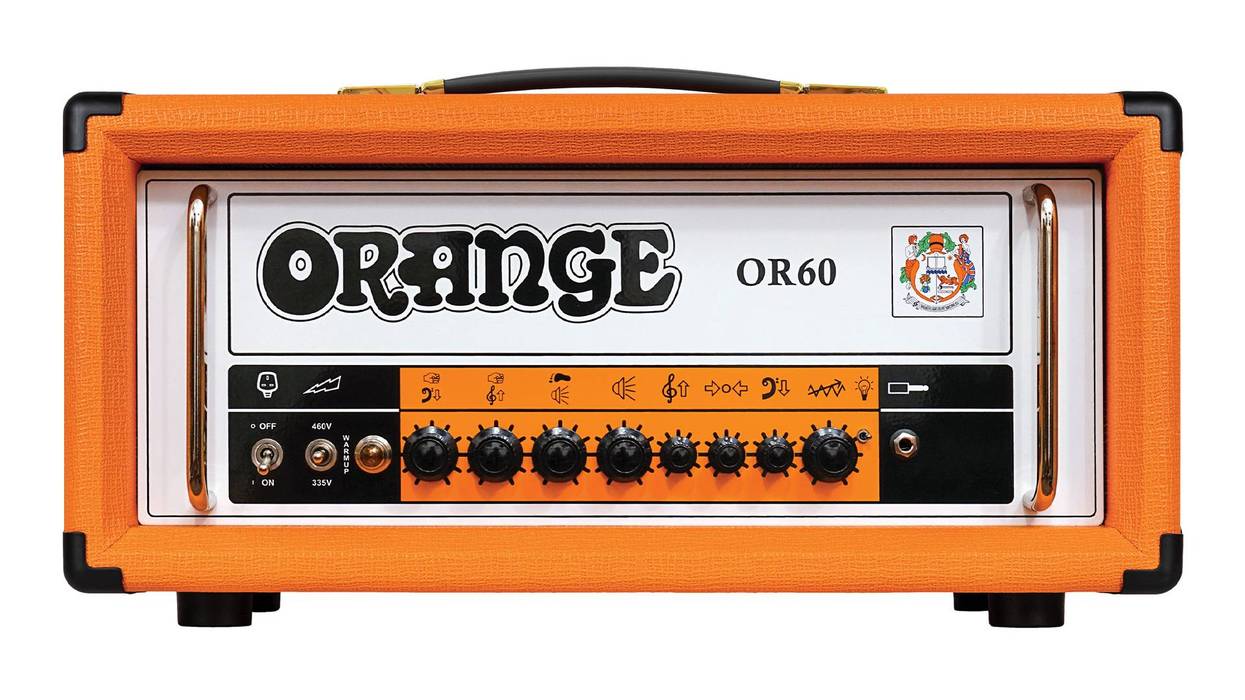
You might instead eschew the amp modeling software and run the signal into a pair of guitar amplifiers (Fig. 2). This offers a way to keep your favorite tube amps as part of your rig. But be careful: Some effects plug-ins can put out low frequencies that don’t work well with guitar amps and speakers.
For both of those methods, all you need is an interface with one input and two outputs. You run your guitar signal into the interface, which converts your analog signal to digital, and then sends that digital info through USB, Lightning, or Thunderbolt cables into the laptop and the software. Next, a stereo digital signal is sent back to the interface, where it is converted to stereo analog and sent out to the amps, powered speakers, or PA using standard guitar cables or XLR-style microphone cables.
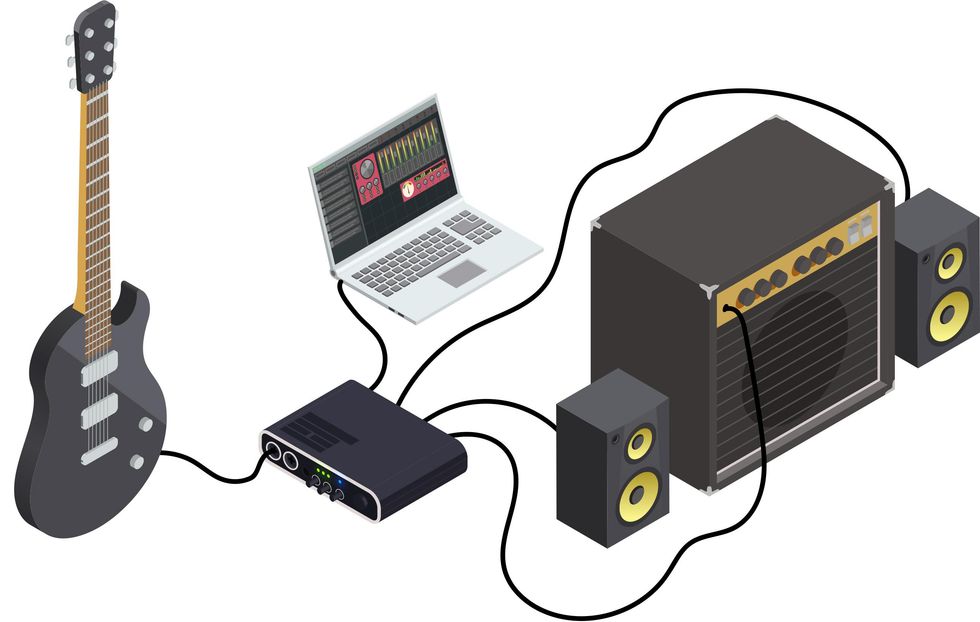
Fig. 3
A more complicated method is a version of the wet-dry-wet setup. Here you would split your guitar signal between a mono signal going directly into a guitar amplifier and the laptop’s stereo output to two full-range powered speakers or the PA. This setup can be achieved in a few ways. You can use an interface with one input and three or more outputs that can be routed inside the interface. This allows you to send your guitar signal from the interface simultaneously to the laptop and directly to a guitar amplifier (Fig. 3).
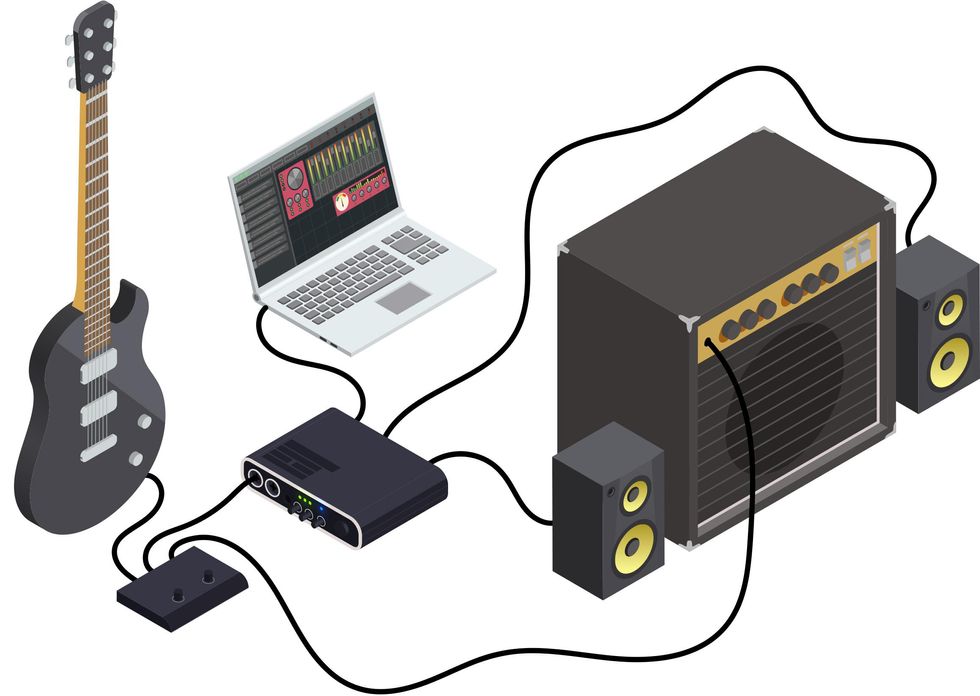
Fig. 4
Alternately, you could use a splitter box before the audio interface that sends one signal to your interface and computer, and one to the amp (Fig. 4).
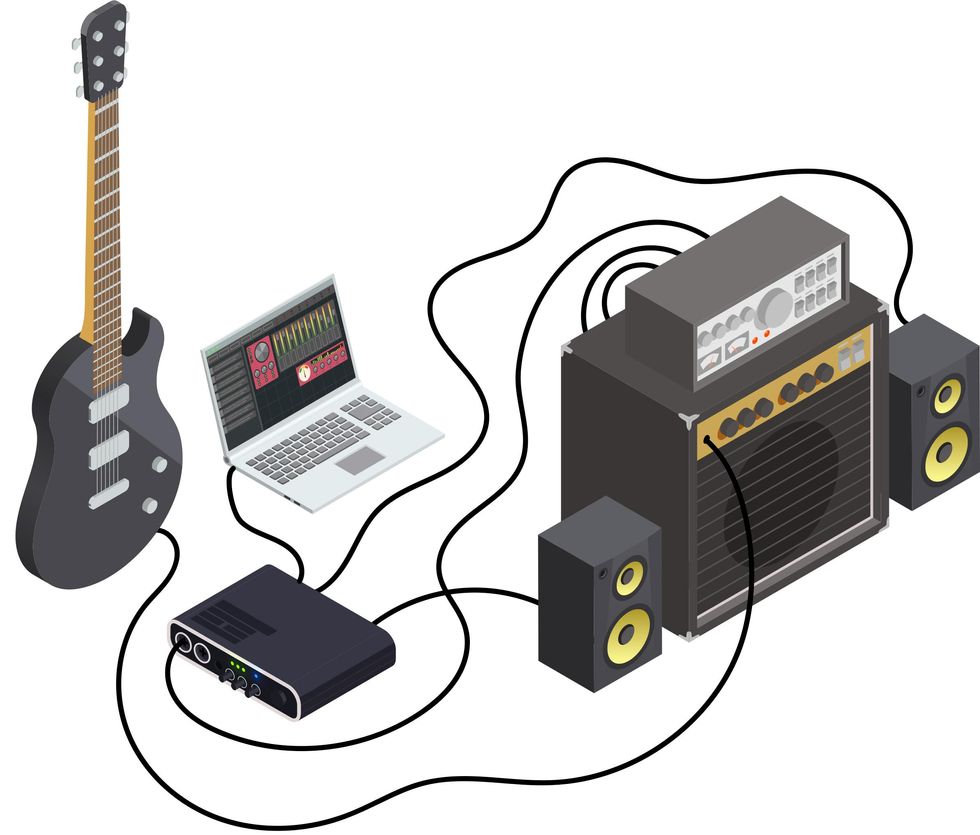
Fig. 5
If you don’t want to use modeling software in the computer for the wet signal, you can use a reactive load box, like the Universal Audio OX ($1,499 street) or Fryette’s Power Station ($899 street) or Power Load ($699 street), which gets placed between your amplifier and its speaker (Fig. 5). You run your guitar into the amp, and two outputs on the load box simultaneously send your amp signal to the speaker and, with speaker emulation, to the computer interface. Sending the sound of your amplifier to the DAW means there is no need for amp modeling within the computer. Once the sound is processed, it is sent to powered speakers or the PA, as in Fig. 2. In this method, your amplifier signal can remain dry and present, while processed sounds will emanate from the powered speakers or PA.
If you don’t want your amplifier signal completely dry or just want to place some of your effects pre-computer, you may want to use pedals in front of your amp. Which brings us to.…
Pedals and Laptop
As much as a computer can do, there are plenty of good reasons to combine pedals with laptop sounds. Digital modeling software sounds excellent these days, but adding a mild overdrive pedal before your interface can lend some analog warmth to the sound. In addition, a drive pedal set for just a little breakup can make the playing experience feel more organic. As you play harder and softer, the “give” of the pedal can often feel more expressive than even the best amp modeling software.
Plus, just as many plug-ins are not yet duplicated in pedal form, likewise there are pedals that perform functions not available as plug-ins. Glitchy, digital micro-looping pedals like the Red Panda Tensor, Hologram Electronics Dream Sequence, Chase Bliss’ Blooper and Mood, and the Hexe FX Revolver do not yet have any direct analogs in the plug-in world. If you want to learn a programming language like Max MSP, you might be able create something like these pedals inside your computer. Ableton includes Max for Live with the purchase of their suite and a plethora of pre-programmed plug-ins are available using Max as their basis, but these pedals still offer something special.
Taking the Stage
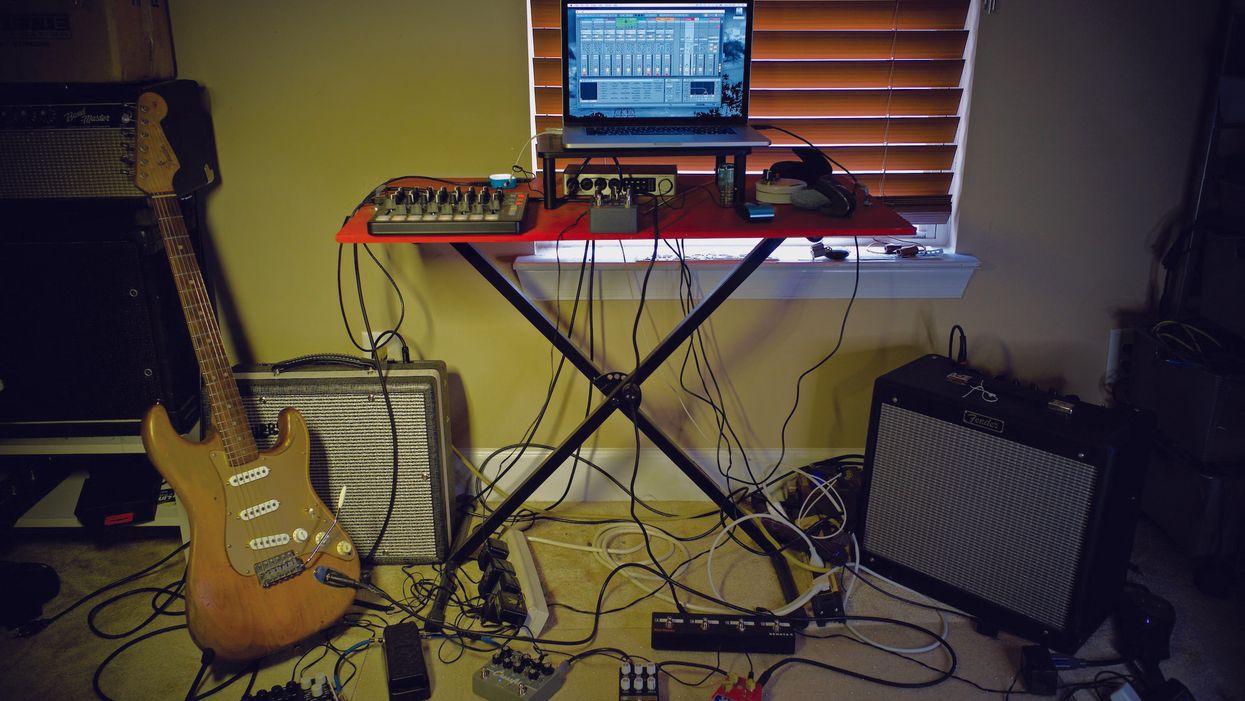
You now have all your hardware and software and are ready to perform. Depending on how you use the laptop in your signal chain, you might be able to place it out of the way and use a foot switcher, as if you were using a standard multi-effects unit. But if you want to maximize the advantages of using a computer live, you will likely want it at hand.
In almost two decades of performing with this setup, I have had fewer computer crashes than pedal malfunctions.
You can normally rely on the venue to provide a table of some sort, or you could try Eivind Aarset’s solution. He brings a keyboard stand and places his guitar’s hard case on it, creating a perfect platform for controller, computer, interface, and some of his hardware pedals. I haven’t used a hard case in years, so I just screwed some handles onto a painted piece of plywood and place that on a keyboard stand.
As with any performance, hearing yourself is crucial. If you are using guitar amps or powered speakers, they will act as monitors. Some powered speakers may have XLR outs to send to the house PA. If you are only running through the PA, you may want to use headphones plugged into your interface to be assured of hearing the same thing as the audience.
Some guitarists have trepidation about reliability when using a laptop. All I can say is that in almost two decades of performing with this setup I have had fewer computer crashes than pedal malfunctions. It is also easier to bring a backup laptop and interface than a second pedalboard and amp.
A laptop dedicated to only music is ideal, but if you don’t have that luxury, make sure to quit any programs other than the performing software in use. Turning off WiFi during your set will prevent notifications from interrupting and provide a little extra processing power. And speaking of power, while it is best to keep your laptop plugged in while performing, if there is ever an issue with clean power or a faulty socket, unlike with pedals, your laptop battery will take over and the show will go on.
Is It for You?
Playing through a laptop is not for everyone. You probably won’t be welcome at your local blues jam if you say, “Hang on a minute while I boot up my Mac.” But if your music involves a world of sounds that go well beyond those offered by hardware pedals and multi-effects, or you’re just seeking a more portable way of producing interesting tones, taking the stage with a computer might be an option. And, with tubes becoming harder to get, who knows? Someday it may be the best option.
- Which IR Box Is 4U? - Premier Guitar ›
- 10 Recording Mistakes Guitarists Make (And How to Avoid Them ... ›
- Recording: Going Mobile - Premier Guitar ›
Neutrik’s Timbre plug, made for toggling between capacitors.
This follow-up to May 2025’s column shows you a few basic techniques to inject some capacitance into your rig.
Hello, and welcome back to Mod Garage. This month, we will dive into the details of how to add additional guitar-cable capacitance—the right way. Time to get started!
Let’s begin with some typical additional capacitance values that certain lengths of cable (or capacitors) can bring to your system:
• 10’ vintage coiled cable (approx. 3 meters) -> 1 nF
• 15’ vintage coiled cable (approx. 4.5 meters) -> 1.5 nF
• 20’ vintage coiled cable (approx. 6 meters) -> 2.2 nF
• 30’ vintage coiled cable (approx. 9 meters) -> 3.3 nF
• Ritchie Blackmore-style, ultra-long vintage coiled cable -> 4.7 nF
I listed standard values here, so you should have no problem getting caps to match them in any local electronics store or online; the type of cap doesn’t really matter and will mostly be dominated by size, but I’ll share more about this in a minute.
Let’s quickly summarize the first installment of this column from last month’s issue: From a technical point of view, added capacitance shifts down the resonance frequency of the pickups, so they sound fatter, especially when using overdrive. This is exactly the reason why a lot of distortion and fuzz boxes with a vintage voicing use an additional cap at the input section; the resulting overdriven tone is fat and warm.
This month’s mod, which involves adding a capacitor to your signal, works best with vintage-flavored single-coil pickups (approximately 2.4 H inductance) or a typical old-school PAF-style pickup (approximately 3.8 H inductance). Modern high-output pickups are often sporting inductances of 6 H to 8 H, and don’t sound very good with this mod—when adding more cable capacitance to such pickups, the result is a dull and wooly tone without any clearness and definition. If you want to make your single-coil guitar sound more Les Paul-ish, you should try a 4.7n capacitor. It will shift the resonance frequency of your single-coil pickups down to the typical PAF ballpark, making for a very cool and usable old-fashioned guitar tone. It might feel a little muffled when playing clean, but ultra fat and punchy when using overdrive! In general, values higher than 4.7n are not recommended.
We have two options for where to install our cap.
On the Guitar Cable
This is the easiest location to add additional capacitance to your system, with several mod options:
1. The lightest mod ever isn’t a mod at all—it’s to simply buy a vintage guitar cable and plug it in whenever you need it! I don’t know of any company that offers modern guitar cables with intentionally high capacitance.
2. The Neutrik company offers a special angled plug, called the Timbre Plug, that you can solder to any guitar cable of your choice. The plug has a 4-way rotary knob on top to toggle between different capacitors. In addition to a bypass setting, the plug offers capacitances of 1nF, 2.2nF, and 3.3nF, letting you simulate different cable lengths on the fly.
3. You can add an additional capacitor to any guitar cable of your choice to convert it into a “longer-sounding” cable. You simply open one of the plugs to solder the cap between the hot and ground—that’s it. Small, 2.5 mm contact spacing ceramic caps are easy to put into a standard plug and are your weapon of choice here. It’s essential to only add the additional cap to one of the two plugs, but it doesn’t matter if you plug this side into your guitar, an effect, or your amp. This method allows you to build yourself some cables that simulate their older, longer relatives.
You can add an additional capacitor to any guitar cable of your choice to convert it into a “longer-sounding” cable.
Photo courtesy SINGLECOIL (https://singlecoil.com)
Inside the Guitar
You can also add a cap (or several) inside your guitar if you only need this mod for one instrument. If you’re looking for added capacitance with all your guitars, you’d be better off choosing one of the techniques mentioned above.
1. The easiest way is to solder your additional capacitor directly to your volume pot; this way it has a fixed value that can’t be changed and is always engaged. This operation is very simple to do, and you can use regular-sized caps for this.
You can add a cap (or several) inside your guitar if you only need this mod for one instrument.
Illustration courtesy SINGLECOIL (https://singlecoil.com)
2. If you want to make the cap switchable, such that you can run it either bypassed or engaged, you can install a SPST mini toggle switch or use half of a push-pull or push-push pot, which usually sport a DPDT switch underneath.
This drawing shows how to make your additional cap switchable.
Illustration courtesy SINGLECOIL (https://singlecoil.com)
3. If you want to use more than one cap to simulate different cable lengths, your weapon of choice is a rotary switch, setting up a kind of Gibson Varitone wiring without the inductor. Because we are switching capacitances, it is essential to run an additional 10 meg resistor in parallel to each of the caps, and to use a make-before-break, not a break-before-make, rotary switch to prevent loud popping noises when using the switch while your guitar is plugged into an amp. Leave the first lug of the rotary switch open for the bypass position without an additional cap.
If you want to use more than one cap to simulate different cable lengths, use a rotary switch.
Illustration courtesy SINGLECOIL (https://singlecoil.com)
4. If you want to make this mod even more flexible, you can add an additional “cable simulator pot” to your system. The pot should have the same resistance as your volume pot, and should be wired to your volume pot. This way, for example, you can add a 3.3nF or 4.7nF cap to the extra pot, and dial in as much cable capacitance as you like.
On the Pedalboard
The idea of putting a rotary switch or cable-simulator-pot solution into an external unit to create a kind of extra-capacitance stompbox to use with all of your instruments is just around the corner, and yes, it’s possible! However, I don’t recommend this, because it’s physically located after the volume pot in the guitar, which means less volume (no unity gain) and less high end. But don’t worry: If you are looking for a pedalboard solution to simulate different cable lengths (which, as we defined earlier, means to shift the resonance frequency of the pickups), there are some active solutions on the market offering such a feature, usually in combination with a boost or buffer functionality. To name just a few, you should look into the Seymour Duncan Pickup Booster, Stellartone Micro Pedal, or the i2e Audio AG1.0 The PURR. Along with some other brands, these pedals will do the trick, and they’re not difficult to build if you are looking for a DIY solution.
So far, I’ve received several emails from readers asking for some more DIY guitar tools, so next month, we will look into some sustainable and environmentally friendly DIY guitar helpers—all of which you can build yourself easily by upcycling things you already have at home. Stay tuned!
Until then... keep on modding!
Vox’s Valvenergy Tone Sculptor
Two new pedals from the Valvenergy series use a Nutube valve to generate unique dynamics and tone ranges that can be used to radical ends.
When tracking in a studio or DAW, you’re likely to use compression and EQ on most things. Many enduringly amazing and powerful records were made using little else. And though many musicians regard both effects as a bit unglamorous and utilitarian, EQs and comps are as capable of radical sounds as more overtly “weird” effects—particularly when they are used in tandem.
I spent a day workshopping ideas in my studio using just the Vox Valvenergy Smooth Impact compressor and Tone Sculptor EQ, and a dash of amp tremolo and reverb to taste. In the process, I produced more arresting sounds than I had heard from my guitars in many days. There were radical direct-to-desk-style Jimmy Page/Beatles distortion tones, sun-sized, cosmic electric 12-string, Bakersfield twang that could burn through crude, and many other sweet and nasty colors. Most decent EQ and compressor combinations can achieve variations on all those themes. But the Smooth Impact and Tone Sculptor also reveal interesting personalities in unexpected places.
The individuality and energy in the Vox Valvenergy pedals is attributable, in part, to the Nutube vacuum tube used in the circuit. Though it looks little like a vacuum tube as most guitarists know them, the thin, wafer-like Nutube is, in fact, a real vacuum tube like those used in fluorescent displays. Fluorescent display tubes have limitations. A maximum operating voltage of around 40 volts means they aren’t useful for bigger power tube applications like a 6L6, which has an operating voltage of about 400 volts. But it can work quite well as a preamp tube in concert with an op amp power section, which is how the Nutube is used in the new Valvenergy pedals, as well as older Vox products like the Vox MV50 and Superbeetle amps.
Valvenergy Tone Sculptor
When you think about “cinematic” effects, you likely imagine big reverb or modulation sounds that create a vivid picture and feeling of space or motion. But narrow, hyper-focused EQ profiles can evoke very different and equally powerful images. Radical EQ settings can add aggression, claustrophobic intimacy, and stark, explosive dark-and-light contrasts more evocative of Hitchcock’s Psycho than Ridley Scott’s Blade Runner.
Any of these moods can be summoned from the Valvenergy Tone Sculptor. Six sliders cut or boost 10 dB frequency bands spanning 100 Hz to 5.6 kHz. A seventh slider cuts or boosts the master output by 12 dB. This platter of options might not sound like much. But you can use these seven controls together to very specific ends.
“Radical EQ settings can add aggression, near-claustrophobic intimacy, and stark, explosive dark-and-light contrasts.”
For example, bumping the high-midrange and the master output produces narrow cocked-wah-like filter sounds with enough push to produce extra amp overdrive—effectively turning the Tone Sculptor into a buzzy, almost fuzz-like filter effect. But unlike a wah, you can carefully scoop high end or add a spoonful of bass to blunt harsh frequencies or give the tone a bit more weight. You can also broaden the palette of an amp/guitar pairing. I matched a particularly trebly Jazzmaster bridge pickup with a very hot and toppy Vox AC15-flavored amp for this test—a recipe that can be spiky on the best days. But with the Tone Sculptor in the line, I could utilize the same sharp, fuzzy, and filtered Mick Ronson wah tones while shaving some of the most piercing frequencies.
EQ pedals exist on many points along the cost spectrum. And at $219, the Tone Sculptor lives on the high side of the affordable range. Does it offer something less expensive models can’t deliver? Well, for one thing, I found it relatively quiet, which is nice whether you’re shaping toppy high-contrast effects or performing more surgical adjustments. And the sliders feel nuanced and nicely tapered rather than like a dull axe with a few basic frequency notches. But in many situations I also liked the color imparted by the circuit—generated, presumably, by the Nutube. “Color,” in audio terms, is a broad and subjective thing, and one should not necessarily expect the warm, tube-y glow of a vintage tube Pultec. Still, the Tone Sculptor has many forgiving, flattering qualities—typical of studio EQs—that enable fine tuning and experimentation with more radical and creative applications of the effect.
Valvenergy Smooth Impact
As with the Tone Sculptor, the Smooth Impact’s use of Nutube engenders certain expectations. It’s easy to surmise that because Smooth Impact has a vacuum tube in the circuit that it will behave like a little Teletronix LA-2A leveling amplifier. That’s a big ask for a $219 stompbox. On the other hand, the Smooth Impact exhibits some appealing characteristics of studio tube compression. At lower compression levels, it works well as a thickening agent—adding mass without much additional noise. And at higher compression levels it can sound snappy, crisp, and tight without feeling like you’ve bled every trace of overtone from your signal.
The Smooth Impact’s controls aren’t totally atypical. But because it lacks some familiar features like variable attack and release, yet is more complicated than a 1-knob DynaComp, you have to trust your ear to navigate interactions among the controls. The most unfamiliar of these is the 3-way vintage/natural/sag toggle. The first two are defined by preset attack and release settings: Vintage is slow attack and long release, and natural is the opposite. The sag mode’s compression is more like what you get from tube saturation, and it’s useful for adding thickness and complexity to a thin amp tone at modest compression levels.
Though the vintage and natural modes certainly have a different feel, they don’t always sound worlds apart. And like the sag mode, the thing they have in common is the way they enrich lifeless amp output at low to medium compression, with a bit of grind from the tube gain and a little extra makeup gain from the output. At the most aggressive settings, the tube gain can get a little crispy. And really crushing the compression can flatline your tone without adding much in the way of extra sustain. These are limitations common to many compressors with similar features. But unless I was chasing very ultra-snappy Prince and Nile Rodgers fast-funk caricatures, I enjoyed the Smooth Impact most in its in-between ranges, where mass, mild, harmonious drive, and low noise showcase the pedal’s sometimes studio-like personality.
The Cars’ self-titled 1978 debut record changed the world of power pop forever. Guitarist and co-vocalist Ric Ocasek penned all the tunes, but lead guitarist Elliott Easton transformed them with his tasteful 6-string stylings. This time on Shred With Shifty, Easton sits down with Chris Shiflett to show him how to play the solo from “My Best Friend’s Girl.”
The Cars’ self-titled 1978 debut record changed the world of power pop forever. Guitarist and co-vocalist Ric Ocasek penned all the tunes, but lead guitarist Elliot Easton transformed them with his tasteful 6-string stylings. This time on Shred With Shifty, Easton sits down with Chris Shiflett to show him how to play the solo from “My Best Friend’s Girl.”
Born in Brooklyn before winding up in Long Island, Easton washed dishes to save up for his first 1971 Fender Telecaster, and after high school he studied at Berklee College of Music in Boston, where he picked up key theory and technique that he still holds dear. Reared on country and rockabilly players like Roy Buchanan, Jesse Ed Davis, Gram Parsons, James Burton, and Roy Nichols, Easton brought a slick twang to Ocasek’s new-wave gems.
Easton tells Shifty how the band came to work with producer Roy Thomas Baker in London, while crashing at a label-provided mansion nearby and driving a loaned Jaguar and Land Rover to the sessions. Easton’s celebrated leads didn’t take long to come together. “On my mother’s memory, I did all my guitar parts in a day and a half,” he says. All he had with him was a 1978 or ’77 Telecaster with a Bartolini Firebird-style mini humbucker in it, a red Les Paul, a Martin acoustic, and two effects: the brand-new Boss CE-1 and a Morley EVO-1 Echo Volume pedal. His amp of choice in those days? An Ampeg VT-22 or VT-40.
After running down his giddy-up guitar parts from “Best Friend’s Girl,” Easton talks about which modern players impress him, why he doesn’t consider himself a shredder, and the experience of working with Mutt Lange: “I spent as much time tuning with him as playing!”
If you’re able to help, here are some charities aimed at assisting musicians affected by the fires in L.A:
https://guitarcenterfoundation.org
https://www.cciarts.org/relief.html
https://www.musiciansfoundation.org
https://fireaidla.org
https://www.musicares.org
https://www.sweetrelief.org
Credits
Producer: Jason Shadrick
Executive Producers: Brady Sadler and Jake Brennan for Double Elvis
Engineering Support by Matt Tahaney and Matt Beaudion
Video Editor: Addison Sauvan
Graphic Design: Megan Pralle
Special thanks to Chris Peterson, Greg Nacron, and the entire Volume.com crew.
Significantly smaller and lighter than original TAE. Easy to configure and operate. Great value. Streamlined control set.
Air Feel Level control takes the place of more surgical and realistic resonance controls. Seventy watts less power in onboard power amp. No Bluetooth connectivity with desktop app.
$699
Boss Waza Tube Amp Expander Core
Boss streamlines the size, features, and price of the already excellent Waza Tube Expander with little sacrifice in functionality.
Many of our younger selves would struggle to understand the urge—indeed, the need—to play quieter. My first real confrontation with this ever-more-present reality arrived when Covid came to town. For many months, I could only sneak into my studio space late at night to jam or review anything loud. Ultimately, the thing that made it possible to create and do my job in my little apartment was a reactive load box (in this case, a Universal Audio OX). I set up a Bassman head next to my desk and, with the help of the OX, did the work of a gear editor as well as recorded several very cathartic heavy jams, with the Bassman up to 10, that left my neighbors none the wiser.
Boss’ firstWaza Tube Amp Expander, built with an integrated power amp that enables boosted signal as well as attenuated sounds, was and remains the OX’s main competition. Both products have copious merits but, at $1,299 (Boss) and $1,499 (Universal Audio), each is expensive. And while both units are relatively compact, they aren’t gear most folks casually toss in a backpack on the way out the door. The new Waza Tube Expander Core, however, just might be. And though it sacrifices some refinements for smaller size, its much-more accessible price and strong, streamlined fundamental capabilities make it a load-box alternative that could sway skeptics.
Micro Manager
The TAE Core is around 7 1/2" wide, just over 7 " long, and fewer than 4 " tall, including the rubber feet. That’s about half the width of an original TAE or OX. The practical upside of this size reduction is obvious and will probably compel a lot of players to use the unit in situations in which they’d leave a full-size TAE at home. The streamlined design is another source of comfort. With just five knobs on its face, the TAE Core has fewer controls and is easier to use than many stompboxes. In fact, the most complicated part of integrating the TAE Core to your rig might be downloading the necessary drivers and related apps.
Connectivity is straightforward, though there are some limitations. You can use TAE Core wirelessly with an iOS or Windows tablet or smartphone, as long as you have the BT-DUAL adaptor (which is not included and sets you back around 40 bucks). However, while desktop computers recognize the TAE Core as a Bluetooth-enabled device, you cannot use the unit wirelessly with those machines. Instead, you have to connect the TAE Core via USB. In a perfectly ordered world, that’s not a big problem. But if you use the TAE Core in a small studio—where one less cable is one less headache—or you prefer to interface with the TAE Core app on a desktop where you can toggle fast and easily between large, multi-track sessions and the app, the inability to work wirelessly on a desktop can be a distraction. The upside is that the TAE Core app itself is, functionally and visually, almost identical in mobile and desktop versions, enabling you to select and drag and drop virtual microphones into position, add delay, reverb, compression, and EQ effects, choose various cabinets with different speaker configurations and sizes, and introduce new rigs and impulse responses to a tone recipe in a flash. And though the TAE Core app lacks some of the photorealistic panache and configuration options in the OX app, the TAE Core’s app is just as intuitive.Less Is More
One nice thing about the TAE Core’s more approachable $699 price is that you don’t have to feel too bad on nights that you “underutilize” the unit and employ it as an attenuator alone. In this role, the TAE Core excels. Even significantly attenuated sounds retain the color and essence of the source tone. Like any attenuator-type device, you will sacrifice touch sensitivity and dynamics at a certain volume level, yielding a sense of disconnection between fingers, gut, guitar, and amp. But if you’re tracking “big” sounds in a small space, you can generate massive-sounding ones without interfacing with an amp modeler and flat-response monitors, which is a joy in my book. And again, there’s the TAE Core’s ability to “expand” as well as attenuate, which means you can use the TAE Core’s 30-watt onboard power amp to amplify the signal from, say, a 5-watt Fender Champion 600 with a 6" speaker, route it to a 2x12, 4x12, or virtual equivalent in the app, and leave your bandmate with the Twin Reverb and bad attitude utterly perplexed.
The Verdict
Opting for the simpler, thriftier TAE Core requires a few sacrifices. Power users that grew accustomed to the original TAE’s super-tunable “resonance-Z” and “presence-Z” controls, which aped signal-chain impedance relationships with sharp precision, will have to make do with the simpler but still very effective stack and combo options and the “air feel level” spatial ambience control.The DC power jack is less robust. It features only MIDI-in rather than MIDI-in/-through/-out jacks, and, significantly, 70 watts less power in the onboard power amp. But from my perspective, the Core is no less “professional” in terms of what it can achieve on a stage or in a studio of any size. Its more modest feature set and dimensions are, in my estimation, utility enhancements as much as limitations. If greater power and MIDI connectivity are essentials, then the extra 600 bones for the original TAE will be worth the price. For many of us, though, the mix of value, operational efficiencies, and the less-encumbered path to sound creation built into the TAE Core will represent a welcome sweet spot that makes dabbling in this very useful technology an appealing, practical proposition.