Photo 1 — The essentials: a low-watt soldering iron, a stand, a small damp sponge, and a roll of “electronic silver solder” like this .020" 60/40 tin/lead rosin flux solder from Kester.
Learn to solder like a pro in this easy-to-follow demonstration.
Given the DIY nature of this issue, we thought it would be appropriate to address good soldering technique. If you’re willing to invest a few bucks in some modest tools and spend a little time practicing the basics, you can learn to wire up guitars, stomp kits, speaker cabinets, and even do some simple amp mods. Once you understand the fundamentals, you can save money and derive a lot of satisfaction from working on your own gear.
The tools.
You’ll want a decent soldering pencil (a small type of soldering iron) rated at least 25 watts, but no more than 60 watts. (Many guitar techs like a 30-watt soldering iron for working on guitars and amps, and a 15-watt iron for working inside stompboxes and on delicate printed circuit boards.) You’ll also want a stand to hold the hot iron when not in use, a damp sponge, and some rosin core solder made for electronic work (Photo 1).
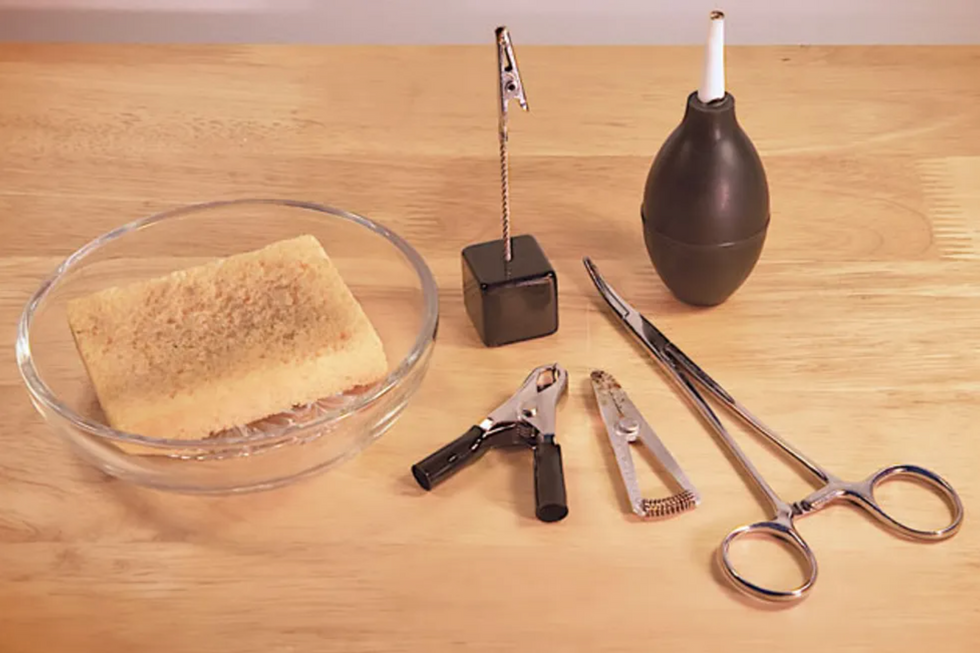
Photo 2 — If your soldering stand doesn’t house a sponge, just put a damp household sponge in a glass or ceramic dish. Other helpful tools: a hemostat and small clamps to hold parts still as you solder them, and a “solder sucker” bulb for removing solder.
You should also have some basic hand tools, such as wire strippers, needle-nose pliers, wire cutters, and something to hold the wire in place while a solder joint cools (Photos 2 and 3).
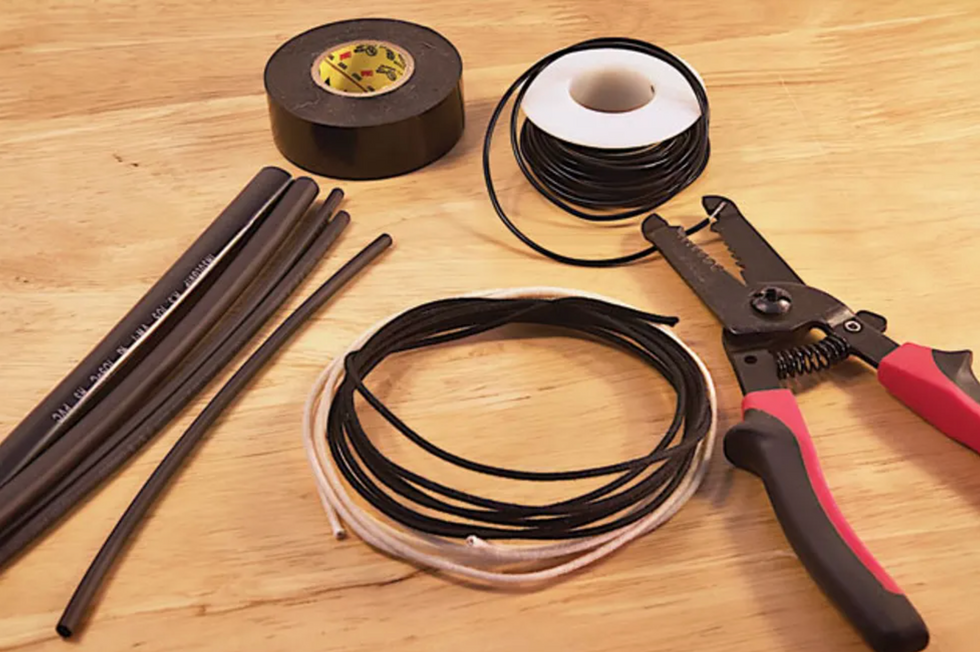
Photo 3 — In addition to hook-up wire, you’ll want wire strippers. Alternatively, luthier suppliers offer old-school “push-back” wire with a waxed cotton jacket (center) that eliminates the need for stripping off the plastic insulation from the end of the wire. Electrical tape and heat shrink tubing come in handy when you need to protect or insulate your work.
There are tools sold specifically for holding wires and parts, available through an electronics supply house.
Step 1: Prepare the Joint
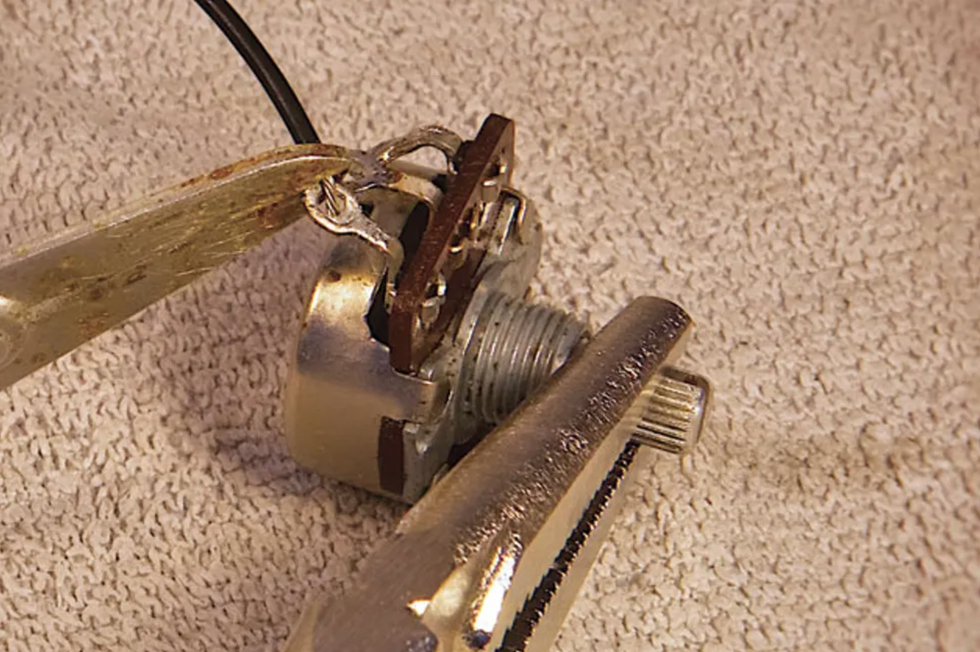
Photo 4 — Before you attempt to solder a connection, the wire and component must be secured to assure they remain absolutely motionless. Here, a spring-loaded heat-sink clamp holds the wire in place while a vice grip gently clamps the pot shaft.
For every joint, you need to find a way to hold the wire in position without using your hands (Photo 4). Wrap the wire through the solder lug once to make it hold tightly on its own, use tape to hold it in place, lay a pair of pliers on the wire to hold it firmly where you want it, or use a mechanical soldering aid to hold it. Use whatever works, except holding the wire manually. When you make a solder connection and rely on your hands to hold the soldered wire steady while the joint cools, you will fail—no human hands are steady enough to hold anything perfectly still, and you want the wire to remain absolutely motionless while it cools. If there is movement, the result will be internal fractures in the solder.
Step 2: Clean the Tip
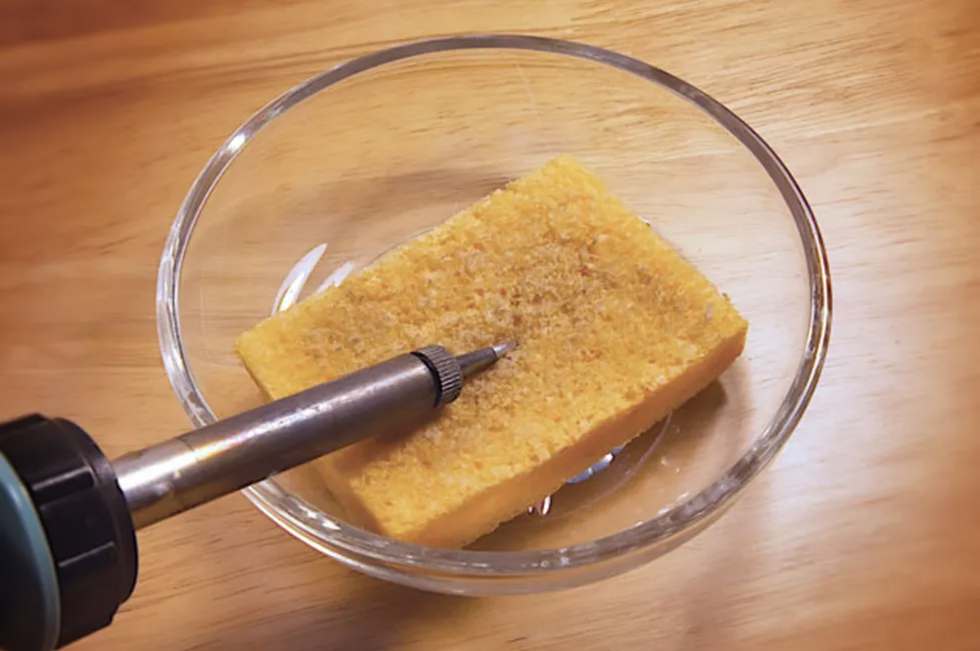
Photo 5 — Wipe the hot tip with a damp sponge to keep it clean.
The tip must be cleaned before each and every joint—you can use the damp sponge for this (Photos 5 and 6).
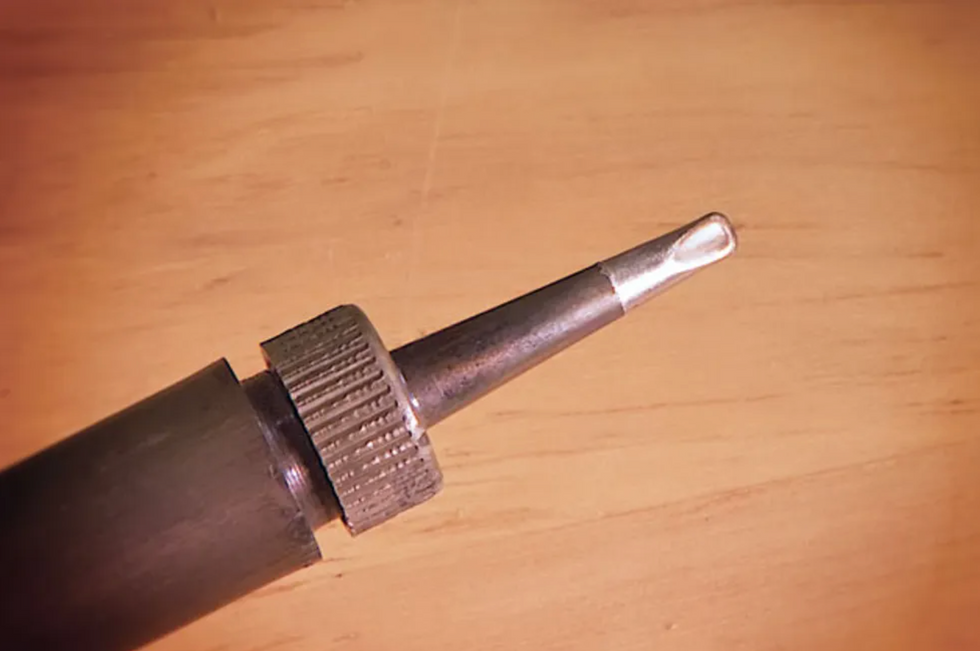
Photo 6 — A clean, dross-free tip looks smooth and shiny.
Solder produces a by-product called dross very, very quickly, and the dross fouls the tip, preventing good heat conduction and introducing waste material into your solder joints.
Step 3: Tin the Tip
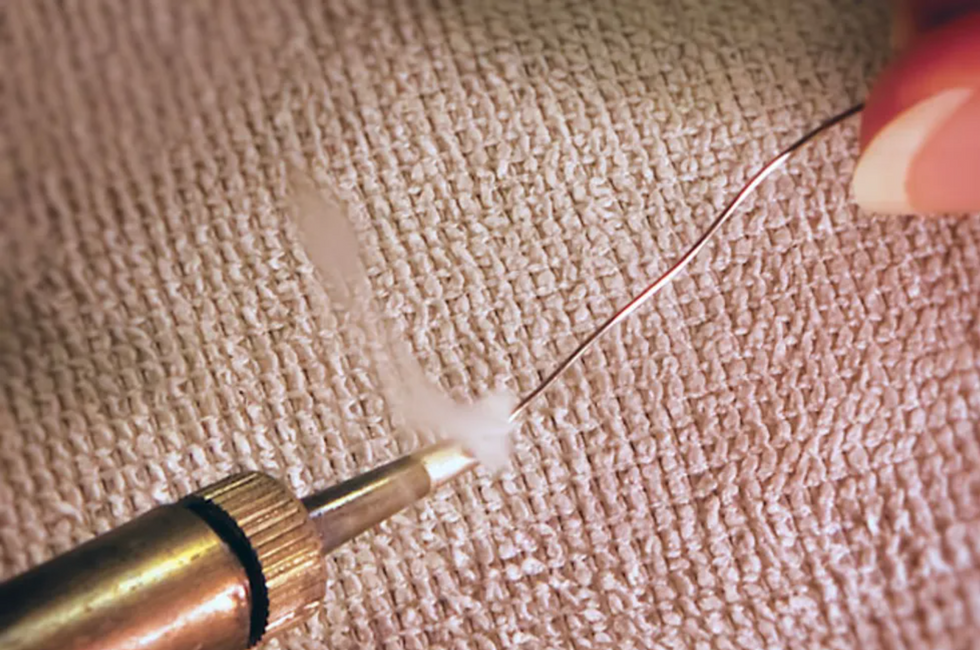
Photo 7 — Add a small amount of solder to a freshly cleaned tip just before you solder a connection. When you see this telltale puff of smoke, pull the strand of solder off the tip, shake off any excess, and then move quickly to the joint.
Immediately before you get on the joint with the heat, add fresh solder to the tip of the iron to “tin” it. Simply feed solder directly onto the tip so it’s completely coated (Photo 7). A tinned tip will provide much better heat conduction than a tip that’s clean but not tinned.
Step 4: Remove the Excess Solder
Shake off the excess solder after tinning—you want the tip coated, but not dripping. I have a fire-resistant container beside my soldering bench, and after tinning I tap the barrel of my iron on the edge of the container to knock excess molten solder into it. You can use any fire-resistant container for this, such as a tin can or ceramic bowl, but use care not to start a fire. Because solder melts at such a low temperature the risk of a fire is very low—molten solder is unlikely to ignite even highly flammable materials like paper—but use care anyway!
Step 5: Get on the Joint Right Away
As soon as you’ve removed the excess solder from the tip, get right on the joint. By “joint,” I mean the wire and the solder lug, or the wire and the back of the pot, or whatever it is you’re soldering. Dross will start to form on the tip very quickly, so as soon as the tip is prepared, get to work.
Step 6: Heat the Joint
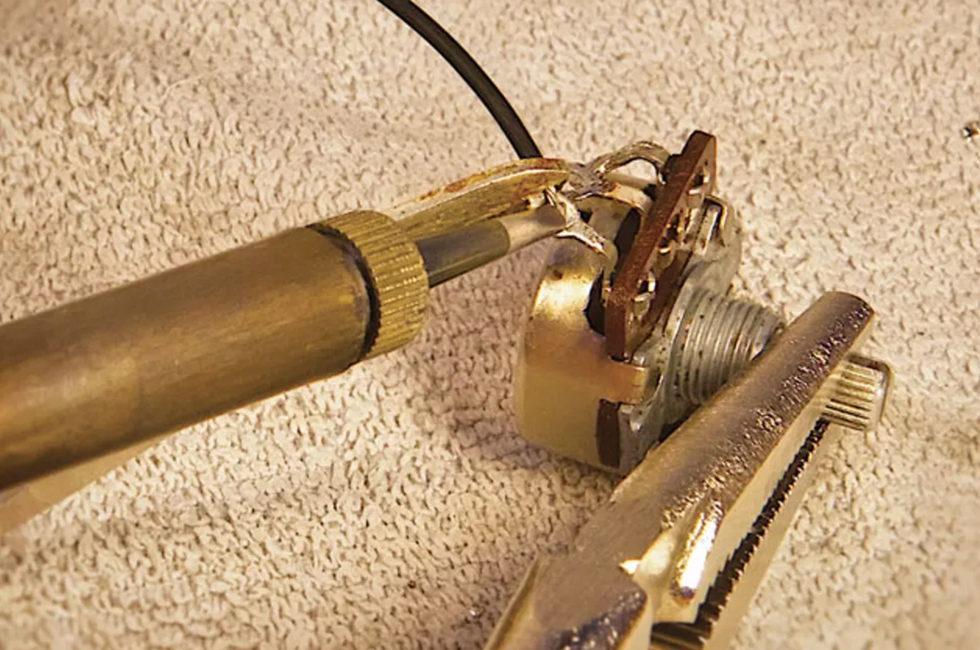
Photo 8 — Gently press the iron’s hot tip against the joint to heat it before you bring the solder into the equation. The goal is to make the joint itself hot enough to melt the solder.
Heat the joint, not the solder (Photo 8). You want the joint to be hot enough to melt the solder. It’s a given that the iron is hot enough to melt it—just feed a little onto the tip and you’ll see—but you also want the joint itself to be hot enough to do the same.
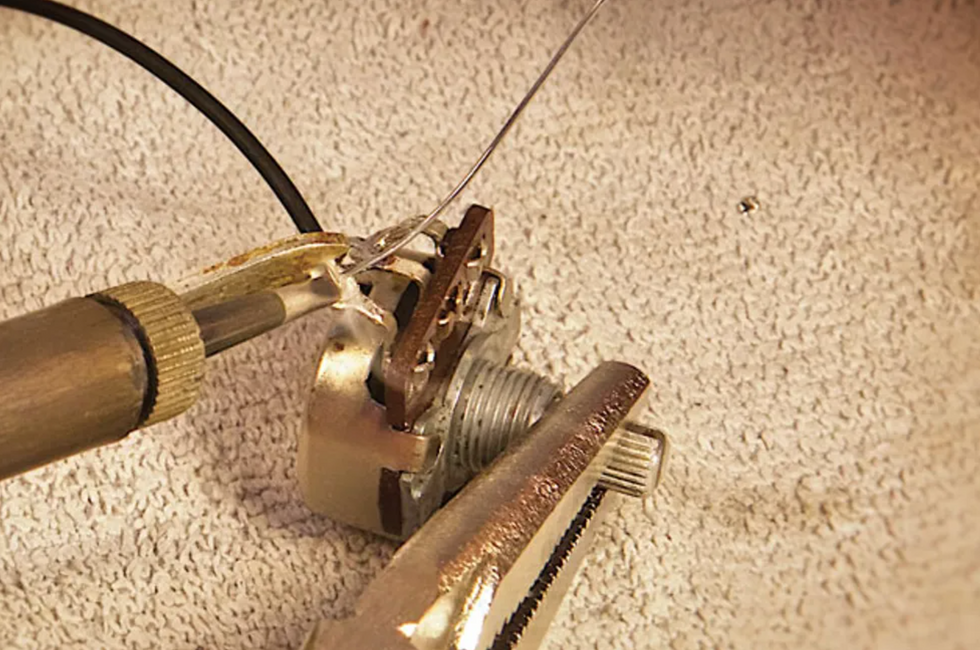
Photo 9 — While holding the tip against the joint, feed the solder onto the heated joint, not the soldering iron tip. Here the emerging puff of smoke indicates the solder is melting.
If you feed solder onto the joint without it touching the iron (Photo 9), the solder will melt and be attracted right to the joint. You can watch the solder actually wick out onto the surface you’re soldering to—this is what you want.
Step 7: Get off the Joint
As soon as the solder has flowed onto the joint properly, remove the heat from the joint. Most components can stand a fair amount of heat, but some are more susceptible to damage than others, so there’s no need to push your luck. Pots are fairly durable (unless it’s a cheap pot), so it’s highly unlikely you’ll damage one by trying to solder a wire to its back. But again, there’s no need to push your luck, so as soon as you’ve completed the joint, pull the iron away and let the joint cool with the components remaining motionless.
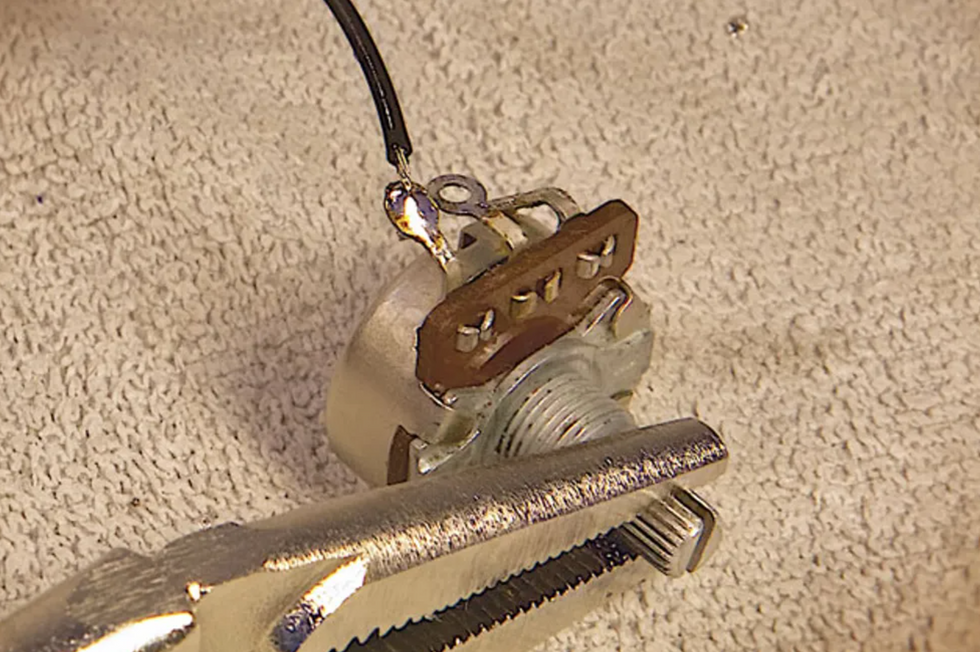
Photo 10 — When the molten solder has flowed into the joint, pull away both the solder and iron. Keep the joint motionless as it cools and don’t blow on it—the moisture in your breath will enter the cooling connection and potentially cause it to fail.
If you’re soldering to a ring-shaped solder lug, then you’ll want to fill it completely with solder (Photo 10). This will maximize the mechanical strength of the joint.
Like most skills, soldering proficiency is acquired through practice. Employing good technique will allow you to become competent all the more quickly, so follow these steps, and you’ll be soldering like a pro in no time. You should probably practice on projects that aren’t expensive or mission critical—you might want to think twice about rewiring your only guitar before that gig with Clapton tonight. But if you keep at it, you’ll be one step closer to being a consummate DIY’er.
Two Ways to Improve Your Soldering Projects
After you master the basics, there are two more skills to add to your bag of tricks: removing old solder and installing heat shrink tubing. There are plenty of occasions where you’ll wish you could remove old solder and re-use a part. For example, you might have rescued a volume or tone pot from a previous mod or project. If it’s a high-quality pot, like those from CTS, why toss it and buy a new replacement when you can put the old one back into service? It’s easy to reverse the soldering process and remove old solder and bits of wire. You simply need a solder removal tool. There are several types, including disposable braided wire that’s designed to wick molten solder away from a joint, and various vacuum pump tools and “solder suckers.” I prefer a simple rubber bulb with a heat-resistant Teflon tip.
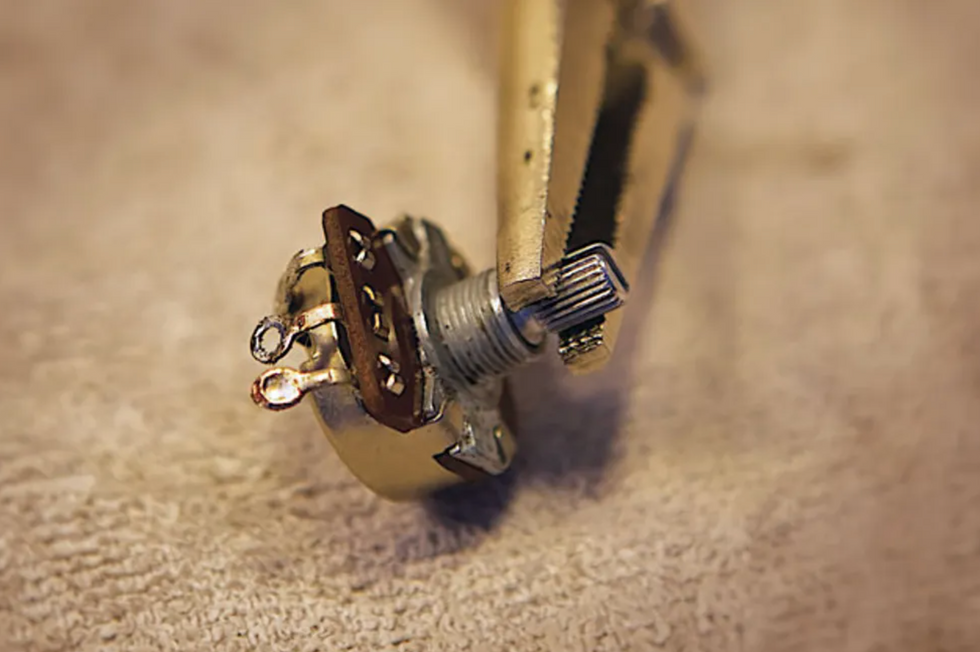
Photo 11
Here’s how it works: Stabilize your component, in this case, a pot (Photo 11). See how one lug is filled with solder? Let’s make that go bye-bye. Apply heat to the lug with a freshly cleaned soldering-iron tip.
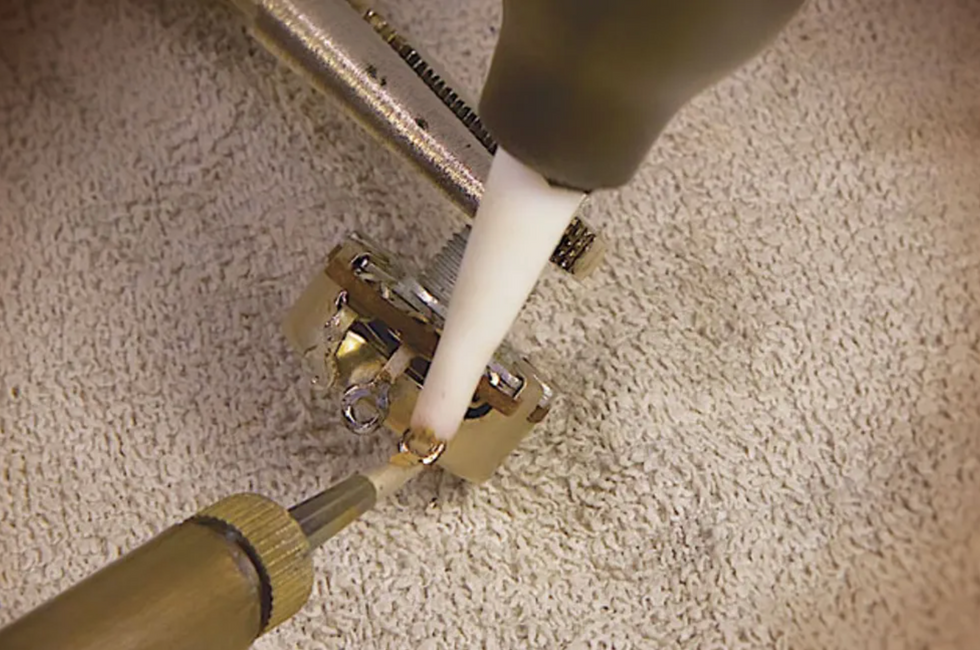
Photo 12
When you see the solder turn shiny and molten, hold the bulb away from the lug, squeeze and hold the bulb, and then bring its tip to the lug and release the bulb. Fffffft! The molten solder goes up the tip and into the bulb (Photo 12).
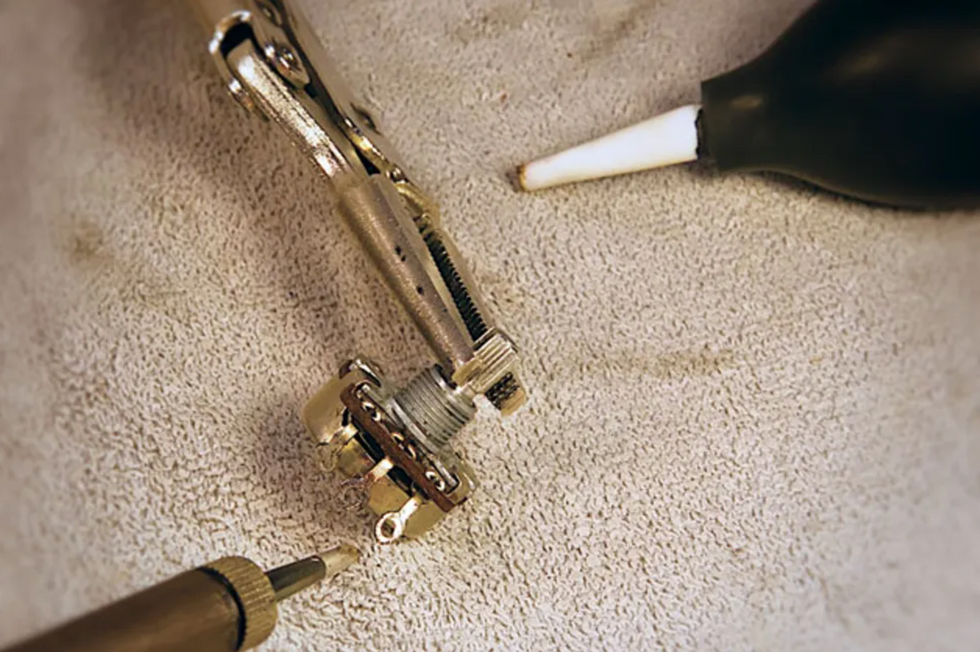
Photo 13
Look at that—a nice clean lug ready for its next mission (Photo 13).
Tip:It’s good to recycle pots and parts, but never try to reuse old solder. Clean it off and start fresh.
In case you’re wondering what happens to the old solder, every few months you simply work the tip out of the bulb, shake the collected cold solder beads into the trash, and reinsert the tip into the bulb. Good to go.
When you’re working with wire and electronics, you’ll often encounter instances where you need to insulate a connection from other wires or components. For example, you want to install a favorite old pickup into another guitar. However, the pickup leads have been cut back over the years and now they won’t reach the intended switch or pot, which means it’s time to splice short extensions to the pickup leads. No problem, except if the exposed wires touch each other or other components, they’ll create a short and you’ll hear only silence (or an annoying hum).
Electrical tape will do the job to insulate the splices, but heat shrink tubing—aka heat shrink—offers a more elegant solution. To make this work, you’ll need a heat source. Some folks use a lighter, but I prefer a heat gun because I like to avoid open flame in my workshop. Heat guns aren’t expensive and they get the job done efficiently and safely.
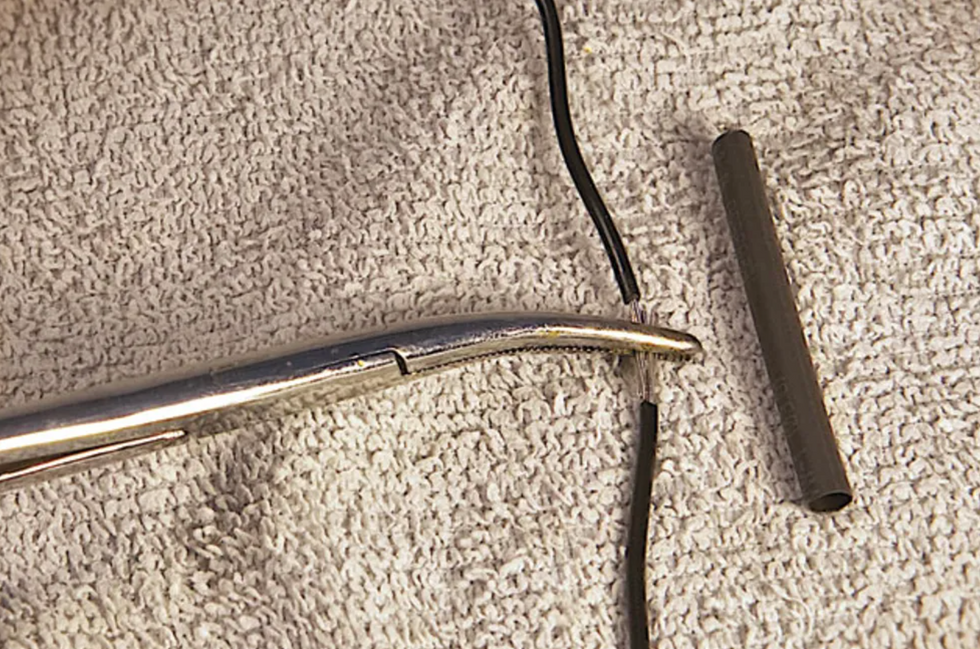
Photo 14
The details: Designed to slide over wire of different gauges, heat shrink comes in various diameters. After you select the right diameter to comfortably slip over your wire, cut off a piece that will straddle the solder splice or joint you plan to cover. The pros suggest a length that’s about three times as long as the exposed section. Use hemostats or a clamp to temporarily hold the ends together while you gauge the length you’ll need to cut (Photo 14).
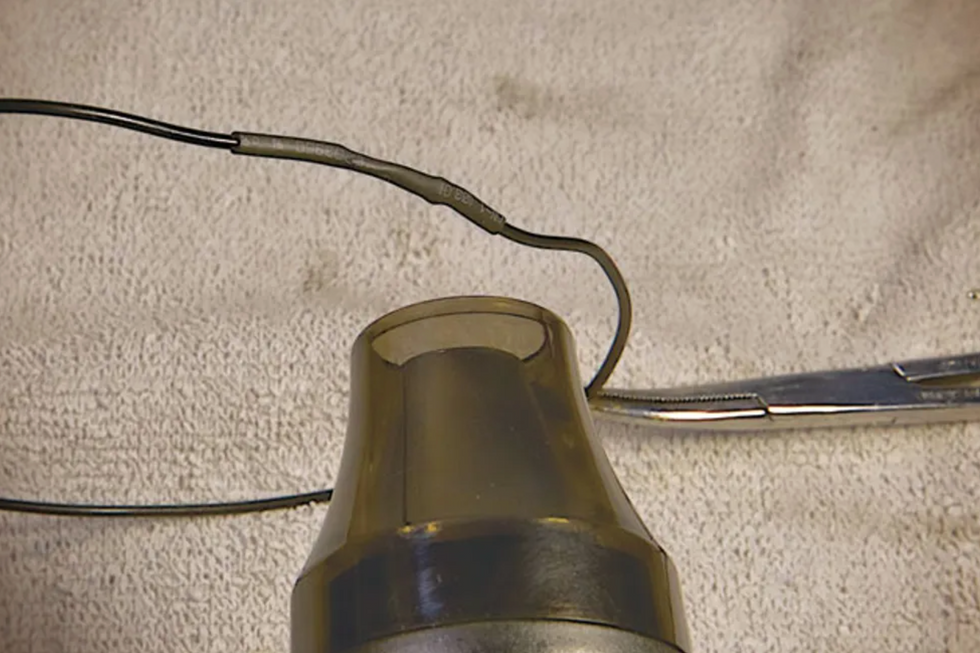
Photo 15
Next, remove the clamp, slide the heat shrink over one end of the wire (keep it far away from your hot iron) and solder the wires. When the solder has cooled, slip the heat shrink over the new joint, center it, and fire up the heat gun. The tubing will start to immediately contract around the joint (Photo 15). Don’t worry, air from the heat gun doesn’t get hot enough to compromise the solder joint. Once the tubing has completely closed up around the wire, you’re done. The joint now has a tough, new skin to protect it. —Andy Ellis
[Updated 1/13/22]
- Three Must-Try Guitar Wiring Mods - Premier Guitar ›
- The ABCs of Output Jacks - Premier Guitar ›
- The Stompbox-Builder's Secret Weapon - Premier Guitar ›
Montana’s own Evel Knievel
If artists aren’t allowed to take risks, and even fail, great art will never be made. Need proof? Check Picasso, Hendrix, Monk, and Led Zeppelin.
In sixth grade, I went to a strict Catholic school. When you have an Italian-Irish mother, that’s just part of the deal. The nuns had the look and temperament of the defensive line of the ’70s Oakland Raiders. Corporal punishment was harsh, swift, and plentiful–particularly toward boys—and we all feared them. All but one second grader. I can’t remember his first name; nobody used it, because his last name was Knievel. His uncle was Evel Knievel, the greatest and perhaps only celebrity ever to come from my home state, Montana. On the playground, we would watch in awe as this wild Knievel kid raced by us, nuns chasing in an awkward, sluggish pursuit as he knocked kids over, dust, books, and gravel flying behind his path of terror. This kid was fearless. It was truly inspiring to watch.
I hadn’t thought about my schoolmate for decades, until recently, when I saw Dave Chappelle talking about a terrible show he had in Detroit where the audience rebelled against him and began chanting, “We want our money back. We want our money back.” Chappelle told the angry mob: “Good people of Detroit. Hear me now. You are never getting your f*****g money back. I’m like Evel Knievel. I get paid for the attempt. I didn’t promise this shit would be good.”
Good art is a gamble. Look at Picasso. In 1907, he spent nearly a year drawing rough sketches and eventually painting his jagged, raw, unpretty Les Demoiselles d’Avignon. Picasso kept Les Demoiselles d’Avignon in his Montmartre, Paris, studio for years after its completion due to the mostly negative reaction of his immediate circle of friends and colleagues. After its first public showing in 1916, critics were hostile. Today, the painting is hailed as a pivotal moment in art history—the first true work of both Cubism and modern art. Many argue that the 20th century began culturally in 1907, with this painting that today hangs in the Museum of Modern Art in New York. Picasso wasn’t paid to make folks comfy; he got bank for shoving boundaries.
Similarly, I remember my sister and I watching a clip of Hendrix’s feedback-drenched “Star-Spangled Banner” at Woodstock. I couldn’t really process it at the time, but I knew I was watching something that had never been done. When he got to the “bombs bursting in air” part, it sounded like a barrage of explosions. Then, he references the mournful military bugle call “Taps,” played on bases at the end of each day and at funerals. My sister was offended. When I asked why, she said it was “unpatriotic.” I watch it now and I see a Black Army veteran who justifiably had a complex relationship with the country he had served. Martin Luther King was assassinated a year earlier, police brutality toward Black citizens was common. Black Americans were disproportionately stuck in low-wage jobs, and unemployment rates for Black workers were roughly double those of white workers. And although Hendrix was discharged, many of his Army buddies were overseas fighting a war they did not understand or support. So, yes, unpatriotic seems appropriate. But Hendrix’s performance was iconic because he dared to try to show his complex feelings through his guitar.“That’s the sweet spot: Fearless doesn’t mean flawless.”
Listen to Led Zeppelin’s groundbreaking “Black Dog.” The B section is so wonky, sticking out like a sore thumb with that weird timing that always feels wrong to me, but it would not be the rock masterpiece it is without that unsettling section. Maybe that’s the sweet spot: Fearless doesn’t mean flawless. Thelonious Monk’s janky genius proves that; those off-kilter notes hit you in the gut, not the head. Beck, Bowie, Coltrane… they didn’t polish away the edges; they leaned into them. That’s what makes you feel like a kid at an amusement park, wide-eyed and along for the ride.
When somebody hires me, they get what they get. I want to nail it, but art is subjective, so my idea of what feels right may not jibe with theirs. Humans are not great at communicating, so often I walk away from sessions and gigs wondering if my contribution was good, great, or garbage. But that’s a stupid question I try not to allow myself to indulge. You can’t do great work playing scared. There are times when music is not creative, just painting by numbers, trying to give the customer what they think they want. I do a lot of that to make a living, but that’s more like being a vending machine spitting out custom orders, not an artist.
Real artists are like that Knievel kid—leaving a trail of chaos, and not apologizing for it. I think artists who do it the best flip the script. Their audience isn’t just a judge, but a co-conspirator in the mess. They’re betting on the artist’s next move, not buying a finished product. They’re paying for the front-row seat to potential, not a flawless show. The paycheck was for the swing, not the home run. If the audience pays for “enjoyment” that turns artists into jukeboxes, not creators… if artists aren’t free to fail… innovation dies.
Stringjoy has introduced the Ariel Posen Signature String Set, a heavy-gauge Nickel Wound set designed in close collaboration with acclaimed slide guitarist and singer-songwriter Ariel Posen.
The Ariel Posen Signature String Set from Stringjoy
Ideal for B Standard, Open C, and other lower tunings, this set offers exceptional tone and feel for players who want to explore new sonic territory while maintaining their guitar's unique voice.
Each string in this set is built with Stringjoy’s trademark quality: wound at tension with high compression winds for maximum output, durability, and smooth playability. The result? Strings that hold up under pressure while delivering a natural, expressive voice—perfect for hybrid playing and expressive slide work.
Ariel Posen Signature Set Specs:
• .014 – .018p – .026w – .038 – .050 – .062
• Wound 3rd string
“If you didn’t know these were 14-62 gauges, you’d swear they were just 11s tuned down,” said Ariel Posen. “They feel like home and preserve the sound of the guitar, even in lower tunings. That’s the biggest thing—it still sounds like guitar.”
“We’ve spent ten years experimenting and testing together to find the right combination,” said Scott Marquart, Stringjoy Founder & President. “This release is more than just a new product—it’s the culmination of a shared journey between friends and musicians. Ariel’s set is uniquely him, and I think players will love how it feels and responds.”
Stringjoy’s Ariel Posen signature string set carry a street price of $13.99. Learn more at at stringjoy.com.
Kemper updated the entire product range introducing the all-new Kemper Profiler MK 2 Series. More Power. More Flexibility.
KEMPER PROFILER - The all-new PROFILER MK 2 Series
Kemper today announces the immediate availability of the all-new KEMPER PROFILER MK 2 Series. Kemper continues to raise the bar with the upcoming Profiler MK 2 Series — a bold evolution of the Profiler lineup (All PROFILERs: Head, Rack, Stage, the Player, and the powered versions), delivering more power, more flexibility, and more creative potential than ever before.
At the heart of the PROFILER MK 2 Series works an upgraded processing engine, unlocking faster performance, with boot times clocking in around 20 seconds, and a host of new features that expand the boundaries of what a modern guitar or bass rig can do.
A New Era of Effects:
20 Blocks in Series, the most powerful effects architecture ever found in a Kemper unit - The PROFILER MK 2 Series now offers seven additional effect blocks, raising the total number of simultaneous audio effect blocks to an incredible 20 — all running with zero added signal latency. It’s like having an entire, fully integrated pedalboard with pedal essentials at your feet — but one that boots in seconds, never needs rewiring, and always remembers your settings.
A new Era of Profiling:
Kemper announces a new profiling technology for the MK 2 series. Availabilty is expected during Summer. Currently in extended testing with some selected third-party profile vendors the new profiling offers:
- More than 100,000 individual frequency points meticulously analyzed for the most precise amp recreation ever achieved.
- Next-Level Speaker & Dynamically adjustable Cabinet Resonance – Capturing the true dynamics of your setup with the longest and most complex impulse responses in the industry.
- Liquid Profiling Technology – Seamlessly integrate the original amp’s gain and tone controls, transforming a single profile into a fully dynamic, living amplifier.
- Unparalleled Precision & Feel – A cutting-edge hybrid approach combining precise, deterministic analog measurement with Kemper’s industry-leading profiling intelligence.
Overview - All that’s new in the PROFILER MK 2 in more Detail:
All-New FX Section – 7 Additional FX Slots - ThePROFILER MK 2-Series introduces an expanded FX section with seven dedicated “pedalboard essential” FX slots, featuring: A new second Noise Gate (Palm Ninja), Compressor, Pure Booster, WahWah, Vintage Chorus, Air Chorus, and Double Tracker.
Adding these to the pre-existing 10 audio blocks, Spectral Noise Gate, Transpose Effect, and Volume Pedal - in total this provides users with 20 simultaneous audio effect blocks, setup gig-ready right out of the box while maintaining full flexibility for customization.
This new layout makes it convenient to cover all the bases and offers 8 flexible FX blocks available for the acclaimed tone shapers and studio-grade unique FX the KEMPER PROFILER is famous for.
Performance Meets Portability - With a smarter internal design and new lightweight aluminum components, the Profiler Stage Mk 2 has shed excess weight — making it even more gig-friendly without sacrificing the tank-like build quality musicians rely on. Whether for touring the world or heading to a local session, this is the most travel-ready full-featured Profiler yet.
Mk 2-ready Player! - For all guitarists and bassists already rocking the compact PROFILER Player, there is good news: it’s been “MK 2”-ready from day one, meaning it’s fully aligned with the power and potential of the new series, and now, on LVL 1 already, it features 16 simultaneous FX in total. This new extended signal flow becomes available for all Player owners as a free update, and yes, it will get Profiling, too. Making the PROFILER Player out of the box the features richest and most professional performance and recording solution - with its travel-friendly footprint and convenient price point!
8-Channel USB Audio Support for the new Mk 2-Series - Native 8-channel USB audio support to all KEMPER PROFILER MK 2 Series units, enabling seamless multitrack recording and reamping directly into your DAW – no external interface required.
Loop Longer, Play Harder - The integrated Looper also gets a serious upgrade. With up to two full minutes of recording time, the MK 2 Series lets you capture extended phrases, build layered soundscapes, or craft entire performances — all on the fly. (Looper available from LVL 3 for the Player)
Speed and Responsiveness Upgrades - Major improvements under the hood. Boot times, preset switching, and UI responsiveness are noticeably faster and smoother, especially in Performance Mode.
Christoph Kemper, Founder & CEO:
“The new PROFILER MK 2-Series makes the PROFILERs feel more like a complete rig than ever before. With instant access to essential FX, full USB audio integration, and improved playability, we’re giving our users a platform that adapts and grows with them.”
Pricing & Availability:
The new KEMPER PROFILER MK 2 Series models are available now from dealers worldwide and directly from the Kemper Online Store. All the new features require a KEMPER PROFILER MK 2 Series device. Visit www.kemper-amps.com for downloads and release notes.
PROFILER Head $1,348.00
PROFILER Rack $1,398.00
PROFILER Stage $1,498.00
PROFILER Player $ 699.00
PROFILER PowerHead $1,798.00
PROFILER PowerRack $1,798.00
PROFILER Remote $ 469.00
At a glance!
The Kemper Profiler MK 2 Series isn’t just about doing more. It’s about doing it better, faster, and without compromise. With unmatched tonal power, surgical precision, and effortless usability, this is the most complete and forward-thinking Profiler platform yet.
The Billy Idol guitarist rides his Knaggs into Nashville.
There’s nothing subtle about Billy Idol, so it tracks that there’d be nothing subtle about the guitars used onstage by his longtime guitarist, Steve Stevens. Famous for his guitar work with Idol and the Grammy-winning symphony of sustain “Top Gun Anthem,” Stevens brought a brigade of eye-popping signature electrics and some choice other jewels out on the road with Idol this spring.
The tour touched down at Bridgestone Arena in downtown Nashville in May, and while Stevens was jetting into town, PG’s John Bohlinger met up with tech and guitar builder Frank Falbo to learn the ins and outs of Stevens’ rig.
Brought to you by D’Addario
Cherry Pie
This cherryburst is one of a score of single-cut Knaggs Steve Stevens signature models in Stevens’ arsenal. He plays with heavier Tortex picks and uses Ernie Ball strings, usually .010–.048s.
More, More, More (Sustain)
This Knaggs Steve Stevens Severn XF, complete with a Sustainiac pickup system, was designed to mimic the look of one of his old guitars, and the stage lights make this finish go insane. It comes out for three to four songs in any given set, including “Rebel Yell.”
Songs from the Sparkle Lounge
This Knaggs Steve Stevens, finished in silver sparkle, is outfitted with a killswitch, push-pull control knobs, and Fishman Fluence pickups. Falbo was on the R&D team that helped design the Fluences.
Other guitars backstage include a red sparkle Knaggs with PAFs, a Godin LGXT with piezo saddles and Seymour Duncan pickups that sends three signals (synth, electric, and piezo), a pair of piezo- and MIDI-equipped Godin nylon-string guitars, a dazzling Gibson Les Paul with stock Gibson pickups, a Suhr T-style electric, and a Ciari Ascender for travel and dressing-room rehearsal.
Tube Heart, Digital Brains
Stevens runs through a pair of Friedman heads—a B100 and Steve Stevens SS100, plus a third backup—with each panned hard to either the left or right. Both signals run through a Neve 8803 rack EQ into two RedSeven Amplification Amp Central Evo loadboxes, and through their impulse response programs to front of house. A Neural Quad Cortex is on hand as a backup and for fly dates.
Steve Stevens’ Pedalboard
Stevens’ pedal playground is masterminded by an RJM Mastermind GT, which lives on its own board alongside a Fractal FM3 MK II. He orchestrates most of the changes himself, but Falbo is ready to flip switches backstage in case Stevens is away from his board for a key moment.
The centre hub, built on a Tone Merchants board, carries a TC Electronic PolyTune2 Noir, Xotic Effects Super Sweet Booster, Vox wah, Ernie Ball volume pedal, Mission Engineering expression pedal, DigiTech Whammy Ricochet, Suhr Discovery, JHS Muffuletta, DigiTech Drop, ISP DECI-MATE, Walrus Voyager, Suhr Koji Comp, Zvex Super Ringtone, DryBell Vibe Machine, and Ammoon EX EQ7. An Ebtech Hum Eliminator, two Strymon Ojais, and a Strymon Zuma keep the wheels greased.
The board to the right carries a Boss RV-500, Fender Smolder Acoustic OD, Lehle Dual Expression, Boss GM-800, Empress Bass Compressor, Grace Design ALiX preamp, Fishman Aura, and a Peterson tuner. Utility boxes include an Ernie Ball Volt and a Radial J48.