Photo 1 — The essentials: a low-watt soldering iron, a stand, a small damp sponge, and a roll of “electronic silver solder” like this .020" 60/40 tin/lead rosin flux solder from Kester.
Learn to solder like a pro in this easy-to-follow demonstration.
Given the DIY nature of this issue, we thought it would be appropriate to address good soldering technique. If you’re willing to invest a few bucks in some modest tools and spend a little time practicing the basics, you can learn to wire up guitars, stomp kits, speaker cabinets, and even do some simple amp mods. Once you understand the fundamentals, you can save money and derive a lot of satisfaction from working on your own gear.
The tools.
You’ll want a decent soldering pencil (a small type of soldering iron) rated at least 25 watts, but no more than 60 watts. (Many guitar techs like a 30-watt soldering iron for working on guitars and amps, and a 15-watt iron for working inside stompboxes and on delicate printed circuit boards.) You’ll also want a stand to hold the hot iron when not in use, a damp sponge, and some rosin core solder made for electronic work (Photo 1).
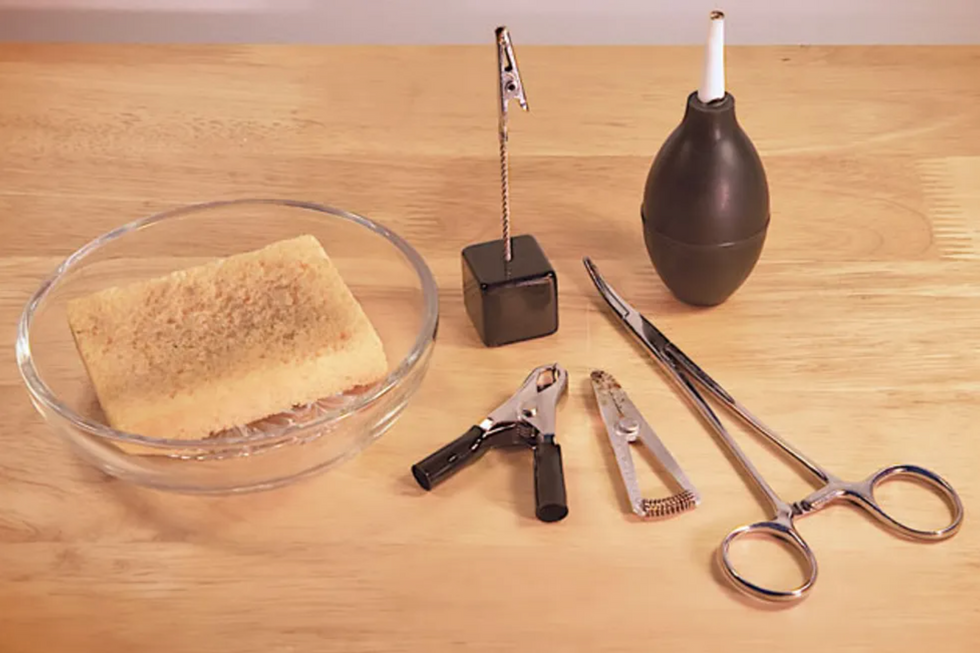
Photo 2 — If your soldering stand doesn’t house a sponge, just put a damp household sponge in a glass or ceramic dish. Other helpful tools: a hemostat and small clamps to hold parts still as you solder them, and a “solder sucker” bulb for removing solder.
You should also have some basic hand tools, such as wire strippers, needle-nose pliers, wire cutters, and something to hold the wire in place while a solder joint cools (Photos 2 and 3).
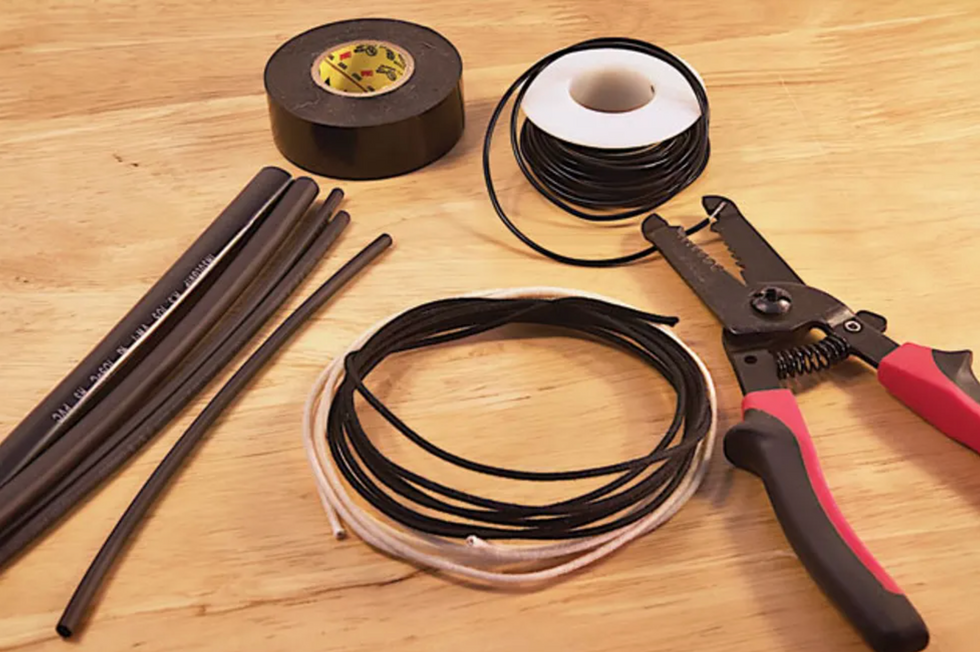
Photo 3 — In addition to hook-up wire, you’ll want wire strippers. Alternatively, luthier suppliers offer old-school “push-back” wire with a waxed cotton jacket (center) that eliminates the need for stripping off the plastic insulation from the end of the wire. Electrical tape and heat shrink tubing come in handy when you need to protect or insulate your work.
There are tools sold specifically for holding wires and parts, available through an electronics supply house.
Step 1: Prepare the Joint
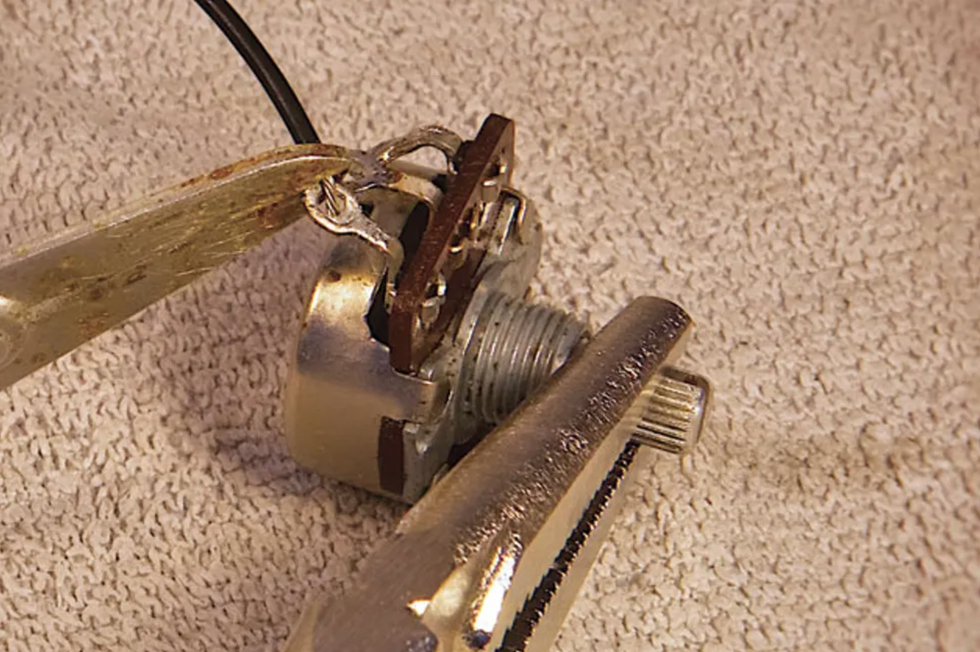
Photo 4 — Before you attempt to solder a connection, the wire and component must be secured to assure they remain absolutely motionless. Here, a spring-loaded heat-sink clamp holds the wire in place while a vice grip gently clamps the pot shaft.
For every joint, you need to find a way to hold the wire in position without using your hands (Photo 4). Wrap the wire through the solder lug once to make it hold tightly on its own, use tape to hold it in place, lay a pair of pliers on the wire to hold it firmly where you want it, or use a mechanical soldering aid to hold it. Use whatever works, except holding the wire manually. When you make a solder connection and rely on your hands to hold the soldered wire steady while the joint cools, you will fail—no human hands are steady enough to hold anything perfectly still, and you want the wire to remain absolutely motionless while it cools. If there is movement, the result will be internal fractures in the solder.
Step 2: Clean the Tip
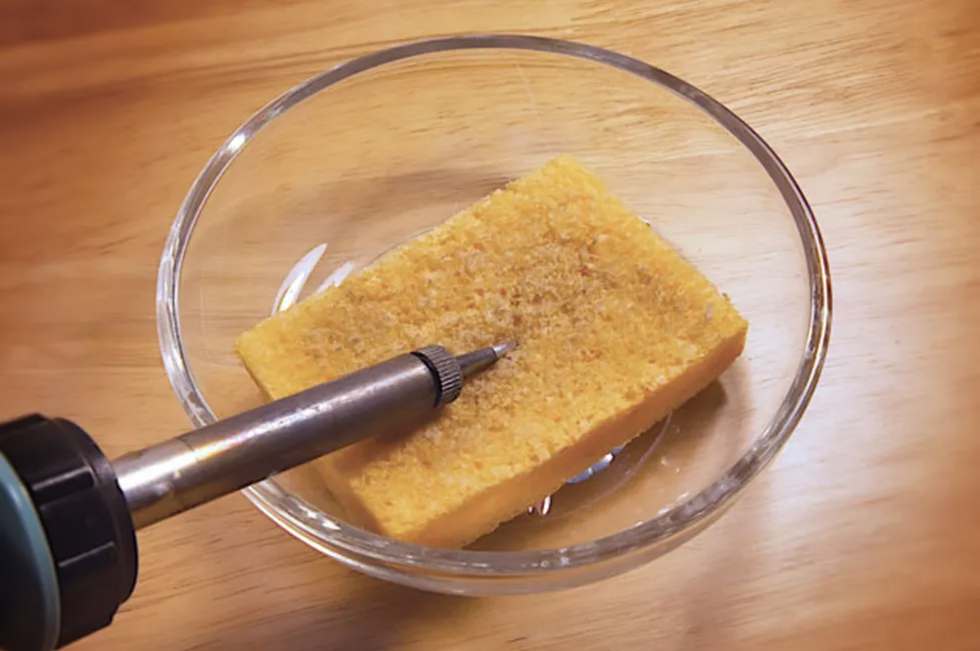
Photo 5 — Wipe the hot tip with a damp sponge to keep it clean.
The tip must be cleaned before each and every joint—you can use the damp sponge for this (Photos 5 and 6).
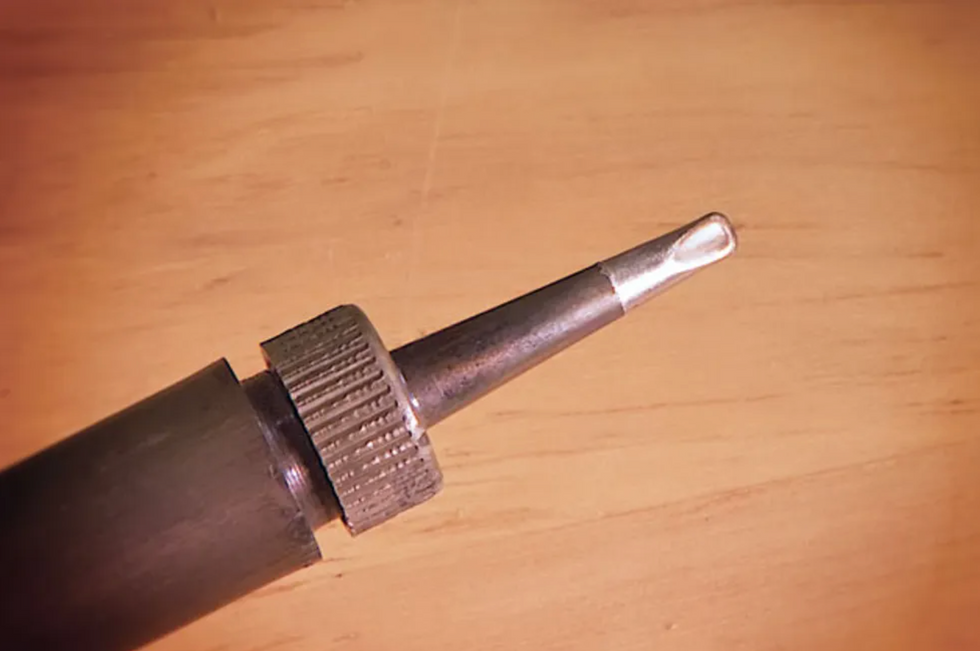
Photo 6 — A clean, dross-free tip looks smooth and shiny.
Solder produces a by-product called dross very, very quickly, and the dross fouls the tip, preventing good heat conduction and introducing waste material into your solder joints.
Step 3: Tin the Tip
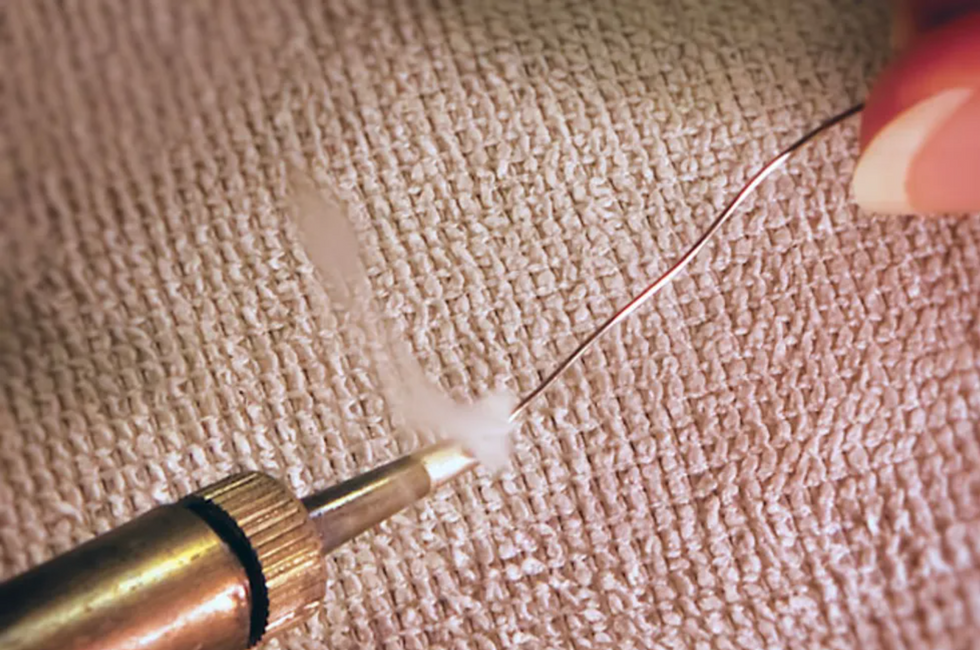
Photo 7 — Add a small amount of solder to a freshly cleaned tip just before you solder a connection. When you see this telltale puff of smoke, pull the strand of solder off the tip, shake off any excess, and then move quickly to the joint.
Immediately before you get on the joint with the heat, add fresh solder to the tip of the iron to “tin” it. Simply feed solder directly onto the tip so it’s completely coated (Photo 7). A tinned tip will provide much better heat conduction than a tip that’s clean but not tinned.
Step 4: Remove the Excess Solder
Shake off the excess solder after tinning—you want the tip coated, but not dripping. I have a fire-resistant container beside my soldering bench, and after tinning I tap the barrel of my iron on the edge of the container to knock excess molten solder into it. You can use any fire-resistant container for this, such as a tin can or ceramic bowl, but use care not to start a fire. Because solder melts at such a low temperature the risk of a fire is very low—molten solder is unlikely to ignite even highly flammable materials like paper—but use care anyway!
Step 5: Get on the Joint Right Away
As soon as you’ve removed the excess solder from the tip, get right on the joint. By “joint,” I mean the wire and the solder lug, or the wire and the back of the pot, or whatever it is you’re soldering. Dross will start to form on the tip very quickly, so as soon as the tip is prepared, get to work.
Step 6: Heat the Joint
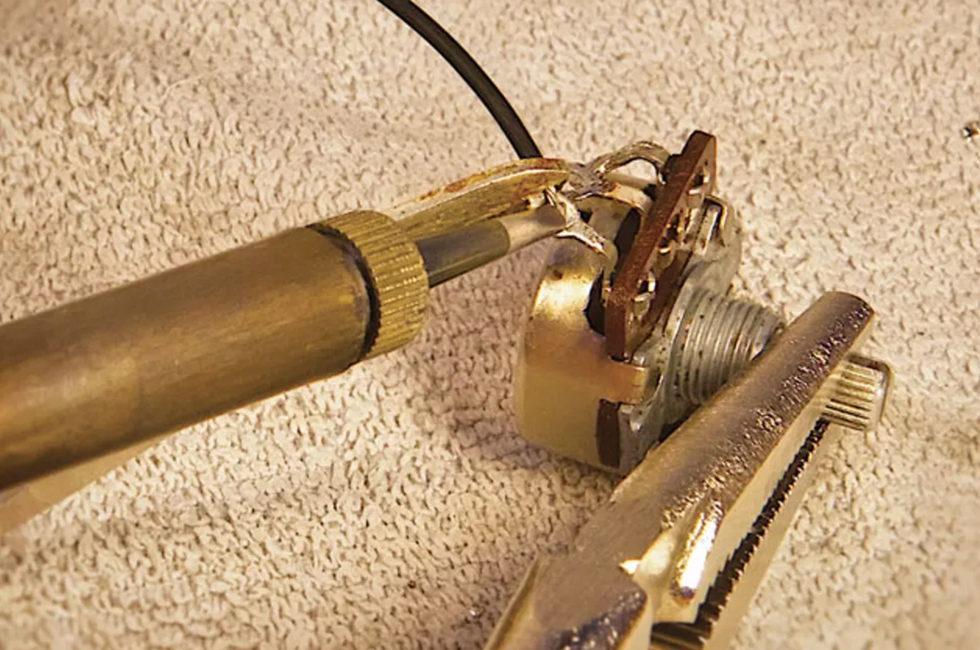
Photo 8 — Gently press the iron’s hot tip against the joint to heat it before you bring the solder into the equation. The goal is to make the joint itself hot enough to melt the solder.
Heat the joint, not the solder (Photo 8). You want the joint to be hot enough to melt the solder. It’s a given that the iron is hot enough to melt it—just feed a little onto the tip and you’ll see—but you also want the joint itself to be hot enough to do the same.
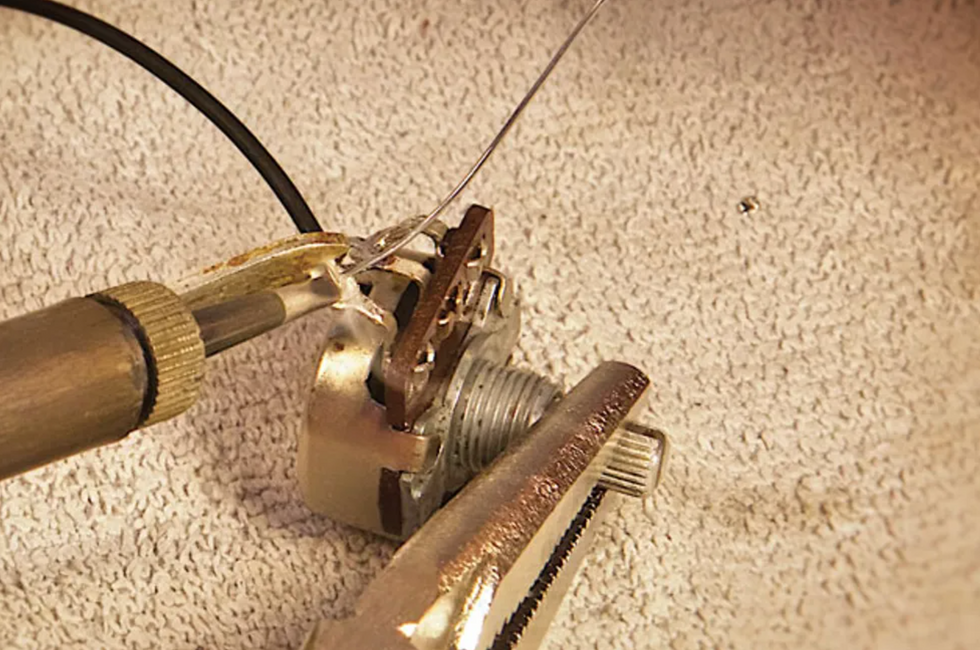
Photo 9 — While holding the tip against the joint, feed the solder onto the heated joint, not the soldering iron tip. Here the emerging puff of smoke indicates the solder is melting.
If you feed solder onto the joint without it touching the iron (Photo 9), the solder will melt and be attracted right to the joint. You can watch the solder actually wick out onto the surface you’re soldering to—this is what you want.
Step 7: Get off the Joint
As soon as the solder has flowed onto the joint properly, remove the heat from the joint. Most components can stand a fair amount of heat, but some are more susceptible to damage than others, so there’s no need to push your luck. Pots are fairly durable (unless it’s a cheap pot), so it’s highly unlikely you’ll damage one by trying to solder a wire to its back. But again, there’s no need to push your luck, so as soon as you’ve completed the joint, pull the iron away and let the joint cool with the components remaining motionless.
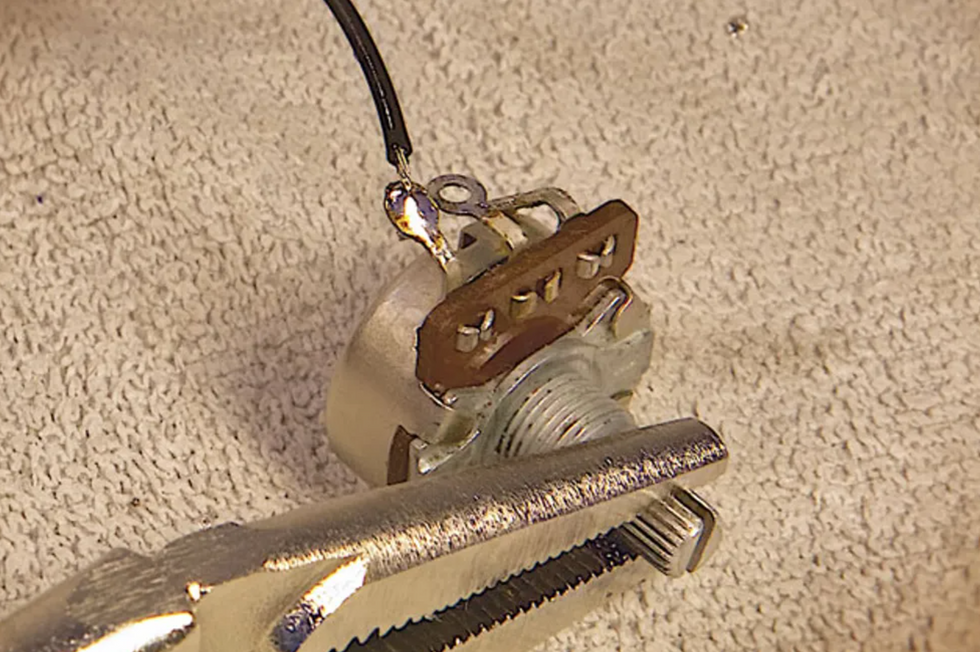
Photo 10 — When the molten solder has flowed into the joint, pull away both the solder and iron. Keep the joint motionless as it cools and don’t blow on it—the moisture in your breath will enter the cooling connection and potentially cause it to fail.
If you’re soldering to a ring-shaped solder lug, then you’ll want to fill it completely with solder (Photo 10). This will maximize the mechanical strength of the joint.
Like most skills, soldering proficiency is acquired through practice. Employing good technique will allow you to become competent all the more quickly, so follow these steps, and you’ll be soldering like a pro in no time. You should probably practice on projects that aren’t expensive or mission critical—you might want to think twice about rewiring your only guitar before that gig with Clapton tonight. But if you keep at it, you’ll be one step closer to being a consummate DIY’er.
Two Ways to Improve Your Soldering Projects
After you master the basics, there are two more skills to add to your bag of tricks: removing old solder and installing heat shrink tubing. There are plenty of occasions where you’ll wish you could remove old solder and re-use a part. For example, you might have rescued a volume or tone pot from a previous mod or project. If it’s a high-quality pot, like those from CTS, why toss it and buy a new replacement when you can put the old one back into service? It’s easy to reverse the soldering process and remove old solder and bits of wire. You simply need a solder removal tool. There are several types, including disposable braided wire that’s designed to wick molten solder away from a joint, and various vacuum pump tools and “solder suckers.” I prefer a simple rubber bulb with a heat-resistant Teflon tip.
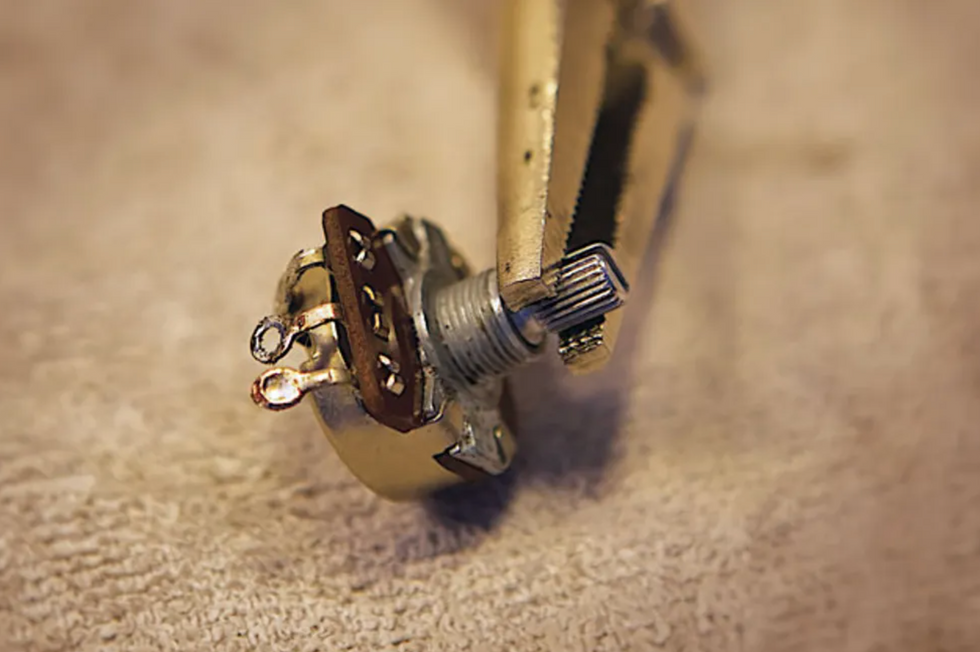
Photo 11
Here’s how it works: Stabilize your component, in this case, a pot (Photo 11). See how one lug is filled with solder? Let’s make that go bye-bye. Apply heat to the lug with a freshly cleaned soldering-iron tip.
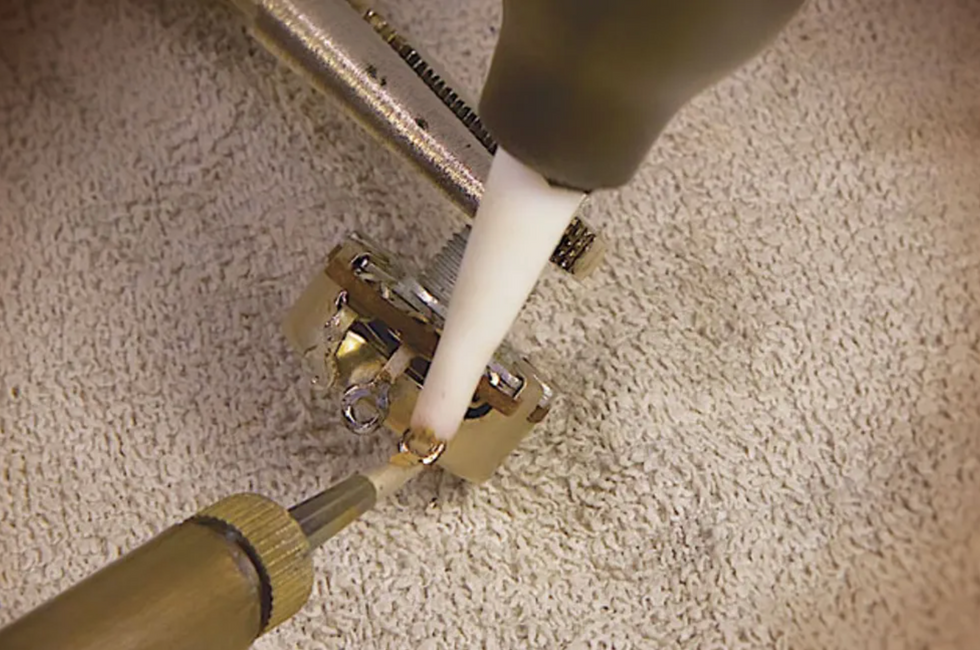
Photo 12
When you see the solder turn shiny and molten, hold the bulb away from the lug, squeeze and hold the bulb, and then bring its tip to the lug and release the bulb. Fffffft! The molten solder goes up the tip and into the bulb (Photo 12).
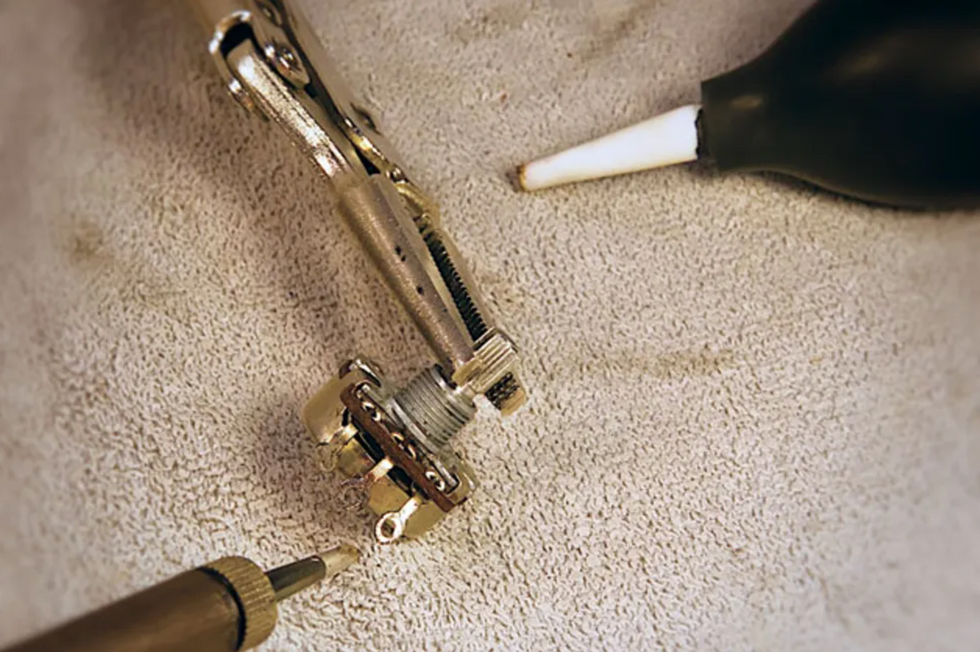
Photo 13
Look at that—a nice clean lug ready for its next mission (Photo 13).
Tip:It’s good to recycle pots and parts, but never try to reuse old solder. Clean it off and start fresh.
In case you’re wondering what happens to the old solder, every few months you simply work the tip out of the bulb, shake the collected cold solder beads into the trash, and reinsert the tip into the bulb. Good to go.
When you’re working with wire and electronics, you’ll often encounter instances where you need to insulate a connection from other wires or components. For example, you want to install a favorite old pickup into another guitar. However, the pickup leads have been cut back over the years and now they won’t reach the intended switch or pot, which means it’s time to splice short extensions to the pickup leads. No problem, except if the exposed wires touch each other or other components, they’ll create a short and you’ll hear only silence (or an annoying hum).
Electrical tape will do the job to insulate the splices, but heat shrink tubing—aka heat shrink—offers a more elegant solution. To make this work, you’ll need a heat source. Some folks use a lighter, but I prefer a heat gun because I like to avoid open flame in my workshop. Heat guns aren’t expensive and they get the job done efficiently and safely.
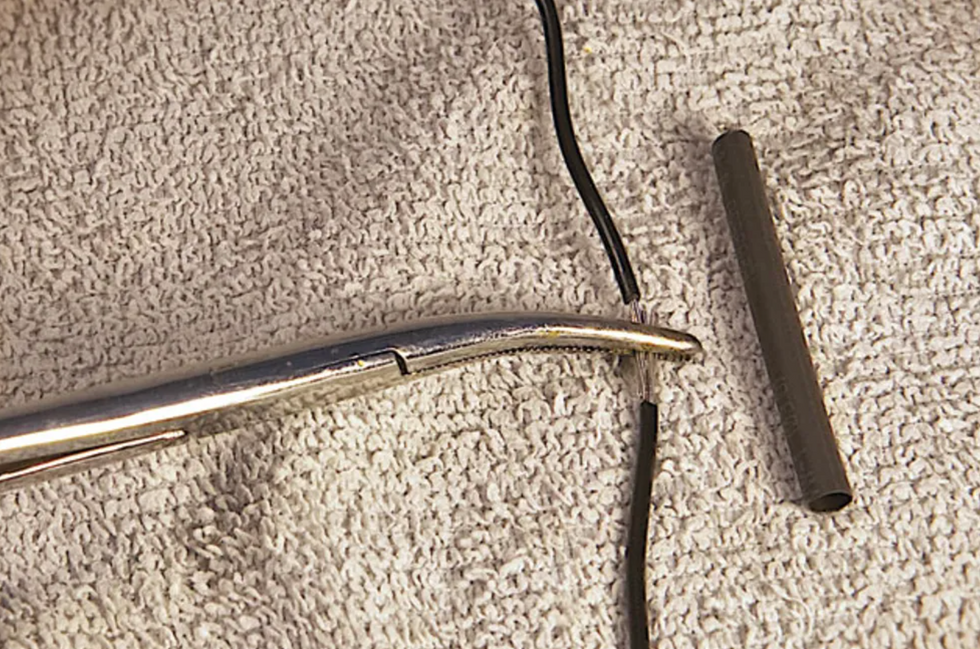
Photo 14
The details: Designed to slide over wire of different gauges, heat shrink comes in various diameters. After you select the right diameter to comfortably slip over your wire, cut off a piece that will straddle the solder splice or joint you plan to cover. The pros suggest a length that’s about three times as long as the exposed section. Use hemostats or a clamp to temporarily hold the ends together while you gauge the length you’ll need to cut (Photo 14).
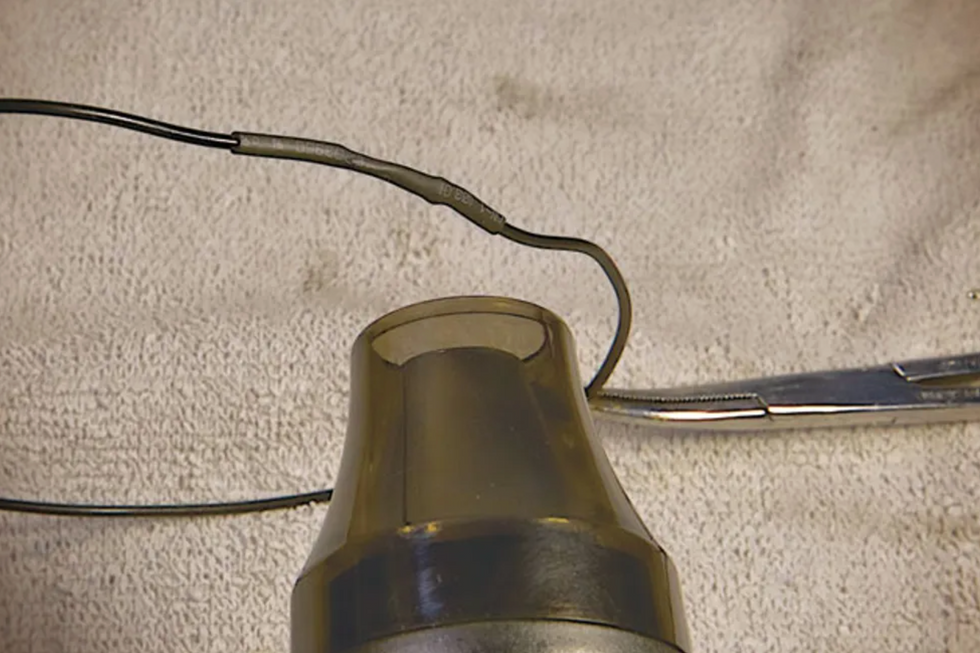
Photo 15
Next, remove the clamp, slide the heat shrink over one end of the wire (keep it far away from your hot iron) and solder the wires. When the solder has cooled, slip the heat shrink over the new joint, center it, and fire up the heat gun. The tubing will start to immediately contract around the joint (Photo 15). Don’t worry, air from the heat gun doesn’t get hot enough to compromise the solder joint. Once the tubing has completely closed up around the wire, you’re done. The joint now has a tough, new skin to protect it. —Andy Ellis
[Updated 1/13/22]
- Three Must-Try Guitar Wiring Mods - Premier Guitar ›
- The ABCs of Output Jacks - Premier Guitar ›
- The Stompbox-Builder's Secret Weapon - Premier Guitar ›
Some names you’ve heard, others maybe not. But they all have a unique voice on the instrument.
Intermediate
Intermediate
• Open your ears to new influences.
• Understand how to create interlocking rhythm parts.
• Develop a new appreciate for the rhythmic complexity of Wayne Krantz, the effortless bebop of Biréli Lagrène, and the driving force that is David Williams.
The guitar has been a major factor in so many styles of music over the last 70 years, and any experienced musician can tell you that playing any one of those styles with authenticity takes countless hours of dedication. As we learn the instrument, we seek out music that we find inspiring to help guide us toward our voice. The legends we all know in the guitar pantheon have inspired millions of players. In my musical journey over the years, I’ve always been thrilled to discover unique musicians who never attained the same recognition as their more famous counterparts. With so much music at our disposal these days, I thought this group of guitarists deserved a little more spotlight. The inspiration and knowledge they have provided me were paramount in my development, and I wouldn’t be the player I am without them.
Biréli Lagrène’s Bombastic Bop
Standards was the first jazz guitar record I really listened to, and his playing on this entire album is devastating. There is so much groove, joy, and ferocity in every note. The way he lays ideas out on the fretboard made a lot of sense to me, his rhythms were intentional and clear, and it was surprisingly easy to dig into as a rock guitarist at the time. He has an extensive catalog of jazz, gypsy jazz, and fusion records with some of the best in the world, and he’s also a killer bass player who can sing just like Frank Sinatra! Ex. 1 is over the first eight measures of “Stella by Starlight.” I stole so much vocabulary from this solo that I can still play bits from memory 20 years later. Lagrène’s treatment of two-measure chunks to play his ideas was significantly helpful. Whether it was an engaging rhythmic phrase, constant eighth-notes, or just cramming in as much as he could, I stopped worrying so much about catching every chord change after I learned this one.
Ex. 1
Stella by Starlight
Old-School Swing!
George Barnes is a unique jazz guitarist who was a contemporary of Charlie Christian, Johnny Smith, and Django. A significant part of his early work was writing and arranging for radio and television, for NBC, and he also wrote the very first electric guitar method book in 1942. A friend in Austin gave me two CDs of his: a collection of his playing from the Plantation Party radio show and an overview of his octet recordings. The octet recordings sound like unhinged cartoon music with guitar and orchestral instruments and are highly enjoyable. Ex. 2 is a line I lifted from a recording of him playing “Ain’t Misbehavin.” It was one of the hippest endings I have ever heard on a jazz tune, and although I can’t find the recording anywhere, I still use it all the time. I love the intention in George Barnes’ playing. Swinging and mischievous, he always sounds like he was having fun.
Ex. 2
The George Barnes Sextet - Lover, Come Back to Me
“Thrilling” Rhythm Solos
David Williams is one of the greatest rhythm players of all time. He is responsible for most of the memorable guitar moments on Michael Jackson’s records, and all his parts have an infectious nature. He is the primary reason I got interested in rhythm guitar, and he is still an inspiration on that front. One of my favorite examples of his playing is the breakdown in Michael Jackson’s “Thriller” (where Vincent Price does the rap). His signature thunderous right-hand approach to single-note rhythm parts is in full effect, and the natural accents between the two rhythm parts are infectious on their own but weave perfectly together. Ex. 3 is my interpretation of two interlocking parts in this style. He’s said in interviews that his concept as a player was to develop “rhythm solos” that could stand out front in a song, and this is a perfect example of that.
Ex. 3
Thriller
(Better than) Average Riffs
Though Hamish Stuart is most known for being an original member of the Average White Band, the singer/guitarist/composer/producer also did extensive work with heavyweights such as George Benson, Paul McCartney, Chaka Khan, and Aretha Franklin. Though AWB was still working until 1983, Hamish was doing sessions with various artists as a sideman in the early ’80s, including this excerpt from “Move Me No Mountain” off Chaka Khan’s Naughty from 1980 (Ex. 4). I’ve always loved the interplay between these two parts, range-wise and rhythmically. The lower pick line hits some unusual 16th-note placements, and the higher dyads have a churn to them that is amazing. Both parts together feel different rhythmically from anything I have ever heard but sound so cool and unique.
Ex. 4
Chaka Khan - Move Me No Mountain
Wayne Krantz
Wayne Krantz is one of those guys that hit me like a lightning bolt. Upon hearing him, I felt like I had “permission” to play more with the fingers of my right hand, use jagged and intentional rhythms, and above all, to play more naturally. Wayne has always played like himself. His control over rhythm and articulation alone is legendary, not to mention the vast body of unique work he has created. Ex. 5 is an excerpt from the only solo I ever learned of his, from “Infinity Split” off 1999’s Greenwich Mean. I love this solo because it is incredibly engaging rhythmically and melodically, but almost 100 percent inside the harmony. This solo taught me more about rhythmic placement and articulation than anything.
Ex. 5
Wayne Krantz - Infinity Split
Though I could only grab a certain percentage of these guys’ “vocabulary,” learning these parts over the years helped me find my sound. The result was an attempt to emulate some of their musicality in my way, rather than outright imitating them. Anything you hear that grabs your interest is probably worth sitting down and figuring out. While we might not mention the guitarists above alongside Hendrix or Van Halen, they have all done their part to put a brick in the cathedral, furthering music, and the instrument.
Seven previously-unheard Bruce Springsteen records will be released for the first time this summer with “Tracks II: The Lost Albums,” coming June 27.
A set spanning 83 songs, "The Lost Albums" fill in rich chapters of Springsteen’s expansive career timeline — while offering invaluable insight into his life and work as an artist. “'The Lost Albums' were full records, some of them even to the point of being mixed and not released,” said Springsteen. “I’ve played this music to myself and often close friends for years now. I’m glad you’ll get a chance to finally hear them. I hope you enjoy them.”
From the lo-fi exploration of “LA Garage Sessions ’83” — serving as a crucial link between “Nebraska” and “Born in the U.S.A.” — to the drum loop and synthesizer sounds of “Streets of Philadelphia Sessions,” “The Lost Albums” offer unprecedented context into 35 prolific years (1983-2018) of Springsteen’s songwriting and home recording. “The ability to record at home whenever I wanted allowed me to go into a wide variety of different musical directions,” Springsteen explained. Throughout the set, that sonic experimentation takes the form of film soundtrack work (for a movie that was never made) on “Faithless,” country combos with pedal steel on “Somewhere North of Nashville,” richly-woven border tales on “Inyo” and orchestra-driven, mid-century noir on “Twilight Hours.” Alongside the announcement of “The Lost Albums,” a first look at the collection also arrives today with “Rain In The River” — which comes from the lost album “Perfect World,” and encapsulates that project’s arena-ready E Street flavor.
“The Lost Albums”will arrive in limited-edition nine LP, seven CD and digital formats — including distinctive packaging for each previously-unreleased record, with a 100-page cloth-bound, hardcover book featuring rare archival photos, liner notes on each lost album from essayist Erik Flannigan and a personal introduction on the project from Springsteen himself. A companion set — “Lost And Found: Selections from The Lost Albums” — will feature 20 highlights from across the collection, also arriving June 27 on two LPs or one CD. “The Lost Albums” were compiled by Springsteen with producer Ron Aniello, engineer Rob Lebret and supervising producer Jon Landau at Thrill Hill Recording in New Jersey.
For more information, please visit brucespringsteen.net.
Tracks II: The Lost Albums
LA Garage Sessions ’83
1. Follow That Dream
2. Don’t Back Down On Our Love
3. Little Girl Like You
4. Johnny Bye Bye
5. Sugarland
6. Seven Tears
7. Fugitive’s Dream
8. Black Mountain Ballad
9. Jim Deer
10. County Fair
11. My Hometown
12. One Love
13. Don’t Back Down
14. Richfield Whistle
15. The Klansman
16. Unsatisfied Heart
17. Shut Out The Light
18. Fugitive’s Dream (Ballad)
Streets of Philadelphia Sessions
1. Blind Spot
2. Maybe I Don’t Know You
3. Something In The Well
4. Waiting On The End Of The World
5. The Little Things
6. We Fell Down
7. One Beautiful Morning
8. Between Heaven and Earth
9. Secret Garden
10. The Farewell Party
Faithless
1. The Desert (Instrumental)
2. Where You Goin’, Where You From
3. Faithless
4. All God’s Children
5. A Prayer By The River (Instrumental)
6. God Sent You
7. Goin’ To California
8. The Western Sea (Instrumental)
9. My Master’s Hand
10. Let Me Ride
11. My Master’s Hand (Theme)
Somewhere North of Nashville
1. Repo Man
2. Tiger Rose
3. Poor Side of Town
4. Delivery Man
5. Under A Big Sky
6. Detail Man
7. Silver Mountain
8. Janey Don’t You Lose Heart
9. You’re Gonna Miss Me When I’m Gone
10. Stand On It
11. Blue Highway
12. Somewhere North of Nashville
Inyo
1. Inyo
2. Indian Town
3. Adelita
4. The Aztec Dance
5. The Lost Charro
6. Our Lady of Monroe
7. El Jardinero (Upon the Death of Ramona)
8. One False Move
9. Ciudad Juarez
10. When I Build My Beautiful House
Twilight Hours
1. Sunday Love
2. Late in the Evening
3. Two of Us
4. Lonely Town
5. September Kisses
6. Twilight Hours
7. I’ll Stand By You
8. High Sierra
9. Sunliner
10. Another You
11. Dinner at Eight
12. Follow The Sun
Perfect World
1. I’m Not Sleeping
2. Idiot’s Delight
3. Another Thin Line
4. The Great Depression
5. Blind Man
6. Rain In The River
7. If I Could Only Be Your Lover
8. Cutting Knife
9. You Lifted Me Up
10. Perfect World
Bruce Springsteen - Tracks II: The Lost Albums Trailer - YouTube
Enjoy the videos and music you love, upload original content, and share it all with friends, family, and the world on YouTube.The guitarist-of-all-trades runs us through his formidable live rig.
Rhett Schull’s a busy guy. Between being one of the most prolific YouTubers in the guitar sphere, working as a trusted hired gun, and creating his own original music, including last year’s EP The Early Days, he’s an avid cyclist. Just a week before we met up with Rhett at Eastside Bowl in Madison, Tennessee, for this Rig Rundown, he was slated to ride a 100-mile race in Stillwater, Oklahoma. Those plans were dashed when 70-mile-an-hour winds stoked a wildfire near town and burned just over 26,000 acres. But the show must go on: The next night, Schull played a gig in town, a special release for people reeling from a brutal natural disaster.
Schull’s a certified gear aficionado and tone wizard, so PG’s Chris Kies headed to Eastside Bowl to have him walk us through his current live rig. Check out the Rundown here, and stay tuned; Schull’s got more music coming later this year.
Brought to you by D’Addario.
Special Serus
Schull’s wife pointed out this Novo Serus J hanging on the wall of a guitar shop back in 2017, and it was love at first strum. Made from tempered pine and loaded with Amalfitano P-90 pickups, plus sporting an unmissable pink sparkle polyurethane finish, it’s a real looker, and one of Schull’s favorite guitars.
Third Man Thumper
After Schull did a video on the Fender Jack White Pano Verb amplifier, Fender sent him a Jack White Triplecaster Telecaster, part of his signature series of gear with Fender launched last year. Schull calls it one of the most versatile guitars he owns, with each of the three pickup options virtually splitting it into three separate guitars.
Firebird-Watching
This beauty from Gibson’s Custom Shop came to Schull following NAMM in 2020. On tour, he needs something with humbuckers and something with single-coils. Then, he thinks of what’s exciting him. These days, it’s this Firebird V, which doesn’t have a typical Firebird tone, but cuts closer to something like a Telecaster at times.
Rockin' Two With a Two-Rock
Schull runs two amps onstage, but he doesn’t run them in stereo; he believes the stereo image doesn’t translate as well in a live situation where listeners are spread across the speaker system’s field. With this Two-Rock Classic Reverb Signature and an AC15-ish David Edwards Apollo, Schull gets a “broadband” sound set for big, fat clean tones, like one giant amp on the edge of breakup.
Fun fact: Edwards surprised Schull with the Apollo when Rhett went to Florida to work on some videos.
Rhett Schull's Pedalboard
Schull’s 2024 EP is very effects-heavy, so he commissioned the pedalboard-whisperers at XAct Tone Solutions to build him this double-decker station based around an RJM Mastermind PBC/6X switcher. Some of the stomps, like the Chase Bliss Mood, are activated by MIDI, and all the different sounds from each song—from intro to chorus to bridge to finish—is set up in the RJM. If Rhett wants to go off script, he can hit the function button, which lets him engage pedals on a one-by-one basis. A Line 6 HX One is a “wildcard” pedal in this rig, filling in gaps as needed.
In addition to those machines, the rig includes a Chase Bliss Dark World, GFI System Synesthesia, Hologram Electronics Chroma Console, Boss Space Echo RE-202, GFI System Duophony (which mixes the Dark World and Synesthesia), Chase Bliss Automatone Preamp MkII (used for boost, EQ, fuzz, or overdrive depending on the song), Old Blood Noise Endeavors Beam Splitter, Source Audio ZIO, Memory Lane Electronics Tone Bender clone, and a Mythos Argonaut. A mysterious Japan-made Noel dirt pedal, finished in striking red and gifted to Shull by JHS Pedals’ Josh Scott, rounds out the collection. Utility boxes include a TC Electronic PolyTune3 Noir, Lehle Little Dual, a pair of Strymon Ojai power supplies, and a bigger Strymon Zuma supply.
Sterling by Music Man introduces the Joe Dart Artist Series Collection, featuring the Dart I, II, and III basses.
The original Dart I features the Sterling-shaped body with a single humbucker and volume knob. The Dart II, featuring the beloved Ernie Ball Music Man Caprice body, swaps the humbucker fortwo single-coil pickups, each with its own volume knob for precise, hum-free control. Completing the trilogy, the Dart III is a short-scale StingRay bass with a split single-coil pickup and single volume knob.
A blank canvas, the bass collection embodies the no-frills philosophy of the original Ernie BallMusic Man design—everything you need and nothing you don’t. All three basses are equipped with passive electronics, Ernie Ball flatwound strings, and are available in Natural or Black finishes. No tone knobs here.
“Jack Stratton and I are thrilled to team up once again with Sterling by Music Man to build affordable versions of the three best basses I've ever held in my hands. The JoeDart I, II, and III represent three different sounds and feels, three different eras of bass,and three different shades of my own work as a bassist,” said Dart. “The feel of these instruments is incredible, and the quality would be remarkable at any price point.”
This is a special “Timed Edition” release, only available for pre-order on the Sterling by MusicMan website for two months. Each bass is made to order, with the window closing on May 31st and shipping starting in September. The back of the headstock will be marked with a “2025Crop” stamp to commemorate the harvest year for this special, one-of-a-kind release. A gig bag will be included with each purchase.
All basses are priced at $499.00
For more information, please visit sterlingbymusicman.com.