Given the popularity of Les Pauls, SGs, Explorers, Flying Vs—and the thousands of other two-pickup axes inspired by these iconic models—it's no surprise I've replaced many failing 3-way switches over the years. Switches get used a lot and eventually they can wear out. When this happens, you'll hear loud popping sounds or scratchy noises, and the signal may even cut out when you're switching pickups.
Fortunately, 3-way toggle switches are easy to replace, and you can do it yourself with just a few tools and a bit of patience. It only takes a few minutes to cover the process, so let's get started.
The project.
To illustrate the steps, I'll use a 1983 Ibanez Les Paul copy that has a standard 3-way pickup selector: neck only, neck-plus-bridge, bridge only (Photo 1). Charmingly, Ibanez kept the arcane "Rhythm" and "Treble" designations for the neck and bridge pickups.
This is a cool guitar and it plays great, but the toggle switch is shot. Like many imported guitars, it has a cheap switch. I'm going to upgrade the guitar with a Switchcraft model, one of several options preferred by discerning players and professionals who are willing to pay a bit extra for reliability. Let's take a closer look.
Types of toggle switches.
On most guitars, you'll find one of two different types of 3-way toggle switches: the box style and the open style. In a box toggle switch, the internal parts are enclosed—typically in plastic—and they can fail if the prongs get overheated, especially when the switch has been re-soldered too many times. As a result, box switches tend to have a short life.
The internal parts are exposed on an open toggle switch, but open switches are usually made from better materials. Switchcraft double-pole 3-way switches boast solid construction and last a long time, which explains why they're used on so many high-quality instruments.
Open toggle switches come in three styles: short straight, tall straight, and right-angle. The short and tall straight switches have their switching apparatus below the toggle, while the switching mechanism on the right-angle switch is perpendicular to the toggle. All three are wired identically, they simply differ in depth and width. For example, guitars with shallow electronics cavities, such as the SG and many thin ES-style hollowbodies, use the right-angle switch. Gibson Les Pauls take the tall switch.
Here's an easy way to tell which type of replacement switch you need: Check out the minimum cavity size for all three Switchcraft styles at stewmac.com, and then compare these dimensions to your guitar's switch cavity.
Removing the old switch.
Using a Phillips screwdriver, remove the cover plate on the back of the guitar to access the switch cavity. If you already have an open switch and you're simply replacing it with a new one, draw a diagram of the old switch or label each wire to help you remember the connections.
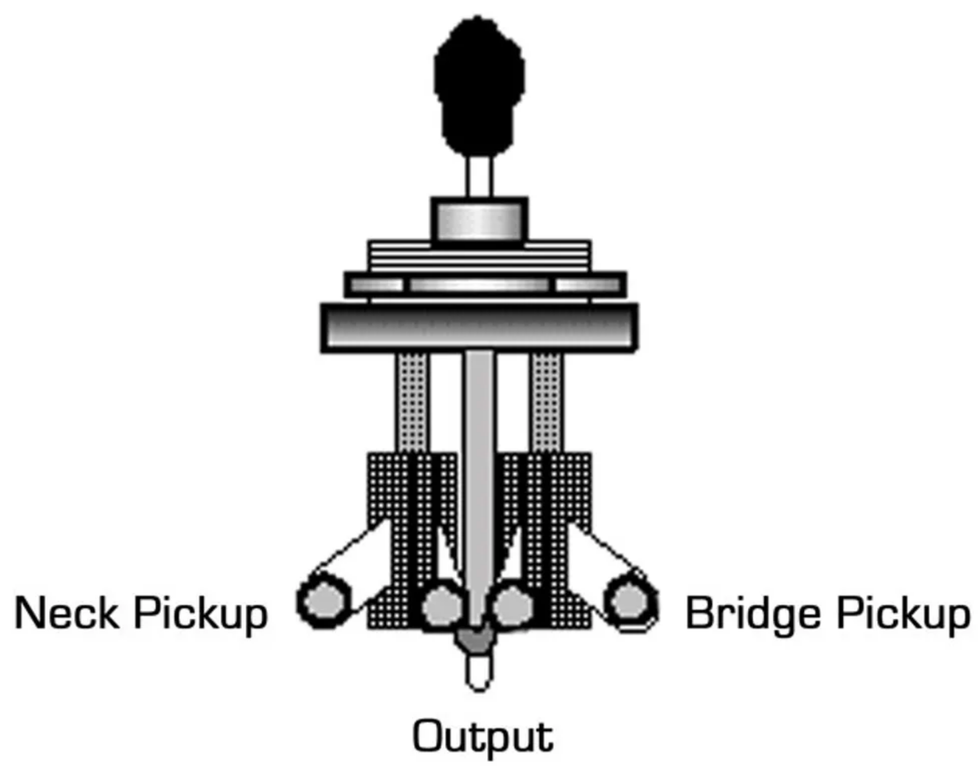
Image 1
If you're replacing a budget box switch with an open toggle switch, you can use the simple diagrams I've provided as a guide. Image 1 (above) shows a common 3-way toggle as seen from the front and Image 2 (below) shows the back view.
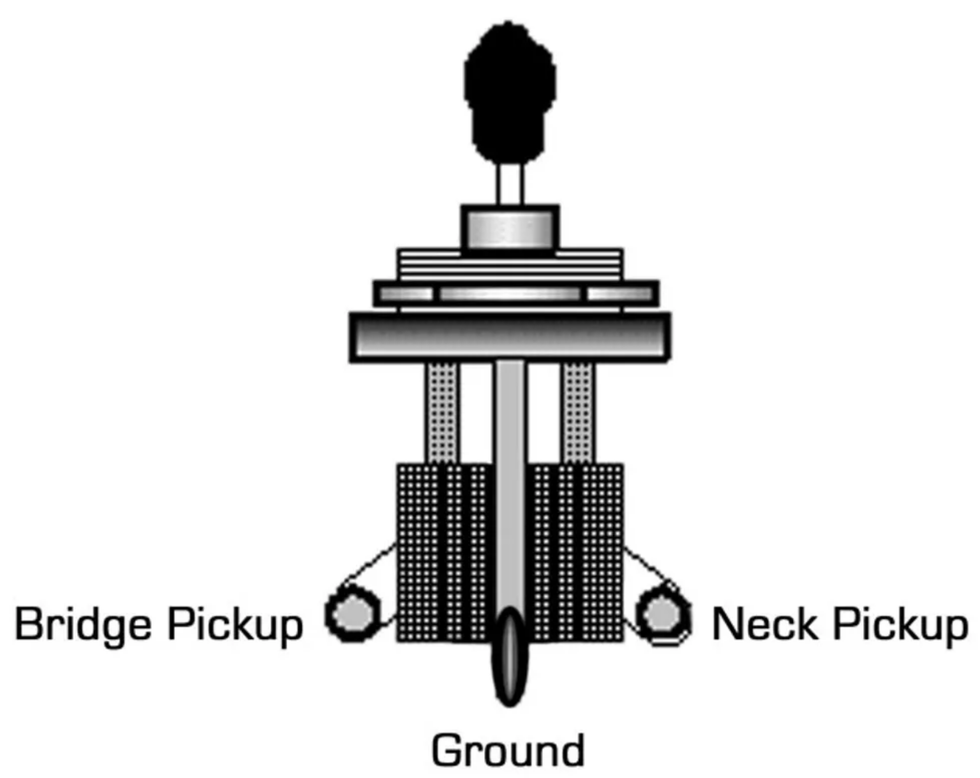
Unsolder each wire and then remove the switch by turning the mounting nut counter-clockwise. Some toggle switches have a hex nut and require a deep well socket wrench, others have a knurled collar nut that can be loosened or tightened using an adjustable toggle switch wrench.
Tip: Don't use a pair of pliers to remove the nut collar! Pliers will mar the knurled nut and if you slip, you'll also damage the top of your guitar.
Installing the new switch.
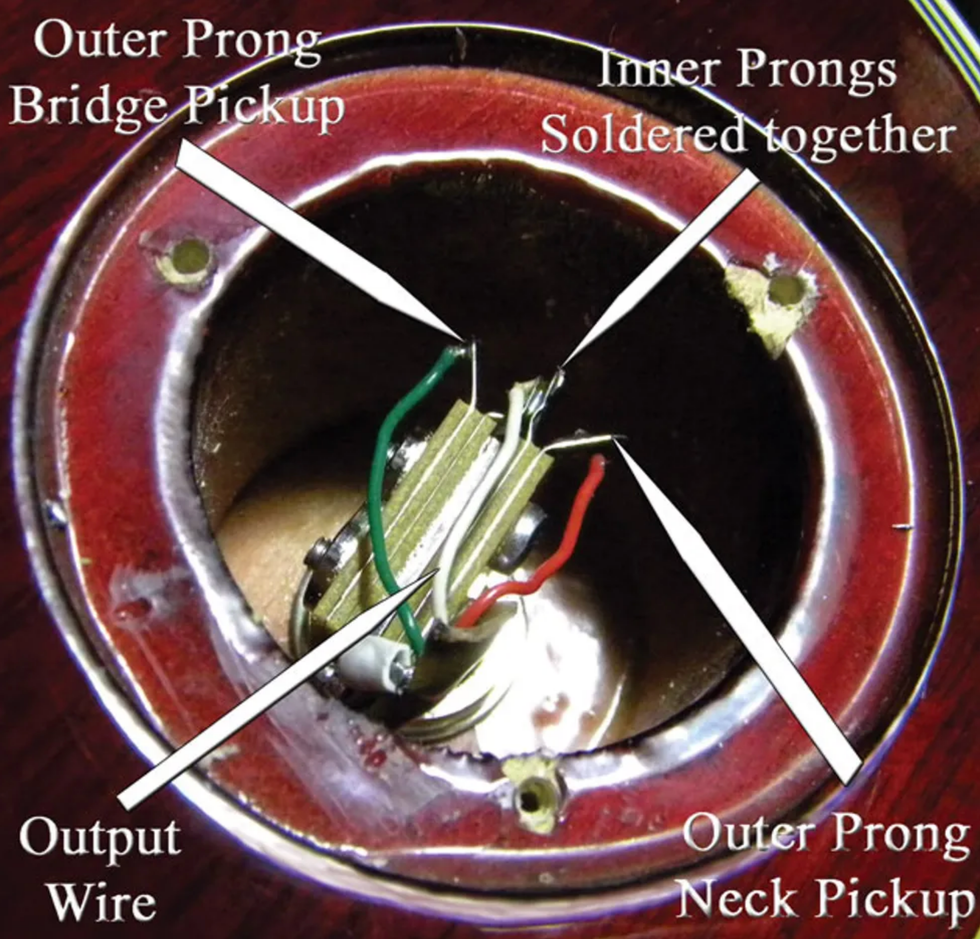
Photo 2
On the open switch I'm installing in this Ibanez, there are four prongs at one end and one prong on the opposite side (Photo 2). The four grouped prongs are the switch's inputs and output, and the single prong on the opposite side is the ground. In the group of four prongs, the two outer prongs are the inputs for the pickups and the two in the center are the outputs.
Before soldering, I use hemostats to gently bend the outer prongs (these connect to the pickups) away from the two output prongs between them. Then I crimp the two inner prongs together, because they'll share one wire from the switch's output to the output jack.
Note: Open 3-way toggles may differ physically. On a right-angle switch, for example, the ground prong and the input and output prongs are stacked vertically, and on some straight switches the ground prong is located between the two inputs, while the outputs are on the opposite side. But regardless of the layout, the principle is the same, and once you understand it you'll be able to confidently wire up your guitar. Study the wiring diagram that came with your new switch to confirm how it's configured, or use a multimeter to test and identify the input and output prongs.
Slide the new switch into the switch cavity, thread on the collar or nut, and then tighten it. Be careful when tightening the collar—it only needs to be "finger tight." If you torque it too much, you'll strip the threads. Also be sure to orient the switch so the toggle throw matches the original.
Switches get used a lot and eventually they can wear out. When this happens, you'll hear loud popping sounds or scratchy noises, and the signal may even cut out when you're switching pickups.
Switches get used a lot and eventually they can wear out. When this happens, you'll hear loud popping sounds or scratchy noises, and the signal may even cut out when you're switching pickups.
Solder up.
There are typically four wires to solder: the neck pickup, the bridge pickup, the output (this connects to the output lug on the jack), and the ground. Select a wire and clamp it to its respective prong with the hemostats, then briefly touch the tip of your soldering iron to preheat the prong and wire, and finally touch the solder to the connection just long enough to let a small amount of solder flow over the wire and prong. For detailed soldering tips, see "Tips for Replacing a Strat-style 5-way Switch."
Tip: When soldering, be careful not to heat up the prongs too much. Excessive heat can damage the switch.
Once you've soldered the four wires to their prongs, it's time to check your work. Gently tap the pickups with your hemostats for each position of the switch. You should get neck and bridge alone when the toggle is pointed up or down, respectively, as viewed from the playing position, and both when the toggle is in the center position.
If the neck and bridge toggle positions are working in reverse (i.e., the bridge pickup engages when the switch is up), then reverse the leads on the outer prongs. If the pickups are working correctly, reinstall the cover plate and you're done!
[Updated 11/10/21]


