
Fig. 1: This 1960 Gibson Les Paul Classic model needs a new Tune-o-matic bridge.
No matter what style Tune-o-matic your guitar has, it’s important to regularly inspect the bridge for wear. Eventually, you may need to replace it.
Tune-o-matic bridges are common on many guitars, including Gibson Les Paul, SG, and Firebird models. They come in several styles and shapes, depending on the guitar. Some Tune-o-matics have a retaining wire (the vintage ABR-1, for example), others have self-contained saddles like the Nashville Tune-o-matic. No matter what style Tune-o-matic your guitar has, it's important to regularly inspect the bridge for wear. Eventually, you may need to replace it—we'll see why in a moment.
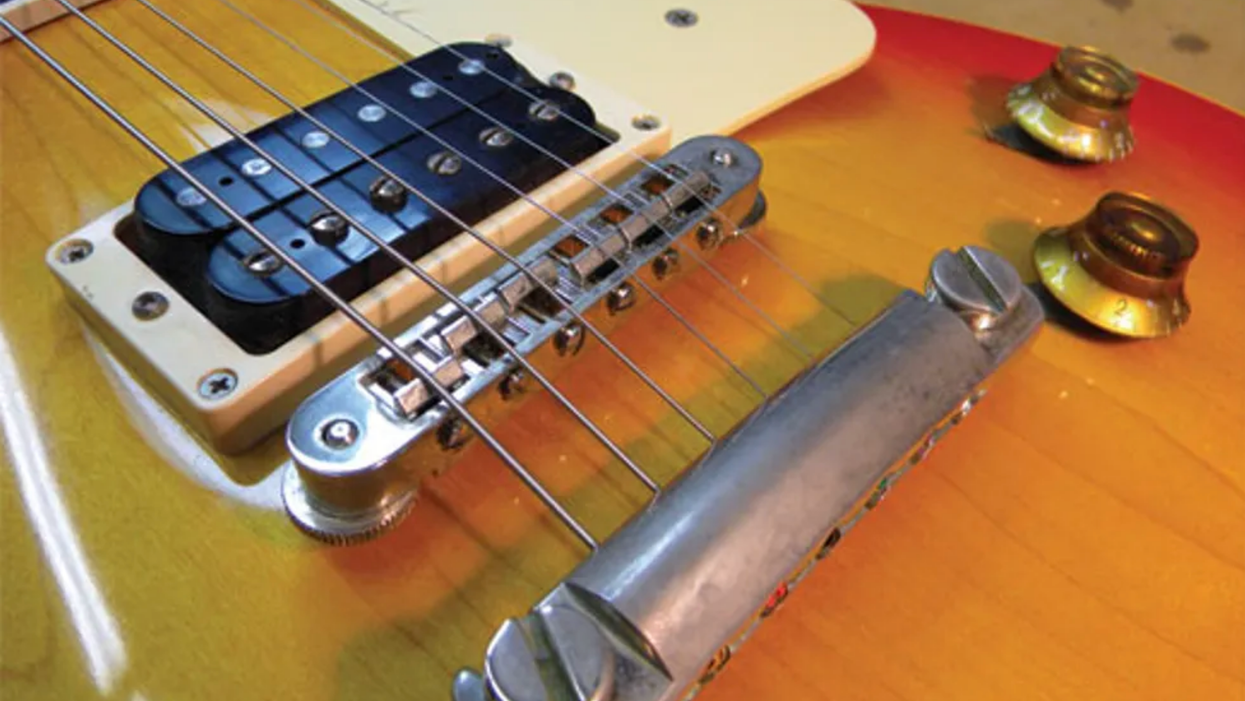
It's not hard to install a Tune-o-matic, if you know what's required and how to avoid a few pitfalls. Let's explore these points, using a 1960 Gibson Les Paul Classic model (Fig. 1) as our project guitar. Note: These techniques apply to any guitar equipped with a Tune-o-matic-style bridge.
Getting started.
The first step in any repair or upgrade is to evaluate the guitar. As part of this process, I always measure the action at the 12th fret, the neck relief, the action at the 1st fret, and also check the intonation.
From this preliminary evaluation I discovered that the action at the 12th fret on this Les Paul was 4/64" on the 1st string, 3/64" for the 3rd and 4th strings, and 5/64" for the 6th string. This is high action! In addition, the 3rd and 4th strings were much lower than the rest. This was caused by a bad case of what I call "smiling bridge syndrome." That's where the bridge begins to warp between the adjustment posts. (For more details, see the sidebar at the end of this article.)
The best way to correct this problem? Replace the bridge.
Installing the new Tune-o-matic.
For this Les Paul, I chose a Schaller Nashville Tunematic—a high-quality bridge that should last longer than the typical replacement units. When replacing a Tune-o-matic-style bridge, you need to consider several critical variables: string spacing, string angle, and the slot width.
String spacing is the distance between the strings in relation to the fretboard. This is critical: When the strings aren't aligned properly, one of the E strings can slip off the fretboard or the pickup may produce uneven string-to-string volume. At the very least, playability will suffer.
String angle describes the path each string follows from the tailpiece to the top of the bridge saddles. If this angle is not carved properly in the backside of the saddle, strings can break and you may have problems keeping the guitar in tune.
The width of the slots in each saddle is also very important. Each slot carved into the saddles should precisely match the gauge of its respective string. When a slot is too narrow, the string will bind, causing tuning problems and string breakage. When the slot is too wide, the string can rattle, buzz, and slide sideways when you bend notes.
Here's how I determine the proper spacing, angle, and slot width for each string and saddle: First I remove the old bridge, install the new one, tune the guitar, and adjust the string height at the 12th-fret roughly where my client wants it. For this guitar, that was 3/64" for the 1st string and 4/64" for the 6th string.
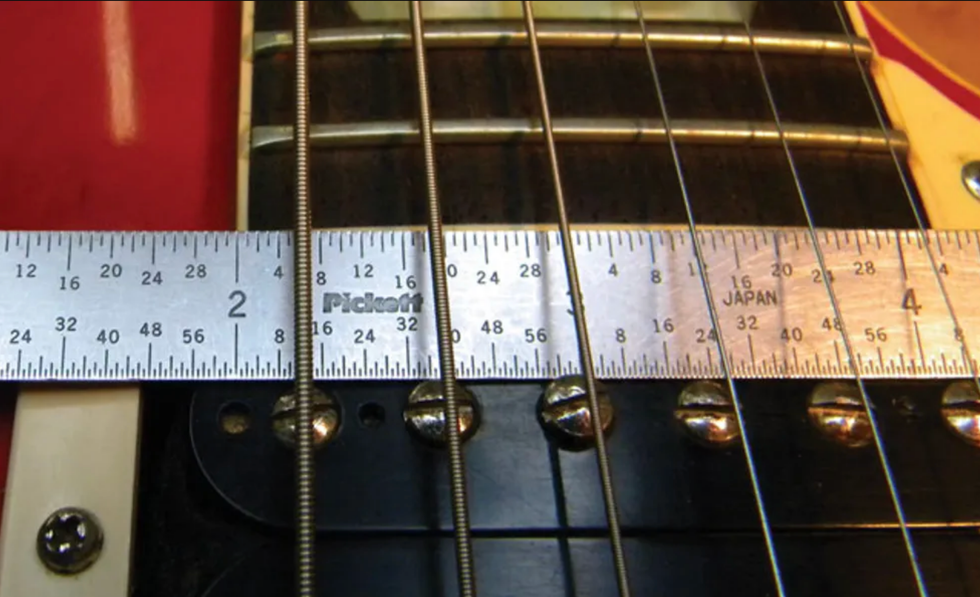
Fig. 2: Measuring the space between the edge of the fretboard and the two outside strings.
Next I measure the distance at the last fret from the edge of the fretboard to the outside edge of the 1st and 6th strings (Fig. 2). It's important that both strings are the same distance from the edge of the fretboard—approximately 1/8" in is a good starting point. Each guitar will vary slightly, depending on the width of its neck, but the key is equal spacing from the outside edge of the string to the edge of the fretboard. Again, this applies to both strings.
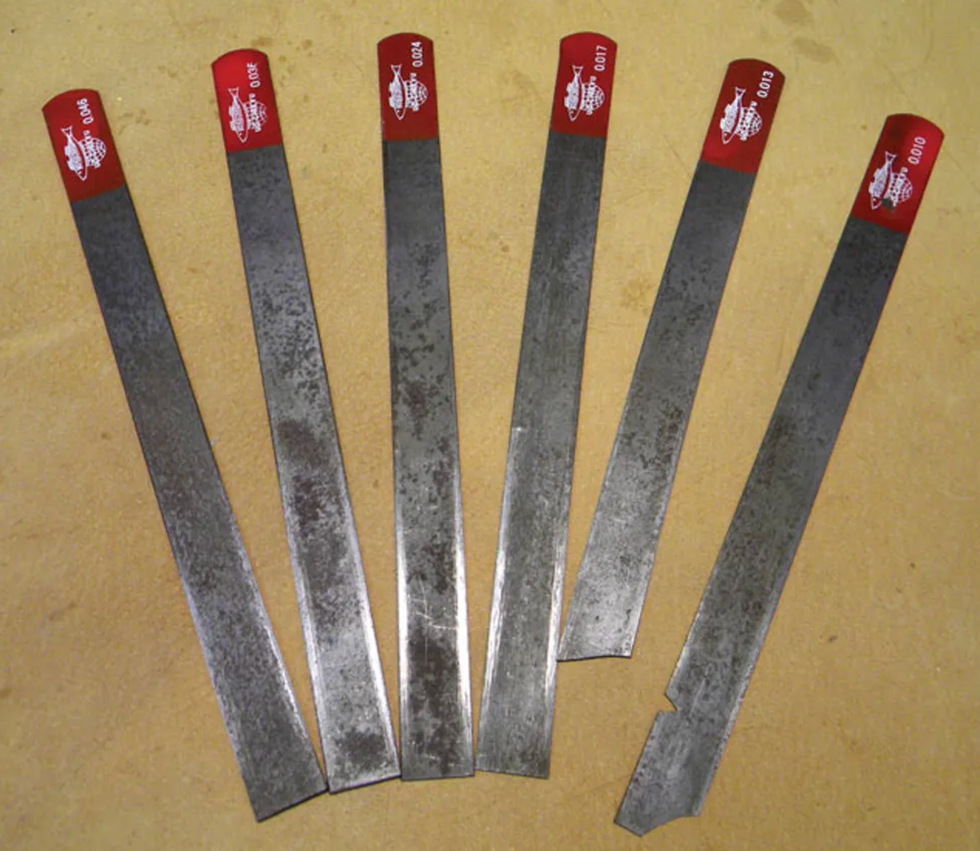
Fig. 3: Gauged nut files, which are available from luthier supply shops, are ideal for cutting the string slots in new saddles.
To seat the 1st and 6th strings, I then carve a very shallow slot into their saddles. I use nut files for this (Fig. 3)—a .010" file for the 1st saddle and a .046" for the 6th.
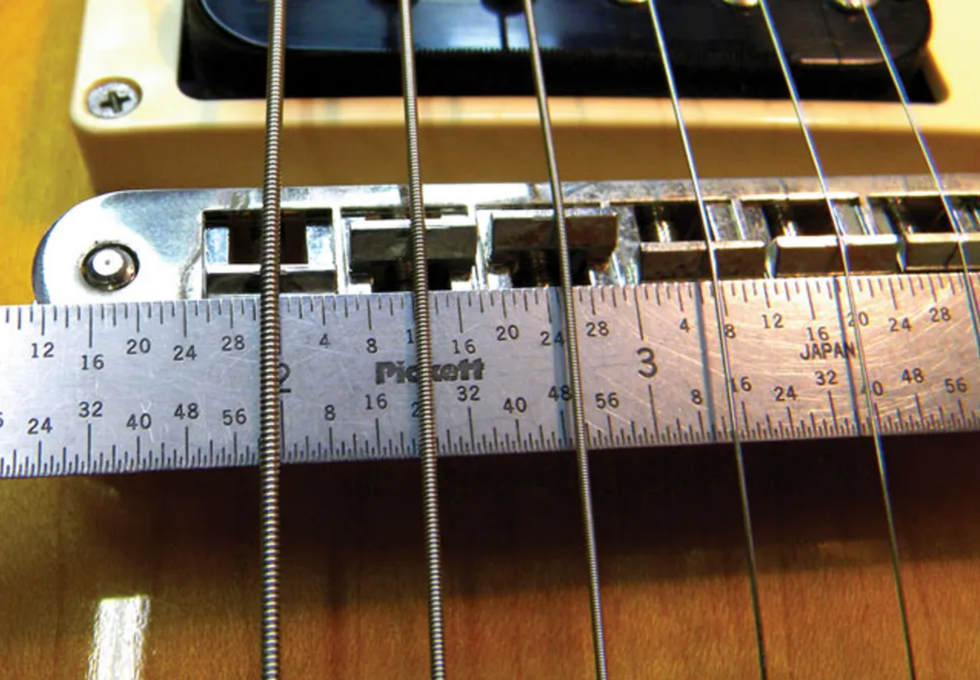
Fig. 4: Measuring the space between the edges of adjacent strings. The distance should be identical between all strings, so don't measure from the center of each string, as this will result in the bass strings being closer together than the treble strings.
Once the outside strings are set, I position the inside four strings over the unslotted saddles until the strings are equidistantly spaced, measuring from the outside edge of each adjacent string. These five gaps will be approximately 25/64" (Fig. 4). Do not measure from the center of each string, as this will result in the bass strings being closer together than the treble strings.
After I've measured the spacing—and double-checked it with a ruler—I cut a shallow slot into each saddle using nut files that match the gauge of each string.
Caution: If you're unsure about filing the string slots, consult a qualified tech or luthier. If you make a mistake with the slots, you may have to start over with a new Tune-o-matic or at least new saddles.
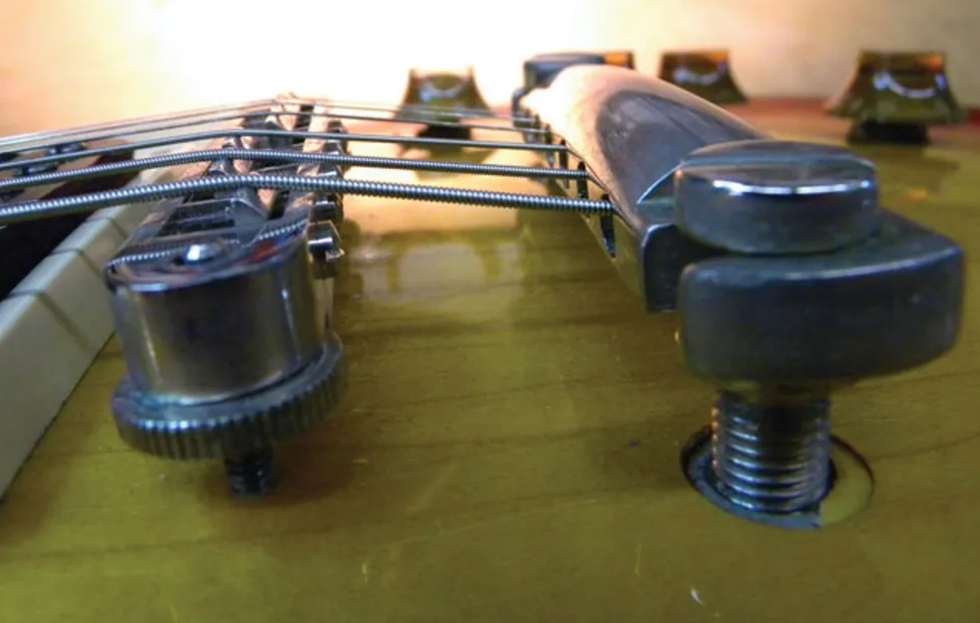
Fig. 5: Set the tailpiece height so no strings rest against the rear of the bridge frame. The only point of contact for each string should be the top of its respective saddle.
Pay close attention to the angle of each string in relation to the tailpiece. The tailpiece should be adjusted so the strings never touch the rear edge of the Tune-o-matic. Contact here can cause tuning problems, so all the strings need to clear the bridge frame (Fig. 5).
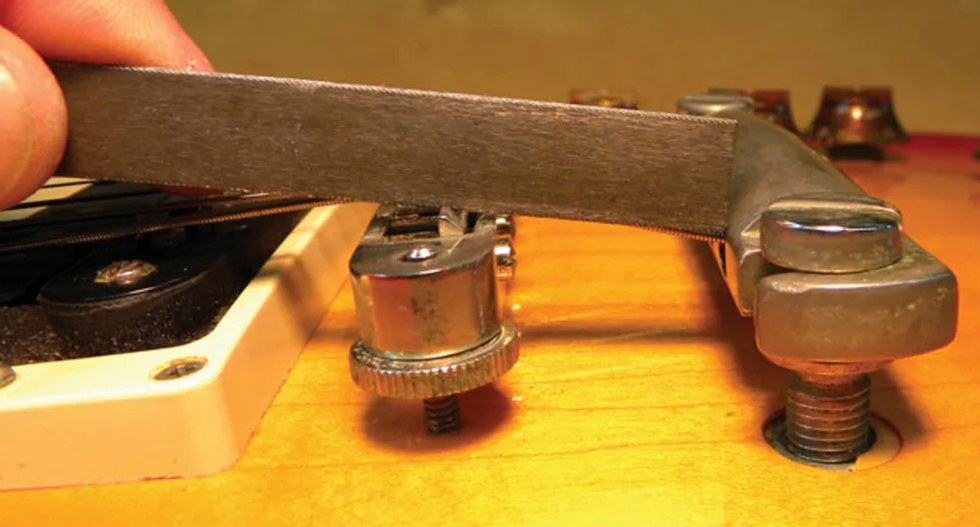
Fig. 6: File the saddle slots to allow each string to follow its natural angle to the tailpiece.
When the tailpiece is adjusted, I finish filing the string slots. This involves carefully sloping down the back of the slots to allow each string to follow its natural angle as it emerges from the tailpiece to the point where it contacts the saddle (Fig. 6).
Adjusting intonation.
The final step is to intonate the guitar by moving the new saddles forward or backward in the bridge to shorten or lengthen the vibrating portion of the string. The saddle-intonation adjustment screw is located at the rear of the bridge, and the idea is to move each saddle forward (by turning the screw counterclockwise) or backward (clockwise) using a small screwdriver. (Typically it's a Phillips or flathead, depending on the make and model of the bridge.)
Here's how to set the intonation:
- Using a high-quality electronic tuner, bring each string to pitch. But instead of playing an open string and tuning it, strike the 12th-fret harmonic and tune it to pitch.
- Starting with the 1st string, play the 12th-fret harmonic and then fret and pluck the same note. If the fretted note is sharp compared to the harmonic, move the saddle away from the neck. Conversely, if the fretted note is flat, move the saddle toward the neck. Make small adjustments and retune the harmonic each time you make an adjustment. Continue comparing the 12th-fret note to its reference harmonic until the former matches the latter.
- Repeat this process until all the 12th-fret notes on all six strings match their corresponding 12th-fret harmonics.
Once the strings are intonated and you've confirmed they're spaced, seated, and angled correctly, you're good to go with your new Tune-o-matic.
Smiling Bridge Syndrome
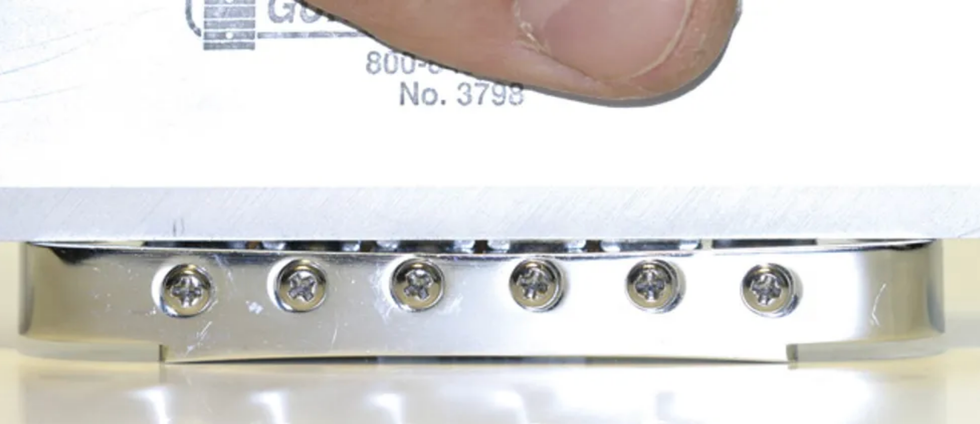
Fig. 7: See the gap in the middle of the bridge between the ruler and frame? Years of string pressure have caused this bridge to collapse, dropping the middle strings lower than the outside strings.
The last thing you want to see is your Tune-o-matic smiling ... as if to mock you! When this happens, it means the bridge has collapsed, causing the action of the middle strings to drop lower than the outside strings. Many Tune-o-matic-style bridges are made of zinc—a metal that's softer than steel—and years of downward string pressure can destroy the bridge's built-in radius that's designed to match your fretboard.
You can check this with a 6" machinist's metal ruler. Fig. 7 shows the original, collapsed Les Paul bridge, and the large gap between the ruler and the top of the bridge frame reveals the problem.
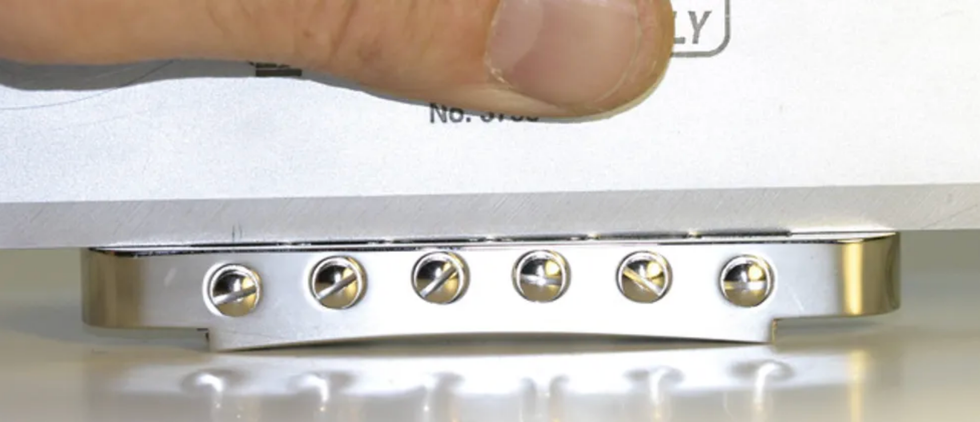
Fig. 8: This new bridge has no gap. Once it's installed, the Les Paul will be playable again.
Notice how the ruler lies flat against the top of the new replacement bridge (Fig. 8).
[Updated 10/22/21]
- Tools for the Task: Tune-o-matic-Style Bridges - Premier Guitar ›
- No-Brainer Mods 2020 - Premier Guitar ›
- DIY: How to Set up Jazzmasters & Jaguars - Premier Guitar ›
Fender’s American Vintage II Series
For these new recreations, Fender focuses on the little things that make original golden-era Fenders objects of obsession.
If there’s one thing players love more than new guitars, it’s old guitars—the unique feel, the design idiosyncrasies, the quirks in finish that all came from the pre-CNC era of instrument manufacturing. These characteristics become the stuff of legend, passed on through the years via rumors and anecdotes in shops, forums, and community networks.
It’s a little difficult to separate fact from fiction given these guitars aren’t easy to get your hands on. Fender Telecasters manufactured in the 1950s and 1960s sell for upwards of $20,000. But old is about to become new again. Fender’s American Vintage II series features 12 year-specific electric guitar and bass models from over two decades, spanning 1951 to 1977, that replicate most specs on their original counterparts, but are produced with modern technologies that ensure uniform build and feel.
Chronologically, the series begins and ends, fittingly, with the Telecaster—starting with the butterscotch blonde, blackguard 1951 Telecaster (built with an ash body, one-piece U-shaped maple neck, and 7.25" radius fretboard) and ending with the 1977 Telecaster Custom, which features a C-shaped neck, a CuNiFe magnet-based Wide Range humbucker in the neck position, and a single-coil at the bridge. The rest of the series spans the highlights of Fender’s repertoire: the 1954 Precision Bass, 1957 Stratocaster in ash or alder, 1960 Precision Bass, 1961 Stratocaster, 1963 Telecaster, 1966 Jazz Bass, 1966 Jazzmaster, 1972 Tele Thinline, 1973 Strat, and 1975 Telecaster Deluxe. The 1951 Telecaster, 1957 Strat, 1961 Strat, and 1966 Jazz Bass will also be offered as left-handed models. Street prices run from $2,099 to $2,399.
Fender '72 American Vintage II Telecaster Thinline Demo | First Look
Spec’d To Please
Every guitar in the series sports the era’s 7.25" radius fretboard, a mostly abandoned spec found on Custom Shop instruments—Mexico-made Vintera models, and Fender’s Artist Series guitars like the Jimmy Page, Jason Isbell, and Albert Hammond Jr. models. Most modern Fenders feature a 9.5" radius, while radii on Gibsons reach upwards of 12". Videos experimenting with the 7.25" radius’ playability pull in tens of thousands of viewers, suggesting both a modern fascination with and a lack of exposure to the radius among some younger and less experienced players.
T.J. Osborne of the Brothers Osborne picks an American Vintage II 1966 Jazzmaster in Dakota red.
Bringing back the polarizing 7.25" radius across the entire series is a gamble, and it’s been nearly five years since Fender released year-specific models. But Fender executive vice president Justin Norvell says that two years ago when the Fender brain trust was conceptualizing the American Vintage II line, they decided the time was right to “go back to the well.”
“We’ve been doing the same [models], the same years, over and over again for 30 years,” says Norvell. “We really wanted to change the line and expand it into some new things that we hadn’t done before and pick some different years that we thought were cool.”
“It takes a lot of doing to go back in time and sort of uncover the secret-sauce recipes.”—Steve Thomas, Fender
To decide on which years to produce, Fender drew from what Norvell calls a “huge cauldron of information” from Custom Shop master builders to collectors with vintage models to former employees from the 1950s and 1960s. The hands-on manufacturing of Fender’s golden years meant guitars produced within the same year would have marked differences in design and finish. So, the team had to procure multiple versions of the same year’s guitar to decide which models to replicate. Norvell says some purists would advocate for the “cleanest, most down-the-middle kind of variant,” while others would push for more esoteric and rare versions. Norvell says that ultimately, the team picked the models that they felt best represented “the throughline of history on our platforms.”
Simple and agile, the Fender Precision Bass—here in its new American Vintage II ’54 incarnation—earned its reputation in the hands of Bill Black, James Jamerson, Donald “Duck” Dunn, and other foundational players.
Norvell says the American Vintage II series was developed, in part, in response to calls to reproduce vintage guitars. Just like with classic cars, he says, people are passionate about year-specific guitars. Plus, American Vintage II fits perfectly with the pandemic-stoked yearning for bygone times. “For some people, these specific years are representative of experiences they had when they were first playing guitar, or a favorite artist that played guitars from these eras,” says Norvell. “These are touchstones for those stories, and that makes them very desirable.”
Cracking Codes
Fender’s electric guitar research and design team, led by director Steve Thomas, dug through the company’s archive of original drawings and designs—dating all the way back to Leo Fender’s original shop in Fullerton, California. They found detailed notes, including some documenting body woods that changed mid-year on certain models. Halfway through 1956, for example, Stratocaster bodies switched from ash to alder. That meant the American Vintage II 1957 Stratocaster needed to be alder, too. That, in turn, meant ensuring enough alder was on hand to fulfill production needs.
Among the series’ Stratocaster recreations is this 1973-style instrument, with an ash body, maple C-profile neck, rosewood fretboard, and the company’s Pure Vintage single-coils.
Thomas and his team discovered another piece of the production puzzle when researching how pickups for that same 1957 Strat were made. “We realized that if we incorporated a little bit more pinch control on the winders, we could more effectively mimic the way pickups would have been hand-wound in the ’50s,” says Thomas. “It takes a lot of doing to go back in time and sort of uncover the secret-sauce recipes.”
Thomas proudly calls the guitars “some of the best instruments we’ve ever made here in the Fender plant,” pointing to the level of detail put into design features, including more delicate lacquer finishes which take longer to cure and dry, and vintage-correct tweed cases for some guitars. New pickups were incorporated in the series, like a reworking of Seth Lover’s famed CuNiFe Wide Range humbuckers, which were discontinued around 1981. Even more minute details, like the width of 12th fret dots and the material used for them, were labored over. Three different models in the line feature clay dot inlays at unique, year-specific spacings.
Ironically, modern CNC manufacturing now makes these design quirks consistent features in mass-produced instruments. While the hand-crafted guitars from the ’50s and ’60s varied a lot from instrument to instrument. “Everything needs to be located perfectly, and it wasn’t necessarily back in the day,” says Norvell. “Now, it can be.”
Don’t Look Back
With this new series so firmly planted in the rose-tinted past, Fender does run the risk of netting only vintage-obsessed players. But Norvell says the team, despite being sticklers for period-correct detail, sought to strike a balance between vintage specs, practicality, and playability. The 1957 Stratocaster, for example, has a 5-way switch rather than the original’s 3-way switch. Norvell also asserts that the “ergonomic” old-school radius feels great when chording. “It might not be [right for] a shred machine, but it feels great and effortless.”
The 1966 Jazz Bass is also represented, shown here in a left-handed version.
Norvell also pushes back on the notion that Fender is playing it safe by indulging nostalgia and leaning on their past successes. He says that while the vintage models are some of the most desirable on the market, the team “purposely did not stick to the safe bets,” citing unusual year models like the 1954 P Bass and the 1973 Stratocaster.
There’s a good reason why anything that hails back to “the good ol’ days” hits home with every generation. We’re constantly plagued by a belief that what came before is better than what we’ve got now. But with the American Vintage II series, Fender makes the case that guitars from the ’50s, ’60s, and ’70s can very easily be a relevant part of the 2020s.The Red Sea was born out of the vision to provide complex signal routing options available to the live/performing musician, that up until now, are only found in a studio mixing environment.
Introducing the Red Sea, an all-analog signal routing matrix, designed for countless stereo and mono signal path routing options. The Red Sea was born out of the vision to provide complex signal routing options available to the live/performing musician, that up until now, are only found in a studio mixing environment. The Red Sea has accomplished this in a compact, easy-to-use, and cost-effective solution.
Wet | Dry | Wet
The Red Sea gives you the ability to run a FULL Stereo wet dry wet rig using only 2 amps or just 2 signals to the FOH, while also giving you complete control over your Wet & Dry mix! Use the Blend knob to control the overall mix between stereo wet effects and mono dry/drive signals.
Stereo Dual Amps
Run dual amp modelers if full stereo w/ stereo effects. Gone are the traditional ways of one amp in the Left channel and another in the Right channel. Now use the Red Sea to seamlessly blend between two separate amps in true stereo. Think of this as a 2-channel amp where you can blend anywhere between both amps.
Stereo Parallel FX
Red Sea has two independent stereo FX loops. Use each FX loop to run stereo delay's and reverb's in parallel, where each effect does not interact with each other. Huge soundscapes can be achieved with washy reverbs and articulate delay repeats while being able to blend between each FX loops mix level.
The Red Sea can also do the following routing options:
- Wet | Dry utilizing a single amp
- Clean Wet | Dry | Wet (drives DO NOT run into wet effects)
- Wet | Dry | Wet with dual delays (one in the L channel & other in R channel)
- Parallel Dual Amps (run dual amp modelers in FULL stereo)
- Convert a tube amp's serial FX Loop to a parallel FX Loop
- Stereo and Mono analog dry through (avoid latency in digital pedals)
Features:
Stardust V3 was designed to capture the sound and response of 3 distinct amplifier models.
Stardust V3 was designed to capture the sound and response of 3 distinct maxed-out amplifier models. An all-analog signal path with discrete gain stages featuring MOSFET transistors provides juicy overdrive tones with great note separation that clean up to that sparkly sound that we all love and heard in recordings of the past. Set gain and tone and control everything from your guitar. Sparkly clean to crunchy mean are all there.
You can select the amplifier voicing via the onboard toggle switch.
BSM: Voiced after a blackface amp head that was primarily targeted for bass guitar players but got famous for electric guitar classic rock tones.
VLX: Voiced after a chimey 2x10” combo offering the perfect amount of controllable crunch
DLX: Voiced after one of the most popular low wattage 1×12″ combo amps that have found their way in countless recording studios and clubs around the world.
Stardust V3 now comes with top-mounted jacks and soft-click true bypass via a high-quality relay. The pedal has loads of output volume and enhanced headroom provided by 18V DC (boosted internally) so that it can also be used as a preamp going straight into your Power Amp or AudioInterface when combined with a separate speaker simulation device.
Street price: 199 Euro / 199 USD.
For more information, please visit crazytubecircuits.com.
The Sunn O))) Life Pedal circuit has been meticulously tweaked from the original and includes a third footswitch.
Sunn O))) present an enhanced version of the Sunn O))) Life Pedal Octave Distortion + Booster, in collaboration with their comrades at EarthQuaker Devices. The Sunn O))) Life Pedal circuit has been meticulously tweaked from the original to squeeze every last drop of heavy crushing tone available. The octave section has been fine tuned to make it more pronounced without losing the bottom end and we added a third footswitch, utilizing Flexi-Switch Technology, for the octave to allow an additional method of quick and radical tone shaping.
“Working on this new version has been a great continuity of this collaboration which feels so right, and sounds so right,” says Stephen O’Malley. “It’s a really beautiful pedal and it’s also a beautiful art collaboration. I think we made something really interesting that people can enjoy to use for their own music, but also, it makes a lot of sense to release a piece of distortion as a release for our band. We’re really happy that this is a trilogy now.”
The Sunn O))) Life Pedal is designed to represent the core front end chain used in those sessions, to drive the tubes of the band’s multiple vintage Sunn O))) Model T amplifiers (or take your fancy) into overload ecstasy. This is a 100w tube amp full stack’s holy dream, or its apostate nightmare.
Tech Specs:
Sunn O))) Life Pedal is a distortion with a blendable analog octave up and a booster- Features 3 different clipping options: Symmetrical Silicon, Asymmetrical Silicon & LED, and pure OpAmp Drive
- Distortion and booster can be used independently
- Expression and footswitch control over analog octave up
- Octave blend allows total control over how much Octave is mixed into the circuit
- True bypass with silent relay based soft touch switches
- Features EarthQuaker Devices’ proprietary Flexi-Switch® Technology
- Lifetime warranty
- Current Draw: 15 mA
- Octave Distortion: Input impedance: 1 MΩ / Output impedance: <1 kΩ
- Booster: Input Impedance: 500 kΩ / Output Impedance: <1 kΩ
- List Price: $299 USD