Vintage-style, straight-bar saddles will never intonate properly—we find a way to fix this issue that doesn’t involve replacing the entire bridge.
One of my clients recently brought me a fascinating guitar to work on (Fig. 1). It's a 1993 Japanese custom-shop Fender Telecaster that screams “1962-Tele-meets-Nascar." This Tele is in excellent condition and plays great, but not in tune. The bridge has three vintage-style, straight-bar saddles. Unfortunately, these saddles will never intonate properly (and they never did back in the day), so I need to find a way to fix this intonation issue that doesn't involve replacing the entire bridge.
Fortunately, several vendors make "tilt-compensated" saddles that are perfect for this Tele. (Searching eBay or visiting websites for custom part-makers like Joe Barden or Callaham Guitars, or going to vendors like stewmac.com and allparts.com will yield a number of options for tilt-compensated saddles.) Let's see what's involved with retrofitting a Tele with this type of saddle.
Project overview.
With its cool custom paint job, this 1962 reissue looks sharp. But by today's standards, a Tele is simply not gig-worthy if you can't intonate it.
Here's the problem:
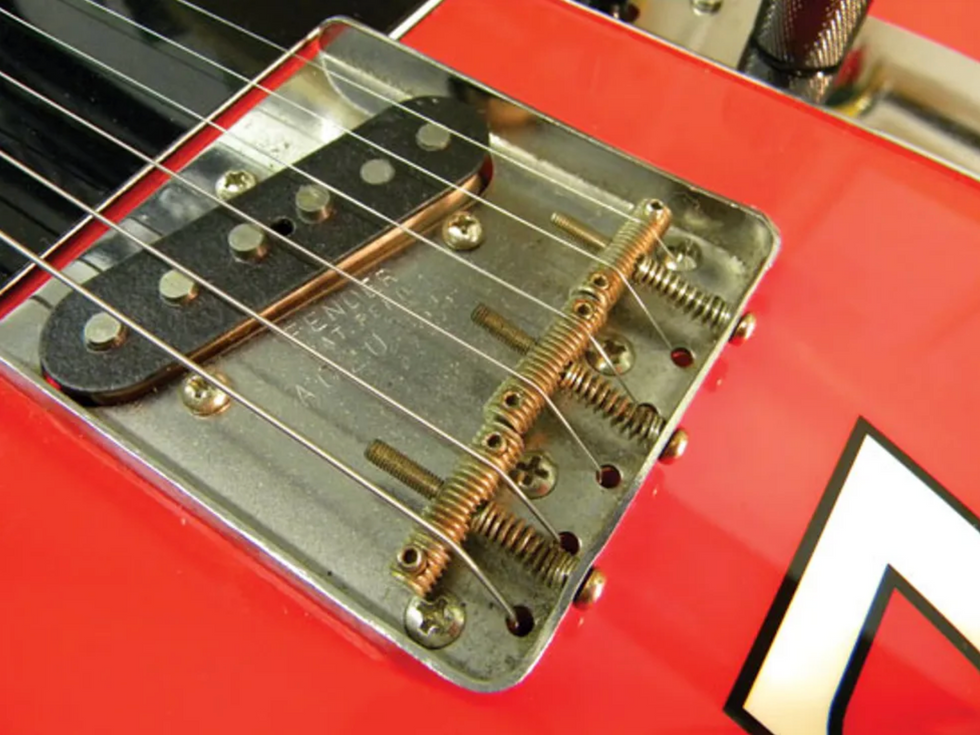
Fig. 2: This guitar came from the factory with period-correct straight-bar saddles. Unfortunately, such saddles are impossible to intonate accurately.
Two strings share each of the three straight-bar bridge saddles (Fig. 2). If you correctly intonate one of the strings in each of the pairs, this puts the other string way out of tune. The end result? Three strings are intonated and three aren't. Typically, the best-case scenario is to average the two strings on each saddle, but the strings are always more out of tune than with a correctly adjusted 6-saddle Tele bridge.
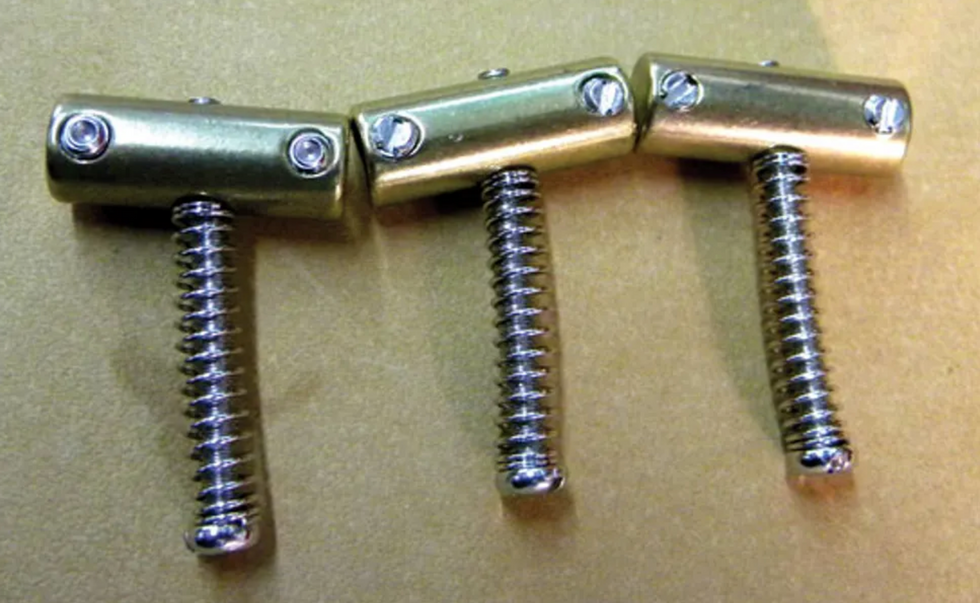
Fig. 3: These brass "tilt-compensated" saddles offer improved intonation while preserving the characteristic tone of a three-saddle Tele.
But many Tele freaks prefer the tone of a classic 3-saddle bridge (why it sounds different from the 6-saddle bridge is another discussion), so rather than replace the entire assembly, enterprising players developed the tilt-compensated scheme (Fig. 3). This allows for accurate intonation without losing the snap and twang of a classic 3-saddle bridge.
If you have a guitar with a 3-saddle bridge, you can replace the straight-bar saddles with a tilt-compensated set and have the best of both worlds. It sounds simple, right? Hey, let's just swap out a few saddles. Believe it or not, there's a lot more to it.
Getting started.
Before doing any work on a guitar, it's important to take measurements. These will help you determine if you need to make any necessary setup adjustments to the guitar you're about to modify.
After tuning the guitar to pitch, I always check three crucial things:
- The action at the 12th fret.
- The amount of relief in the neck.
- The action at the string nut.
In this case, all the measurements looked spot on. Moving from the 1st to 6th string, the 12th-fret action measured 3/64" x 4/64". The neck relief was .012" and the action at the 1st fret was 1/64" x 2/64", again moving from the 1st to 6th string. [To review the setup process for an electric guitar, see How to Set Up a Fender Stratocaster. The same basic principles apply for setting up a Telecaster.]
After taking these measurements, remove the strings and the bridge saddles. Once the saddles are off, compare them to the new tilt-compensated saddles to see if the height of the new saddles will match up.
On this Tele, the new saddles appeared to be a little taller for the two E strings—strings 1 and 6—but otherwise they matched the height of the old saddles. So I installed the new saddles and tuned the Tele to pitch, and once again took the above three measurements.
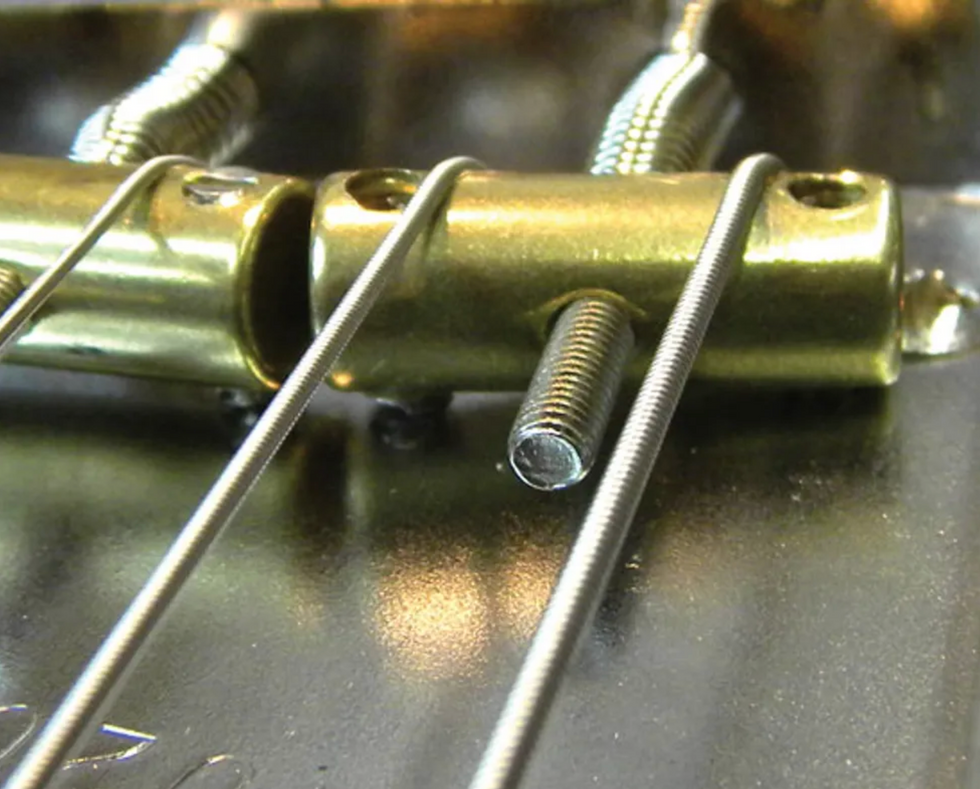
Fig. 4: With the tilt-compensated saddle, the 6th string sits too high on this guitar, even with the height-adjustment screw backed out all the way.
Overall, the action was pretty close, but the two E strings were just a little too high (about 1/64" too high), even with the height adjustment screws backed all the way out for both E strings (Fig. 4 and Fig. 5).
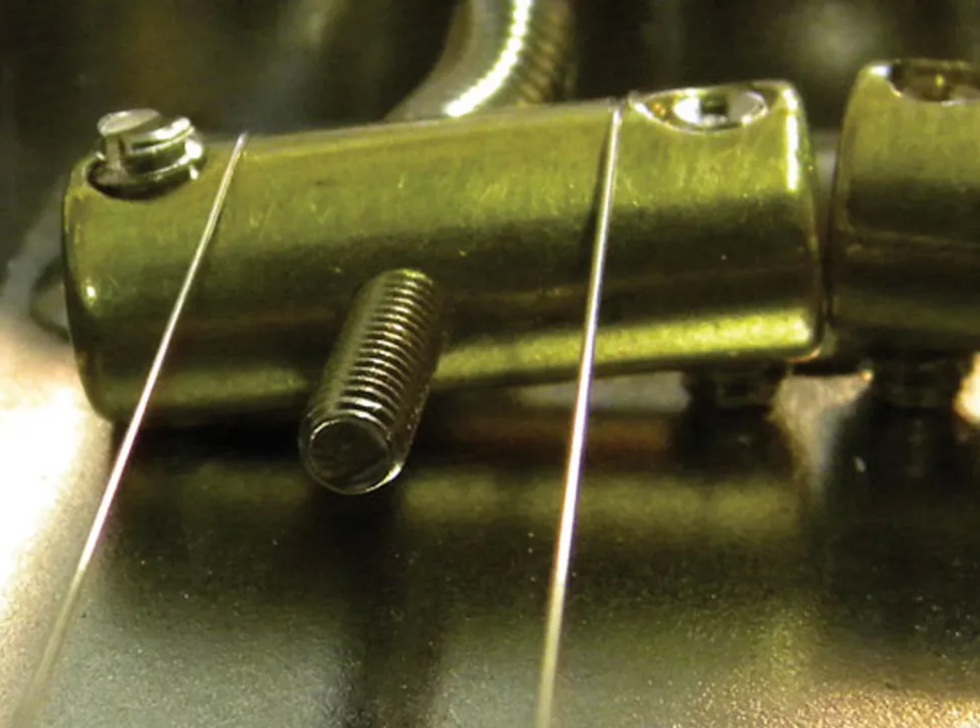
Fig. 5: Like the 6th string, the 1st string sits too high.
There is only one cure for this—remove the offending saddles and mill them down underneath.
Milling the saddles.
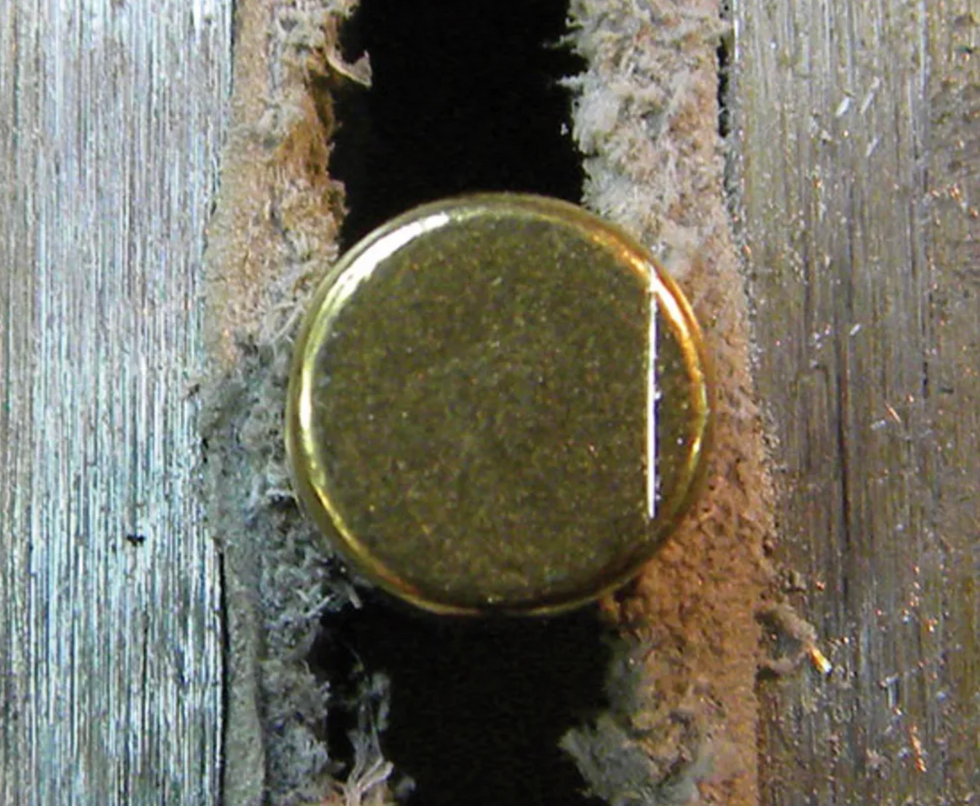
Fig. 6: When a barrel saddle sits too high in the bridge assembly, you need to remove some material from its underside. Here the saddle sits in a vise, protected by leather pads. Once it's secured, you can scribe a guideline in the end of the saddle to indicate how much brass (in this case, 1/32") needs to be milled away from the bottom.
I determined the saddles needed to be lowered 1/32" below the 1st and 6th strings. Removing this much will allow for additional adjustment in the event my client wants to lower the action more than 1/64".
I put the saddle in a vice that's equipped with leather pads on the jaws to prevent the saddle from being scratched. Then I measured 1/32" from the bottom of the saddle, and used a scribe to mark this distance. This mark tells me how far to mill the saddle (Fig. 6).
You can mill a saddle by hand on a flat surface using 80-grit sandpaper or alternatively on a belt sander or grinder. If you opt for a belt sander or a grinder, be extremely careful. All it takes is one slip and the saddle is ruined. At best, if the saddle slips out of your fingers, it will launch across the room.
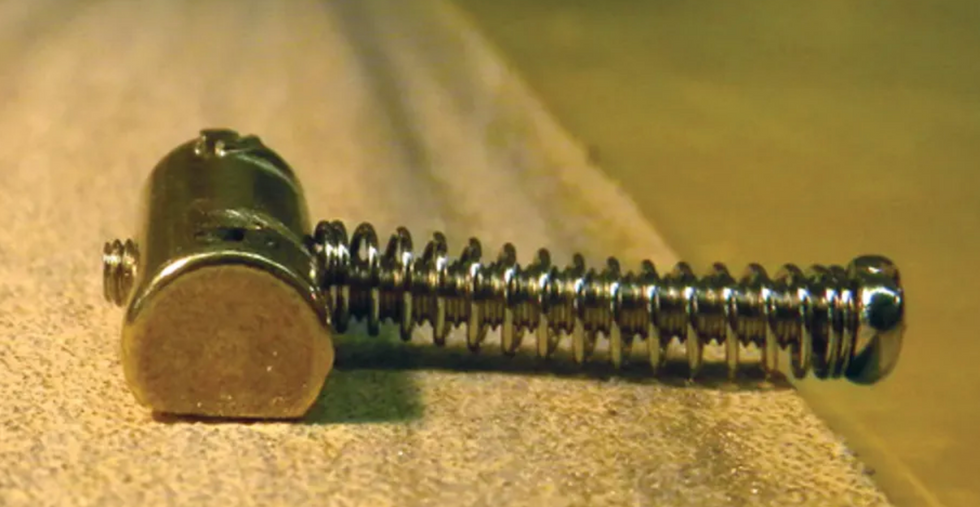
Fig. 7: A saddle in the process of being milled on a flat surface that's covered with self-adhesive, 80-grit sandpaper.
That's why I prefer to do this job by hand on a flat surface. It takes a lot longer this way, but you have much more control over the saddle, and to me, that's worth it. Fig. 7 shows the underside of a saddle in the process of being milled on a flat surface.
With saddles milled, the next step is to install them and tune the guitar to pitch. With the new saddles installed, the action looked great. Now the process of adjusting the string spacing begins.
Adjusting string spacing.
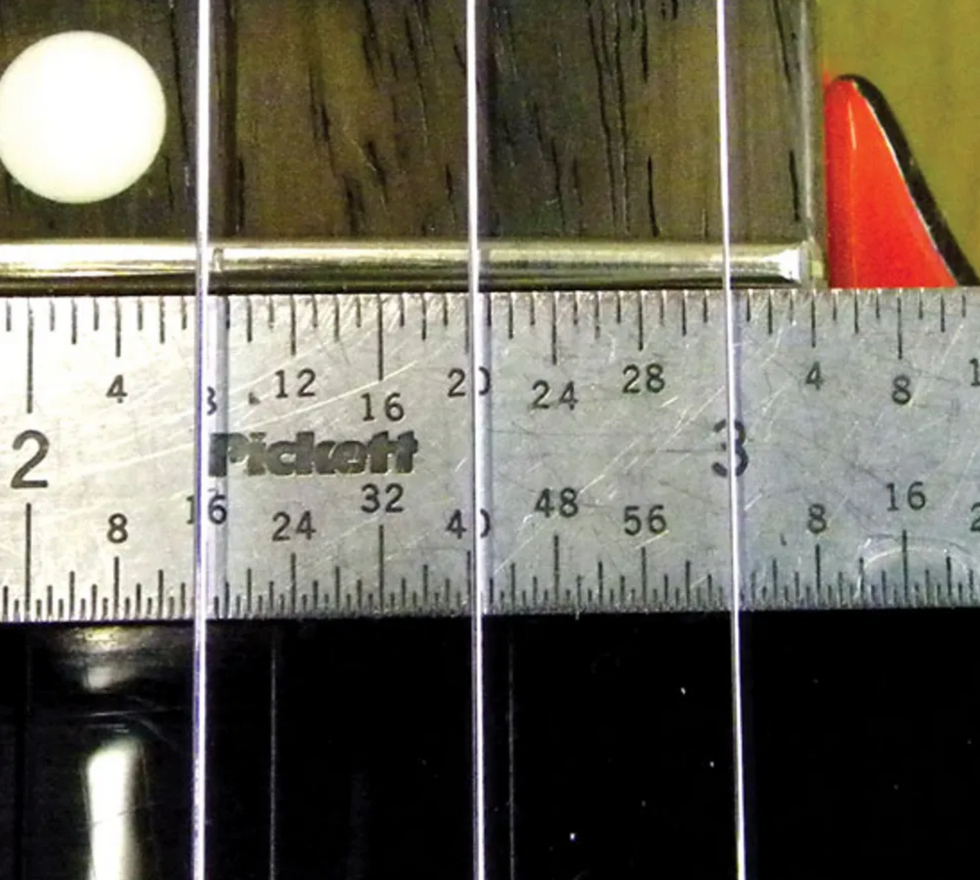
Fig. 8: Measuring the distance between the 1st string and fretboard edge.
Spacing the strings is rather tedious, but it's critical for playability. On the new tilt-compensated saddles, the strings sit on a rounded surface. To prevent the strings from sliding sideways, you need to file grooves into the saddles—one groove for each string. In addition to holding the strings securely, these grooves also ensure proper and consistent spacing.
Measure approximately 1/8" from each side of the fretboard at the last fret—this will be the starting point. Once you have the outside edges of the two E strings evenly spaced from the fretboard sides, make a small groove in the saddles to hold the strings in place.
To match the grooves to their respective string gauges, I use a string nut file. (These special gauged files are available in sets or individually from luthier supply shops.)
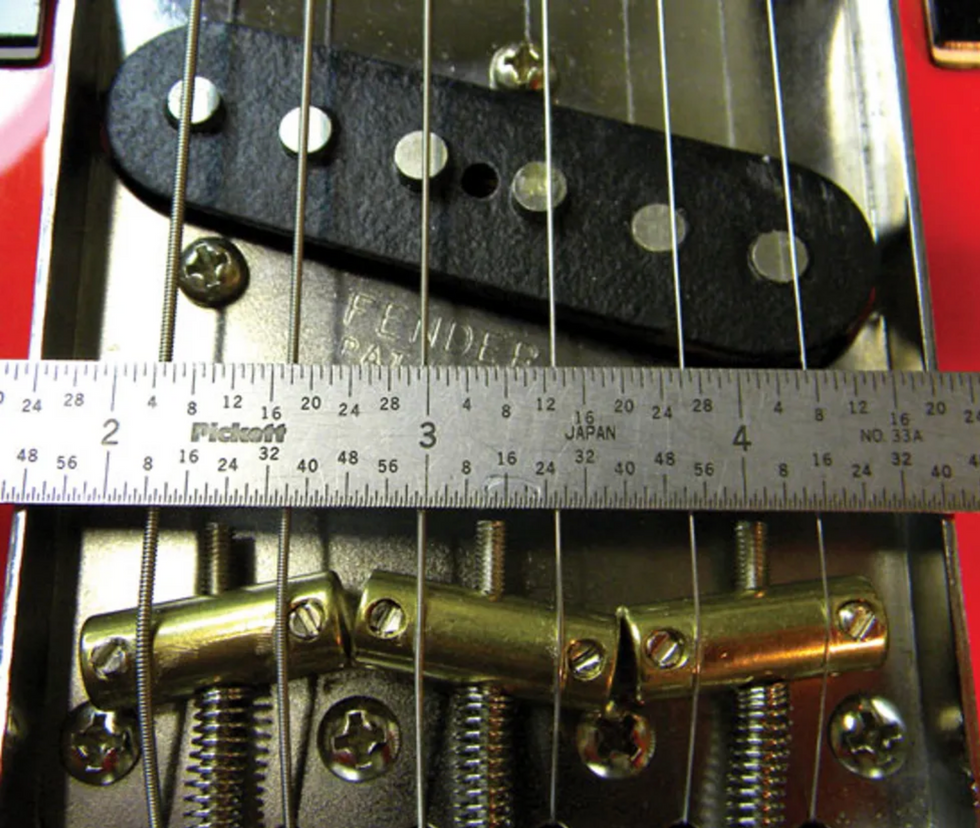
Fig. 9: Measuring string-to-string spacing.
Next, move each of the remaining four strings to their proper spacing. The goal is to have them an equal distance apart, measuring from the outside edge of each string. Use a precision metal ruler to check your spacing (Fig. 9).
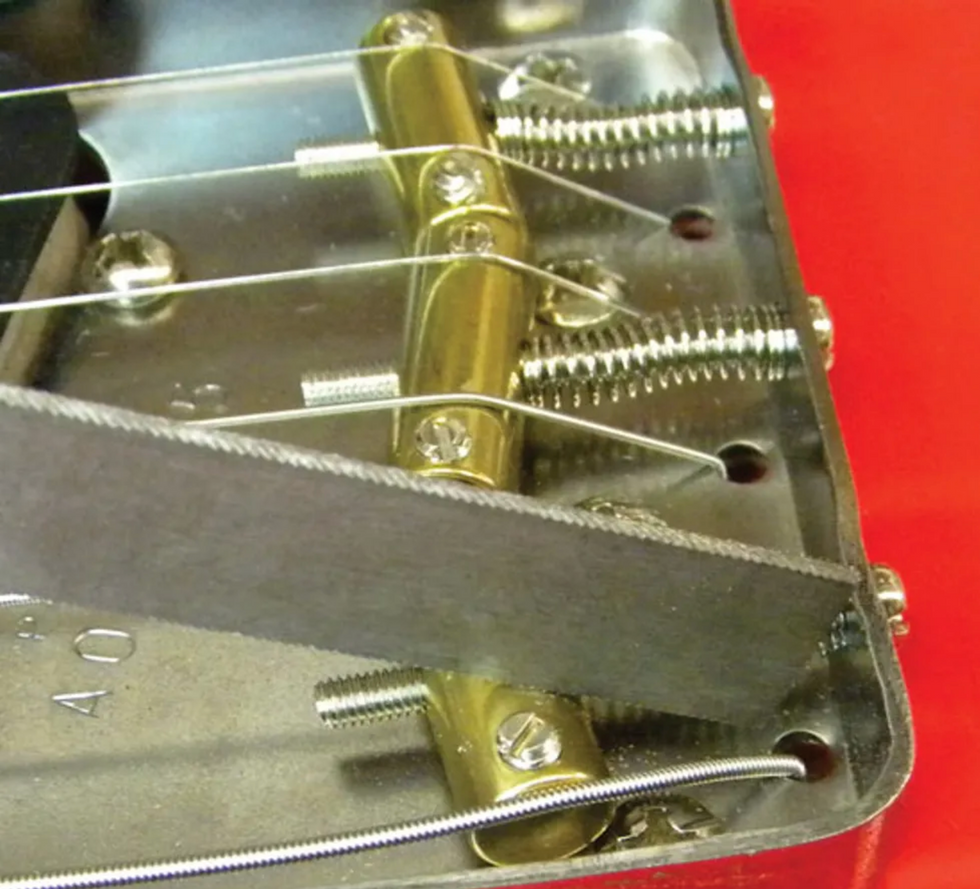
Fig. 10: Filing the string grooves with a nut-slotting file.
Once I have the spacing correctly set, I file a small groove under each string (Fig. 10). The spacing for this particular bridge is approximately 13/32" from string to string. Of course this will vary, depending on the width of your guitar's fretboard. To ensure proper spacing, always measure several times before you file the grooves.
Remember: When filing the grooves for each string, make sure you use the properly sized file. If the file is too small, the strings will bind in the grooves, causing tuning issues. But if the grooves are too large, the strings can rattle in the grooves. Also make sure each groove follows the proper angle for each string as it comes out of the bridge plate.
Adjusting the intonation.
Once the string spacing is correct and you've filed the string grooves, it's time to adjust the intonation—the point of this whole project. Adjusting intonation requires several things: a precise tuner (a strobe tuner is preferable), a screwdriver, and a lot of patience!
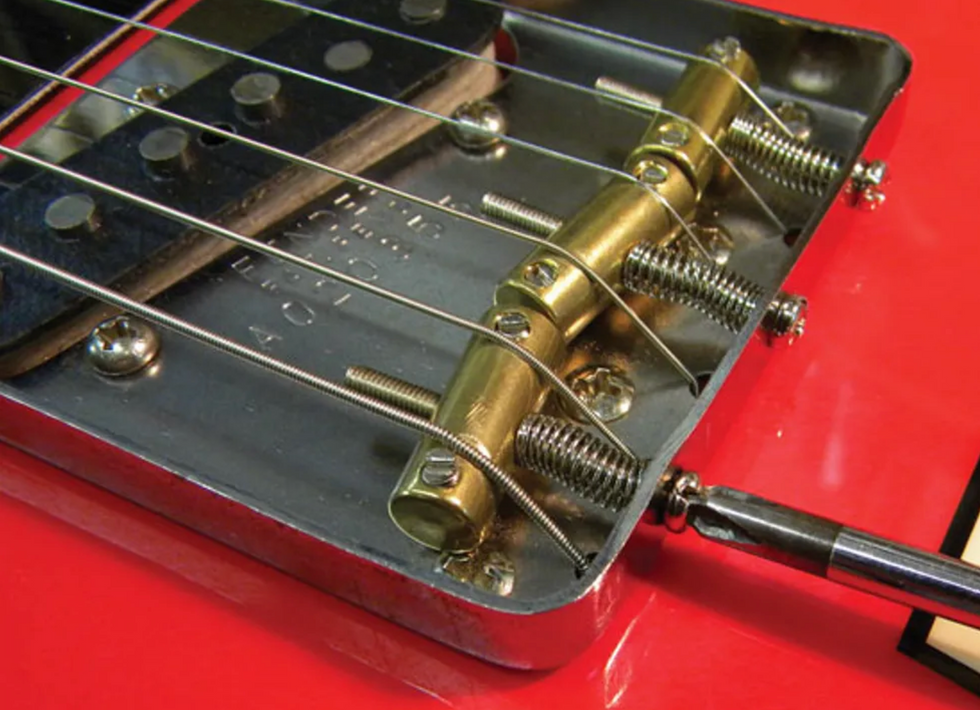
Fig. 11: Adjusting intonation takes a very accurate tuner and a lot of patience.
Start by tuning the guitar to pitch. Then, one string at a time, compare the 12th-fret harmonic to the fretted note at the 12th fret. The harmonic is your reference tone. When comparing the two, if the fretted note is sharp, tighten the intonation screw located at the back of the bridge assembly (Fig. 11). This moves the saddle backward. If the fretted note is flat, loosen the intonation screw to move the saddle forward.
Always retune after each adjustment and then check intonation for accuracy. The goal is to match these two tones so they're perfectly in tune … to a certain extent. I've found this process works great for the low E, A, D, and high E strings (the 6th, 5th, 4th, and 1st). For the G and B (3rd and 2nd) strings, I use a tempering method so those strings will sound more in tune with the rest of the strings. I intonate the B string approximately 1 cent sharp at the 12th fret and set the G string approximately 2 cents sharp at the 12th fret. The end result produces slower "beating" or oscillation between the notes when you play a chord, making the guitar sound more in tune. This temperament "fudging" can vary from one guitar to another, and many techs, luthiers, and players have developed their own particular tempering scheme.
Note: A cent is 1/100th of a semitone or half-step, so you see why a precision tuner is necessary for adjusting intonation. If you don't have an accurate strobe tuner—one that can give you a 1/100th cent reading—it's best to simply intonate each string to match the 12th-fret harmonic.
That's it for now. See you next time for another adventure in DIY guitar maintenance.
[Updated 10/22/21]
See and hear Taylor’s Legacy Collection guitars played by his successor, Andy Powers.
Last year, Taylor Guitars capped its 50th Anniversary by introducing a new guitar collection celebrating the contributions of co-founders Bob Taylor and Kurt Listug to the guitar world. The Legacy Collection revives five of Bob Taylor’s classic acoustic models, curated by the legendary luthier and innovator himself. “To imagine that we’re doing guitars that harken to our past, our present and our future all at the same time,” Bob says, “I really like that.”
In developing the collection, Bob preserved the essence of his originals while integrating performance and playability upgrades introduced during his tenure as designer-in-chief. “It’s an up-to-date version of what those guitars would be,” Bob explains, “but with the same sound.”
Visually, these guitars feel classic—clean, understated and unmistakably Taylor. While Bob’s original aesthetic preferences are showcased in his Legacy models, the nod to the past runs deeper than trade dress.
From his earliest builds, Bob favored slim-profile necks because he found them easier to play. That preference set a design precedent that established Taylor’s reputation for smooth-playing, comfortable necks. Legacy models feature slim mahogany necks built with Taylor's patented New Technology (NT) design. “My first neck was a bolted-on neck but not an NT neck,” Bob says. “These are NT necks because it’s a better neck.” Introduced in 1999, the NT neck allowed for unprecedented micro-adjustability while offering a consistent, hand-friendly Taylor playing experience.
What makes this collection unique within the Taylor line is Bob’s use of his X-bracing architecture, favoring his time-tested internal voicing framework over more recent Taylor bracing innovations to evoke a distinctive tone profile. Since Andy Powers—Taylor’s current Chief Guitar Designer, President and CEO—debuted his patented V-Class bracing in 2018, V-Class has become a staple in Taylor’s premium-performance guitars. Still, Bob’s X-bracing pattern produces a richly textured sound with pleasing volume, balance and clarity that long defined the Taylor voice. All Legacy models feature LR Baggs VTC Element electronics, which Bob says “harkens back to those days.”
The team at Taylor thought the best way to demonstrate the sound of the Legacy guitars was to ask Andy Powers, Bob’s successor, to play them. A world-class luthier and musician, Andy has spent the past 14 years leading Taylor’s guitar innovation. In addition to V-Class bracing, his contributions include the Grand Pacific body style, the ultra-refined Builder’s Edition Collection, and most recently, the stunning Gold Label Collection.
Below you’ll find a series of videos that feature Powers playing each Legacy model along with information about the guitars.
Legacy 800 Series Models
First launched in 1975, the 800 Series was Taylor’s first official guitar series. Today, it remains home to some of the brand’s most acclaimed instruments, including the flagship 814ce, Builder’s Edition 814ce and new Gold Label 814e.
The Legacy 800 Series features the 810e Dreadnought and two Jumbos: the 6-string 815e and 12-string 855e. Each model serves up a refined version of the Dreadnought and Jumbo body shapes Bob inherited from Sam Radding—the original owner of the American Dream music shop where Bob and Kurt first met. “I was making my guitars in the molds that Sam had made at American Dream,” Bob recalls. “There was a Jumbo and a Dreadnought. That’s all we had.”
All three Legacy 800 Series guitars feature one of Bob’s favorite tonewood combos. Solid Indian rosewood back and sides are paired with a Sitka spruce top, yielding warm lows, clear trebles and a scooped midrange.
Aesthetic appointments include a three-ring abalone rosette, mother-of-pearl Large Diamond inlays, white binding around the body and fretboard, and Bob’s “straight-ear” peghead design. Both Jumbo models also showcase a mustache-style ebony bridge—a nod to Bob’s early Jumbo builds.
Legacy 810e
The 810 Dreadnought holds a special place in Bob Taylor’s heart. “My first 810, the one I made for myself, was a thrilling guitar for me to make,” he says. “It’s the one and only guitar I played. It didn’t matter how many guitars we made at Taylor, that’s the one I took out and played.” The Legacy 810e brings back that bold, room-filling Dreadnought voice along with the easy playability expected from a Taylor.
Taylor Guitars | Legacy 810e | Playthrough Demo
Legacy 855e
Taylor’s first 12-strings found an audience in 1970s Los Angeles. “I was making guitars that would find their way to McCabe’s in Santa Monica and Westwood Music,” Bob says, “and these guitars were easy to play. Twelve-strings were a popular sound in that music. It was a modern country/folk/rock music genre that was accepting our guitars because they were easy to play. They also liked the sound of them because our guitars were easier to record.” The Legacy 855e, with its resonant Jumbo body, slim neck and gorgeous octave sparkle, carries that tradition forward.
Taylor Guitars | Legacy 855e | Playthrough Demo
Legacy 815e
The Legacy 815e revives Taylor’s original Jumbo 6-string, delivering a big, lush sound with beautifully blooming overtones.
Legacy Grand Auditoriums
In the early 1990s, Bob Taylor heard a consistent refrain from dealers: “Not everybody wants a dreadnought guitar anymore.” Players were asking for something with comparable volume but different proportions—something more comfortable, yet still powerful. This feedback inspired Bob to design a new body style with more elegant curves, more accommodating proportions and a balanced tonal response. The result was the Grand Auditorium, which Taylor introduced in 1994 to celebrate its 20th anniversary.
Thanks to its musical versatility and easy playability, Bob’s Grand Auditorium attracted a wide variety of players. “We came into our own with our Grand Auditorium,” he says. “People were describing it as ‘all around.’ It’s a good strummer and good for fingerstyle, but it’s not totally geared toward strumming or totally geared toward fingerstyle.” Also referred to as the “Swiss-Army Knife” of guitars or the “Goldilocks” guitar, the GA quickly became a favorite among guitarists across playing styles, musical genres and different playing applications including recording and live performance. “That guitar made studio work successful,” Bob says. It gained a wider fanbase with the debut of the “ce” version, which introduced a Venetian cutaway and onboard electronics. “That became one of our hallmarks,” says Bob. “If you want to plug in your guitar, buy a Taylor.”
Today, the Grand Auditorium is Taylor’s best-selling body shape.
The Legacy Collection features two cedar-top Grand Auditoriums inspired by past favorites: the mahogany/cedar 514ce and rosewood/cedar 714ce. Both models incorporate Bob’s original X-bracing pattern for a tonal character reminiscent of their 1990s and 2000s counterparts. Shared aesthetic details include a green abalone three-ring rosette, ebony bridge pins with green abalone dots, a faux-tortoiseshell pickguard and Taylor gold tuning machines.
Taylor Guitars | Legacy 815e | Playthrough Demo
Legacy 514ce
The Legacy 514ce features solid mahogany back and sides paired with a Western Red cedar top, yielding a punchy midrange and dry, woody sonic personality that pairs beautifully with cedar’s soft-touch sensitivity and warmth. It’s a standout choice for fingerstyle players and light strummers who crave nuance and depth. Distinct visual details include faux-tortoise body and fretboard binding, black-and-white top trim, and mother-of-pearl small diamond fretboard inlays.
Taylor Guitars | Legacy 514ce | Playthrough Demo
Legacy 714ce
The Legacy 714ce also features a cedar top, this time matched with solid Indian rosewood back and sides. The result is a richly textured sound with deep lows, clear trebles and a warm, mellow response. Inspiring as it is, this specific wood pairing isn’t currently offered in any other standard Taylor model. Additional aesthetic details include green abalone dot fretboard inlays, black body and fretboard binding, and black-and-white “pinstripe” body purfling.
While the Legacy Collection spotlights Taylor’s past, newer models from the Gold Label, Builder’s Edition and Somos Collections show the company’s legacy is always evolving. Explore the Legacy Collection at taylorguitars.com or visit your local authorized Taylor dealer.
Taylor Guitars | Legacy 714ce | Playthrough Demo
Detail of Ted’s 1997 National resonator tricone.
What instruments should you bring to an acoustic performance? These days, with sonic innovations and the shifting definition of just what an acoustic performance is, anything goes.
I believe it was Shakespeare who wrote: “To unplug, or not to unplug, that is the question. Whether ’tis nobler in the mind to suffer the slings and arrows of acoustic purists, or to take thy electric guitar in hand to navigate the sea of solo performing.”
Four-hundred-and-twenty-four years later, many of us still sometimes face the dilemma of good William when it comes to playing solo gigs. In a stripped-down setting, where it’s just us and our songs, do we opt to play an acoustic instrument, which might seem more fitting—or at least more common, in the folksinger/troubadour tradition—or do we bring a comfy electric for accompaniment?
For me, and likely many of you, it depends. If I’m playing one or two songs in a coffeehouse-like atmosphere, I’m likely to bring an acoustic. But if I’m doing a quick solo pop up, say, as a buffer between bands in a rock room, I’m bringing my electric. And when I’m doing a solo concert, where I’ll be stretching out for at least an hour, it’s a hybrid rig. I’ll bring my battered old Guild D25C, a National tricone resonator, and my faithful Zuzu electric with coil-splitting, and likely my gig pedalboard, or at least a digital delay. And each guitar is in a different tuning. Be prepared, as the Boy Scouts motto states. (For the record, I never made it past Webelos.)
My point is, the definition of the “acoustic” or “coffeehouse” performance has changed. Sure, there are still a few Alan Lomax types out there who will complain that an electric guitar or band is too loud, but they are the last vestiges of the folk police. And, well, acoustic guitar amplification is so good these days that I’ve been at shows where each strum of a flattop box has threatened to take my head off. My band Coyote Motel even plays Nashville’s hallowed songwriter room the Bluebird Café as a fully electric five-piece. What’s key, besides a smart, flexible sound engineer, is controlling volume, and with a Cali76 compressor or an MXR Duke of Tone, I can get the drive and sustain I need at a low level.
“My point is, the definition of the ‘acoustic’ or ‘coffeehouse’ performance has changed.”
So, today I think the instruments that are right for “acoustic” gigs are whatever makes you happiest. Left to my own devices, I like my Guild for songs that have a strong basis in folk or country writing, my National for blues and slide, and my electric for whenever I feel like adding a little sonic sauce or showing off a bit, since I have a fluid fingerpicking hand that can add some flash to accompaniment and solos. It’s really a matter of what instrument or instruments make you most comfortable because we should all be happy and comfortable onstage—whether that stage is in an arena or theater, a club or coffeehouse, or a church basement.
At this point, with instruments like Fender’s Acoustasonic line, or piezo-equipped models from Godin, PRS, and others, and the innovative L.R. Baggs AEG-1, it’s worth considering just what exactly makes a guitar acoustic. Is it sound? In which case there’s a wide-open playing field. Or is it a variation on the classic open-bodied instrument that uses a soundhole to move air? And if we arrive at the same end, do the means matter? There is excellent craftsmanship available today throughout the entire guitar spectrum, including foreign-built models, so maybe we can finally put the concerns of Shakespeare to rest and accept that “acoustic” has simply come to mean “low volume.”
Another reason I’m thinking out loud about this is because this is our annual acoustic issue. And so we’re featuring Jason Isbell, on the heels of his solo acoustic album, a piece on how acoustic guitars do their work authored by none other than Lloyd Baggs, and Andy Fairweather Low, whose new solo album—and illustrious career—includes exceptional acoustic performances. If you’re not familiar with his work, and you are, even if you don’t know it, he was the gent sitting next to Clapton for the historic 1992 Unplugged concert—and lots more. There are also reviews of new instruments from Taylor, Martin, and Godin that fit the classic acoustic profile, so dig in, and to heck with the slings and arrows!Ernie Ball, the world’s leading manufacturer of premium guitar strings and accessories, proudly announces the launch of the all-new Earthwood Bell Bronze acoustic guitar strings. Developed in close collaboration with Grammy Award-winning guitarist JohnMayer, Bell Bronze strings are engineered to meet Mayer’s exacting performance standards, offering players a bold new voice for their acoustic guitars.Crafted using a proprietary alloy inspired by the metals traditionally found in bells and cymbals, Earthwood Bell Bronze strings deliver a uniquely rich, full-bodied tone with enhanced clarity, harmonic content, and projection—making them the most sonically complex acoustic strings in the Ernie Ball lineup to date.
“Earthwood Bell Bronze strings are a giant leap forward in tone, playability, and durability. They’re great in any musical setting but really shine when played solo. There’s an orchestral quality to them.” -John Mayer
Product Features:
- Developed in collaboration with John Mayer
- Big, bold sound
- Inspired by alloys used for bells and cymbals
- Increased resonance with improved projection and sustain
- Patent-pending alloy unique to Ernie Ball stringsHow is Bell Bronze different?
- Richer and fuller sound than 80/20 and Phosphor Bronze without sounding dark
- Similar top end to 80/20 Bronze with richer low end than Phosphor Bronze
Brent Mason is, of course, on of the most recorded guitarists in history, who helped define the sound of most ’90s country superstars. So, whether you know it or not, you’ve likely heard Mason’s playing.
Professional transcriber Levi Clay has done the deepest of dives into Brent Mason’s hotshot licks. At one point, he undertook the massive project of transcribing and sharing one of Mason’s solos every day for 85 or so days. Mason is, of course, on of the most recorded guitarists in history, who helped define the sound of most ’90s country superstars. So, whether you know it or not, you’ve likely heard Mason’s playing. Levi shares the insight he gleaned from digging deep, and he tells us what it was like when they shared a stage last year. Plus, Levi plays us some great examples of Mason’s playing.