Vintage-style, straight-bar saddles will never intonate properly—we find a way to fix this issue that doesn’t involve replacing the entire bridge.
One of my clients recently brought me a fascinating guitar to work on (Fig. 1). It's a 1993 Japanese custom-shop Fender Telecaster that screams “1962-Tele-meets-Nascar." This Tele is in excellent condition and plays great, but not in tune. The bridge has three vintage-style, straight-bar saddles. Unfortunately, these saddles will never intonate properly (and they never did back in the day), so I need to find a way to fix this intonation issue that doesn't involve replacing the entire bridge.
Fortunately, several vendors make "tilt-compensated" saddles that are perfect for this Tele. (Searching eBay or visiting websites for custom part-makers like Joe Barden or Callaham Guitars, or going to vendors like stewmac.com and allparts.com will yield a number of options for tilt-compensated saddles.) Let's see what's involved with retrofitting a Tele with this type of saddle.
Project overview.
With its cool custom paint job, this 1962 reissue looks sharp. But by today's standards, a Tele is simply not gig-worthy if you can't intonate it.
Here's the problem:
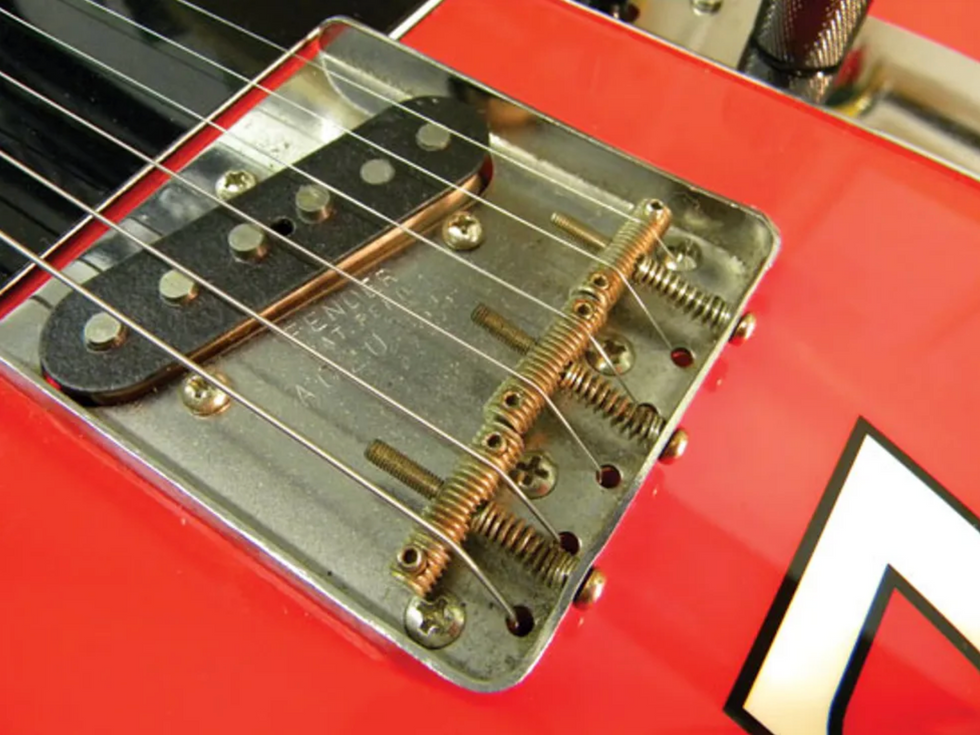
Fig. 2: This guitar came from the factory with period-correct straight-bar saddles. Unfortunately, such saddles are impossible to intonate accurately.
Two strings share each of the three straight-bar bridge saddles (Fig. 2). If you correctly intonate one of the strings in each of the pairs, this puts the other string way out of tune. The end result? Three strings are intonated and three aren't. Typically, the best-case scenario is to average the two strings on each saddle, but the strings are always more out of tune than with a correctly adjusted 6-saddle Tele bridge.
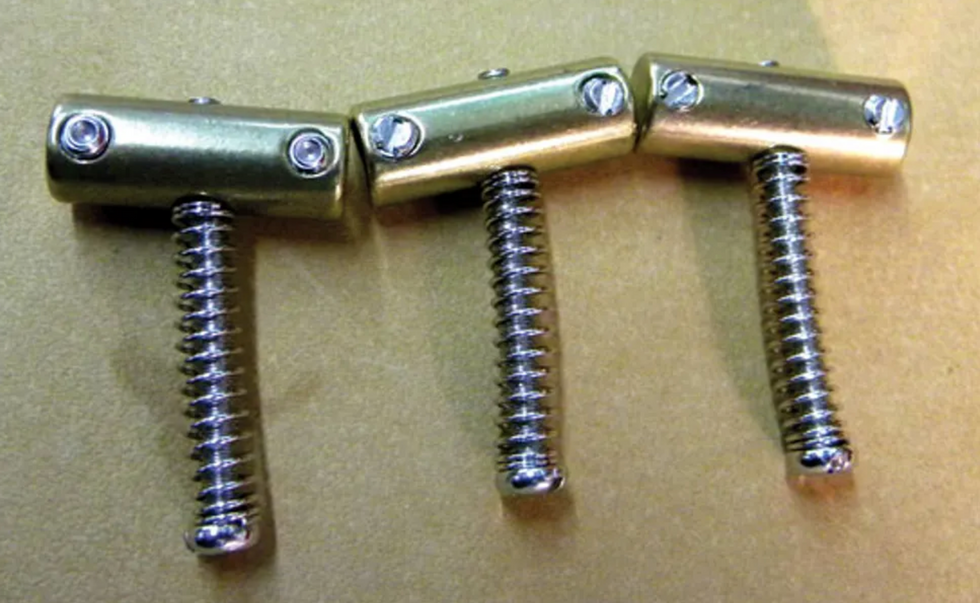
Fig. 3: These brass "tilt-compensated" saddles offer improved intonation while preserving the characteristic tone of a three-saddle Tele.
But many Tele freaks prefer the tone of a classic 3-saddle bridge (why it sounds different from the 6-saddle bridge is another discussion), so rather than replace the entire assembly, enterprising players developed the tilt-compensated scheme (Fig. 3). This allows for accurate intonation without losing the snap and twang of a classic 3-saddle bridge.
If you have a guitar with a 3-saddle bridge, you can replace the straight-bar saddles with a tilt-compensated set and have the best of both worlds. It sounds simple, right? Hey, let's just swap out a few saddles. Believe it or not, there's a lot more to it.
Getting started.
Before doing any work on a guitar, it's important to take measurements. These will help you determine if you need to make any necessary setup adjustments to the guitar you're about to modify.
After tuning the guitar to pitch, I always check three crucial things:
- The action at the 12th fret.
- The amount of relief in the neck.
- The action at the string nut.
In this case, all the measurements looked spot on. Moving from the 1st to 6th string, the 12th-fret action measured 3/64" x 4/64". The neck relief was .012" and the action at the 1st fret was 1/64" x 2/64", again moving from the 1st to 6th string. [To review the setup process for an electric guitar, see How to Set Up a Fender Stratocaster. The same basic principles apply for setting up a Telecaster.]
After taking these measurements, remove the strings and the bridge saddles. Once the saddles are off, compare them to the new tilt-compensated saddles to see if the height of the new saddles will match up.
On this Tele, the new saddles appeared to be a little taller for the two E strings—strings 1 and 6—but otherwise they matched the height of the old saddles. So I installed the new saddles and tuned the Tele to pitch, and once again took the above three measurements.
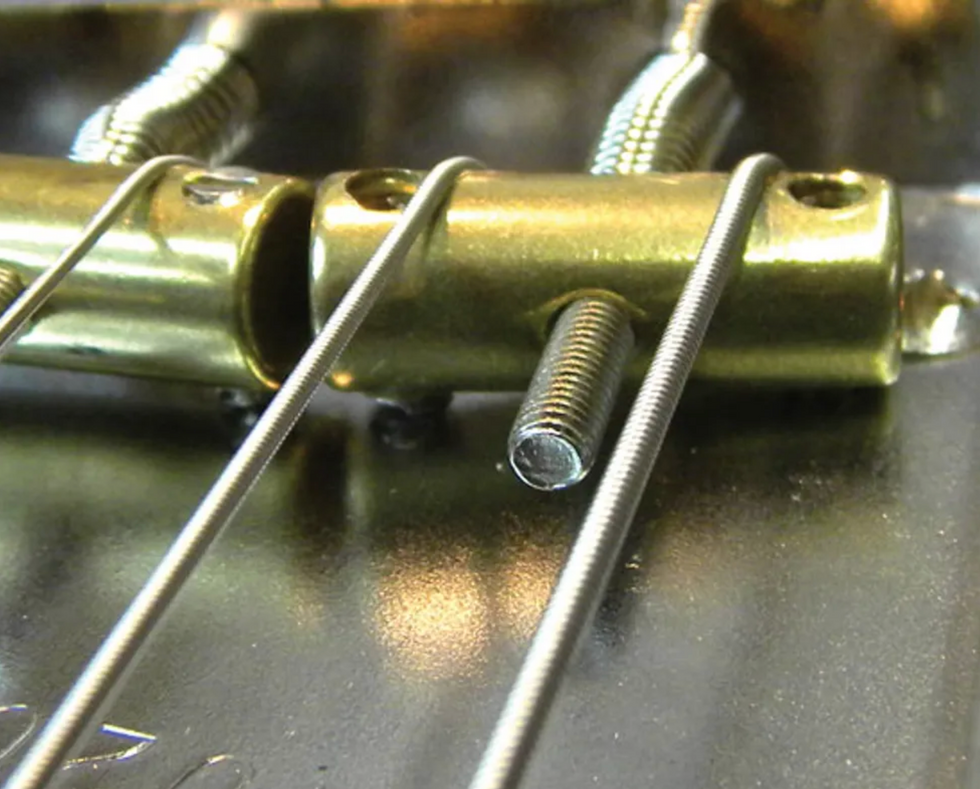
Fig. 4: With the tilt-compensated saddle, the 6th string sits too high on this guitar, even with the height-adjustment screw backed out all the way.
Overall, the action was pretty close, but the two E strings were just a little too high (about 1/64" too high), even with the height adjustment screws backed all the way out for both E strings (Fig. 4 and Fig. 5).
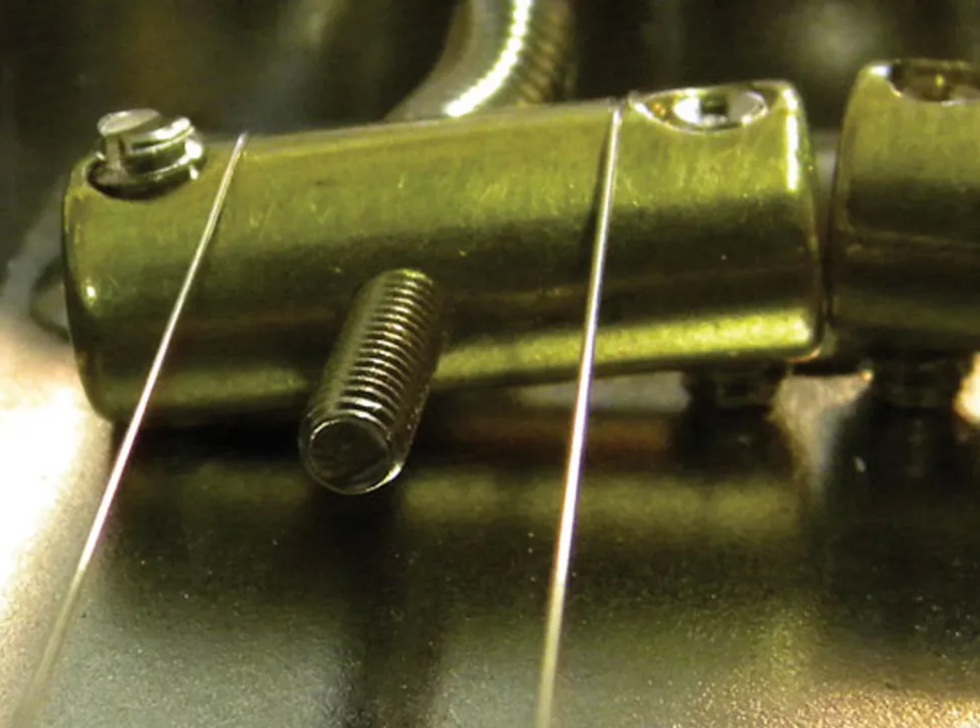
Fig. 5: Like the 6th string, the 1st string sits too high.
There is only one cure for this—remove the offending saddles and mill them down underneath.
Milling the saddles.
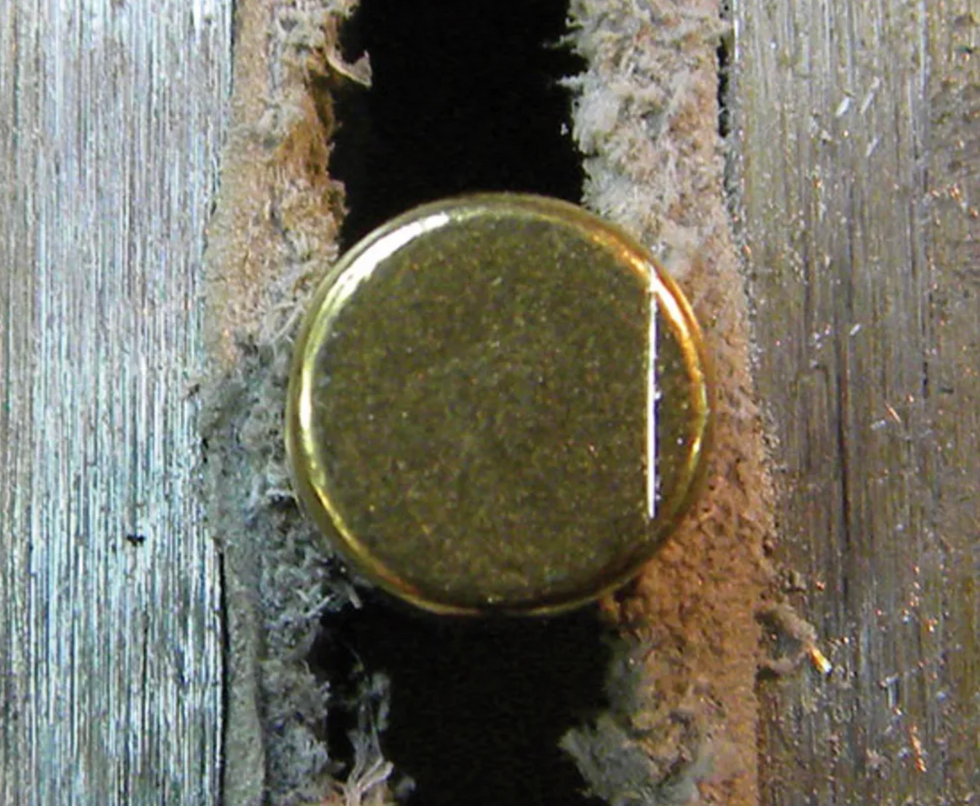
Fig. 6: When a barrel saddle sits too high in the bridge assembly, you need to remove some material from its underside. Here the saddle sits in a vise, protected by leather pads. Once it's secured, you can scribe a guideline in the end of the saddle to indicate how much brass (in this case, 1/32") needs to be milled away from the bottom.
I determined the saddles needed to be lowered 1/32" below the 1st and 6th strings. Removing this much will allow for additional adjustment in the event my client wants to lower the action more than 1/64".
I put the saddle in a vice that's equipped with leather pads on the jaws to prevent the saddle from being scratched. Then I measured 1/32" from the bottom of the saddle, and used a scribe to mark this distance. This mark tells me how far to mill the saddle (Fig. 6).
You can mill a saddle by hand on a flat surface using 80-grit sandpaper or alternatively on a belt sander or grinder. If you opt for a belt sander or a grinder, be extremely careful. All it takes is one slip and the saddle is ruined. At best, if the saddle slips out of your fingers, it will launch across the room.
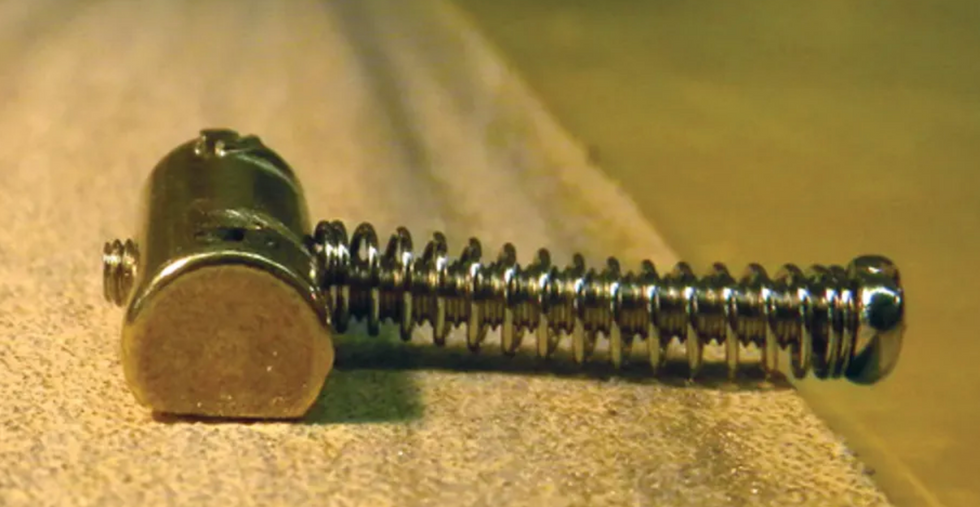
Fig. 7: A saddle in the process of being milled on a flat surface that's covered with self-adhesive, 80-grit sandpaper.
That's why I prefer to do this job by hand on a flat surface. It takes a lot longer this way, but you have much more control over the saddle, and to me, that's worth it. Fig. 7 shows the underside of a saddle in the process of being milled on a flat surface.
With saddles milled, the next step is to install them and tune the guitar to pitch. With the new saddles installed, the action looked great. Now the process of adjusting the string spacing begins.
Adjusting string spacing.
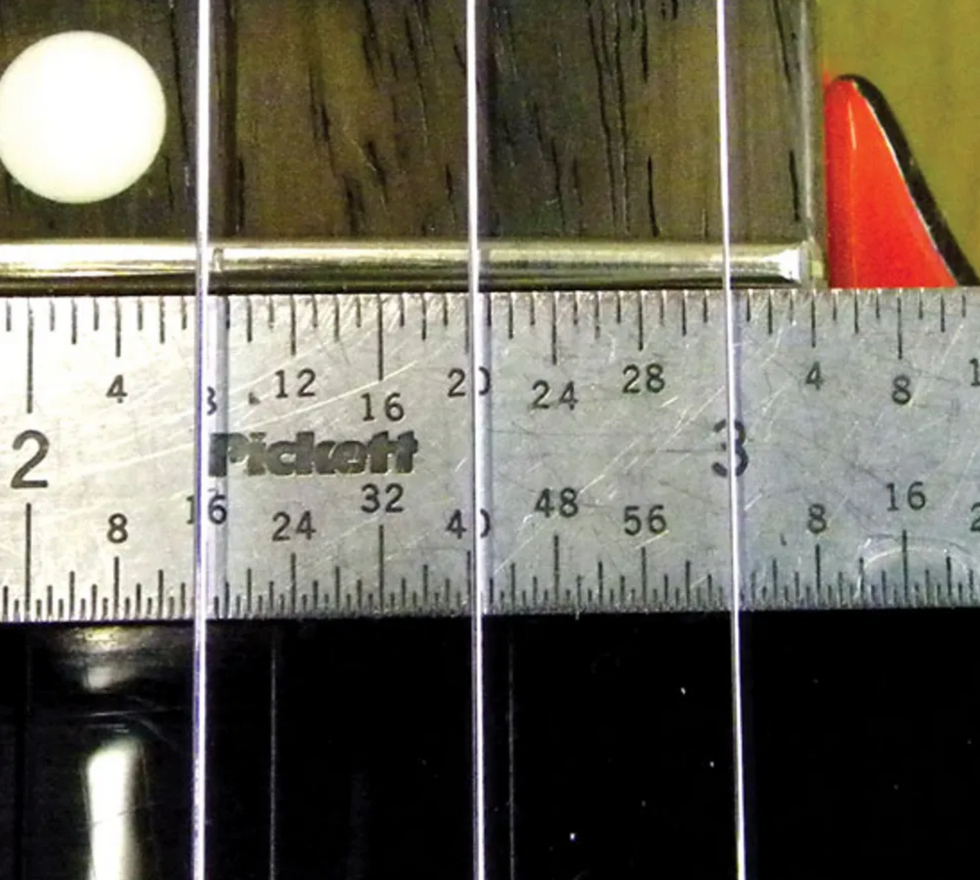
Fig. 8: Measuring the distance between the 1st string and fretboard edge.
Spacing the strings is rather tedious, but it's critical for playability. On the new tilt-compensated saddles, the strings sit on a rounded surface. To prevent the strings from sliding sideways, you need to file grooves into the saddles—one groove for each string. In addition to holding the strings securely, these grooves also ensure proper and consistent spacing.
Measure approximately 1/8" from each side of the fretboard at the last fret—this will be the starting point. Once you have the outside edges of the two E strings evenly spaced from the fretboard sides, make a small groove in the saddles to hold the strings in place.
To match the grooves to their respective string gauges, I use a string nut file. (These special gauged files are available in sets or individually from luthier supply shops.)
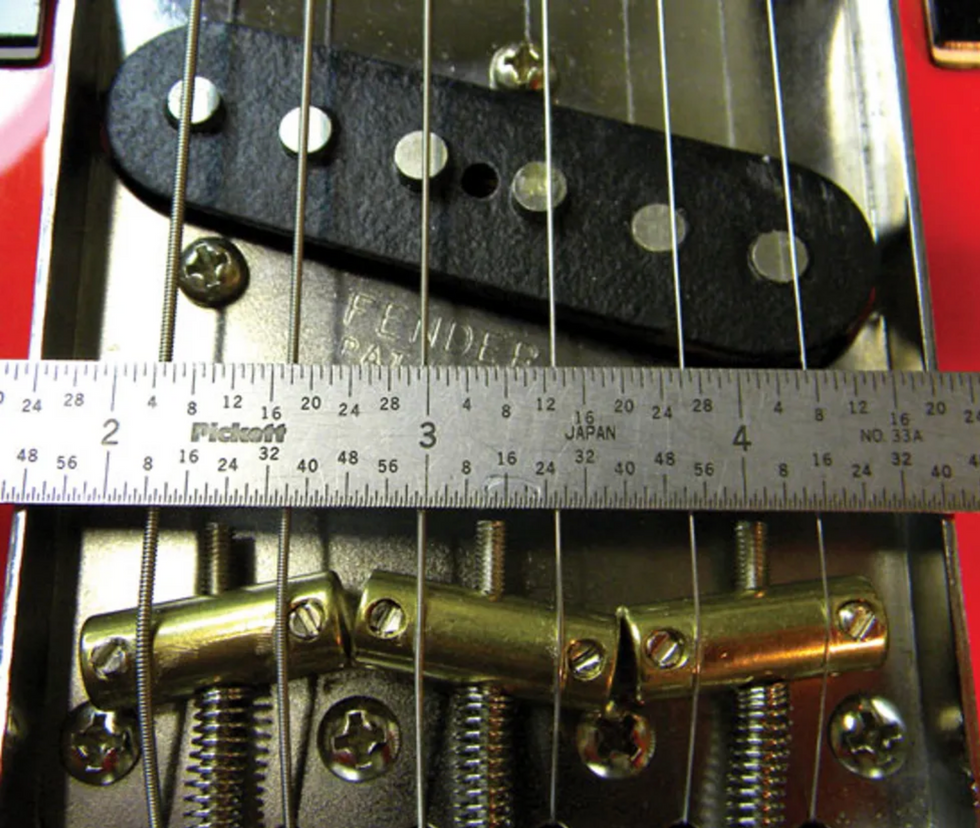
Fig. 9: Measuring string-to-string spacing.
Next, move each of the remaining four strings to their proper spacing. The goal is to have them an equal distance apart, measuring from the outside edge of each string. Use a precision metal ruler to check your spacing (Fig. 9).
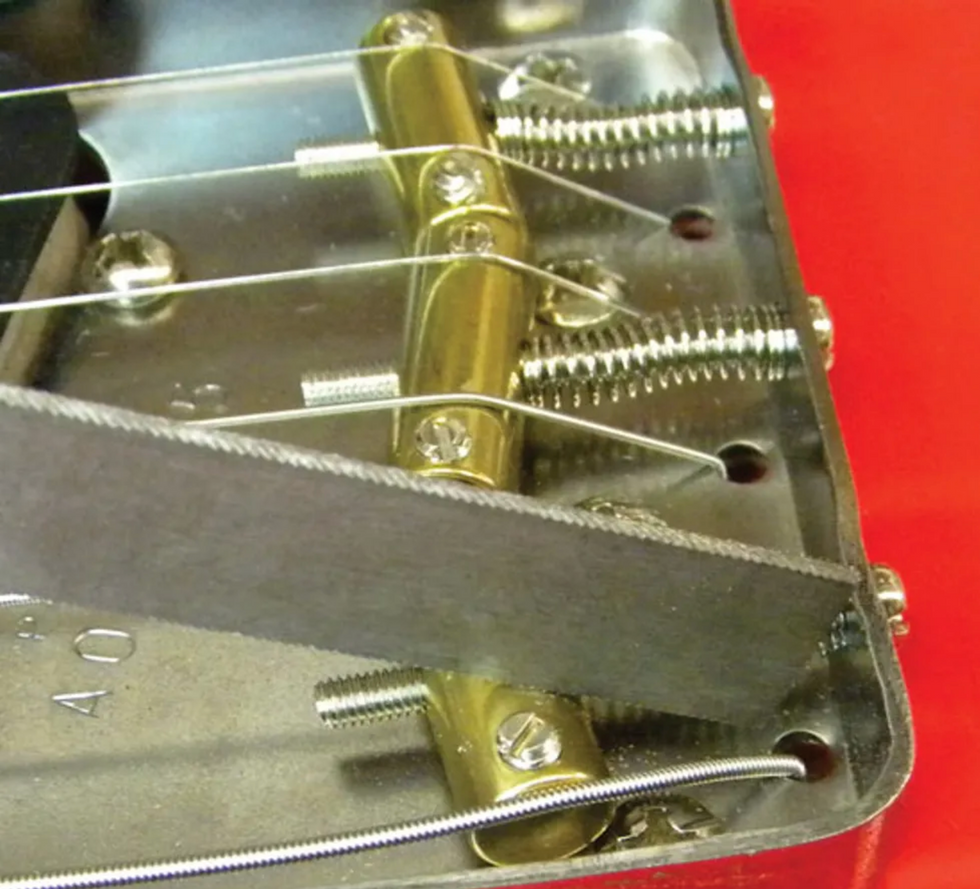
Fig. 10: Filing the string grooves with a nut-slotting file.
Once I have the spacing correctly set, I file a small groove under each string (Fig. 10). The spacing for this particular bridge is approximately 13/32" from string to string. Of course this will vary, depending on the width of your guitar's fretboard. To ensure proper spacing, always measure several times before you file the grooves.
Remember: When filing the grooves for each string, make sure you use the properly sized file. If the file is too small, the strings will bind in the grooves, causing tuning issues. But if the grooves are too large, the strings can rattle in the grooves. Also make sure each groove follows the proper angle for each string as it comes out of the bridge plate.
Adjusting the intonation.
Once the string spacing is correct and you've filed the string grooves, it's time to adjust the intonation—the point of this whole project. Adjusting intonation requires several things: a precise tuner (a strobe tuner is preferable), a screwdriver, and a lot of patience!
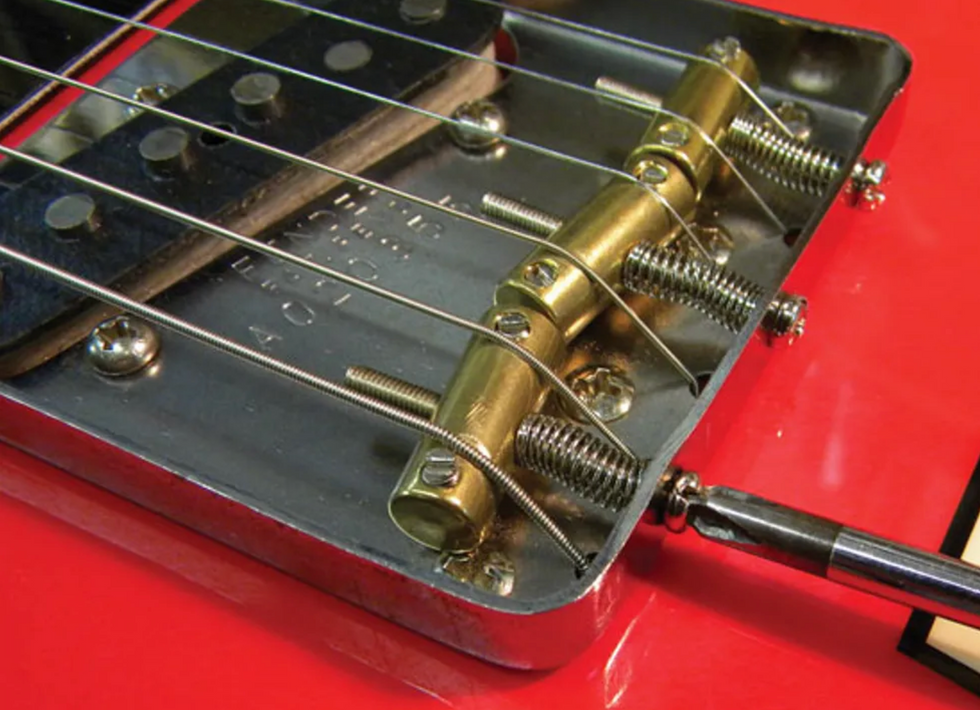
Fig. 11: Adjusting intonation takes a very accurate tuner and a lot of patience.
Start by tuning the guitar to pitch. Then, one string at a time, compare the 12th-fret harmonic to the fretted note at the 12th fret. The harmonic is your reference tone. When comparing the two, if the fretted note is sharp, tighten the intonation screw located at the back of the bridge assembly (Fig. 11). This moves the saddle backward. If the fretted note is flat, loosen the intonation screw to move the saddle forward.
Always retune after each adjustment and then check intonation for accuracy. The goal is to match these two tones so they're perfectly in tune … to a certain extent. I've found this process works great for the low E, A, D, and high E strings (the 6th, 5th, 4th, and 1st). For the G and B (3rd and 2nd) strings, I use a tempering method so those strings will sound more in tune with the rest of the strings. I intonate the B string approximately 1 cent sharp at the 12th fret and set the G string approximately 2 cents sharp at the 12th fret. The end result produces slower "beating" or oscillation between the notes when you play a chord, making the guitar sound more in tune. This temperament "fudging" can vary from one guitar to another, and many techs, luthiers, and players have developed their own particular tempering scheme.
Note: A cent is 1/100th of a semitone or half-step, so you see why a precision tuner is necessary for adjusting intonation. If you don't have an accurate strobe tuner—one that can give you a 1/100th cent reading—it's best to simply intonate each string to match the 12th-fret harmonic.
That's it for now. See you next time for another adventure in DIY guitar maintenance.
[Updated 10/22/21]
Swirl deeper in an excellent rotary speaker simulation’s complex, intoxicating charms.
Wide-ranging controls enable a wide spectrum of subtle-to-powerful modulation textures. Intuitive.
Jewel bypass/rate LED can be blinding.
$299
Keeley Rotary
robertkeeley.com
Certain facets of a rotary speaker’s mystery and magic can be approximated via phasers, vibratos, choruses, or flangers. But replicating anything more than a small percentage of a rotary speaker’s sonic complexity in a stompbox takes a keen-eared designer, a fair bit of R&D, and a digital engine that can crunch a few numbers. As a consequence, really good rotary simulations are typically pretty expensive. And because a lot of players view them as one-trick ponies, they are relatively few in number.
Keeley’s Rotary, as the name suggests, specializes in emulating the ineffable, Doppler-y, delicious tones of a Leslie. But it is hardly limited. In addition to super-thick, syrupy, and head-spinning sounds, the rangeful blend control enables many subtle, subdued, and just-barely-there modulation washes—the kind that add critical, transformative, animating energy to spare arrangements. The drive control is a tasty thickening agent that adds color, equalization nuance, and significant push at more pronounced modulation levels. Keeley also added a 3-position mid boost—presumably to help overcome perceived volume loss inherent to modulation effects, but also to add pep in moments where phase cancellation seems to swipe energy. In concert with the drive, it can be used as a dedicated tone control—helping match the pedal to different pickups, amps, and musical moods. Secondary controls for chasing extra-slow speeds and customizing ramp rates also make it easy to tailor the Rotary for very specific placement in a mix or an arrangement. But the real value in the Rotary for many will be the wobbly prettiness of the many modulations here—particularly in stereo—and the musical provocation they so readily supply.
Bergantino revolutionizes the bass amp scene with the groundbreaking HP Ultra 2000 watts bass amplifier, unlocking unprecedented creative possibilities for artists to redefine the boundaries of sound.
Bergantino Audio Systems, renowned for its innovative and high-performance bass amplification, is proud to announce the release of the HP Ultra 2000W Bass Amplifier. Designed for the professional bassist seeking unparalleled power and tonal flexibility, the HP Ultra combines cutting-edge technology with the signature sound quality that Bergantino is known for.
Operating at 1000W with an 8-ohm load and 2000W with a 4-ohm load, the HPUltra offers exceptional headroom and output, ensuring a commanding presence on stage and in the studio. This powerhouse amplifier is engineered to deliver crystal-clear sound and deep, punchy bass with ease, making it the perfect choice for demanding performances across any genre.
The HP Ultra incorporates the same EQ and feature set as the acclaimedBergantino Forté HP series, offering advanced tonal control and versatility. It includes a highly responsive 4-band EQ, Bergantino’s signature Variable RatioCompressor, Lo-Pass, and Hi-Pass Filters, and a re-imagined firmware that’s optimally tuned for the HP Ultra’s power module. The intuitive user interface allows for quick adjustments and seamless integration with any rig, making it an ideal solution for both seasoned professionals and rising stars.
As compared to previous forte HP iterations (HP, HP2, HP2X), Ultra is truly its own amp. Its behavior, feel, and tonal capabilities will be well noted for bass players seeking the ultimate playing experience. If you’ve been wishing for that extreme lead sled-type heft/force and punch, along with a choice of modern or vintage voicings, on-board parallel compressor, overdrive; high pass and lowpass filters, and more—all in a 6.9 lb., 2ru (8” depth) package...the BergantinoHP Ultra is worth checking out.
Building on the forte’ HP2X’s leading edge platform (including a harmonic enriching output transformer (X) and 3.5db of additional dynamic headroom (2),the HP Ultra’s power focus is not about playing louder...it’s about the ability to play fuller and richer at similar or lower volumes. Many players will be able to achieve a very pleasing bass fill, with less volume, allowing the guitars and vocals to shine thru better in a dense mix. This in turn could easily contribute to a lower stage volume...win-win!
Key Features of the Bergantino HP Ultra 2000W Bass Amplifier:
- Power Output: 1000W @ 8ohms / 2000W @ 4ohms, 1200W RMS @2-Ohms (or 1700W RMS @2.67-Ohms-firmware optimizable via USB
- Dual Voicing Circuits: offer a choice between vintage warmth and modern clarity.
- Custom Cinemag Transformer: elevates harmonic enrichment to new heights
- Variable Low-Pass (VLPF) and Variable High-Pass (VHPF) filters, critical for precise tone shaping and taming of the most challenging gigging environments.
- 4-Band Tone Controls: Bass: +/-10db @40hz, Lo-Mid:+/-10db @250hz,Hi-Mid: +/-10db @ 1khz, Treble: +/-10db @ 3.5khz
- Punch Switch: +4db @110hz
- Bright Switch: +7db @7kHz or +6db @2khz – user selectable● Built-in parallel compression - VRC
- 3.5dB of additional dynamic headroom
- New Drive Circuit featuring our proprietary B.S.D (Bergantino SmartDrive) technology
- Auxiliary Input and Headphone Jack: for personal monitor and practice
- Rack Mountable with optional rack ears
- Effects send and return loop
- Studio quality Direct Output: software selectable Pre or Post EQ
- UPS – Universal power supply 115VAC – 240VAC 50/60Hz
- Weight: 6.9 pounds
- Dimensions: 13.25”W x 8.375”D x 3.75”H
- Street Price: $1895.00
For more information, please visit bergantino.com
The NEW Bergantino Forté HP ULTRA!!! - YouTube
A touch-sensitive, all-tube combo amp perfect for clean & edge of breakup tones. Featuring a custom aesthetic, new voicing, & Celestion Creamback 75 speaker.
Debuted in Spring 2023, the Revv D25 is a clean/crunch combo amplifier perfect for pedals that released to widespread critical claim for its combination of touch-sensitive all-tube tone & modern features that make gigging & recording a breeze. 'D' stands for Dynamis, a series of classic-voiced amplifiers dating back to the early days of Revv Amplification, when A-list artists like Joey Landreth helped give feedback on voicings & designs. Joey is a longtime Revv user & personal friend of the company, & the D25 immediately became a favorite of his upon release.
While the D25 already had features Joey was looking for, we wanted to collaborate to celebrate our long relationship & give players a unique option. We’re proud to announce the D25 - Joey Landreth Edition. Featuring custom aesthetic, new voicing & a Celestion Creamback 75 speaker. The D25 is designed to solve problems & remove the barrier between you & your music - but more importantly, it just plain sounds great. It features a simple single-channel layout perfect for clean & edge of breakup tones. With organic tone you can take anywhere, the D25 - Joey Landreth Edition empowers you to focus on your music on stage, in the studio, & at home.
The D25 - Joey Landreth Edition 1x12 Combo Amplifier features:
- All-tube design with two 12AX7, two 6V6, & selectable 25w or 5w operation.
- Level, treble, middle, bass, & volume controls with switchable gain boost voice.
- Perfect for clean & edge of breakup tones
- Organic, touch-sensitive feel, perfect for pedals.
- Pristine digital reverb & transparent buffered effects loop.
- Two-notes Torpedo-embedded mono direct XLR out reactive load & impulse. responses for zero-compromise direct performance & recording.
- Celestion 75W Creamback Driver
- 32 lbs. Lightweight open-back construction
- Manufactured in Canada.
- 2 year limited warranty
Revv’s D25 Joey Landreth Edition has a street price of $1899 & can be ordered immediately through many fine dealers worldwide or directly at revvamplification.com.
For more information, please visit revvamplification.com.
Gibson partners with Warren Haynes to release the Warren Haynes Les Paul Standard, featuring P-90 DC pickups and a 15 dB boost for modern functionality in a traditional 50s-era Les Paul design.
Grammy Award-winning artist Warren Haynes is a cornerstone of the American music landscape, lauded as one of the most formidable and prolific guitarists, vocalists, songwriters, and producers of the modern era. Gibson is proud to announce its partnership with Warren Haynes for the release of his first signature guitar, the Gibson Warren Haynes Les Paul Standard. The Warren Haynes Les Paul Standard from Gibson is available worldwide now at the Gibson Garage Nashville and London, at authorized Gibson dealers, and on Gibson.com.
“I’ve always been a Gibson guy—I got hooked on that sound as a teenager and have been playing them ever since,” says Warren Haynes. “Needless to say, I’m honored to be partnering with Gibson to release my Signature Les Paul Standard. Being traditionally a humbucker guy, I’m really loving the hum-free P-90s. It’s a really cool tonal change, and the boost offers even more tonal options. I’m really enjoying playing this guitar on stage and looking forward to using it in the studio. I’m equally psyched that other guitar players will now have the opportunity to own and play one as well.”
Warren Haynes effortlessly cross-pollinates genres and unfurls solos that broil with passion in his distinctive, signature playing style. Renowned and highly regarded for his work in rock, blues, and Americana music through his work with the Allman Brothers Band, as a founding member of Gov’t Mule, the leader of The Warren Haynes Band, a solo artist, and as a session guitarist and sideman for numerous famous friends and groups. As one of music’s most treasured storytellers, Haynes and his artistry have led to thousands of memorable performances and millions of album and track sales. A master of multiple styles and genres, Warren has also shared his expertise with other players via multiple instructional videos. A self-described “Gibson man,” Warren has used several Gibson models throughout the years, including his cherished ’61 ES-335™, among others.
The new Warren Haynes Les Paul Standard is another standout, with features tailored specifically to Warren’s preferences, including a mahogany body with a plain maple cap, a 60s Cherry finish, a mahogany neck with a chunky 50s vintage profile like all of Warren’s favorite Les Pauls, a rosewood fretboard with acrylic trapezoid inlays and 22 medium jumbo frets, a pair of P-90 DC pickups that deliver hum-free performance with all the sonic nuances of traditional P-90 DC pickups, and a 15 dB boost that can be activated via a mini toggle switch. The quick-access battery compartment is mounted into the control cover on the rear, and the guitar will still function, even if the battery dies, by simply flipping the mini toggle switch to the off position.
Bearing the traditional looks and feel of a 50s-era Les Paul coupled with modern features like hum-free P-90 DC pickups and an onboard boost, the Warren Haynes Les Paul Standard bridges modern and traditional and is a great choice for players who, like Warren, want both a traditional appearance and modern functionality in one outstanding guitar.
Last fall, Warren Haynes released his fourth solo album, Million Voices Whisper, via Fantasy Records. Haynes sounds as energetic and focused as ever on the self-produced album, powering through an 11-song set of soulful blues-rock, his first solo collection in nearly a decade. Accompanying Warren on the collection are members of his current all-star band, including John Medeski on keyboards, longtime drummer Terence Higgins (of the Dirty Dozen Brass Band), and Gov’t Mule bassist Kevin Scott. Million Voices Whisper also features guest appearances from his Allman Brothers Band compatriot Derek Trucks, whose unmistakable guitar sound toughs up three tracks on the album that were co-produced with Haynes, and his Last Waltz tour co-stars Lukas Nelson and Jamey Johnson, who are featured on the forceful “Day Of Reckoning.” Joining Haynes in the studio for the first time since the final sunset of the ABB, one of the featured tracks with Trucks on guitar is “Real Real Love,” a song initially co-written with Gregg Allman that Warren finished in Allman’s style and methods as if Gregg were singing it to honor his friend.
Buzzing through the chart-topping album is the question of how to make things better—in love, in life, in the world—led by Haynes’s soaring vocals and the poignancy of his six-string mastery. Million Voices Whisper opens with “These Changes,” a co-write with Trucks, leading into “Go Down Swinging,” co-written with Johnson, which features a horn section and a Van Morrison vibe. Then, there’s the soulful power ballad “Till The Sun Comes Shining Through,” driven by Warren’s impassioned vocals and slide guitar skills. The expressive pipes of touring backup singer Saundra Williams are also heard on multiple tracks, including the lead single “This Life As We Know It,” which reached Top 15 on the Americana singles chart and Top 40 at Triple A radio. Among the four bonus tracks on the deluxe CD version is a new version of the Trucks-Haynes composition “Back Where I Started” featuring Warren on lead vocals and slide guitar and the power trio of Haynes, Nelson, and Johnson covering the CSNY classic “Find The Cost Of Freedom” into an extended version of “Day Of Reckoning.” Million Voices Whisper combines the eloquent musicianship of a triple-threat blues-rocker with the glowing spirit of a vital creative artist at the peak of his powers.
For more information, please visit gibson.com.