
Hello and welcome to our last chapter on all things true bypass. Now that you know a lot about true bypass, what it is and how it works, it''s time to think about going true bypass with your setup (or not). As you now know, true bypass is not always the best solution for a good tone -- large, unbuffered true bypass setups can sound thin and dull. But if planned the right way, an all true bypass setup will give you the best and strongest tone you've ever heard.
There are several ways to get a true bypass setup:
Enclosure
I highly recommend using a standard Hammond box, they are easy to work with and they are well shielded.
3PDT switch
These are available from a lot of companies, but personally I prefer the ones from Banzai – they''re not a cheap, but are definitely worth the price!
Jacks
For a single loop box you will need four jacks: three mono and one stereo as the master input with the power switching option. Neutrik and Switchcraft jacks are the best you can buy. If you want to build a box with more than one loop, you will need four jacks for the first loop (same as above), and two mono jacks for each additional loop.
DC jack
This is the power input jack that will make your LEDs light up. The true bypass circuit itself is pure passive and doesn''t need any power. Use a standard 2.1mm isolated plastic jack, it''s the same standard as in all the Boss and Ibanez-style stompboxes.
LED and bezel
Choose any type, color and size you want. 5mm LEDs are the standard.
Hookup Wire
You will need some good quality, non-shielded wire to hook up everything. For maximum tone and transparency, I recommend to use Teflon insulated silver wire.
A good US source to get all these parts in good quality is Small Bear Electronics, based in Brooklyn, NY. They stock everything you will ever need to build such a box and their prices are more than fair ! For all you european guys, check out Banzai.
Before we really start to build, I would like to give you a link that may be very helpful. It''s my DIY True Bypass Strip webpage and contains much more information about this subject than we can discuss here. You will also find drawings there covering how to build multi-loop boxes, how to add tuner-out, master-bypass etc.
Assuming you''ve procured all of the necessary components, we''re ready to build. First of all, you have to drill all the holes in the enclosure and to assemble all the parts in place. After that, it´s time to wire everything up. Follow the diagram below.
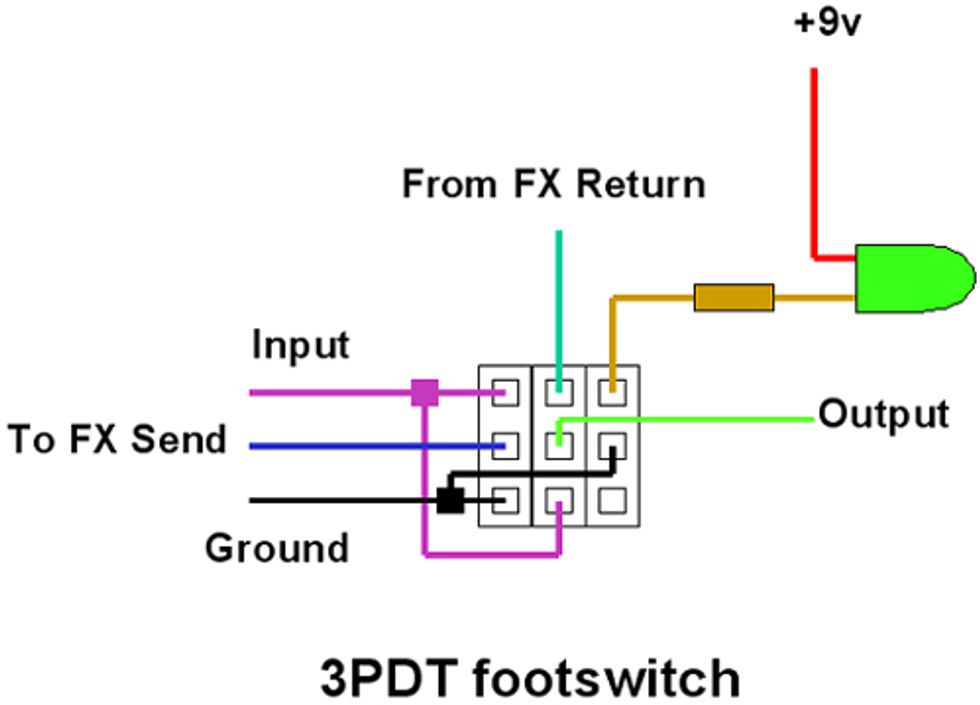
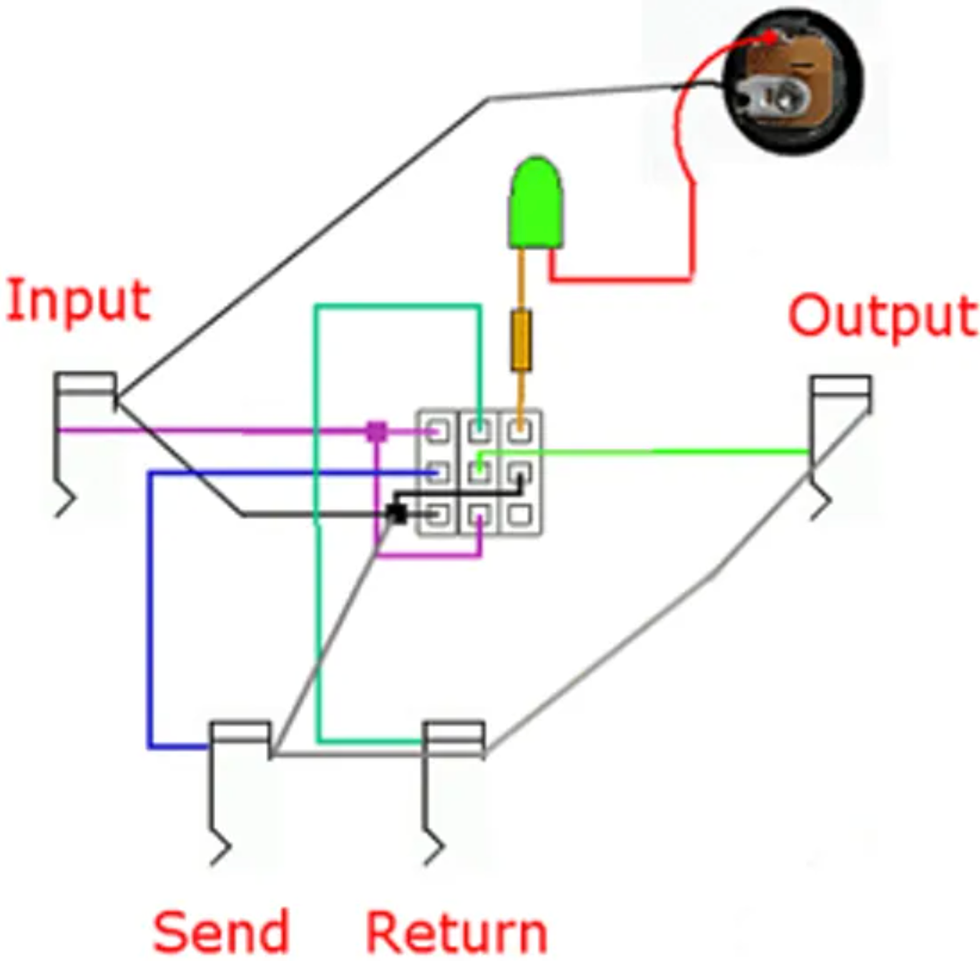
A short word of warning: most of the true-bypass wiring schemes out there on the internet are switching inputs, not outputs. In engineering that''s regarded as a bad thing. When the loop is engaged, all schematics are essentially the same: the Input jack is connected to the Send and the Output jack is connected to the Return. But when the loop is bypassed things are different. In the common schematics, the input to the pedal is left unconnected. If you had a high-gain pedal in the loop you could then get all sorts of squealing, or if there was a delay pedal you''d be filling the delay line with noise. In our diagram here, when the loop is bypassed, the input to the pedal is grounded. No noise, no hum, no squealing.
To transfer this schematic to our true bypass box, please wire everything up like this:

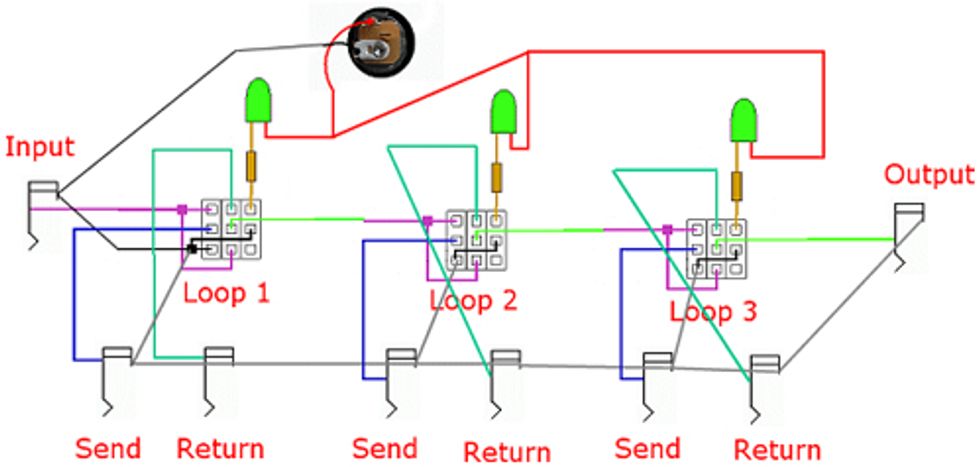
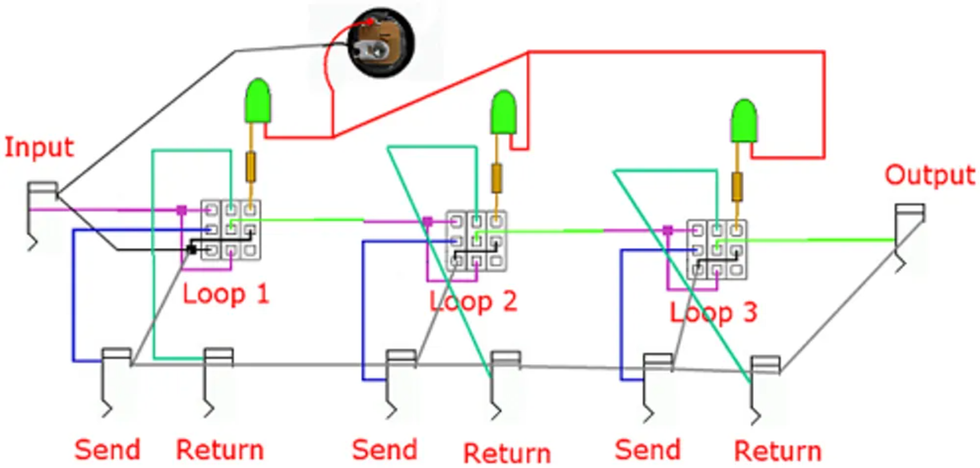
To cascade the loops in order to make a multi-loop box or true bypass strip, you would wire it all together like this:
Remember, after you've finished your box and everything is connected, you need a quality, transparent buffer (aka "line driver") in front of your true bypass strip to keep your tone alive. If you use a guitar with active electronics, you don''t have to worry about this, but the rest of us need to pay attention.
The enhancement in tone when using a buffer in front of a true bypass strip is amazing, and you can use longer cables without a dramatical high-end loss. You can simply connect a buffered stompbox, like any Boss or Ibanez pedal, in front of the strip if you like the tone, or you use a standalone buffer. It should be at unity gain, free of any tone coloration and have an extremely low impedence.
I encourage everyone to try to build such a buffer -- you can find all the info you need on my webpage. If you are an experienced builder, you can also build the IC Buffer on a piece of cardboard or veroboard by following the layout below. Keep in mind that most fuzz pedals don´t like to see another pedal in front of them and a line-driver is no exeption from this rule ! If you use one in front of the true bypass box or another one after the true bypass box is a matter of taste. I only use one in front of my true bypass strip and have never had a problem, but try it out on your own.

Hopefully you''ll give this build a go, as the improvement in tone is simply stunning. Again, don''t forget to read my DIY True Bypass Strip webpage, as all of the things we''ve discussed here in short are explained in detail.
1. You already have some real true bypass boxes.
Congratulations! If they really have true bypass you don't have to worry about them anymore. If you are unsure as to whether or not they are really true bypass, please read the previous two installments of this column; they'll guide you through a true bypass test of your own boxes.
2. You have stompboxes that can be easily converted into true bypass.
There are a lot of stompboxes -- most wah pedals, MXR, ProCo, Marshall and older EH pedals -- that already use a 2PDT or 3PDT switch internally but as you know, this does not always mean that they are true bypass. In most cases, it''s possible to rewire them for true bypass, but this depends on the individual pedal and sometimes it''s even a question of the production year (e.g. MXR pedals). It''s not possible to name each end every pedal here, so try a search on the internet for the specific stompbox you want to convert to true bypass; chances are good that someone has done it before.
It´s also possible to internally convert the standard Boss/Ibanez style stompboxes, but it involves a lot of work. First you must drill a large 12mm hole into the box to install the 3PDT switch and afterwards you have to rewire the complete switching circuit, messing with a lot of small cables and not much interior space. I doubt this is the premium solution for such boxes; read on for an easier solution.
3. Build yourself a good sounding true bypass box or strip to convert your stompboxes into true bypass devices.
The basic idea of a true bypass box is to leave the original stompbox untouched and to add true bypass as a kind of "add on" function; your stompbox is still not true bypass, but you connect it to the true bypass box and this box contains the true bypass function for the stompbox. In bypass mode, the signal passes through this true bypass box without coming in contact with the connected effect.
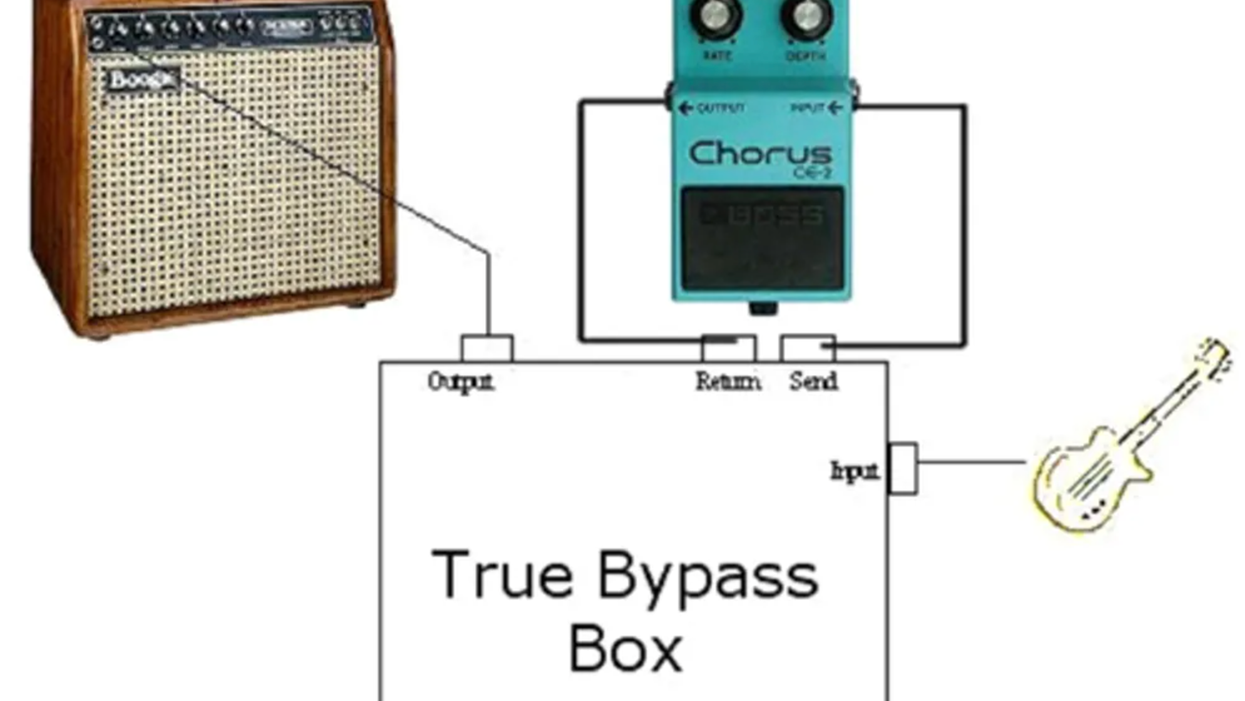
External true bypass boxes have always the same basic construction: you have a Master Input and Master Output, and Send and a Return jacks to connect the effect you want to true bypass. In a nutshell, connect your guitar to the Master Input of the true bypass box, run a cable from the Send jack to the Input jack of the effect, from the effect's Out to the Return of the true bypass box and connect a cable from the Master Out of the true bypass box to your amp – that's it !
Naturally you can connect more than one effect to a single loop, but for a lot of stompboxes it''s better to have more than one loop; that is what we call a true bypass strip or multi-loop true bypass box.
Building a true bypass box is very easy and a perfect beginner''s DIY project. The result is a very versatile and good-sounding box, usable in many different configurations. Now we''ll look at how to build a true bypass box with a status LED and how to cascade the loops if you need more than one true bypass channel.
First of all you''ll need some parts:
- Enclosure
- I highly recommend using a standard Hammond box, they are easy to work with and they are well shielded.
- 3PDT switch
- These are available from a lot of companies, but personally I prefer the ones from Banzai – they''re not a cheap, but are definitely worth the price!
- Jacks
- For a single loop box you will need four jacks: three mono and one stereo as the master input with the power switching option. Neutrik and Switchcraft jacks are the best you can buy. If you want to build a box with more than one loop, you will need four jacks for the first loop (same as above), and two mono jacks for each additional loop.
- DC jack
- This is the power input jack that will make your LEDs light up. The true bypass circuit itself is pure passive and doesn''t need any power. Use a standard 2.1mm isolated plastic jack, it''s the same standard as in all the Boss and Ibanez-style stompboxes.
- LED and bezel
- Choose any type, color and size you want. 5mm LEDs are the standard.
- Hookup Wire
- You will need some good quality, non-shielded wire to hook up everything. For maximum tone and transparency, I recommend to use Teflon insulated silver wire.
A good US source to get all these parts in good quality is Small Bear Electronics, based in Brooklyn, NY. They stock everything you will ever need to build such a box and their prices are more than fair ! For all you european guys, check out Banzai.
Before we really start to build, I would like to give you a link that may be very helpful. It''s my DIY True Bypass Strip webpage and contains much more information about this subject than we can discuss here. You will also find drawings there covering how to build multi-loop boxes, how to add tuner-out, master-bypass etc.
Assuming you''ve procured all of the necessary components, we''re ready to build. First of all, you have to drill all the holes in the enclosure and to assemble all the parts in place. After that, it´s time to wire everything up. Follow the diagram below.
A short word of warning: most of the true-bypass wiring schemes out there on the internet are switching inputs, not outputs. In engineering that''s regarded as a bad thing. When the loop is engaged, all schematics are essentially the same: the Input jack is connected to the Send and the Output jack is connected to the Return. But when the loop is bypassed things are different. In the common schematics, the input to the pedal is left unconnected. If you had a high-gain pedal in the loop you could then get all sorts of squealing, or if there was a delay pedal you''d be filling the delay line with noise. In our diagram here, when the loop is bypassed, the input to the pedal is grounded. No noise, no hum, no squealing.

To transfer this schematic to our true bypass box, please wire everything up like this:
To cascade the loops in order to make a multi-loop box or true bypass strip, you would wire it all together like this:
Remember, after you've finished your box and everything is connected, you need a quality, transparent buffer (aka "line driver") in front of your true bypass strip to keep your tone alive. If you use a guitar with active electronics, you don''t have to worry about this, but the rest of us need to pay attention.
The enhancement in tone when using a buffer in front of a true bypass strip is amazing, and you can use longer cables without a dramatical high-end loss. You can simply connect a buffered stompbox, like any Boss or Ibanez pedal, in front of the strip if you like the tone, or you use a standalone buffer. It should be at unity gain, free of any tone coloration and have an extremely low impedance.
I encourage everyone to try to build such a buffer -- you can find all the info you need on my webpage. If you are an experienced builder, you can also build the IC Buffer on a piece of cardboard or veroboard by following the layout below. Keep in mind that most fuzz pedals don't like to see another pedal in front of them and a line-driver is no exception from this rule ! If you use one in front of the true bypass box or another one after the true bypass box is a matter of taste. I only use one in front of my true bypass strip and have never had a problem, but try it out on your own.

Hopefully you''ll give this build a go, as the improvement in tone is simply stunning. Again, don''t forget to read my DIY True Bypass Strip webpage, as all of the things we''ve discussed here in short are explained in detail.
Well, it's already the November issue and next month it's X-Mas ! I bet many of you will take some time to visit the family or simply enjoy a holiday. To prepare you for this, next month we'll build a petite but good sounding "$5 Practice Amp," so you can take it with you on your holiday trips and practice your lead lines.
Until then, stay tuned and take care!
[Updated 2/2/22]