Build a killer distortion pedal customized for your style. It’s easier than you think!
Building stompboxes from scratch is easier than you might expect. So is customizing the circuits to suit your style and taste. This project walks you through the process step by step. When you're done, you'll have a killer distortion pedal—and enough knowledge about using and choosing stompbox components to build countless other pedals.
Anyone of average intelligence with functional hands and eyes can complete this project. But there are many steps—more than we can cover in a conventional magazine article. So we've created an illustrated build guide in PDF form, which you must download to complete the project.
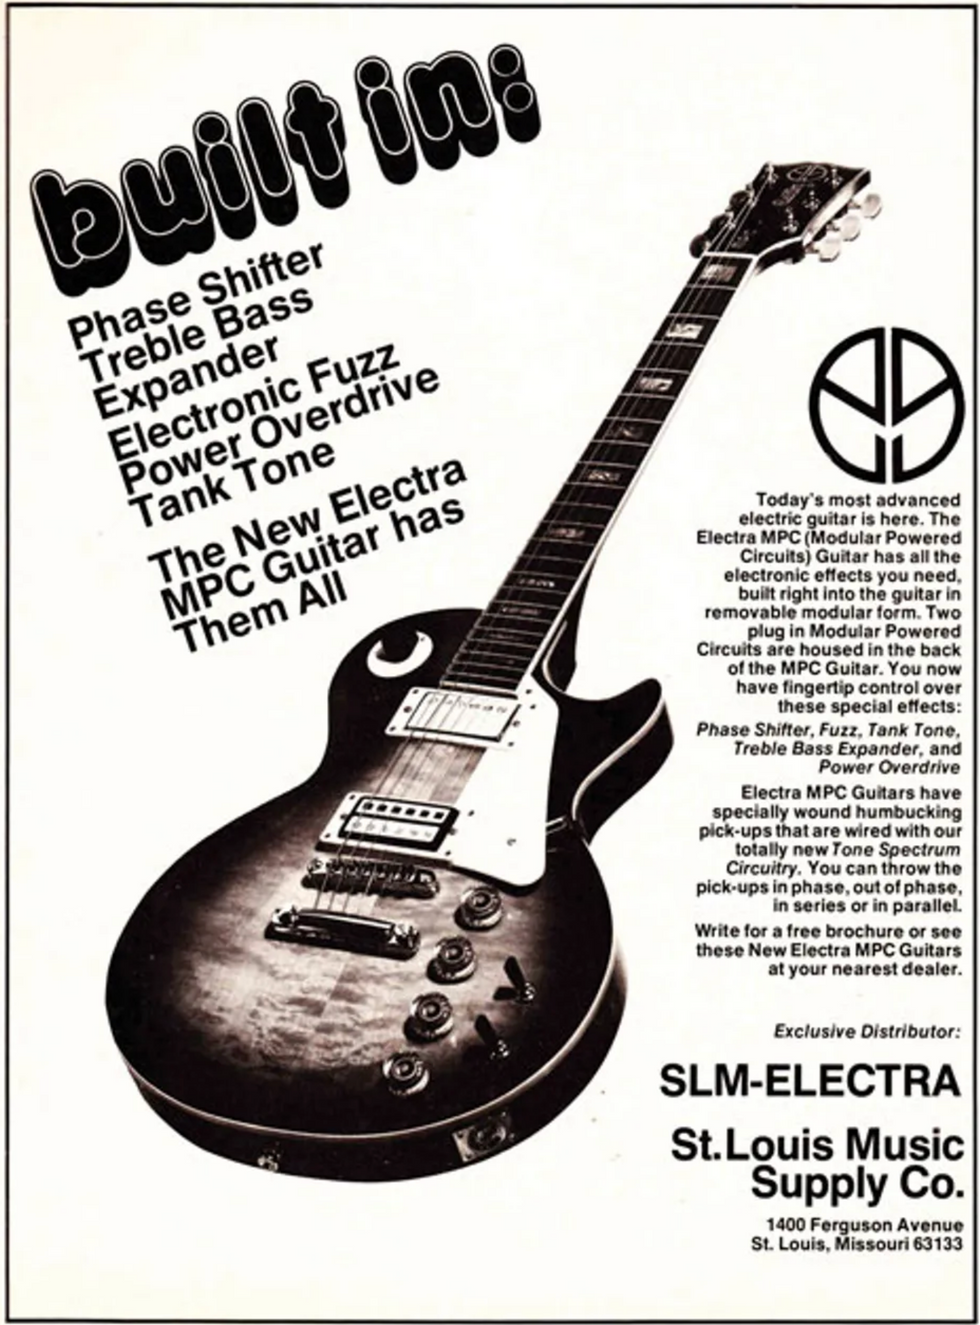
Photo 1: The Electra MPC, a late-'70s/early-'80s guitar with built-in effects, has been largely forgotten. But many boutique builders have borrowed its simple yet great-sounding distortion circuit.
What you'll build. This project is a modernized and tweaked version of a distortion circuit that originally appeared in Electra's MPC (Modular Powered Circuits) guitar, a Japanese axe with built-in effects that was imported into the U.S. by Saint Louis Music in the late '70s and early '80s (Photo 1). The guitar was never very popular, but at some point savvy boutique stompbox builders realized that despite (or maybe because of) the circuit's simplicity, it offers terrific overdrive tones. It's a fine alternative to the Tube Screamer-influenced designs found in perhaps 90 percent of today's overdrive pedals.
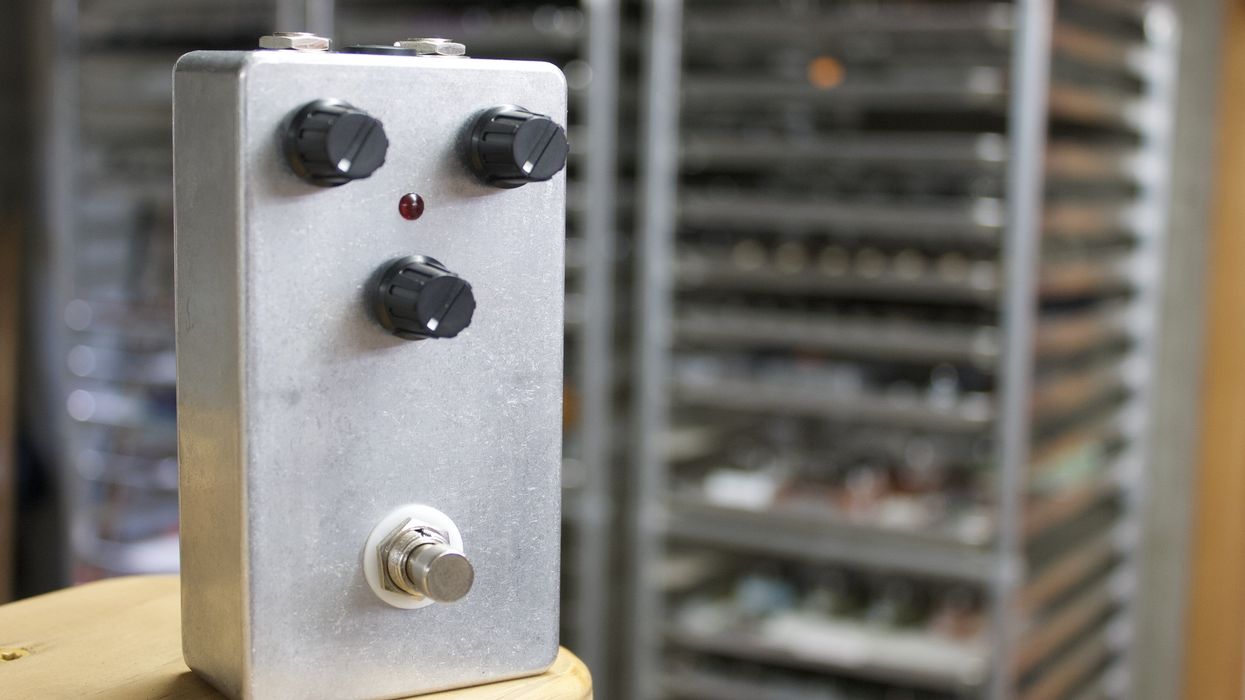
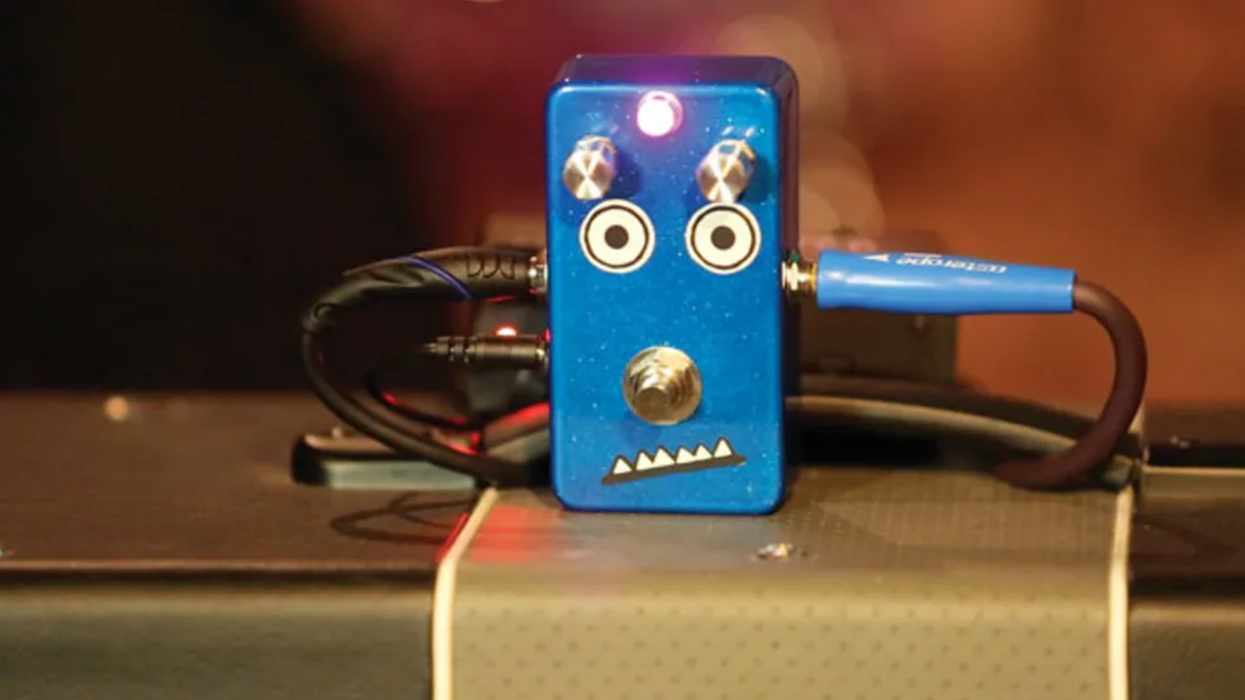
We're calling our Electra variation the PG Distortion (Photo 2). Compared to a Screamer, the PG Distortion is less compressed, less midrange-heavy, and more responsive to variations in your playing dynamics. It preserves note attack and has an edgy grind that cuts through onstage and in a mix. It's been used in several highly regarded boutique pedals (just Google the phrase "based on Electra distortion").
What you'll learn. The circuit's simplicity makes this a perfect starter project. But the goal isn't just to build a cool pedal from a few modestly priced parts. From the very first steps, you'll make design choices to suit your style and taste. You'll learn how common stompbox components work, and how to choose the right ones for your needs. Making stuff you like is a prime motive for DIY.
Now, if your goal is simply to build a cool pedal as quickly and cheaply as possible, you might consider a prefab DIY kit rather than this project. (I'm especially fond of kits from Build Your Own Clone because of their clever designs and excellent documentation.) But usually, kits like that only tell you the next step—not why you're doing the step, or how you can apply the procedure to future builds. Also, kits usually come with a printed circuit board (PCB) for mounting components, while we will make connections manually using a blank piece of perforated circuit board—a more laborious process, but a more informative one. So think of this as a stompbox-building class, with the PG Distortion as our case study.
Watch the Video Demo of the PG Distortion:
Project overview. The project is organized into five parts:
1. Preparations. Here you assemble all the needed tools and round up your parts.
2. Breadboarding the circuit. You'll assemble the circuit on electronics "breadboard"—an inexpensive prototyping tool that lets you create circuits without soldering. This method makes it easy to understand which components accomplish what (Photo 5).
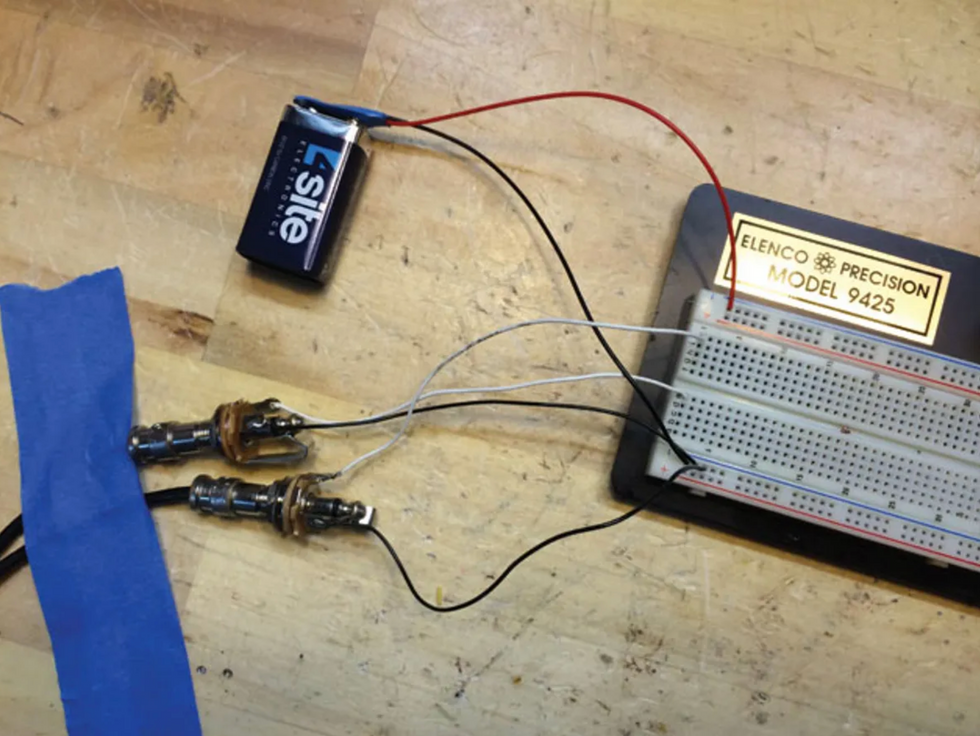
Photo 5 — An electronics breadboard lets you test and customize circuits without soldering.
3. Customizing the circuit. Breadboarding is also a great way to explore design options, which you'll do right from the beginning.
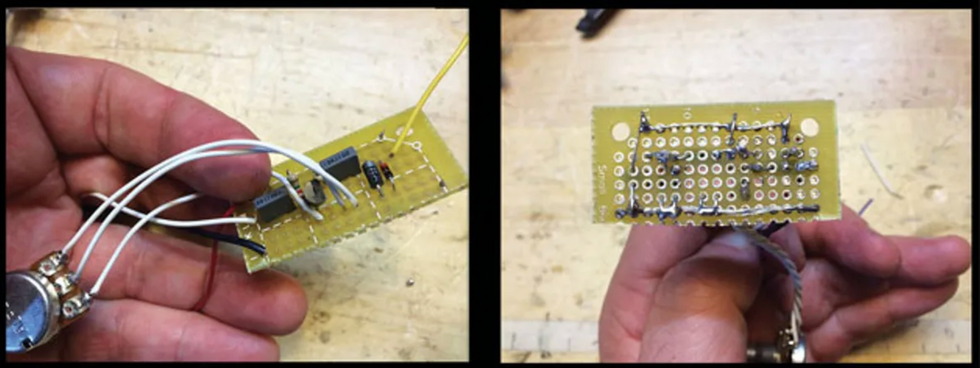
Photo 6 — After refining your circuit on the breadboard, you'll mount the components on a piece of perforated circuit board, soldering everything together on the board's reverse side.
4. Assembling the circuit on perf board. Once you finalize your design, you'll solder it onto "perf board," a type of circuit board (Photo 6). It's a more complex process than just plugging parts into holes on a prefab PCB, but it permits customization.
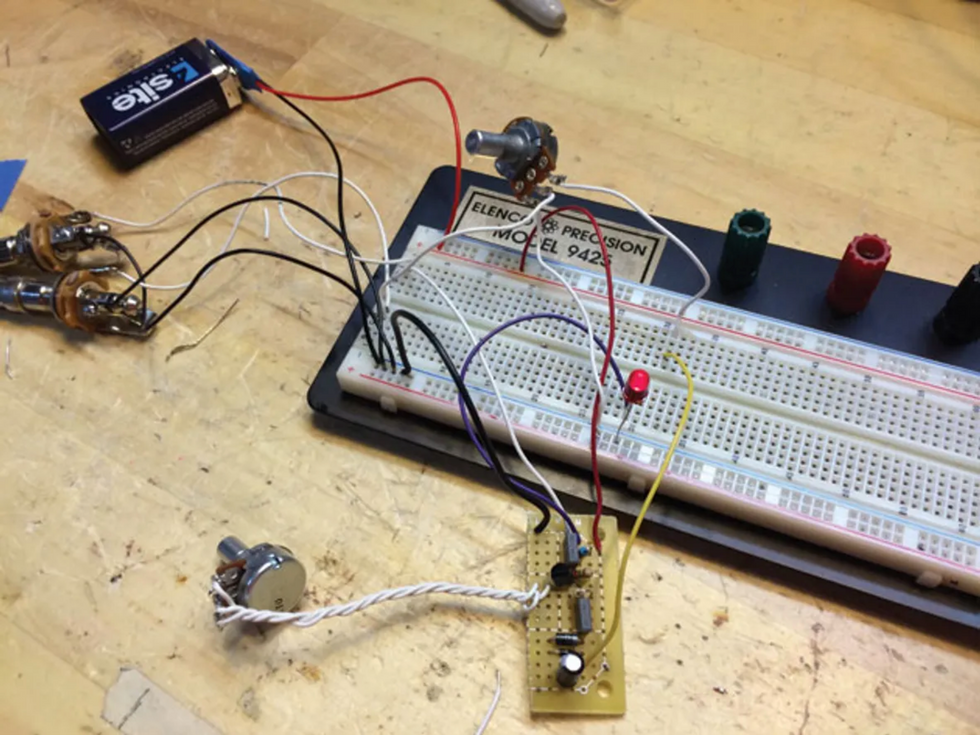
Photo 7 — You'll test your completed board on the breadboard before boxing it up.
Once you learn the technique, you'll be able to transpose most stompbox circuits directly from schematic to perf board—and almost every stompbox schematic is available online. (Yes, reading schematics is one of our topics.) After assembling the circuit board, you'll test it using the breadboard (Photo 7).
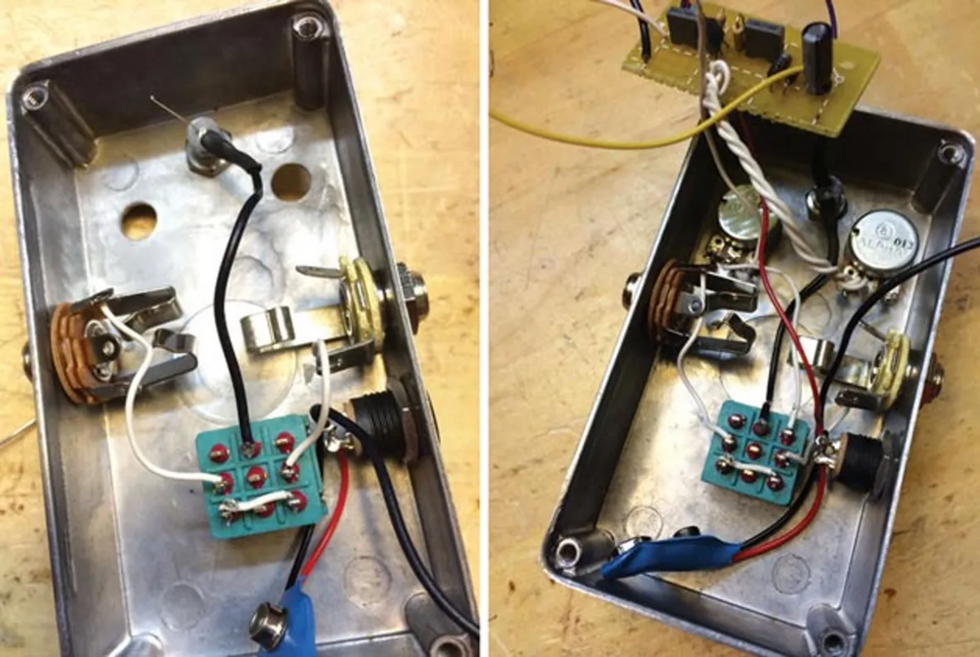
Photo 8 (left): Your stompbox will have pro hardware, including true-bypass switching, a DC adapter, and a power-indicator LED. Photo 9 (right): In the final assembly, your circuit board rests atop the gain and volume pots.
5. Boxing the circuit. Finally, you'll box everything up. You'll install the jacks, footswitch, LED, and DC adapter into the enclosure (Photo 8) and then add the circuitry (Photo 9).
Tools.
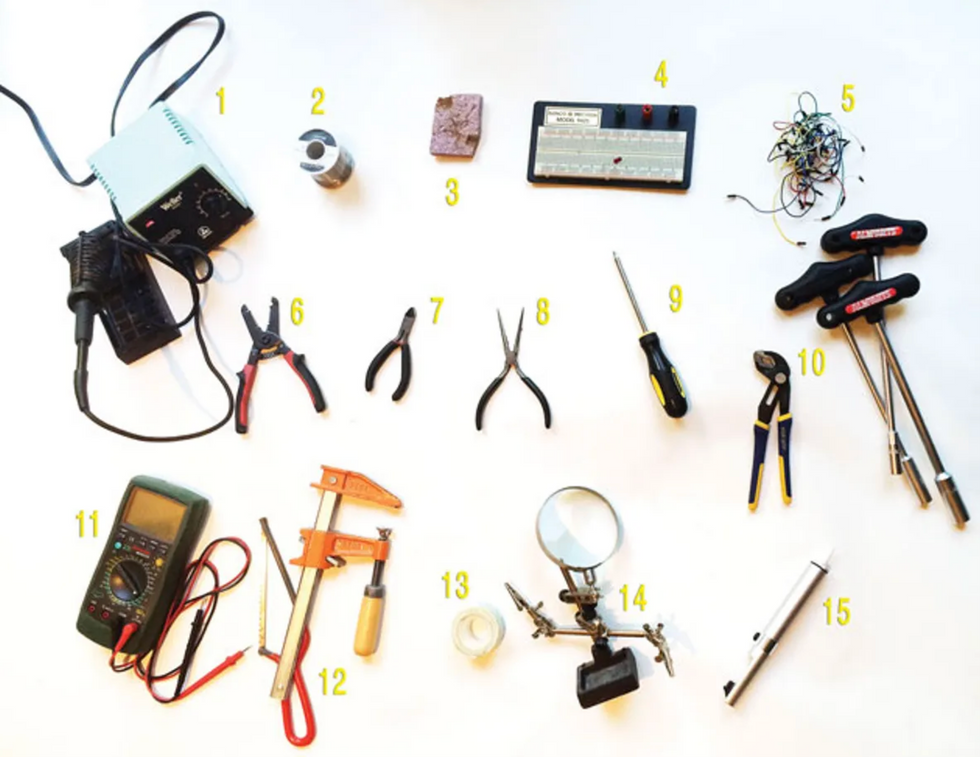
The tools you need—plus a few that are nice to have.
You'll need these tools to complete the project. Ones marked "optional" are nice to have too.
1. Soldering iron. (Preferably 30 watts or more, but not a large gun-type iron. A "soldering station" with a temperature control is a big plus. Use a fine, narrow soldering iron tip—the best choice for small-format electronic work.)
2. Lead-free solder. (Less toxic than the leaded kind, but still nasty.)
3. A damp sponge to clean the soldering iron's tip.
4. A small electronics breadboard. (They make large-format ones, but most stompbox circuits are simple enough for a small board.)
5. An assortment of jumper cables. (You can make your own, but the prefab ones have metal tips that don't fray from repeated use.)
6. Wire stripper.
7. Wire cutter. (Most strippers have cutters, but you'll probably want a separate flush-edged tool for tight, close cuts)
It's never too early to modify projects to better meet your musical needs and personal style. Even in this simple circuit, small modifications can dramatically alter the effect's sound and response
8. Needle-nosed pliers.
9. Phillips-head screwdriver.
10. An adjustable wrench or a wrench set. (Long-handled luthiers wrenches are nice if you can afford them—plus you can use them for guitar repairs.)
11. A digital multimeter. "Auto-ranging" meters are the easiest to work with. These have many functions, and the high-end ones can be quite complicated. But even budget models should have the functions needed for this project: a voltmeter, an ohmmeter, and a continuity function (a beeper that sounds when you touch the test terminals to any two points that are linked electronically).
12. A small saw and vise for cutting perf board to size.
13. Double-sided foam tape
14. Optional: a "helping hand" vise to hold components steady while soldering.
15. Optional: a syringe-style de-soldering pump.
… plus an electric guitar, an amp, and two audio cables.
Parts.
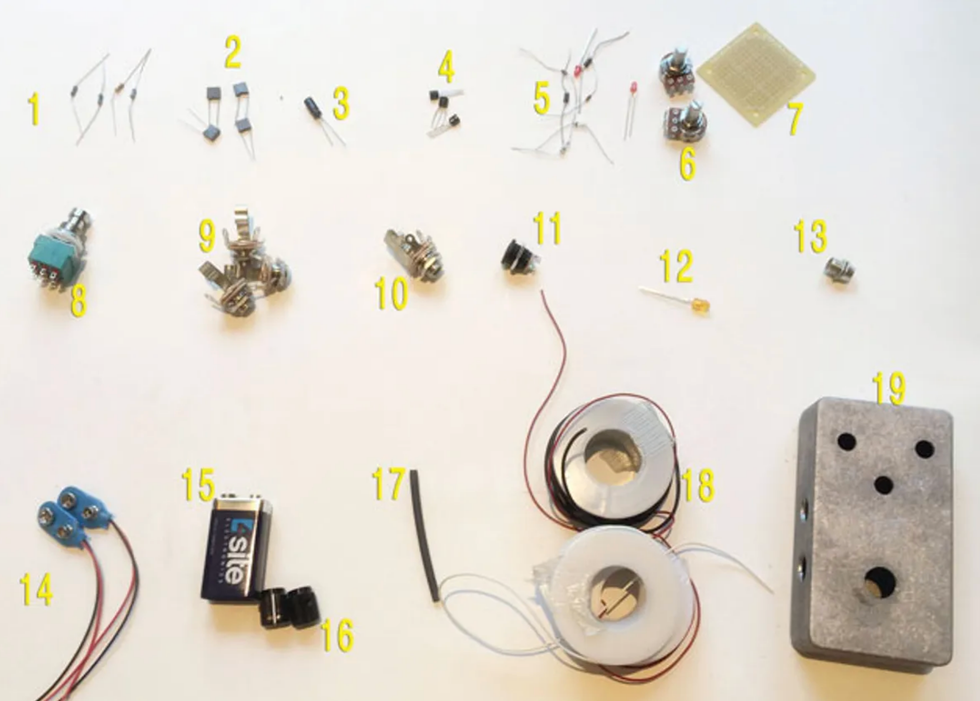
You can get some parts from any electronics supplier. Others you must order from a stompbox parts specialist.
Here's your "bill of materials" (BOM)—the engineer's term for a parts list. Part of the project involves auditioning multiple components to choose your favorites, so not everything in the list will appear in the final pedal. The extra parts are quite inexpensive, so I recommend getting them all—you'll learn a lot. (In the U.S., a complete set of parts should cost around $50.)
1. Five ¼-watt metal film resistors. Values: 470R, 4.7K, 10K, 68K, 2.2M.
2. Four non-polarized capacitors (caps):
· 473 (also called .047µF or 47n)
· 683 (also called .068µF or 68n)
· two units of 104 (.1µF or 100n)
These can be polyester film, "box style," or ceramic—they all sound the same in this circuit. Get small-format caps rated between 50 and 100 volts, not the large-format caps used in amps and other AC-powered devices. (You'll only use two of these in the final pedal.)
3. One 16V 22µF electrolytic capacitor. (This cap type is polarized.)
4. Three transistors: 2N5088, 2N5089, and 2N3904. (You'll only use one in the final pedal.)
5. Eight diodes, two each of the following. (Not all will appear in the final pedal.)
- 1N4001
- 1N914
- 1N34A
- red 3 mm LED
6. Two 16 mm potentiometers ("pots"): A100K and C10K. (Substitute a B10K if you can't find a C10K.)
Schematics can look intimidating, but it doesn't take long to learn the basic symbols.7. A piece of perf board (perforated circuit board) at least 15 holes in width and seven in height. Chances are you'll saw a standard-sized 45 mm x 45 mm piece (shown) in half.
8. A 3PDT footswitch.
9. Three 1/4" mono jacks. (One is for the pedal, and two are for your breadboard testing rig.)
10. One 1/4" stereo jack.
11. One DC jack. (I used the standard type with an internal nut for the photos in this guide, though you may find it easier to work with an external-nut model.)
12. One 5 mm LED (any color).
13. One 5 mm LED bezel.
14. Two battery snaps. (One for the pedal, and one for the breadboard rig.)
15. One 9-volt battery.
16. Two knobs of your choice.
17. One 2" length of 1/8" heat-shrink tubing. (You can substitute standard electrical tape.)
18. Hookup wire, preferably 24-gauge, stranded and pre-bonded. (For visual clarity, it may help to use several contrasting colors, such as black, red, and white.)
19. One 1590B-size enclosure drilled for two knobs, footswitch, input, output, LED, and DC jack. You can order a pre-drilled box, or use a drill press to make your own holes. Use a larger enclosure if you like, though everything should fit into a compact 1590B. (If you have a drill press, you can save a couple of bucks by drilling your own holes. For an appropriate drill template, Google "1590B drilling template.")
Sourcing parts.
Stompbox parts tend to fall into two categories: those you can get from large electronics supply houses, and those sold chiefly by stompbox specialists. Large suppliers such as Mouser, Digi-Key, and Allied often have the lowest prices, but they don't stock some of the essentials. Meanwhile, the specialized stompbox vendors often carry both specialized and non-specialized parts, and the convenience of one-stop shopping may compensate for slightly higher prices on generic parts.
This isn't a complete list of stompbox parts specialists—just three reliable U.S.-based vendors with fine reputations, listed in alphabetical order. I've had great service from all three businesses.
Meanwhile, I hear good things about Germany's Banzai Music from my friends in the E.U.
Mammoth Electronics has created a preassembled kit with all the parts needed for this project. (Premier Guitar has no financial stake in the product—it's merely offered as a convenience.) The parts are good and the prices are competitive, but it's just one way to go. The kit includes all needed parts, but you must provide the tools. More details here.
Despite (or maybe because of) the circuit's simplicity, it offers terrific overdrive tones. It's a fine alternative to the Tube Screamer-influenced designs found in perhaps 90 percent of today's overdrive pedals.
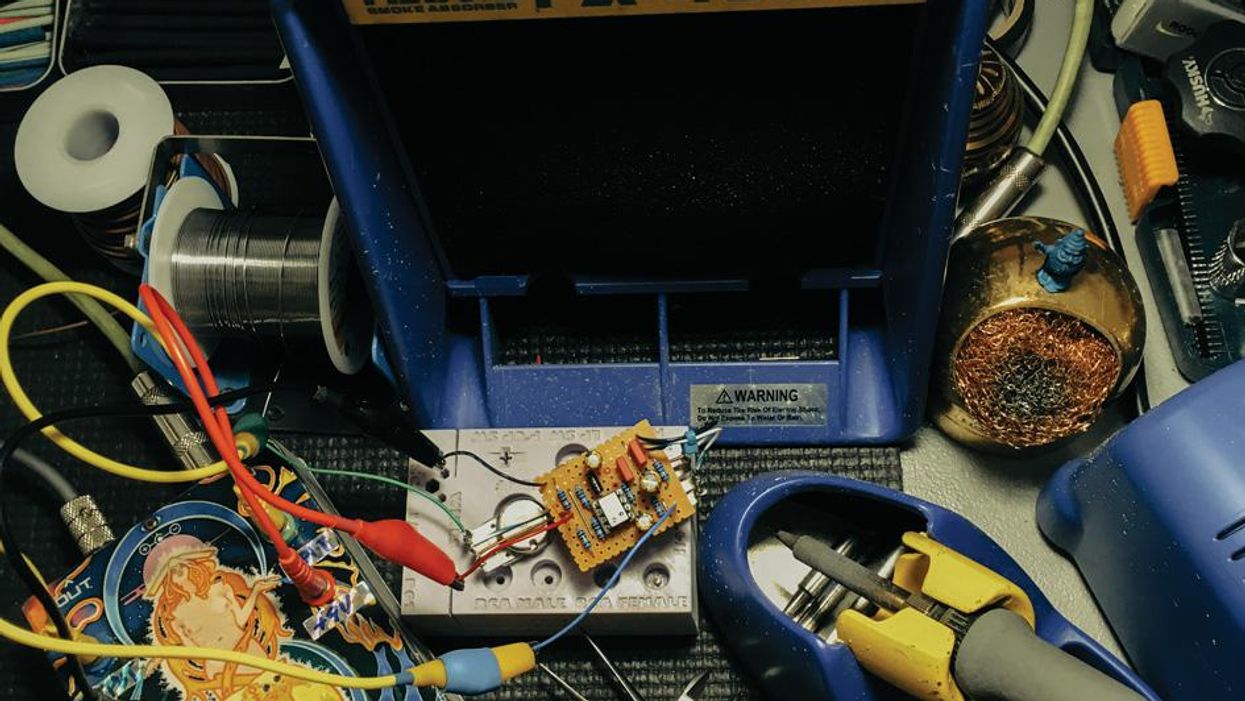
Your workspace. Work somewhere with decent lighting and ventilation. Expect everything to take longer than planned, so don't start working at your kitchen table if you plan to eat there this week. Remember, a clean, well-organized workspace is a sign of a clean, well-organized mind. My bench is a filthy junk pile.
Safety first (and second and third). This project requires tools and techniques that can hurt you if you're not careful. Fortunately, it's pretty much impossible to electrocute yourself with 9-volt circuits like this one, but it's all too easy to cut or burn yourself.
When in doubt, step away from the bench and seek help. Don't touch things that are hot or sharp. Wear eye protection. Don't work when you're angry or stressed. Don't leave anything dangerous where kids or pets can find it. You know the drill—including the fact that you proceed at your own risk, and that neither I nor Premier Guitar can assume any responsibility for injury, property damage, or other unfortunate events that may occur while attempting this project. Be smart and careful, okay?
Common-sense soldering. If you've never soldered, it can be intimidating. And yes, it's possible to burn things, including yourself. But it's actually an easy procedure that quickly becomes second nature. If you've never soldered before, watch a few YouTube soldering tutorials. Start with this one, in which a clever 11-year-old covers most of what you need to know in three fast minutes.
Some basics.
- Don't touch the hot part.
- Don't leave a hot iron unattended.
- Work in a ventilated area. Even if you're using lead-free solder, it can't be healthy to inhale those fumes for hours!
- Wear eye protection.
- "Tin" the iron's tip by touching a bit of solder to it before starting.
- Keep a damp sponge or rag handy and swab the iron's tip frequently to keep it clean.
- Instead of touching solder to the iron's tip, try to heat the target component and melt the solder against the component. (But yeah, sometimes we cheat and quickly touch the solder to the iron for a fraction of a second to get it flowing.)
- A good solder joint is shiny, smooth, and shaped like a Hershey's Kiss. If it's dark, or sits on the surface like a water droplet, reapply the iron.
- If you make mistakes, it may help to have a syringe-type de-soldering tool. (You simply re-melt the solder, and then suck it up with the tool.)
- Consider using a "helping hands" vise to hold your components, leaving both your hands free for work.
It's possible to complete this project with a bare-bones pencil-type soldering iron, but it's far easier if you use a "soldering station" with adjustable temperature from a company such as Weller or Hakko. Simple hobbyist models start at around $40, and fancier models go for about double that. But don't use big, high-wattage soldering guns—they're too powerful for work like this. Use a fine, narrow soldering iron tip suitable for delicate electronics work.
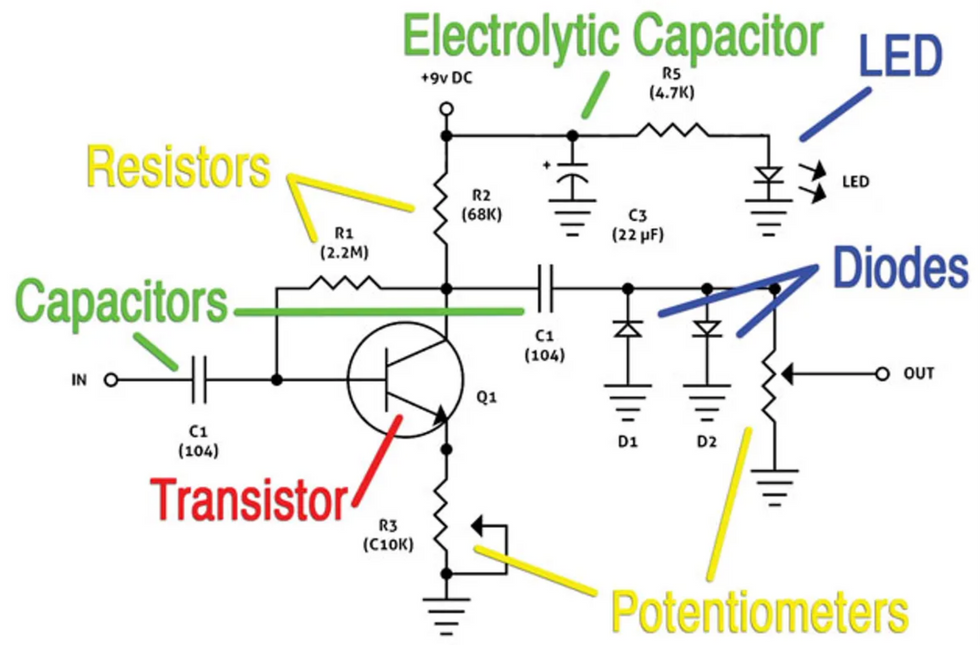
Photo 10 — You can make sense of many stompbox schematics if you learn half a dozen symbols.
Working with schematics. A schematic is simply a graphic representation of a circuit. Schematics can look intimidating, but it doesn't take long to learn the basic symbols. Photo 10 shows the schematic for this project. The build guide PDF discusses it in detail, but here's a quick intro:
- Schematics are usually arranged with the power connection at the top, ground connections at the bottom, input to the left, and output to the right.
- The zigzag lines depict resistors.
- The potentiometer symbol is like the resistor symbol, but with an added arrow to indicate the middle lug.
- Parallel lines symbolize non-polarized capacitors.
- The electrolytic cap symbol adds a curved line and a plus sign to indicate polarity.
- The diode symbol includes a triangle and a line. The side with the line is the negative terminal. The LED symbol adds arrows representing emitted light.
- Like most circuits, this one includes many connections to ground. We could connect them all with lines in the schematic, but the schematic is easier on the eye is we indicate ground connections with a simple symbol: the downward-facing triangle.
Don't sweat it if you're still confused—it's covered extensively in the build guide.
Stompbox parts tend to fall into two categories: those you can get from large electronics supply houses, and those sold chiefly by stompbox specialists.
Mods of the gods.
Sure, you might be a beginning builder, but chances are you have strong tastes when it comes to guitar sound. It's never too early to modify projects to better meet your musical needs and personal style. In fact, you'll be doing just that within the first few minutes. Even in this simple circuit, small modifications can dramatically alter the effect's sound and response.
Your modding experiments will focus on three areas:
- You'll try different values for the input capacitor (labeled C1 in Photo 10). This part acts as a high-pass filter, removing lows. But the result isn't quite like, say, turning down the bass knob on your amp, or using EQ to remove lows from a recording. Here at the front of the circuit, slight component variations alter the effect's fundamental character.
- You'll audition three different transistors (the part labeled Q1 in Photo 10). This component defines the circuit's gain. You can make this an understated overdrive or an angry chunk machine.
- You'll experiment with different combinations of clipping diodes (parts D1 and D2 in Photo 10). The result can range from soft, warm distortion to razor-edged sizzle.
DIY not? Remember, this project isn't just about building a cool distortion pedal. The goal is learning the "whys" as well as the "hows" so you can a) apply these techniques to any project, and b) alter circuits to taste. I hope you find the process fun and informative, and that when the smoke clears—hee hee—you have an inspiring musical tool. For best results, maintain your patience and sense of humor, and don't freak out when you hit the inevitable hurdles.
There's much more info in the PDF build guide, including additional resources and troubleshooting tips. Download it if you dare!
Click to download the entire build guide in an easy-to-use PDF.
[Updated 8/10/21]
- Build Your Own Stompbox! - Premier Guitar ›
- Stompbox Savants - Premier Guitar ›
- The DIY True Bypass Lesson - Premier Guitar ›
- DIY: How to Install Onboard Effects - Premier Guitar ›
- Get the latest FREE Ebook from PG's Digital Press - Premier Guitar ›
- Why I Built This: Atelier Rosenkrantz’s Rachel Rosenkrantz - Premier Guitar ›
- The DIY True Bypass Lesson - Premier Guitar ›
A more compact Cortex puts a universe of sounds and tone creation potential at your feet, at a price that’s a fraction of bigger floor modelers.
Fast, easy capture process. Easy to navigate top-level functions. Captures can sound very accurate. Extensive online community creates a trove of downloadable models.
No onboard screen means you rely on a smartphone or tablet for deep navigation. Getting closest possible amp captures via miking can take a lot of trial and error.
$549
Neural DSP Nano Cortex
neuraldsp.com
The complexities and capabilities of modelers like Neural DSP’s Cortex series demand certain tradeoffs. For starters, a powerful modeler can’t be the size of a postage stamp, at least if you intend to adjust many parameters and source numerous presets in real time on a stage. Neural’s newNano Cortex pushes back at the boundaries of that compromise. It's not much wider than two MXR pedals side by side. The $549 price tag, which is just about a third of the price of the Nano’s more capable big brother,the Quad Cortex, makes it an appealing proposition too.
Taken at Face Value
The Nano Cortex is a streamlined piece of hardware. An array of five push buttons enables signal capture and navigation of banks and effects. Two rotary bypass footswitches also move through presets and effects blocks, and six knobs (with LED surrounds that display levels) govern gain, output level, EQ, and wet/dry effects blend. The big omission here is, of course, a screen that displays signal effects chains and preset names. That job, if you choose to use the Nano in that fashion, falls to the Cortex Cloud app and a smartphone or tablet, meaning you’ll need two pieces of hardware on hand to make the most of the Nano’s potential. You can use the Nano in performance without a phone or tablet. But you’ll need to have a photographic memory of what presets are made up of what amps and effects, which gets extra tricky if you use wildly divergent sounds designed to work at vastly different output levels.
Many sounds from the Nano Cortex are fantastic. Many of the factory presets—particularly those dressed up with a little gain, will probably fool listeners in a blind test when those sounds are situated in a mix, and can be fairly classified as authentic in most cases. Like any modeler, the accuracy of modeled tones doesn’t mean that dynamic interactions with those same models will feel the same way, especially if you use feedback and the overtones and harmonics generated via amp proximity in your expression. For guitarists that don’t integrate these methods into their playing, the Nano’s sounds will be more than satisfactory stand-ins for their analog equivalents.
A Captive Audience
Modelers love the convenience of capture technology—the ability to clone the characteristics of many amps and pedals in your collection, which you can then take on the road, to a gig, or practice in a compact floor unit. It’s a very appealing and practical idea, particularly if you’re playing anywhere where parking in front of the venue isn’t a given. Neural’s capture method is fast and easy. To capture an amp’s personality, you mike an amp (or send the signal via a load box) to the Nano Cortex, run a signal from the Nano to your amp, press capture, listen for the test signals and kick back for five minutes while the unit does its thing. The process is fundamentally easy. And it enables you to stuff an approximation of your favorite amp, or 10, in the pocket of a gig bag. It’s also what makes the tone library crowd sourced by the constantly growing and dedicated Cortex artist and user community so extensive.
“Nano Cortex’s capture process is fundamentally easy. And it enables you to stuff an approximation of your favorite amp, or ten, in the pocket of a gig bag.”
But while you can conceivably nail the sound of your amp, or pedal, to the letter in five minutes, achieving the best possible approximation can take many tries—particularly if you use the amp-miking method. Though I got close, I never quite hit the bullseye in my attempts. The same mic placement, amp settings, and audio interface all sounded more expansive and livelier when tracked live than via a capture. Would I love to have close-but-not-quite approximations of my favorite three different amps on a fly date? You bet—especially if I could situate a few key, favorite pedals on a small pedalboard with the Nano.
The Verdict
Though there is no shortage of serviceable sounds built into the Nano Cortex, the real action will, for many, be the abundance of captures and sounds created via the larger Cortex community. This is no bad thing—especially if you have the time to cruise and create these sounds at leisure. There’s no reason that any of these sounds can’t become solid foundations for core live tones. But time spent exploring an extensive online library of captures or creating them is time not spent creating songs. So, for many players, Nano Cortex will be a better bet for home recording than for performance or in a deadline-driven studio situation. This is made doubly true for the lack of the onboard editing interface and the Nano Cortex reliance on a smartphone or tablet for deeper editing. Adding a second piece of gear compounds the risks inherent in an already complex technology.
Still, the number of available presets is considerable, and players with gigs that require spanning multiple styles in a night will have so much to work with here if they manage without a screen and trust their phone. In terms of achieving sheer processing power in a small size, the Nano Cortex is tough to beat. And for those that savor the experience of creating and sourcing a huge library of sounds in a unit with the footprint of a sandwich, thrills and big-time dividends await.
How the Irish guitar virtuoso got a unique tone with a factory-stock Strat.
Hello and welcome back to Mod Garage. In this column, we’ll take a closer look at the very unique sound of the famous Rory Gallagher Stratocaster and discuss why it sounded so outstandingly good.
Unless you are living in a cave, you should know who Rory Gallagher was and will recognize his beaten-up Fender Stratocaster, which is a symbol of pure rock ’n’ roll. The story goes that Rory bought this used 1961 sunburst Stratocaster in 1963 for £100 in Cork, Ireland, in a shop named Crowley’s Music Store. Allegedly, this was the first Stratocaster ever to reach Ireland. The guitar’s previous owner ordered a red Stratocaster from the U.S., but a sunburst came instead. After using the guitar for around half a year, the red one arrived. The sunburst was exchanged and put on sale, and Gallagher soon found it. True or not, the story is simply priceless.
When Rory bought this Strat, it was absolutely factory stock, which was typical for this time. It stayed that way for a long time and became a piece of musical history in the hands of Rory. Nearly all of the sunburst lacquer was naturally removed over the years by Gallagher’s acidic sweat, so today the guitar is almost completely stripped down to the bare wood, giving it its iconic look.
The first mods done to this guitar happened around the mid-70s, when two of the pickups were damaged and had to be replaced. Later on, some other parts like the pickguard and pickup covers had to be replaced, and in his later career he did start to use different pickups. The standard 3-way pickup-selector switch was replaced with a more modern 5-way switch, and the controls were rewired for master volume and master tone with the middle tone pot disconnected.
What was the secret behind Rory’s unmistakable Stratocaster tone, which he had from the start? First and foremost, and without any doubts, you all know the saying: Tone comes from the fingers! When such outstanding playing chops meet a great instrument, the result is marvelous.
Having said that … Rory’s pickups did play a large role in his sound. The standard Stratocaster pickups Fender used at the time had staggered magnets with beveled edges. There is complex physics behind it, but in basic terms, these pickups sound fatter, sweeter, and with more overtones. The beveled edges greatly influence the magnetic field, which causes them to sound so different. This has to do with the pickup’s unique aperture or “magnetic window.” These were hand-beveled edges, and it was generally assumed that this was done to disguise the rough and uneven surface left by the sand casting. But this can’t be the reason because doing such handiwork takes a lot of time and care to get right, and Leo Fender wasn’t known for spending time on such unnecessary things in his building processes. (Later, Fender stopped beveling and the sound of the pickups changed because of this.)
In 2016, Seymour Duncan explained the tone of beveled pickups to Guitar.com: “The bevel causes the magnetic field to shoot out a little around the bevel area, but it results in a tapering of the field above that point. So, if you could, imagine the magnetic field shaped like the flame of a candle or a teardrop.” That’s an excellent metaphor that hits the nail on the head.
“Depending on the employee working the sanding machine, the edges are more or less beveled from pickup to pickup—one of the reasons why vintage Strats sound so different from guitar to guitar.”
But why did Fender originally do hand beveling and why did they stop later on? Were his choices based on tone? I don’t think so. I think the answer must be seen in the historical context of the time.
The alnico 5 material used for the magnets was brand-new and very expensive at that time. It was also very porous, and many magnets crumbled while using a hammer to drive them into the pickup, which was the usual procedure in the Fender factory. So, Fender started hand beveling the magnets on one side, which minimized the risk of destroying the magnet during the hammering process. It was an accident that this created such great tone. Depending on the employee working the sanding machine, the edges are more or less beveled from pickup to pickup—one of the reasons why vintage Strats sound so different from guitar to guitar.
Here you can see the normal, non-beveled magnets of a Stratocaster pickup:
Photo courtesy of Leosounds (https://leosounds.de)
And here is a faithful recreation of the beveled magnets in Gallagher’s Stratocaster:
Photo courtesy of Leosounds (https://leosounds.de)
Gallagher’s pickup set has a very pronounced bevel. The Fender worker who produced these certainly also created some more sets like this.
The influence of the bevel on a pickup’s tone is huge. To give a better idea, here are some magnetic visualizations that my dear friend Bernd C. Meiser from the German BSM company made for me. Bernd sadly died on July 30, 2024, after fighting against cancer for two years. It won’t get loud anymore without him.
Here you can see the common magnetic spread-out of a non-beveled Strat pickup:
Drawing courtesy Singlecoil (https://singlecoil.com) in memory of Bernd C. Meiser
And here is the same with a beveled Strat pickup:
Drawing courtesy Singlecoil (https://singlecoil.com) in memory of Bernd C. Meiser
You can clearly see the difference of the magnetic spread-out and the much wider aperture these beveled magnets provide, causing the different tone.
So where is the mod for this column? I’m sorry to disappoint you, but it’s not possible to change the magnets on a standard Stratocaster pickup without destroying the pickup. And there is no way to retroactively put a bevel on the magnets of your pickup with the magnets installed. The only way to convert your Strat to beveled pickups is to install a new pickup set with beveled magnets. Fender ’57/’62 pickups feature beveled edges, as do many offerings from other pickup companies.
Next time, we will have a look at the mid-boost and scoop mod from Dan Torres, so stay tuned!
Until then ... keep on modding!
Saxophonist Charlie “Bird” Parker’s challenging version of a 12-bar blues is one of his most enduring contributions. Learn how to navigate these tricky changes by combining bebop and blues.
Chops: Intermediate
Theory: Intermediate
Lesson Overview:
• Use IIm–V7 progressions to add interest to a blues progression.
• Combine the blues scale with Mixolydian and Dorian to create swinging phrases.
• Increase your rhythmic awareness by using triplets and syncopation.
Click here to download a printable PDF of this lesson's notation.
A big part of the bebop spirit was learning how to navigate through seemingly unrelated chords at speedy tempos. Saxophonist Charlie “Bird” Parker was a pioneer in the bebop movement and he combined his love of the burgeoning style with a deep appreciation for the blues. It’s easy to look at bebop in 2017 and think of it as a complicated and overly intellectual genre, but adding in a blues sensibility can make the changes a bit more approachable.
When looking at a traditional I–IV–V blues, there’s not all that much harmonic information to outline, so bop players like Parker would add chord substitutions. His composition “Blues for Alice” is an example of what’s become known as “Bird Blues.” The changes Parker used on this tune of become so accepted that other composers have written contrafacts—a different melody written on the same changes.
To fully digest these changes, it makes sense to examine the progression in small chunks and see how it relates to the traditional blues form. First, let’s look at the “Bird” changes below. (Remember, in jazz circles a triangle means a major 7 chord and a dash means minor 7 chord.)
When looking at a traditional 12-bar blues in F, the first four measures are usually an F7 (I) moving to a Bb7 (IV) in measure 5. In this version, Parker works backwards from the IV chord with a series of IIm-V7 moves that descend in whole-steps. Measures 4 and 3 are “major” IIm–V7s, but the second measure uses a “minor” version with a half-diminished chord for the IIm. Finally, Parker changed the chord in the first measure from a dominant 7 to a major 7 to place us squarely in the key of F. (It also helps with voice-leading across the first four measures.)
YouTube It
Saxophonist Charlie “Bird” Parker was the figurehead of the bebop era. Listen to his relaxed, swinging take on “Blues for Alice,” which is one of his most popular compositions.
Ex. 1 demonstrates one way to navigate the first four measures. Let’s break that down a bit. I stick entirely within the F major scale (F–G–A–Bb–C–D–E) for the first measure. Easy enough. In the second measure, for the sake of simplicity, I am just implying A7 through both chords. The first two beats outline A7 (A–C#–E–G) and the remaining notes are plucked from the A Super Locrian scale (A–Bb–C–Db–Eb–F–G).
Click here for Ex. 1
I’m using a similar concept in Ex. 2, working with the F major scale in the first measure and thinking A7 in the second. I’m using the D melodic minor scale (D–E–F–G–A–B–C#) over the third measure while targeting the 3 of Cm7 (Eb) on the downbeat of the fourth measure. To create an altered sound over the F7b9, I use a Gbdim7 arpeggio (Gb–A–C–Eb) to nail the b9 (Gb).
Click here for Ex. 2
This next example (Ex. 3) takes cues from great piano players so it requires some quick position shifting. The first shift happens in the first measure, where we move from 5th position up to 8th on the “and” of beat 2. In the second measure, we imply an A7b9 sound using a Bbdim7 (Bb–C–E–G) arpeggio that touches on the #9 (C) and b9 (Bb).
In the second and third measures of this example, we’re basically using the same concept. Because D Dorian (D–E–F–G–A–B–C) and G Mixolydian (G–A–B–C–D–E–F) contain the same notes, we’re simply adding some chromatic passing tones that help the chord tones line up on strong beats. Move the whole concept down a whole-step (to C Dorian/F Mixolydian) for the next measure.
Click here for Ex. 3
The next section of a blues in F might look something like: Bb7–Bb7–F7–F7. Or, if you think of a traditional jazz-blues progression, it might be Bb7–Bdim7–F7–D7. Looking ahead, Parker wanted to target the Gm7 in measure 9. What’s the best way to lead into that chord? Simply add a IIm–V before it. Parker used backcycling to create a series of descending IIm-V7 progressions that connect the Bb7 in measure 5 to the Gm7 in measure 9. Rather ingenious, huh?
While these chords are easy enough to play with basic chord forms, it’s much trickier to solo through them in an authentic way.
Ex. 4 uses the Bb Mixolydian scale (Bb–C–D–Eb–F–G–Ab) over the Bb7 before moving to Eb Mixolydian (Eb–F–G–Ab–Bb–C–Db) for Bm7–Eb7. In the third measure, we move to A minor pentatonic (A–C–D–E–G) before coasting through an Abm7 arpeggio (Ab–Cb–Eb–Gb) for the last measure.
Click here for Ex. 4
The next lick (Ex. 5) demonstrates how you can use simple melodies to navigate this chord progression. The first measure is a simple lick based on the Bb7 chord, then we create a melody just using the F major scale—it’s all about landing on the Gm7 chord at the right time.
Click here for Ex. 5
Our final example over this section (Ex. 6) is just as loose with the chords, but makes sure to hit them as they land. The first measure uses the Bb major pentatonic scale (Bb–C–D–F–G) before using some outside notes that resolve to the root of the Am7 chord. At this point you should be seeing that a big part of the bebop genre is based on rhythm. The mixture of triplets and heavy syncopation is an essential part of the sound.
Click here for Ex. 6
The final section of a blues in F usually goes: C7–Bb7–F7–C7, but that’s too basic for beboppers. In Bird blues, we use a two-measure IIm-V7 progression before increasing the harmonic rhythm with F7–D7–Gm7–C7. In Roman numerals, this translates to I7–VI7–IIm7–V7.
I find the best way to play over this section is to remember you’re playing a blues, so some blues scale ideas might not be a bad idea, as shown in Ex. 7. We’ve even included some slight bends!
Click here for Ex. 7
This final example (Ex. 8) feels like another melody rather than something clever. Remember, we’re playing music, and often the best music is the type that your audience can sing along to. So don’t be afraid to hold off and play something melodic.
Click here for Ex. 8
Lastly, here’s a short backing track to help you practice these ideas, and then come up with some of your own. Keep listening and copying and before long you’ll be soaring like Bird!
Less-corpulent, Big Muff-style tones that cut in many colors.
Unique, less-bossy take on the Big Muff sound that trades excess fat for articulation. Nice build at a nice price.
Some Big Muff heads may miss the bass and silky smooth edges.
$149
Evil Eye FX Warg
evileyefx.com
Membership in the Cult of Big Muff is an endless source of good times. Archaeologically minded circuit-tracers can explore many versions and mutations. Tone obsessives can argue the merits of fizzier or fatter tone signatures. The Ace Tone FM-3 is one of the less famous branches on the Big Muff evolutionary tree, but one that every true Big Muff devotee should know. It came out around 1971 and it was among the first in a line of often-imaginative Japanese takes on the circuit.
Evil Eye Warg Fuzz - MAIN by premierguitar
Listen to Evil Eye Warg Fuzz - MAIN by premierguitar #np on #SoundCloudEvil Eye’s Warg Fuzz marks another generation in this evolution. It uses the FM-3 as a design foundation and inspiration, and shares many of its tone characteristics. It’s most overtly a buzzier, less bass-hefty take on the V1 “Triangle” Big Muff, which serves as the FM-3 design’s launch pad. But the Warg also adds a midrange boost switch that makes the pedal better suited to mixes and environments where a little extra presence serves the musical setting.
Close Cousins
If you look at schematics for a V1 Big Muff and an Ace Tone FM-3 (minus its largely superfluous “boost” circuit) side by side, you’ll see a near-mirror image. But the small differences are significant. On the Ace Tone and Evil Eye Warg, the volume pot is positioned before the output gain stage rather than after, as it is on a Big Muff. A few filter and feedback capacitor values are smaller than those on the Big Muff, and there are a few extra resistors and an extra capacitor. Those changes aside, the two circuits would be hard to differentiate at a glance. But as we’ll hear, the audible differences are often profound.
Though Evil Eye was careful to replicate the Ace Tone circuit as closely as possible, the company added a second path for reshaping the output in the form of the “scooped and flat” toggle. Big Muffs are generally pretty scooped in the midrange, which is one of the breed’s distinguishing qualities, no matter the version. But that doesn’t keep newer manufacturers, like EarthQuaker and Stomp Under Foot, to name a few, from building Big Muff clones that add a midrange boost. Here, a variable boost knob is replaced by the flat-switch setting, which still offers ample tone reshaping utility.
“In a band mix, there’s more contrast with a burly bass.”
Build quality on the Philadelphia-made Warg is very nice. The circuit board is tidy, arranged along four rows of components that make the circuit relatively easy to trace. Input and output jacks as well as the footswitch are mounted to the chassis rather than the circuit board. The footswitch is a soft-relay unit. The pedal also looks bitchin’ (though the namesake wolf beast on the enclosure looks a little slender for a mythical, massive Warg). Given the careful, high-quality execution, the $149 street price is an especially good value.
Less Woof in This Wolf
Situating the Warg alongside any Big Muff makes the sonic family resemblance very clear. For comparison, I used a Sovtek Big Muff as well as really nice Ram’s Head and Triangle Big Muff clones. And while the Triangle is very clearly the closest cousin, in an audible sense, in the mid-scooped setting, the Warg shares a powerful, thick, high-gain profile and feel with all three Big Muff types. Where it’s most pronouncedly different is in its relatively light bottom end. For Big Muff hounds that savor the unique, bassy Big Muff ballast, the difference will probably sound pretty stark. But there’s lots of upside to the Warg’s less fat and sprawling profile. In a band mix, there’s more contrast with a burly bass. It will inhabit a much more individual space in a mix, too, which can open up mixing and arrangement options once you’ve laid down your tracks. And for this Big Muff fan, the less-bass-forward profile meant I could coax thick, grindy tones that were a touch more evocative of mid-to-late-’60s fuzz tonalities and felt less shackled to fat stoner-rock templates or late-Gilmour butter-sustain cliches without sacrificing a Big Muff’s sense of wide-spectrum chord aggression.
In the flat frequency mode, I found that the closest sonic likeness to the Warg was an EarthQuaker Hoof with an enhanced mids setting. The EQD probably offered more range on the traditional, bassy side of the Big Muff spectrum. But almost none of the pedals I tested against the Warg could match the Evil Eye’s high-mid clarity in chording situations and melodic leads.
The Verdict
Ascertaining how the very apparent, but sometimes subtle, differences between Big Muff types and the Evil Eye Warg fit your tone ideals and musical needs will probably take a shootout of your own. But if, like me, you’re a Big Muff user that sometimes wearies of that pedal’s smooth, fat, bluster, Evil Eye’s alternative is attractive and intriguing. It’s a great study in how different the basic Big Muff architecture can sound. And at just less than $150, you don’t have to feel too scared about taking a chance on this very interesting fuzz