Get custom-shop options on a bargain budget by making it yourself.
After playing and collecting pedals for a while, many players decide that off-the-shelf pedalboards don't quite offer all of the options they'd prefer for organizing and getting the most out of their stompboxes. Some of us want little more than a platform with space for our effects and a power supply, while others are at the opposite end of the spectrum and can't live without various jacks and specialized connections being built right into the pedalboard.
For this DIY piece, I wanted to solve the problem I'm facing: I have a growing pedal collection, but after using some of the pre-assembled products on the market for a while I decided they weren't quite cutting it. I wanted something closer to a custom pedalboard—minus the elevated price tag. After scoping out the range of custom options offered by various companies, I decided to make something with all the features I wanted. It's a bit more involved than duct-taping everything to an IKEA shelf, but it's definitely not as involved as some of the space-age control centers on the market. I was careful to keep costs as low as possible, though. in fact, I was able to keep the price around $100.
Tools & Supplies
- Appropriate lengths of 1/2" oak and 3/4" cabinet-grade birch
- Table Saw (with taper angle attachment and 80-tooth blade)
- Mitre Saw
- Router (with 1/2" straight bit)
- Medium-sized Phillips screwdriver (or similar-sized bit for a power drill)
- (6) 1/2" self-tapping wood screws (1/8" diameter with fine threads)
- (24) 1" self-tapping wood screws (1/8" diameter with fi ne threads)
- (10) 1 1/4" self-tapping wood screws (1/8" diameter with fi ne threads)
- Kreg Jig
- Marinco 5278BL power inlet
- (2) solderless Neutrik conenctors
- 7/8" hole saw
- 1 3/4" hole saw
- Power drill
- 1/8" drill bit
- Wire strippers
- Electrical tape
- IEC power cord
- 2" industrial-strength Velcro
- 220-grit sandpaper
A couple of notes about things we're not covering here: I won't go into the theory of wiring up your board (effect order, switching options, etc.)—that's a whole other topic. Here we're covering the basics of getting a signal and power to and from your board. Also, though most players need a pedalboard case because they drag their boards all over the place, we'll refer you to the fine folks at blackbirdpedalboards.com, stompin-ground. com, nycpedalboards.com and other outlets with a multitude of sizes, options, and materials for you to choose from once you've decided on the final size and shape of your board.
All right—let's get to it!
Step 1
Lay out your pedals on the floor in ideal performing position and use a tape measure to determine what size of board will fit them. I decided on 24" x 16". I wanted my board to have an angled surface so I can comfortably reach two rows of pedals, so we'll also make the surface angle from 4" high in back down to 1 1/2" high along the front edge. This will also let me mount a power supply underneath.
Step 2
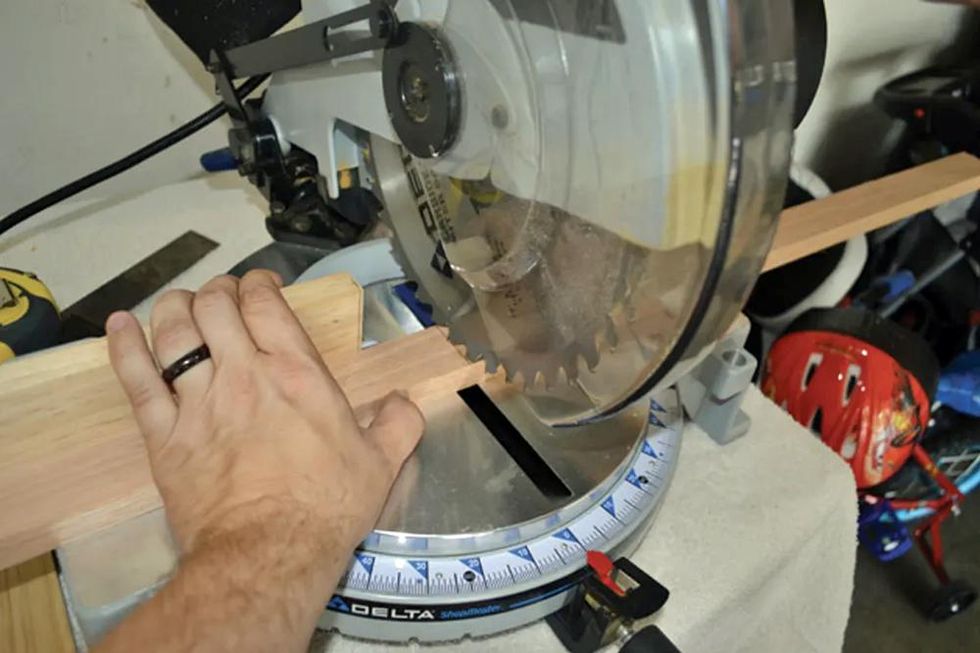
Next, we need a basic frame. I used a miter saw to cut the four sides to the appropriate lengths. I chose 1/2" oak for the sides, and 3/4" cabinet-grade birch for the top.
Step 3
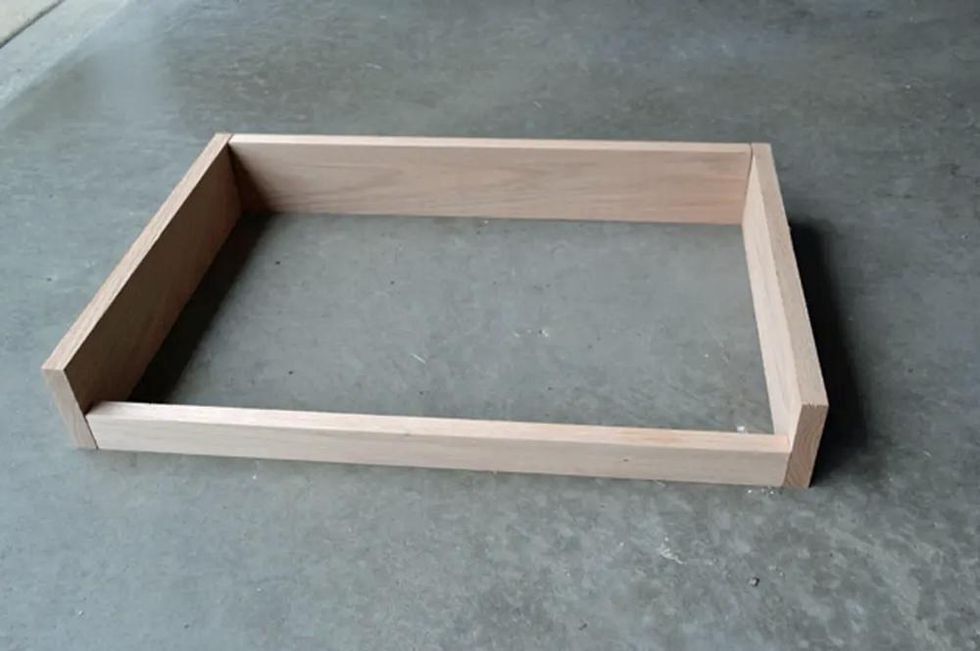
I determined that a 7-degree cut on each of the pedalboard's side pieces would provide the optimum surface incline.
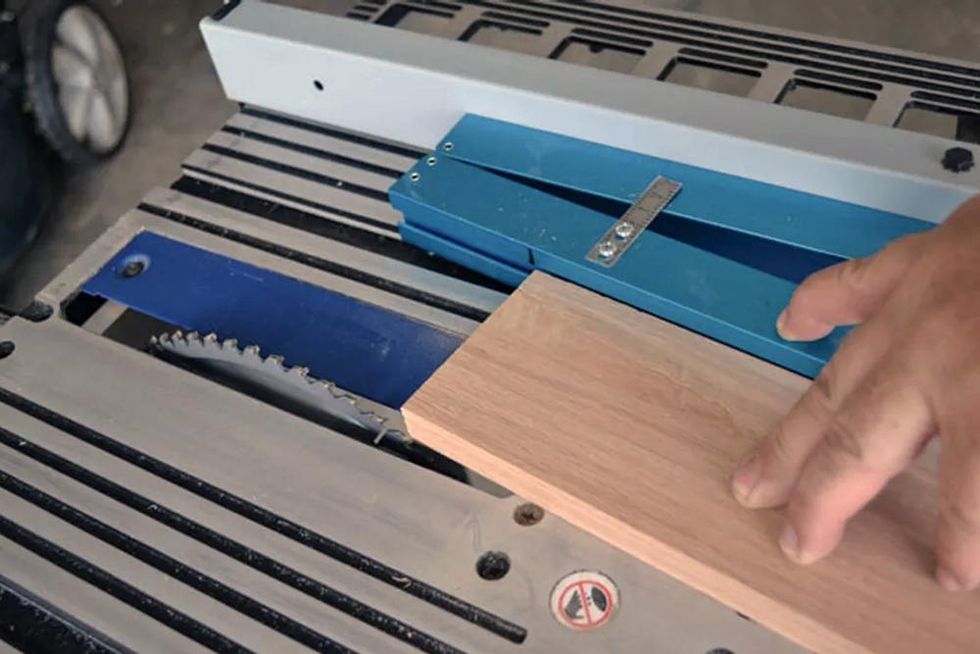
To cut the sides flat and even so they'd make complete contact with the underside of the top, I used a table saw and the blue taper-angle attachment in the top portion of this photo. A blade with a higher number of teeth reduces the chance of rough or damaged edges, so I used an 80-tooth blade.
Step 4
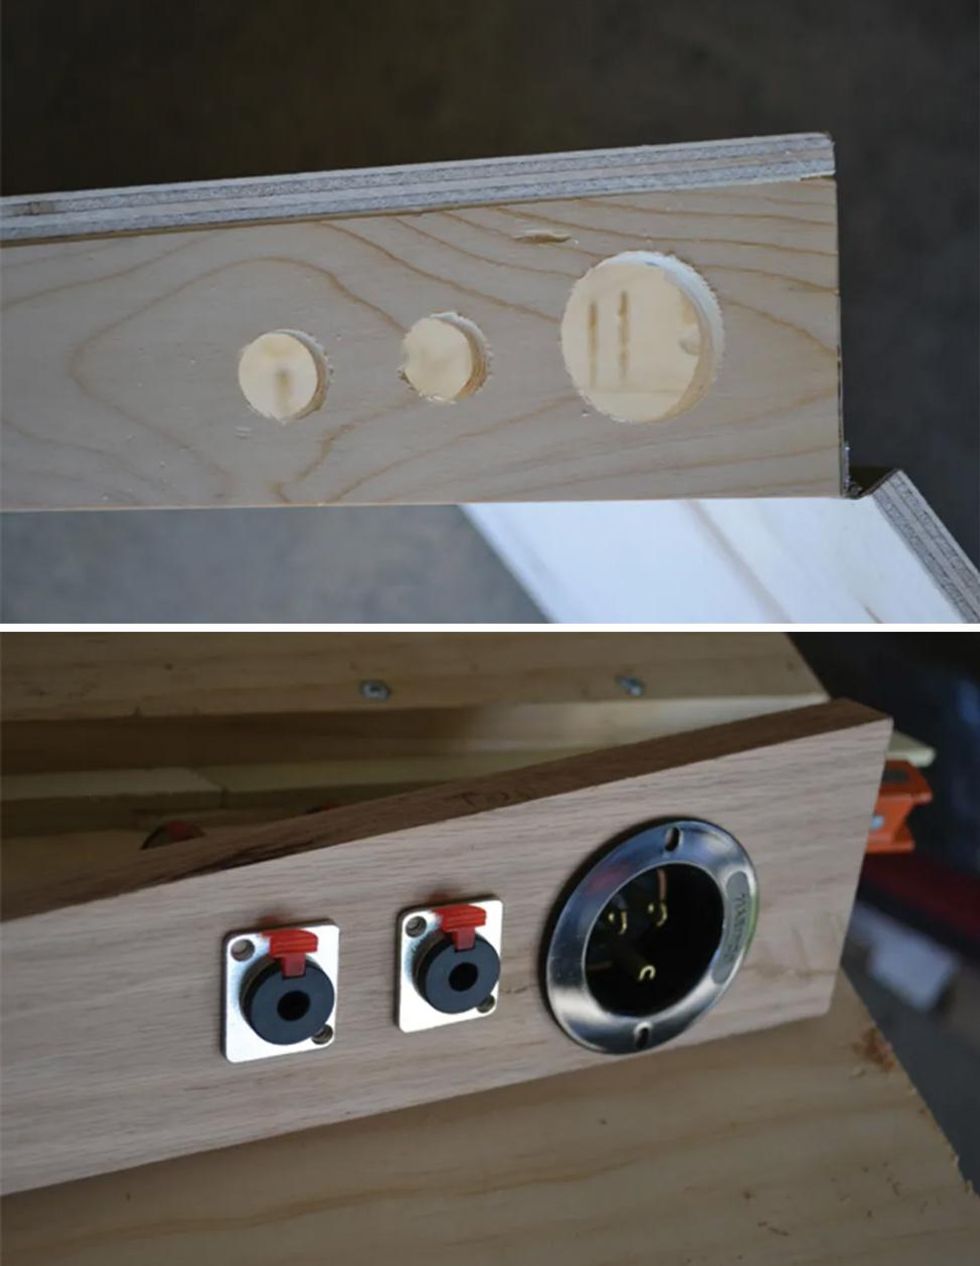
I cut the holes for the power inlet and neutrik connectors in the board's right side piece. I used a 7/8" hole saw for the smaller holes, and a 1 3/8" hole saw for the larger one. If you prefer adding more jacks for, say, an effects loop or a parallel acoustic setup, add the appropriate number of connectors using the same tools.
Step 5
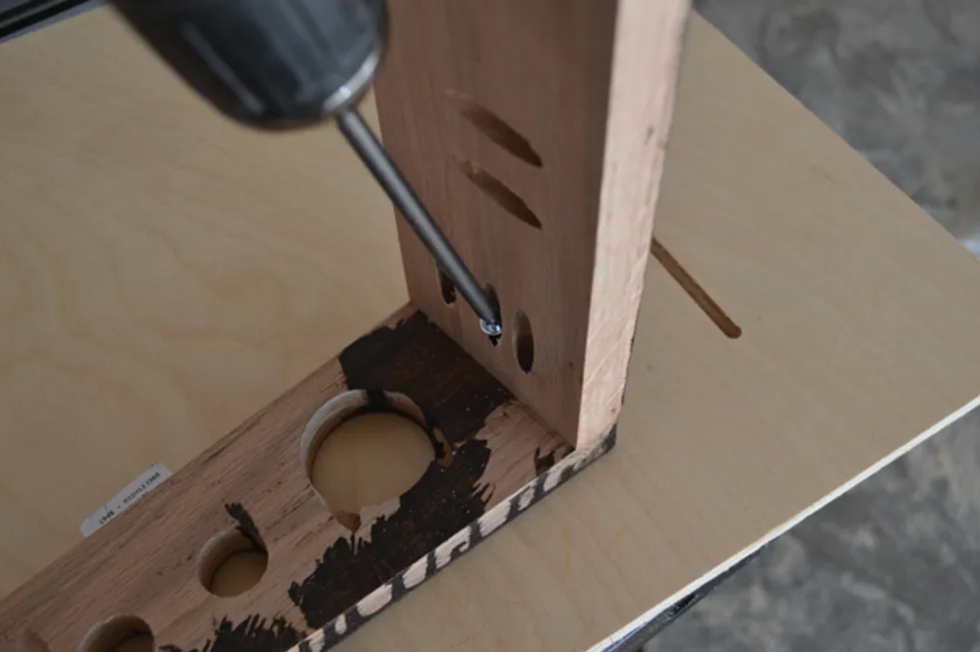
To assemble the frame, we need holes for the screws. I used a kreg jig to pre-drill all the holes with a 3/8" drill bit. for a secure fit, I used two 1 1/4" screws for the front two edges, and three for each of the back corners. be sure to use fine-threaded screws, which prevent splintering and hold things together much tighter. While you're tightening the screws, make sure everything is square and level so it won't rock back and forth during use—the last thing you need to worry about while performing is whether you're stomping too hard.
Step 6
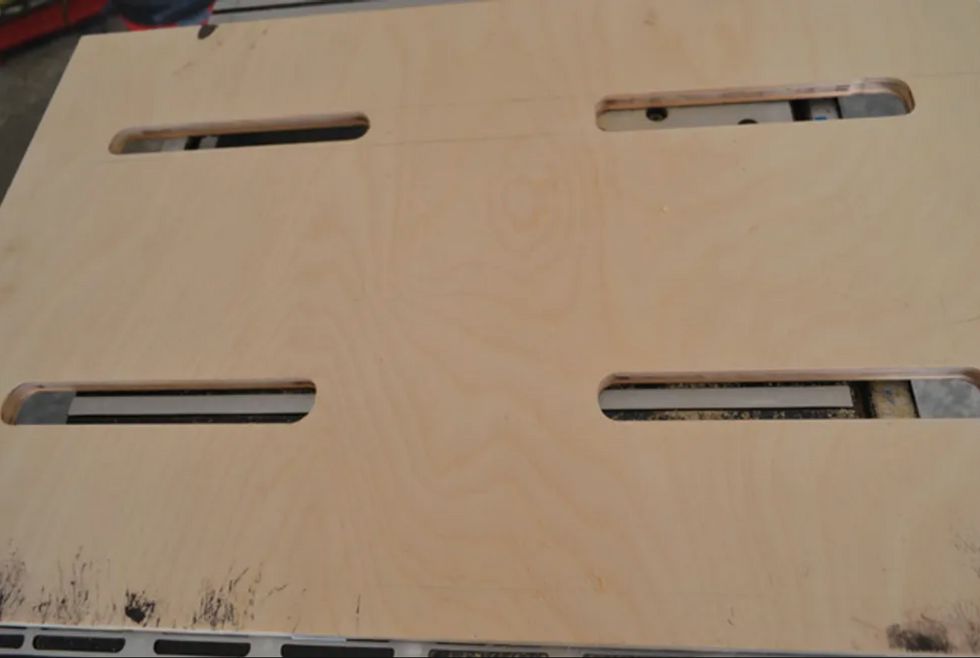
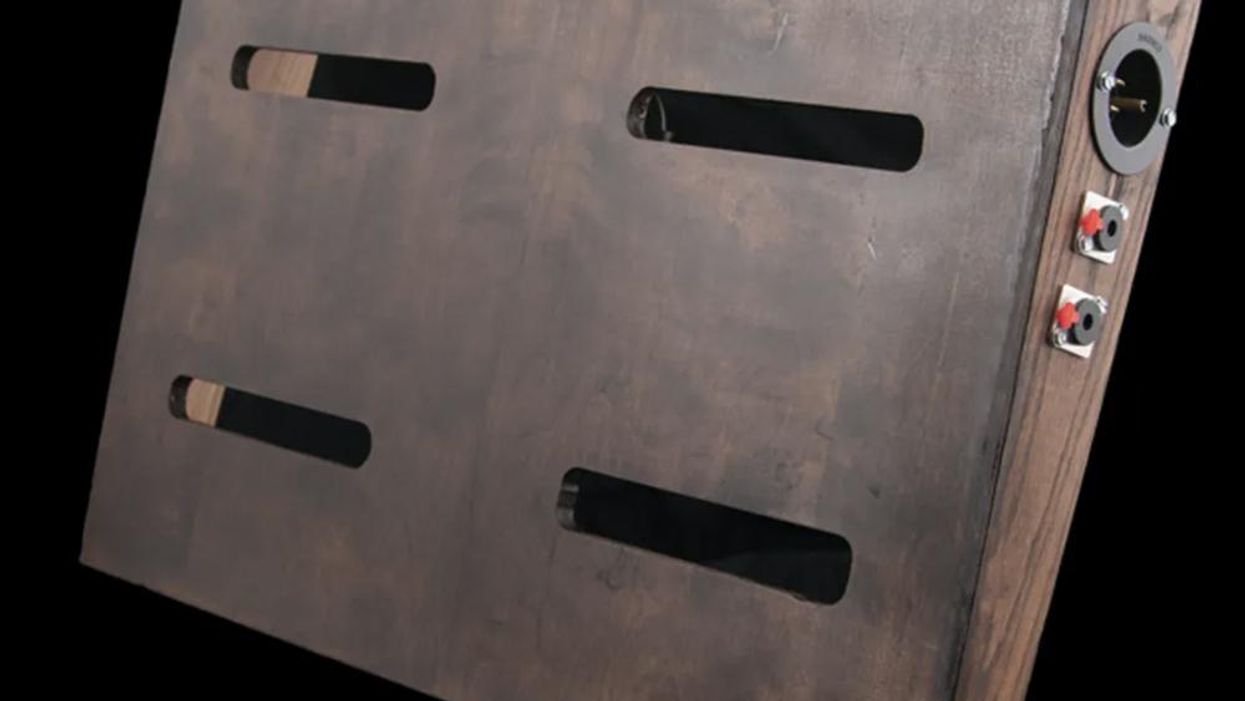
In order for the signal and power cables to pass efficiently throughout the board, I opted for a slotted pattern on the top piece. I used a 1/2" straight bit in my router to cut each channel. Each slot was 7" long, and I left 6" of wood between each pair. Be careful about placing the slots too close together—it can weaken the top of the pedalboard.
Step 7
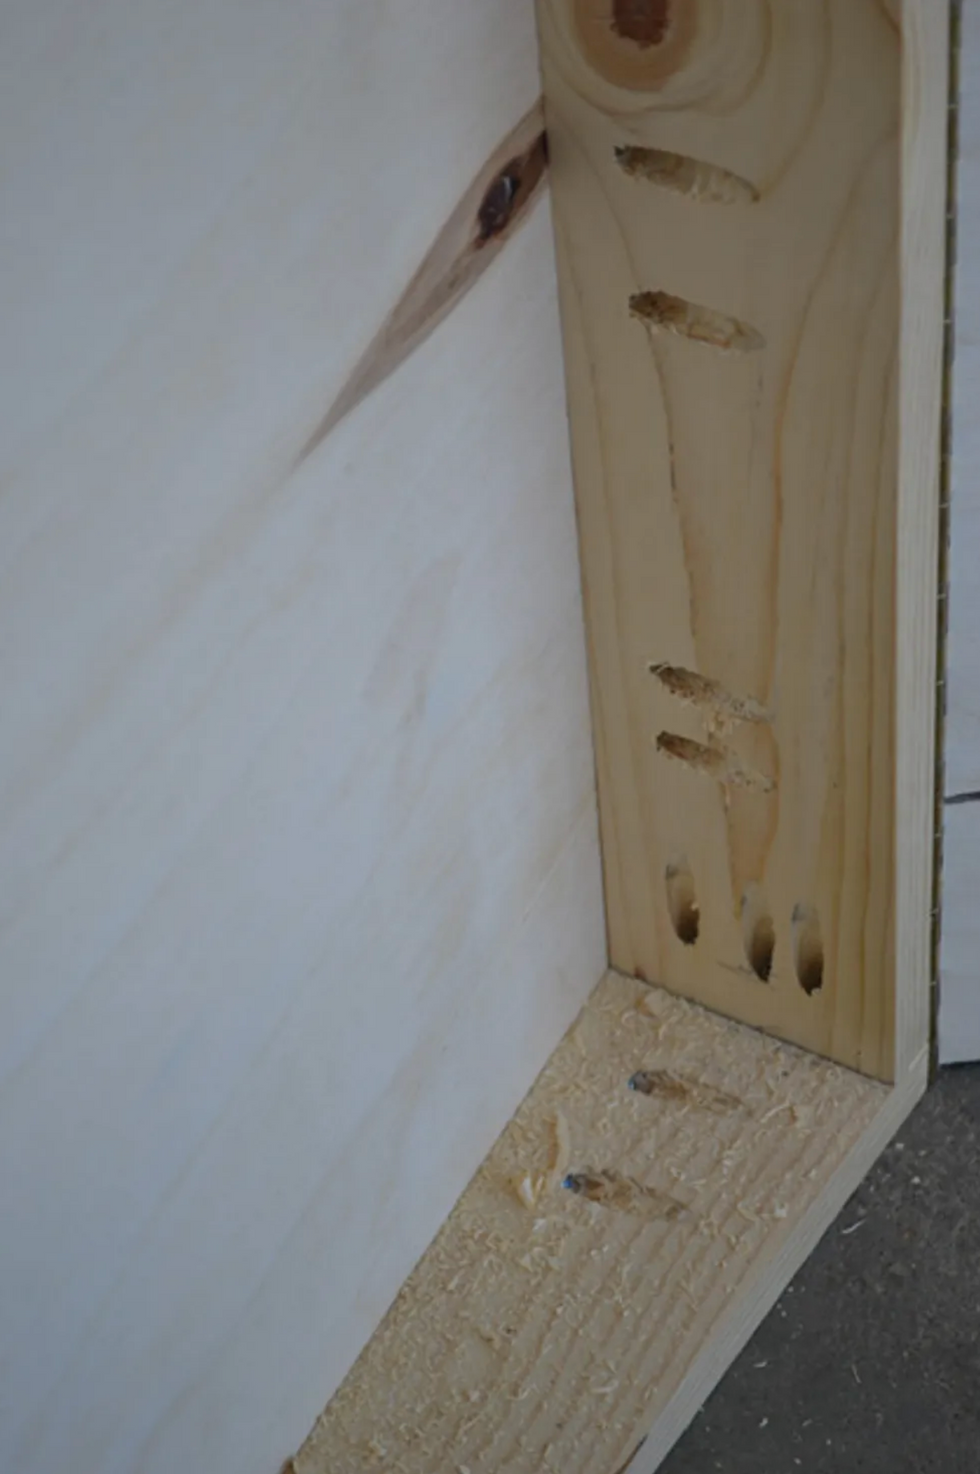
To attach the top piece, I used the Kreg jig and a 3/8" drill bit to pre-drill three pairs of holes along each surface. I spaced them 7" apart along the front and back, and 3" apart along the sides. The top of my board is 1/2" thick, so I used 1" wood screws that wouldn't puncture the top surface. Using screws rather than glue makes it so I can easily remove the top if I ever want to replace or repair anything.
Step 8
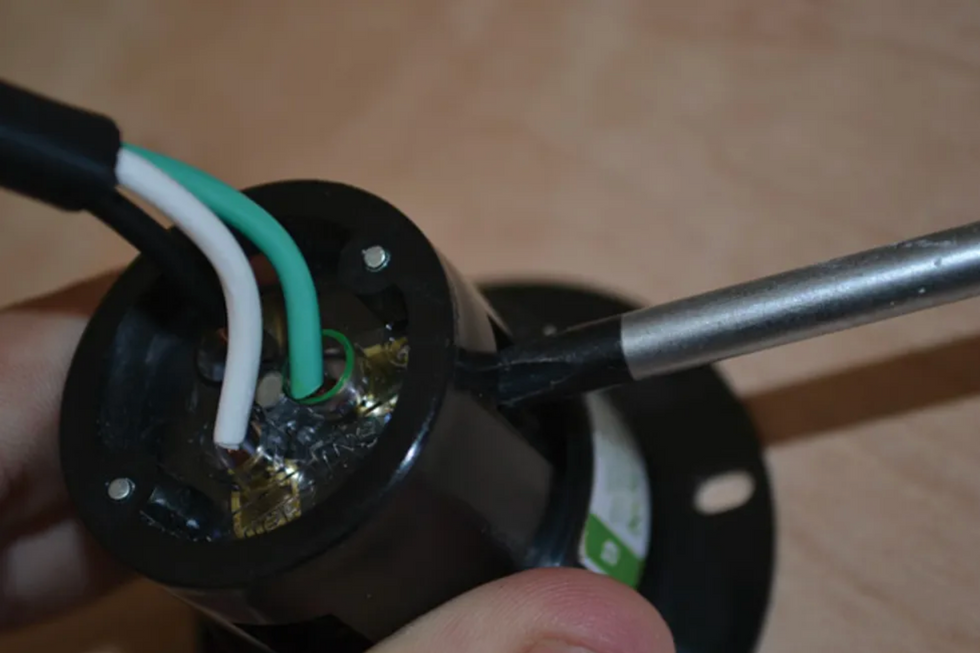
Now it's time to wire up the hardware connectors. I didn't want to risk a bad connection with the power jack, so I used a Marinco 5278BL flanged inlet, which lets you connect wires with screws rather than solder. (You can find this part, as well as the solderless connectors, at pedalboardshop.com.)
To begin, snip the male end from a regular IEC power cord. Inside you'll see three wires with black, green, and white insulation. Strip about 1/2" of the insulation from each wire, then match the wires with the corresponding inlet connectors. Finally, tighten each screw and wrap any exposed wire with electrical tape.
Step 9
Before attaching the hardware, apply whatever finish you prefer. I used a dark polyurethane stain. Don't be afraid to do a few coats to achieve the desired hue, just make sure you wipe the board thoroughly between each one. After the stain has dried, be sure to sand the top surface of your board so that whatever you use to attach the pedals—be it Velcro or a specialized product like Godlyke's Power-grip—has a nice surface to bond to.
Step 10
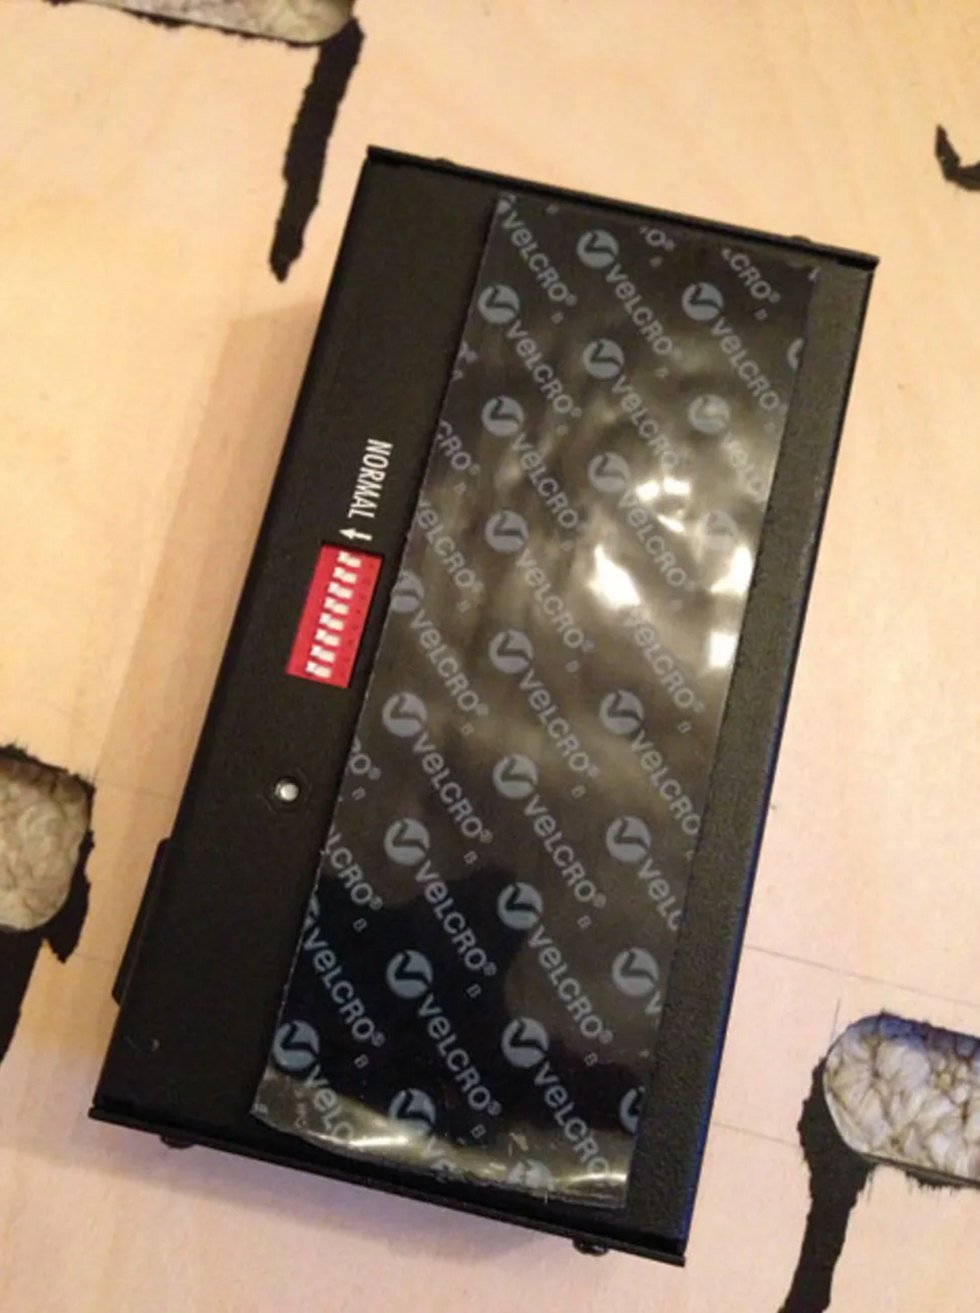
To facilitate a power supply upgrade or replacement in the future, I used a 2" strip of industrial-strength Velcro to attach the power supply to the underside of the top piece.
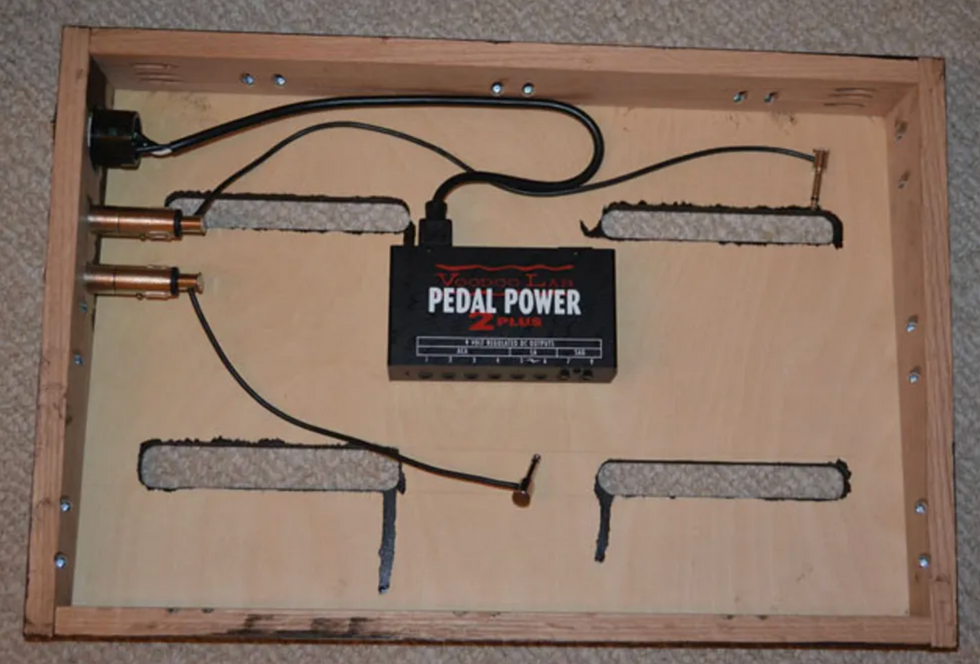
Mount the power supply and install the wired inlet and solderless connectors with 1/2" wood screws.
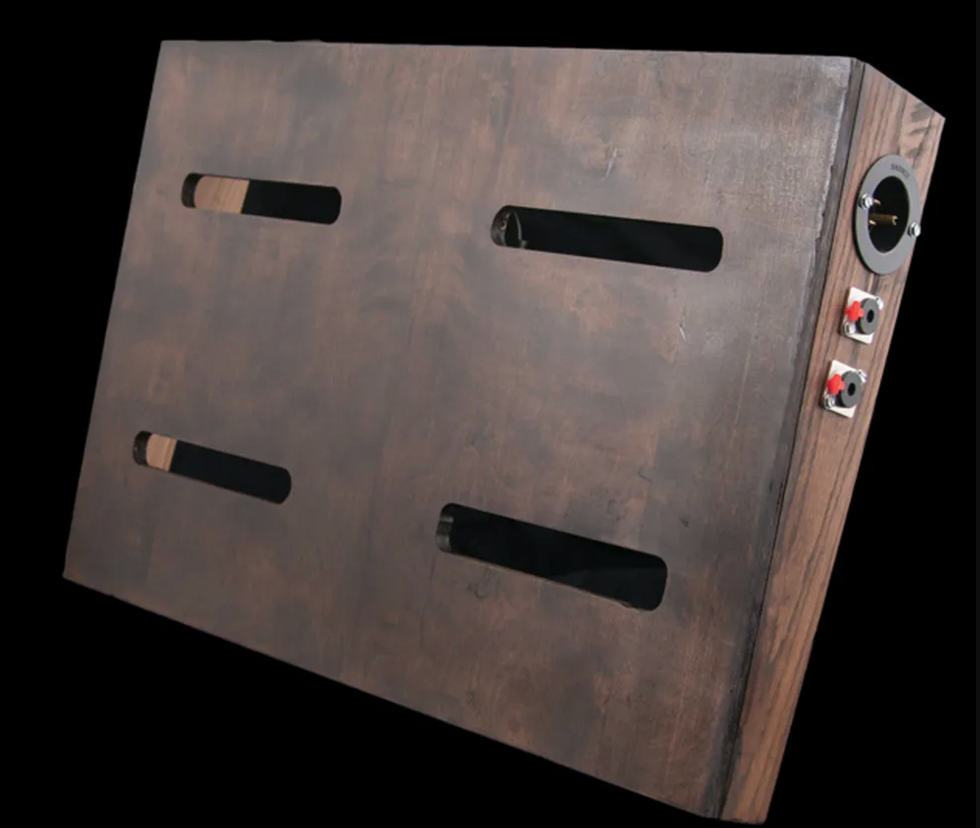
Use fine-grit (at least 220) sandpaper to sand the surface nice and smooth so the Velcro adheres sufficiently.
That's it! Once you've attached your pedals and wired up your power and signal cables, you're ready to plug in and go—enjoy!
Special thanks to Mason Marangella from Vertex Effects, David Quinones from Blackbird Pedalboards, Luke Summers from Agape Custom Shop, and Michael Helweg from Helweg Pedalboards.
[Updated 7/27/21]
- How to Build a Flight-Friendly Pedalboard - Premier Guitar ›
- DIY: How to Make a 9V Power Supply Out of a Drill Battery - Premier ... ›
- 10 DIY Patch Kits to Streamline Your Board - Premier Guitar ›
- Powering Your Board - Premier Guitar ›
- The Stompbox-Builder’s Secret Weapon - Premier Guitar ›
- DIY: How to Make a 9V Power Supply Out of a Drill Battery - Premier Guitar ›
- Reader Pedalboards 2022, Part 1 - Premier Guitar ›
- Tools for the Task: Pedalboard Power Supplies - Premier Guitar ›
- Learn How to Swap Diodes to Improve Your Overdrive - Premier Guitar ›
- DIY: How to Level, Crown & Dress Guitar Frets - Premier Guitar ›
- DIY 101: How to Build a Delay Pedal Kit - Premier Guitar ›
- Discover the Power of J. Rockett Archer Select: Review - Premier Guitar ›
- Way Huge Stone Burner Fuzz Pedal Review ›
- EarthQuaker Devices Zoar Dynamic Audio Grinder Review ›
- Are Pedals Necessary for True Guitar Freedom? ›
- JAM Pedals Harmonious Monk mk.2 Review ›
- Reader Pedalboards 2024: Fuzzy to Checkered Guitar Pedals ›
- EHX Pico Attack Decay, Oceans 3-Verb, Canyon, Deep Freeze ›
- Beetronics Nectar Guitar Pedal Review ›
- Want to Build Pedals? Here's the Ultimate Kit Roundup ›
- Mojo Hand FX Stylus Modulation Pedal ›
- Death By Audio Octave Clang V2 Review ›
With a team of experts on hand, we look at six workhorse vintage amps you can still find for around $1,000 or less.
If you survey the gear that shows up on stages and studios for long enough, you’ll spot some patterns in the kinds of guitar amplification players are using. There’s the rotating cast of backline badasses that do the bulk of the work cranking it out every day and night—we’re all looking at you, ’65 Deluxe Reverb reissue.
Follow some super-hip players and studios on the cutting edge and you’ll find a host of meticulously crafted boutique amps. And for the various flavors of road-dogs, there’s also the emerging force of modeling units that emulate everything under the sun.
Then there are the players who have to go to the source and are doing the tone-gods’ work by keeping vintage amps in the game. (There are a lot of us, and we take our work seriously.) At the highest level of stage and studio, you’ll find the elite vintage models—the tweeds, black-panels, plexis, and all their pals. Those amps command their fair share of literal and digital ink. Then there are the oddball selections that some new player will bring to everyone’s attention.
But there’s a less-hyped flavor of vintage amp that actually shows up much more often than those rare gems. These are the everlasting classics you’ve seen about a million or so times played by bands in every size of stage and lining the walls of your favorite studio. They’re the perennial workhorses whose reputations thrive because of some formula of tone, consistency, reliability, and—maybe the most important variable—price.
Brooklyn-based amp-repair guru Pat Kauffman operates Patrick Kauffman Electronics out of Main Drag Music, where he also teaches amp-building workshops.
Here are six of these vintage models, all priced to fit in a gigging budget, coming in right around $1,000 or less as of this writing. With a trio of experts on hand, here’s an idea of what makes each of these amps tick all these years after they were first introduced.
Silver-Panel Fender Bassman
A drip-edge era Fender Bassman head.
Photo by Pat Kauffman
The Fender Bassman is, of course, one of the most classic amplifiers. The tweed Bassman circuit is one of the most copied and modified circuits of all, serving as a platform for so many designs to follow, most notably Marshalls, as well as a couple more on this list. By the time the silver-panel era began, first with the drip-edge years starting in 1967, the Bassman circuit had evolved from those early days through the also highly coveted black-panel era.
“The silver-panel is not that different from the black-panel,” notes Brooklyn amp-repair guru Pat Kauffman, “and you can easily modify them to black-panel specs—they’re the same transformers.” Both eras kick out 50 watts—though there are quite a few variations, such as Bassman 100, 135, and more than a few others, we’re simply talking about the “Bassman”—and host a tube set that includes a pair of 6L6 power tubes, a trio of 12AX7s, and an ECC81.
“I think the right person can get their own signature tone from these, and it’s not gonna be one that will come from a Fender, it’s not gonna come from a Marshall.” —Jeff Bober on the Ampeg Gemini
This era of Fender Bassmans deliver plenty of headroom, but unlike the Fender “reverb” amps, Kauffman points out there’s an extra gain stage, which he says “gives it a little more grit that makes them kind of unique.”
Jeff Bober, former PGamp columnist and cofounder of Budda Amplification, adds that the silver-panel Bassmans “compress earlier, which might be a little opposite of what they were going for, so you can push the front end a little easier.”
Even better, Kauffman points out that they’re “easily serviceable. That’s key number one—all the parts are available.”
Ampeg Gemini
This Ampeg Gemini II combo includes a 15" speaker.
Photo by Pat Kauffman
If you feel like you’ve seen an Ampeg combo in most studios you’ve ever entered, you probably wouldn’t be exaggerating. And there’s a good chance that a lot of those were an Ampeg Gemini or Gemini II, offered starting in the mid ’60s, with a few variations over its life, from 22 to 30 watts, with speaker offerings ranging from a single 12" to a 15", and in later eras with more watts and more speaker configurations.
Because of their size, these are less common on stage than they are in studio, but Bober—who is a proud native of Ampeg’s hometown of Linden, New Jersey—says of the Geminis as well as the smaller, and also very cool, 12-watt Ampeg Jet, “They have their own unique sound, they’re not all that loud to start with so if you’re in a situation where you can crank an amp a little bit, these are really good to do it.”
Jeff Bober founded Budda and EAST Amplification and was the author of PG’s Ask Amp Man column.
These full-featured combos have onboard reverb and tremolo, and they use a set of 7591 power tubes. Bober points out these are “more of a hi-fi-sounding, very full-bodied tube” that he describes as “somewhere between a 6V6 and a 6L6 power-wise, but with a different tonality.” He adds, “I think the right person can get their own signature tone from these, and it’s not gonna be one that will come from a Fender, it’s not gonna come from a Marshall.”
While these amps are known for their reliability as well as well as their unique sound, Kauffman points out that the phase-inverter tube, a 7199, has gotten expensive in the modern market: “A lot of times, they’ve been changed out to different tubes, or they have a little converter adapter in, so that’s something to look out for.”
Traynor YBA-1 Bass Master
With two inputs per channel, it’s easy to “jump” channels with a patch cable to extend the voice of the Traynor YBA-1.
Photo by Thunder Road on Reverb
Beloved by both guitarists and bassists, the 45-watt Traynor YBA-1 circuit was the company’s first offering in 1963, when it was called the Dyna-Bass. By the next year, it was retitled the Bass-Master and the title stuck. While the company didn’t have the name recognition of a Fender or Ampeg, they developed an underground reputation that is still going strong. In 1969, Traynor provided the backline to 1969’s Toronto Rock ’N’ Roll Revival concert, where the Plastic Ono Band recorded their Live Peace in Toronto 1969 live album, and which was later celebrated in the 2022 documentary REVIVAL69: The Concert That Rocked the World.
The YBA-1’s simple 3-band EQ control set and 2-knob “range expander” make for easy tone-sculpting, and jumping the channels with a small patch cable opens its voice even wider. Kauffman calls the amp a “Bassman on steroids.” He points out that some models use 7027 power tubes—“basically a beefier 6L6”—and others use 6CA7s, plus a pair of 12AX7s and an ECC83. These amps are easily modified to replicate a JTM45 circuit, which is a popular change for some, but many players prefer to keep them unchanged.
“People who are Traynor fans are Traynor fans. They’ve either owned one and sold it and regret it, or they own three of them.” —Blair White on the Traynor YBA-1
Bober says that the YBA-1 is “built as good as any Fender or eyelet-board kind of design. They have probably the biggest transformers for their power rating of amps being built at that time. They’re very clean circuits, great pedal platforms, and they sound great.”
Blair White, owner of Nashville’s Eastside Music Supply, has witnessed the cult of Traynor firsthand and says, “People who are Traynor fans are Traynor fans. They’ve either owned one and sold it and regret it, or they own three of them.” Despite their reputation as well-made, reliable amps with a great tone, White notes that they’re still easy to get a hold of: “I don’t know if it’s just because it was not Fender or Marshall, but for whatever reason, you can still find those for $600 or $700.”
Sovtek MIG
This Sovtek Mig 100h is the high-gain member of the Mig family.
Photo by Brent’s Gear Depot on Reverb
Built in Russia by New Sensor starting in 1991, this head, which came in 50-, 60-, and 100-watt models, is another spin on the same tweed Bassman formula that begat the JTM45 and the Traynor YBA-1. Running a pair of 5881 power tubes and a pair of 12AX7s, the MIGs featured a solid-state rectifier and a slightly slimmed-down control set from the Bass-Master, with two independent volume controls (non-jumper-able), a 3-band EQ, and a presence knob.
In an A/B comparison with the modern EHX MIG 50, where both sound identical (or close to it), JHS Pedals’ head honcho Josh Scott has gone on the record and called the MIG 50 his “favorite amp in the history of the world.” The modern ones tend to come in a little less expensive than the vintage models, which Bober points out have an “iffy” build quality thanks to their Eastern Block components.
“They have a cascading input, so there is an extra gain stage like the JCM800s.” —Pat Kauffman on the Sovtek MIG
Kauffman agrees, “They’re a little awkward to service. A lot of the hardware is kind of cheap, so you’ll often find the jacks busting and the pots busting.” You might want to look out for a deal if you’re considering a vintage model, which could be well worth your time. Kauffman adds that the MIGs have their own cult and calls them “fantastic-sounding amps. They have a cascading input, so there is an extra gain stage like the JCM800s, so they kind of have this Marshall sound but a little more rounded.” If Scott’s comparison tells us anything, the modern version is also worth checking out.
Music Man HD-130
The powerful Music Man HD-130 in its oddball 2x10 form—that’s a lot of power to push through two little speakers!
Photo by Main Drag on Reverb
When Music Man amps hit the scene in the mid ’70s, they were unlike anything Leo Fender had set out to do with his previous designs. Gone was the simple, efficient circuitry of his earlier work. Instead, Music Man amps featured a hybrid solid-state preamp and tube power amp, with the clear target of maximum headroom.
The HD-130 was the most extreme of Music Man’s offerings, delivering a sizzling 130 watts via four 6CA7 power tubes and available in both head and combo form. (If that sounds too extreme, you could get it shrunk down to a small 2x10 combo… but with no less wattage!) The master-volume control set features two channels each with a 3-band EQ and a bright switch, plus combo models and some heads included reverb and tremolo.
Blair White, co-owner of Nashville’s Eastside Music Supply, is so passionate that he spoke to PGwhile movers were loading the store’s gear into their new location!
“Those amps are punishing!” says White. “They’re probably the most bang for your buck that you’ll get as far as power and wattage. Their unique formula certainly got the attention of some major players, and Mark Knopfler, Robbie Robertson, and Johnny Winter all counted on them at some point.”
These days, Kauffman says they remain quite reliable, but issues can arise with modern tubes. “They use high plate voltages, which tends to eat new tubes,” he explains. “If you get the electrolytic caps replaced and have the tubes biased correctly, they really should be reliable. But if you’re having a problem, it’s usually cooking power tubes because they’re a new set.” He adds that, while tube supply changes, he currently finds JJ EL34s to hold up well against the HD-130’s high voltage.
Peavey Mace
The 160-watt Peavey Mace promises extreme volume with high clean headroom plus onboard distortion and phaser.
Photo by Free Lunch on Reverb
No list of great-value amps is complete without a Peavey. Of course, their broad range of models over the years made it hard to decide which to include. At a whopping 160 watts, the Peavey Mace made the cut, if only for sheer power. It’s another hybrid amp, combining a whopping sextet of 6L6s in the power section with a solid-state preamp in both head and 2x12 combo form. Their clean headroom puts them in a class with the HD-130 and also put them onstage with Lynyrd Skynyrd’s Gary Rossington.
The Mace is less common than most of the others on this list, but late-’70s models are fairly easy to track down. Bober says, “If you want loud and clean, those are great amps.” But he notes that the Mace is “not the most accurate pedal platform. Drive or overdrive pedals tend to try and push the front end to get more juice, but things that have IC chips in the front end don’t respond the same way, they don’t agree to being pushed to their limits, and they don’t generate the same harmonics as a tube does.” The Mace has both a normal and effects channel, which includes distortion and reverb, as well as an onboard phaser.
Kauffman reports from his work bench that the Mace is “great and reliable.” He explains that these amps were built on a printed circuit board, and he tends to see bad solder joints when they come in for service. That’s nothing to be afraid of though. “If you have one,” he says, “you could get it cleaned up, change the electrolytic caps, and have it resoldered, and you should be fine.”
At 160 watts, you’ll want to make sure you have your earplugs handy.
Amazon Prime Day is here (July 16-17). Whether you're a veteran player or just picking up your first guitar, these are some bargains you don't want to miss. Check out more deals here! https://amzn.to/3LskPRV
Line 6 Catalyst, Black, 60-Watt, 1x12
First, the Line 6 Catalyst 60-Watt 1x12 Combo Amplifier for $299.99 is a solid pick. It offers versatile tones and is built to handle anything from clean jazz to heavy rock.
MOOER SD30i Practice Guitar Amp Portable Smart Amplifier
For those who enjoy practicing on the go, the MOOER Practice Portable Intelligent Bluetooth Guitar Amplifier at $109.99 offers Bluetooth connectivity, so you can jam wherever you are.
Pyle Multi-Guitar Stand 7 Slot Display Rack
A reliable stand is a must, and the Pyle Guitar Stand at just $30.99 is both sturdy and foldable.
Positive Grid Spark MINI 10W Portable Smart Guitar Amp & Bluetooth Speaker
If you need a portable speaker, the Positive Grid Portable Bluetooth Speaker for $183 packs a punch despite its compact size, making it great for practice sessions and small gigs.
AeroBand Guitar Smart Guitar
For beginners or those looking to try something different, the Stringless Removable Fretboard Guitar for Beginners and Teenagers is a unique, user-friendly option. Designed for learning the basics without the intimidation of traditional strings.
D'addario Nickel Wound Electric Guitar Strings
Beyond Amazon, there are some fantastic deals from other retailers. Sweetwater has the D’Addario EXL110 Regular Light Nickel Wound Electric Strings 10-Pack for $38.49.
PRS Sonzera 20 20-watt 1 x 12-inch Tube Combo Amp
The PRS Sonzera 20 20-Watt 1x12-Inch Tube Combo at $1,099.00 offers those rich, warm tube tones. For a limited time, you can buy any PRS amplifier, and get a free PRS pedal of your choice, a $349.00 value.
Fender American Ultra Stratocaster Maple Fingerboard Electric Guitar Cobra Blue
The Fender American Ultra Stratocaster with a Maple Fingerboard in Cobra Blue at $1,979.99 is a bit pricier but worth every penny for its playability and tone.
Squier Classic Vibe '70s Jaguar Limited-Edition Electric Guitar Daphne Blue
At Guitar Center, the Squier Classic Vibe ‘70s Jaguar Limited Edition Electric Guitar in Daphne Blue for $349.99 is a steal.
Boss DM-101 Delay Machine Pedal
Finally, for pedal enthusiasts, the Boss DM-101 Delay Machine Pedal at $449.99 from ProAudioStar is a must-have. It's a versatile pedal that can add a whole new dimension to your sound
So, whether you’re looking to upgrade your rig or just starting out, these deals are too good to pass up. Happy playing!
A technicolor swirl of distortion, drive, boost, and ferocious fuzz.
Summons a wealth of engaging, and often unique, boost, drive, distortion, and fuzz tones that deviate from common templates. Interactive controls.
Finding just-right tones, while rewarding, might demand patience from less assured and experienced drive-pedal users. Tone control could be more nuanced.
$199
Danelectro Nichols 1966
danelectro.com
The Danelectro Nichols 1966, in spite of its simplicity, feels and sounds like a stompbox people will use in about a million different ways. Its creator, Steve Ridinger, who built the first version as an industrious Angeleno teen in 1966, modestly calls the China-made Nichols 1966 a cross between a fuzz and a distortion. And, at many settings, it is most certainly that.
But it can also be fuzzier than you expect. And calling it a distortion sells short its fine overdrive and boost qualities, as well as its responsiveness to guitar volume and tone variations, and picking dynamics. It interacts with amps spanning the Fender- and English-sound templates as though it has a very individual relationship with each. It rarely sounds generic. And its tone range makes it a potential problem-solver in backline situations or studio sessions where you’re looking for something predictable or altogether weird—which is reassuring if, like me, looking at 10 different gain devices gives you a nervous sense of decision fatigue. The Nichols 1966 may not always be precisely the gain unit you’re looking for, but can also produce scads of tones you may not have known you needed.
Exponential Possibilities, Many Personalities
When the knob count on a pedal goes up, that doesn’t always make the device more effective or complex-sounding. But when controls work as interactively as they do on the Nichols 1966, four knobs and a mid-cut switch can make for a very broad palette, indeed. You don’t often see fuzz and drive controls together on a pedal. Usually, the two terms are interchangeable. Here though, the fuzz and drive knobs have a very different effect on the Nichols 1966 output. They also react very differently to single-coils, humbuckers, and American- and British-style amps.
At its maximum, the drive control’s distortion can sound and feel comparatively midrange-y, not too saturated, and sometimes brittle—requiring careful attention from the tone control. In general, advanced drive settings (with low fuzz) favor slightly attenuated and bassier tone-control positions and the stock EQ toggle setting. At their best, these combinations evoke small vintage amps cranked to their nastiest or larger amps with more sag. Advanced drive control settings with toppier tone settings and/or a mid-cut EQ setting are much less flattering, particularly with single-coils and/or high-mid-focused, British-voiced amps. Introduce humbuckers though—especially neck PAFs with less aggressive tone profiles—and you can coax muscular, hazy gain with tough tenor-saxophone tonalities, which are fatty and delectable. The drive control can also help shape great clean-boost sounds and treble booster-stye distortion. There are discoveries aplenty you can make with the right guitar-and-amp recipe.
The fuzz control is the hotter of the two, in terms of gain. At maximum levels, it’s scorching and buzzy, and, if you like really burning fuzz, it’s actually quite forgiving of trebly settings and mid-gain scoops, even with single-coils. A great technique for creating nasty, mid-’60s fuzz colors is to set the fuzz tone to maximum, scoop the mids, add a fair bit of treble, and add drive to taste.
“It’s plenty loud, and with the volume, fuzz, and drive all the way up, it’s positively brutish.”
Danelectro may allude to the Nichols 1966 being something less than a full-on fuzz, but I just spent the weekend listening to Davie Allan and the Arrows Cycle-Delic Sounds, and if this isn’t fuzz—as in getting-jumped-by-a-gang-of-leather-clad-mace-wielding-wasps kind of fuzz—then I’m Tony Bennett. There may be fuzzes that are silkier, smoother, or sound more like classic fuzz X or guitar-hero Z. But if you regard fuzz as an attitude more than a sonic commandment etched in granite, you’ll be tickled by how unique the Nichols 1966 sounds in that capacity. It’s plenty loud, and with the volume fuzz and drive all the way up, it’s positively brutish.
But it’s the playful use of the interrelationship between fuzz, drive, and tone together that showcase the Nichols 1966’s real strengths. Used actively, intentionally, and with an attentive ear, you can fashion high-gain distortion and fuzz sounds as well as varied, unique overdrive colors that you can fit to single-coils or humbuckers and that summon unique textures from each. The pedal responds effectively to guitar tone and volume attenuation without sacrificing much in the way of dynamic sensitivity. And, at less trebly and cutting settings, it still works as a vehicle for funky David Hidalgo/Tchad Blake Latin Playboys fuzz or Stacy Sutherland’s 13th Floor Elevators drive sounds that are distinctive in a mix in spite of their low-midrange emphasis.
Fuzzy Finish
Though generally sturdy, the Nichols 1966 isn’t a flawlessly executed pedal. The three circuit boards—one for the I/O jacks and DC 9-volt jack, another for the footswitch and LED, and a third for the drive and tone circuitry—are affixed to the enclosure independently of each other, which conceivably makes the pedal less susceptible to cataclysmic failure and more conducive to repair. On the other hand, some of the finishing work around some solders looks less than pretty and irregular. I’m not sure this affects pedal longevity. I’ve seen decades-old fuzzes with solders light-years uglier than these that work perfectly. At $199, you do like to see slightly tidier finishing work. Then again, I suspect most of what looks sloppy here is only superficial. The pots and switches all feel sturdy and smooth.
The Verdict
If you’re non-dogmatic about how much your fuzz, overdrive, or distortion sound like a certain template—and if you have the time and presence of mind to tinker with the Nichols 1966’s interactive controls to learn how they work with each other and different guitar and amp pairings—you’ll find the Nichols 1966 a pedal of power, great utility, copious surprises, nuance, and happy weirdness.
Danelectro Nichols 1966 "Fuzzy Drive" Pedal Demo | First Look
Keep your head down and put in the work if you want to succeed in the gear-building business.
The accelerated commodification of musical instruments during the late 20th century conjures up visions of massive factories churning out violins, pianos, and, of course, fretted instruments. Even the venerable builders of the so-called “golden age” were not exactly the boutique luthier shops of our imagination.
Most likely, the majority of the workers who toiled in those facilities were not necessarily end users of the product. But despite the preponderance of private-equity interests at the top of the music-biz food chain, there have always been musicians down in the trenches.
Today, if you’re employed in the business of creating musical gear, more than ever, you are likely to be a musician. A positive shift in consumer attitudes about small brands, often operated by musicians, has added to this as well. With many players thinking that building pedals, guitars, or amps is a dream job, I thought I’d share what I think it takes.
In many ways, building gear is very similar to being a musician. In the beginning, you have to learn any way you can. You might go to school to get an introduction to machining, electronics, or woodworking to get a leg up. There are instrument-building schools as well, but be advised that you may be only learning one way to do something—their way. An alternate route is to learn from a successful person or enterprise—and I don’t mean viewing videos. When I am asked about how to “get into the business,” my advice is to find a job working for a reputable, successful company that is doing what you like, and stay there for at least three years and learn everything you can. I didn’t do that, but sometimes wish I had—it would have saved me a lot of misery. I learned on the job but luckily had two secret weapons: massive curiosity and the willingness to admit when I didn’t know something.
It takes a bit of an ego to succeed at most anything, but I know firsthand that it can also hinder your progress. A little knowledge can be dangerous. There’s a delicate balance between being confident and being humble enough to shut up and take advantage of the information that’s right in front of you. Arrogance seeks to surround itself with people who will lick boots, but smart people aren’t afraid to work in the shadow of those who are more accomplished. There have been numerous studies that show that when college roommates are chosen at random, the roommate whose GPA is lower will often study harder and raise their own average by a significant amount. The old saying goes something like: You can’t learn anything if you’re the one doing the talking.
Similarly, if, as a musician, you play with people who are better, you have to step up as opposed to just coasting along. It’s humbling to be at the bottom, but humility can be the best way forward. I’ve taken a lot of entry-level jobs at machine shops and factories, and the education served me well. The best advice here is to show that you are eager to learn, not how much you know.
“When I am asked about how to 'get into the business,' my advice is to find a job working for a reputable, successful company that is doing what you like, and stay there for at least three years and learn everything you can.”
Perhaps you’ve heard the story of someone who started out sweeping the floor who eventually rose to the top. Maybe in today’s corporate world, where a degree might be considered more desirable than actual experience, this isn’t a good strategy, but I can tell you that a lot of menial jobs afford you a perspective that will come in handy later. Pay attention to everything.
At one job assembling precision equipment, the supervisor asked me to report to the loading dock to fill in for a couple weeks. Instead of grousing about being demoted to a lower rung, I decided to learn how that department worked. I focused on doing well, learning, and gathering information about shipping and receiving. The shipping guys were happy to pawn off responsibilities on the “new” guy. That knowledge helped immeasurably when I had my own business. The very same scenario presented itself in a succession of industrial and creative jobs. In essence, I was being paid to go to school. People will share their expertise if you show respect for it—and that costs you nothing.
Regardless of what you’re trying to learn, it’s a better education to be a wide-eyed small fish in a big pond than a big fish in your own little puddle. The same goes for any job. Start in a position where you aren’t expected to know everything. This is where pride may derail you, but remember, you’re there to learn, and they’ll be watching. The smart money is on doing a great job sweeping that floor without a trace of complaint, because the way you do anything is the way you’ll do everything.