Acoustic Soundboard: A Master Builder’s Tips for Choosing the Right Pickup

Huss & Dalton’s Mark Dalton shares five points to consider when deciding how to amplify your acoustic.
Acoustic guitar pickups have been written about extensively in Premier Guitar by knowledgeable folks like Larry Fishman, but this month I’d like to touch on the subject through the lens of a guitar builder. I’ll avoid comparison between different pickup models and instead concentrate on the different types of pickups, along with considerations for choosing the right system for you and your guitar.
So, where do you play that requires you to plug in? It’s the very first question I’ll ask anyone who asks me what pickup they should install. It’s a simple question, but it’s critical to getting the best system for you. Over the years, I have identified roughly five different levels of performance/background noise that necessitate the use of particular systems.
Level 1
If you play at home on your own—or maybe with one other acoustic player—and you want to do some recording, I would question the need for a pickup at all. I believe that a good external condenser mic would be the better choice. A mic will usually give you the best tone for recording, and you can easily try out a number of different models and different mic positions to get the tone you hear in your head. Given the relatively low-volume (gain) level that you will need in this scenario, any guitar builder will likely tell you to go with a mic.
Level 2
Let’s say you want to venture out into a quiet coffeehouse or church setting, either solo or along with another player. This is where you might want to invest in a pickup so you can concentrate on your playing and not have to overplay in order to be heard. For this level, you might consider an internally mounted microphone. These will give you good tone and still allow you to have some control over the mic and placement when you’re outside of your home studio.
In the best rooms, a contact pickup will likely work well on its own. But when it’s loud, having the under-saddle transducer is the only way your guitar will be heard at all.
Level 3
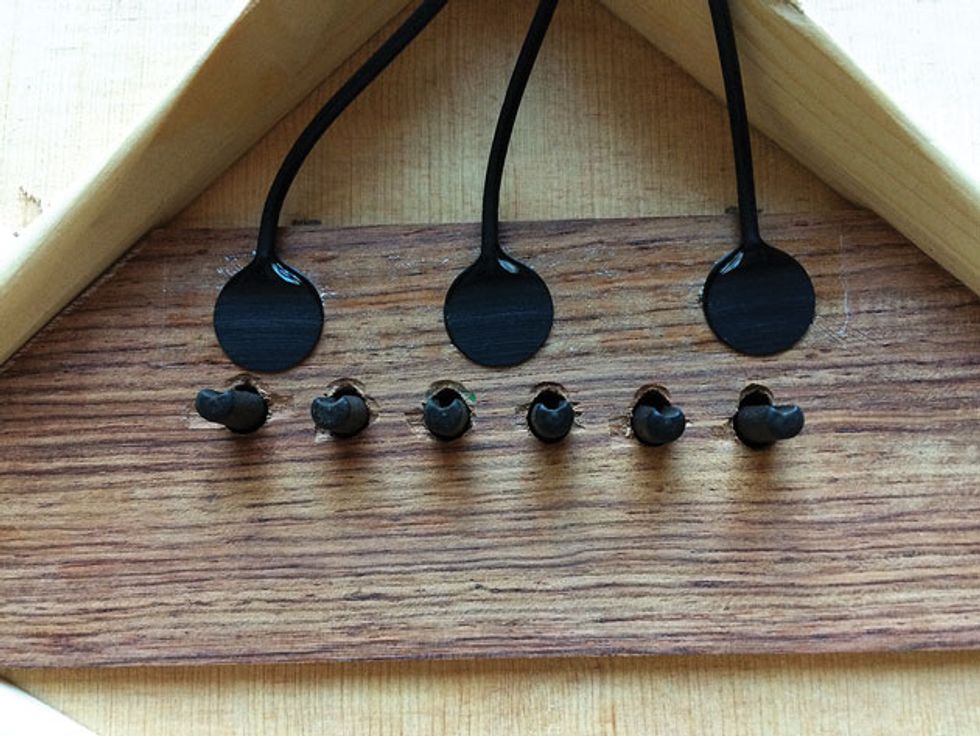
What if that coffeehouse is not so quiet, and you’d also like to throw in the occasional acoustic-duo bar gig? In this situation, I’d suggest going with at least a combo pickup that incorporates an internal mic with another source, such as a bridge-plate contact pickup. This way, you can mix the mic signal in higher when the room is quieter, for better tone, but you can dial it back and use more of the secondary source when the room you’re playing in is noisier.
Level 4
Okay, now add several other players and a bit more noise. At this point, forget the mic—either internal or external. I would use a bridge-plate contact pickup for tone and also consider adding an under-saddle transducer, and then mix the two signals. In the best rooms, the contact pickup will likely work well on its own. But when it’s loud, having the under-saddle transducer is the only way your guitar will be heard at all.
Level 5
This is a full-blown band with drums and electric bass. At this point, you need to concentrate on simply being heard and worry less about tone. While it pains me to say that, it’s the reality of these situations. Considering the high gain needed and the tremendous feedback opportunities involved, I’d recommend finding a good under-saddle transducer. Remember: If nobody hears that great break that you just played, it doesn’t matter how great it was. I’m reminded of a friend (who is a terrific flatpicker) and the time he told me about a night where the sound was particularly bad at the venue they were playing. After the show, a friend of his came up and said, “Man, those were some great-looking breaks you were playing tonight.”
While no acoustic-guitar builder will necessarily tell you that using a pickup is ideal, it’s certainly necessary sometimes in order to be heard. I hope these quick guidelines will help you in achieving the absolute best tone—which is always my focus—at a listenable level of volume.
Though Lou Reed seemed to only use a handful of chords, his shrewd right-hand strumming created limitless rhythmic variations.
Beginner to Intermediate
- Focus on syncopation.
- Add muted strums to enhance your rhythm playing.
- Learn how to modify complex rhythmic patterns into smaller, more comprehensible figures.
Though usually more lauded for his lyrics than his guitar playing, Lou Reed had a distinctive style of strumming that can make replication a challenge and seemingly impossible for beginners to comprehend. With a combination of syncopations and muted strums, Reed’s rhythm guitar—from his time with the Velvet Underground to his solo career—has a groove and feel that all guitar players can learn from.
We’ll start with a relatively simple strummed hook that shows Reed’s roots. Ex. 1 is a variation on “There She Goes Again” from The Velvet Underground and Nico, which was recorded in 1966 and released in 1967. This strum was clearly inspired by Marvin Gaye’s “Hitch Hike,” as it duplicates Gaye’s intro almost exactly, albeit in a different key. (It is worth mentioning that “Hitch Hike” also inspired the Beatles “You Can’t Do That.”)
Ex. 1
Ex. 2 is the samething but performed with cowboy chords instead of barres.
Ex. 2
With Ex. 3, a la “Sister Ray” from 1967’s White Light/White Heat, we get into Reed’s more syncopated strums. Note that after the first beat, the emphasis of each strum is on an upbeat, including the changes from G to F, then from F to C, followed at the end by a typical Lou Reed-ism of strumming while in mid-change (though in all fairness, many guitarists do this). Thus, the last upbeat notes, which imply a G chord, are in fact a byproduct created by the switch, not a specific chord.
Ex. 3
Ex. 4 is the same strum but capoed at the 5th fret, using cowboy chords instead of barres.
Ex. 4
Our final Velvet reference, Ex. 5, comes from “Sweet Jane” (Loaded, 1970), which is a song I loathe teaching to students as it is deceptively tricky—it was the inspiration for this lesson—and can make one feel demoralized. True, the song has only four chords, but the syncopated switching and muted strums can cause problems for many players, and not just beginners. Take your time to get the nuances of the switches and mutes.
Ex. 5
Better yet, start with Ex. 6, which is a simplified version of Ex. 5, using cowboy chords instead of barre chords, as well as a more straightforward strum. True, it does not conform completely to the original, but it is a worthwhile starting point. Once this is mastered, try playing Ex. 5 with the open-position chords before moving onto the barres.
Ex. 6
Solo Years
Ex. 7 is a take on “Walk on the Wild Side” from 1972’s Transformer, arguably the most famous Lou Reed song. Here we’ve graduated from eighth-notes to 16th-notes in the right hand. Once again, the muted strums play a vital role.
Ex. 7
Like the previous two examples, you might want to start with the simpler Ex. 8, although the only change is that the mutes have been omitted. This example demonstrates how essential the mutes are, as the feel changes completely when you leave them out.
Ex. 8
Ex. 9 also comes from Transformer and is a variation on“Vicious.” Additional syncopations and muted strums, both different from “…Wild Side,” complicate what should be carefree.
Ex. 9
Ex. 10 is, again, a simplified alternative.
Ex. 10
Examples 11 and 12 demonstrate two options for fretting chords, using Reed’s “Leave Me Alone” from Street Hassle (1978) as a vehicle.
Ex. 11
Ex. 12
Our last example, Ex. 13, is based on Reed’s late-’80s “comeback” hit, “Dirty Boulevard” from New York. Here we not only get syncopations, but a rhythmic variation in the chorus—same chords, different rhythms. Pay attention to that quick, almost-ghosted B note on the “and” of 1 in measure two. It almost seems like a mistake but it adds so much.
Ex. 13
The Lou Reed Legacy
When most fans think of Lou Reed, the first thing that comes to mind is his pioneering subversive, transgressive, and poetic lyrics. But, clearly, that is not all there is to his work. In truth, Lou Reed is an incomparable musician whose guitar playing should not be underestimated. So, take this lesson as a starting point and search out more of his idiosyncratic strums. You will be well rewarded.
Xotic revamps a classic Vox-boost-in-a-box pedal, creating a new one in the process.
Smart, feature-packed update on a classic. Nice size and price.
Small boost knob.
$180
Xotic Effects AC Booster V2
Xotic Effects newest version of the Vox-flavored AC Booster, the AC Booster V2, adds a second, footswitchable boost circuit (tweakable via a small, clear knob tucked among the four main-channel controls), plus a set of four dip switches on the box’s righthand side which engage compression, modern or classic voicing, low-mid boost, and high-mid boost.
This new suite of features packs significant extra functionality into V2’s still-diminutive enclosure. The Vox sounds are all there, and with the high-mids juiced and treble nudged, you’re squarely in clanging Top Boost territory. The modern voicing trades some furry mid-range chunk for a bit more aggression and clarity, while the compression is useful for leveling leads and smoothing out unruly playing.
The boost knob is a little difficult to access, situated as it is in the center of the primary four-knob array. I don’t have particularly big fingers, but even I had trouble twiddling it. That’ll annoy some. But it’s a small price to pay for such a pedalboard-friendly footprint. The boost doses you with a healthy bump in level and gain that’s great for stand-out leads and solos. And speaking of standing out, the upper-mid boost switch is a treat. I found that creating a greater disparity between the high mids from the low mids made for a more precise and satisfying tone-shaping experience than I would experience using a standard mids knob.
There are no shortage of pedals that ape Vox AC30 mojo, but I haven’t seen many that will give you the range of utility that the AC Booster V2 will, for less for $200. Xotic nailed a smart and versatile redesign here.
Stringjoy has introduced the Ariel Posen Signature String Set, a heavy-gauge Nickel Wound set designed in close collaboration with acclaimed slide guitarist and singer-songwriter Ariel Posen.
The Ariel Posen Signature String Set from Stringjoy
Ideal for B Standard, Open C, and other lower tunings, this set offers exceptional tone and feel for players who want to explore new sonic territory while maintaining their guitar's unique voice.
Each string in this set is built with Stringjoy’s trademark quality: wound at tension with high compression winds for maximum output, durability, and smooth playability. The result? Strings that hold up under pressure while delivering a natural, expressive voice—perfect for hybrid playing and expressive slide work.
Ariel Posen Signature Set Specs:
• .014 – .018p – .026w – .038 – .050 – .062
• Wound 3rd string
“If you didn’t know these were 14-62 gauges, you’d swear they were just 11s tuned down,” said Ariel Posen. “They feel like home and preserve the sound of the guitar, even in lower tunings. That’s the biggest thing—it still sounds like guitar.”
“We’ve spent ten years experimenting and testing together to find the right combination,” said Scott Marquart, Stringjoy Founder & President. “This release is more than just a new product—it’s the culmination of a shared journey between friends and musicians. Ariel’s set is uniquely him, and I think players will love how it feels and responds.”
Stringjoy’s Ariel Posen signature string set carry a street price of $13.99. Learn more at at stringjoy.com.
Nashville luthier and guitar tech Dave Johnson shows us the baker's dozen of tools he thinks any guitar picker requires to be a guitar fixer.
3. Guitar Tech Screwdriver Set - 3000
4. Nut File Set (for medium guitar strings) - 0882
8. String Spacing Ruler - 0673
9. Nut and Saddle Files - 4556
The Ultimate Guitarist's Tool Chest Giveaway
Whether you're setting up your first guitar or fine-tuning a custom build, these are the 13 tools every guitarist needs. Now you can win them all. We've partnered with our friends at StewMac to give away a complete pro-level toolkit valued at over $750.
Click here to enter